Blast from the Past: October 1956

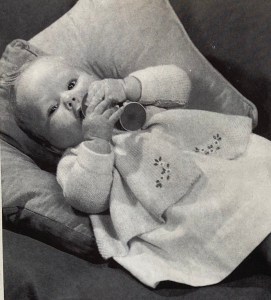
This month’s blog project was a bit different than planned. The August 1964 issue didn’t have any projects that particularly called to me. There was a nice baby set of “vest and pilch”, but I didn’t know anyone who was having a baby soon… or did I? In fact, I did know that a friend of mine was expecting twins, but we hadn’t seen each other for a while and unfortunately that fact slipped my mind until the babies were almost due! At which point I could have made two vest-and-pilch sets, but I wanted to get the project done quickly and also destash some yarn that was more suitable for a top/middle layer than to be worn right next to delicate baby skin.

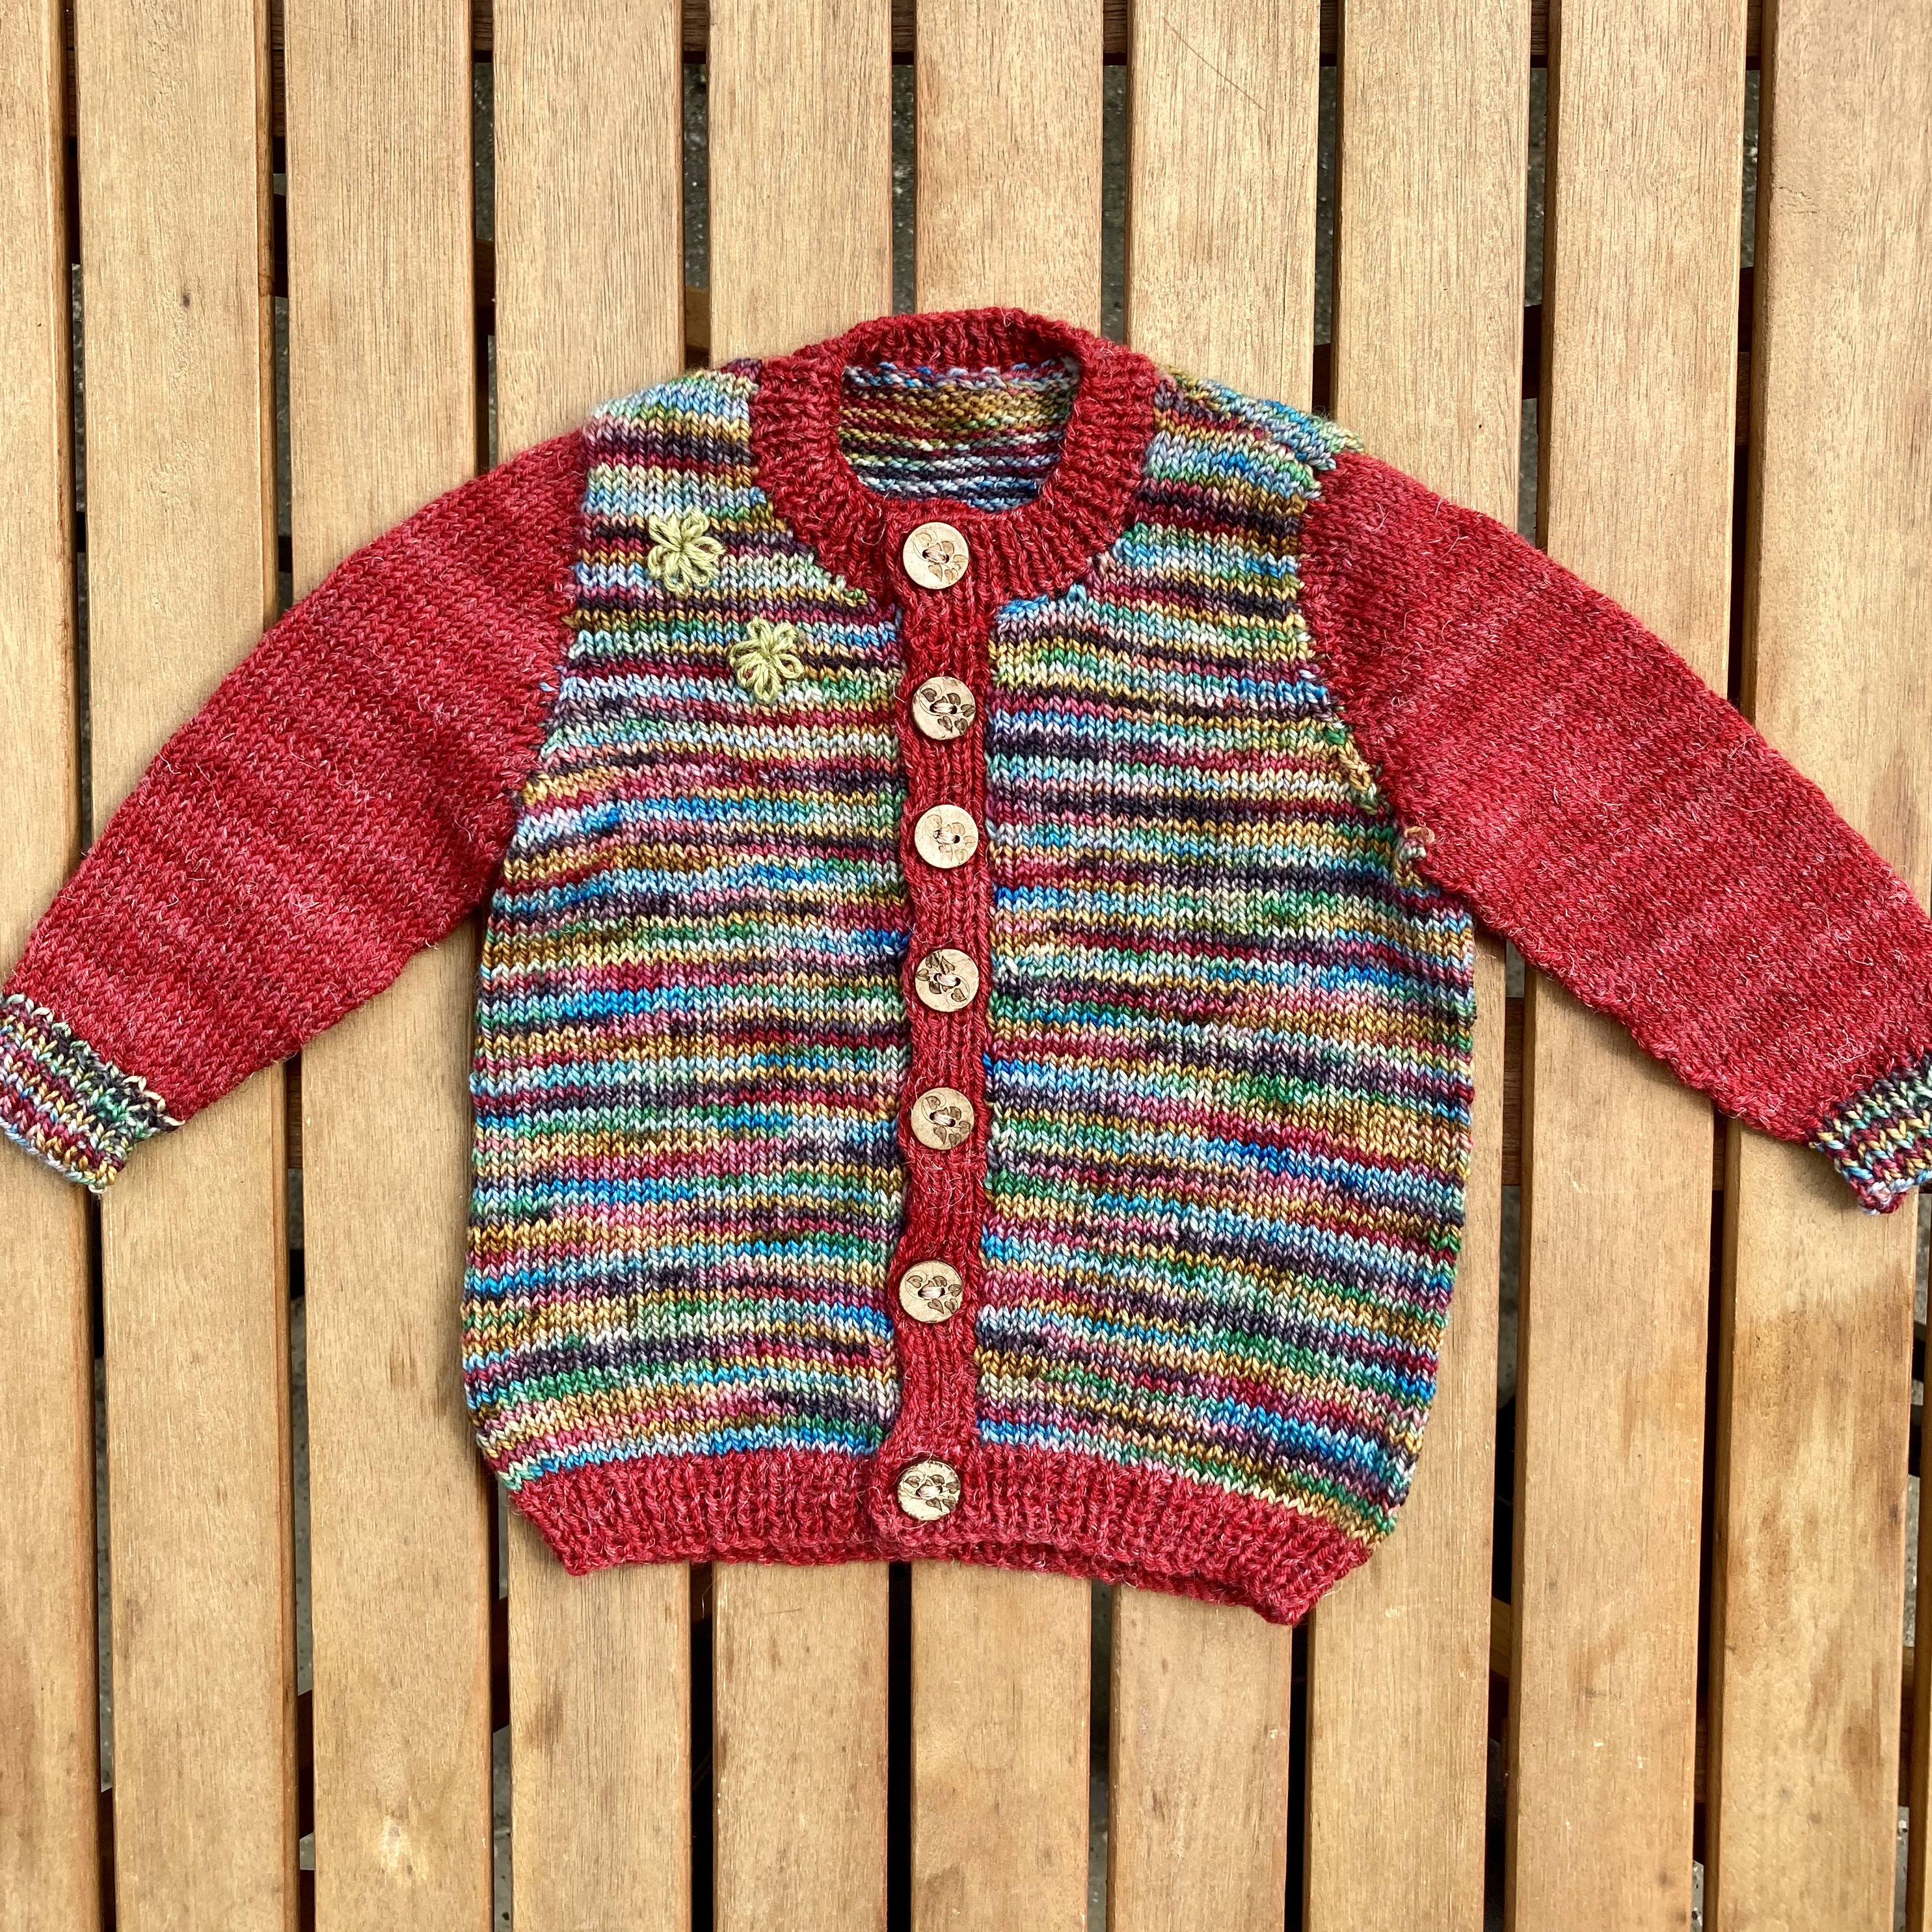
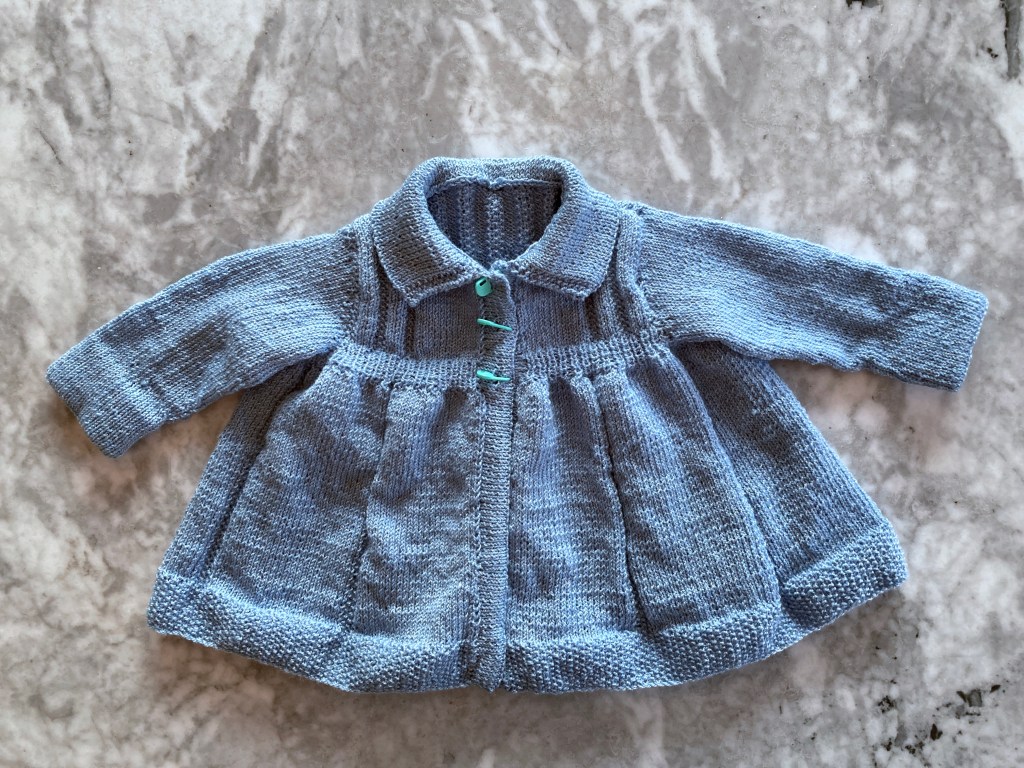
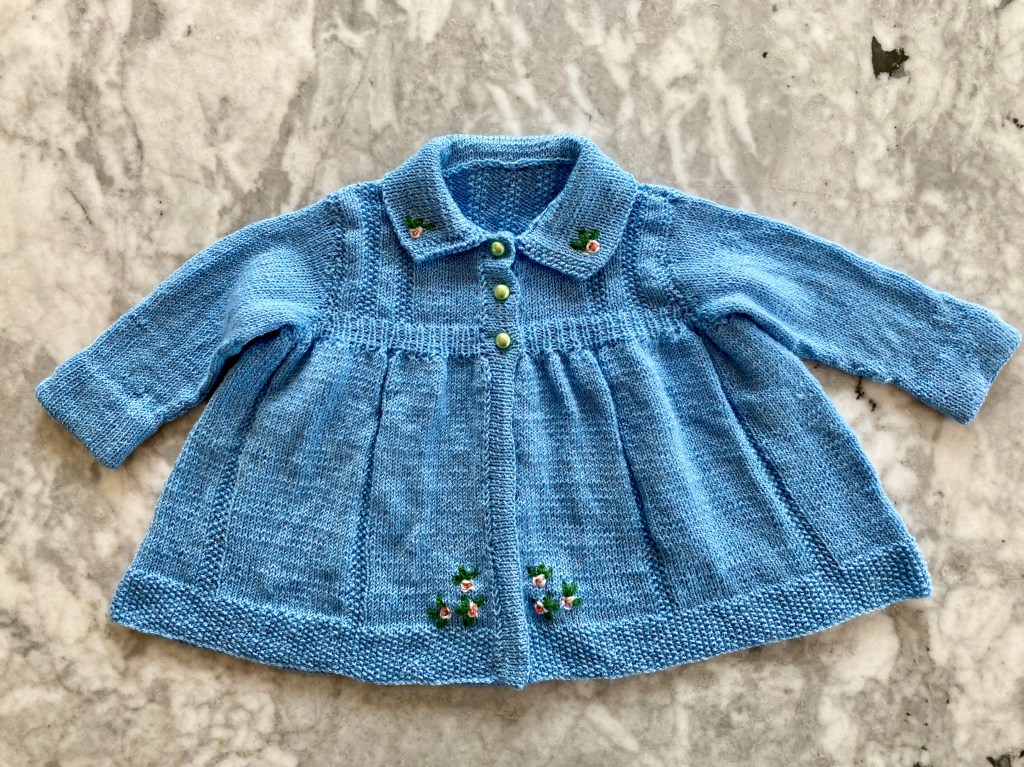
I decided to make two similar, but non-identical cardigans and opted to make one without a pattern and one from this pattern for a dolman-sleeve cardigan from Stitchcraft‘s October 1956 issue. The use of two block colours made it a good choice for the two yarns I wanted to use, and the embroidery was a cute touch.

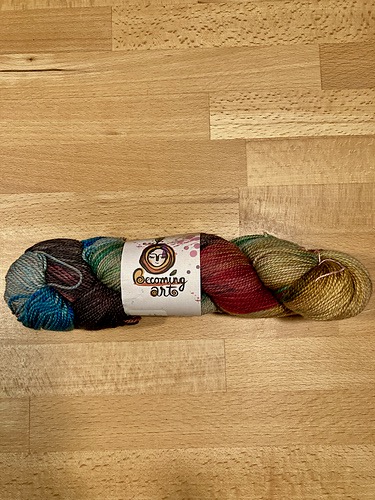
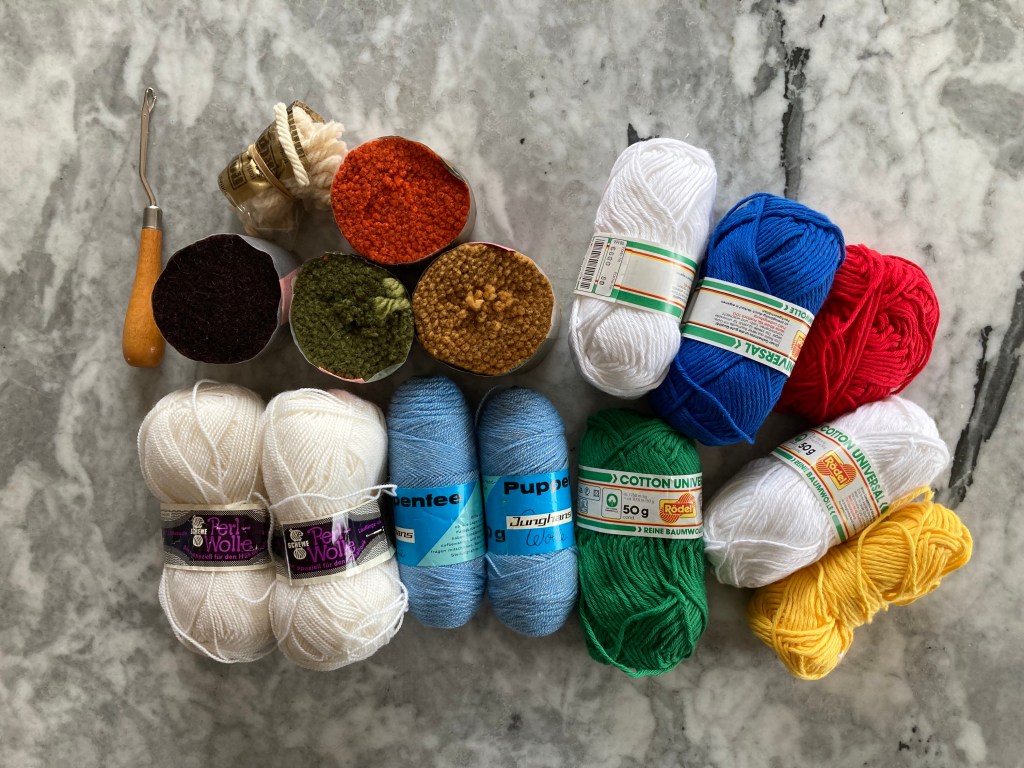
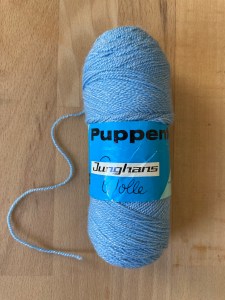
The pattern calls for Patons Beehive 3-ply Baby Wool at a tension of 8 stitches to the inch for a cardigan that is 19 inches around the underarms. My wools were Becoming Art Cielo fingering in the colour combination “Carousel” (multi) and Schöppel Admiral Hanf in red — admittedly not a very vintage colour combination or standard baby-pastel, but I like knitting bright colours for babies, and the mother’s favourite colour to wear is red, so I loved it.

Both wools were gifts — the Admiral Hanf from my knitting group’s holiday “secret Santa” and the Cielo Carousel a prize from the last KAL at the All Things Vintage forum on Ravelry. “Hanf” is German for hemp, which makes up 10% of the red yarn and gives it strength and durability. It’s not scratchy, but also not super-soft. The Cielo fingering is delightfully springy and squishy. I got 6.5 stitches to the inch with each of them on 3 mm needles, but saw no need to change the pattern, as a larger cardigan would be more practical for autumn/winter wear, when the babies will be bigger and wear more clothing underneath.

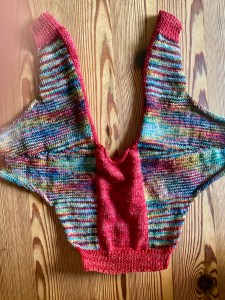
The cardigan is knit from the bottom up in three pieces — back and two fronts, with the sleeves cast on horizontally. The colour-block effect is made by using separate balls of wool and twisting them together at the colour change, intarsia-style. I made both the fronts together with separate balls of yarn on one needle to insure symmetry. The cuff ribbing is picked up and knit in rib after the main pieces are done and the front button bands are knitted separately and vertically in rib and sewn on. (I’m not a fan of this type of button band and would just as soon have knitted the bands together with the fronts, even if technically they’re supposed to be made on a smaller needle.)

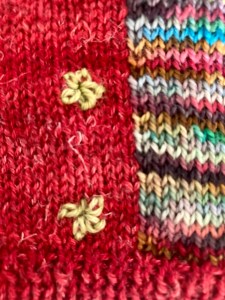
The little flowers on the fronts are embroidered on in loop stitch after everything else is finished. It was surprisingly difficult to get all the “petals” to be the same size and distributed evenly around the centre. Perhaps I should have made them larger. I’m always happy to practice embroidery on knitting, since I think it looks really cool, but it continues to be a challenge. The wool is a bit of leftover Onion Nettle Sock yarn.

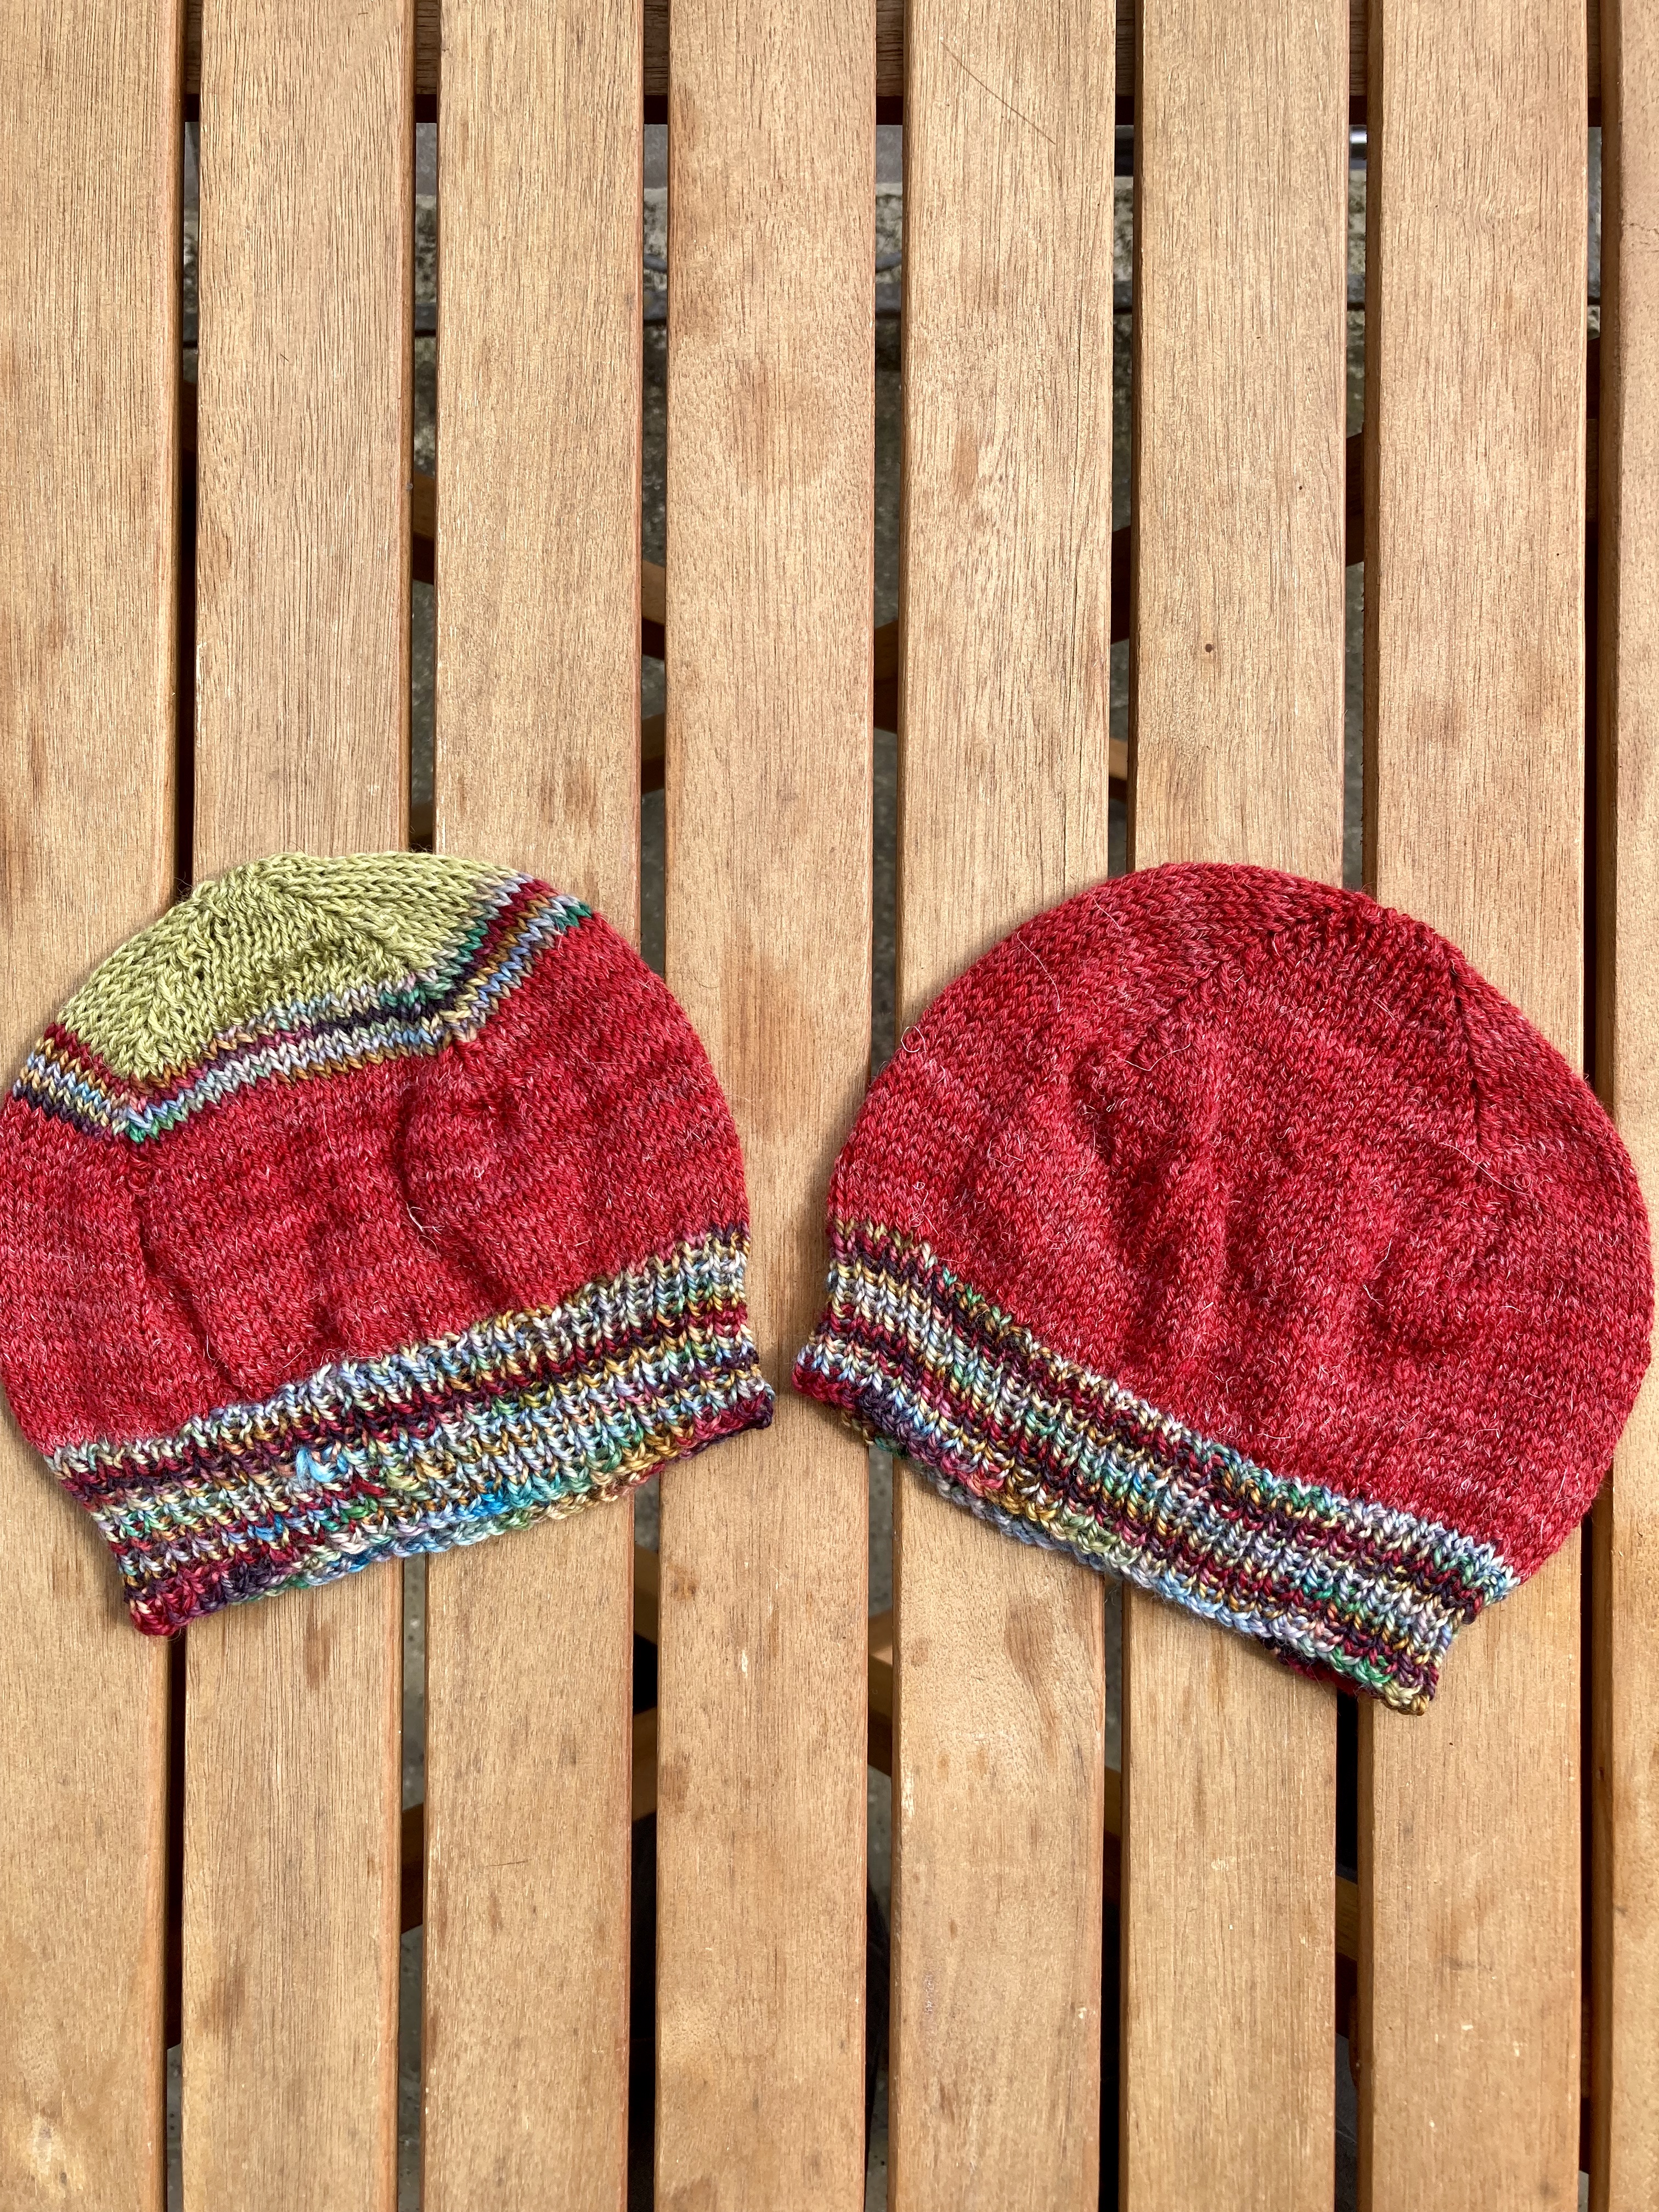
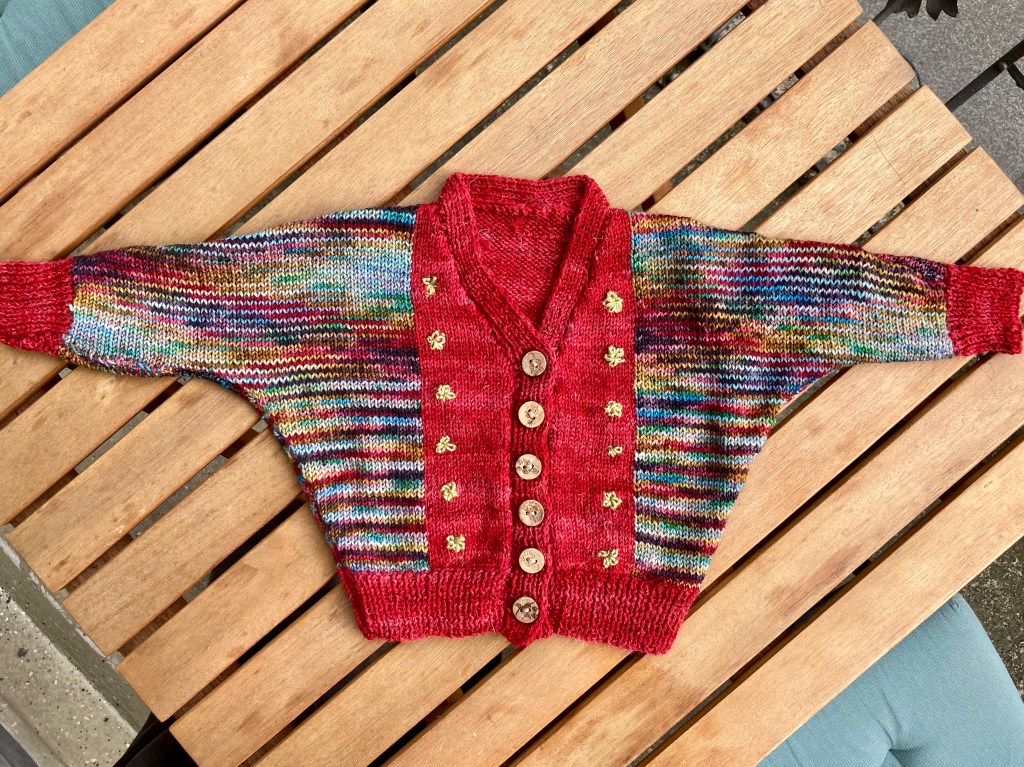
One 100 gram skein of the multi-colour wool and one 50 g ball of the red were enough to make this cardigan, another “fraternal” cardigan (plain crew-neck with set-in sleeves) made without pattern using the multi-colour yarn for the body and the red for the sleeves and ribbing, and almost two hats with multi-colour ribbing and a red body. The crown of one hat was finished in the green Onion sock, which I also used to embroider two larger flowers near one shoulder of the no-pattern cardigan.

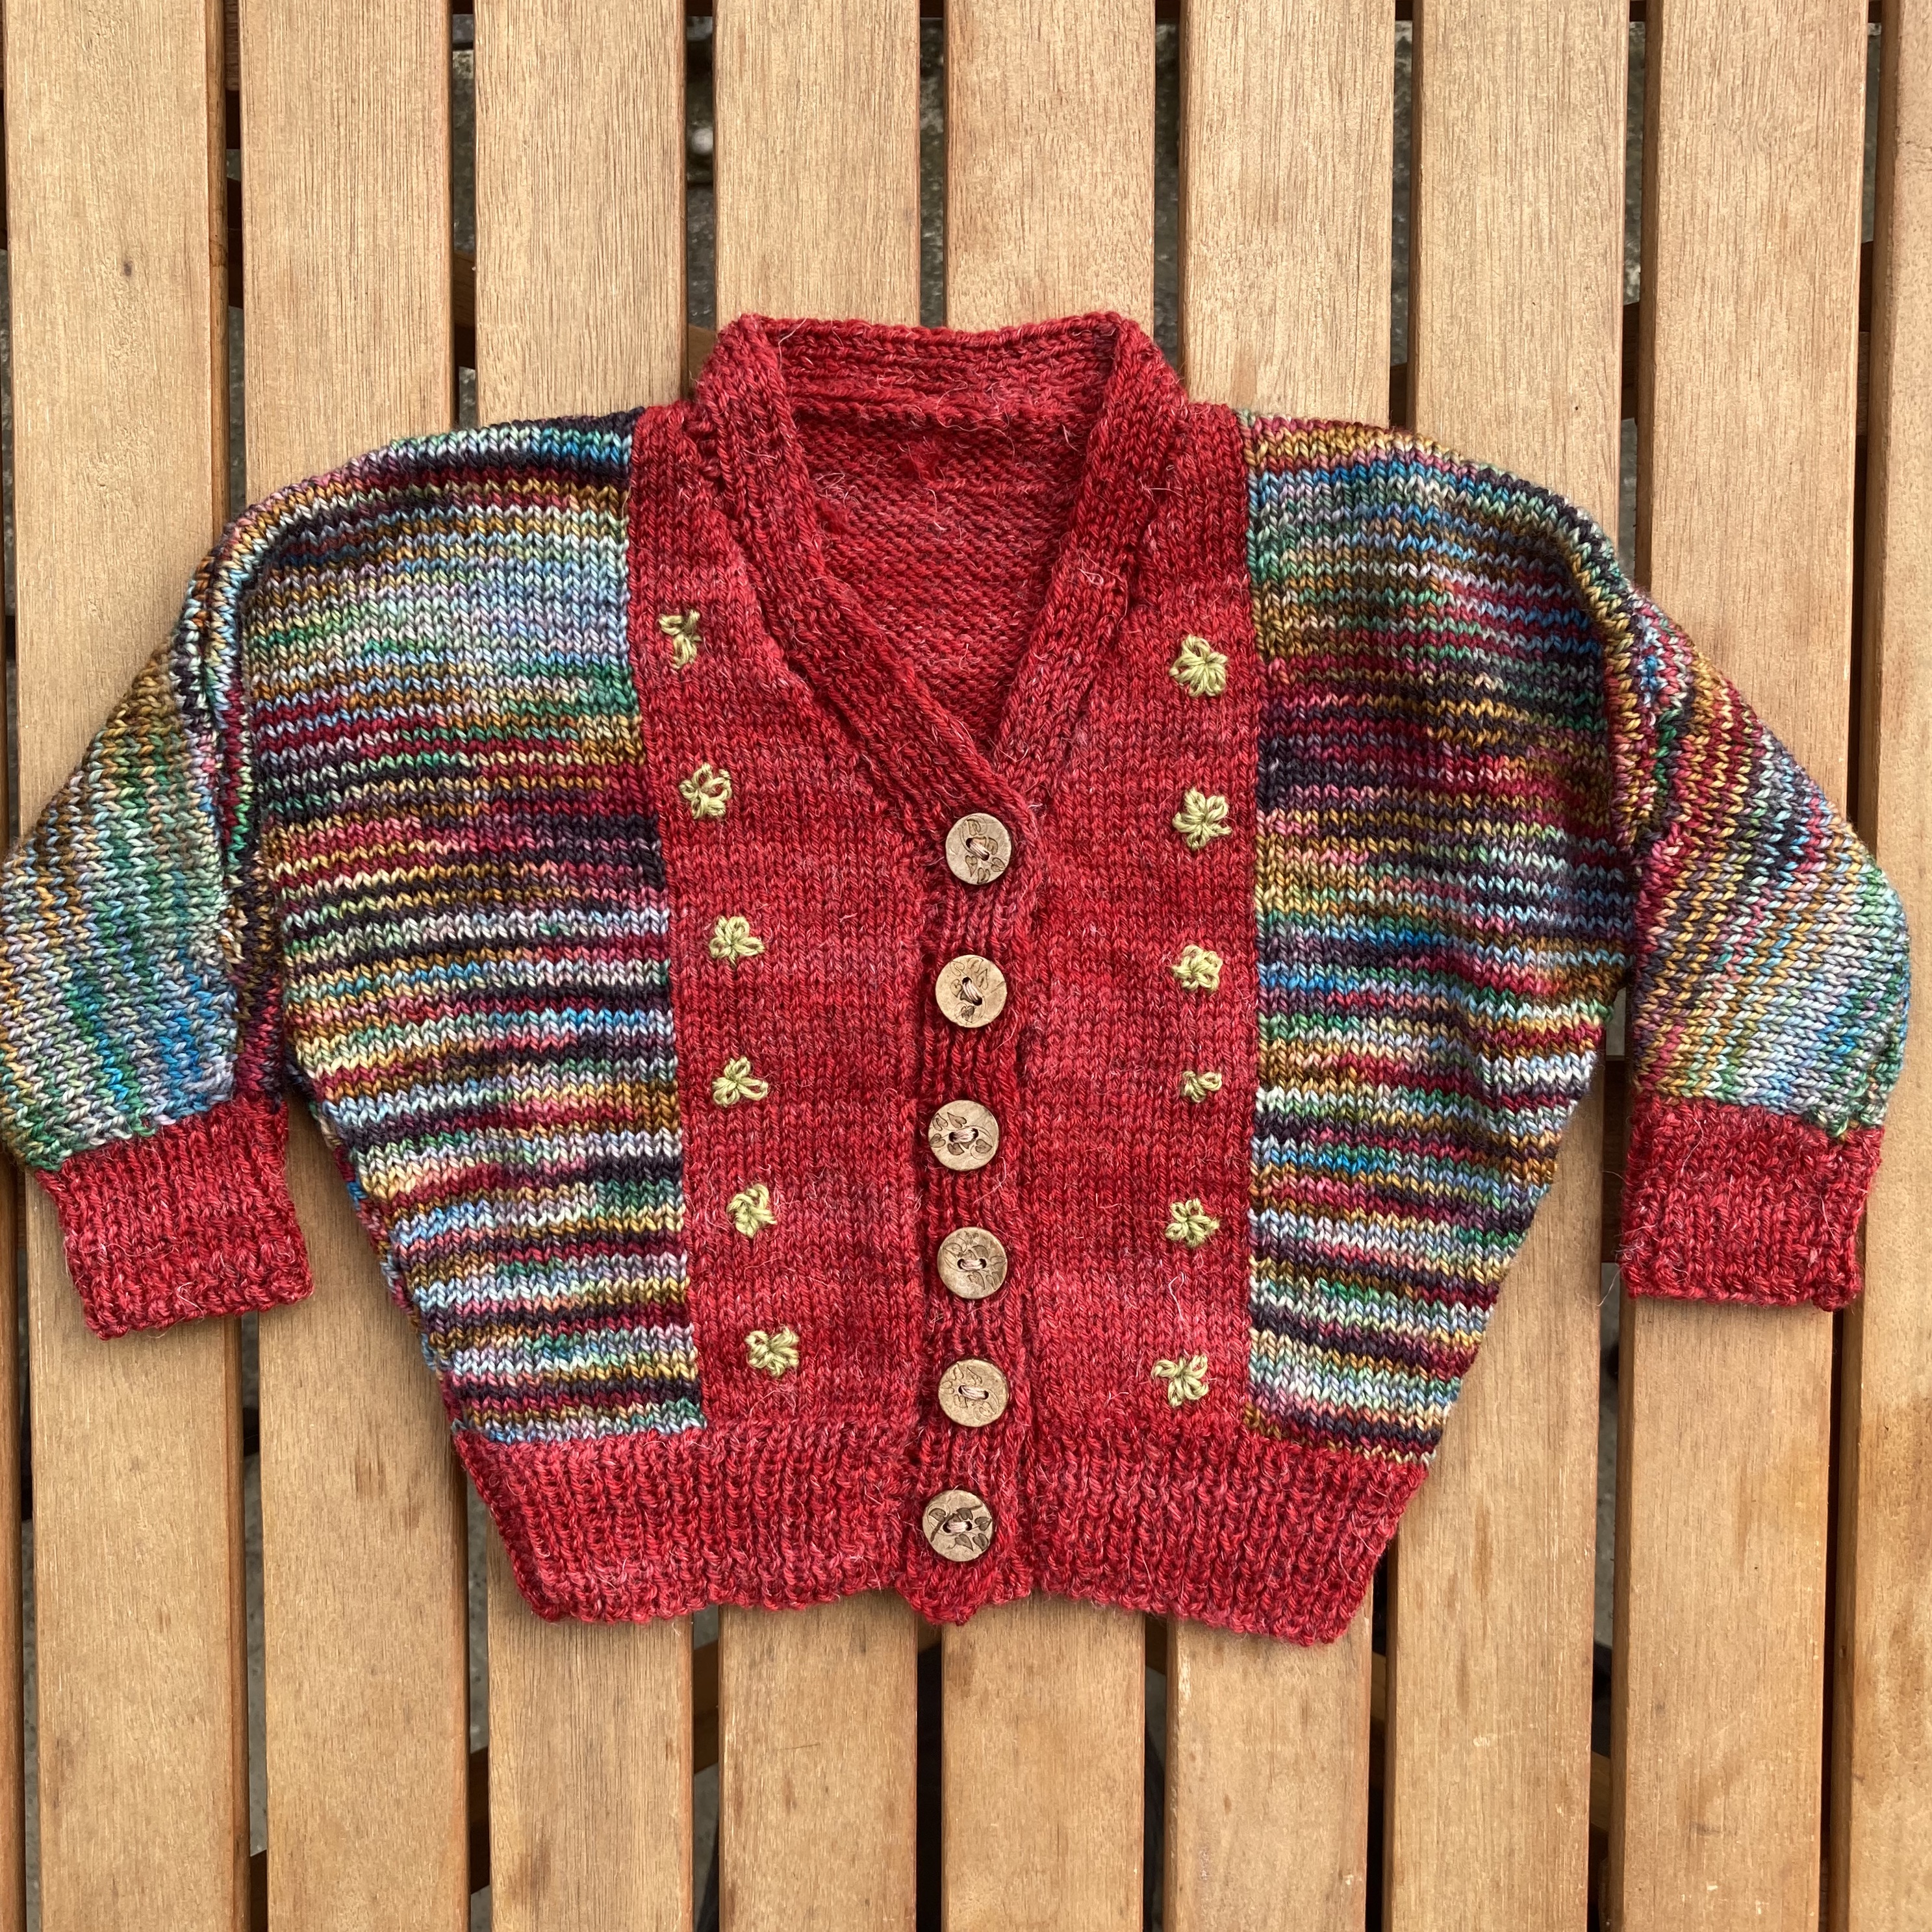
I loved the dolman pattern and will surely use it again for another baby. I love the similar, but not identical cardigans for (fraternal) twins. I love matching hats and cardigans. I love the bright colours! And I think these sets will be very useful for the twins and make the parents happy.

October 1963: Knitting Apron

Photo of a woman wearing a knitting apron and knitting, Stitchcraft magazine, October 1963

This month’s project was, as its name suggests, a knitting workbag with an apron-style top, allowing you to “tie it on and keep your wool in your pocket as you work.” Brilliant idea! I actually have a vintage, embroidered apron that I inherited from my grandmother that I use as a tie-on knitting bag, but this Stitchcraft project goes one better in that the apron top folds down into the bag when not being worn, allowing you to close the bag with drawstrings so that nothing falls out in transport.

It’s supposed to be made with gingham fabric and embroidered with cross-stitches in the gingham squares, but I have so many unfinished embroidery projects that I went ahead and made this one plain, using a nice cotton print from Marimekko.

Fabric cutting plan

Since the “pattern pieces” are all just squares and rectangles, there’s a little chart showing how to divide up the fabric to get piece A (bag), B (apron top), C (waistband), and D (tie strings). After cutting out all the pieces (why are straight lines the hardest to cut?) I was suddenly confused: The bag, piece A, was 18×17 inches. That’s pretty big, and in fact looks just about that size in the photo, but a bag has a front and a back… Was I supposed to cut it on the fold? Or cut two pieces? The waistband is obviously folded in half, and the instructions for hemming the apron top make it clear that only one, unfolded piece was needed. Huh?

I cut another identical piece for the bag and decided to also cut another identical piece for the apron top, so the hems could be neater and the fabric stronger. I cut the two bag pieces with the selvedge on the bottom edge to make a very wide seam allowance, which I could then open up and sew down to make a really sturdy bag bottom. Similarly, I hemmed the side edges before making the side seams instead of zig-zagging the raw edges. This made everything very sturdy and very neat.The apron top is made with a couple of little pleats on the sides to bridge the width difference between bag top and waistband. Before it was sewn on, it looked like a little doll miniskirt!

The apron top is sewn into the back part of the bag, so that it folds down into the bag when not in use. I was really glad I had made the apron top double, as it makes the seams even neater and everything looks very smartly finished from every angle, inside and out. (I am a sloppy sewer, so always impressed with myself when lines are straight or seams are not ragged.)

That was it! I finished the whole thing in three hours. It works perfectly and I can use it to knit while standing, walking, sitting in the train, etc. without worrying that my yarn will roll away, and it packs up in a flash. The bag part is quite large — if I made it again, I would make it slightly smaller. Other than that, it’s perfect. I imagine it would be a lot of fun to make in felt, with an embroidered front part, and that I could adapt a lot of the typical Stitchcraft designs for embroidered chairbacks, cushions, tea cosies etc. to make more of these.

August 1963: Overview

End of the Season! Sadly, yes, the “holiday” season is drawing to a close and although it’s only the last day of July, it feels like autumn is around the corner. On the bright side, the late summer and autumn issues of Stitchcraft are always the most fun, with a good range of lighter-weight and warmer garments, children’s things for school, and more intricate homewares.

“The trend for colour use is in these bold clear motifs” writes “editress” Patience Horne, a trend which is reflected in “chunky”, boxy shapes, bright colours and simple stripe or geometric designs. The cover illustration shows two of a three-piece “his and hers” set — cardigan and mock-layered turtleneck for her and a buttoned-collar pullover for him– that all make use of single bold stripes. The woman’s matching pullover is made to look like a deep V-neck over a turtleneck top, but the under-layer is just an insertion knitted separately and sewn in.

There’s more use of simple, geometric motifs in the other women’s garments: a classic pullover with a wide check stripe down the front in double knitting and a colour-block cardigan with diamond motifs made in bulky “Ariel” wool. Diamond shapes are still trending from last month. There’s a bulky indoor-outdoor cardigan jacket in Big Ben wool, made in a slightly less simple striped waffle stitch. Necklines are high, whether buttoned or not, and collars are either big and square or non-existent.

Continuing the interesting neckline/collar trend, we’ve got unisex “tomboy tops” for children, with a cute “tie” decoration on one of the pullovers. Simple, bold stripes and pointy diamond patterns show up here as well, whether in colour or as a stitch pattern element. The one lighter-weight design is a square, buttoned-neck pullover with double stripes near the hem and a coordinated skirt. Rounding out the garments is a lovely classic cardigan for men featuring cables on the upper yoke and — you guessed it — in two simple lines down the fronts.

Unlike the knit designs, some of the embroidery and tapestry projects are quite elaborate and ornate. Look at these Chippendale chairseats! That seems quite out of place to me in a modern 1963 home of clean lines and unfussy decoration, but of course many of Stitchcraft’s readers were older and/or conservative in their style, and probably not on the cutting edge of home redecoration even if they had the money to spend on it (which I’m guessing most of the readership didn’t.) The “peasant motif” tablecloth and cross-stitch place mats have more of a clean, colour-block aesthetic. I really love the tablecloth design! It can also be adapted for a cushion. Speaking of cushions, here’s a fancy one made of essentially two very large, intricately knitted lace doilies joined together around the cushion base.

And let’s not forget that standby of every proper 1960s home… the fluffy hand-made bathmat and matching well-dressed “pedestal” aka toilet! Hats off to every grandmother and great-aunt who kept true to this amazing home furnishing concept throughout the rest of the 20th century. (Seriously, one of my great-aunts had a setup like this in her guest bathroom in the plushiest, fluffiest, yellow and black shag carpeting you could imagine, and I’m pretty sure it stayed there until the turn of the millennium.)

That about wraps it up for this month’s issue. The ads are unspectacular and a new children’s comic is starting up, featuring twins Joe and Jenny on their hunt for the legendary “Smuggler’s Sack” that just might be waiting to be found in the caves near the beach. Good luck, little friends! My project for this month will be the men’s cabled cardigan.

June 1963: Practical Coat

Baby in a knitted cardigan, pattern photo from Stitchcraft magazine, June 1963

My June 1963 project was a lovely (if not quite as practical as the title suggests) “matinee coat” for a baby. Two styles are given in the pattern, “for a girl” (long coat with ribbing at the waistline, flared skirt and collar) or “for a boy” (straight up and down, basic cardigan styling.) Both styles have dainty flower embroidery as decorative accents. Not wanting to inflict 1960s gender roles on a modern baby and also not having a personal preference, I asked one of the child’s parents which style they liked more, and the answer was “the long coat”, so the long coat it was.

As for the wool, last year another colleague of mine, who knows that I like to knit from vintage patterns, came into a rather large stash of yarn when an elderly relative moved into a care home. Apparently, she (the relative) had liked to crochet and make latch-hook rugs, and when the younger generation of non-crafters cleared out her house, my colleague knew who would give the yarn a good home. There was some great stuff! In addition to a latch hook and some cut rug yarn in very 1960s shades of brown, tan, rust, beige and olive green, there was enough bright cotton to make a crocheted baby blanket, some nice, soft, plain white wool that would be great for baby clothes, and 400 grams of light blue “Puppenfee”, a yarn made by the German Junghans Wolle company in the 1960s? 1970s? which combines light 4-ply wool with a shimmery, presumably nylon or Lurex “Effektfaden”.

Just a selection — there was a lot more of each type of yarn!

The base colour is light blue, and the nylon strand makes the knitting softly sparkly and also very elastic — perfect for a baby cardigan. Happily, light blue was also the parents’ preferred colour, I had plenty of it and the tension and size in the pattern were perfect for this one-year old infant.

The coat is made in one piece from the moss-stitch lower border to the armholes, and the moss-stitch is carried up throughout the stocking-stitch skirt part in narrow vertical bands that make the skirt pleat prettily after the waist is gathered in with decreases and ribbing. Then the fronts and back are continued separately. I made the sleeves in the round from the top down, since that was faster, and made them a little longer than the pattern called for, as the baby is on the tall and thin side and will presumably get longer in the arms before it gets wider in the middle. (Though you never know with babies, but the cardigan is big enough to hopefully fit for a while in any case.)

Both the sleeve edges and interestingly, the collar are hemmed — in the case of the collar, that means stitches are picked up around the neckline as usual, then the collar is knitted in stocking stitch the “wrong way out” i.e. the inner side would be facing once the collar was opened down, then you make a purl ridge for the fold line and knit stocking-stitch for the depth of the collar back again and then sew it together. The result is very neat and crisp. There’s a narrow band of moss stitch (just 3 stitches) at the front corners of the collar to tie it together with the bands in the skirt.

The rosebud embroidery was very easy, no transfers, just a sketch in the pattern and colour choice suggestion. I used bits of leftover Jamieson & Smith Shetland wool in pink, white and green as suggested and finished everything off with three little buttons from stash. Do the buttons look familiar? They are the same ones I used on this “Sunday Best Dress” project from March 1963 / March 2021. And yes, it is even for the same lucky baby! Maybe, with the parents’ permission, we can even re-create the pattern photo. Until then, here it is without the baby — I actually got a project done on time for once!

I am very happy with the finished coat and I hope the baby and parents are as well.

December 1962: Quick and Easy Cushion

I have a huge backlog of unfinished projects and recently even got a commission to write a pattern for a new knitting and sewing magazine, so I needed the December project to be something quick and easy that I could make from stash. Behold, a very 1960s crocheted flower-petal cushion from this month’s issue! I love cheerful crocheted cushions and afghans — they have that fun, old-fashioned charm.

This one is made in double knitting, and I had two colours of blue and one of green to make a big, blue flower. I guess it’s a cornflower? Whatever, it’s cute and the colours looked good together. The dark blue is 100% acrylic (left over from this project and this project, which was patterned after this project — yes, I bought plenty of yarn), the light blue is 90% alpaca / 10% sheep wool (a gift from a very nice friend who brought it over from Chile!) and the green is a wool-acrylic blend last seen in this project from January 1960, so I was concerned that the finished item might behave inconsistently when washed or blocked, but I had no problems with that.

The size and scale, on the other hand… There was no tension given in the instructions, only a finished size of “approximately 17 inches diameter” and instructions to use double knitting wool and a No. 8 (5 mm) hook. The cushion is made in pieces — first the petals, then the triangular inserts at the top of the petals, then the center, then it gets sewn together, then you crochet the border and sew it onto fabric for the back side of the cushion — so it was hard to tell how big it was going to be. Also, the instructions very clearly say to make 12 petals and 12 insertions, but the accompanying photo very clearly shows a cushion with 16 petals and insertions. Patience Horne, you need a tech editor and a proofreader!

The result — once I had finished all 16 petals and 16 insertions, which was in fact the correct number to get the petals to form a circle, and sewn all the fiddly bits and pieces together — was huge. Granted, 17 inches in diameter is a fairly large cushion, but mine was 19 inches in diameter before I had even started crocheting the border, and the triangular insertions were also too big, making them pucker and wave a bit. I made a snap decision to just crochet the border larger and larger until all of the green wool was used up and have it be a baby blanket instead of a cushion, which would also spare me the trouble of figuring out how to make the back of the cushion, whether or not to make an inner cushion pad and have the crocheted part be a removable cover, etc. etc.

The border in the instructions only being a few rounds and me not being the world’s best crocheter, I searched for a formula to crochet something in rounds of double crochet that would have the right amount of increase per round to keep the circle flat. Though I found many amazing doily patterns and not-quite-fitting formulas, I didn’t find what I was looking for, so I just increased one stitch per petal each round and did a plain round in between every so often. There was much ripping back and doing over, but in the end it worked out fine. As for the still-puckery triangle inserts, I declared them a “design feature” and left it at that.

I wash-blocked the blanket, which evened it out some more, and only then realised that I had forgotten to embroider the lines down the center of each petal. In the end, I decided against it. The dark blue and green yarns were all used up, I didn’t have any other colour that looked right and I honestly thought it was fine the way it was. The finished size is 23 1/2 inches or 60 cm in diameter, which will fit a baby’s pram nicely. Not having a baby on hand, here it is with a teddy bear for scale:

It’s not perfect and it definitely has that “home-made charm”, but I think it will make any parents and baby happy.

November 1962: Star Motif Embroidery

The November 1962 issue had so many exciting projects that I wanted to make, but as I am woefully behind on so many other projects, I settled for a modern version of the cute embroidered tea cosy from this “star motif” cosy-and-tray-cloth set. The star design only really comes out on the tray cloth, where flowers with spiky leaf bases are embroidered in circles. The tea cosy has the flowers arranged individually in lines.

Since I don’t use tea cosies, I adapted the design as an iPad / tablet cosy, like I did with the “Gay Goslings” design from April 1960 and the “Posies for Cosies” from March 1961. I had plenty of green felt left over from the not-so-successful October 1960 “No Fun Fuchsia” project and enough scraps of embroidery floss in fitting colours to make everything from stash.

Obviously I didn’t have a transfer, but luckily this design is so simple that I was able to just draw around a coin with chalk for the flower heads and add in the stems freehand. I say “simple” and “just”, but the felt material was of a nature that chalk does not stick to it for more than a minute and the colour is too dark to draw on with a pencil or embroidery marking pen. My continuing incompetence in drawing, cutting or embroidering straight lines came back to haunt me! Oh well, that’s how you know it’s handmade.

The tea cosy has three rows of flowers: three in the top row, four in the second and five in the third. Not sure exactly how to scale the design for a tablet cosy, I started by embroidering two rows of flowers with three flowers in the top row and two in the bottom row. I didn’t like the asymmetry, so I filled in the gaps with more flowers aligned upside down.

Making it up into a bag was straightforward enough (except for the not being able to cut in straight lines thing, even using a ruler and template) and I finished it off with a vintage fabric-covered button from the button box. I’m quite happy with the result, even if the design is not entirely even and the buttonhole stitch pulls to the center of some of the flowers (not sure how to correct that.) And it went so fast! I did the embroidery last night and made it up into a bag this afternoon.

It looks very 1960s!

Since I still use and love my “gay gosling” iPad cover, I will send this one to a friend as a birthday/Christmas present.

September 1962: Overview

Autumn is the nicest season for knitting, and 1960s Stitchcraft usually gave it a little push with extra pull-out supplements, extra colour photo pages, or “bumper issues” full of the latest developments in home-knitting fashion. The September 1962 issue doesn’t have any of these extra features, but it does have a wide variety of designs in mid-weight and warmer wools, starting with the chunky twisted-bobble sweater on the cover. Made in bulky Big Ben wool, it weighs in at a whopping 38 (for the smallest of three sizes, 35-36 inch bust), 40 or 42 ounces (the largest size, for 39-40 inch bust), i.e. about two and a half pounds or 1190 grams. I am guessing the model is quite slender and even she looks bulky in it!

The dresses and separates, made with the same loose fit but in double knitting wool, show a smoother look with minimal patterning. The orange dress in the colour photo and the charcoal-grey dress with the colour-pattern border (“for those who like something really eye-catching”) are the same design, but the pattern-border version is only available in one size, “for the younger girl.” I guess that pattern was just too exciting for doddering middle-aged matrons! The blue and white ensemble, also made in double knitting weight, has three pieces: a simple sleeveless blouse in white k2, p2 rib, a plain blue skirt and a back-fastening cardigan with white vertical stripes on the front. Tops continue to be hipbone-length and hemlines are firmly anchored just below the knee.

Other garments feature interesting colour and texture effects: the man’s “smart weekend sweater” has been treated with a teasel brush to achieve a fuzzy, felted effect. The knitter was not expected to do the brushing herself, but was instructed to “take all pieces at this stage [after knitting all the separate pieces, but before making the garment up] to your usual wool shop who can arrange to quote a price and send them away to be brushed for you.”

There’s also a striped jumper for “young and carefree” women with a fringed collar and hem, similar to the one in the February 1962 issue (yes, it is more or less the same pattern in different colours and with a split collar) and a pullover in an intriguing striped and dotted slip-stitch pattern. Stripes and/or slip-stitches also feature in the three-colour pullover for older children and the toddlers’ dungarees. Colours are navy blue or charcoal grey contrasted with white and neutral pastels, as we saw with the patterned-hem dress and three-piece ensemble.

There is the usual variety of homeware designs, mostly with floral patterns: this month’s flower is the dahlia, or you can sew and embroider and apron with lilac sprays. The leftover gingham fabric from “your” workaday apron can be used for cute animal appliqués on aprons for the children (unsurprisingly, Father seems to be exempted from the washing-up.) There’s also the usual floral cutwork tablecloth and tray cloth and a coffeepot set made in Hardanger embroidery.

Needlepoint fans can make a stool top or a whimsical cross-stitch rug and/or wall panel for the nursery, featuring characters from nursery rhymes. The motifs are separate and interchangeable and can be adapted for different sizes and purposes.

In the children’s serial comic, Peter the puppet has been freed from his marionette strings and is traveling throughout the countryside writing a play about his adventures. Cyril the squirrel helps out by painting illustrations, using his tail as a brush. (But how will Peter get home?) There’s the usual advertisement for Lux washing soap, guaranteed to leave your woollies soft and fluffy, and the latest instalment of the Patons and Baldwins’ “knit to please your man” series of ads, junior version: a teenage girl knits a “nice, husky sweater” for her boyfriend with her own loving hands to show everyone that he’s the “special one.” The young woman on the back cover ad is presumably also trying to catch a man, but she looks more polished in her snappy red dress and white gloves. You can really see 1960s style coming into its own in the straight or A-line sleeveless dress with low contrasting belt, the bobbed and fringed hairstyle and the edgy, off-angle mirror pose. Compared to the designs in this issue, it also shows how fashion-conservative Stitchcraft is.

I’m not sure what I want to make from this issue. I imagine the embroidered dahlias would make a great design for a laptop or tablet sleeve, but I already have a fine home-made laptop cover, not to mention this wonderful gay-geese-in-space tablet cosy. Also, I have probably done enough embroidery for the time being and still haven’t made much progress on this appliqué masterpiece that I started in July. The knit projects are all so bulky and loose-fitting, which is not my style, and I’m not sure I know an appropriately-aged child for the interesting slip-stitch pullover. There was also a perfectly nice, if not exciting baby cardigan (not pictured) in the issue which I could make quickly from stash, which would be useful enough (somebody’s always having a baby) and maybe the best choice for my uninspired mood. Stay tuned and find out!

August 1962: Gladioli

August was a pretty blah month this year, what with the never-ending Covid-19 pandemic and associated long-term isolation, illness and unemployment. My knitting motivation is sub-par and the August 1962 issue of Stitchcraft didn’t have any projects in it that really inspired me. Still, I’ve been trying to turn the situation into an “opportunity” to save money and free up space by finishing WIPS and making new projects from stash.

This month’s embroidery flower was the gladiolus, with a special extra design of wild orchids. I chose the gladioli and embroidered them on another one of the recycled moneybags that I bought at an antique market last year. They really do make excellent sturdy little bags for buying small amounts of potatoes, mushrooms or other vegetable items, and with a zipper on the top they would even be good for buying and storing things like beans and lentils in bulk. They also work well as small project bags — I kept this WIP in the bag that I made in December.

The colours that I had in the embroidery-thread scrap box were more or less accurate to the pattern (mauve, mid-mauve, violet, yellow, gold, dark green and light green.) Also, the stitches are technically not very hard to do: the petals are long-and-short buttonhole (blanket) stitch outlined in stem stitch with straight-stitch center lines and satin stitch centres, the buds are satin stitch, the stems are stem stitch and the leaves are fishbone stitch. I like the effect of the dainty flower embroidery on the rough burlap fabric, too.

On the critical side… I am really not that great at embroidery, especially when I don’t have a transfer and I’m working with fabric like this, on which I can’t draw a design outline very well. I drew a few straight lines and dots with a pencil and improvised from there. Also, since the fabric is already made up into a bag, it’s difficult to use a hoop properly or work on the lower edge. The buttonhole/blanket stitch is a strange choice for the flowers, if you ask me — they look very scraggly! (Just like my real plants at home, ha ha.)

I left the top edge unfinished for now, as I couldn’t decide whether to make a simple button closure like on the other embroidered money bag, a fold-over buttoned closure, or a drawstring. (I don’t have a zipper of the right length on hand and I’d like to stay on the “no-buy” wagon for as long as possible, but it would be the most practical solution.)

I still have plenty more of the bags, so I can keep making one every time a little embroidery project presents itself.

August 1962: Overview

August is the end of the holiday season at Stitchcraft, featuring transitional styles for the cooler days of September as well as a few more small, easy projects that can be worked on from the deck chair or picnic table. The “Contents” column on the facing page divides the adult garment patterns into the categories “First Autumn Fashions” and “Continental Designs”.

The “Continental Designs” comprise a colour-block pullover for men “from Vienna” in graded shades of green, a simple cap-sleeve, T-shirt-style jumper with a little Norwegian motif, and an “Italian design for late Summer” with bands of red and black intarsia in a diamond pattern. I wish they had used these for the colour photos instead of the bland white pullover on the inside front cover!

Loose-fitting, casual shapes and light, sunny colours dominate, exemplified by the apple-green cardigan, collared shirt-sweater and boatneck twin-set on the front and inside covers. Notice how much less fitted the August 1962 twin set is than, for example, this one from August 1960, not to mention earlier twin-sets from the 1940s and 1950s. The concept lives on, but the line has changed completely. Everything is hipbone-length with no or hardly any shaping.

Babies get a standard, but very pretty, lacy matinee coat and bootees, the “smart teenager” has a machine-knit pullover, and her little sister gets a “gay Rimple design” in the still-popular knitted terry-cloth look, so the whole family is taken care of.

Homewares are always big in the summer months, when many readers understandably didn’t want to hold bulky warm wool in their hands in hot weather. The bedside rug is obviously an at-home project, but the smaller projects could easily be taken along on a holiday. This month’s flower in the gladiolus, but there’s also an orchid spray and some forget-me-nots, along with two sewing patterns to embroider them on: a round baby shawl or this wonderful little girl’s dress. For once, you don’t even have to send away for the patterns, as they are geometrically quite simple — the shawl is just a circle, drawn directly onto the fabric with a pencil held on a length of string, and the dress is made up of rectangles with measurements given. I would love to make the dress! I just don’t think it would get worn, since it would only be for “dress-up” occasions, of which there aren’t going to be any for a while.

The back cover shows an interesting feature which took shape in the early 1960s issues: tapestry projects specifically for church use. In this case, there’s a runner and kneeler in shades of red and blue. If anyone happens to know why or if these colours or this pattern are significant in whatever type of Christian tradition, please feel free to tell me, as I don’t know anything about it. The rug, especially, does not say “church use” to me in any way that I can recognise and I could just as easily see it in a normal hallway.

This issue doesn’t stop! The “Readers’ Pages” offer two more very simple projects: a reprint of a young man’s waistcoat from 1957 and a stash-busting baby blanket from double crochet hexagons. And just when you think you’ve come to the end of the issue, here’s this incredible Alice in Wonderland-themed wall hanging in felt appliqué and embroidery:

I’ll close with this full-page ad for Patons & Baldwins wools, showing a newly married couple decorating their home. The happy bride is instructed to

Look after him well. Find out what he likes, and why. See that his clothes are well kept and well pressed. Learn to cook his kind of food. Learn to knit his kind of sweater…

While I’m certainly not surprised that a 1962 advertisement would speak to women like that, I do find it interesting to compare the early and mid-1960s ads — which take on this type of “you exist to please your man” language more and more throughout the years — with those from the 1950s issues, with their much more independent picture of womanhood. Many of the knitting patterns in the earlier issues are explicitly designed “for the office” and most of the advertisements portray women living active, interesting lives in their comfortable shoes and unbreakable skirt zippers. In the wonderful tampon ads (that sadly disappear around the late 1950s), they don’t even let “problem days” stop them from doing anything! In contrast, the full-page P&B ads starting up around this time always feature a man or child with the woman in question and the text is inevitably some variation on “you must do this to please your man.” I had always thought of the 1950s as being a much more repressive time for women that the 1960s, when roles began to change, but judging from Stitchcraft (which, to be fair, is quite conservative both fashion- and otherwise), the earlier part of the decade is more of a backlash than a progression.

I don’t know what project to make from this issue and I still have so many WIPs, both for this blog and otherwise. Maybe a nice, easy flower embroidery on a vegetable bag?

Out of Order: Contemporary Embroidery, June 1961

EDIT December 31st, 2021: FINISHED!

July 1962’s issue didn’t have anything in it that particularly interested me, so I took the time to go back to the June 1961 issue, which had so many nice projects in it that it was hard for me to decide which to make. (I ended up making this lacy top and later, this child’s tunic-dress.)

I loved the extremely complicated, heavily embroidered, faux-neo-Jacobean felt appliqué “birds in a tree” extravaganza featured in colour on the back cover, but it was too daunting. For one thing, of course I didn’t have the transfer or pattern for the appliqué pieces, since I would have had to have sent away for them via postal order in 1962. For another, there weren’t even any instructions in the magazine — the design was offered as either an embroidery or an appliqué project (see photo), and the instructions in the magazine only covered the embroidered version in any detail. The appliqué version just gave a list of materials, size of finished design, and the address where one could order the pattern and instructions. And when it comes right down to it, my appliqué and especially, embroidery skills are really not very well developed.

Oh yes, and while felt is easy enough to buy, the materials included tapestry wool for the embroidery, which is impossible to find in stores anywhere near me and even difficult to order online in the right weight (very fine)! Luckily, last year I happened to be in the one city I know that houses the one shop I know that actually specialises in tapestry and sells the right kind of wool, so I was able to get that, at least.

I decided to make it as a cushion, not a wall hanging. The background tree was easy enough. Technically, the white branches and leaves should have been made by cutting holes in the green tree felt and letting the (white/beige) background fabric show through, but since I chose a blue background fabric, I appliquéd them as well. It was predictably difficult to make and cut out my own patterns for the little bits of felt for the birds and leaves, and after making the first two birds, I realised it was easier to just cut the pieces freehand. Since there were no instructions to follow, I went from the photo and the instructions for the embroidered version, which obviously didn’t give much useful information.

Such a detailed project took forever, of course. It needed many tools and materials, so I could only work on it at home at a table, and not during the winter months, as I needed natural light for the fine work.

I made two of the birds on the left first, wasn’t really happy with them, and realised why after making the first flower on the left. I liked the way the flower turned out — it’s much simpler! The birds seemed overdone in comparison. I thought about changing the design and realised at some point that, of course, the who idea of this neo-Jacobean, embroidered and appliquéd extravaganza is that it is supposed to be over the top.

And so, slowly and painstakingly, it got done, one piece at a time. (It also spent a lot of time in the cupboard in between bursts of activity.) The embroidery directions in the magazine were often quite different from the appliqué version, so I did a lot of guesswork and adaptation based on the (rather small) colour photo on the back cover, from which the colours had changed and faded in the 50 years since its printing.

I was determined to get it done before the end of 2021, and I did (on December 31st.) It was a huge milestone for me in my appliqué / embroidery learning process, and I am really, really happy with the way it turned out.

February 1962: Overview

IMG_3048
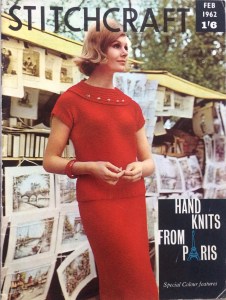
Put on your best traveling suit, pack your Aeros and have your Kodak Instamatic in hand, because it’s February 1962 and Stitchcraft is going to Paris! This month’s issue  features Paris-inspired designs (whatever that means) and extra pages in colour to show off the latest knitwear against a backdrop of Parisian tourist classics.

Travel from London to Paris in the early 1960s was, of course, not on the speedy Eurostar or even quicker cheap flight of our modern times. Commercial air travel was a luxury for the well-to-do and the only way to cross the Channel by train was on the Night Ferry, which ran from London Victoria to Paris Gare du Nord and back. The overnight journey took 11 hours, of which three were spent on the water;  the entire train was loaded onto a ferry for the Channel crossing. I really recommend clicking on the link, which leads to the Wikipedia article. There’s a lot more information about the Night Ferry there, and even a short list of books and films set on or inspired by it.

So what does Paris fashion 1962 have in store for us? Dresses, strong dark colours and smooth crepe wools are all “in”, with a special trend for fringes and bobbles. The two-piece dress on the cover is made in fine bouclet wool and photographed against one of the little bookselling stands that still line the roads along the Seine today. Fine, red crepe wool is the choice for the similar two-piece outfit with fringey bobbles on the front of the jumper, photographed in Montmartre. Are the bobbles supposed to suggest the legs of the painter’s tripod, or an upside-down Eiffel Tower? The dress on the facing page (Sacre-Coeur in the background) is also made in smooth crepe wool, this time in somewhat thicker Totem Double Knitting.

Fringe makes additional appearances in a lemon-yellow jumper with the newly fashionable high neckline and extra collar (Place de l’Opéra) and in the dark green and black plaid-effect longline jumper on the inside front cover (which appears to have been photographed in a Métro station, though I can’t immediately place which one.) Even without fringe, large collars are still going strong, as seen in the belted Rimple jacket. “Chunky” bulky wool makes an appearance in the beret and oversized handbag set (Capucines). The bag is reinforced with strips of cardboard along the top edges and a woven fabric lining to prevent otherwise inevitable sagging.

With all these lovely large projects and the special Parisian focus, it’s not surprising that the rest of the designs in the issue are unspectacular. There are some easy knitted classics for men and children, the usual “Victorian” and “Jacobean” tapestries for the home, and some fun little crafty projects like these “mats with hats” coasters. In the “Little Bobby” serial comic, John and Jane both have a cold. That’s February for you!

I have so many unfinished projects, including the January 1962 jumper, that my February project will be something small and easy. Maybe not the mats with hats, but probably a little embroidered lilac sprig (flower of the month) on a vegetable or project bag. In the meantime, watch for updates on the January project — it’s knitting along quite quickly — and a special 1950s “blast from the past” post.

January 1962: Overview

IMG_3019
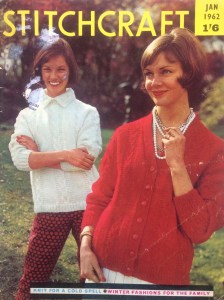
Happy New Year, everyone! It’s 2020 in my real world and 1962 in my blog world. Where will Stitchcraft take us?

… Not very far, fashion-wise. The “Swinging Sixties” started later in the decade; 1962 was still definitely part of the “early” 1960s aesthetic, i.e. more of a continuation of 1950s styles. At the same time, new trends are pushing fashion in new directions, and Stitchcraft is (slowly) moving with the tide.  Fine-knit wool blouses have become rare and the bulky look is definitely in. Knitted suits are loose-fitting and give a rectangular silhouette. Accessories are becoming more experimental and fun, with “turret” and loop-stitch hats and oversized knitted or crocheted bags.

So, what does January 1962 offer us? The cabled sweaters on the front (and yes, that is the word that this British magazine uses: for Stitchcraft, a “jumper” is generally more form-fitting and finely knit, while a “sweater” is bulkier and more casual) can be made in Big Ben wool for the truly bulky effect in a pullover, or in double knitting for a more streamlined cardigan. The casual “his and hers” sweaters with a diagonal “v” stitch pattern are made in double knitting wool, but oversized and loose-fitting. There’s a “big and bold” shortie dolman for teenage girls and you can knit matching, you guessed it, bulky, oversized pullovers for “the menfolk” of the family.

There’s a casual suit in Bracken Tweed wool, highlighting the new fashion for multicolour, heathery tweed yarns. It too is meant to hang loosely, and the collars, cuffs and borders are knitted in a complementary colour that picks up one of the tweed undertones. The only fine-knit garment in the issue is a lovely twin set in 4-ply Cameo crepe wool, and even it is mostly unshaped — quite unlike the twin sets of the 1950s. Children can get a nice warm play-suit in stranded colourwork.

In the early 1960s, Stitchcraft liked “year-round” embroidery themes, with a different versatile small design each month. At the end of the year, all the transfers were made available as a set to be used together on a tablecloth or larger project. 1962’s theme is “flowers” — more conservative and less original than the previous “Zodiac” theme. Still. the narcissus design is pretty and elegant. The bathroom mat, flowery “peasant design” tablecloth, Victorian tapestry and knitted doilies are pretty standard fare and the knitted clown with flags stuck in it like a voodoo doll is predictably terrifying — seriously, do not look at the photo if you have a clown phobia, it will give you nightmares.

To clear your head of that image, you can make a wall hanging — a still life of fruits and vegetables done in padded appliqué for a three-dimensional effect.

IMG_3027

All in all, Stitchcraft‘s 1962 starts with a whimper, not a bang. Still, there are enough nice designs that it’s hard to pick one. I love the twin set, but could also use a nice, normal cabled V-neck cardigan in double knitting, and the toddler’s playsuit is probably fun to knit. I’ll let my local yarn shop decide, i.e. see what they have in stock that says, “Use me for this project.”


December 1961: Star-Spangled Theatre Bag

IMG_2976Technically, it was more of a “star-spangled burlap bag”, but that doesn’t have quite the same ring to it. Happy December, everyone! The 1961 festive holiday season, as envisioned by Stitchcraft magazine, involved at least a couple of glamorous parties and evenings out, for which this white satin drawstring clutch bag could be the perfect accessory.

My holiday season was going along festively enough, but I actually have a couple of vintage evening bags and clutches, should I need one to feel glamorous, and I don’t need a white satin anything. I did love the embroidery design, which features pearls and sequins sewn into flowery “star” motifs in various shades of pink and green. The motifs look very “modern” in that 1960s way — abstract and spiky, but also dainty and bright. What could I embroider them onto?

As it turns out, a few weeks ago I found myself at an antiques fair in Hamburg, Germany, and one of the stands was selling literal moneybags — sacks of burlap linen in different sizes that had been used by the German federal bank to transport money and were then at some point taken out of circulation. The material is very sturdy, finer and more tightly woven than coffee or potato sack burlap, but with a similar feel. The bags were also in perfectly good condition in spite of their age and use — each one is printed with a date, and many of them were from the 1990s. At the very modest price of one Euro each, I went ahead and bought ten of the smaller size (approximately 18 centimetres wide by 30 long).

IMG_3011

So … what to make of them? (Literally.) More vegetable bags? Gift sacks? Little knitting project bags? All of the above? Whatever their use(s), at least one of the bags was going to be star-spangled. Putting fine, pretty flowery embroidery on a coarse natural-fiber sack was a fun idea for a style-mix experiment that I couldn’t resist. After thoroughly machine-washing and steam-ironing the bags (“money is dirty” as the seller said with a IMG_2998wink, and who knows if they had been treated with some kind of additional preservative chemical), I drew the motifs onto the bag with a wax embroidery-transfer pen, tracing around different sizes of button to get the circles, and embroidered them using leftover bits of pink and green embroidery cotton. I decided to forego the pearls and sequins and just made French knots instead. I also didn’t care too much about perfect symmetry or absolutely “clean” lines — I wanted it to look a little bit rough and homemade.

Originally, I wanted to put in a zipper at the top, but didn’t have one to upcycle, so I just made a buttonhole and found a button from the “singles” jar. I might change the button over to the back side of the bag to make a fold-over top closure if stuff falls out, but I preferred the way the bag looked from the front with the single button.

And that was it! I like the result. It’s goofy and incongruous and has a vintage feel in a few different ways. I had already used a few of the other bags as non-embroidered gift bags, so I’ll keep this one for myself as a project bag for small projects, or possibly a vegetable bag. Star-spangled Brussels sprouts, anyone?


October 1961: Overview

IMG_2820
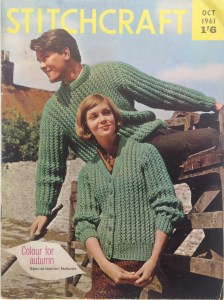
October 1961 gives us “Colour for autumn” with “special fashion features” and a great center spread with colour photos. “I always think October is a nice friendly month,” writes “editress” Patience Horne on the facing page, and I have to agree.

Bulky Big Ben wool and different kinds of textured ribIMG_2821 
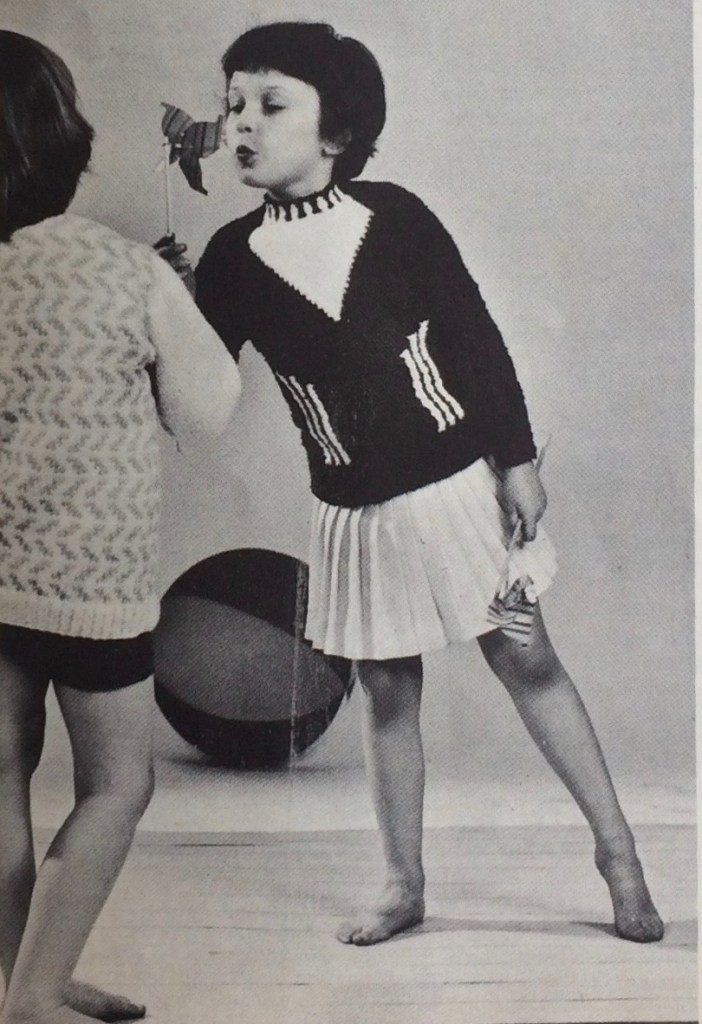
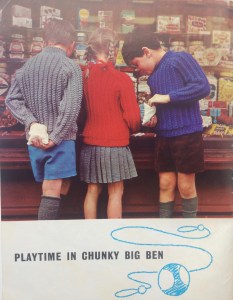
stitches play a prominent role in this month’s issue, starting with the partner-look pullover and cardigan on the front cover. Both are made in the same drop-stitch rib pattern — basically 2×2 ribbing, but you drop a stitch down 3 rows every 4th row and pick it up again in the next row to make a long vertical rib. Children get twisted-rib raglan pullovers to keep their upper bodies nice and warm while their legs freeze in tiny shorts and mini-skirts, typical for the era.

Nubbly Rimple wool may be easing out of fashion, as there’s only one pattern for it in this issue: a simple, yet elegant dress with “the new horseshoe neckline.” Other women’s garments include a cabled cardigan with colour accents and matching cap, a long-line pullover with a wide collar (still in fashion) and saddle-stitching detail, and a cardigan jacket in a wonderfully ornate Florentine stitch that involves a lot of slipping, dropping and pulling stitches up and around in two colours. The finished effect is a lot like a trellis, accentuated here by posing the model in a green skirt and holding on to a plant. Autumn colours of gold, orange, and beige prevail.

There are some additions to the “Stitchcraft Layette” for the smallest member of the family, but we’ve moved on from the bramble-stitch pattern in the last few issues to a mix of cables and flower motifs. Both cardigan and blanket are  pretty and useful, but I don’t like the huge dolman sleeves on the cardigan —  I can see a baby getting their arm stuck inside it. The bottle cover with a fuzzy knitted kitten on it is great, though! If it were made somewhat smaller or larger, I could imagine it as a phone or tablet cover.

In the homewares and accessories department, we’ve got the usual teapot cosies (how many can one household have??), a knitted donkey named “Ned”, and a pair of “mitts for a scooter fan” — with separate thumb and first finger. There are tapestry patterns for a piano stool and a chair seat, and did you honestly think we were finished with the Zodiac theme, just because all the months had had their patterns already? Of course not! Now you can order the complete chart and embroider them all one more time on a tablecloth.

The back cover illustration shows two hand-made rugs using different techniques: flat crossed stitches for a woven effect, or stitching combined with pile knotting (latch hook), which was apparently the latest thing in Sweden at the time.

IMG_2838


The highlight of the home art section, for me, is this sequinned, glittered appliqué wall hanging of some of Great Britain’s famous kings and queens. I don’t think I would hang it in my own home, but what a wild idea and the appliqué and embroidery work is certainly stunning. Look the detail on Queen Elizabeth (I)’s face! And they definitely found a wall with the perfect wallpaper to hang the sample piece on.

The “Readers Pages” have the usual ads, kiddy comic (Sally in Sampler Land), a preview of the next issue, and some easy counted-stitch ideas for borders on towels, pillowcases, etc. I love this ad for the latest Coats crochet booklet — it has flower-arranging lessons in addition to the crochet patterns.

IMG_2836


That’s all for now! My October project will be the baby cardigan (with modified sleeves) and maybe some kind of phone-cover version of the kitten bottle cover.


August 1961: Dainty Rose sprays

IMG_2721
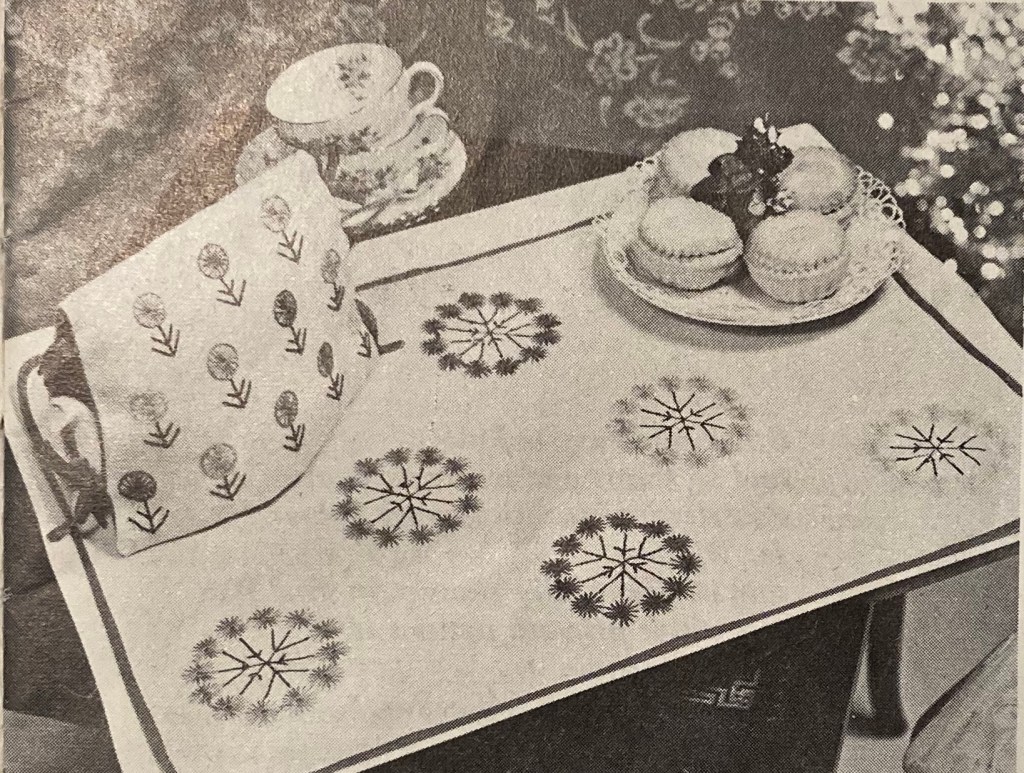
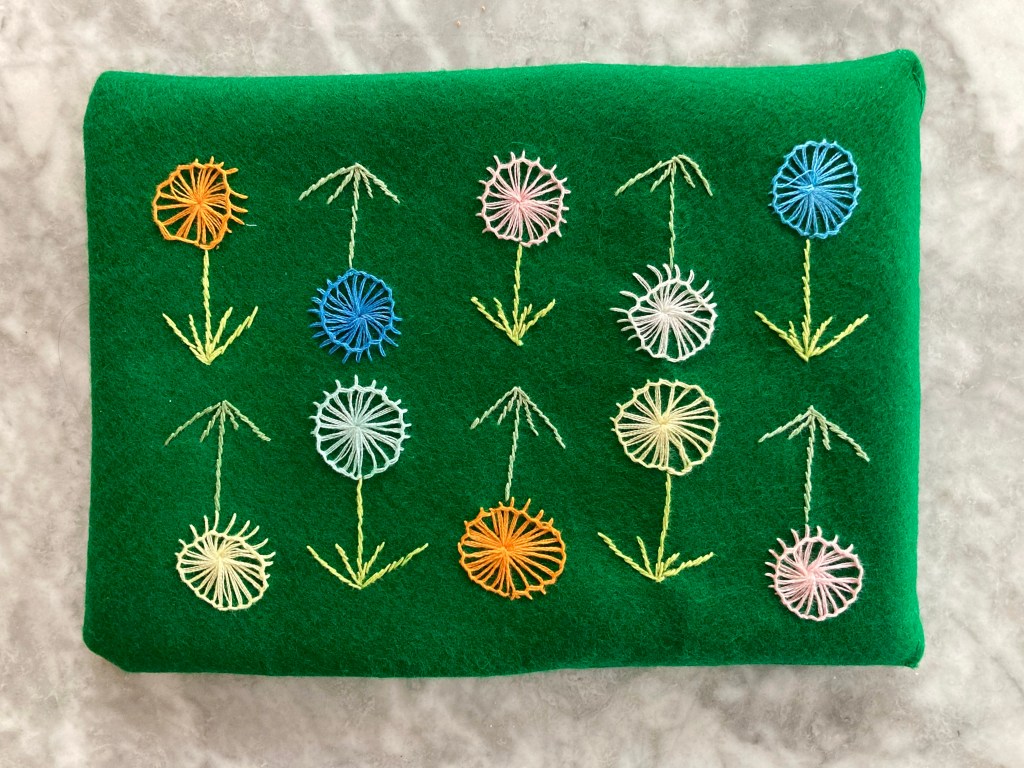
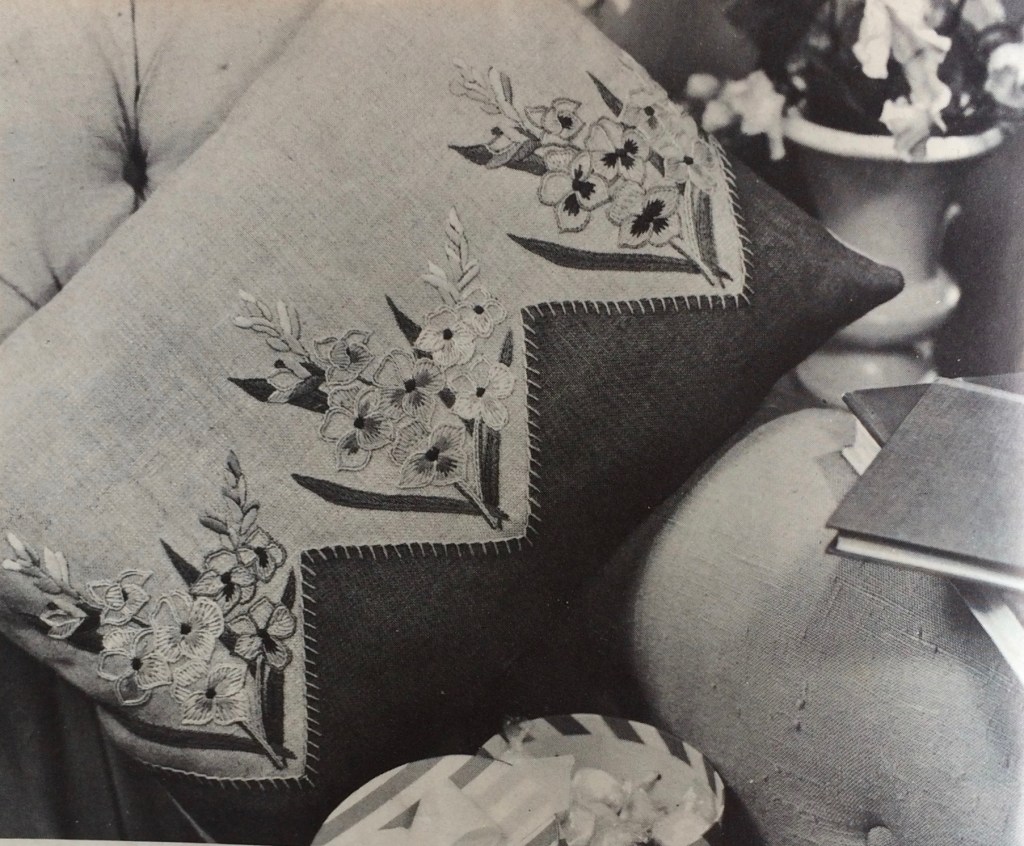
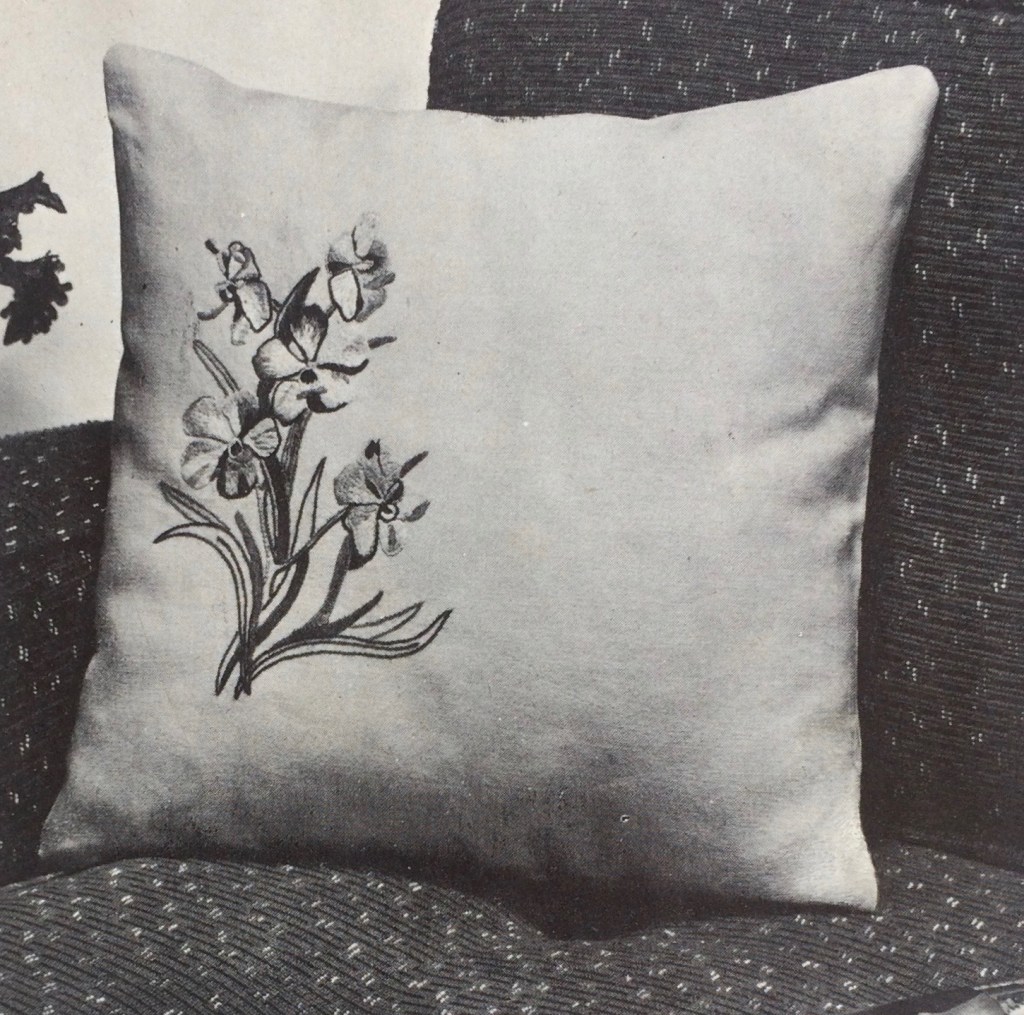
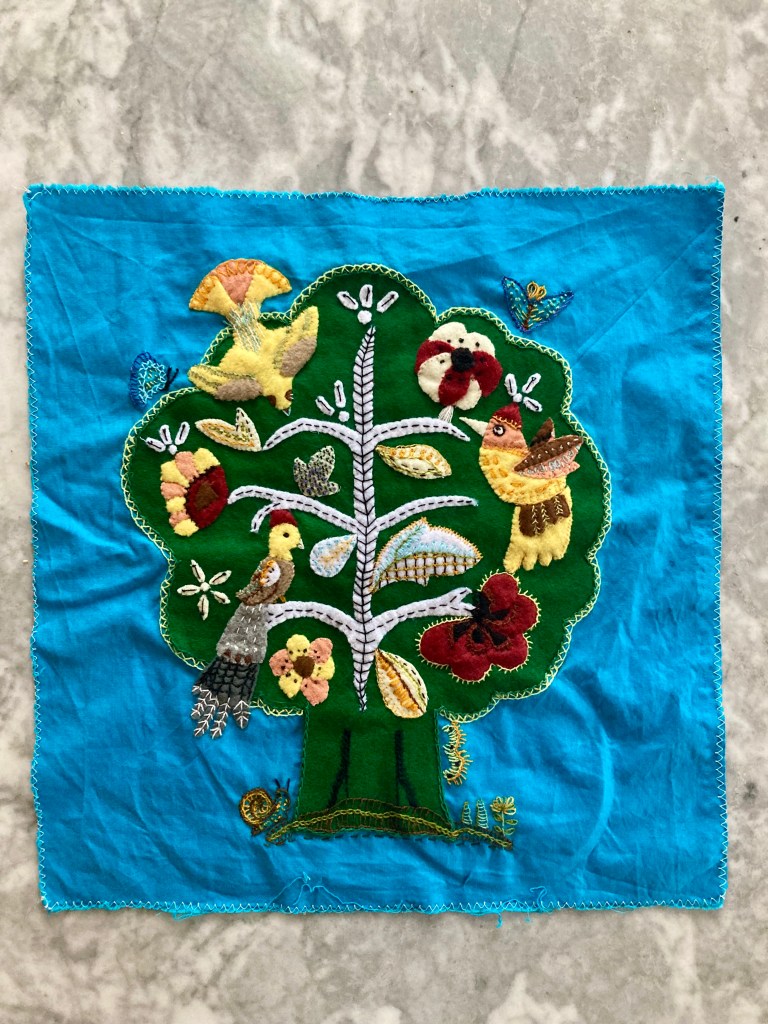
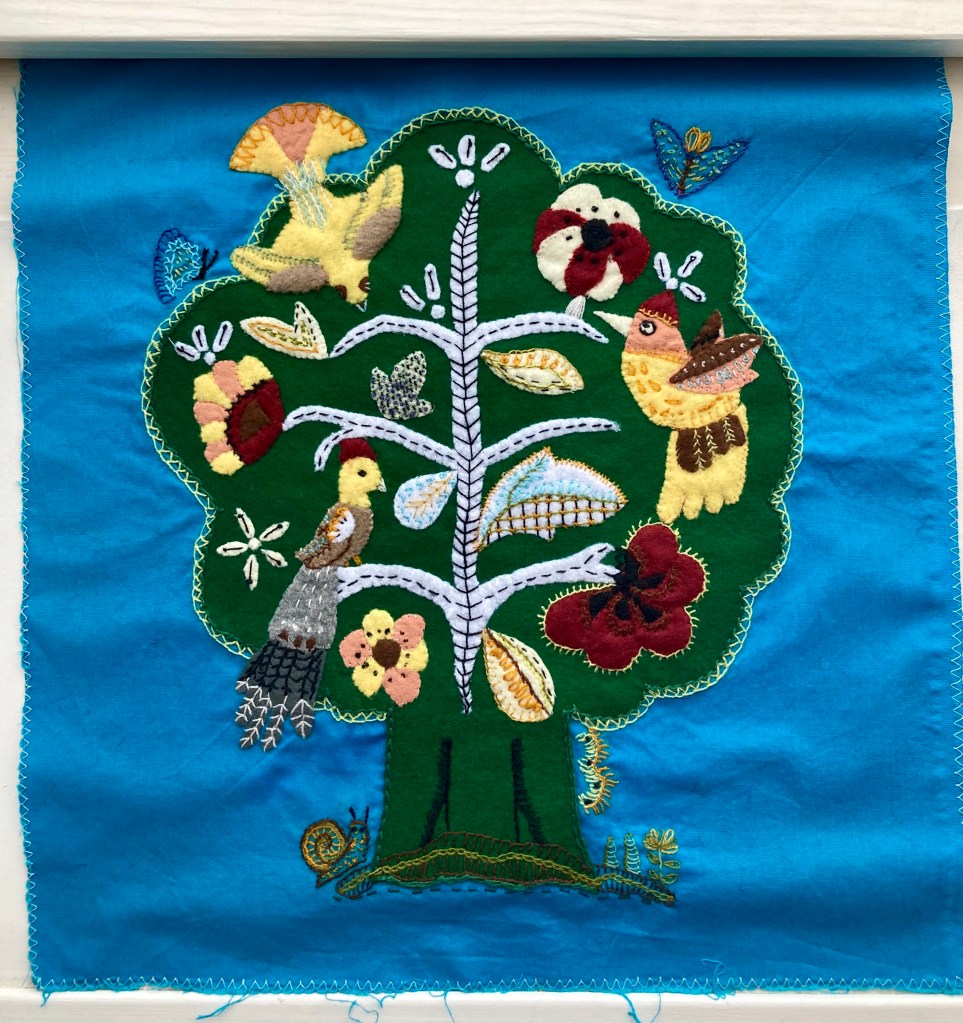
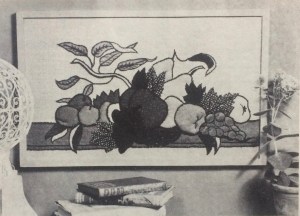
Stitchcraft‘s August 1961 “Late Summer” issue had multiple cute, easy embroidery and tapestry projects. Mine was this little set of rose sprays. To show the versatility of the designs, the magazine usually had directions for and photos of the designs made on different items: a cushion and/or tray cloth, for example. Overall, there was a huge range of homewares that could potentially be embroidered: an apron, a place mat, a chair-back, a wall hanging, a “nightie case”, a project bag, a finger plate, a fire screen, even a room divider or a waste-paper basket cover. This issue added a new idea to the mix: the rose-spray design on a lampshade, complete with a pattern to cut out, sew and fringe the lampshade cover itself.

IMG_2762
Close-up photo from the magazine. Sadly, there was no colour photo.

I don’t need an embroidered lampshade (or finger plate, or fire screen, or tray cloth, or chair-back, or waste-paper basket cover etc. etc.) and I have plenty of cushions and project bags, so I’m often at a loss when I see a nice embroidery pattern and don’t know what to put it on. I’ve made a couple of tablet cosies for myself or for presents for friends, or useful little bags to store “stuff”, but there are limits. I guess I could sell whatever I don’t need, but haven’t gone that route yet. So what to make?

Vegetable bags.

I stopped using plastic bags for vegetables long ago, which wasn’t difficult as I pretty much only buy vegetables at the farmer’s market or organic supermarket, both of which put vegetables in little paper bags (for small or sandy things like mushrooms, potatoes or little tomatoes) or don’t package them at all (I just put them into my basket/cloth shopping bag loose). I try to re-use the paper bags, but my best bag of all is a little linen drawstring sack that originally held soapberry nuts for washing laundry. It’s tough, washable and the perfect size for holding the right amount of potatoes or green beans or whatever. And both the organic supermarket and, incredibly, the regular supermarket in my neighbourhood have now stopped offering even little paper bags for vegetables, so time to make more bags!

IMG_2749
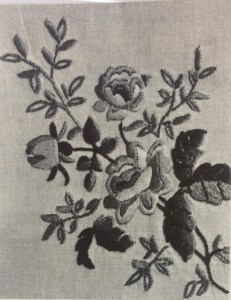
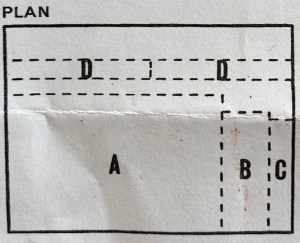
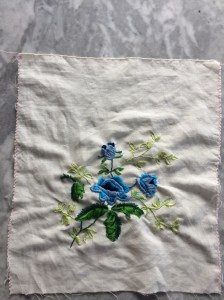
Of course, they don’t have to be embroidered, but why not? Cotton embroidery floss is machine-washable even at high temperatures and I have plenty of scraps and bits of plain linen or cotton materials that can be put to good purpose. The bag I made for this August project was made from a piece of linen from shoes, yes, shoes that a friend bought (the shoes came wrapped in this piece of fabric in the shoe box instead of in paper.) I had enough embroidery floss on hand, so this was an almost 100% up-cycled / didn’t have to buy anything new project. (I say almost because I bought the cord for the drawstrings — then realised I could have made monks’ cord or i-cord from leftover cotton yarn. Next time…)

IMG_2756The design is of blue roses, which don’t exist in the natural world but can be created by putting white roses in blue-tinted water for a few days. (Interestingly, this low-tech process is much more successful than trying to create blue roses via genetic engineering, which so far has only made purplish-lavender roses.) I think blue is an interesting colour choice for embroidered roses, because of course when you see blue flowers you don’t automatically think of roses. I love how the colours turned out though. The stitches are easy stem-stitch, satin stitch and long-and-short stitch. Of course I didn’t have the transfer, but the design was easy enough to copy onto the fabric freehand.

I’m really, really happy with this and look forward to making more unnecessarily pretty, but necessarily environmentally friendly vegetable bags in the future.

IMG_2757

August 1961: Overview

IMG_2709
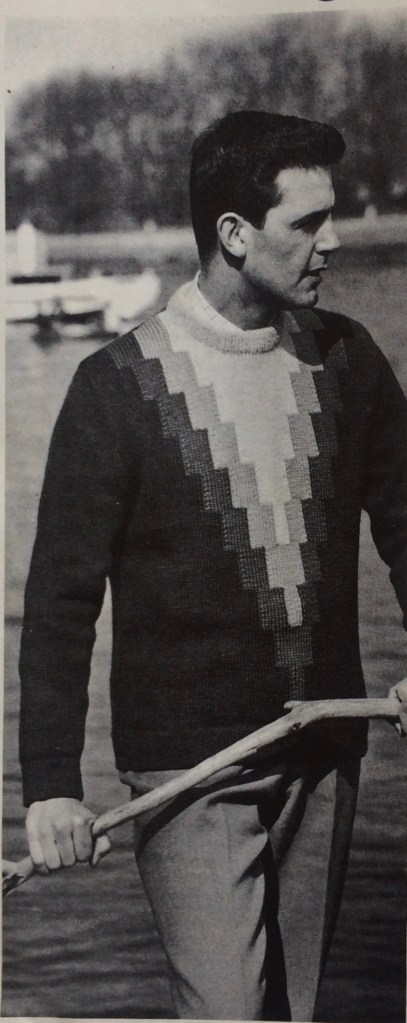
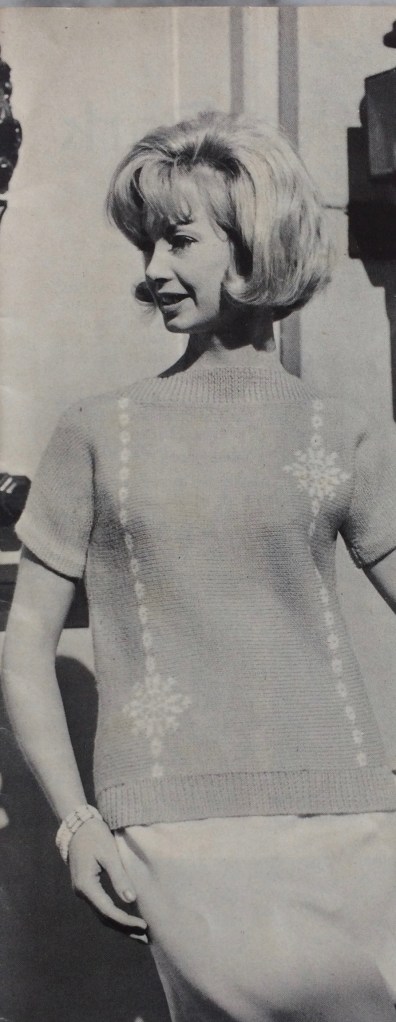
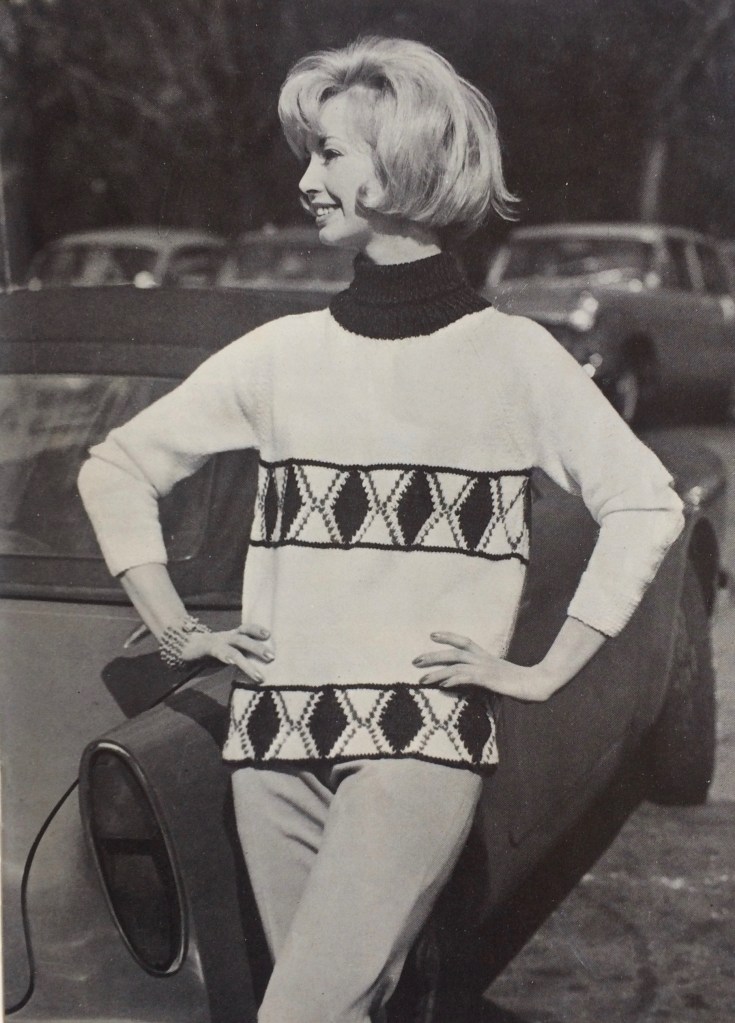
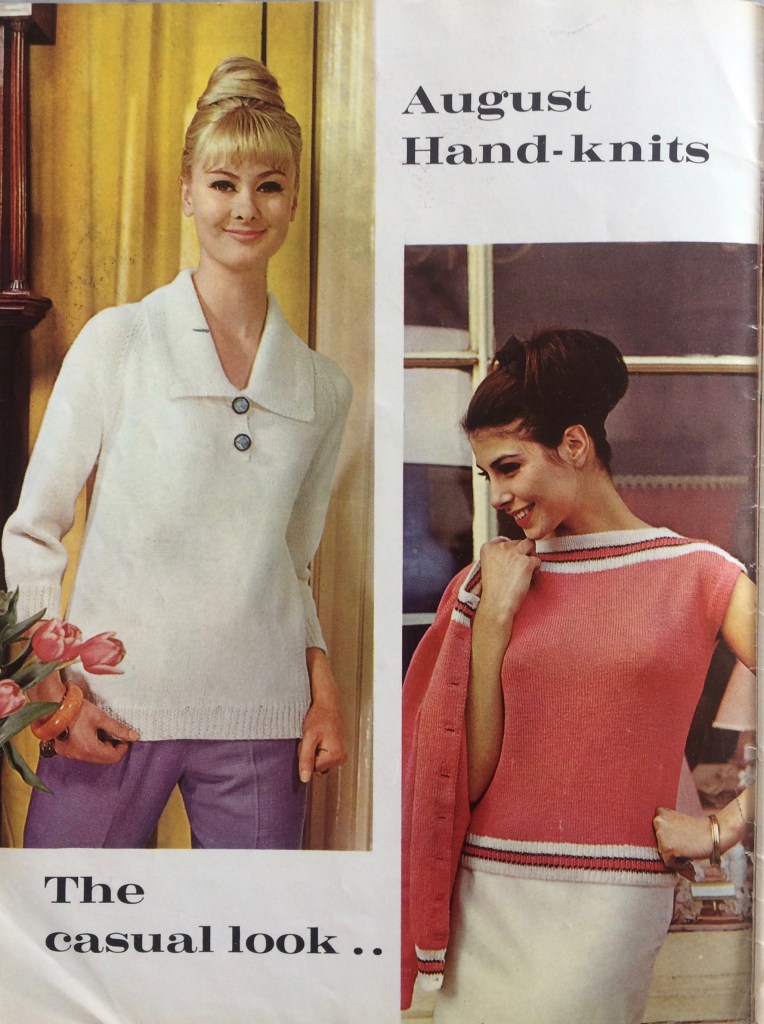
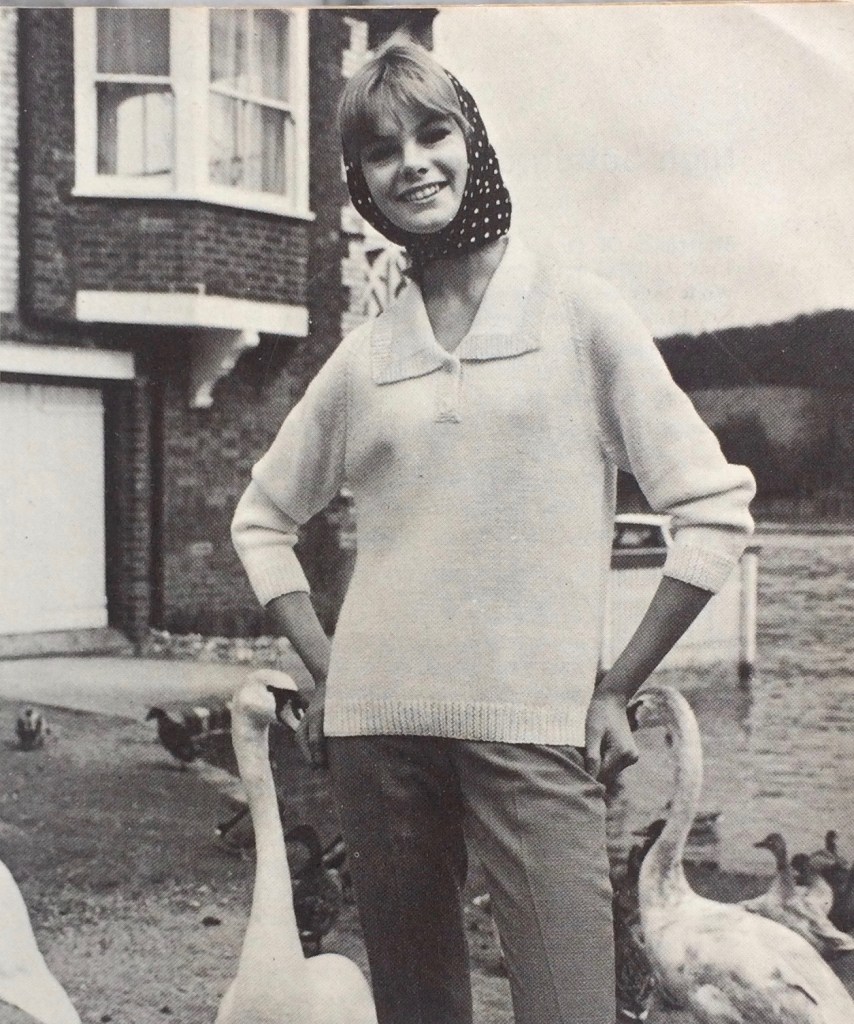
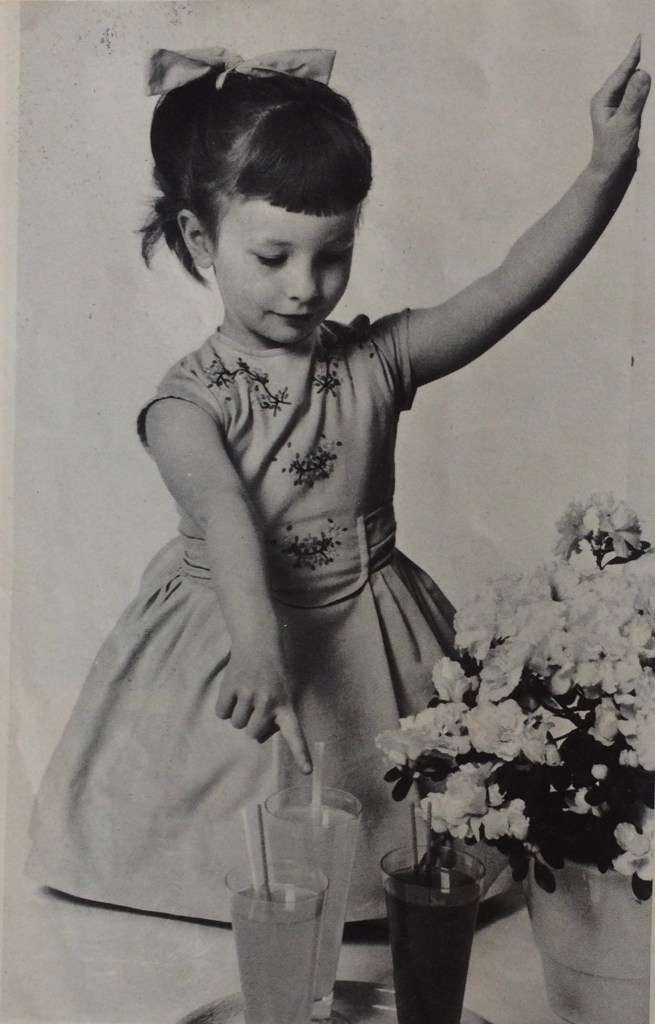
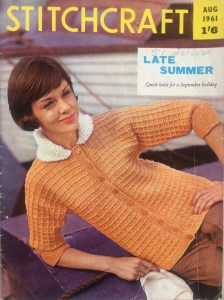
“August is an issue that needs special thought and planning” writes Stitchcraft‘s “editress”, Patience Horne, in the introduction to the August issue, pointing out that it is “rather an “in-between” month for needleworkers” — often too hot to want to wear or make heavy sweaters and too late in the year for fine-knits. At the same time, reminding people that “Autumn is around the corner” can be “a little depressing” to people enjoying their late-summer holiday.

I get this! It’s one of the … hazards? “joys”? features? of living in a temperate/oceanic climate zone like the UK: August, and in fact the entire summer, can be so hot that you can’t even imagine holding wool in your hands or performing any excess movement (thus the small, easy embroidery projects in cotton thread on linen), or 10 degrees Celsius with unending rain (just ask Edinburgh, or the Bretagne), or anywhere in between.

Stitchcraft‘s answer is to offer casual, “all-year-round” knit styles that could work either on a (cold, wet…) holiday or back home in the autumn and lots of little needlepoint and embroidery projects that fit in a suitcase and can be done easily in the heat. The adult garments are thick and warm and serve as outerwear on a summer evening or Atlantic boat trip: the cardigan on the cover, “chunky” pullovers for women (one knitted, one crocheted), and a man’s pullover in “that typical man-appeal style which will make it a winner.” All are made in double knitting-weight or bulky Big Ben wool and both the knitted pullover and cover cardigan feature slip-stitch patterns which make the finished garment that much thicker and warmer. Golden or orange tones and white continue to be popular colours.


There are sleeker, finer-knit short-sleeve tops for girls in their “early teens” (the models seem to be young, slender adults, but OK) with high necklines and an interesting mitred collar on one. Smaller girls (or boys, I guess? this garment doesn’t seem to be heavily socially gendered, but the instructions only have options for buttons on the “girl’s side”) get a fine-knit cardigan with a border of “Scotties chatting to a friendly Cockerel.” Babies get the newest addition to their “Stitchcraft Layette” with a matinee coat and bootees in bramble-stitch to match last month’s dress.


The real fun is in the homewares, where there is a huge selection of projects and needlecrafts to choose from: embroidered ivy borders for tablecloths, traycloths or cushions, a tapestry footstool or “needle etching” picture of a “typical Cornish quayside”, a crocheted rug, blue rose sprigs to embroider on a cushion or a fringed lampshade, a weird crocheted and embroidered tea cosy in Turabast (which I can’t imagine would have good insulating properties), or “Fluff”, a somewhat psychotic-looking, yet endearing knitted kitten. Also, I thought the Zodiac year theme had to be finished by now but no, it’s Leo the lion’s month.


IMG_2723
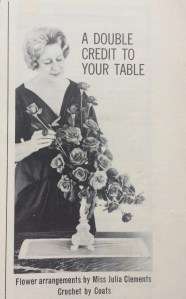
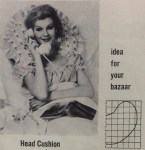
My favourite, though, is this sewing project: a head cushion that lets you recline charmingly in bed with your hair and makeup perfectly done, your satin nightie on, a book on your lap and your telephone on your ear. It’s glamorous  leisure and lifestyle advertising personified, and though they say it’s an “idea for your bazaar”, I would bet the Stitchcraft readers who made this in 1961 did not make it to sell.

IMG_2725
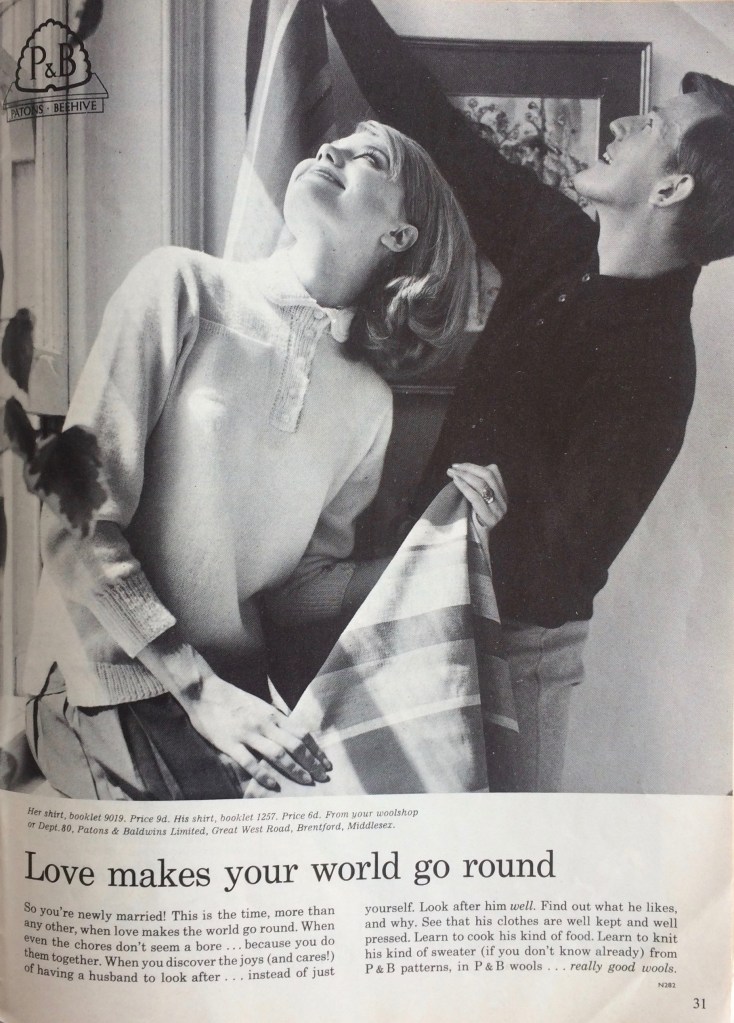
Apropos lifestyle advertising, the early 1960s Stitchcrafts show a rise in full-page ads for Patons and Baldwins wools. That’s obviously not surprising considering the magazine was published for the Patons wool company, but the full-page ads that “tell a story” are a new trend: the late 1950s and 1960s issues up to now had little celebrity testimonials. This one caters to grandmothers and the message is clear: Knitting is not only a rewarding pastime on its own, but earns you the love and affection of the grandchildren for whom you knit. (But only if the kid likes it, and that’s only guaranteed if you use P&B wools, of course.) The 1950s and 1960s saw a huge shift in advertising methods towards a psychologically-based system, which is a huge topic that I won’t start with here, but suffice to say there will be more of these ads, and that they are representative of changing advertising styles.

That’s it for today! I have lots of unfinished projects lying around, so my August project will be something small, definitely not the Turabast tea cosy, but very probably the blue rose sprigs on a little bag, or tablet cosy, or something.