June 1968: Go Sunning And… Lazing

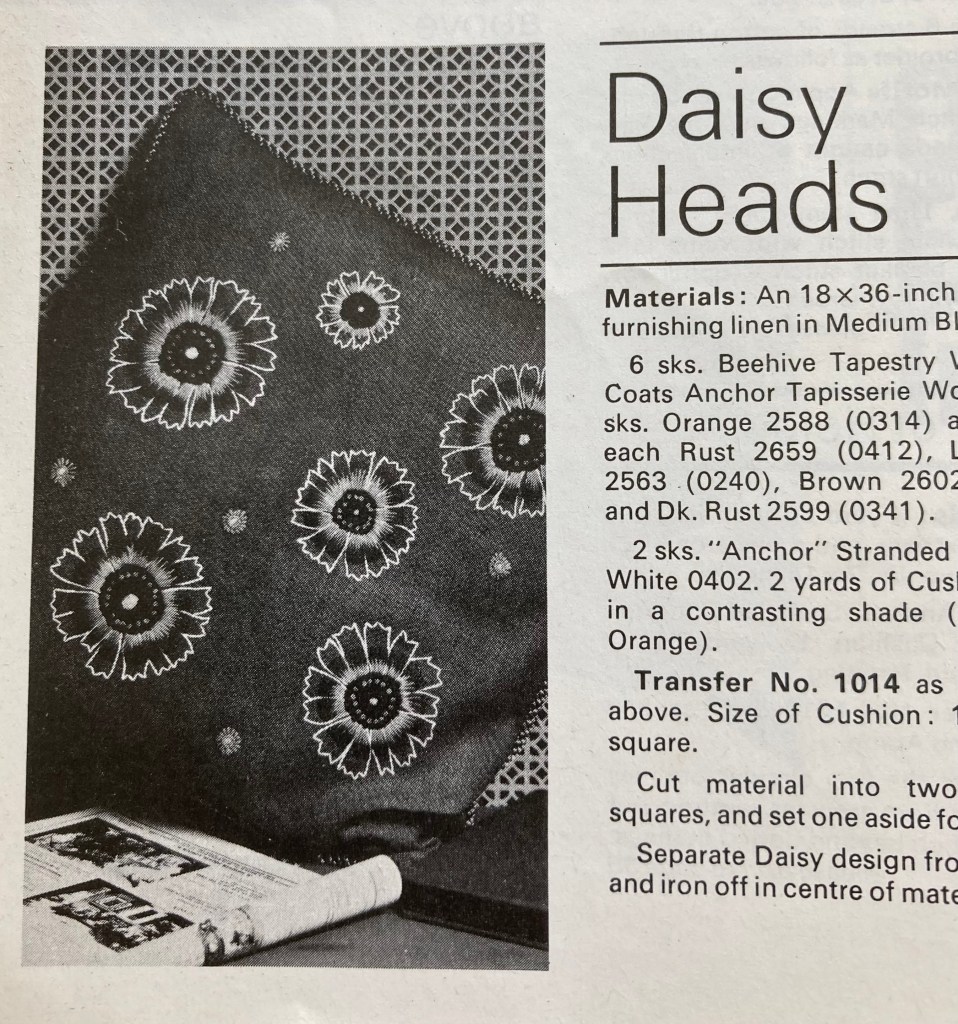
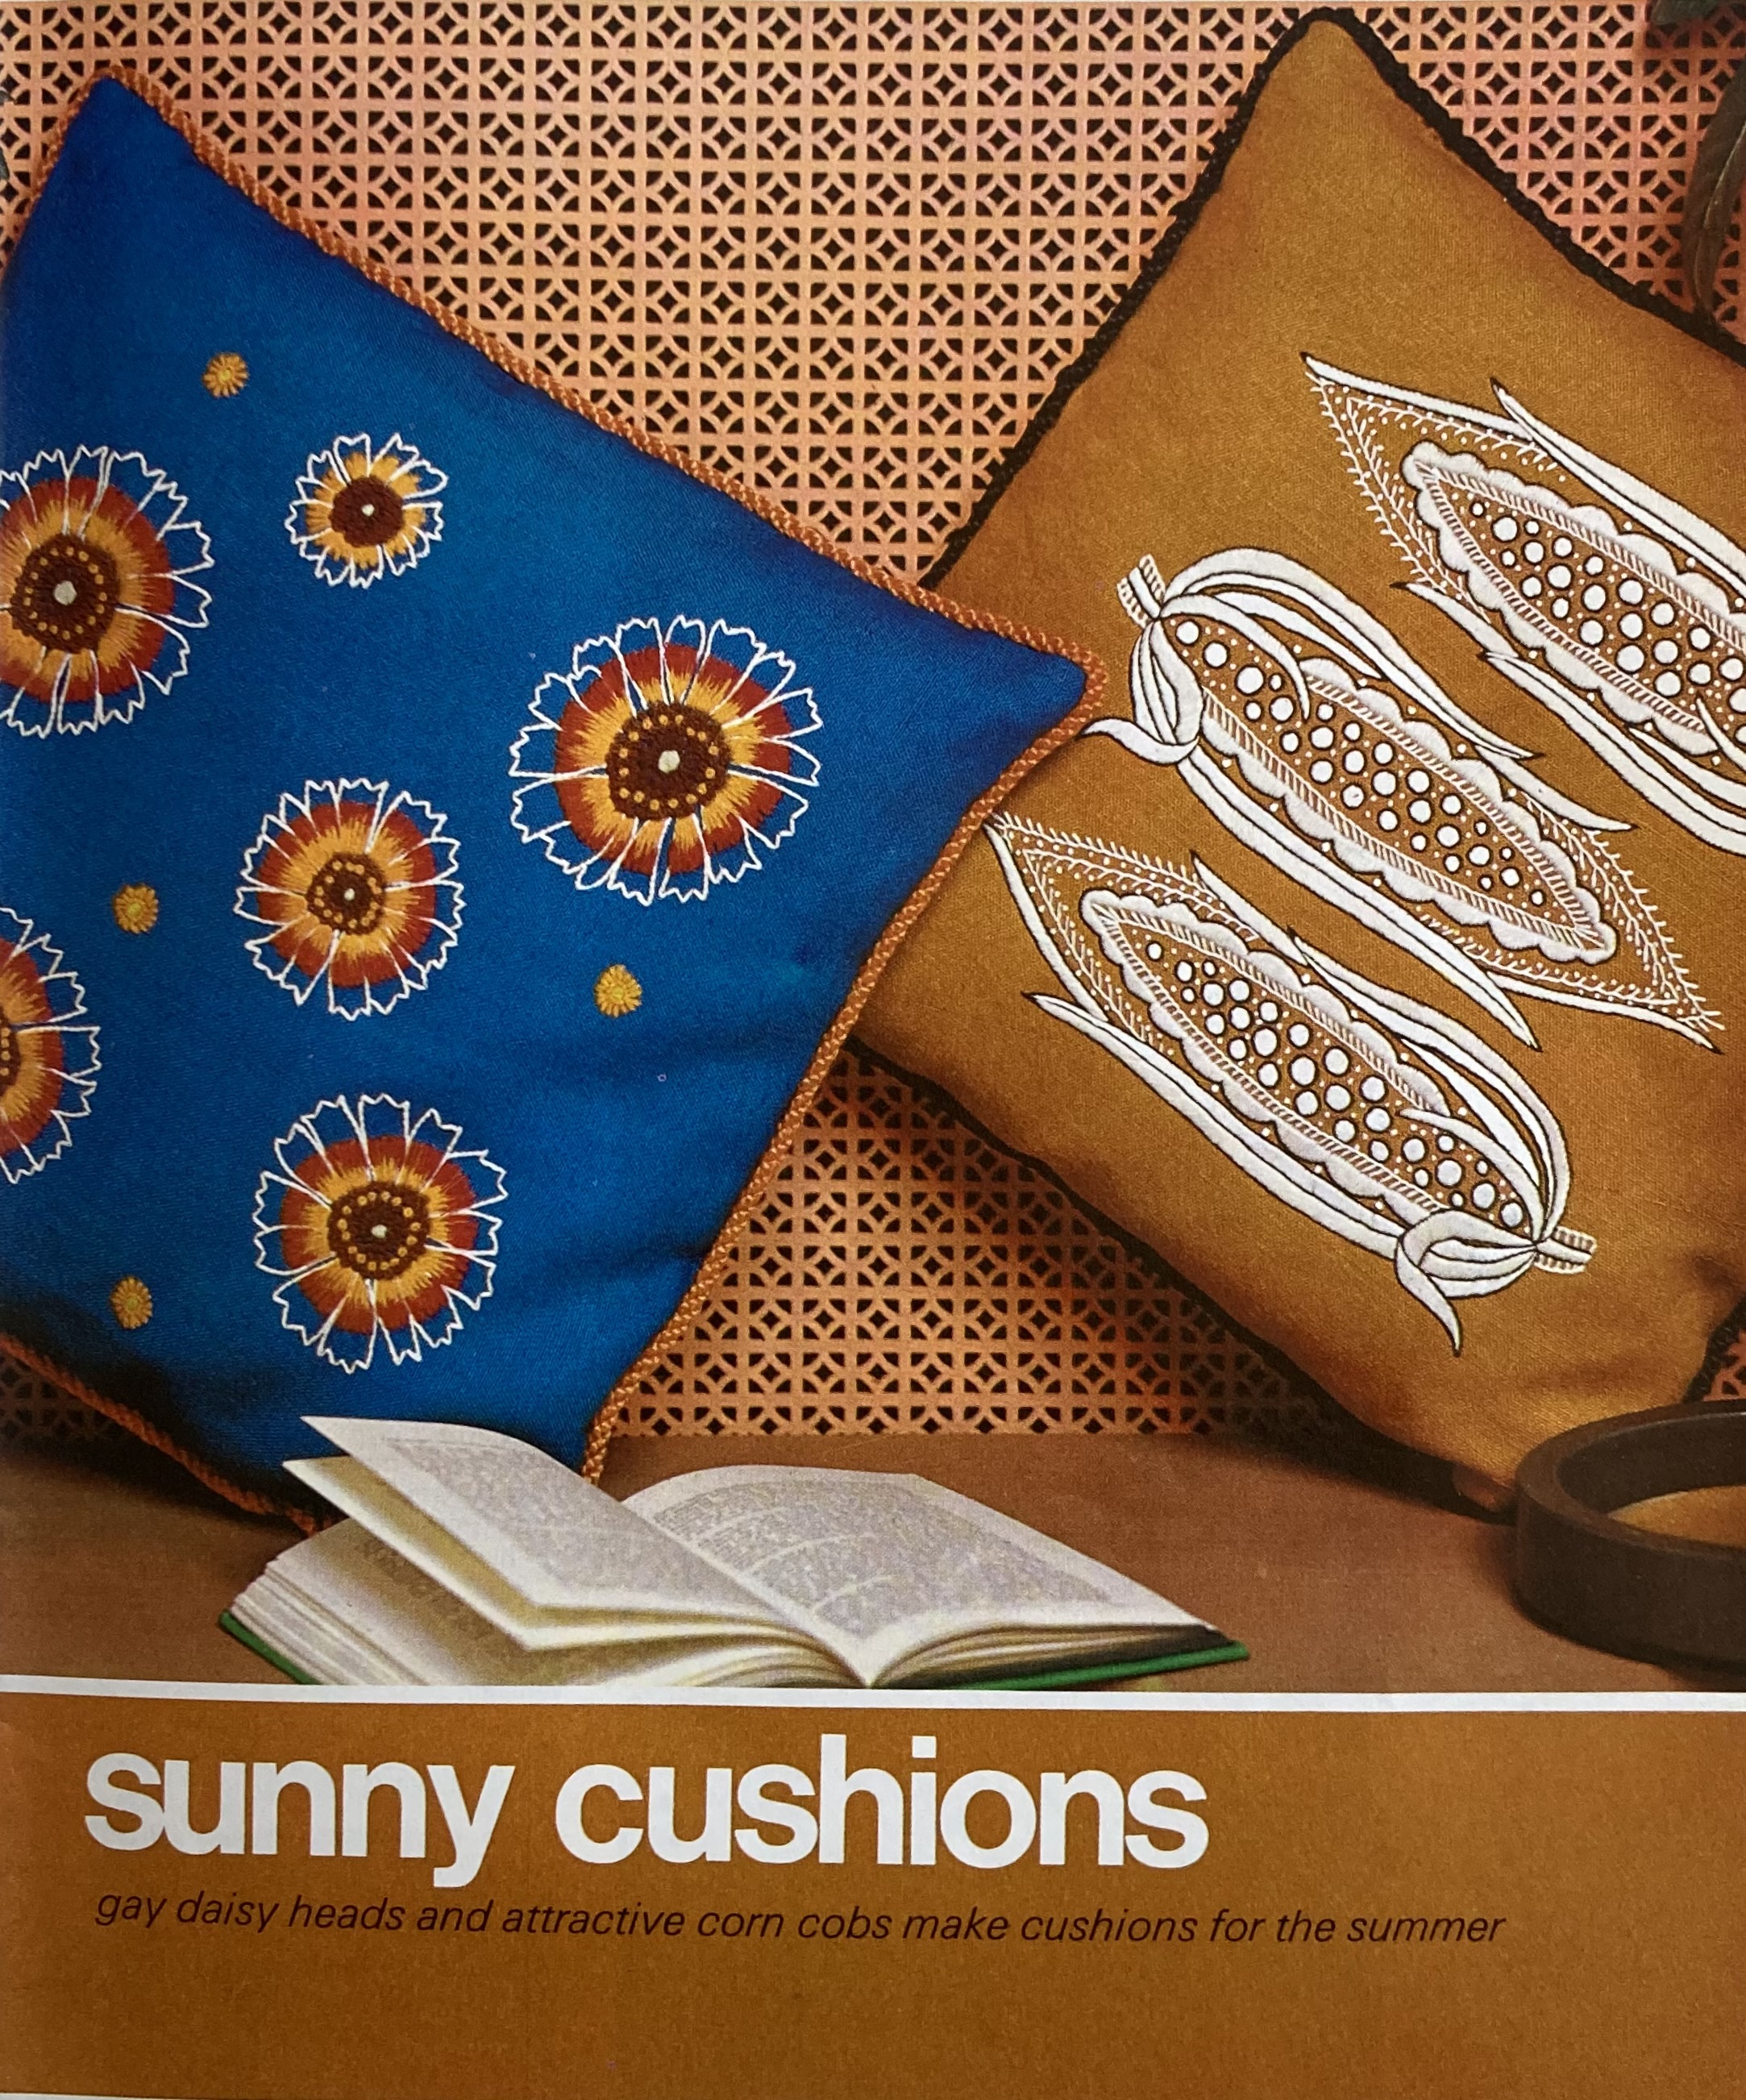
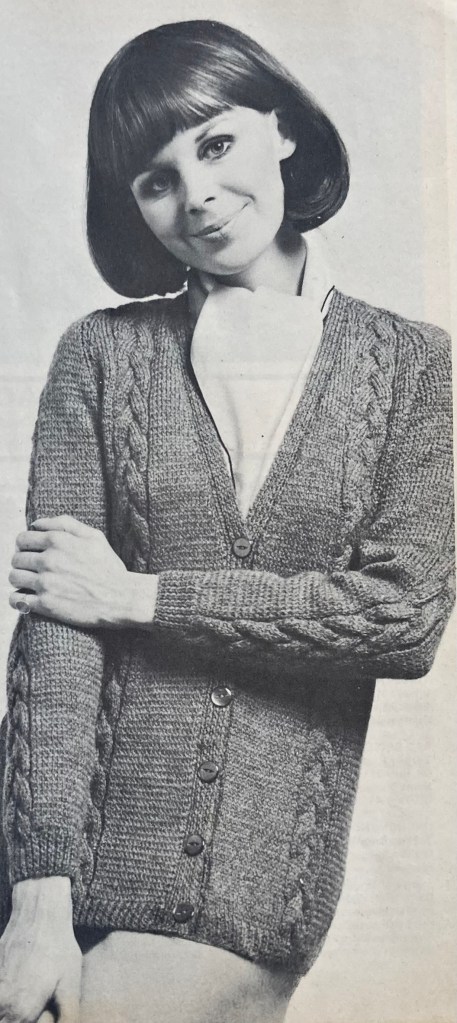
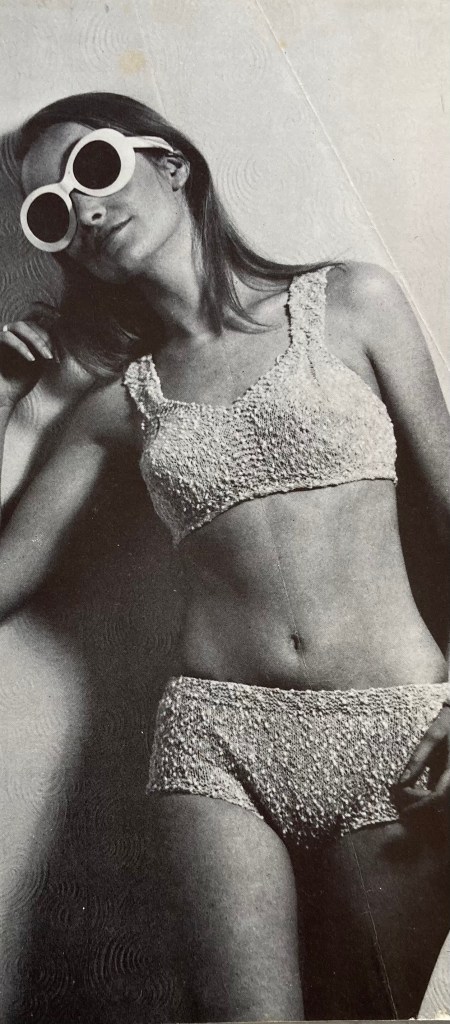
Summer is here! And the June 1968 issue of Stitchcraft has a glorious design to “sun yourself by the pool or on the sand”, “this season’s smartest beach look — the hand knit bikini set.”

The caption at the top of the page promises you can “Go Sunning and… Lazing”, but does not say anything about “swimming”. I can imagine why! Though have heard that the one-piece knitted swimsuits of the 1930s and 1940s didn’t stretch all too much when wet, I cannot imagine that this 1960s bikini with garter-stitch bands would cling to the body effectively in water. Nothing like having your bathing suit float off of your body on a wave to make that day at the beach truly memorable! I have a modern bathing suit for actual swimming (which I don’t do much of for fun anyway), and I try to avoid direct sunlight when possible, but I can definitely see myself “lazing” in the shade on a pool chair in a hand-knit bikini, so this was my project for June.

The three sizes for the top are for 32-33, 34-35, or 36-37 inch bust. I made the third size. Like me, the model seems to have at most a B cup. I imagine this style of hand-knit swimwear wouldn’t work very well for anyone built much bigger than that, since it doesn’t give much support and and more weight would make the bands stretch too much.

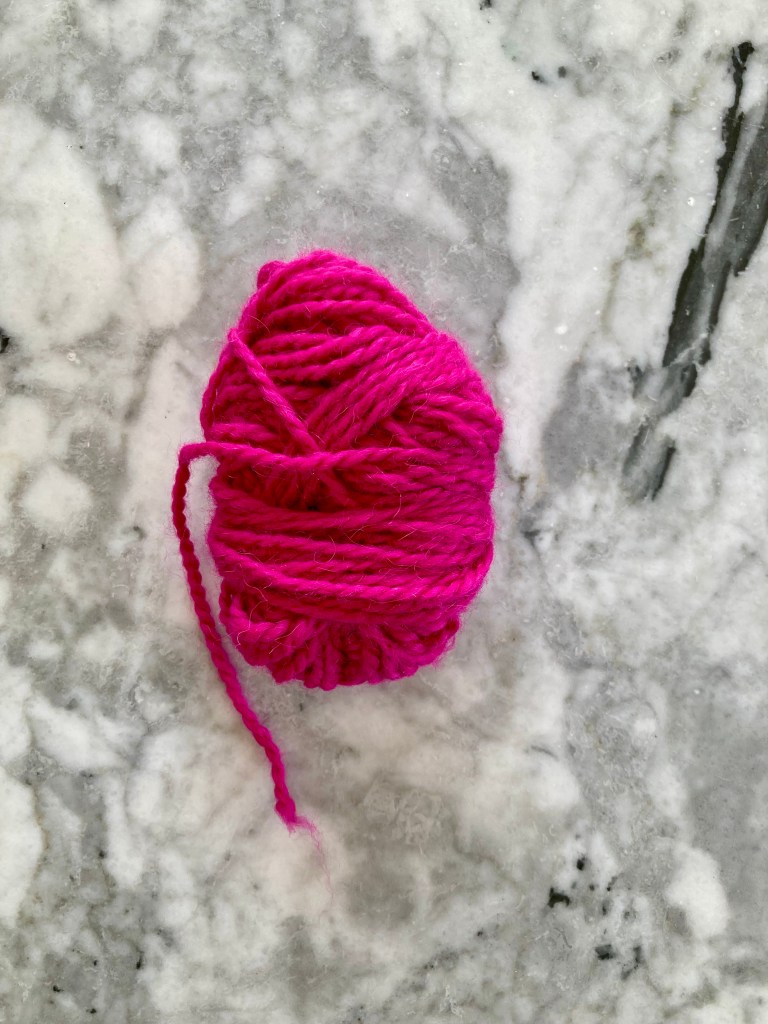
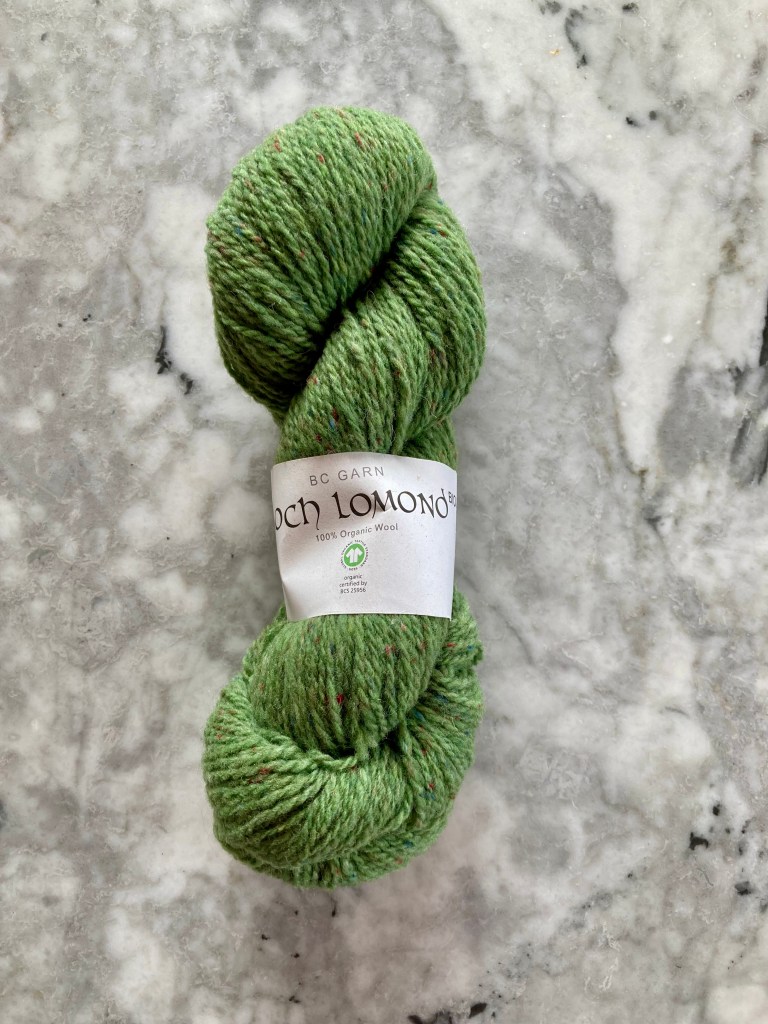
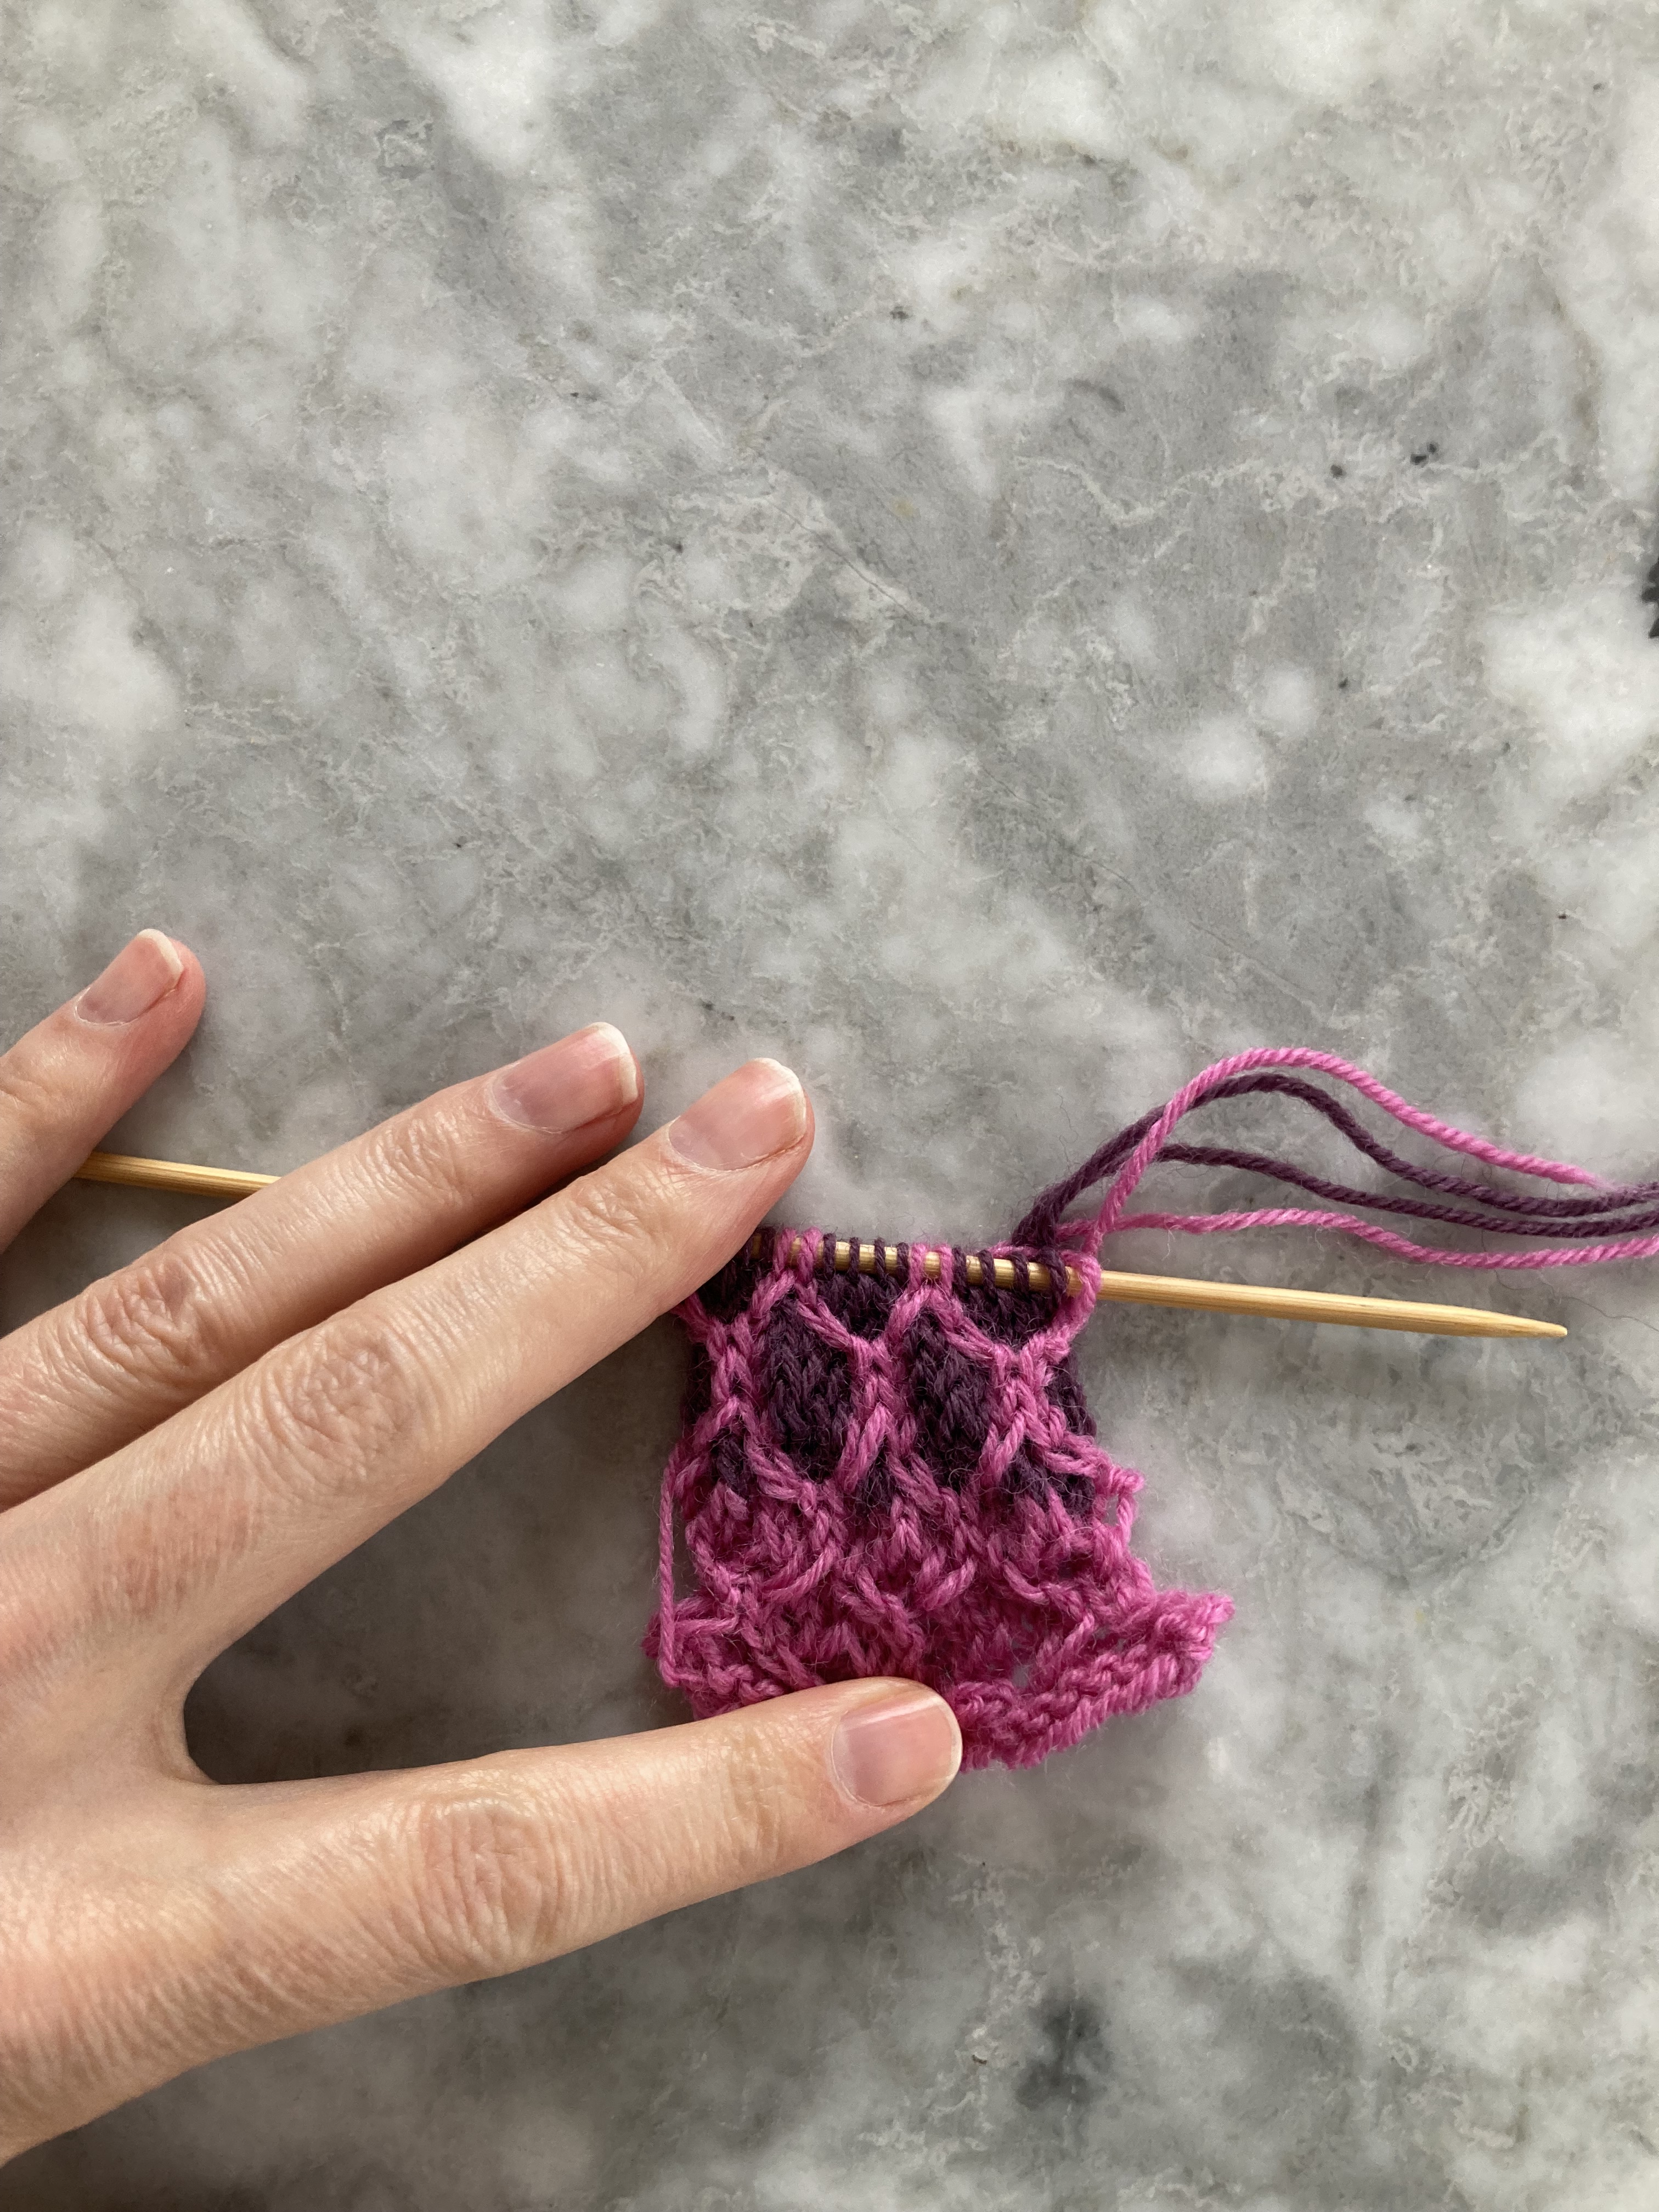
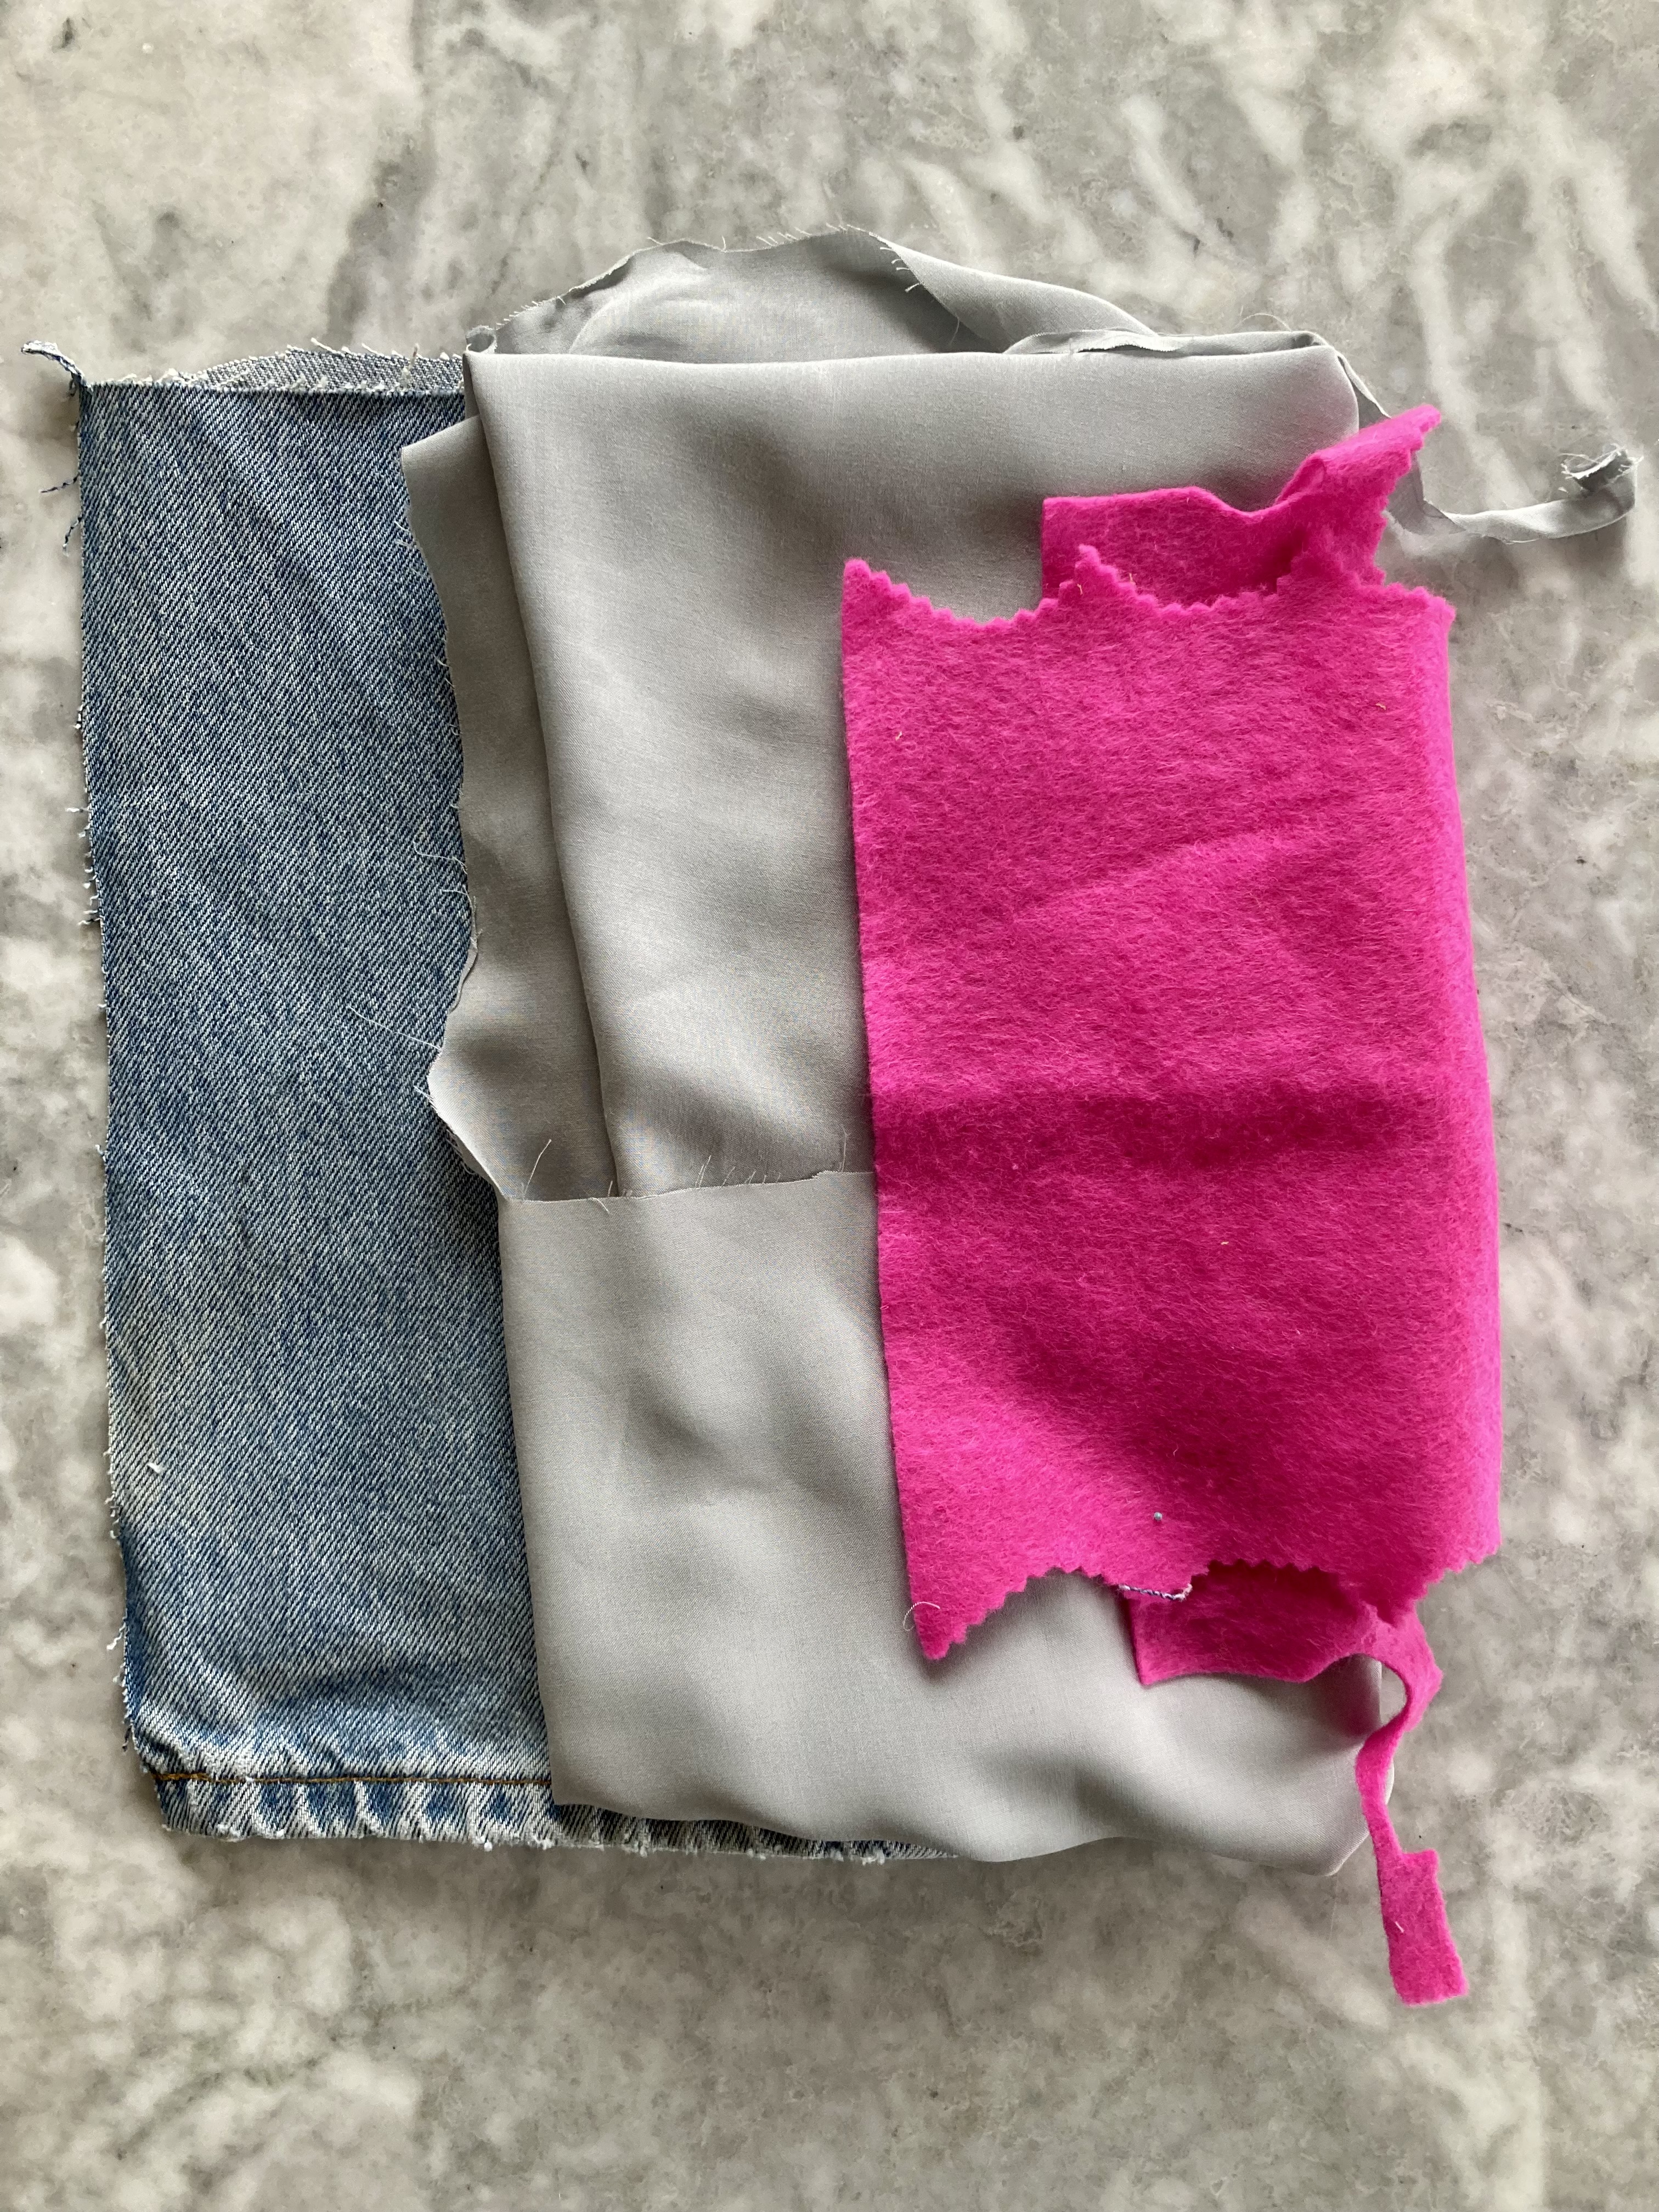
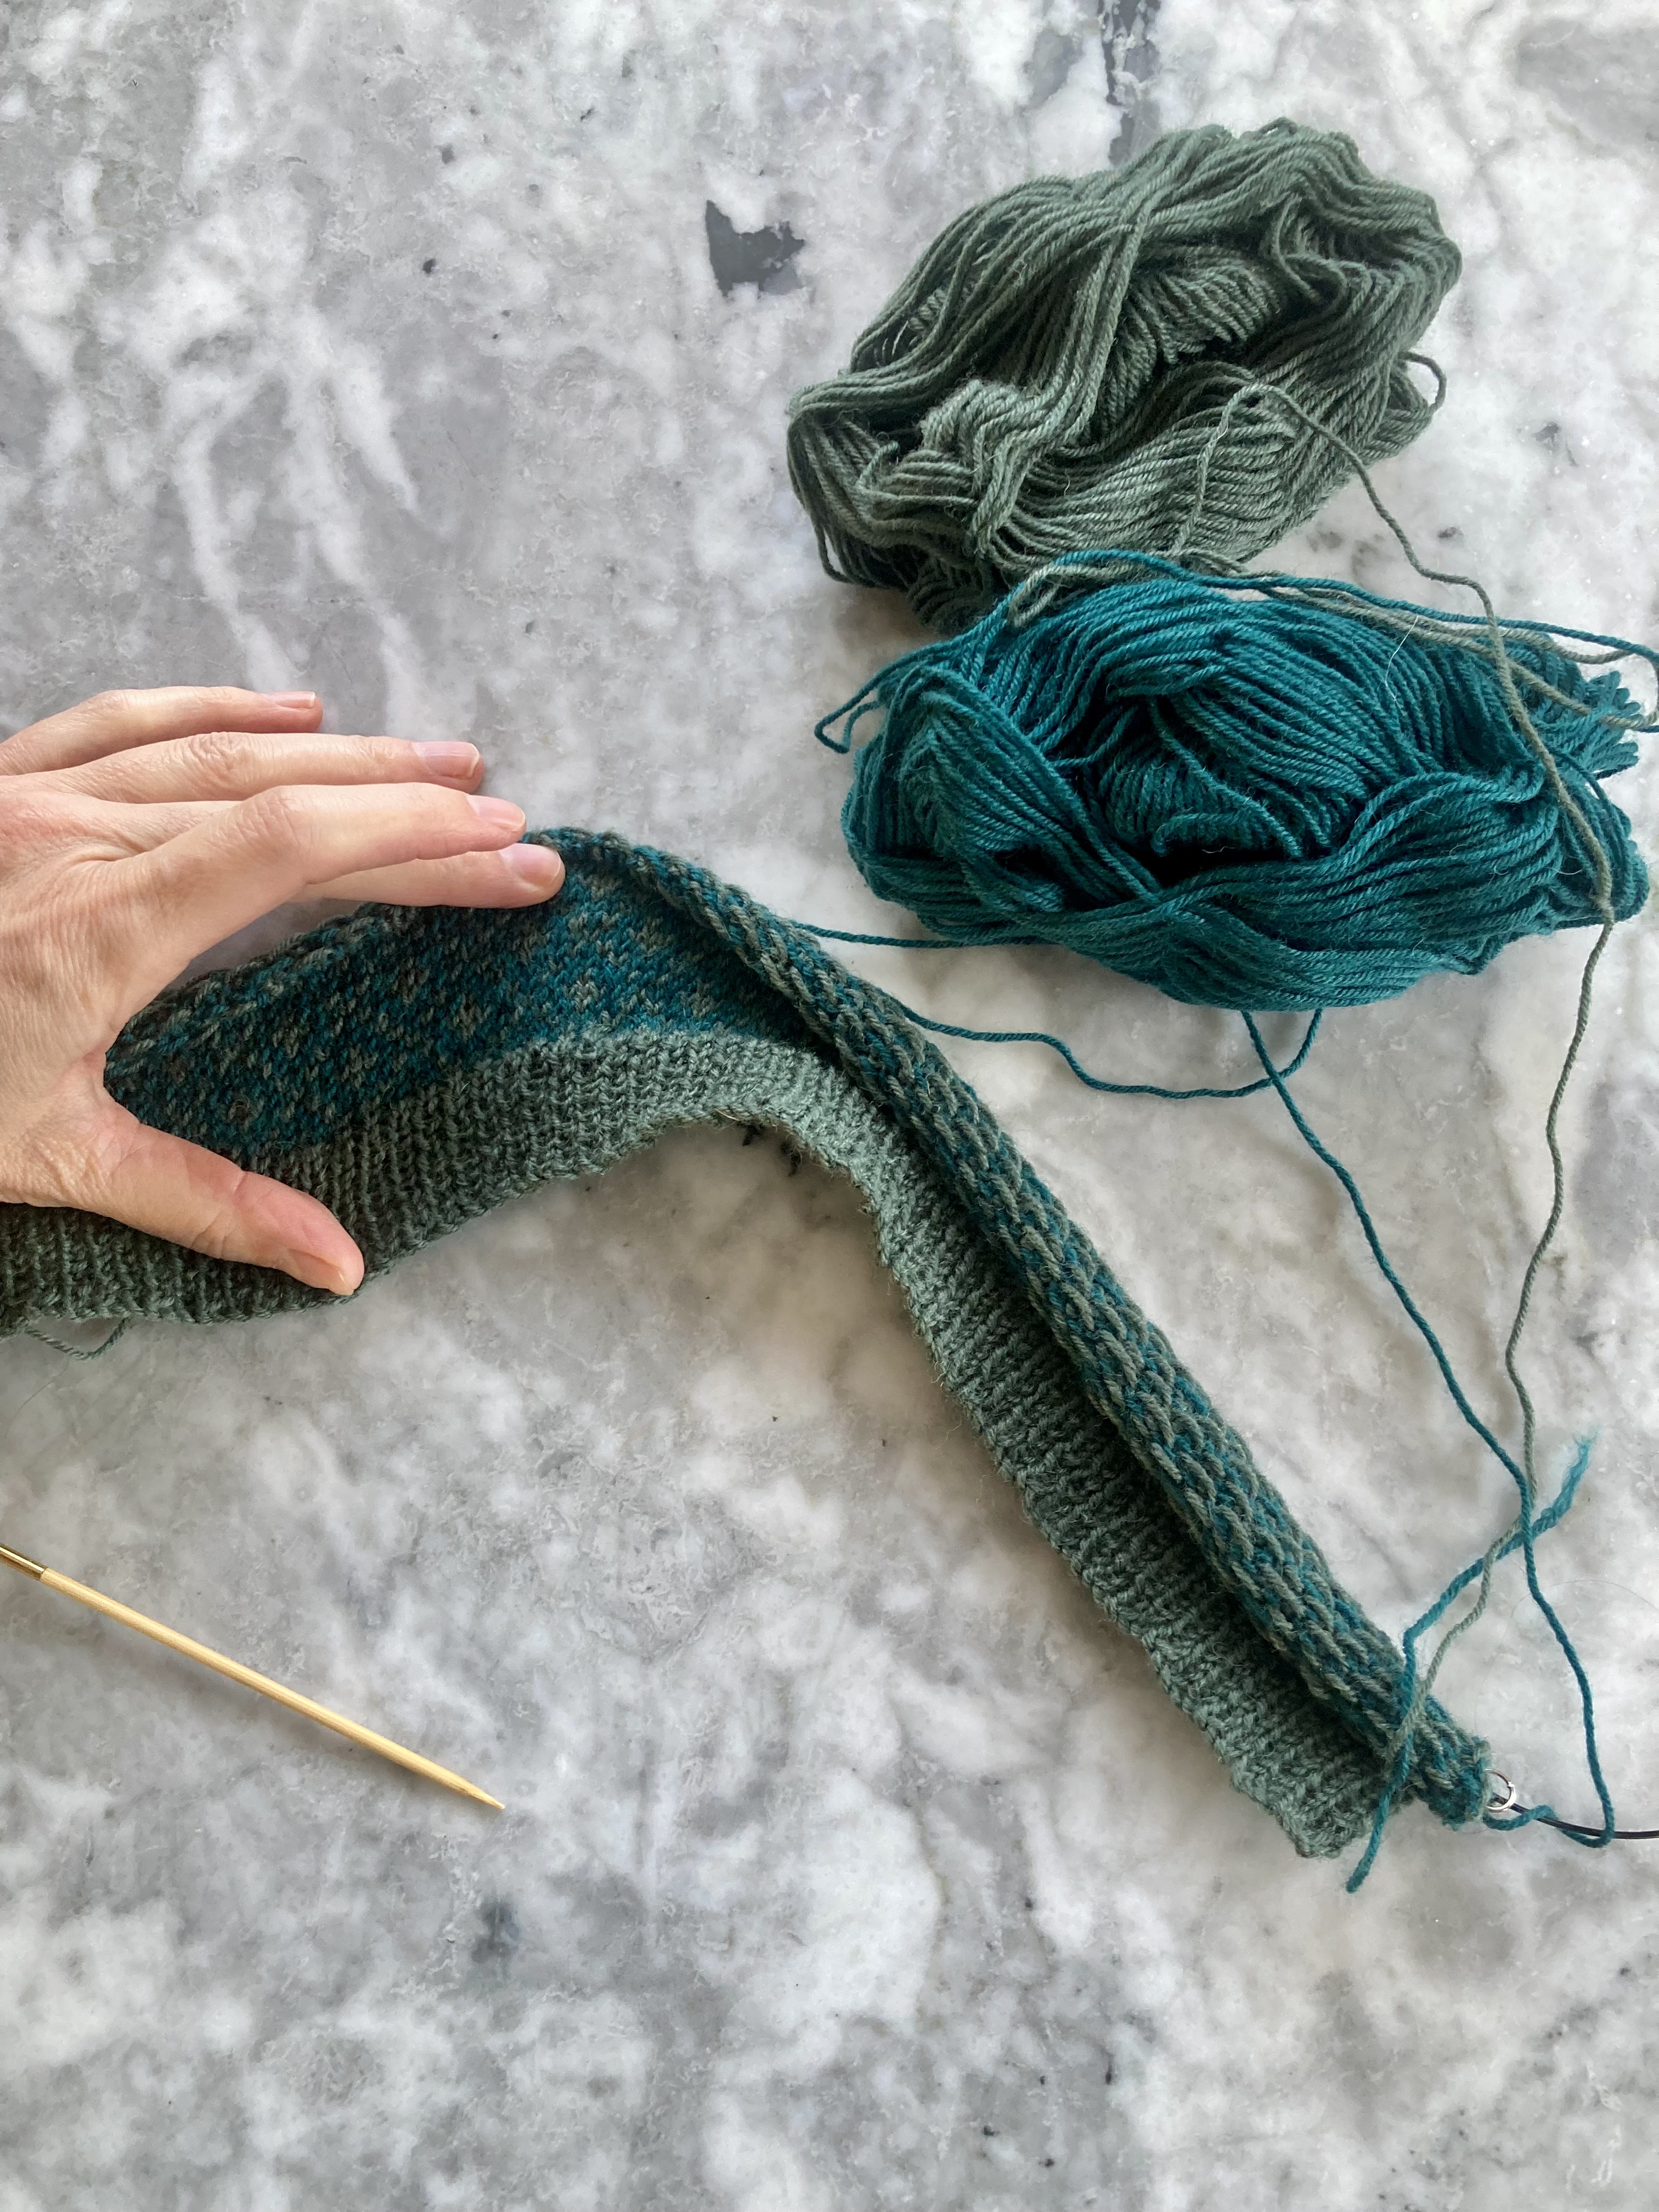
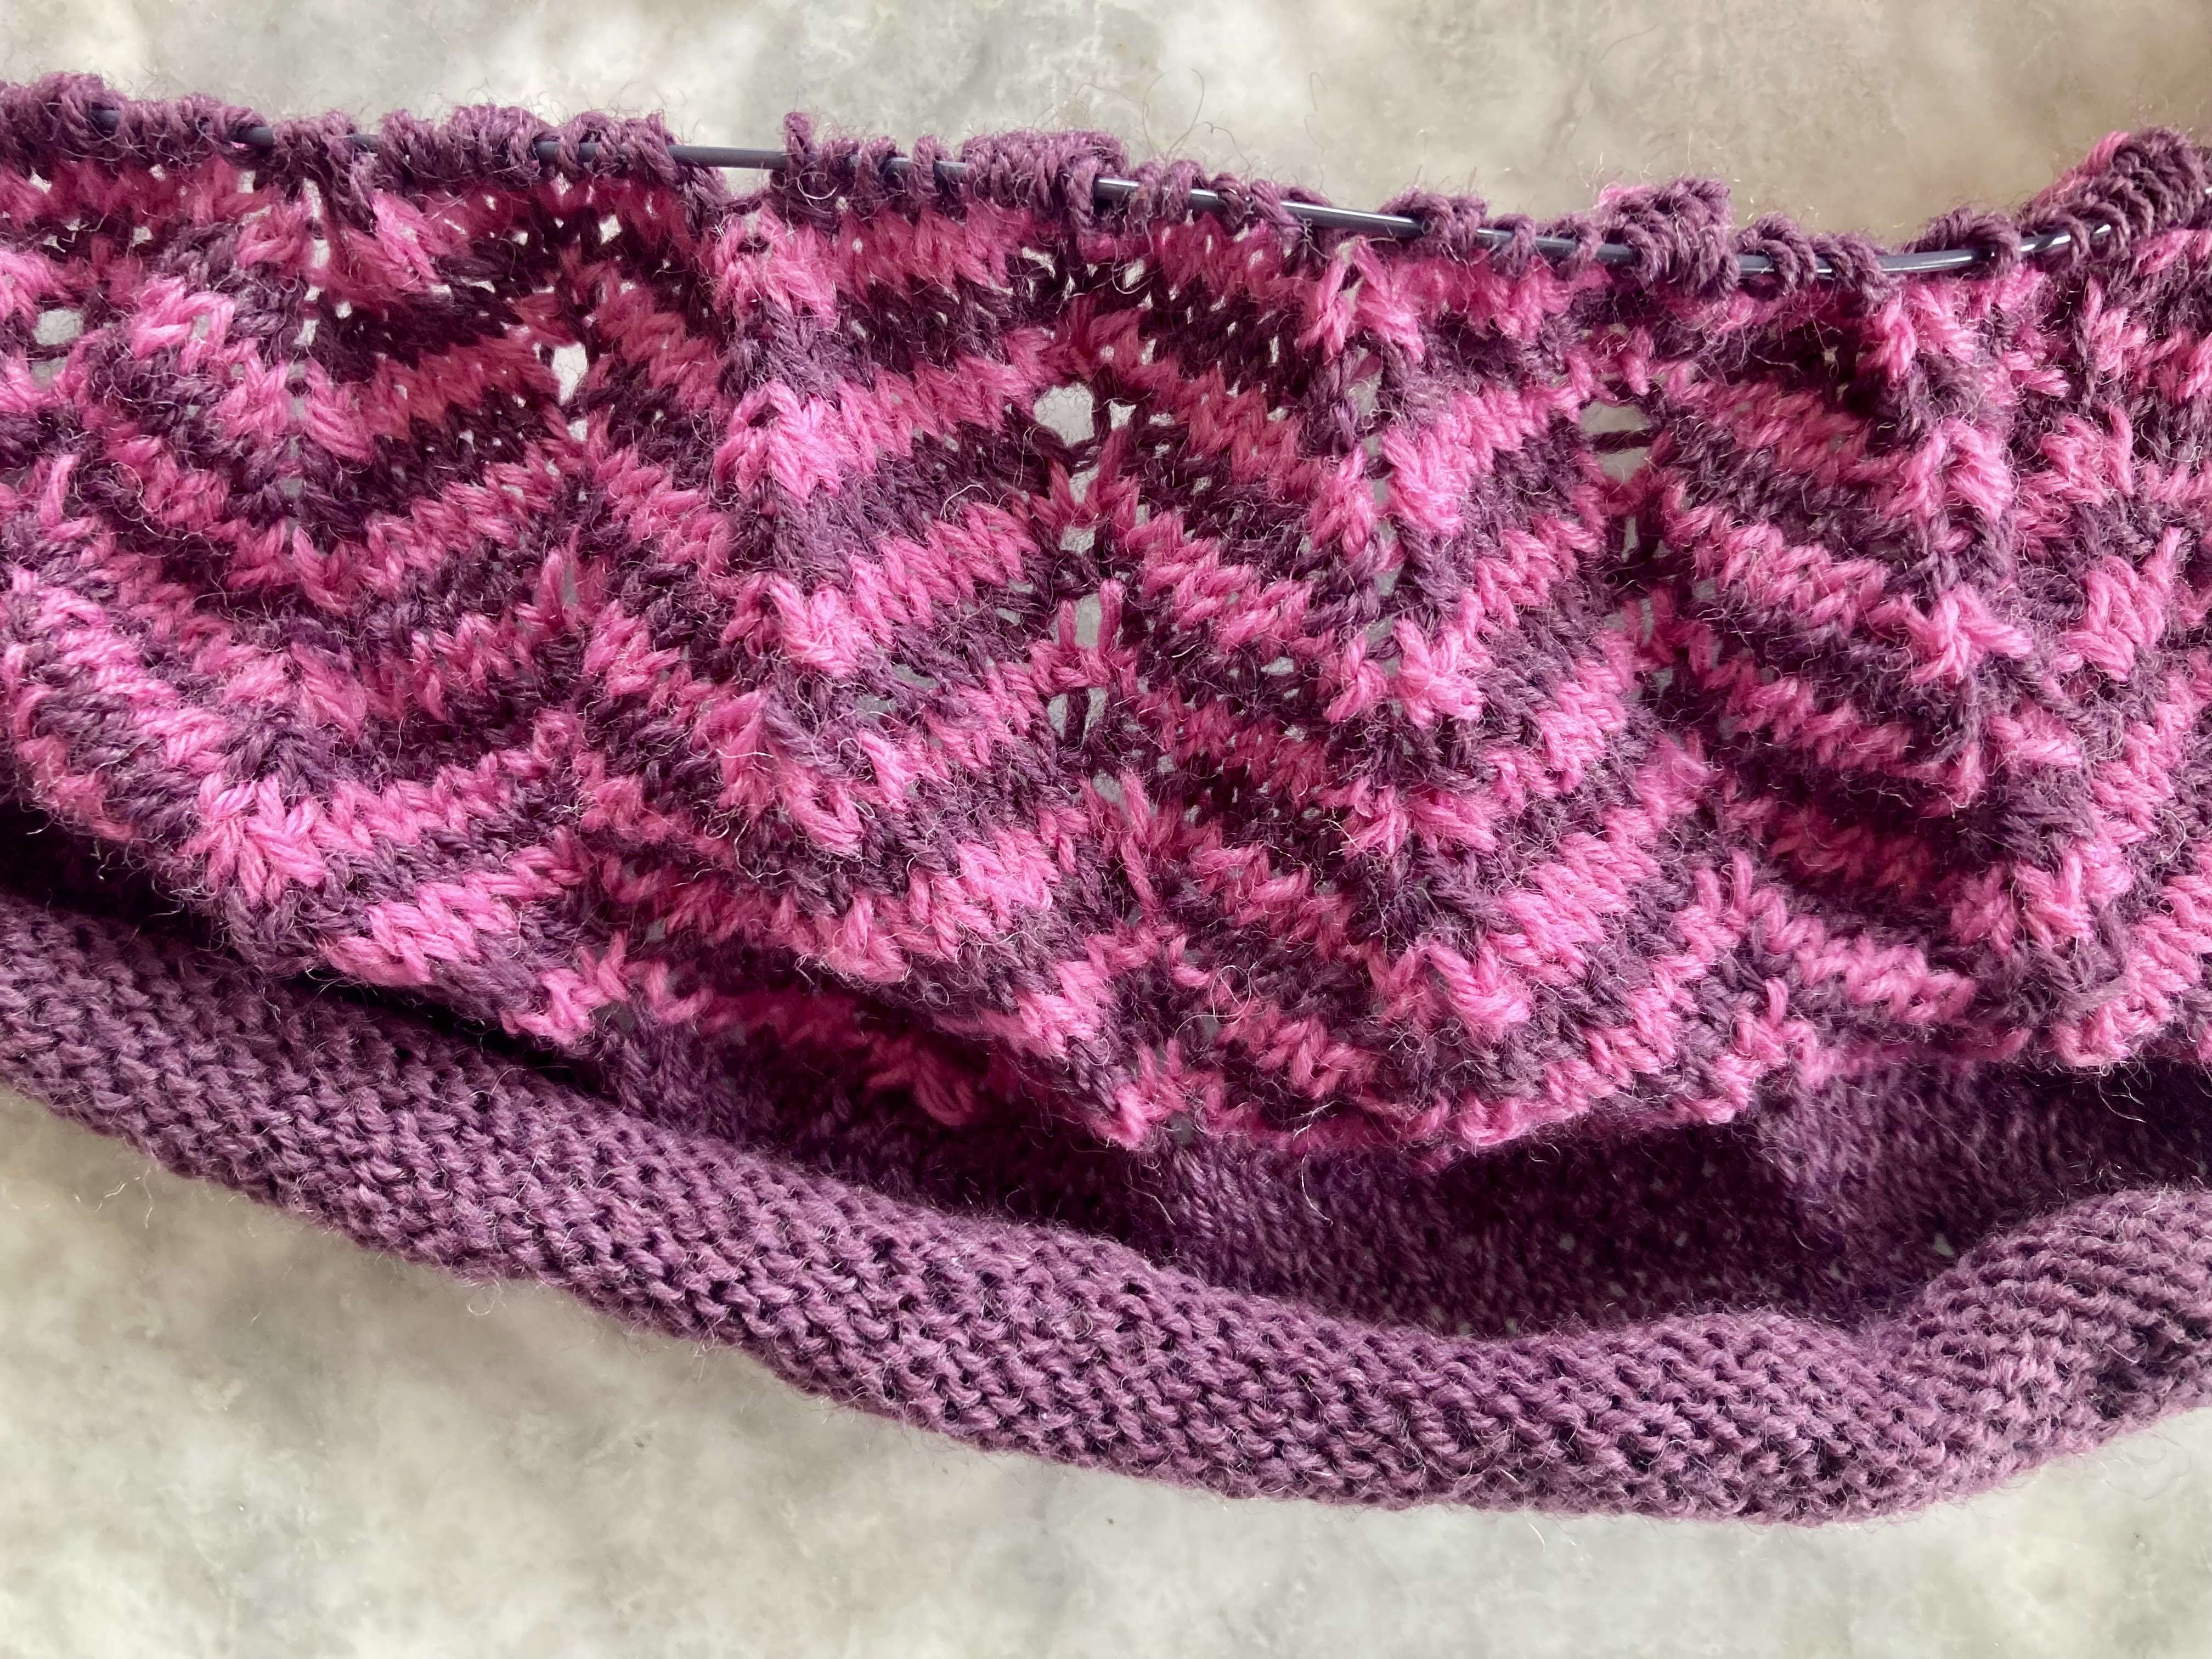
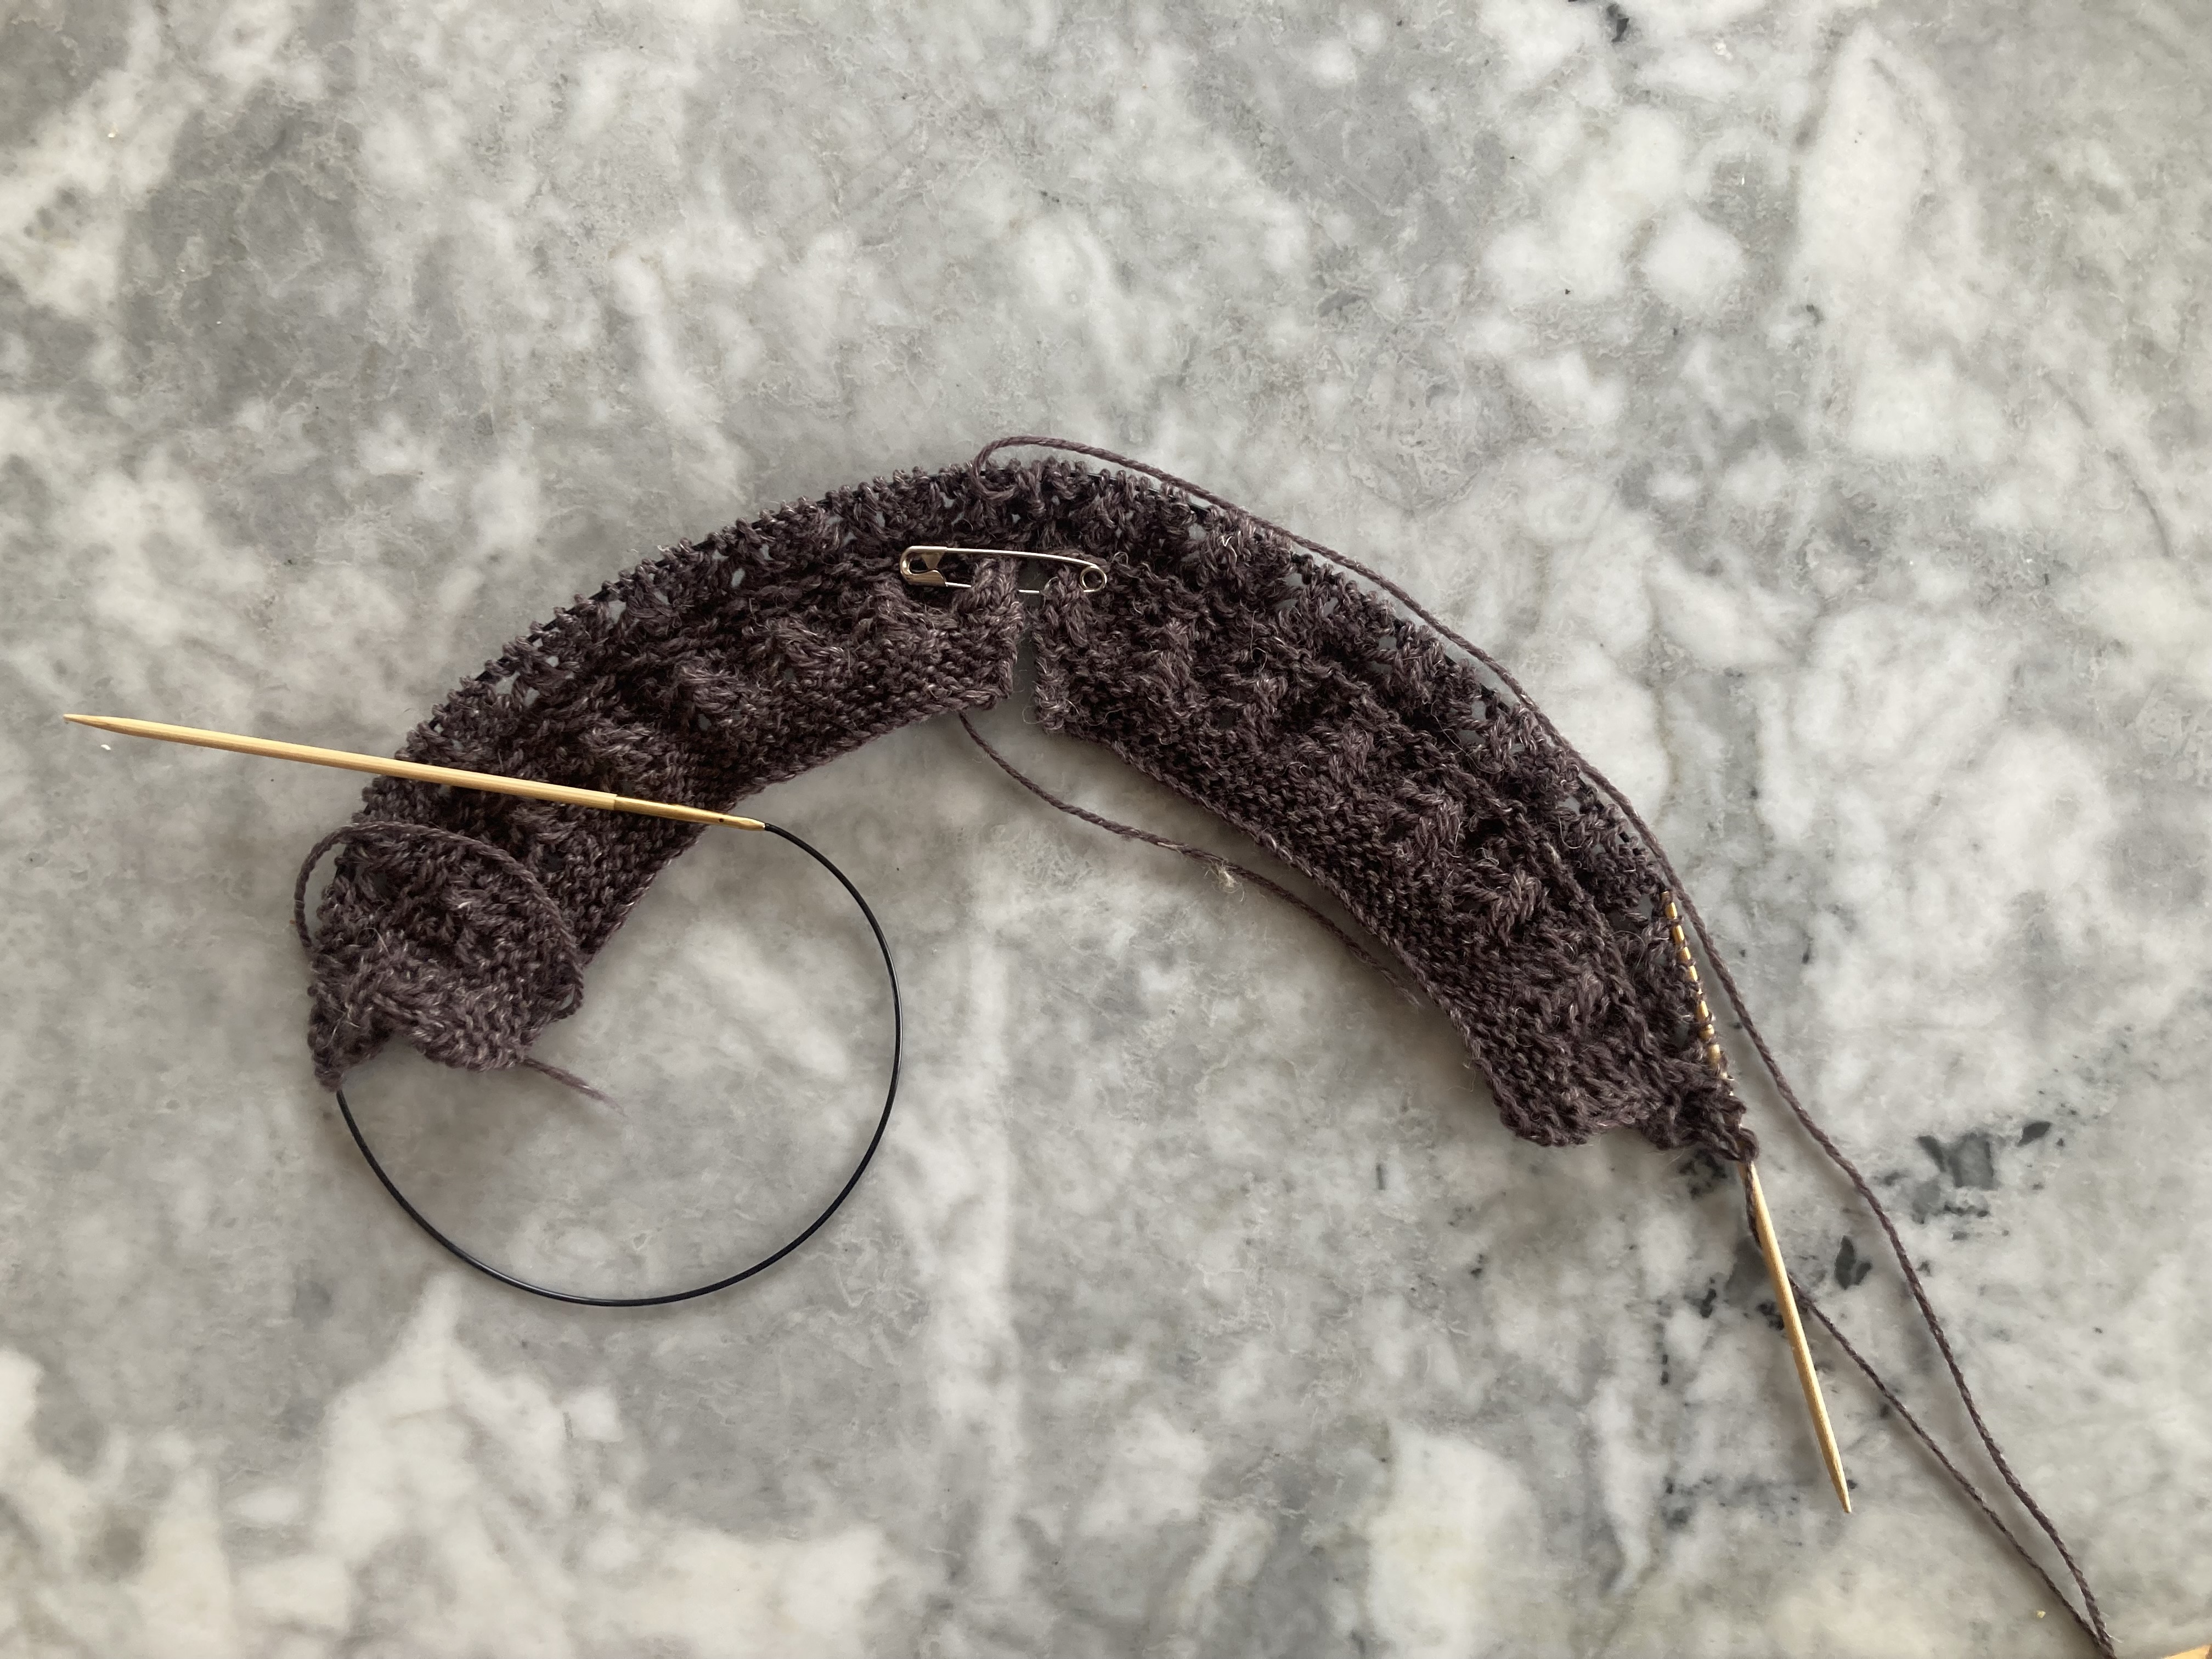
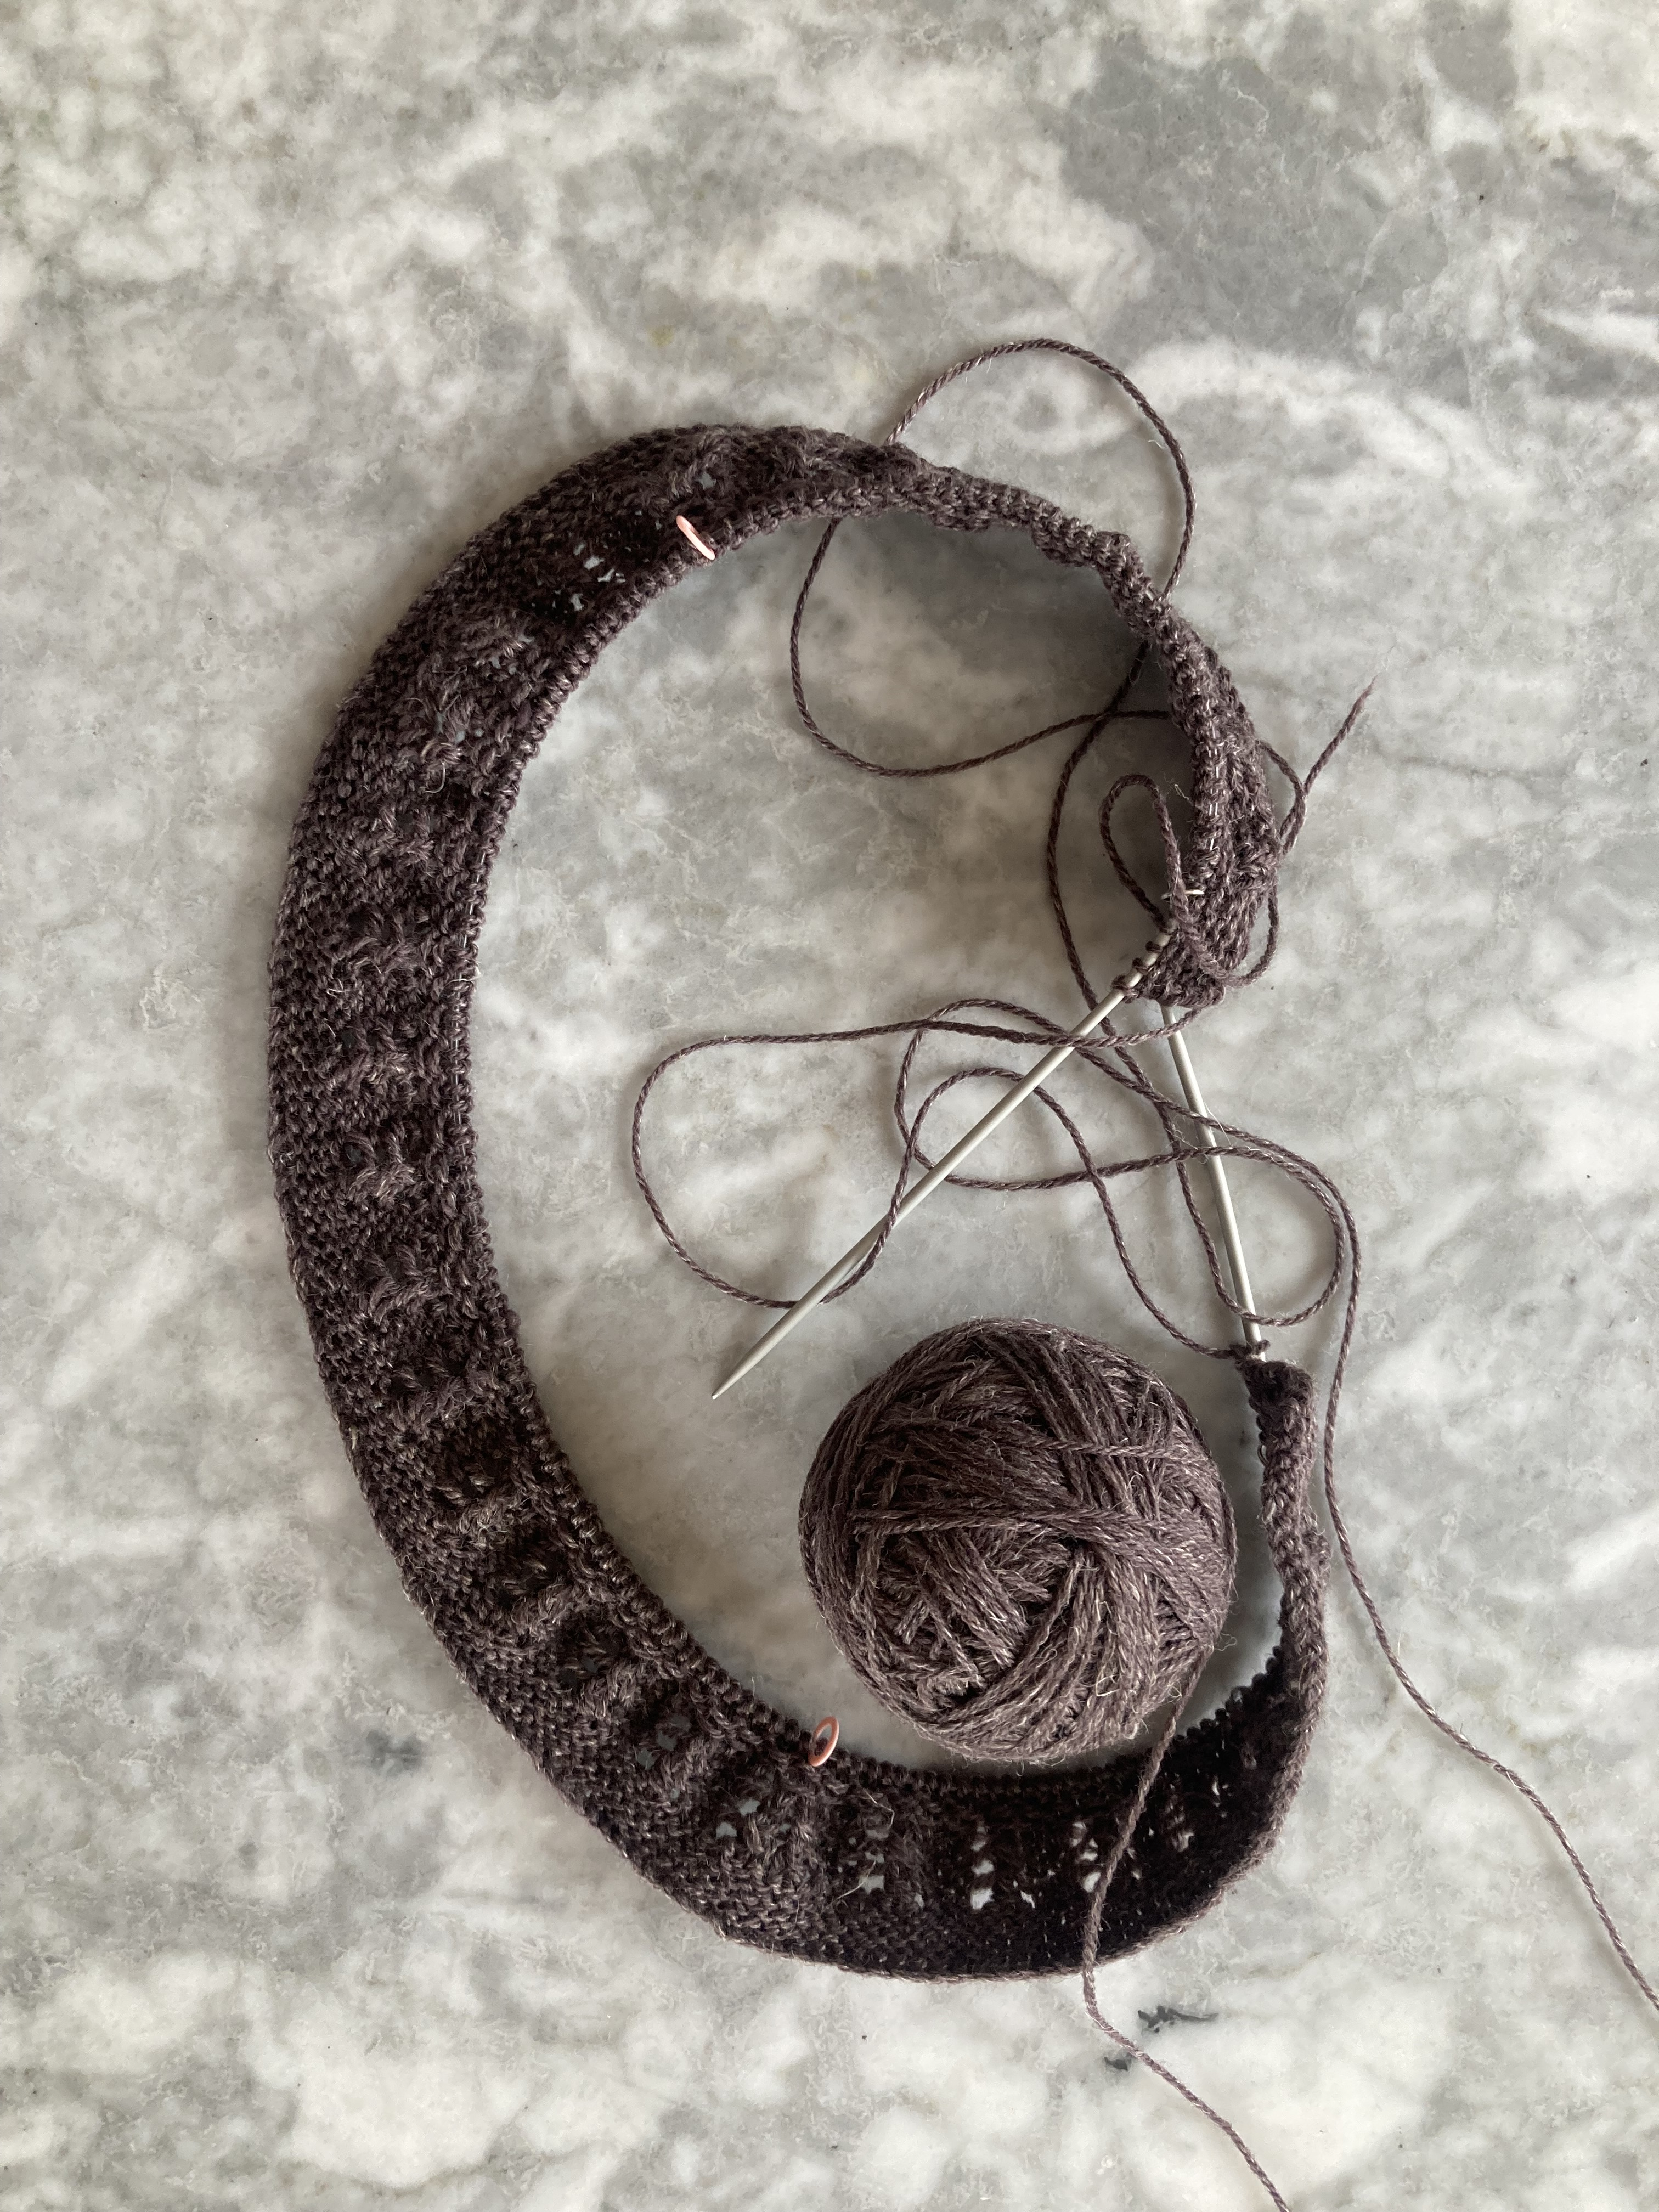
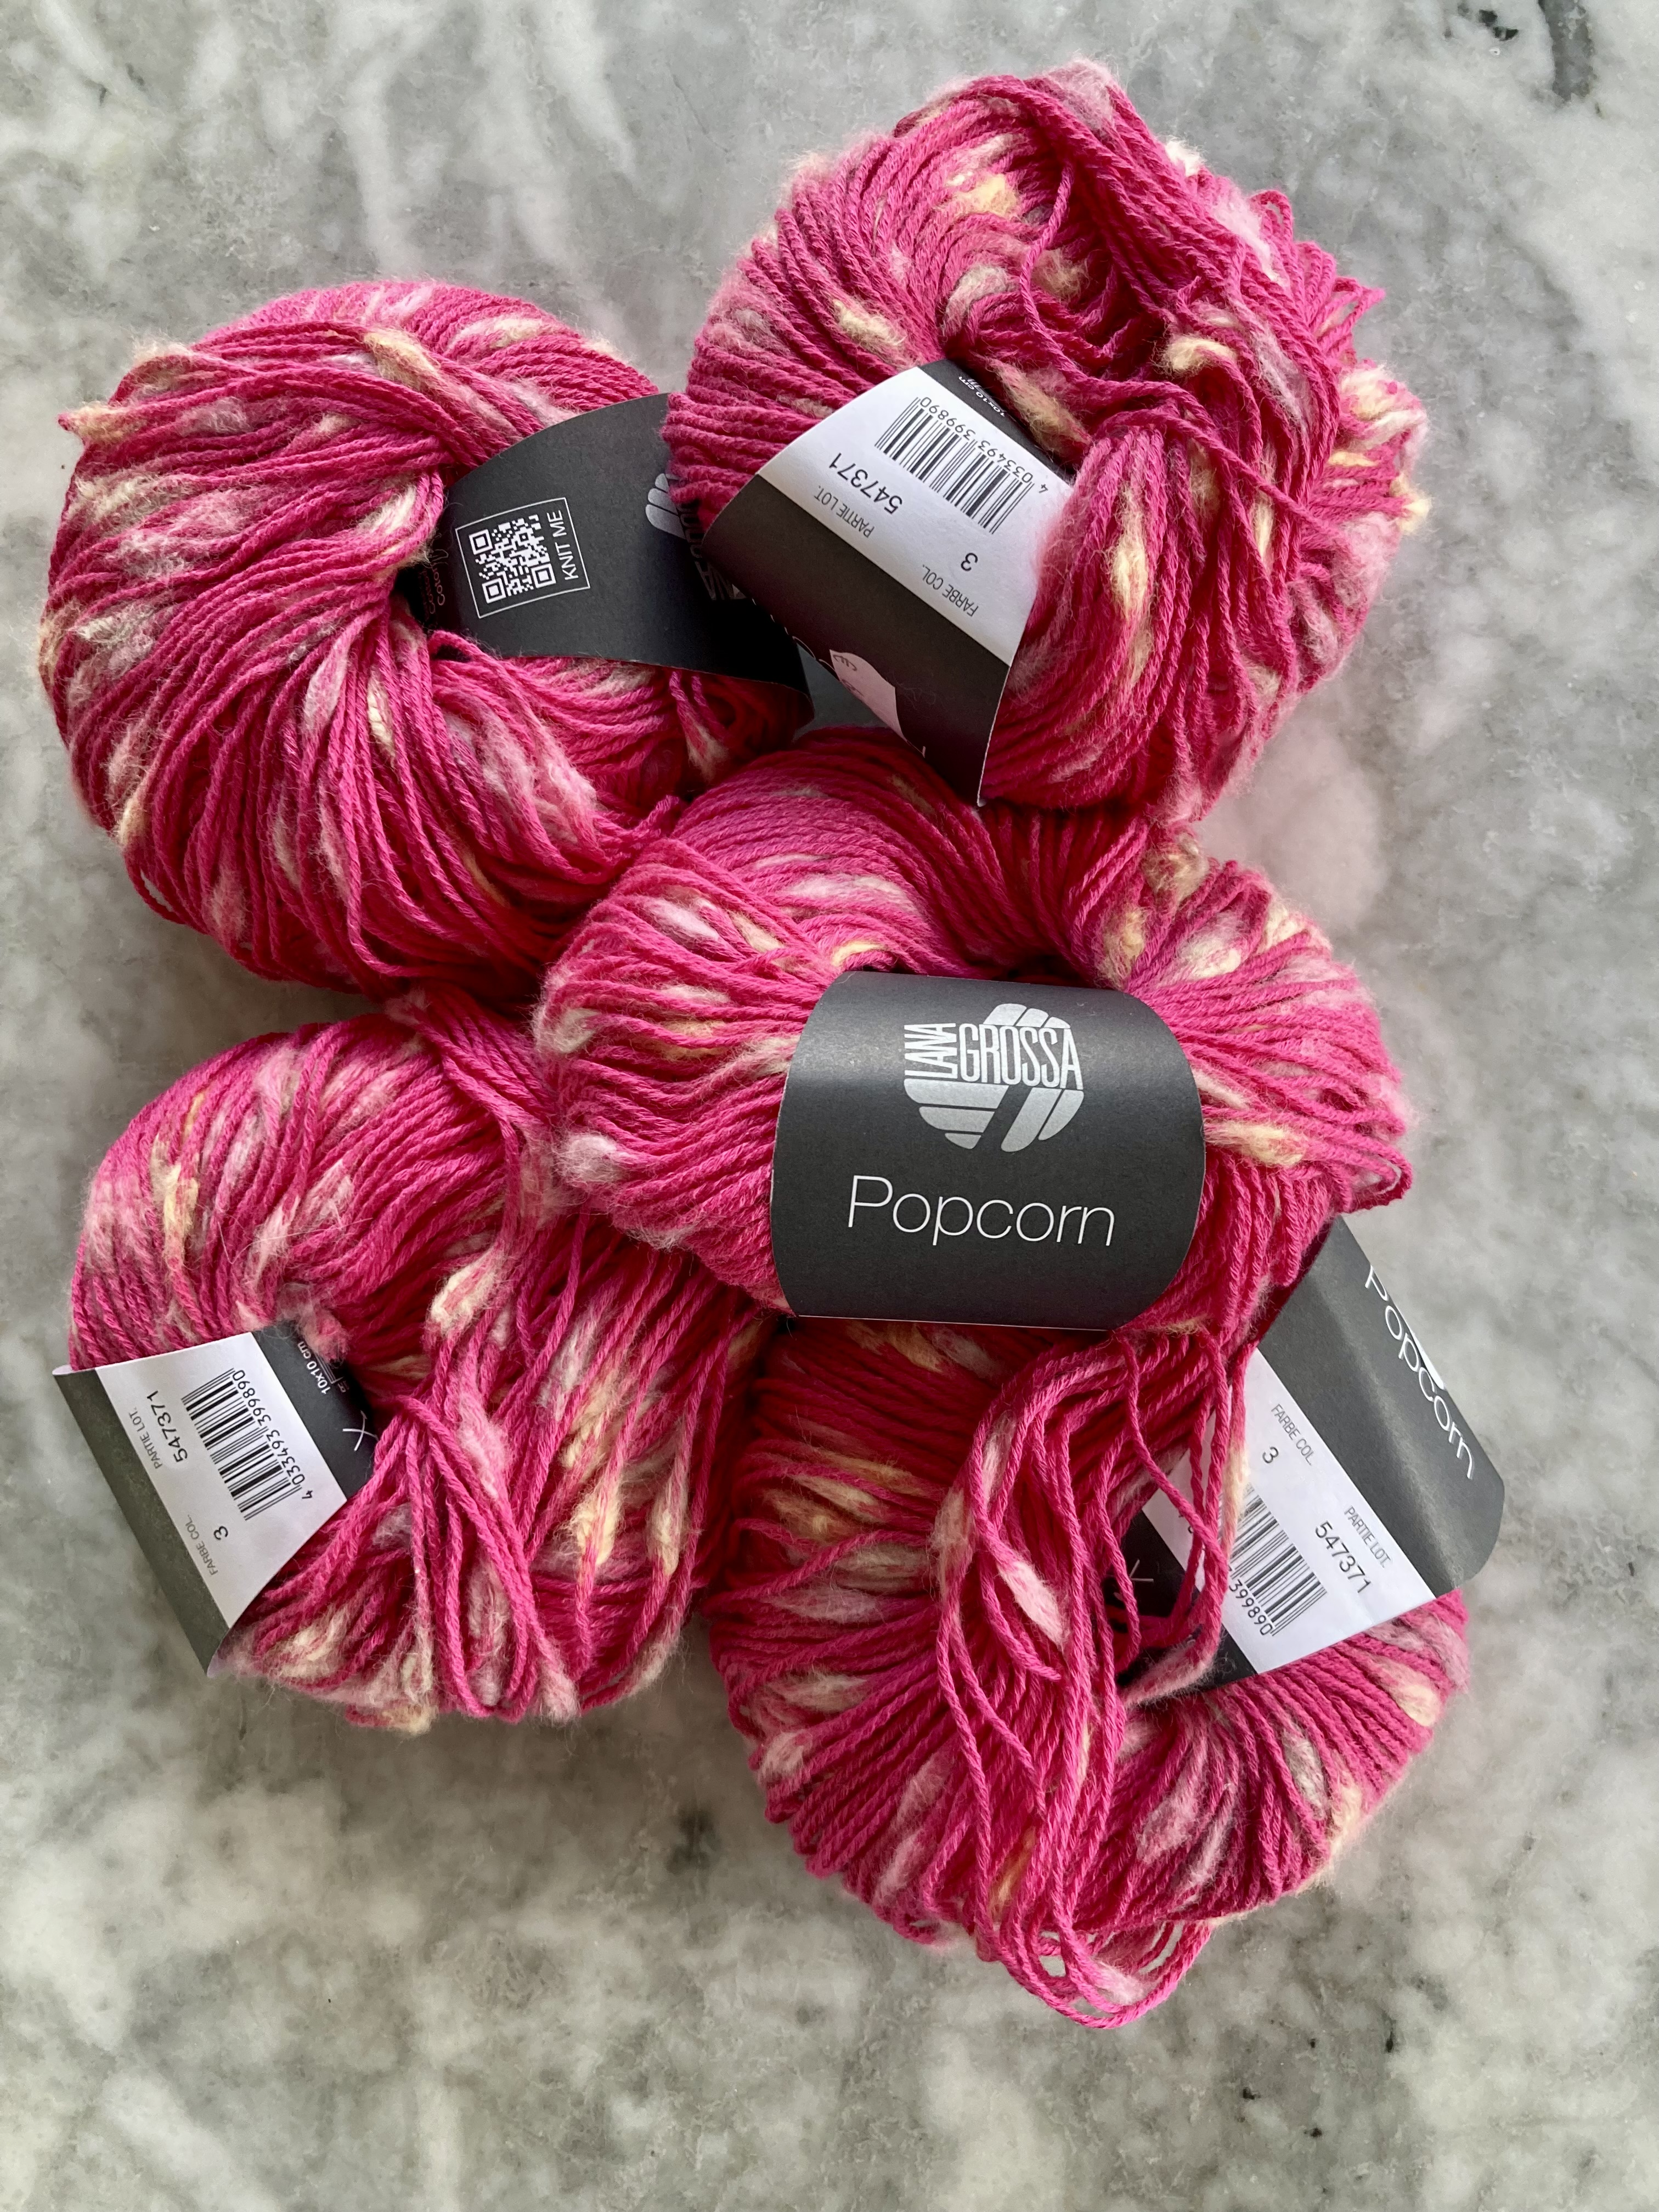
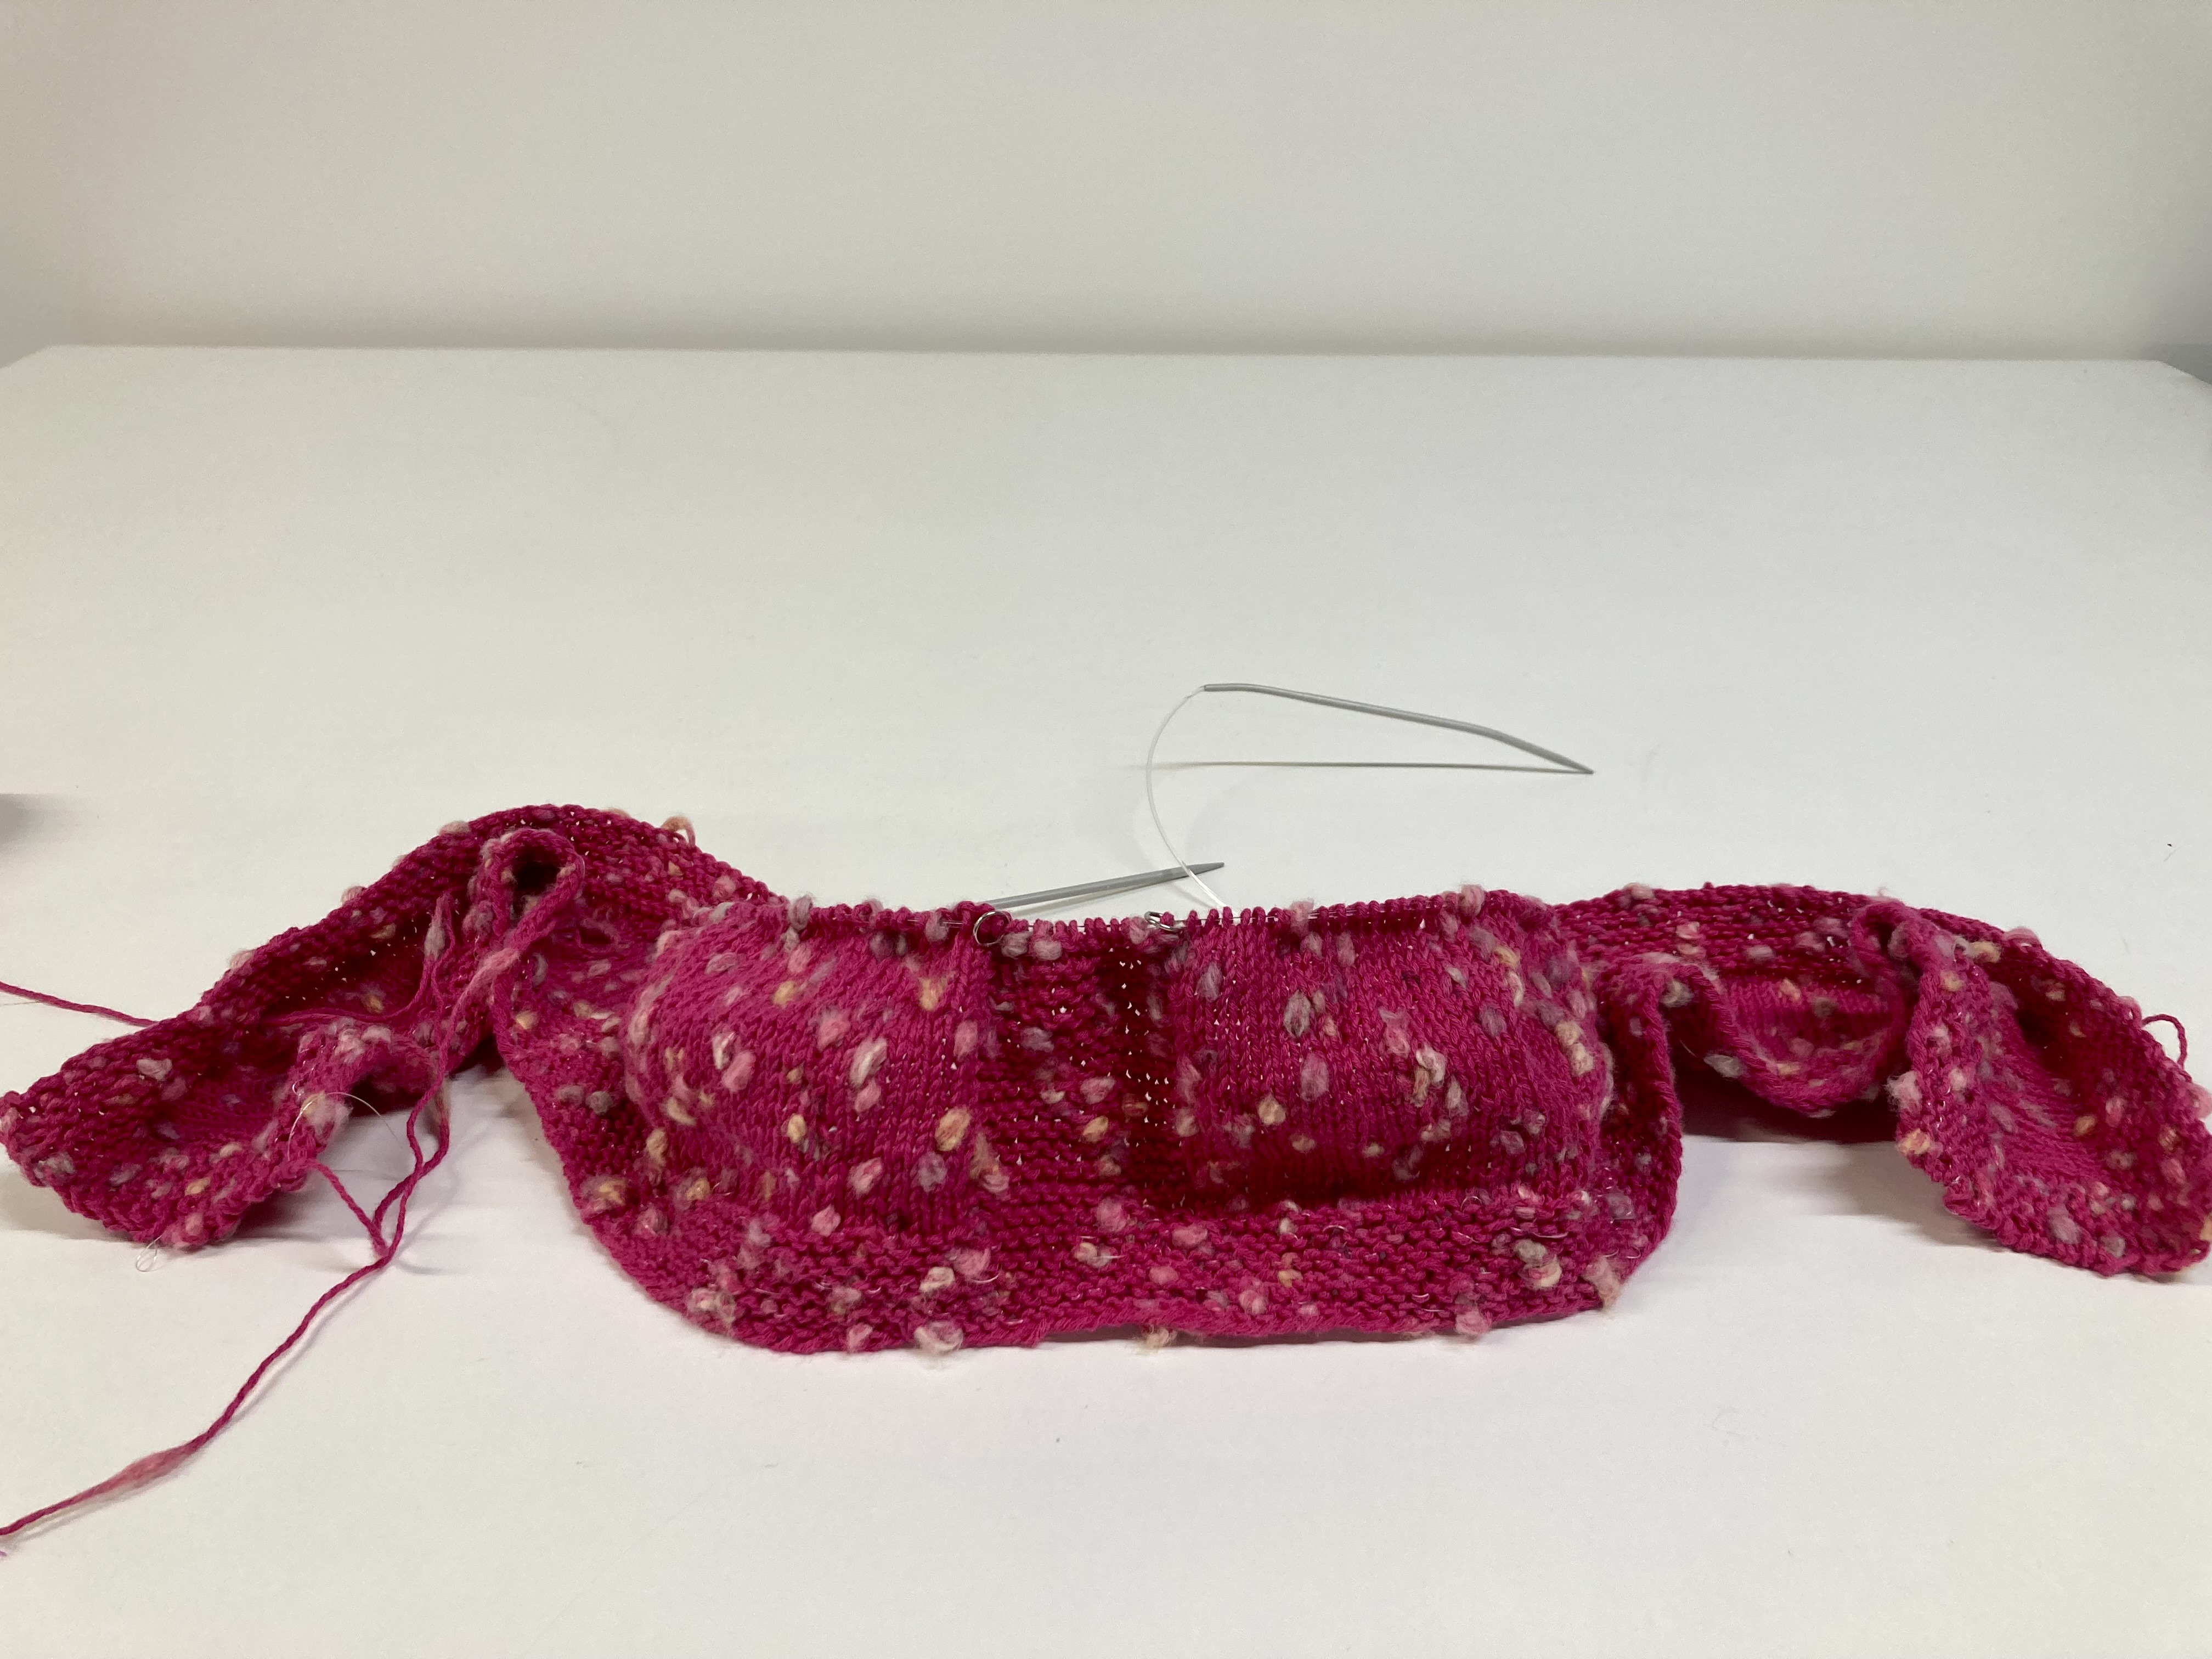
Finding the right yarn was a challenge. The original wool is Patons “Four Seasons”, a sport-weight mix of wool and synthetic fibres with a bobbly, “popcorn” texture, in “Surf Blue” colour. I found exactly one brand of yarn with the right weight and look and it is perfect — Popcorn by Lana Grossa — but it is also 100% cotton, so possibly even less appropriate for swimming than the original. It’s also probably a bit heavier, which was OK with me if it gives a thicker and less see-through fabric. It was also available in bright pink! If I am going to knit myself a bikini from 1968, I want it to be as bright and fun as possible, so that was perfect.

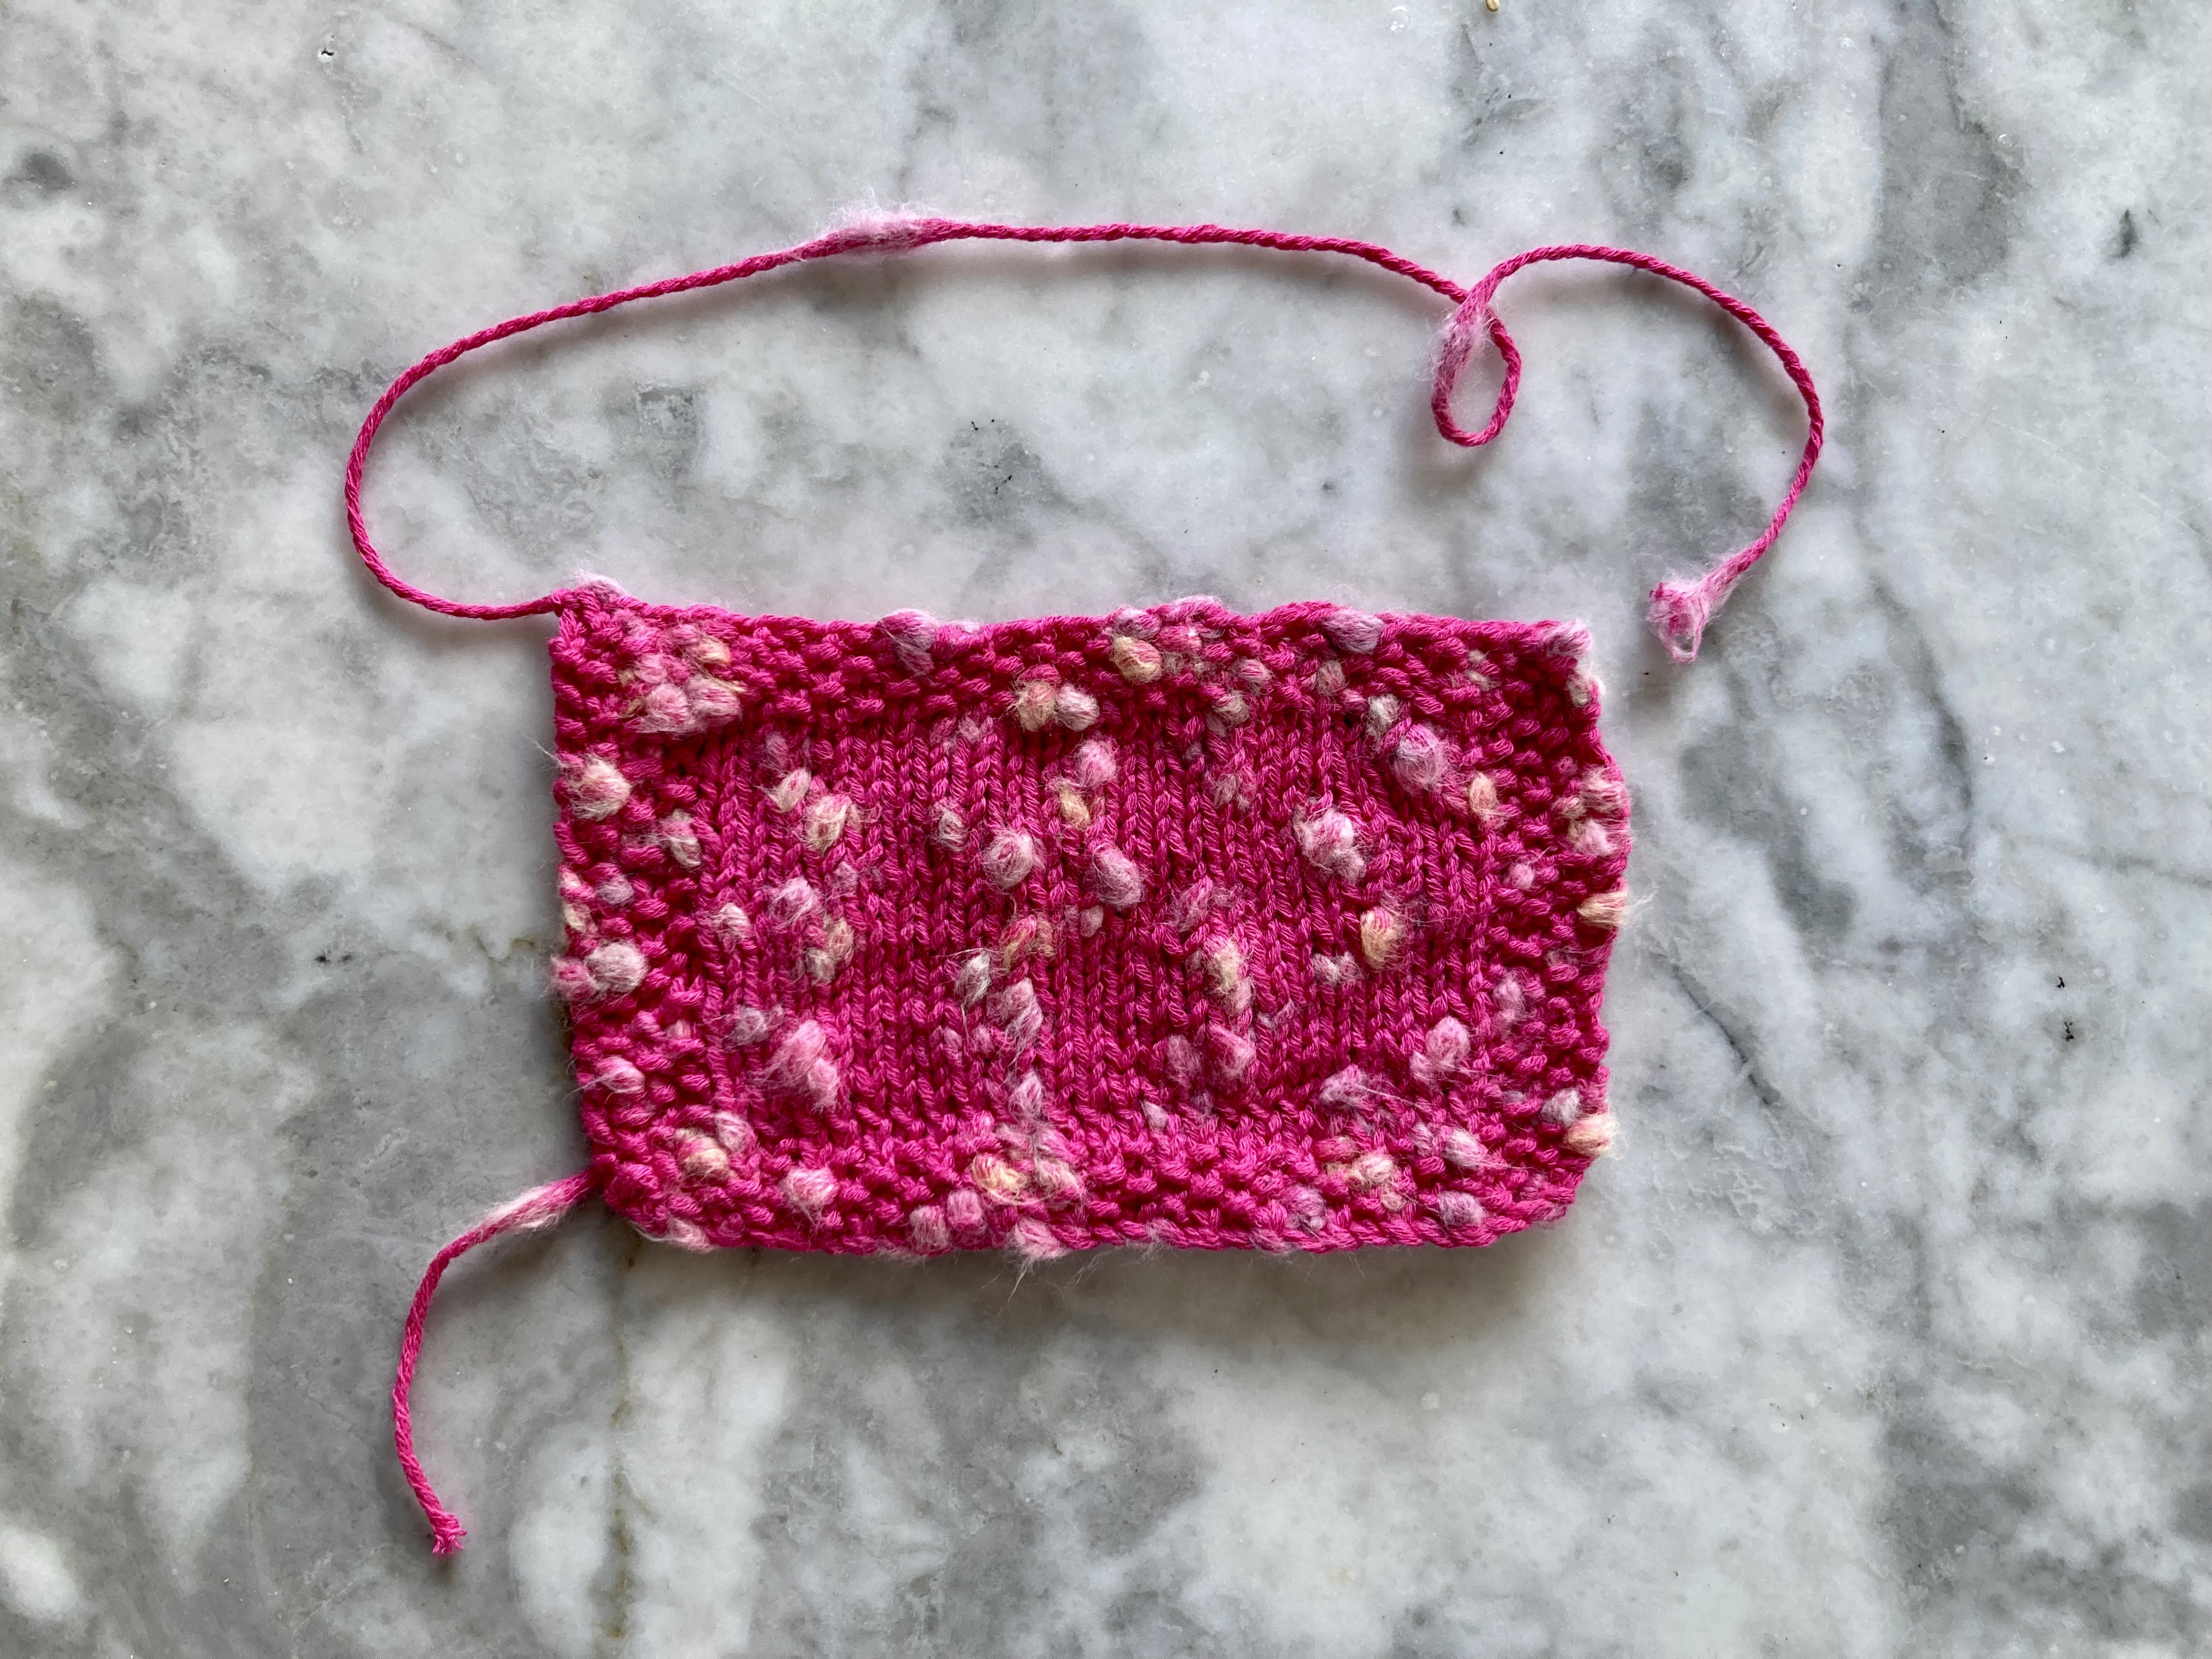
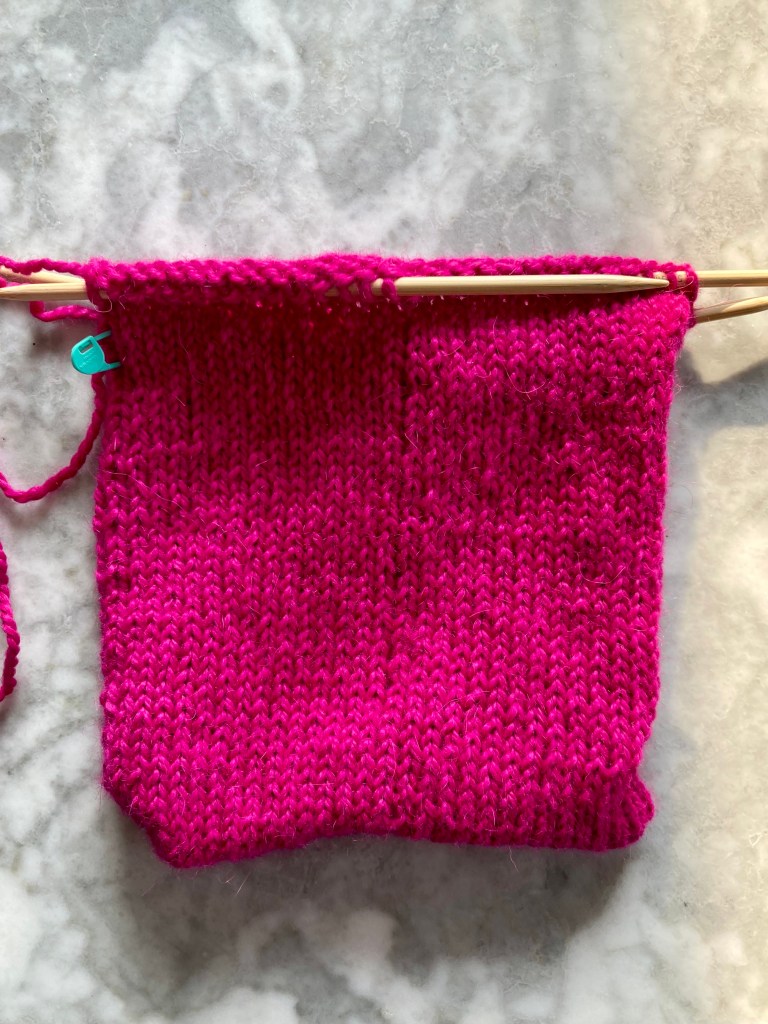
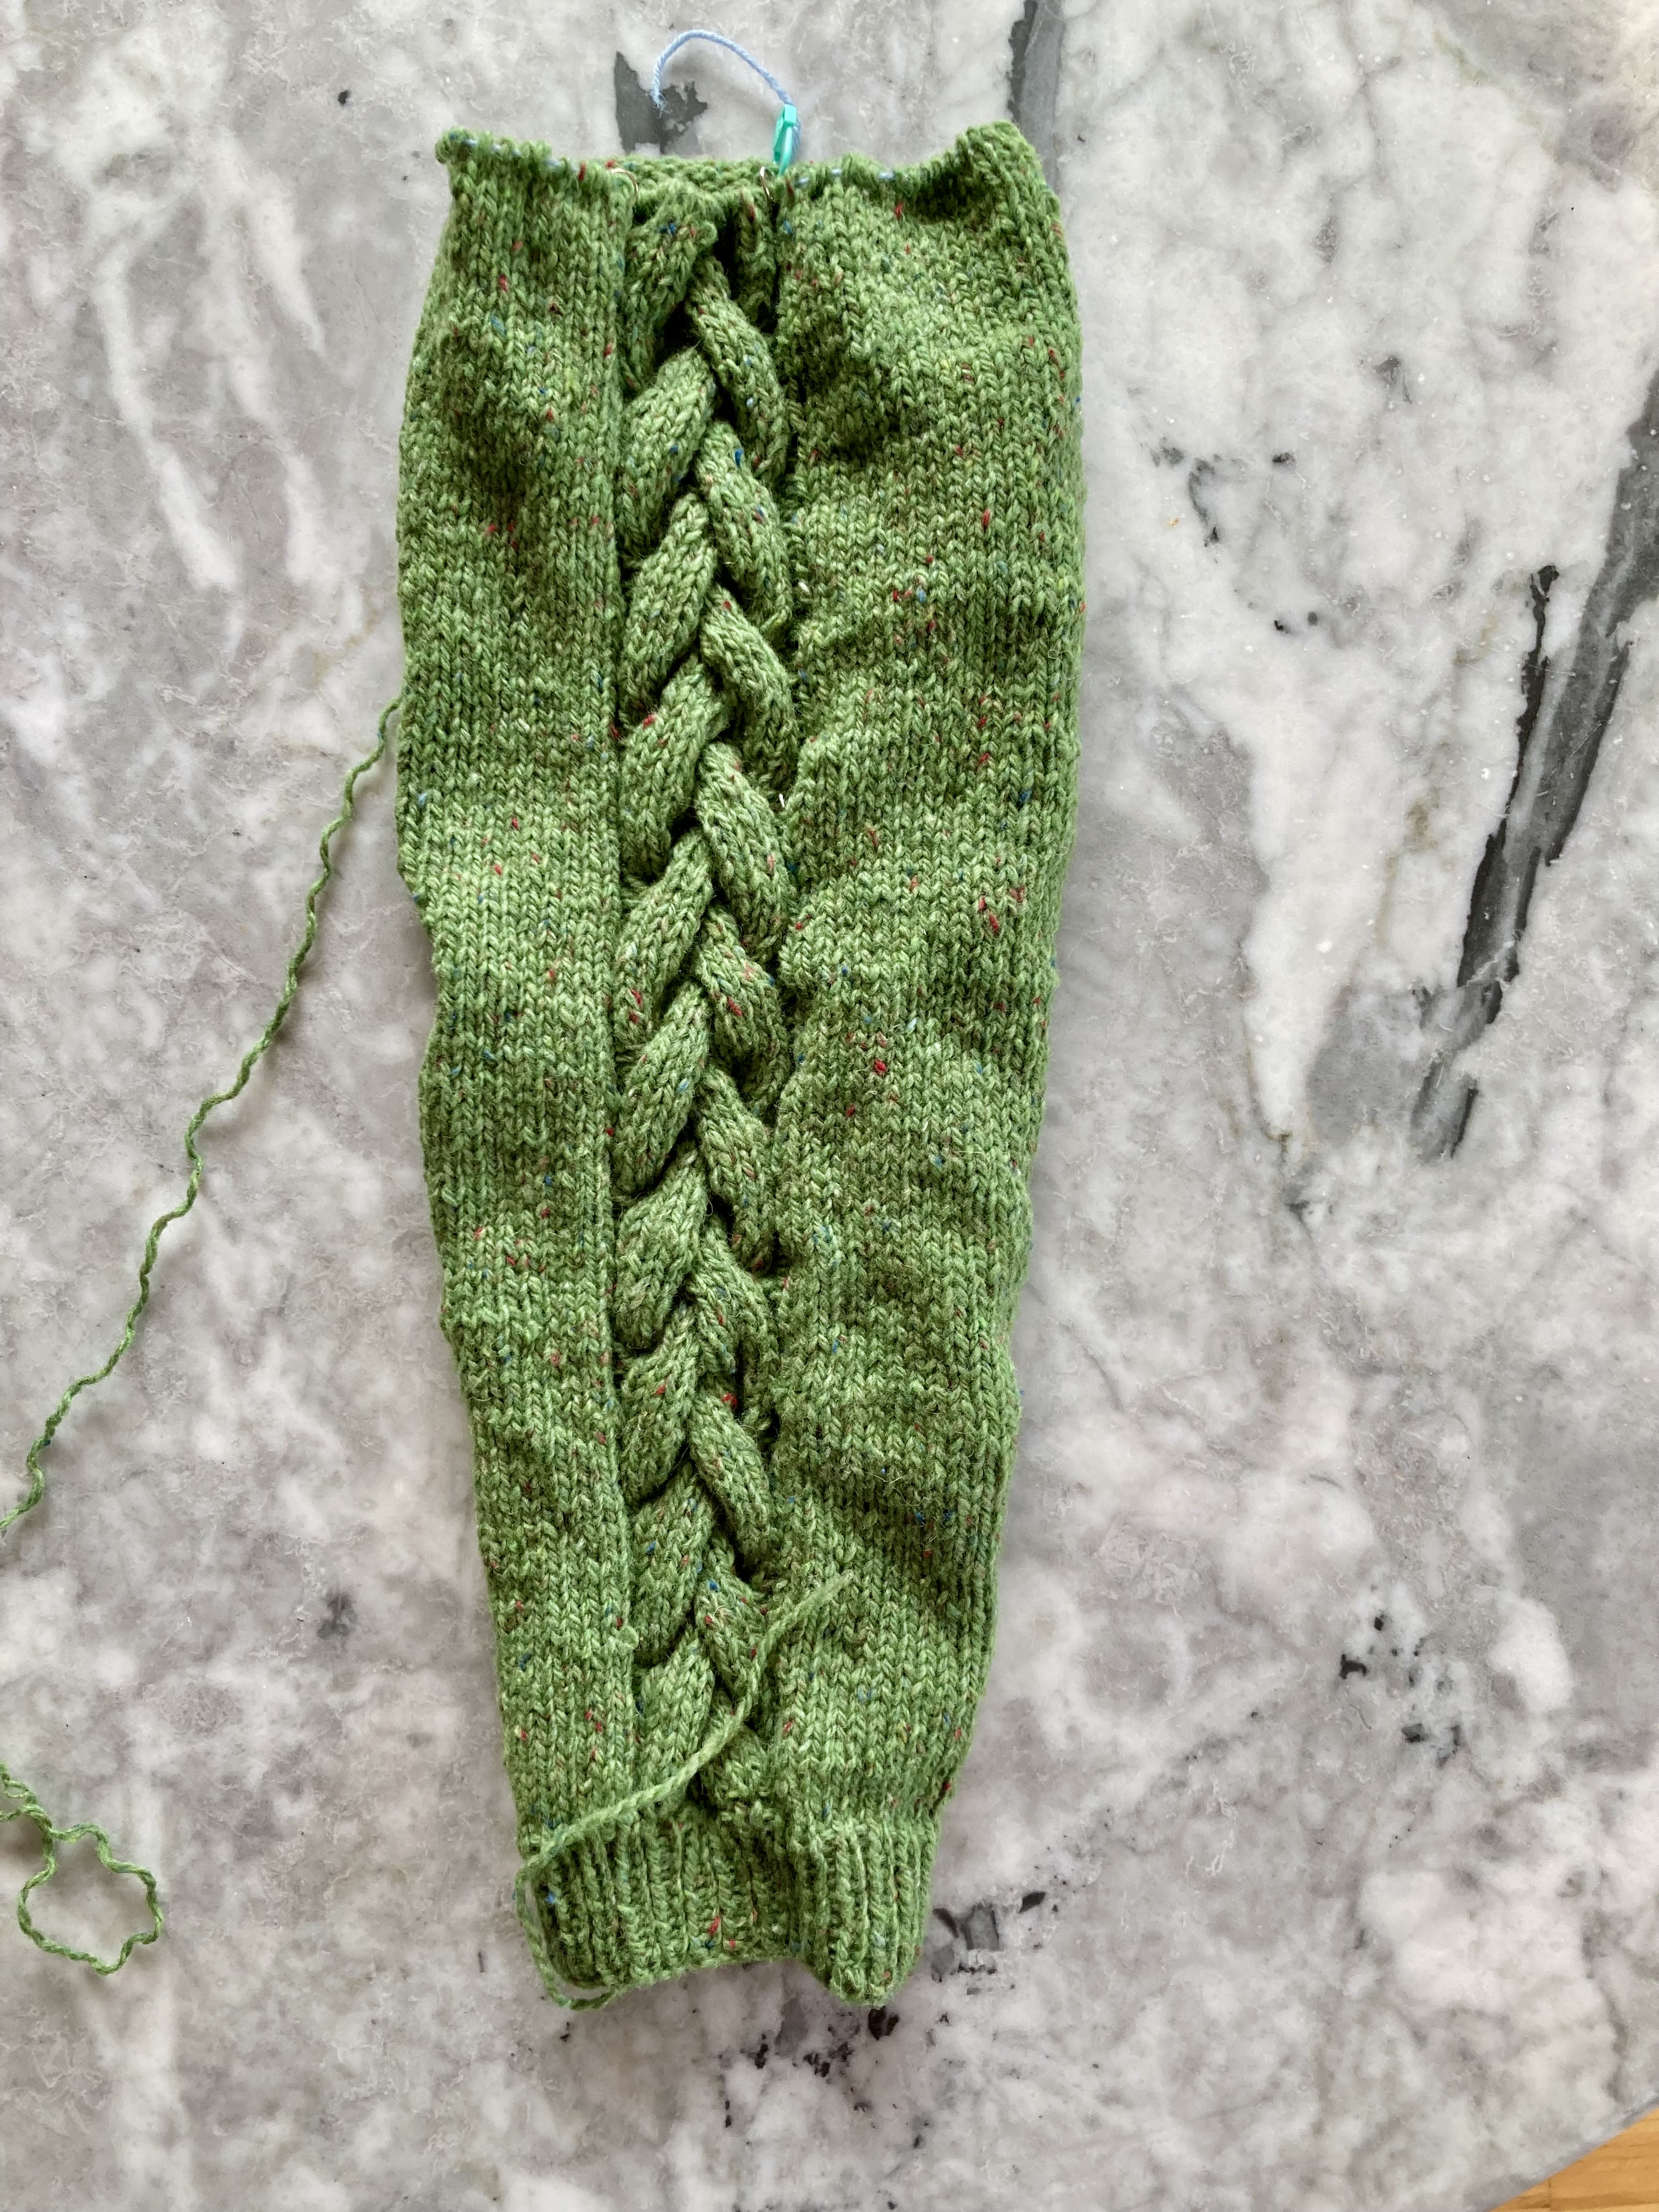
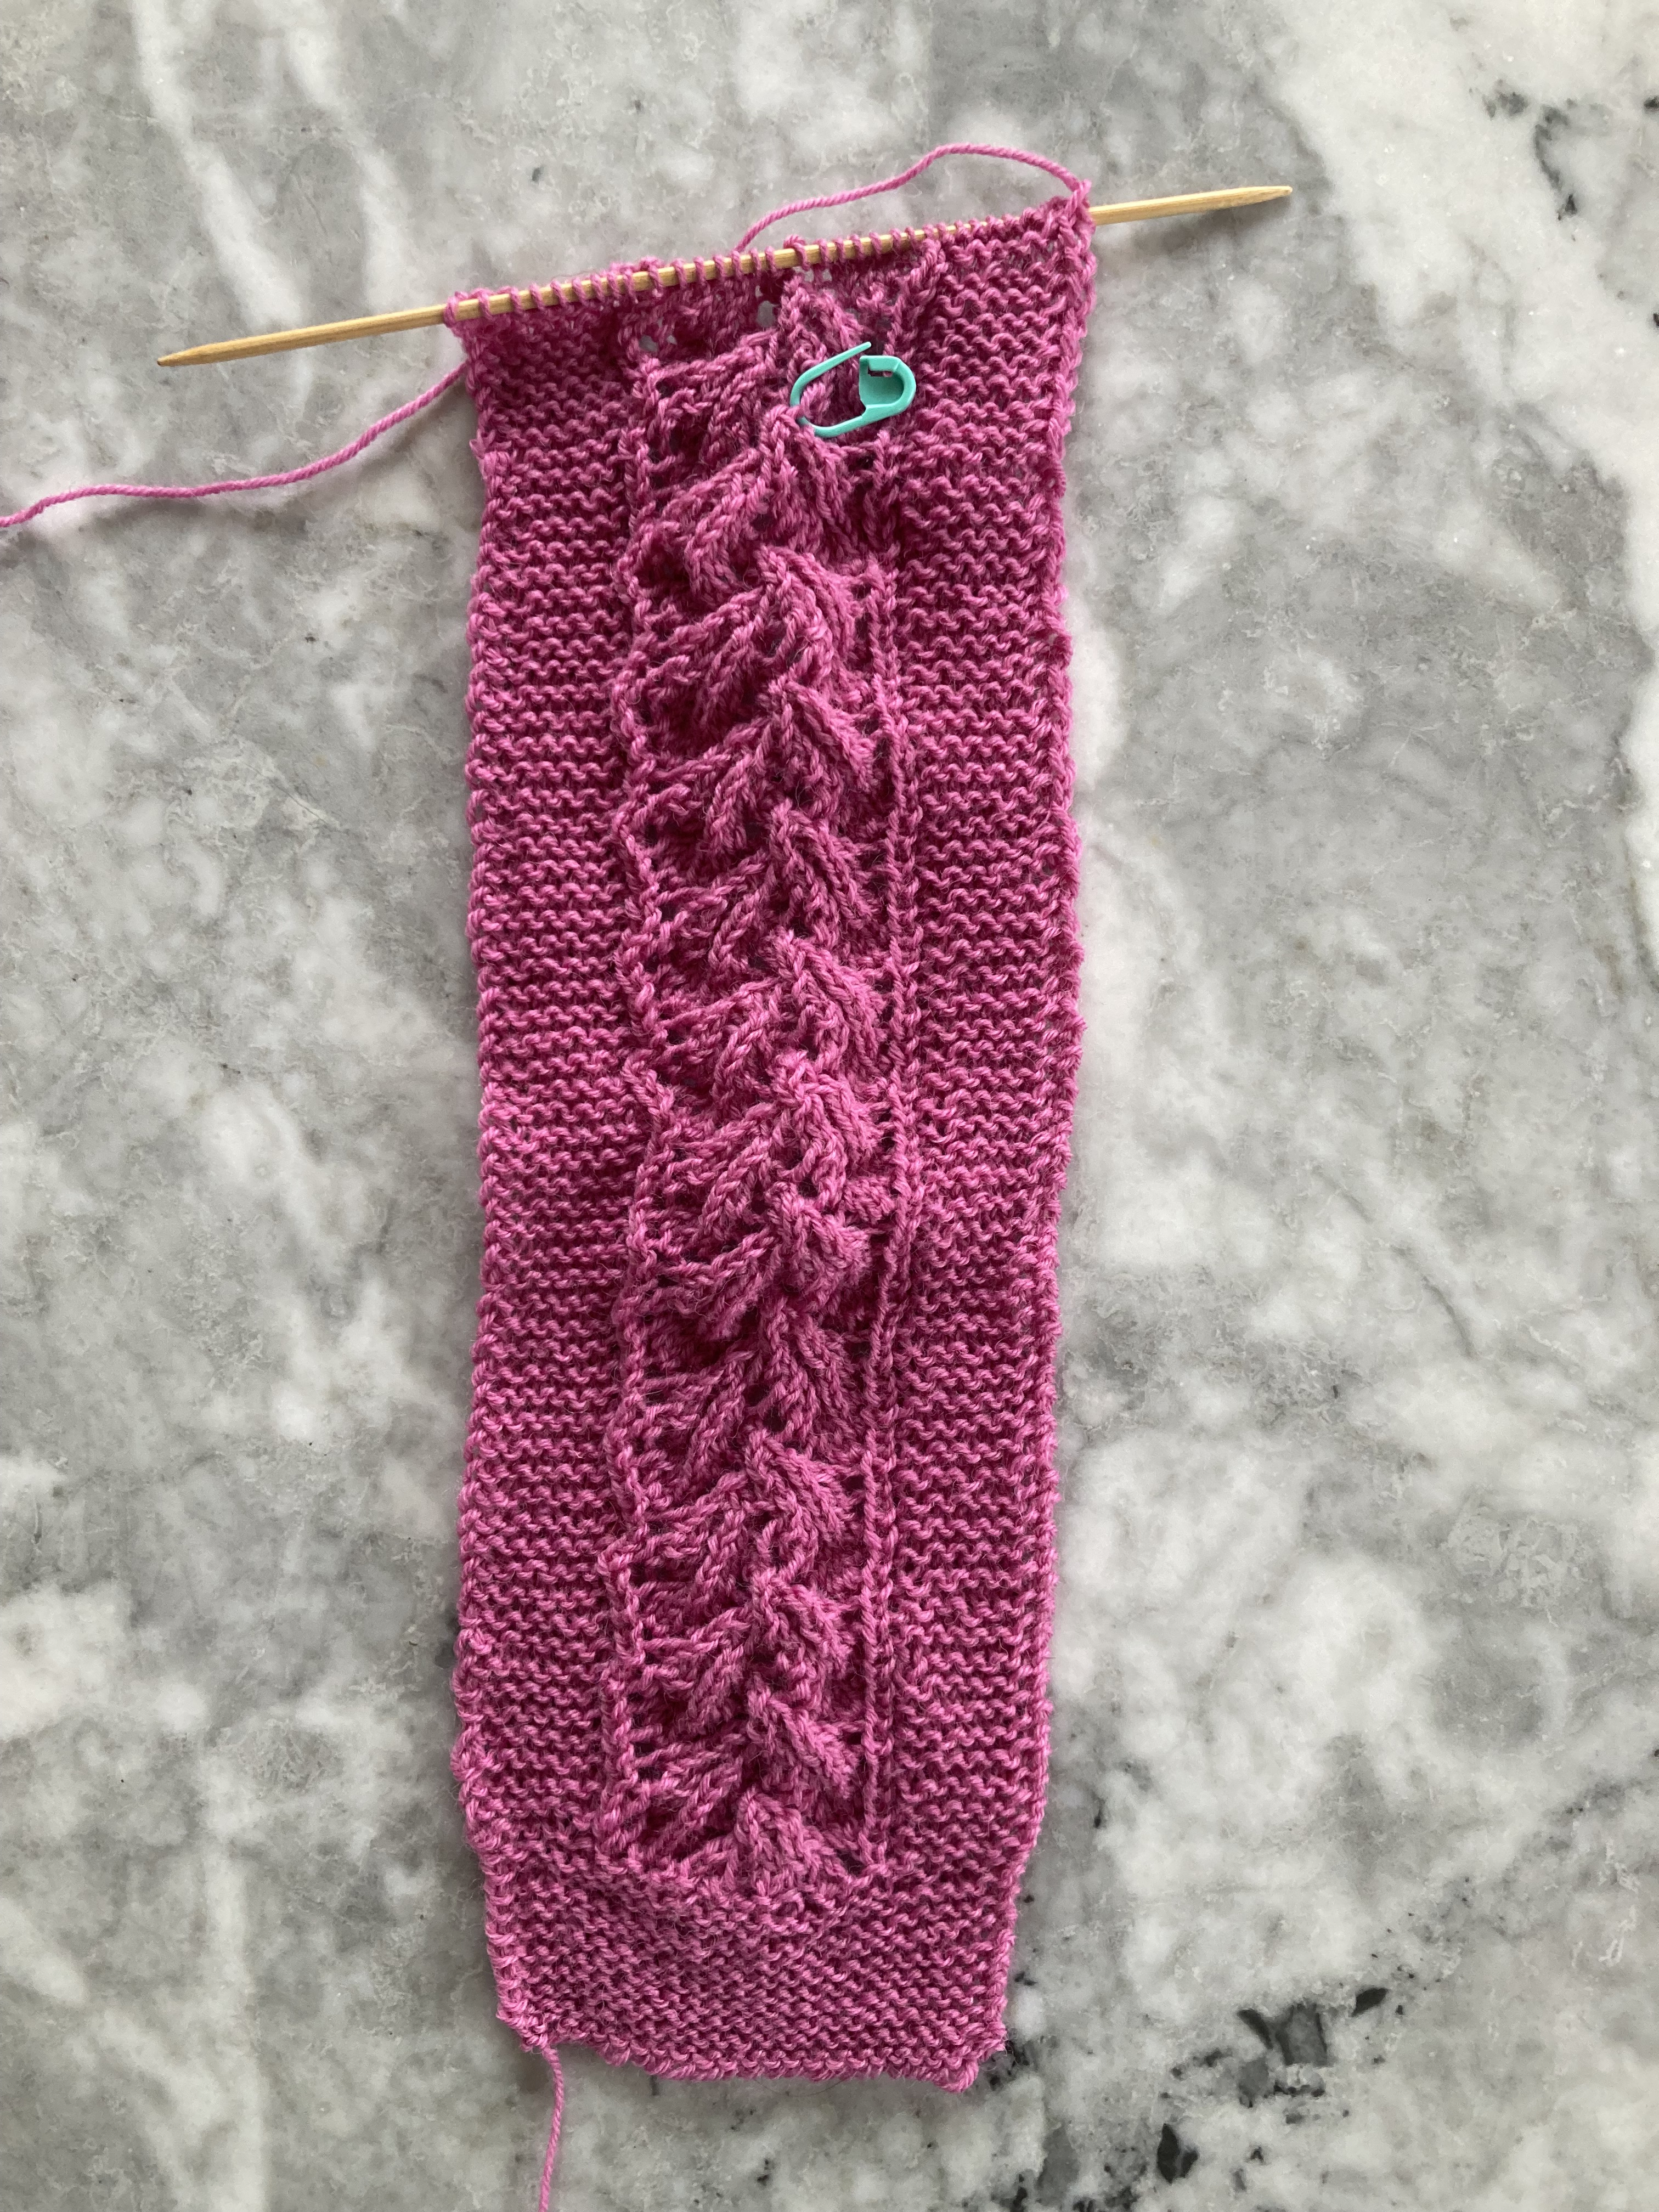
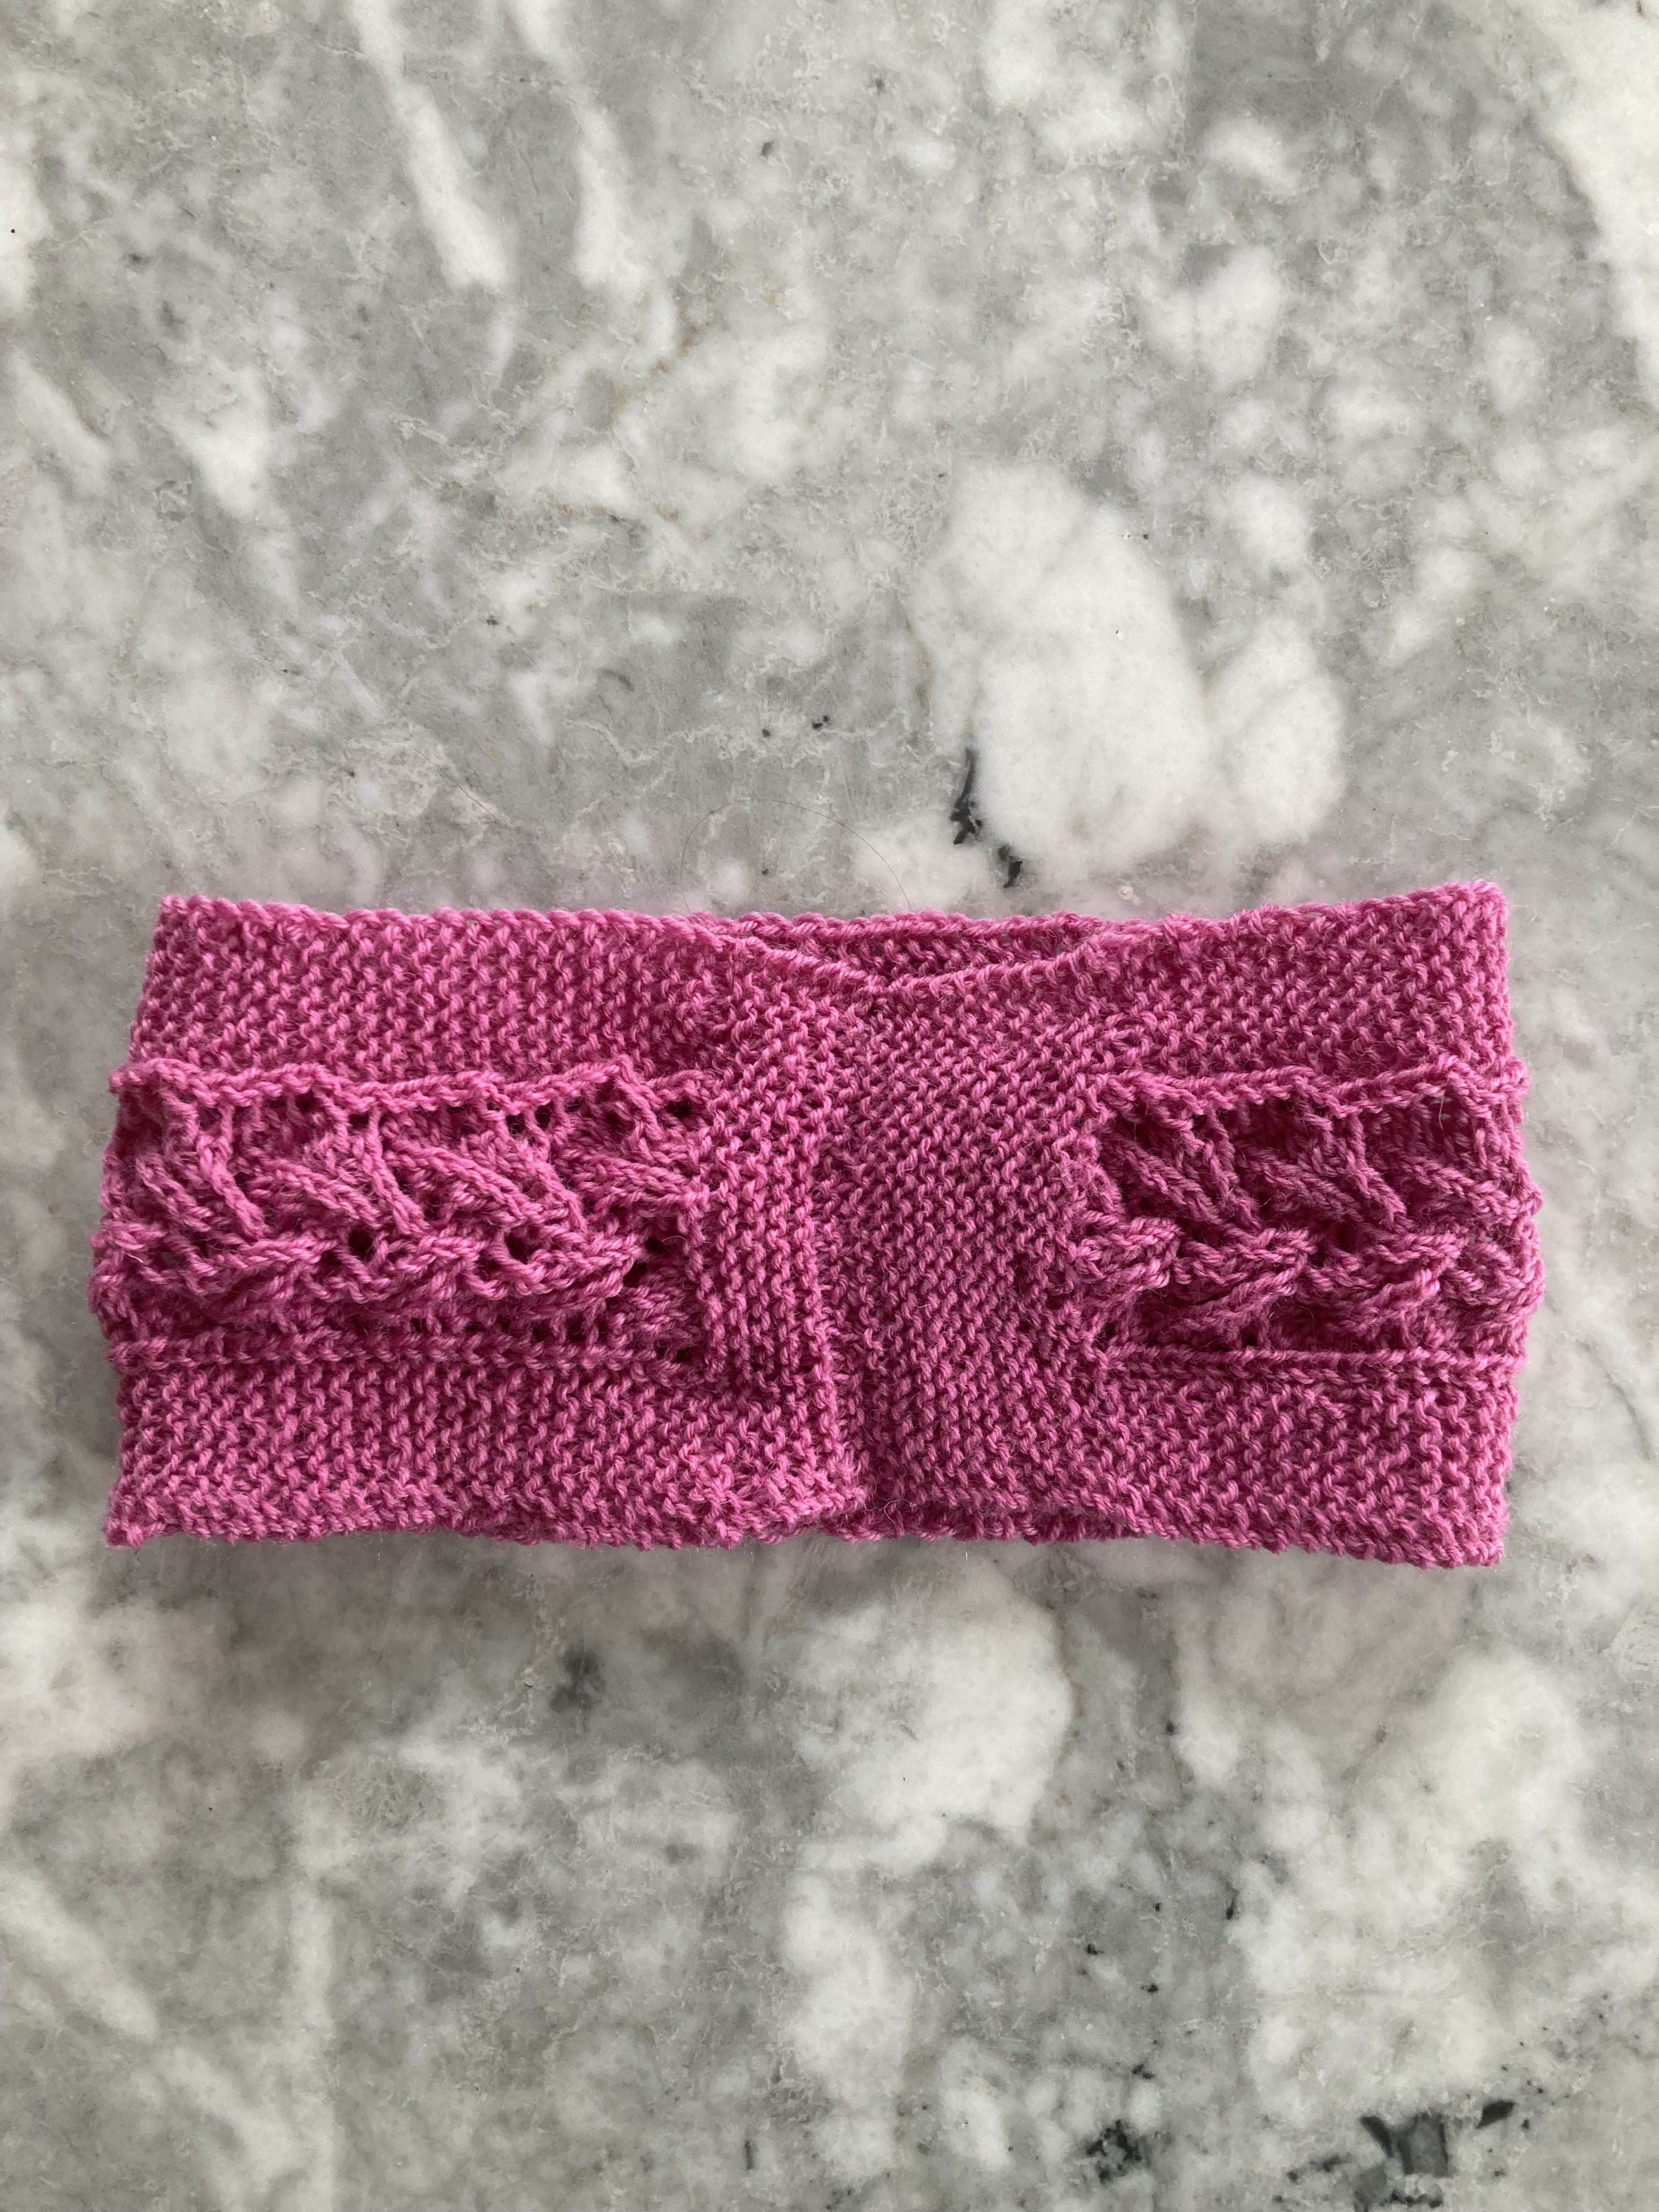
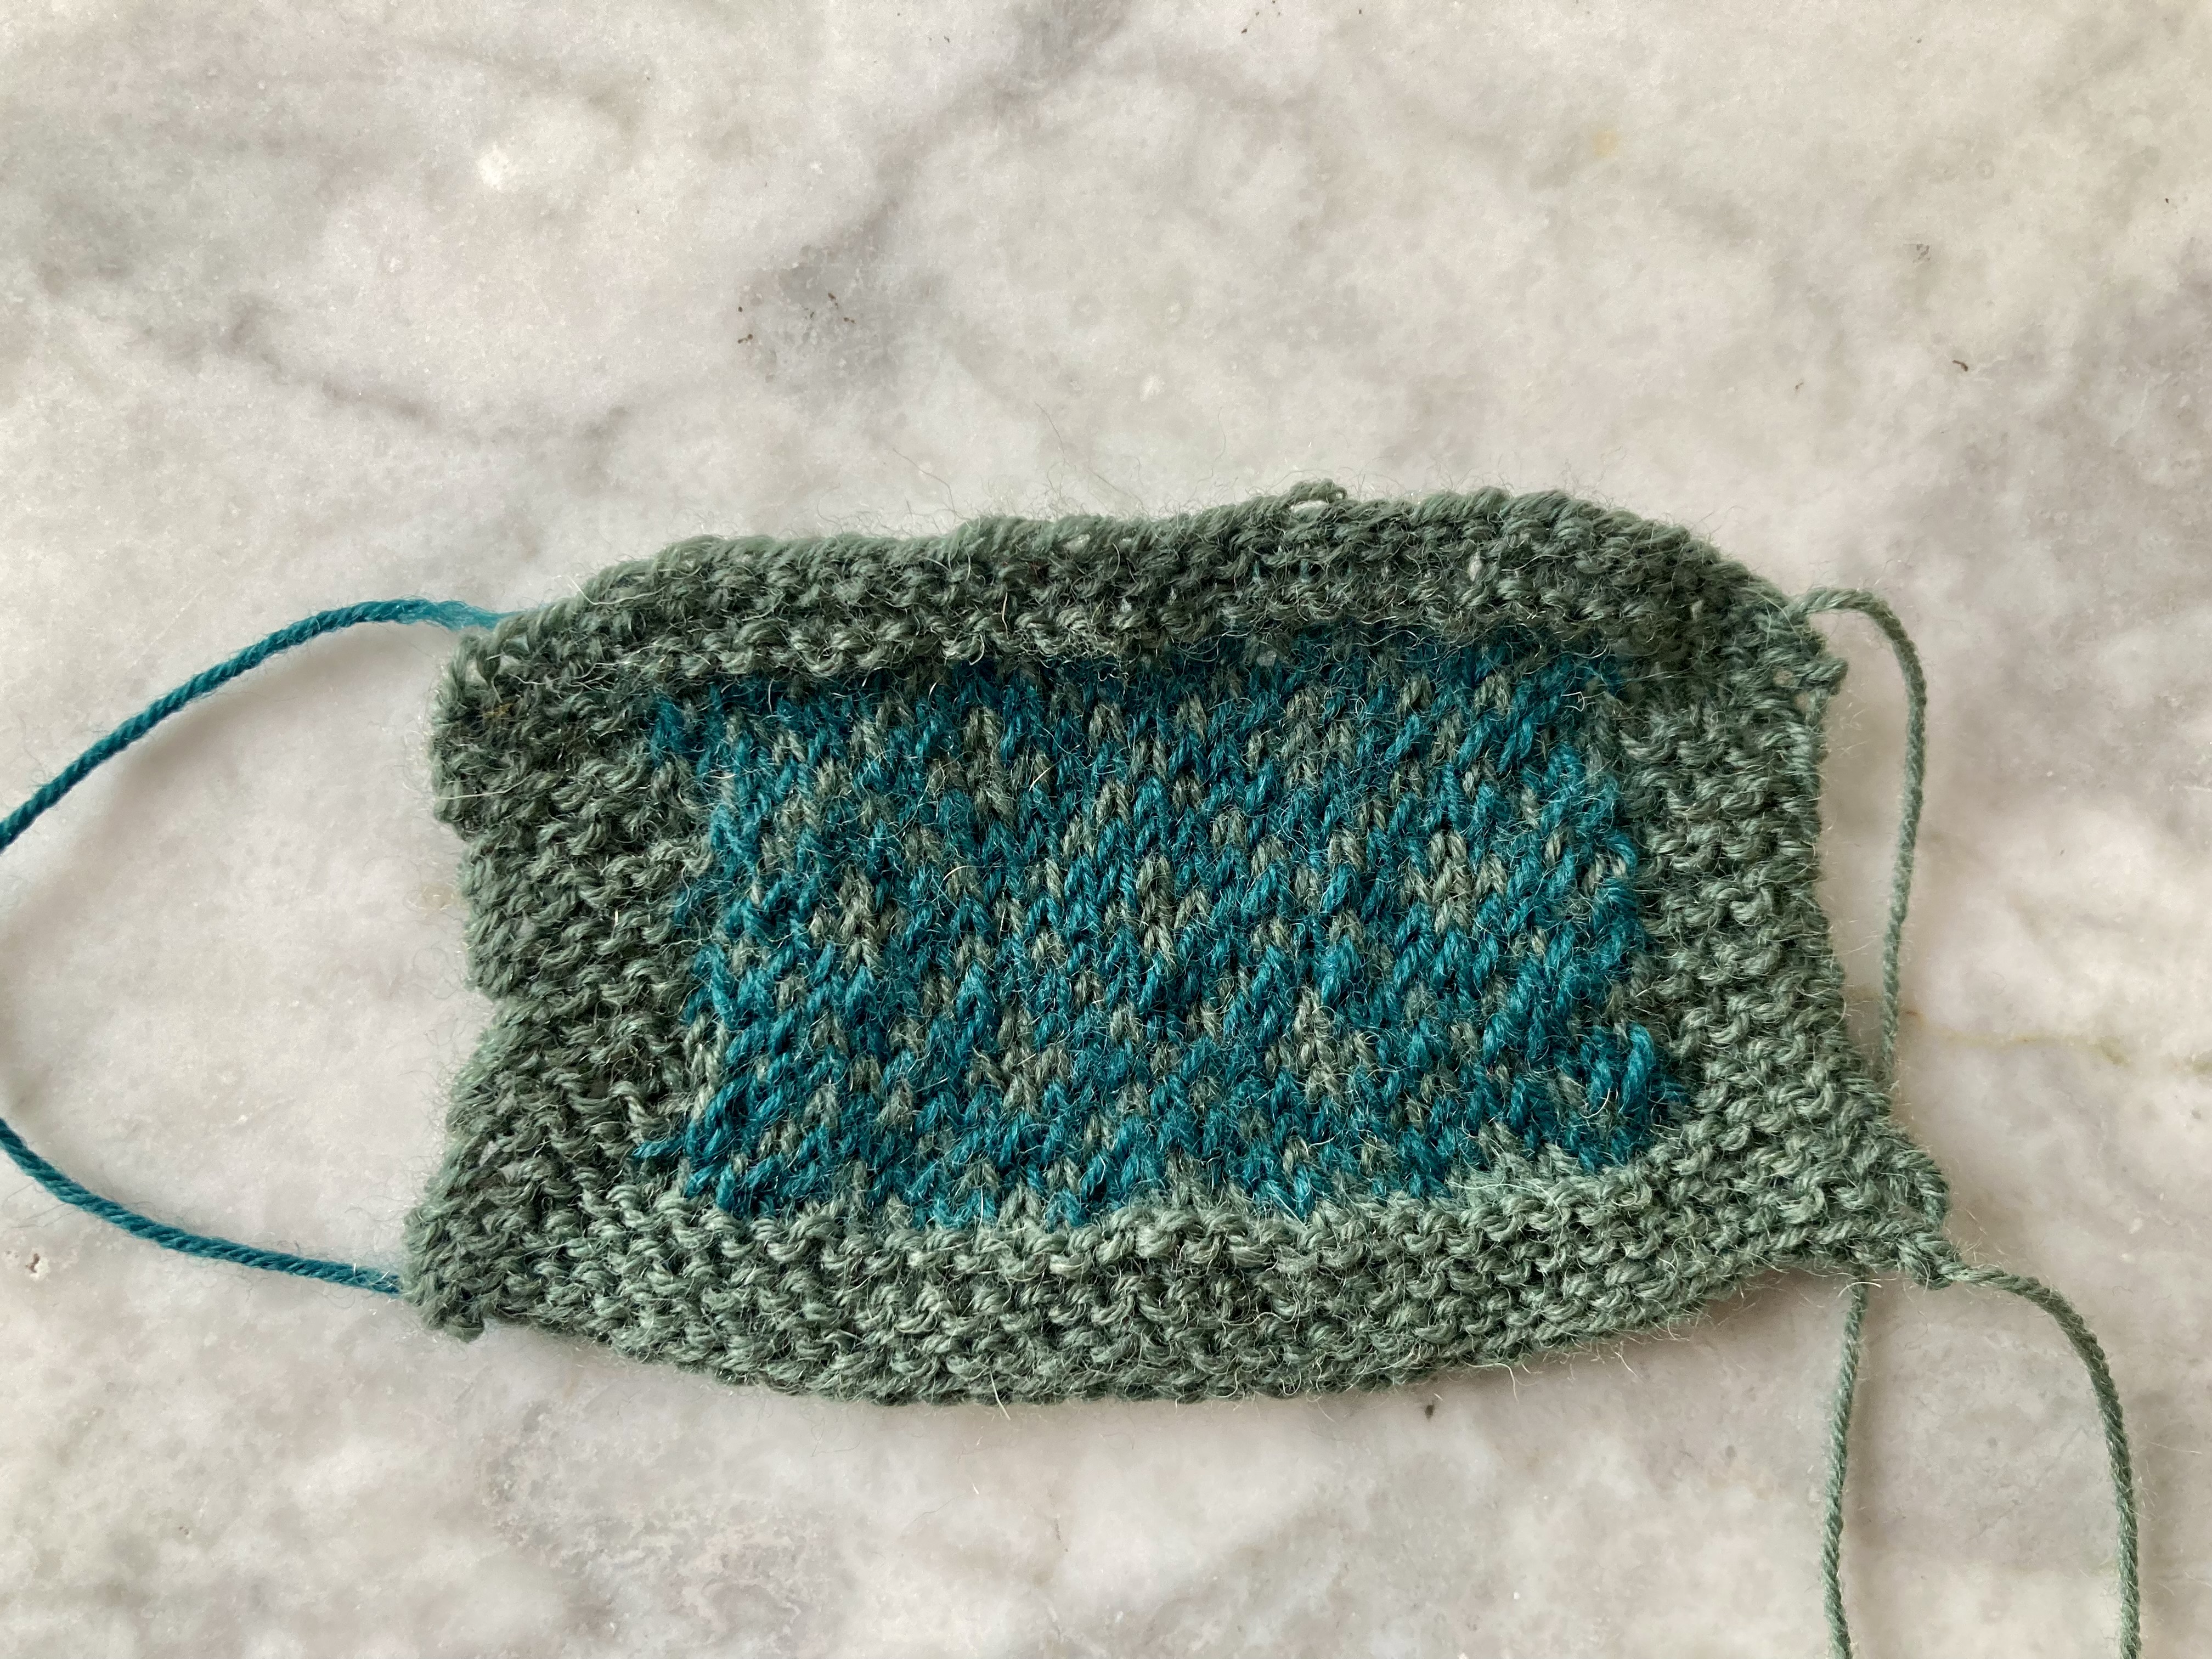
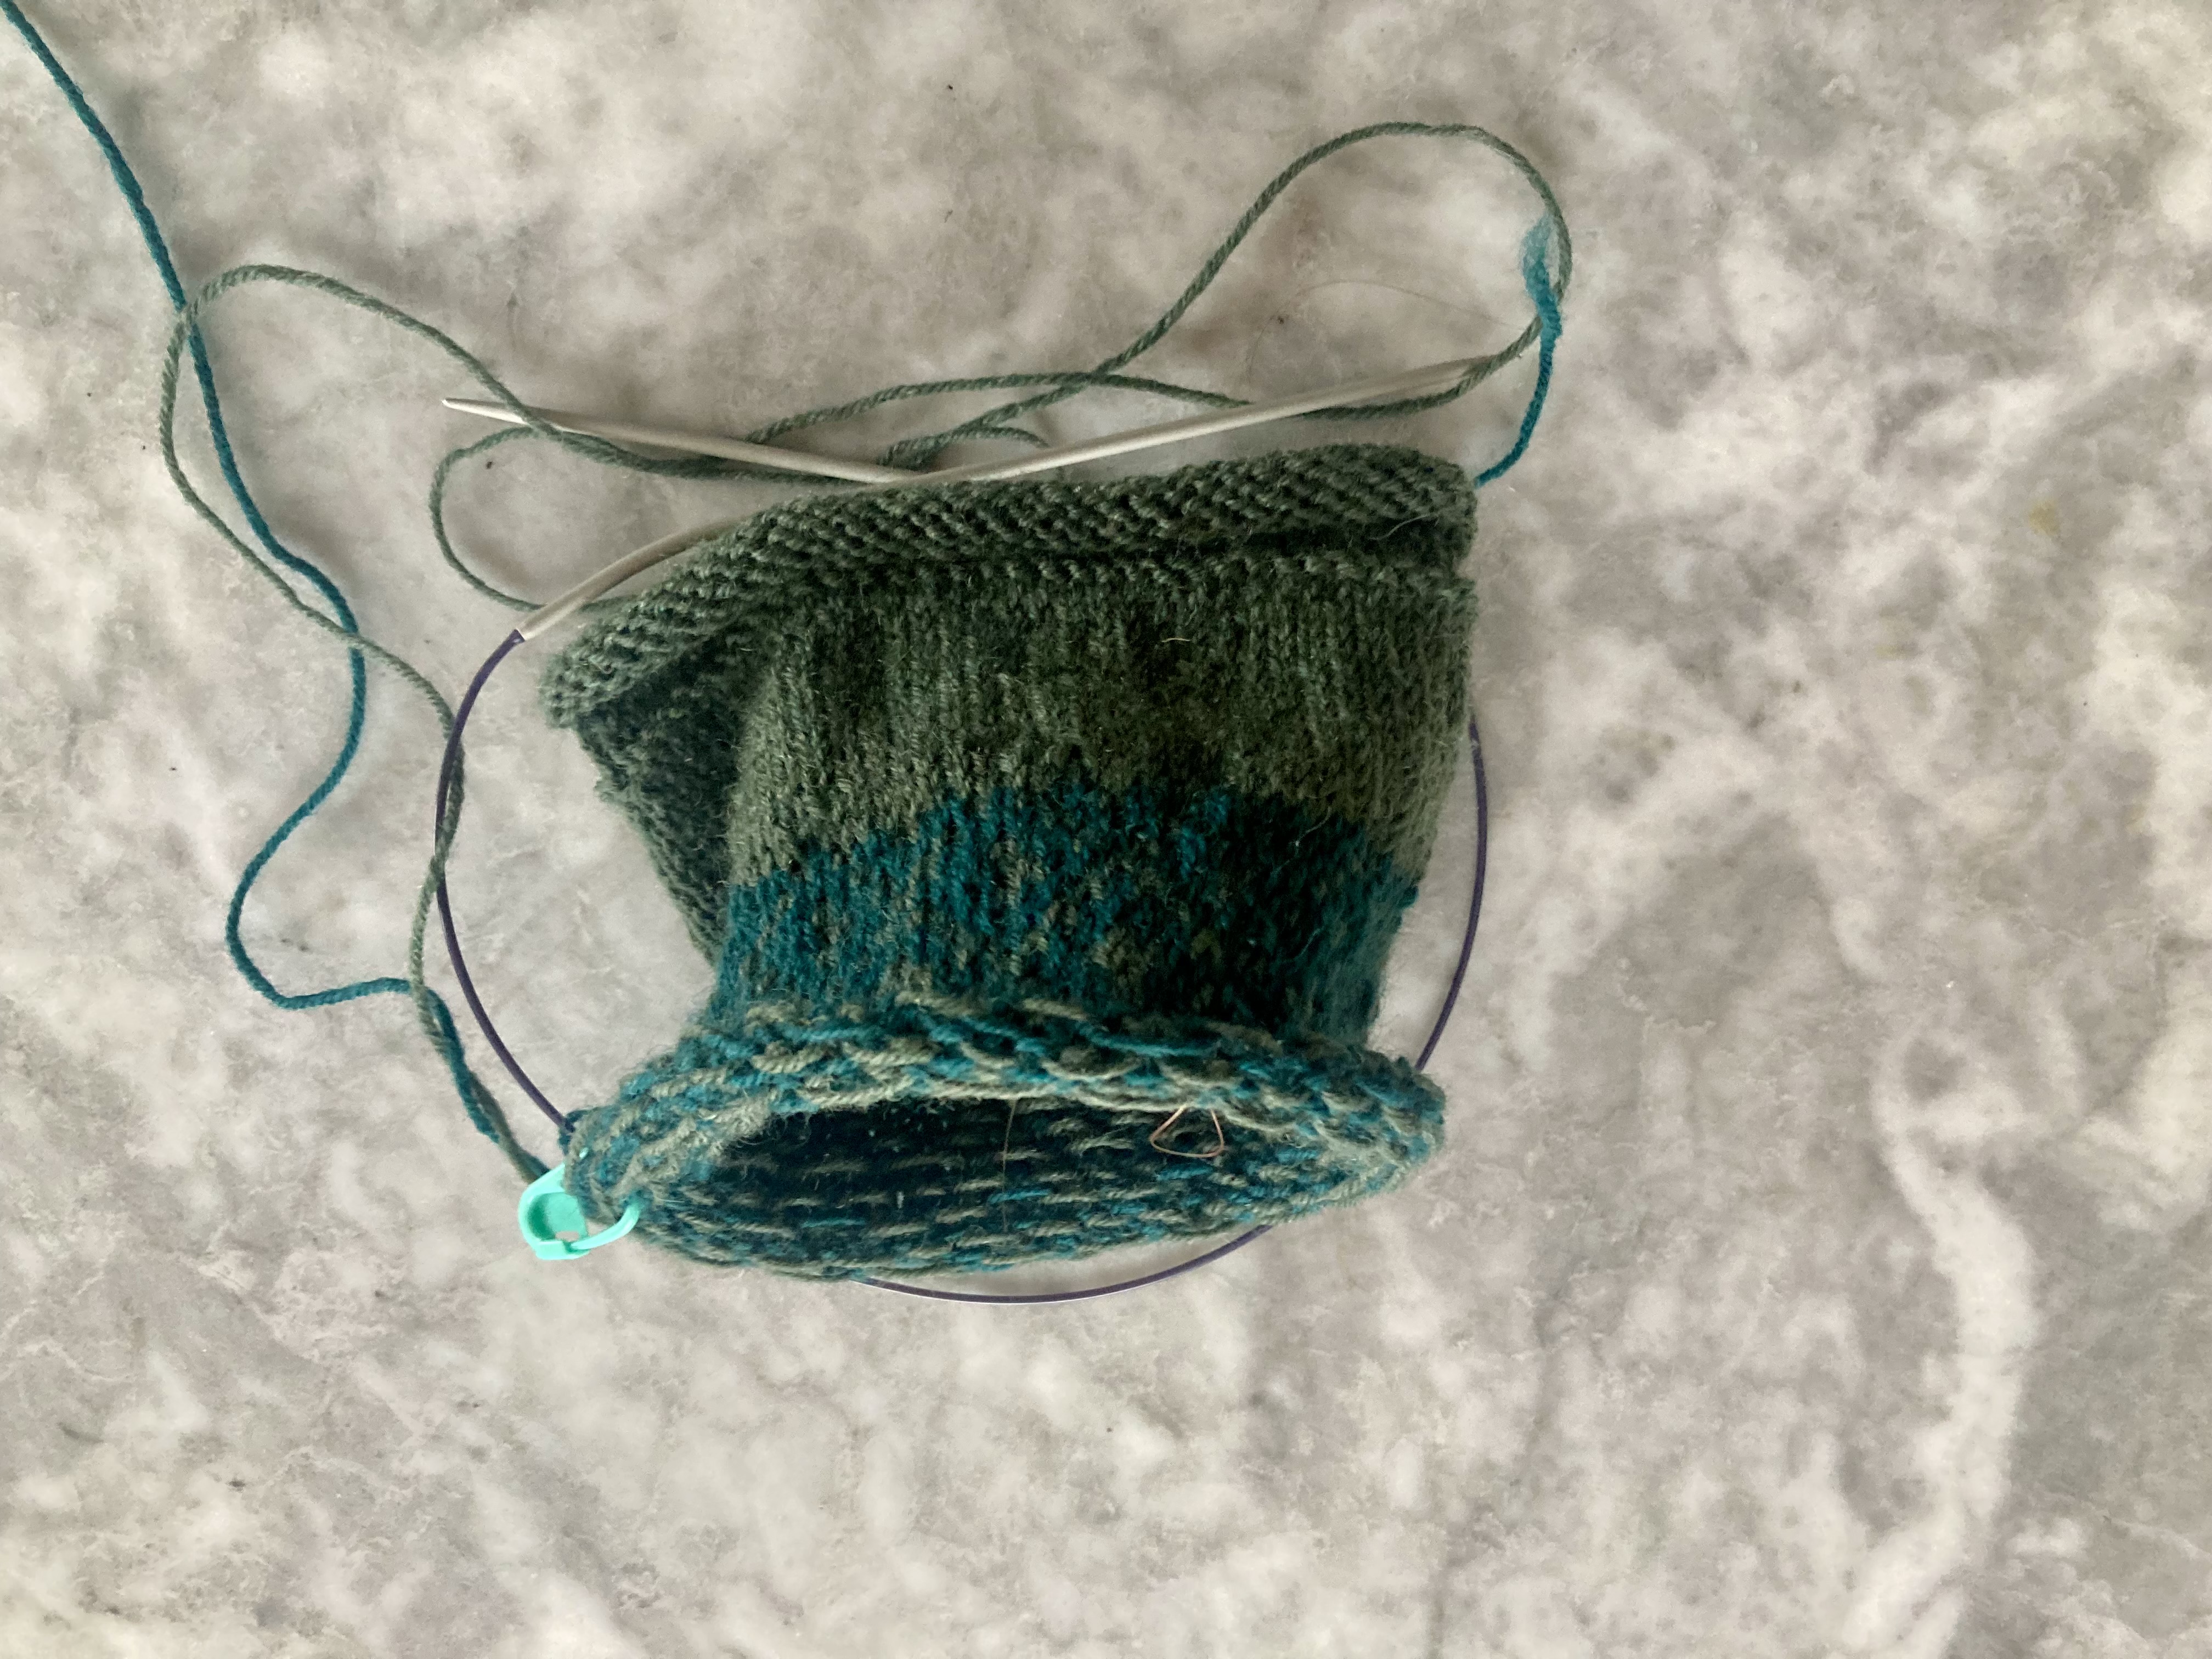
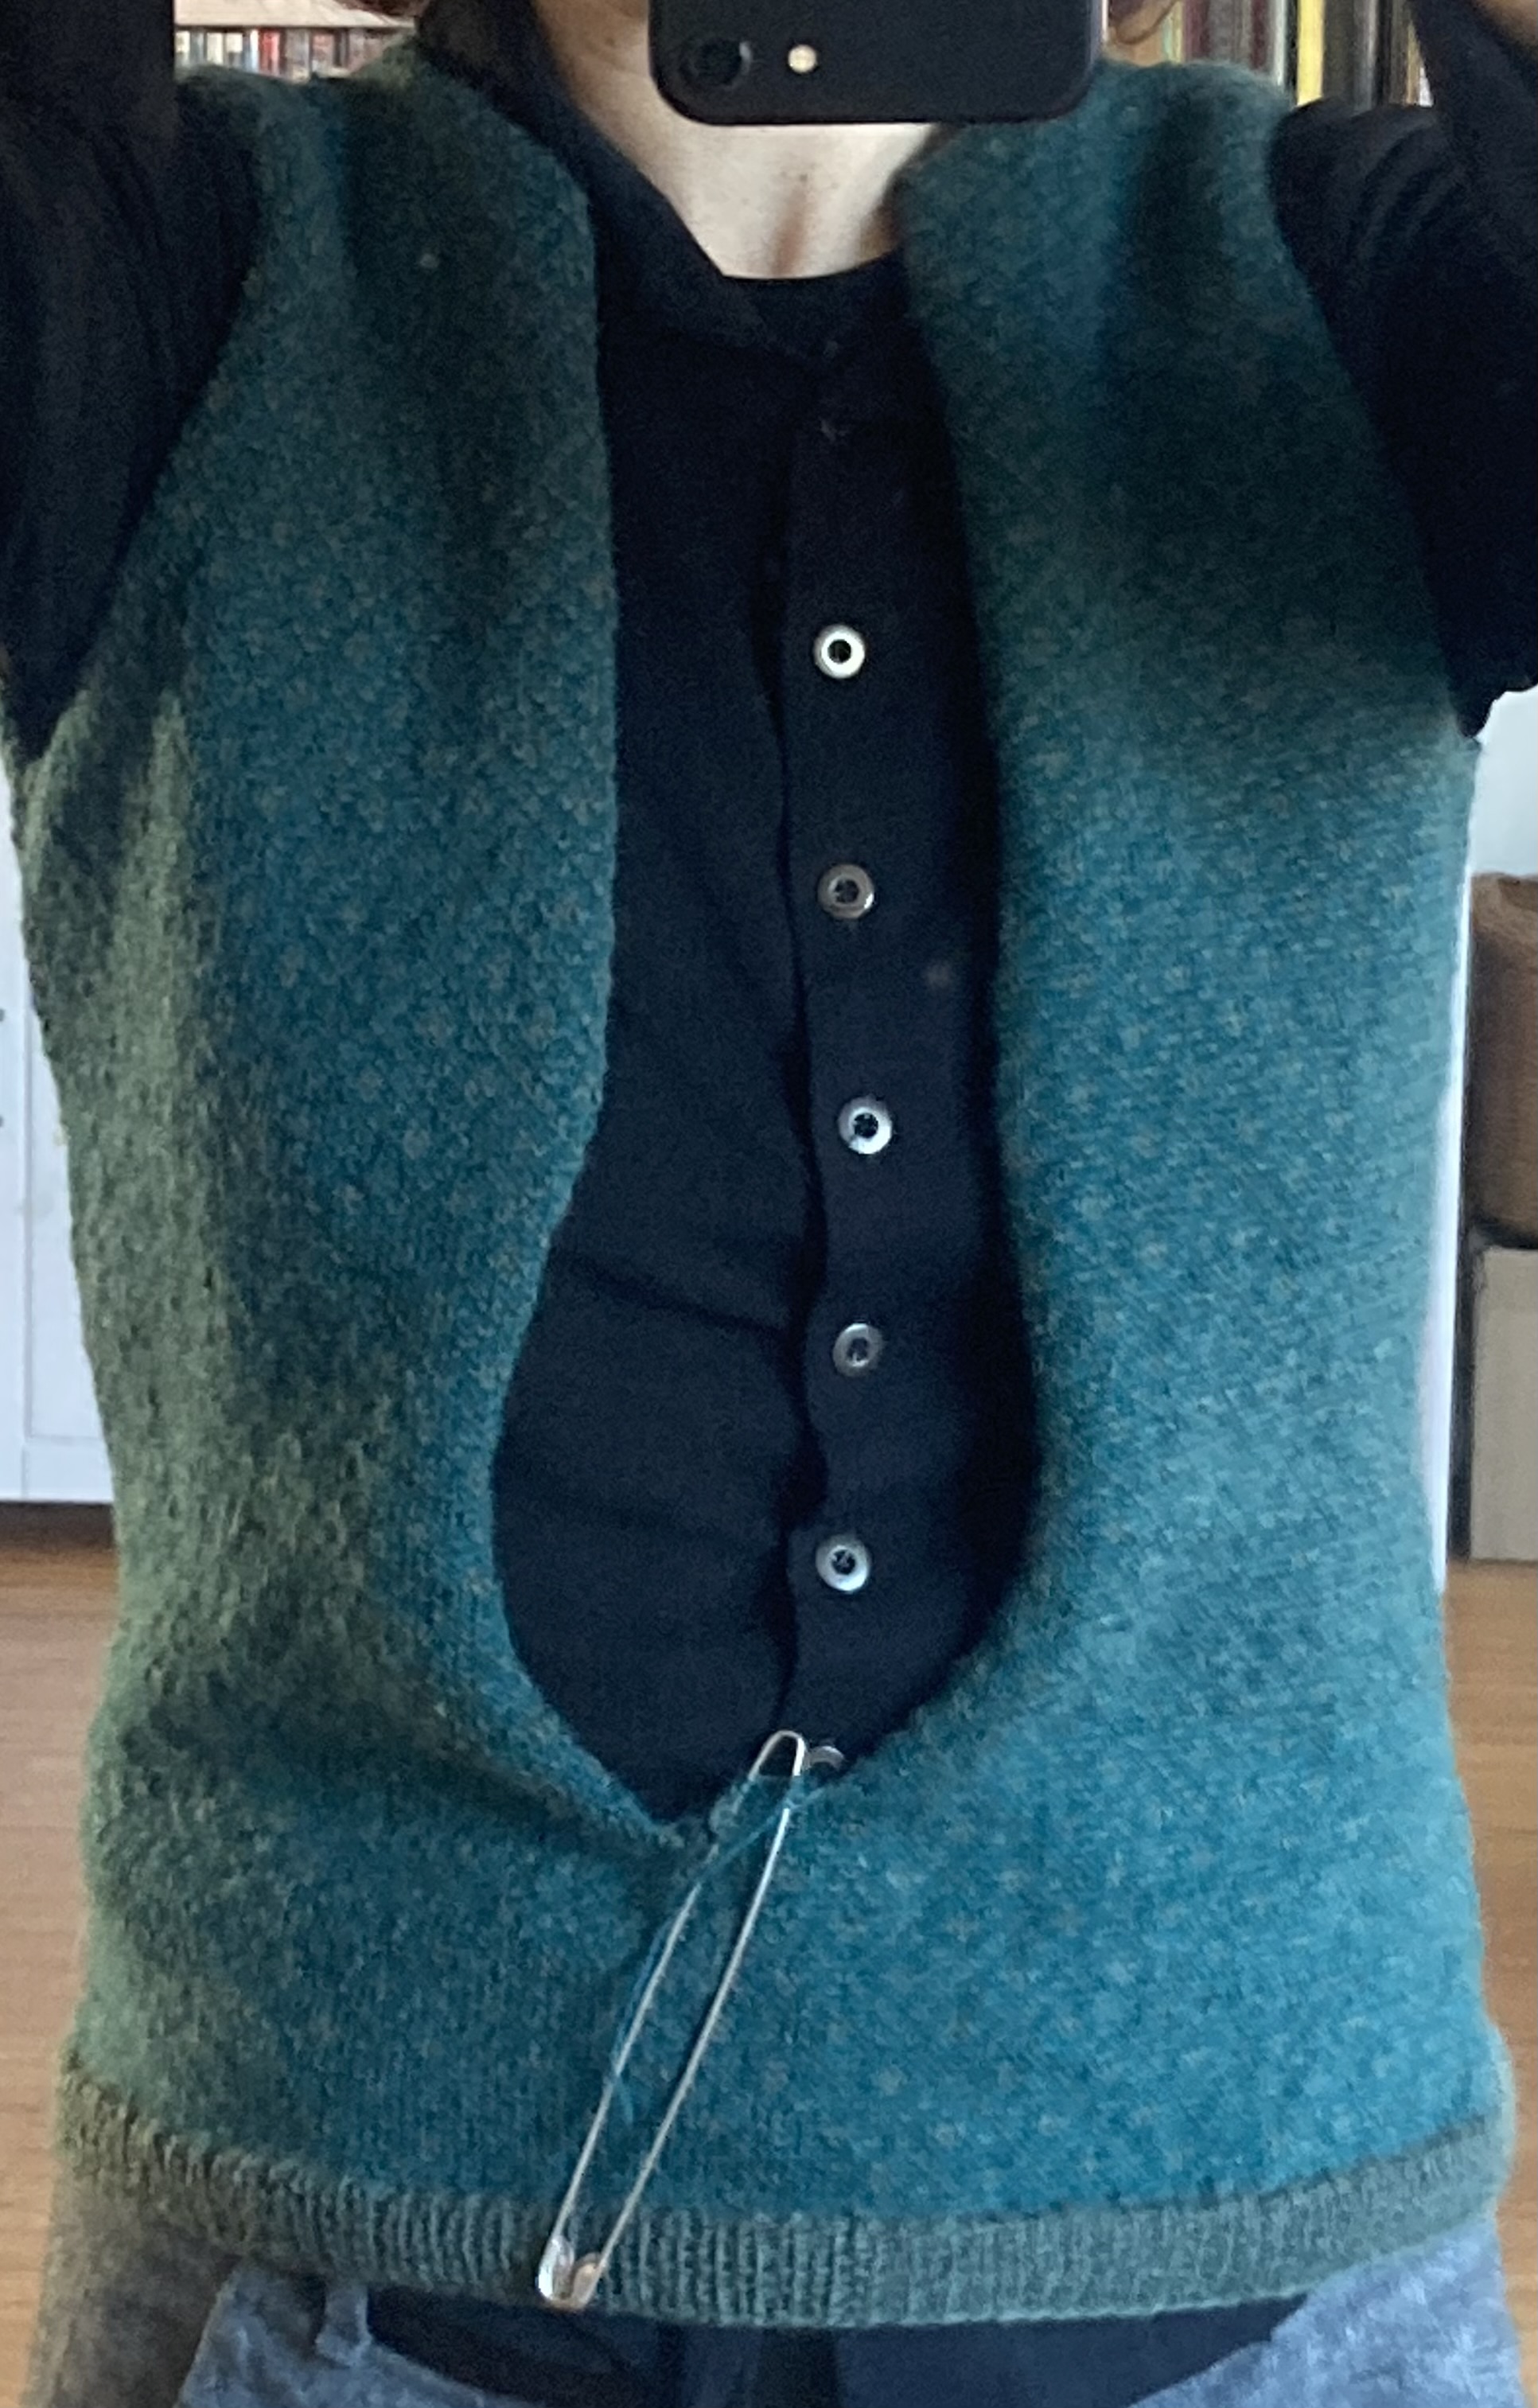
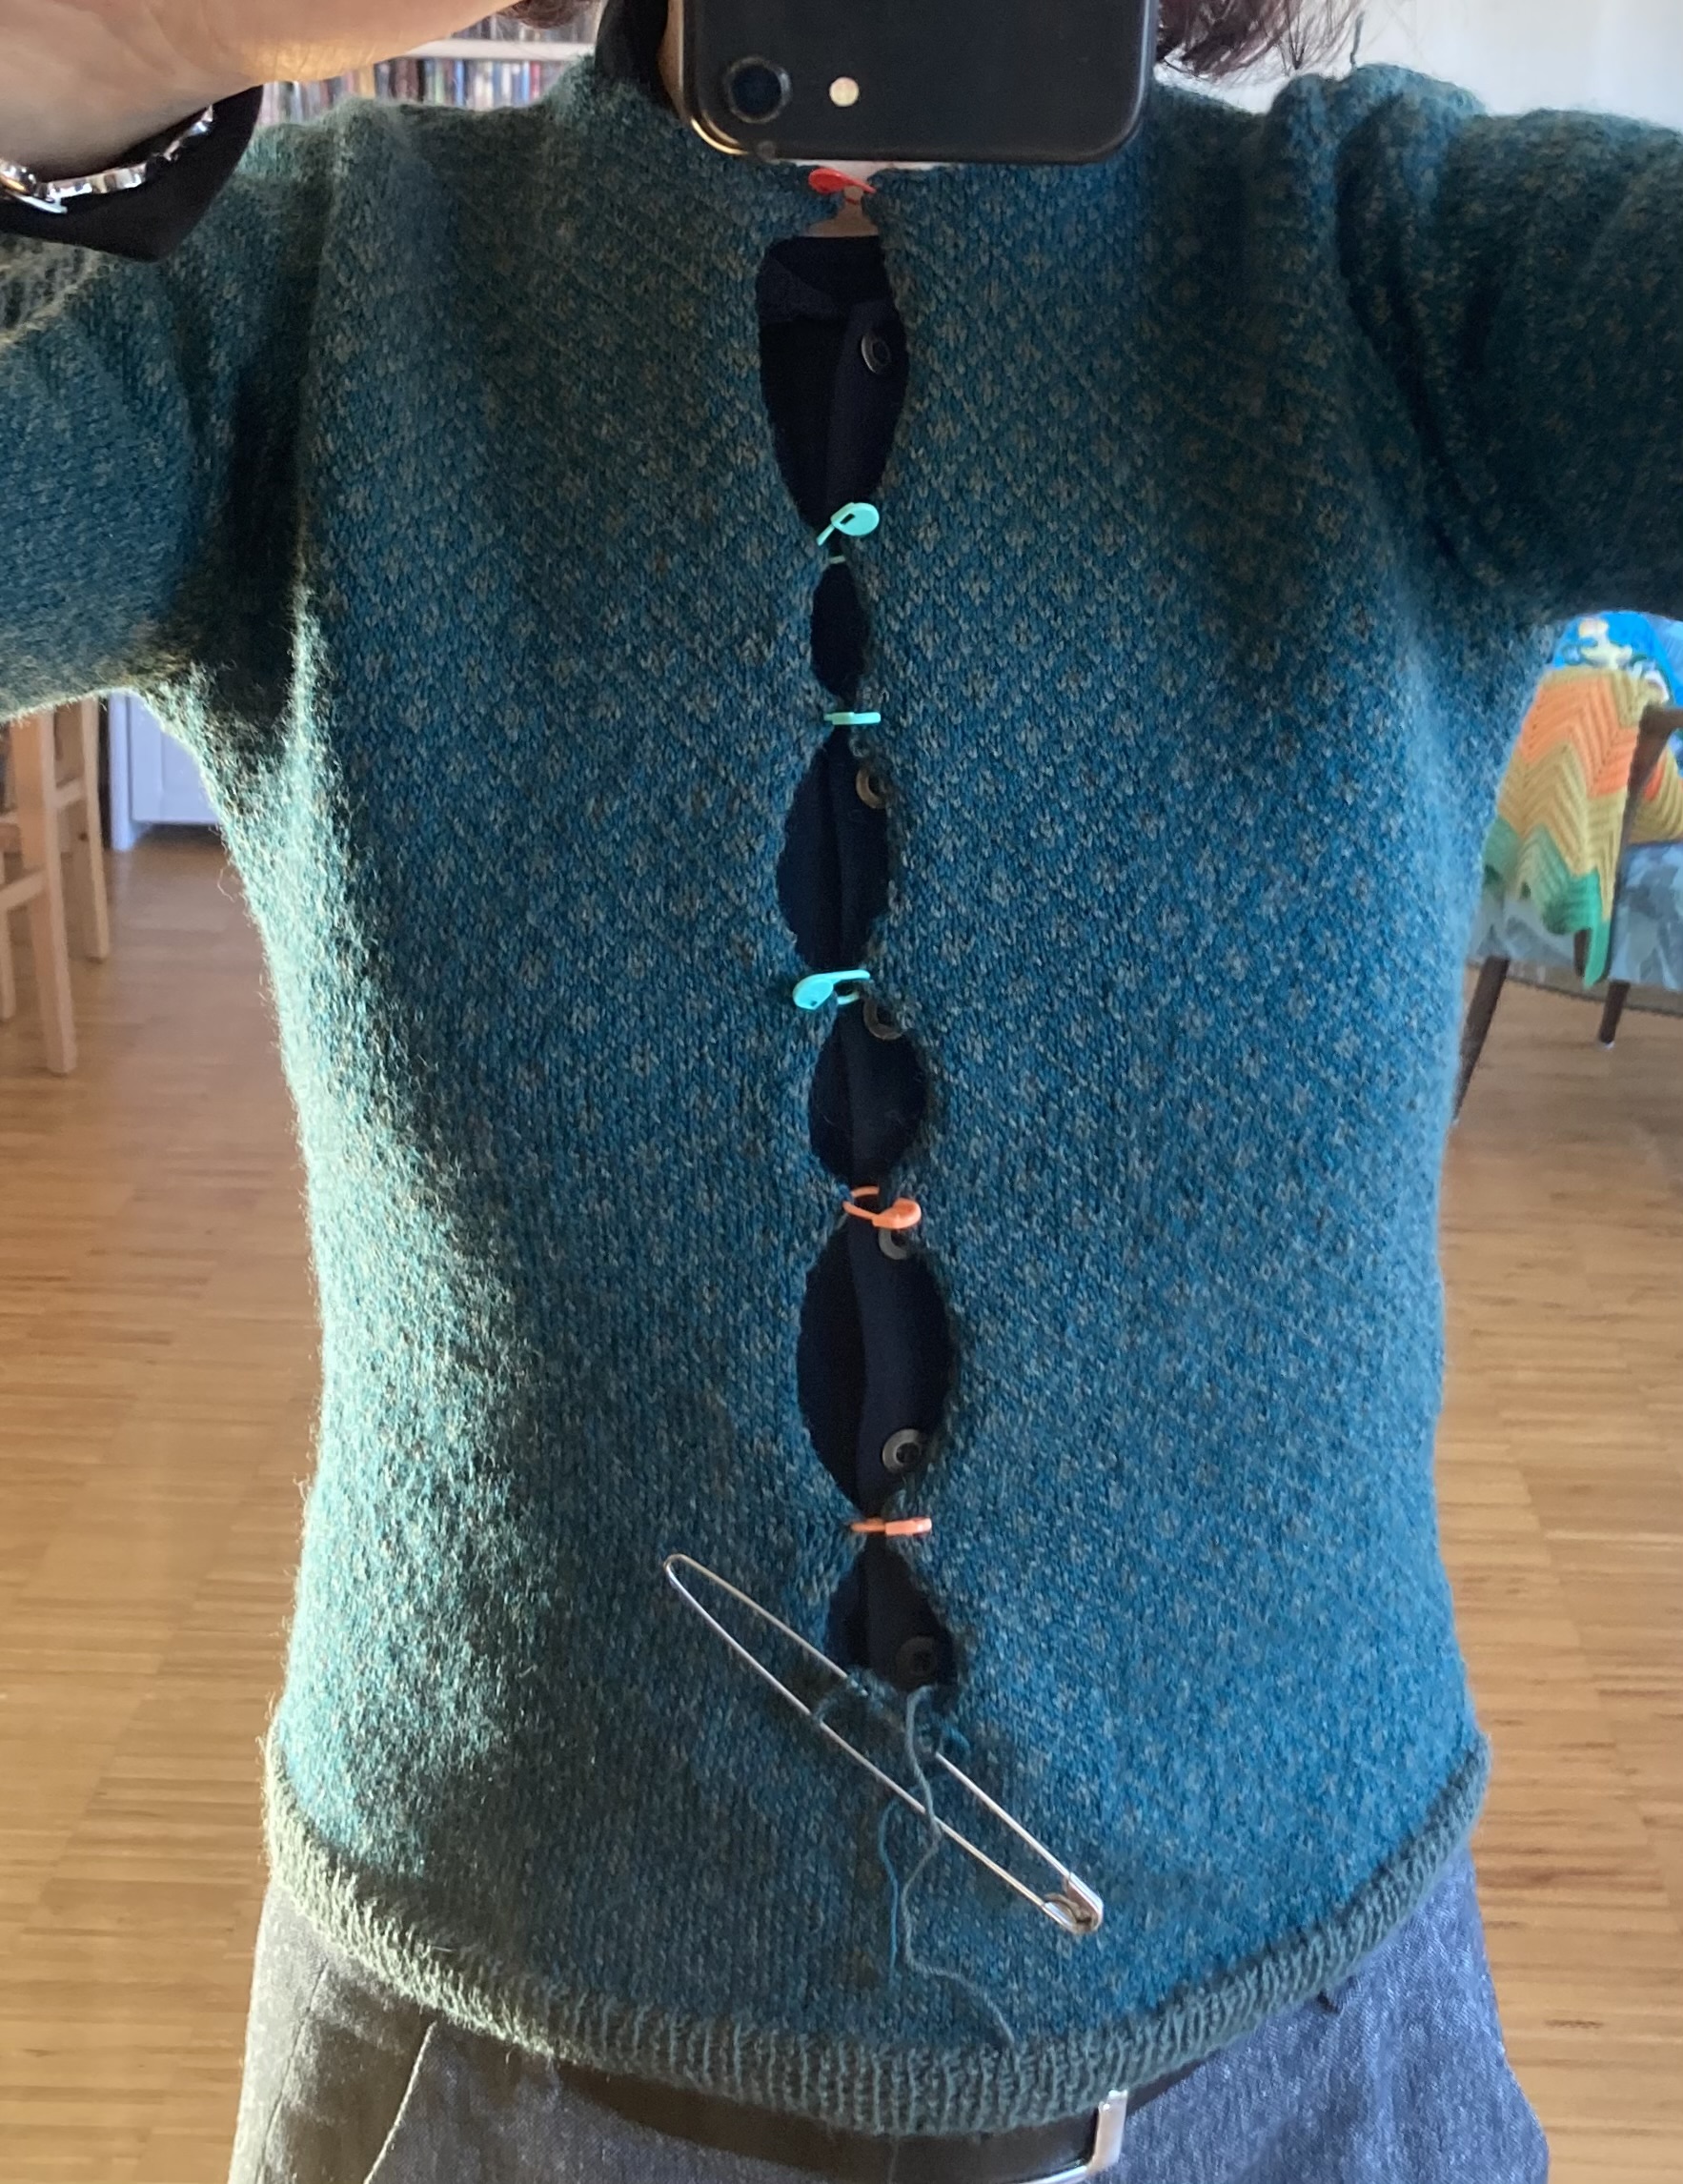
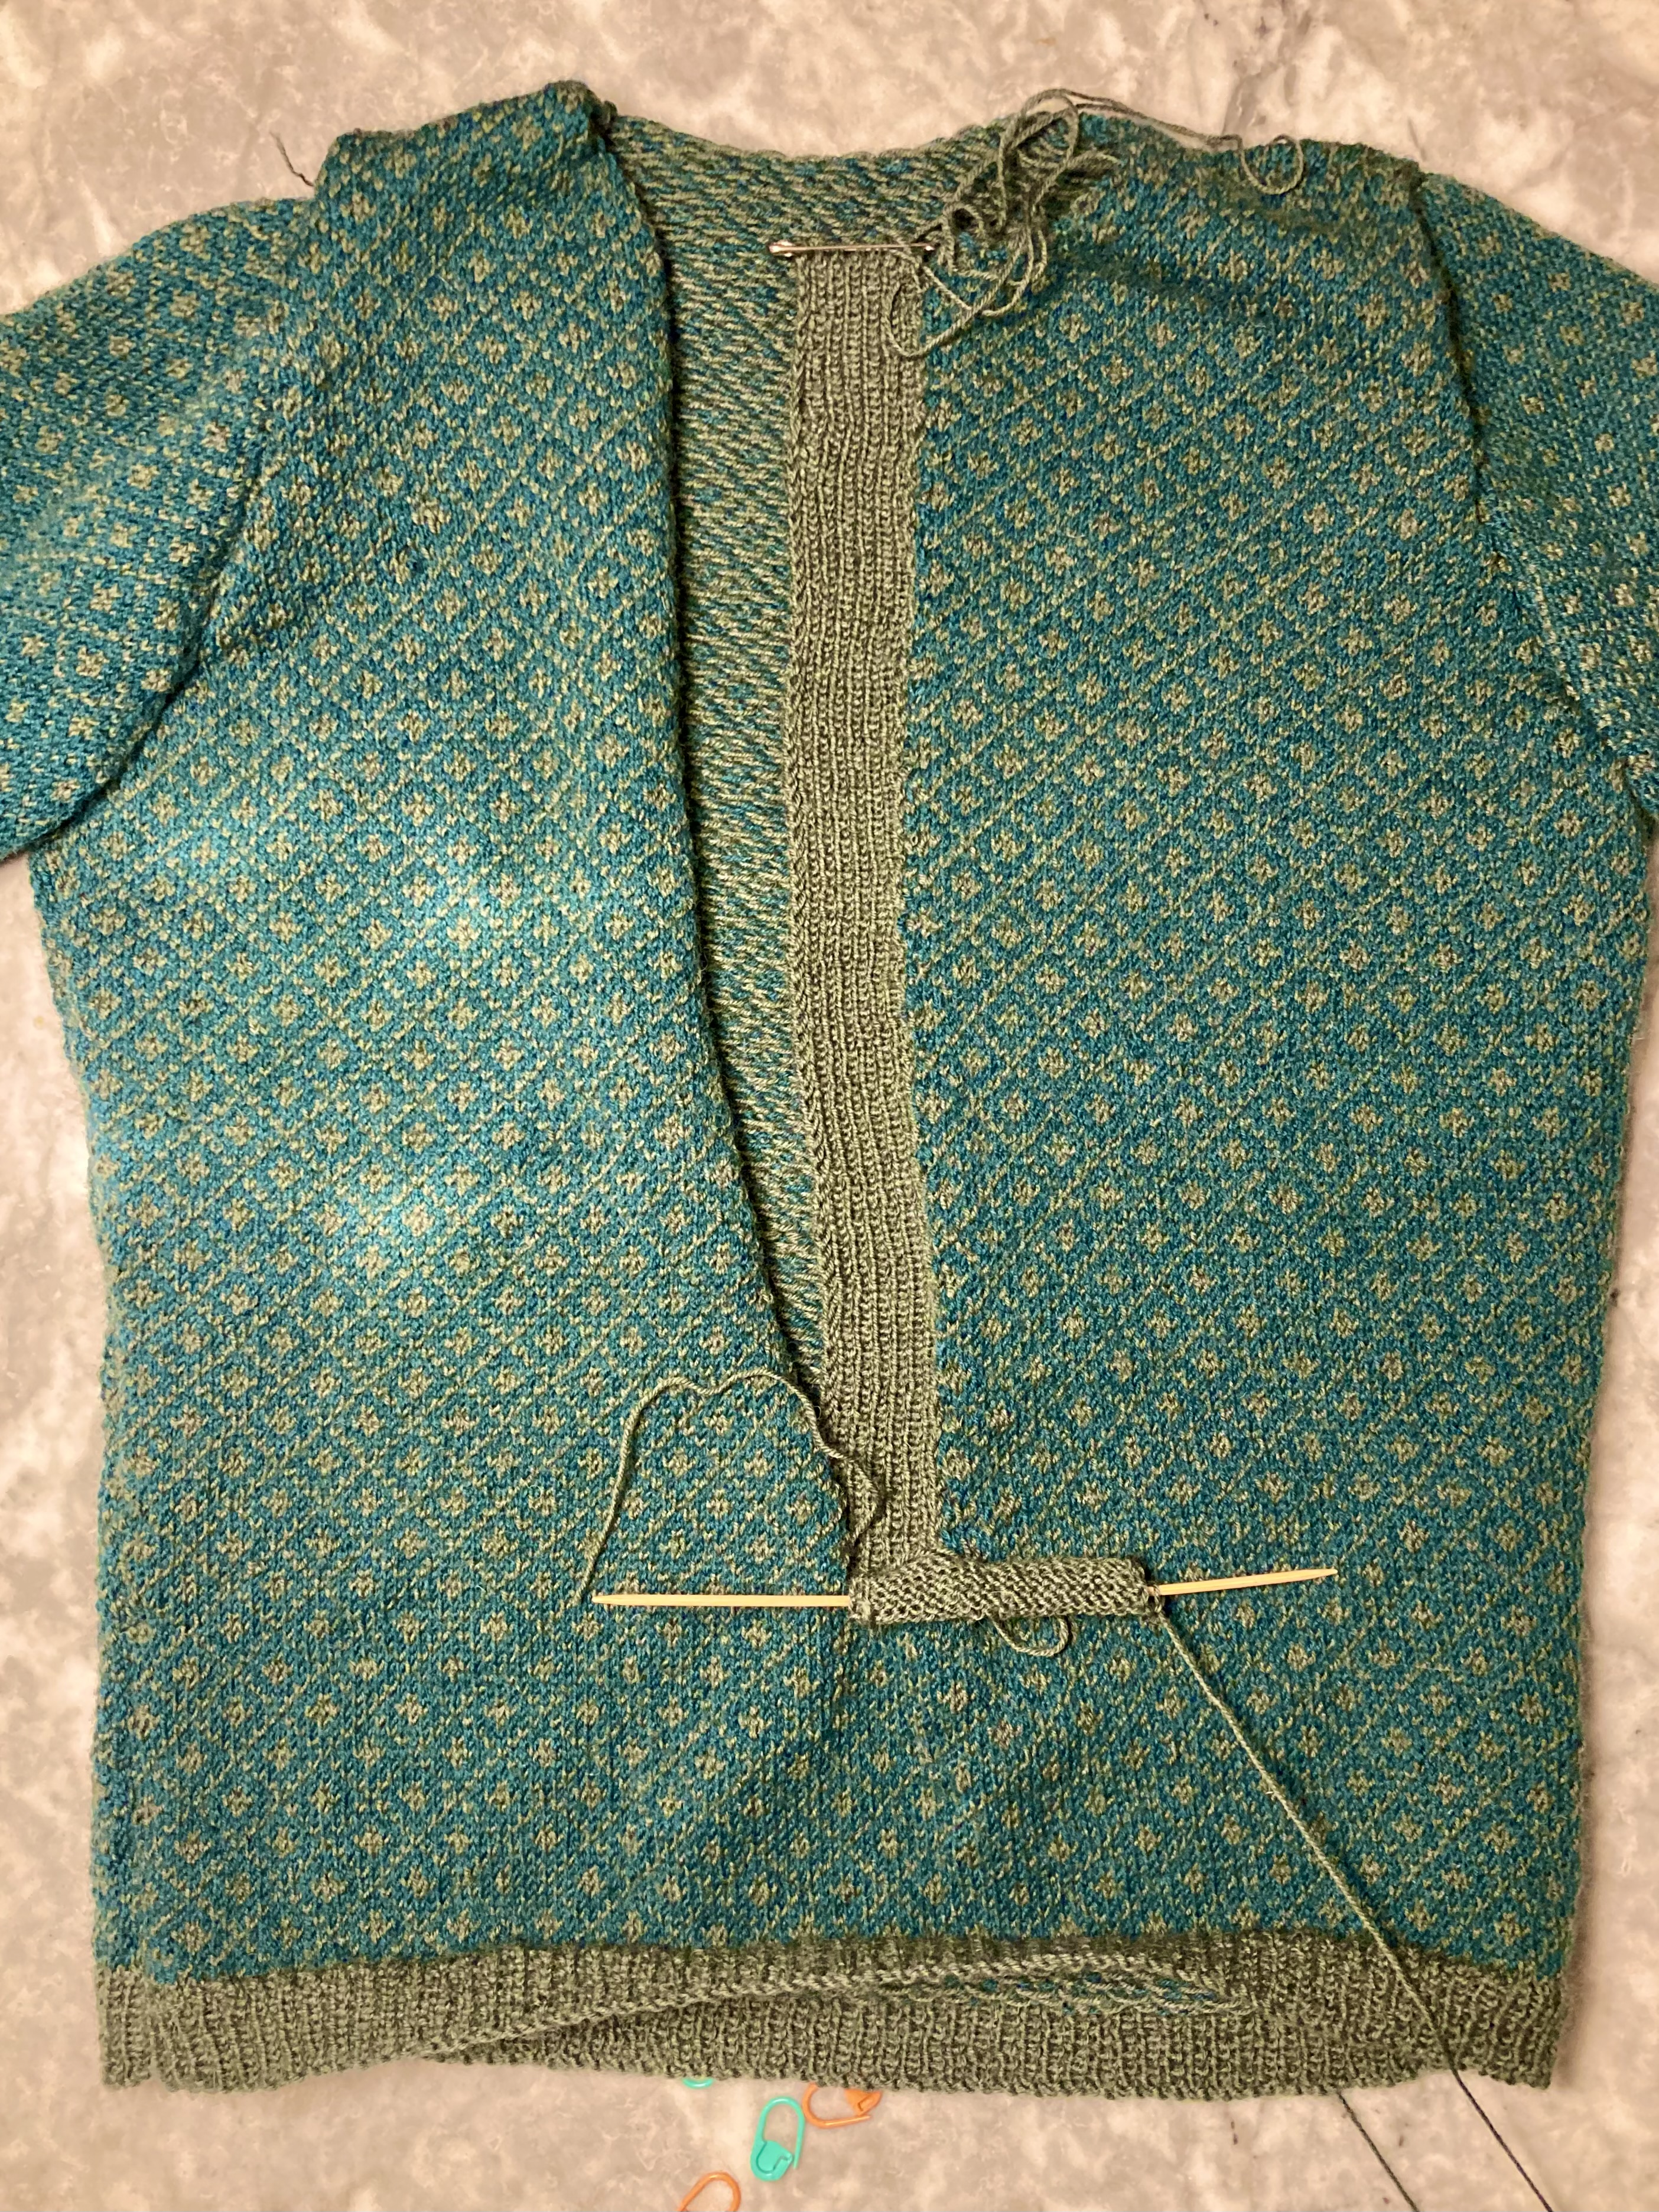
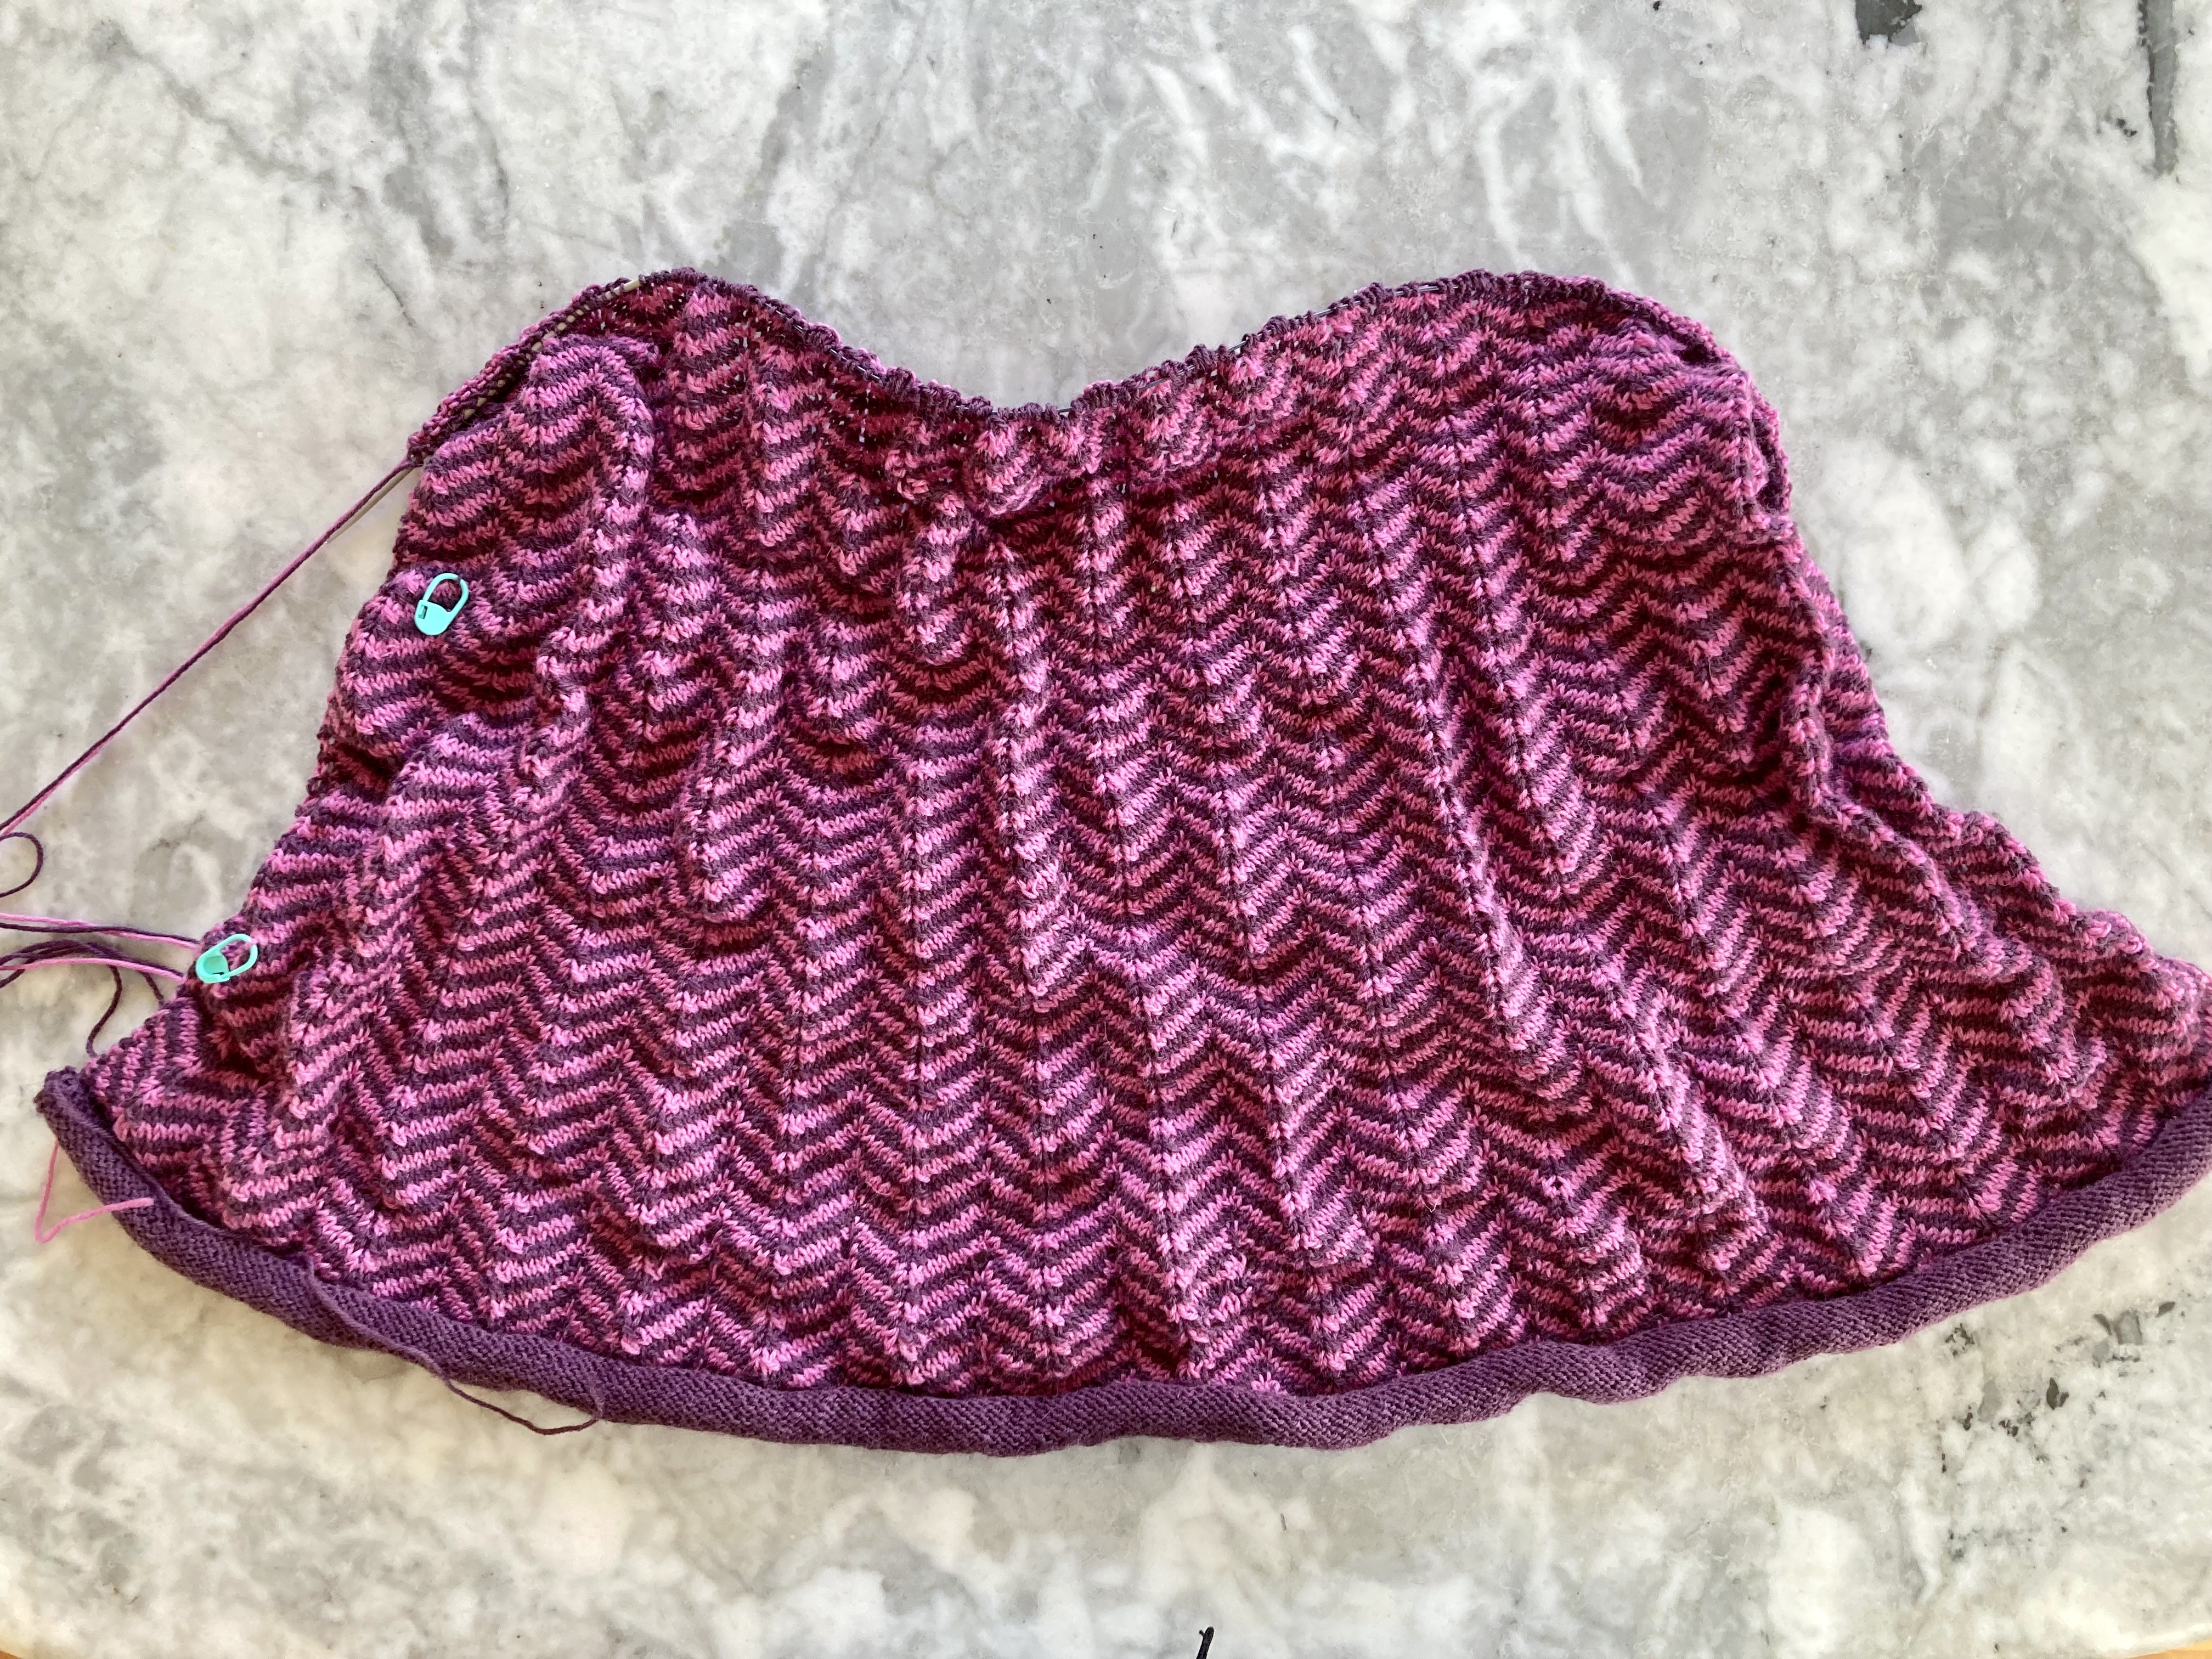
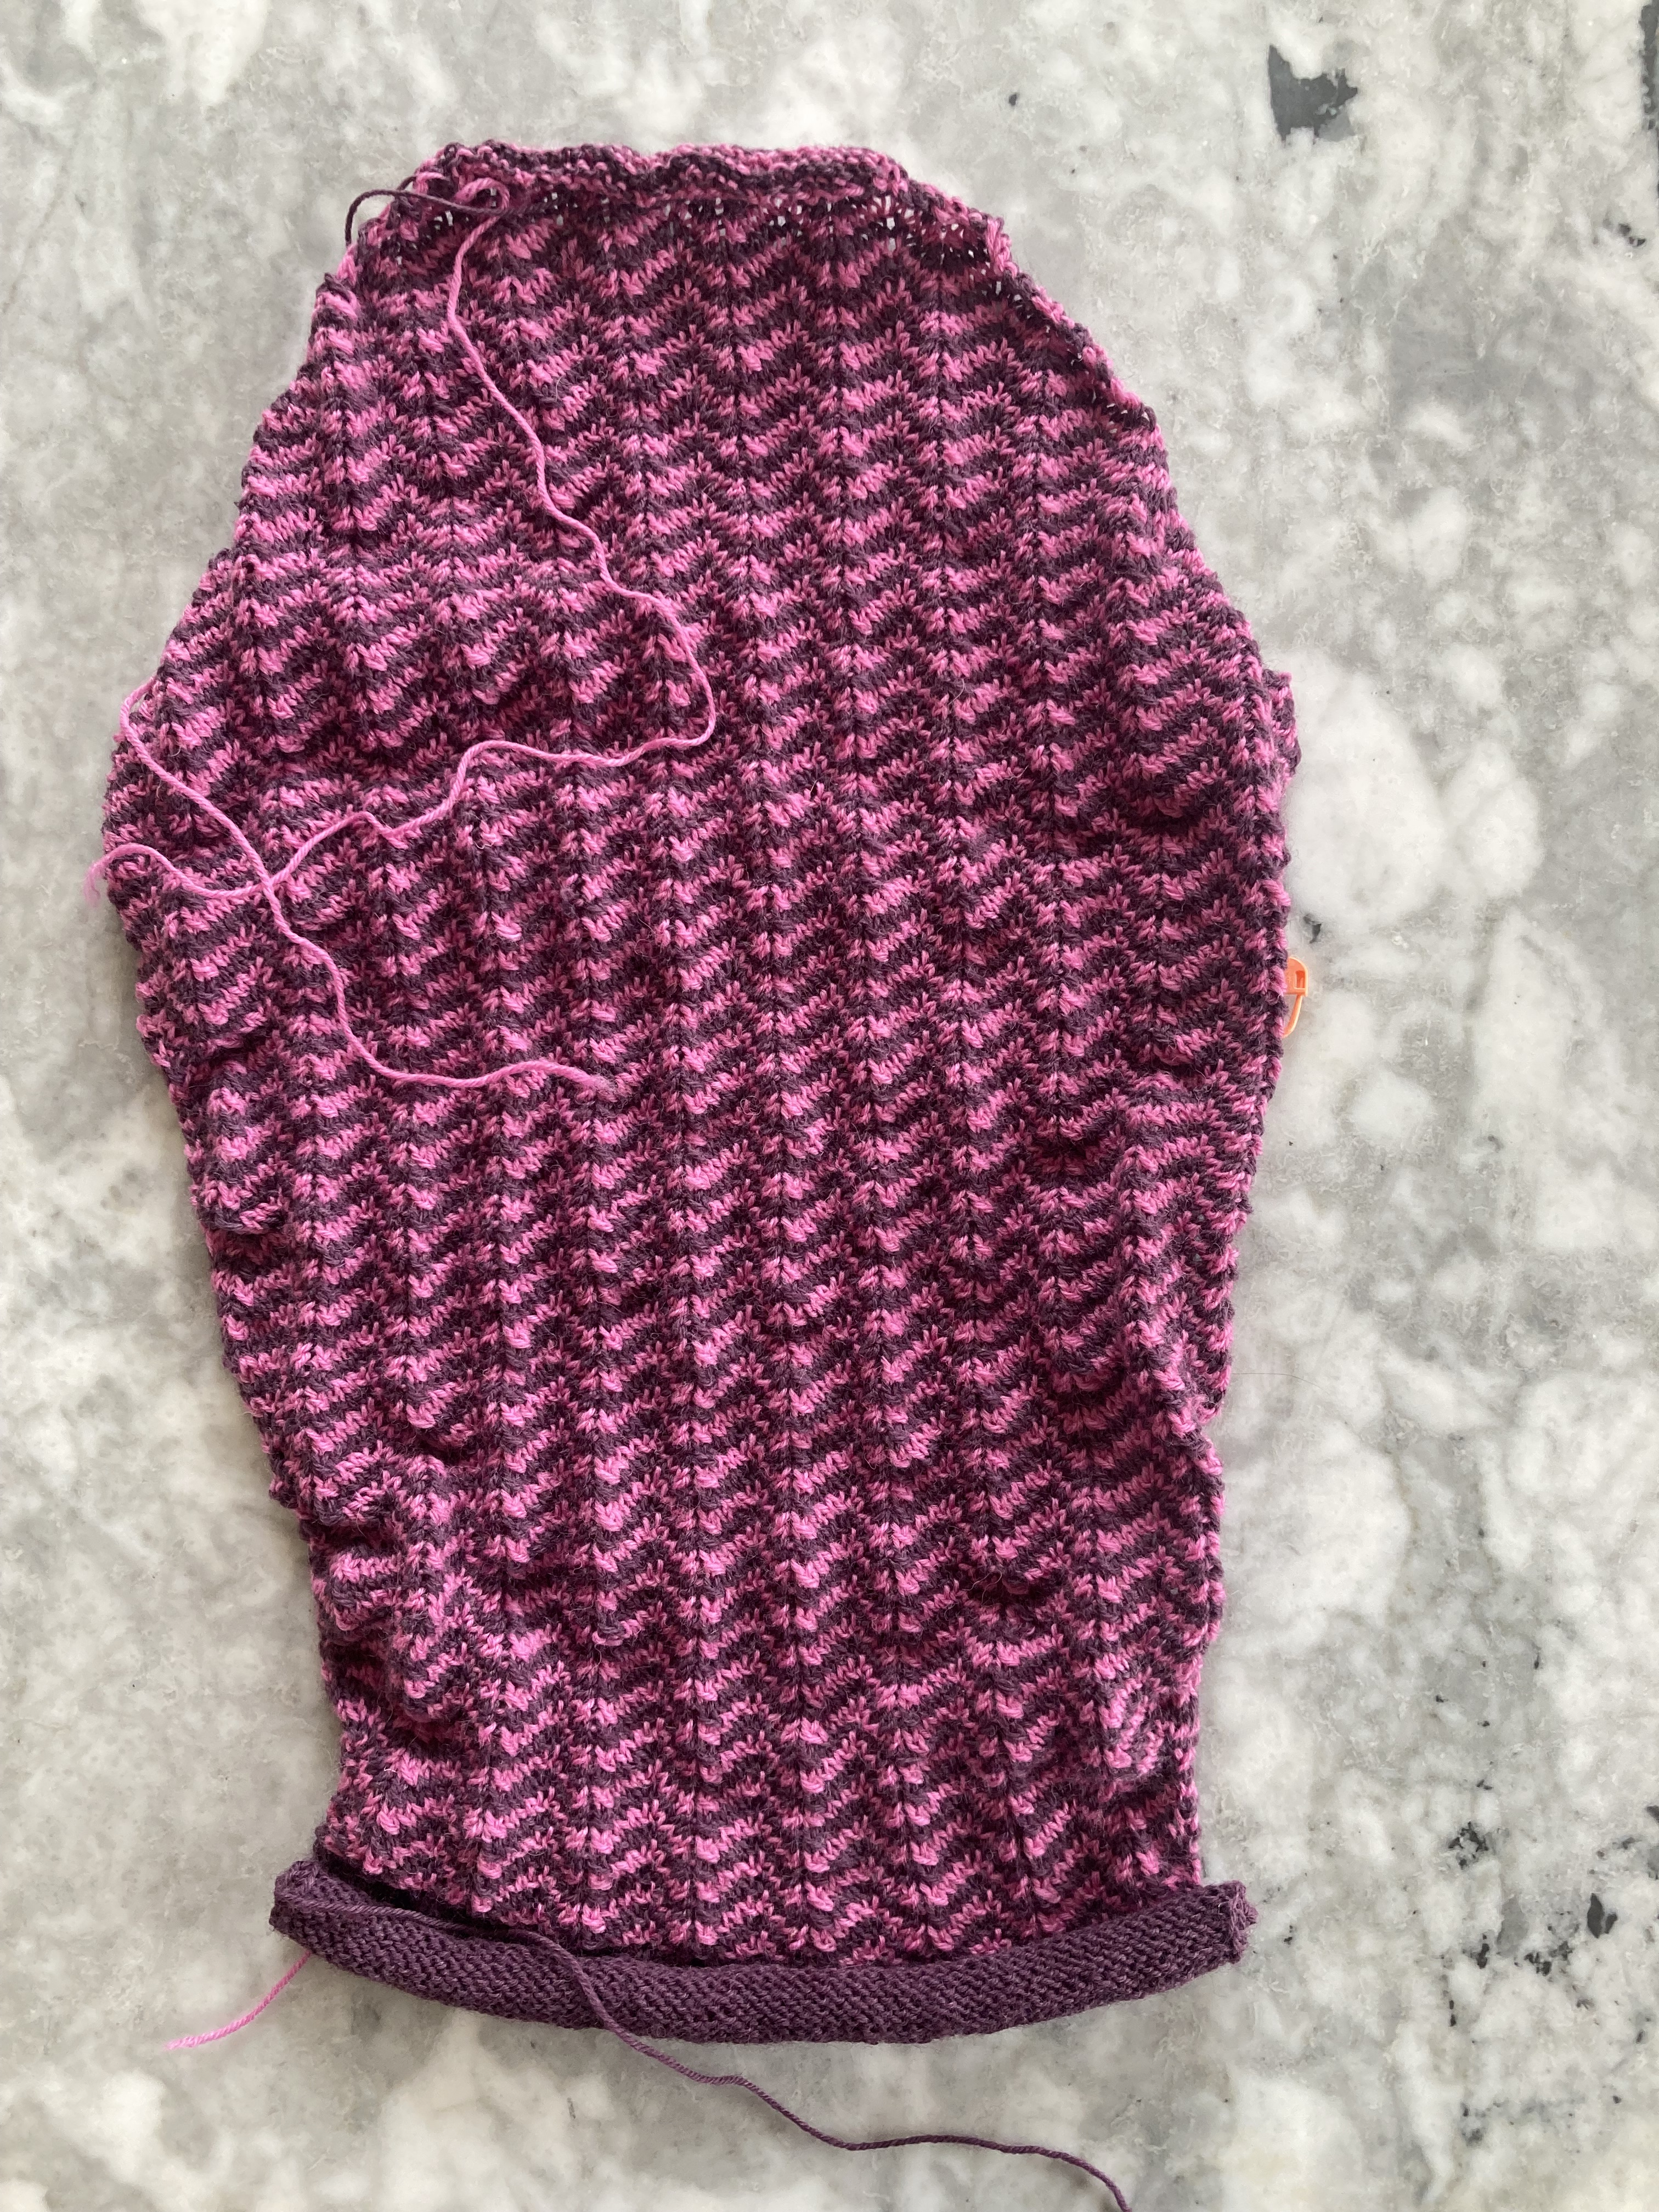
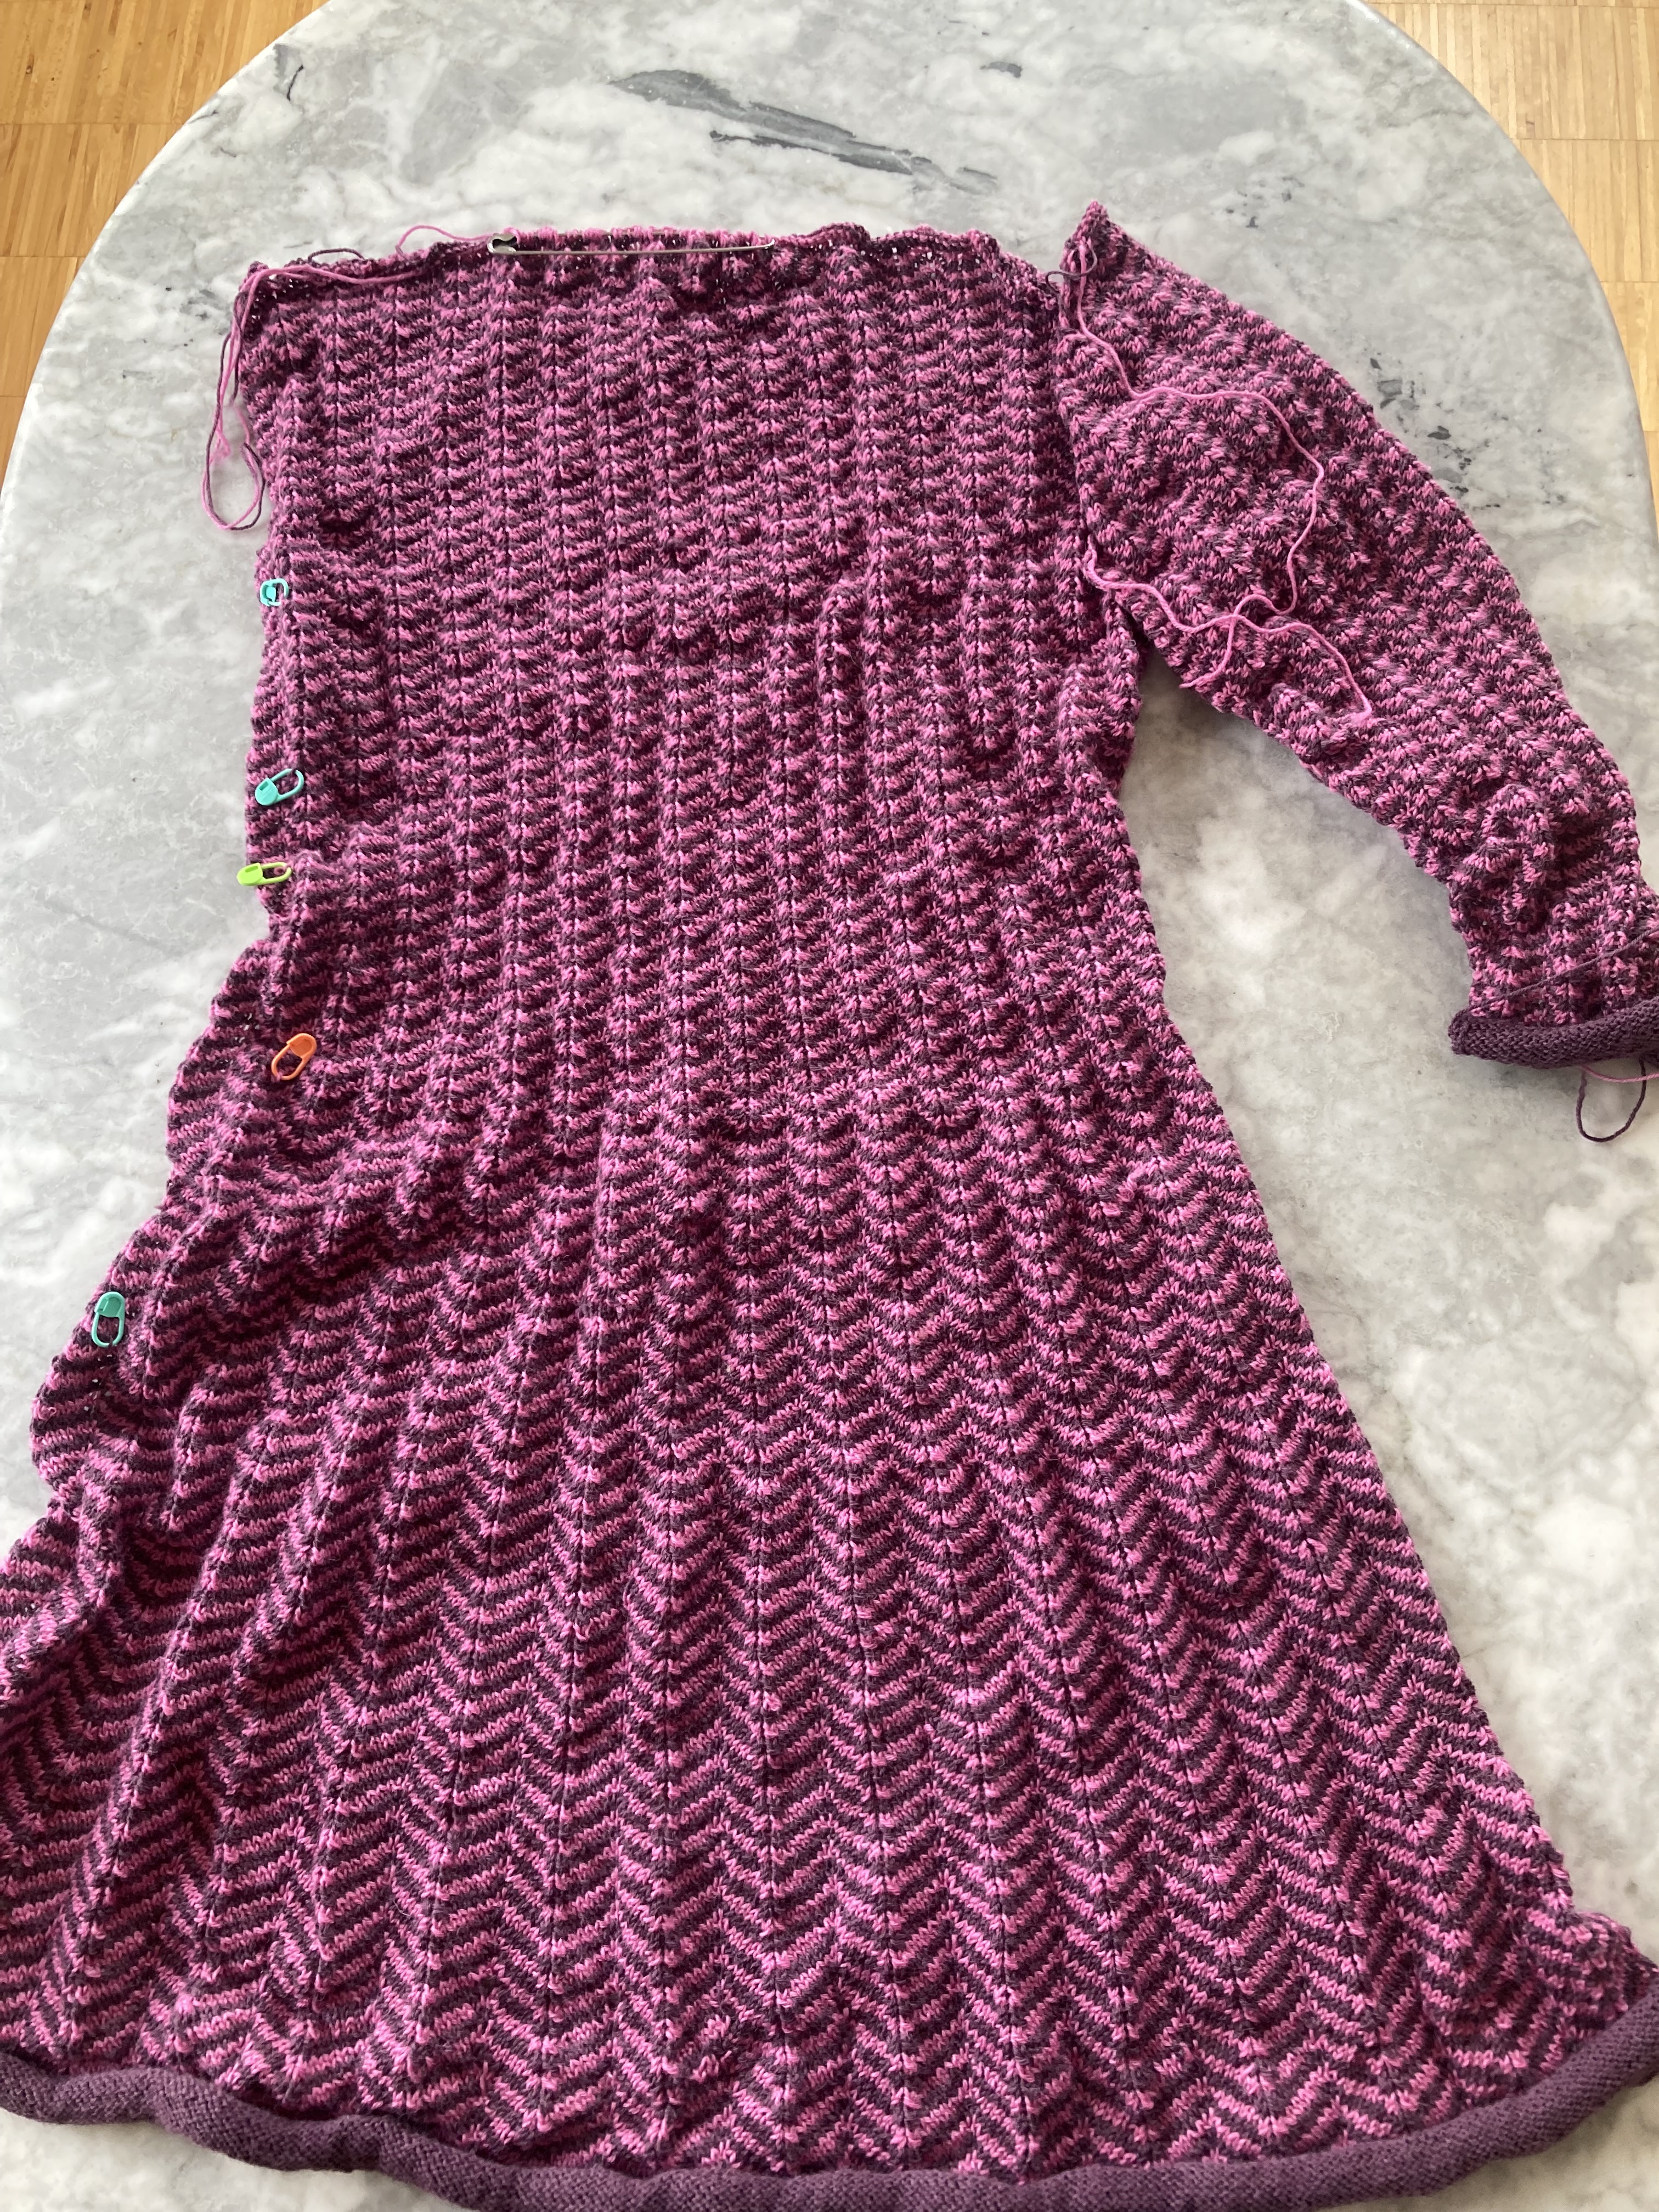
The top is knitted in stocking-stitch, from the band up to the straps, with garter-stitch borders. I was unsure of the suitability of garter stitch for a bra band, as it is just going to stretch horizontally, but ribbing was impractical for the rest of the borders (which need to lie neatly flat) and combining the two didn’t appeal to me. I knit an elastic thread along with the yarn on 3,5 mm needles, which made the band surprisingly firm and gave it some elasticity. If necessary, the band could be reinforced with a narrow strip of elastic. There’s a vertical band of 12 stitches garter stitch in the middle of the front.

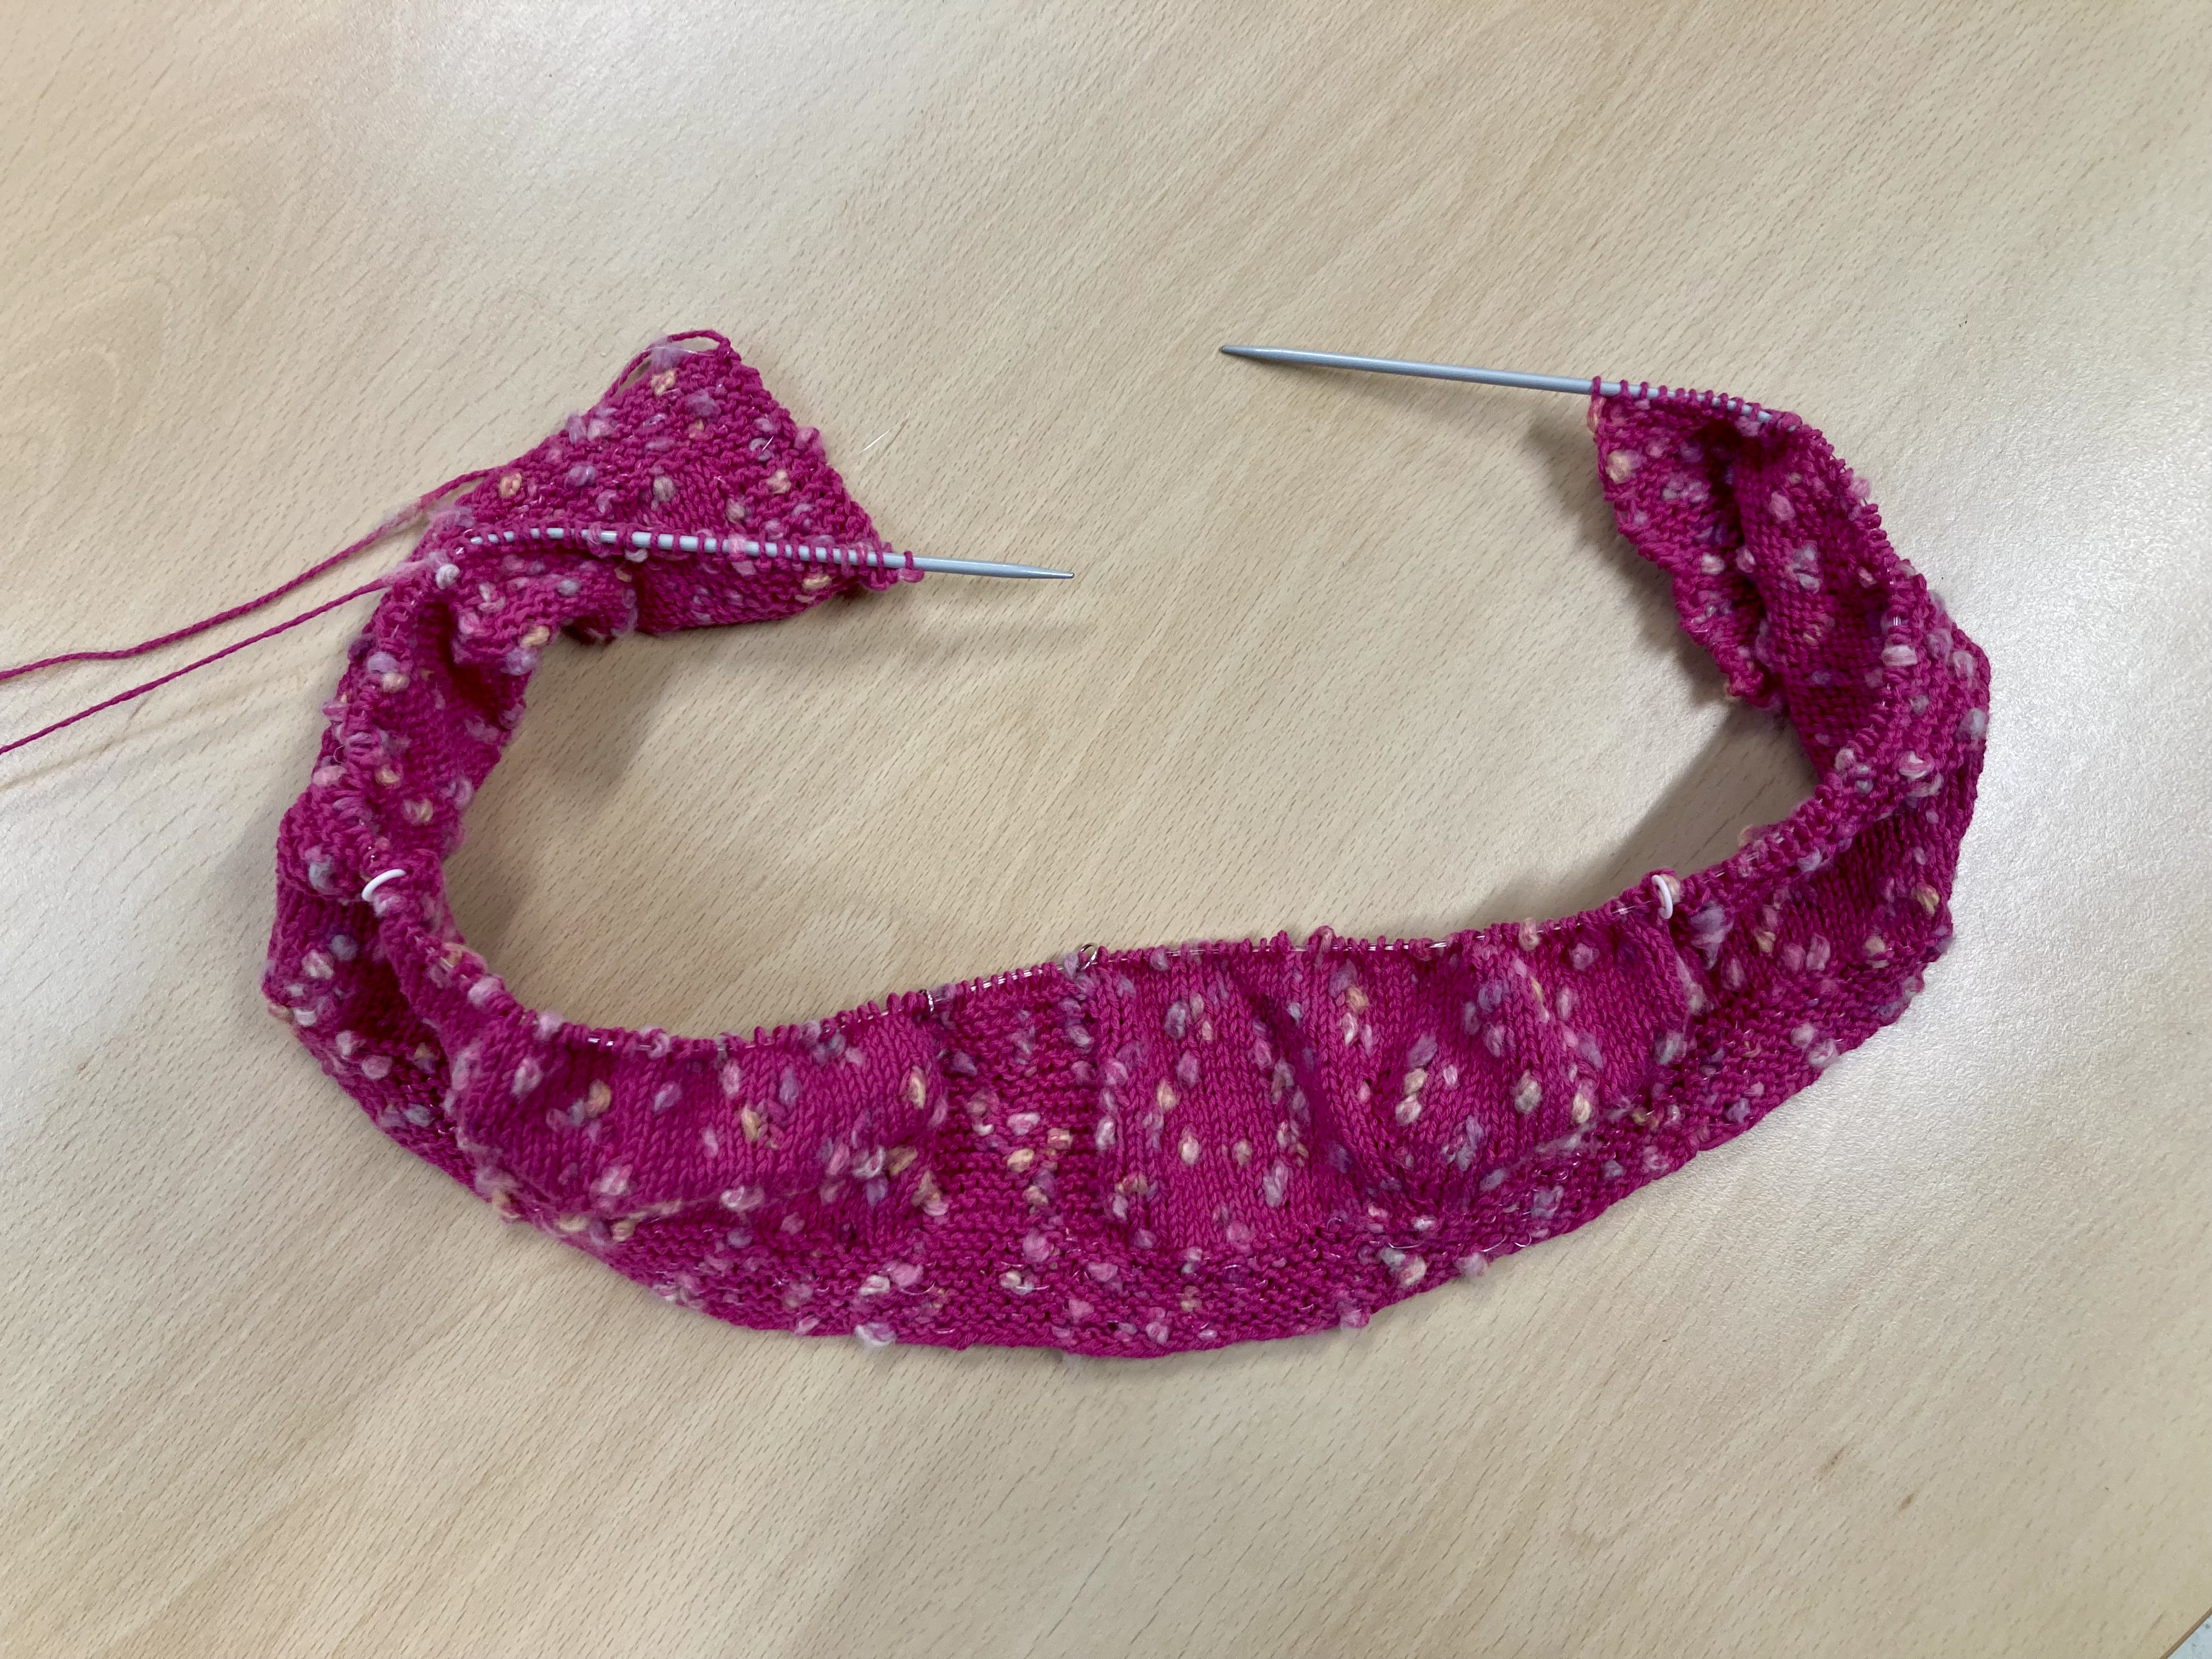
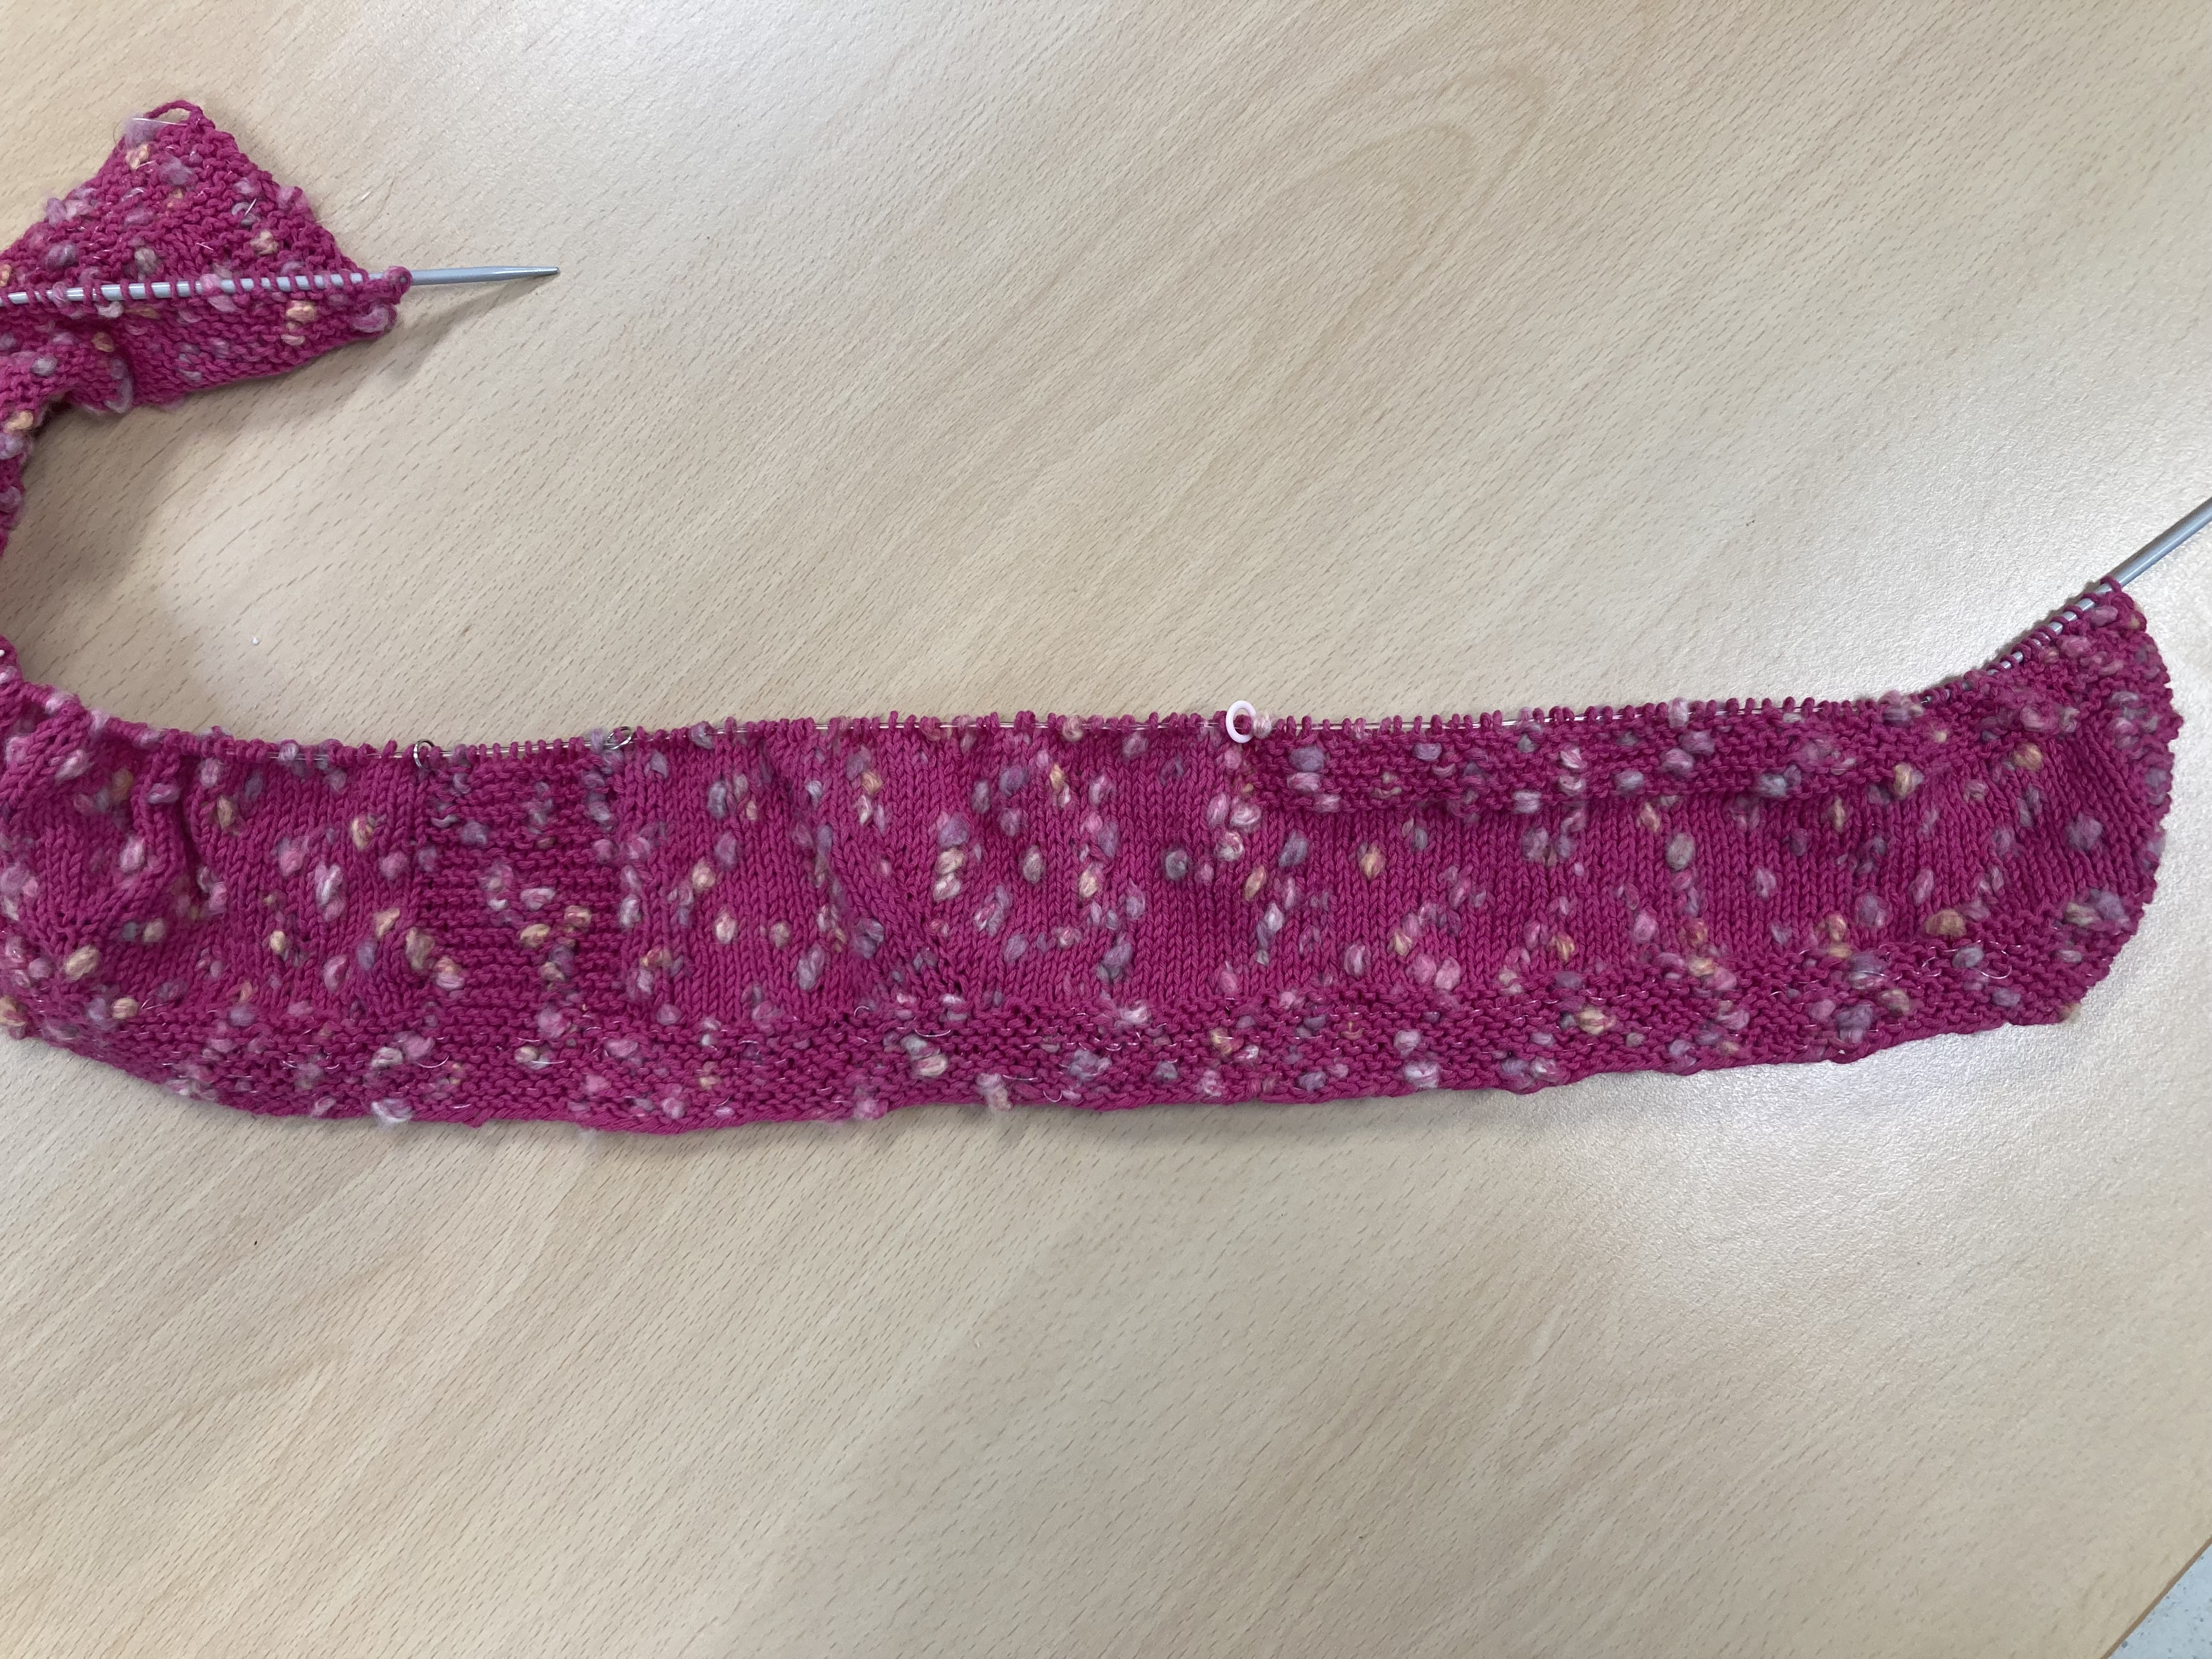
The cups are formed by increasing at the middle of each one, then decreasing rapidly at the same stitch. This makes them kind of pointy, in the old “bullet bra” style. But after finishing the cup shaping, I tried it on and it fit! I think it’s actually going to work!

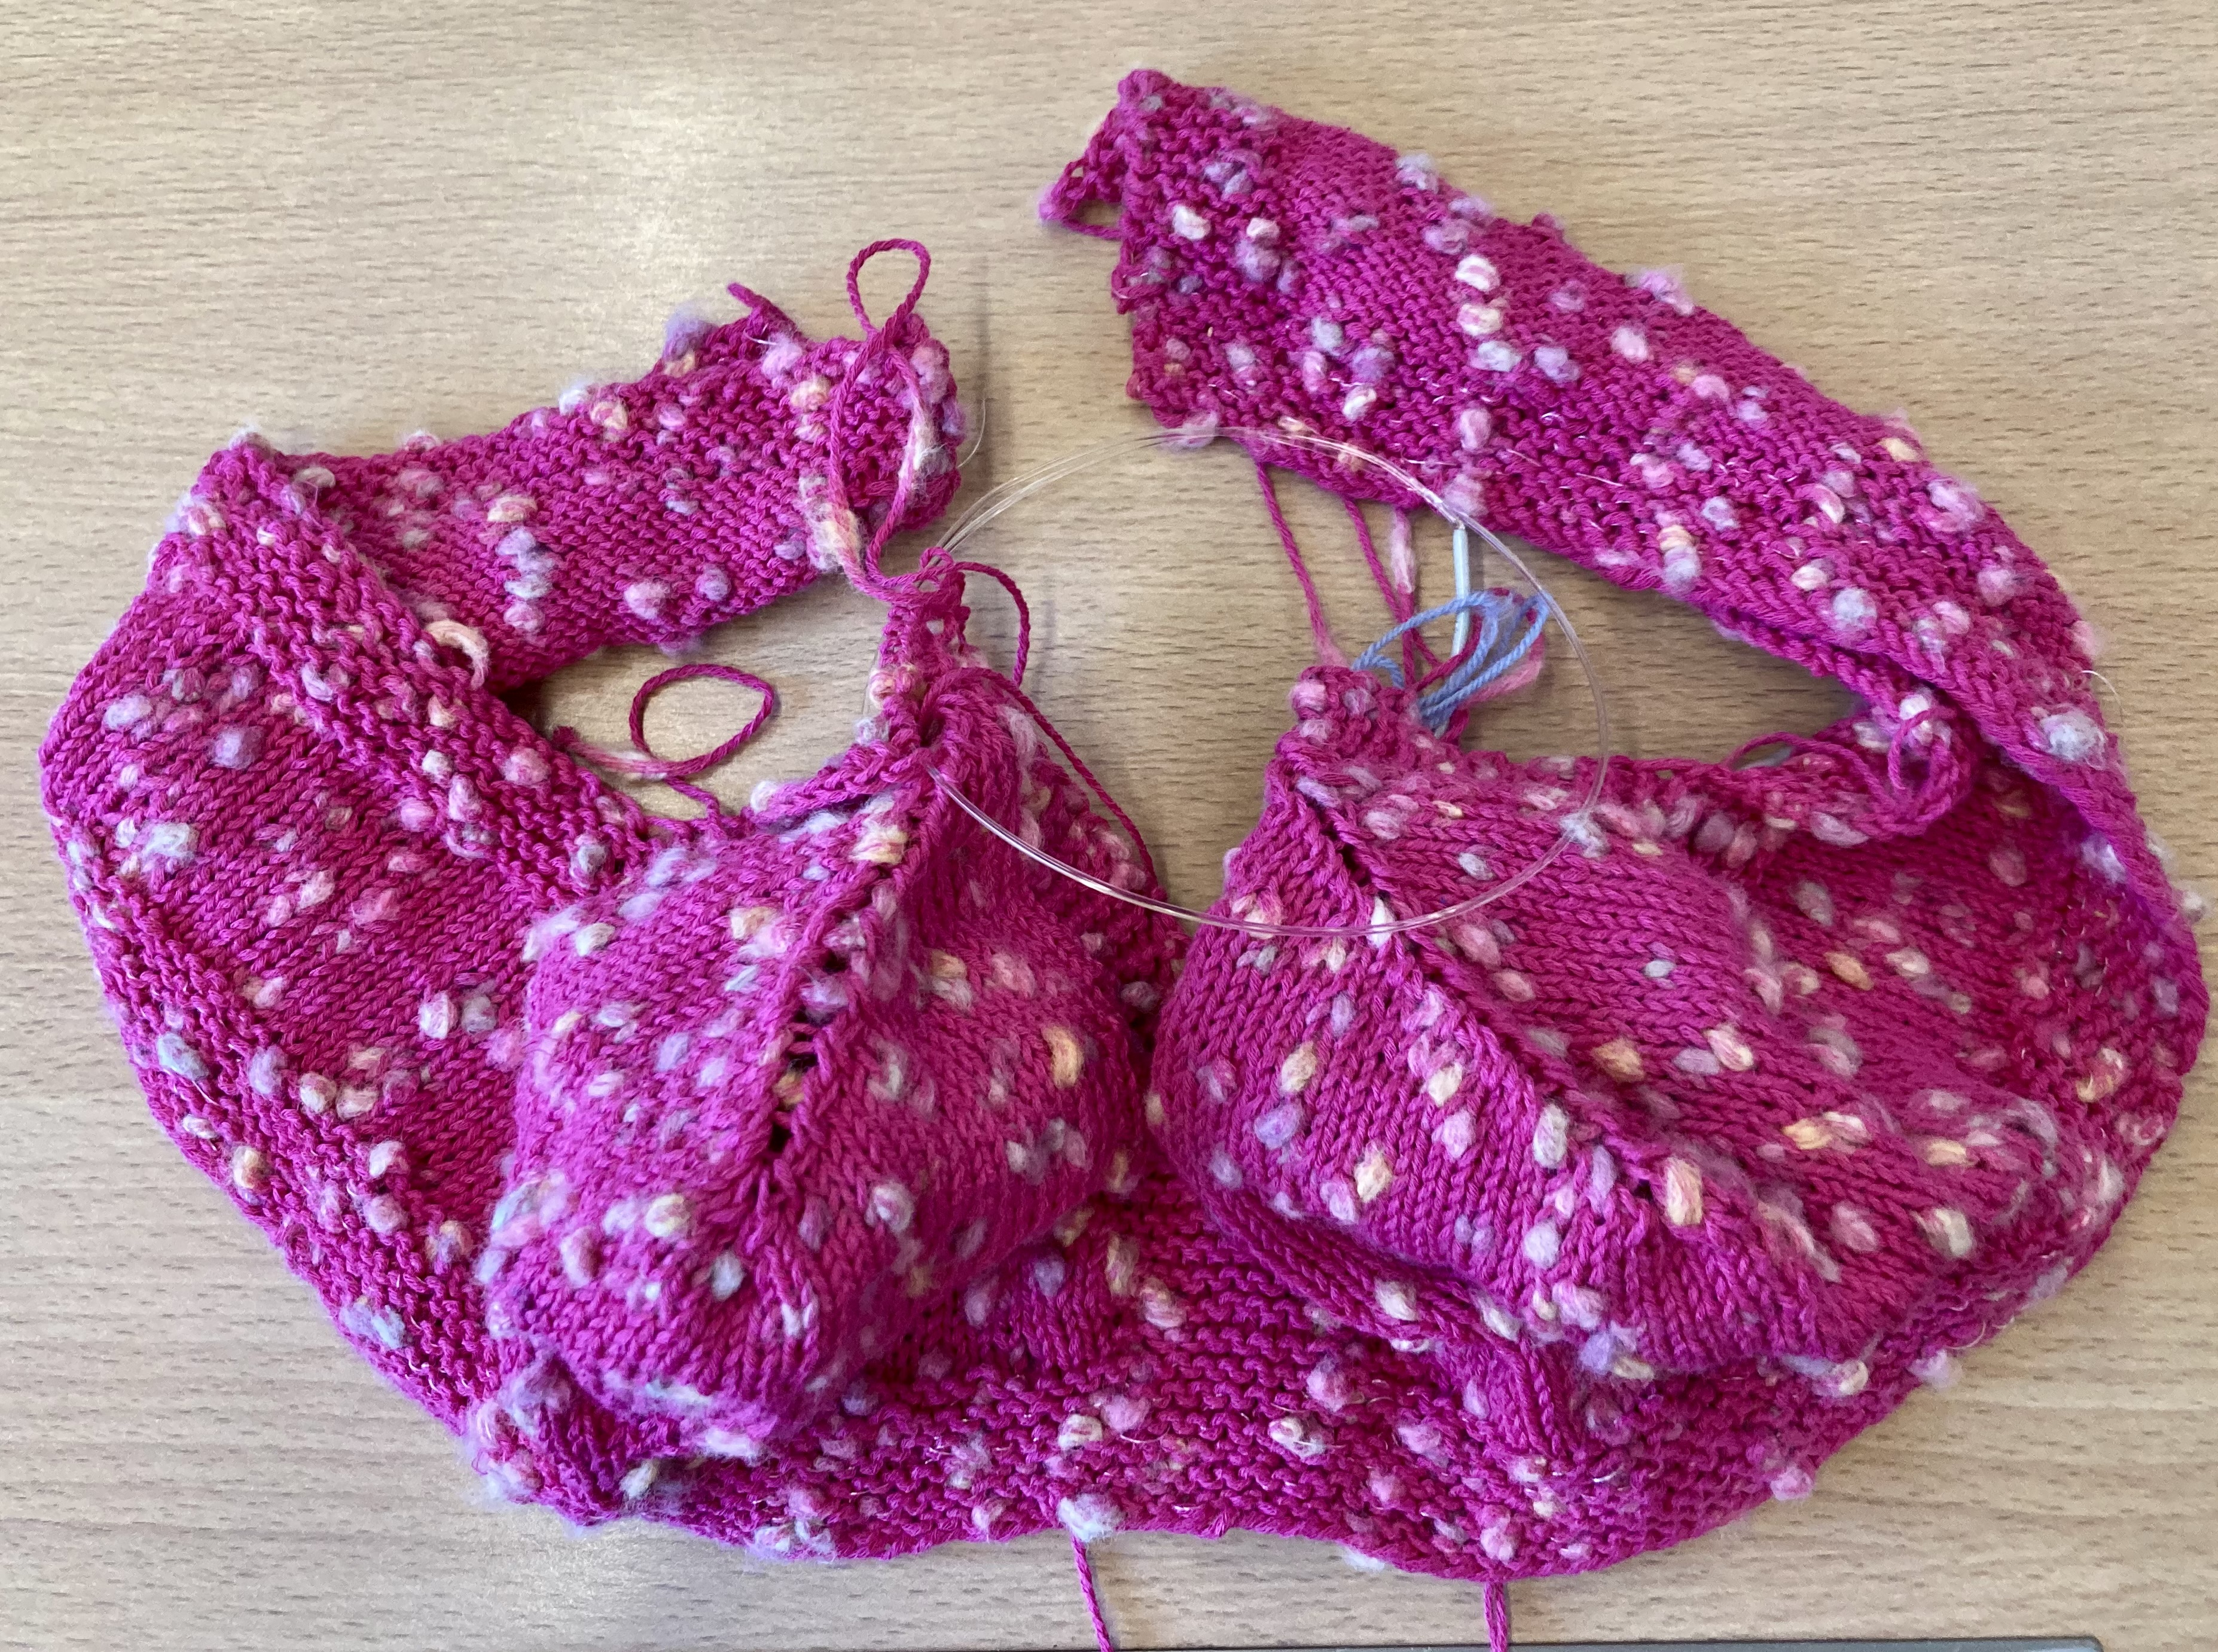
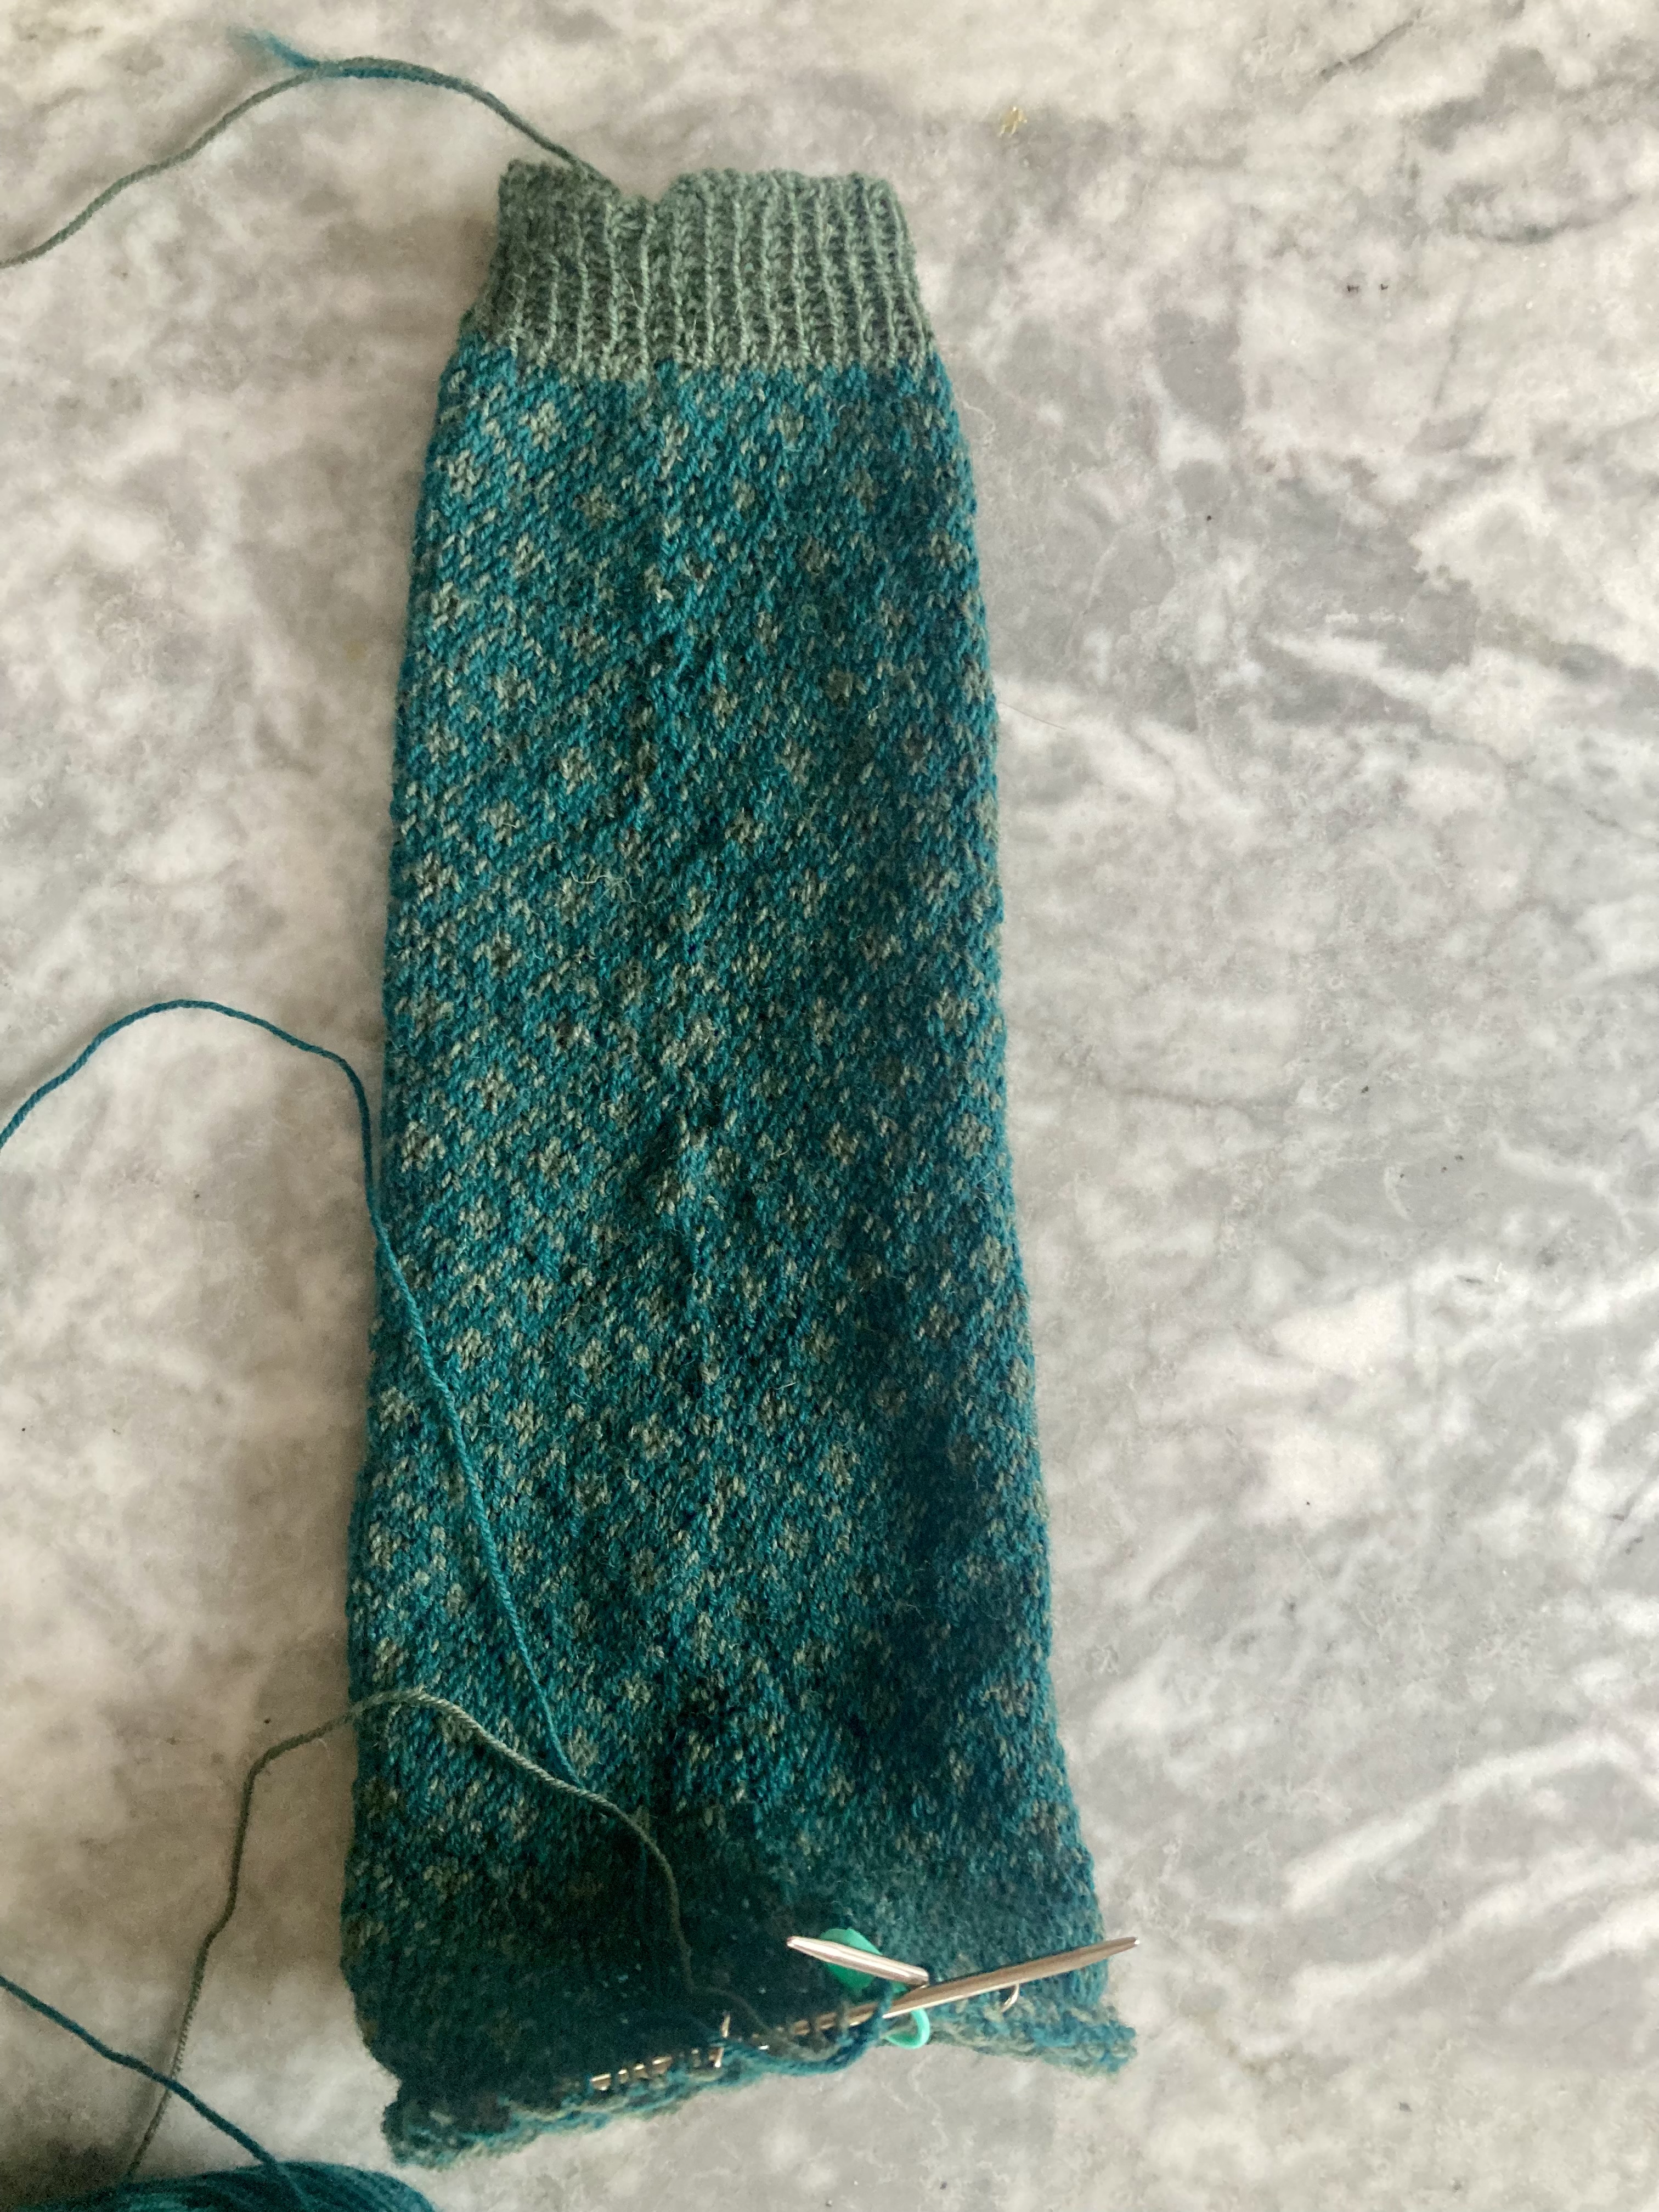
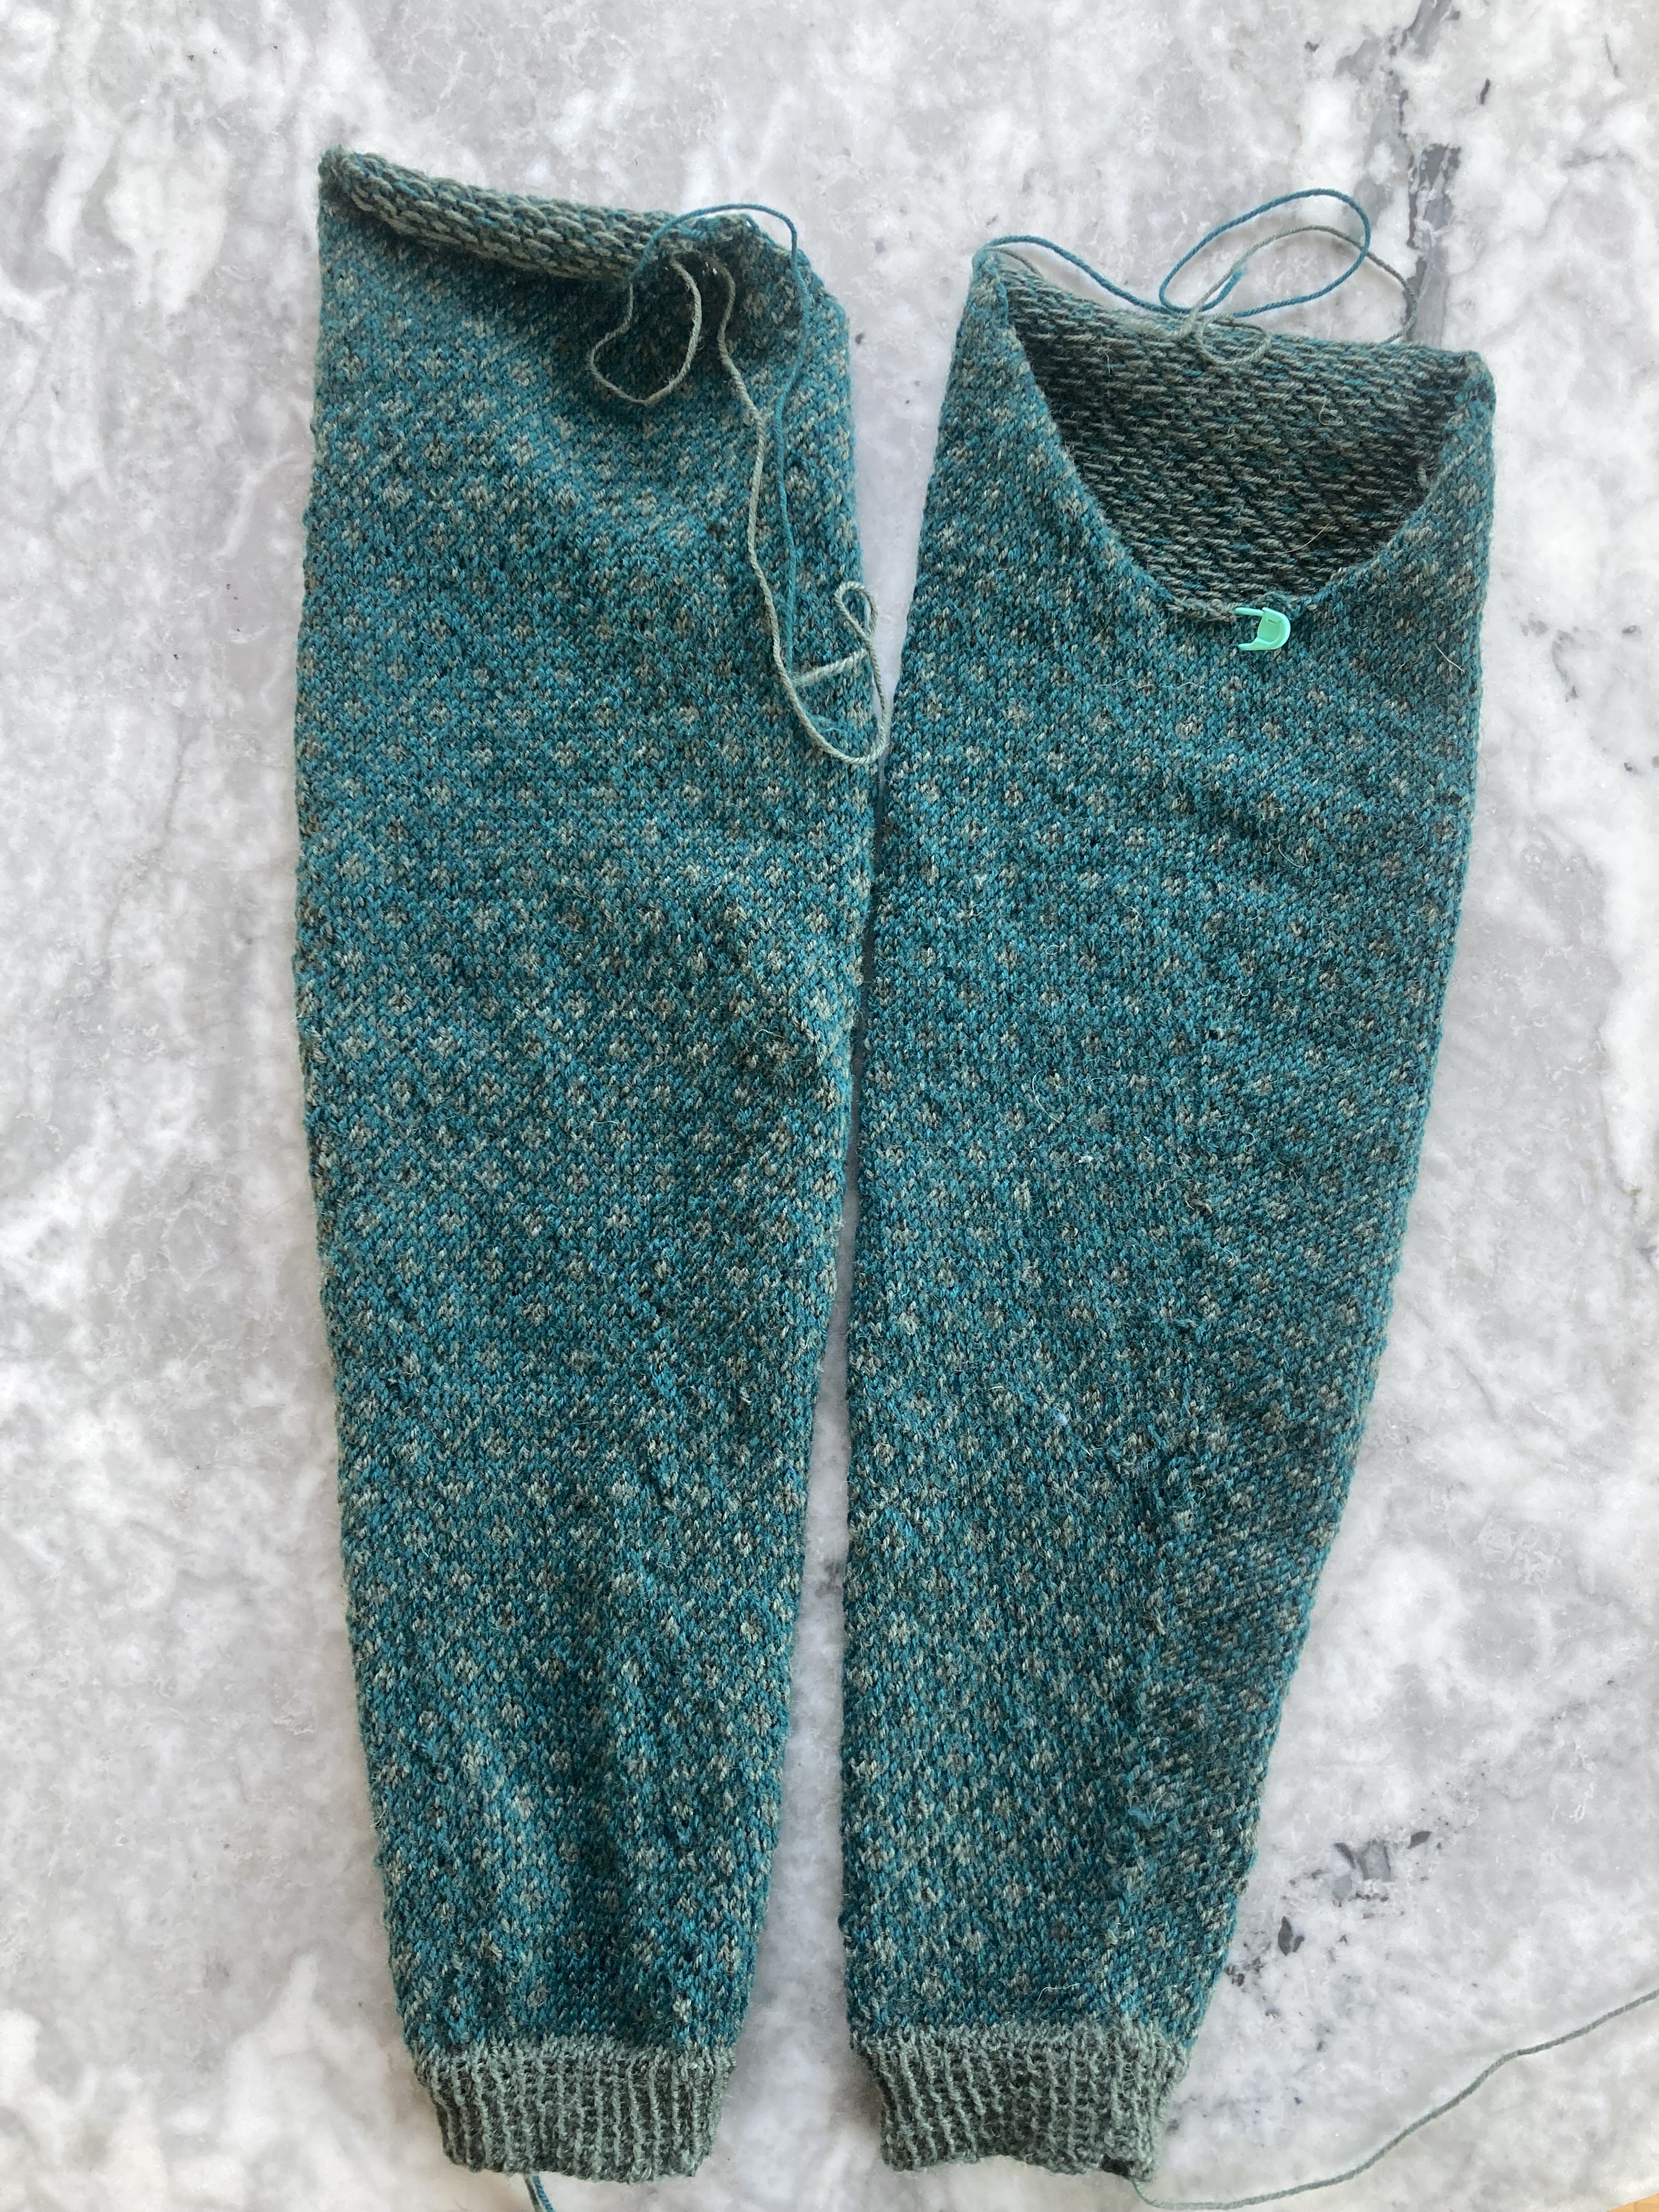
Unfortunately, that was as far as I got as of June 28th, but it does knit fairly quickly and I think the briefs won’t be too difficult (front piece, back piece, sew together, add elastic at the waist, can’t be that hard.) I will update as soon as it is finished!

May 1968: “Sunny Cushions” Adaptation

The May 1968 issue of Stitchcraft had a lot of cute projects: the striped sweater set on the cover, a couple of nice little “shell” sleeveless tops, a baby cardigan, a jumper with an interesting lattice yoke… but alas, I was so busy with real life in 2026 this month, and had so many unfinished projects lying around anyway, that it would have been foolish to try and start (much less finish) an entire normal knitting project. Luckily, there were some cute and easy embroidery projects, and I had a friend visiting whose hot-water bottle was crying out for a knitted cover, so I adapted one of the embroidered cushion designs into a simple motif for a knitted cosy.

I had bought two skeins of bright and fluffy Natural Lama Chunky by Lana Grossa in hot pink some time ago, probably because they were on sale and displayed on that little rolling shelf which my local wool shop so cleverly rolls outside onto the sidewalk in good weather. It is delightfully soft and squishy and can be knit into pretty much whatever tension you want, as the fibres compress or fluff up to fit the space allotted to them.

I used 5 mm needles and just cast on a number of stitches that seemed good, and worked in the round up to the neck part of the bottle. At that point, I realised that it would be much better to do the embroidery before the knitted bag part was completed, since I was going to use ribbing to pull the fabric in at the neck and it would be easier to access the embroidered part while the knitting was shorter and wider.

The embroidery pattern was the oddly-titled “Daisy Heads”, featured together with “Corn Cobs”, the other cushion embroidery project from May 1968. (I really loved the corn-cob pattern, which looked like a fine-line cartoon drawing, but it would have been very difficult to do without the original transfer and certainly not on a knitted bag). Besides looking nothing at all like actual daisies (orange petals with brown centres?), the petals were designed for fine long-and-short stitch on a cushion, with stem-stitch white outlines and French-knot centres, which is all perfectly fine with embroidery wool on a cushion, but equally impractical on a bulky knitted bag. I substituted normal DK knitting wool in white and yellow (somewhat more daisy-accurate) and made the petals in satin stitch, or as close as I could get to long-and-short stitch. The stem-stitch outlines were on a little larger scale, but nice enough, and the French knot centres were fine in in yellow instead of brown. I did have some brown wool that I thought I would use for the very center, but the plain yellow and white on bright pink looked better.

For the top part of the bottle where the cap screws in, I kept the same amount of stitches and just worked them in 1×1 ribbing, with a row of eyelets to thread a cord through to pull it in more if desired. The cord was monk’s cord, made the simple way by tying the strands to a door handle and twisting.

That was all! It was more “inspired by Stitchcraft” than a real re-creation of the pattern, but that’s OK. I destashed some yarn, made a useful object and made my friend happy. What more could a person want? I hope to get some WIPs finished in June and have an extra project or two to write about then.

April 1968: Cables and Twists

My April project (not anywhere near done! This month went by so fast) was the “long-line Shetland cardigan” from the April 1968 issue of Stitchcraft, “Country Knits”. Longer, slightly narrower garments and cabled, twisted or nubbly stitch patterns were all trending.

The cardigan in question is written for Patons “Fiona”, a DK/worsted blend of Shetland wool and synthetic fibre. I used “Loch Lomond” by BC Garn, which is a tweedy, loosely plied DK/worsted wool, softer than Shetland wool and a little bit less hairy, but similarly fluffy. I had bought it to make a cardigan from a modern pattern and had made most of the cardigan before realising that I didn’t like either the fit or the lace pattern on the fronts. It sat around for a while while I worked on other projects, until I decided to cannibalise it in order to make this Stitchcraft cardigan.

The pattern is written from the bottom up, in pieces and seamed, with raglan sleeves. The cables are a 5/5/5 stitch braid with the crosses on rows 5 and 11 of the 12-stitch pattern repeat, and only featured on the fronts — the back is knit plain. I chose to make it with the front and back knit flat in one piece and a seamless raglan yoke, and will probably add wast shaping and/or cables on the center back (without adjusting the total stitch count) to keep it from looking too sack-like or ballooning in the back.

I started with the sleeves to check for fit and tension, and as of April 27th have completed 1 1/2 sleeves up to the armholes — not very much! I’m sorry, it’s been a really busy month. The fabric is a little stiff on 3.5 needles, so I may switch to 4 mm for the body (and adjust for gauge?). The cables have great definition, though. The pattern is easy, the colour is fantastic, and the yarn is pleasantly squishy and tweedy. I just need to find the time to get it done.

I will update this post when I have completed more!

March 1968: Bold and Bright

There were some nice knitting designs in the March 1968 issue of Stitchcraft as well as a very 1960s “bold and bright” embroidery/appliqué design. Captioned “The Modern Look for Embroidery”, it featured flower motifs in a sort of, I don’t know the word — cartoon style? The opposite of delicate and ornate. You could embroider them onto a cushion or appliqué them onto a coffee cosy. I have more cushions than sofas and do not need a coffee cosy, but a new laptop case would be useful and pretty.

In keeping with the spirit of upcycling / using up scraps before buying new products, I decided to make the embroidered version, since I had some wool embroidery thread in the appropriate colours (gold, orange, white and two shades of green) left over from other projects. I had lots of appliqué felt too, but not the right colour scheme. Still had plenty of denim from an upcycled pair of jeans (original would have been yellow furnishing linen), lining fabric from the fabric drawer and quilt interlining for padding. All I needed to buy was a spool of thread and a zipper.

Als always, I would have had to send away for the transfer in 1968, but there was a helpful schematic in the magazine which I transfered over to paper and then onto the denim, sizing it up to fit. Transfering the design to the denim was hard, even with a white tracing pencil. I had to go over it with chalk and then of course keep going over it again and again because the chalk wiped off during the embroidery. One of these days I will try using solvent paper.

The embroidery itself was not hard, but lots and lots of buttonhole stitch over a large area. I had two kinds of embroidery wool and one kind (the two shades of gold and the white) was very fine and thin. There would have been no way to make a proper buttonhole stitch where the threads like right next to each other. So it came out somewhere between buttonhole and blanket stitch.

The hardest part, as always, was setting in the zipper. I try not to use profanity on this blog, so I will just say that I was greatly frustrated. Also, why am I utterly incapable of cutting or sewing a straight line? It is a rectangle…. it is not difficult… I measured constantly in all directions … I have one of those quilting mats with measuring lines on it… I don’t know what my problem is. In the end, I just sewed the zipper in by hand, which was far neater and easier than doing it on the machine. I tacked the lining on by hand as well.

When it was finally finished and I had successfully managed to not throw either the project or my sewing machine out of the window, I realised two things: 1) in spite of the deep frustration and the hours (yes, plural) spent trying to get the zipper in, the upper edge (zipper edge, of course) was totally crooked and 2) the motif was actually meant to be repeated smaller and multiple times across the fabric, not just once and big. No wonder the buttonhole stitch was so hard to do correctly… Yes, there is a photo of both cushion and cosy in the magazine. No, it somehow didn’t dawn on me in spite of consulting the pattern frequently. No, I don’t know what my problem is.

In spite of that, it’s…. not bad? I mean, functionally it’s fine. My laptop fits in it perfectly, the zipper works (hallelujah), the padding is a good thickness, and denim is a good, tough, washable fabric for laptop cases. The design is indeed bold and bright, and quite cheerful. The crooked edge annoys me, but I could re-do it. Still, somehow I feel this project is not quite right. Maybe I will fix the crooked edge and try to sell it? Give it as a gift to someone with the same size laptop? Keep it and let it grow on me? We’ll see.

February 1968: Fine and Lacy Adaptation

The February 1968 issue of Stitchcraft didn’t have any projects in it that immediately called to me, but a good friend had requested a pink headband for keeping her ears warm without wearing an entire hat, so decided to make an adaptation.

I first tried the two-colour pattern from the amazing cardigan set on the inside back cover. It’s made using a combination of stranded two-colour knitting and twisted stitches and makes a great trellis-like effect. It needs to be made in two colours to actually have an effect, though, so I switched to the fern-y lace pattern on the panel of the jumper on the front cover.

I had a decent amount of pink Drops Fabel sock wool left over from the April 1967 chevron-pattern dress, which was coincidentally almost the same shade as the Stitchcraft jumper. The pattern is made using standard knit and purl, k2tog / k3 tog, and yarn overs. The pattern repeat is 16 stitches + 1, worked on a stocking-stitch background i.e. the even-numbered rows are mostly purl. I added 6 stitches of garter stitch and a selvedge stitch on each side of the panel to get a good width and avoid curl. The pattern was surprisingly boring to knit! I didn’t even bother to make a chart, just used the written instructions straight out of the magazine.

I started and ended with a bit of plain garter stitch, increasing up to the total number of stitches to make the headband a bit narrower at the nape-of neck and create an elastic band effect to keep it snug. I wasn’t sure how big to make it — I have a big head and very flat hair, my friend has a presumably average-site head and very fluffy curly hair. After blocking, it ended up a little loose on me. If it’s too loose, I can always undo some of the garter stitch connecting bit on the underside.

It looks pretty and I like the pattern a lot, but I’m not sure if fingering-weight sock yarn was the best choice for a headband that should keep the ears warm. I’m afraid it won’t be warm enough. in which case, I could line it with fleece?

Not 100% happy with this project, but hopefully my friend will be.

January 1968: Knit for a Cold Snap

It is currently minus 13 degrees Celsius outside, so this caption from the January 1968 issue of Stitchcraft couldn’t have been timlier for this month’s project: cabled mittens (“mitts”) that promised me “Cosy fingers and thumbs”.

The pattern is written for Patons Ariel wool, which was marketed as being very airy (hence the name) and fluffy, so it would knit up quickly and be bulky, but not too heavy. It was made of 80% wool and 20% synthetic fibres. I used lovely Lana Grossa Slow Wool Canapa, bought a while ago from the “sale” bin, as it was sadly being discontinued. It is made of 90% wool and 10% hemp, which gives it tweedy white flecks.

The pattern is written to fit an “average hand” (women’s). I assumed my size 8 hands were larger than that, but also having never worked with Patons Ariel and being too lazy to make a swatch for such a small project, I went ahead and started with the suggested needle sizes and figured I could make any necessary adjustments while knitting.

The pattern is intended to be knitted flat from the wrist ribbing to the fingertips and then seamed up on one side. There is a thumb gusset and you are supposed to knit the thumb (flat) at the point where the thumb starts, then go back and finish the hand, picking up stitches that were cast on on the left or right side of the gusset to shape for the right or left hand. I made everything in the round and finished the hand before knitting the thumb (also in the round.) That made the gloves basically identical, but I found a way to finesse the thumb pick-up stitches to make the thumbs lie slightly differently for the right and left mitten. The pattern itself is four regular 6-stitch cables on a background of reversed stocking-stitch.

They came out very nicely and the fit is perfect for me. The only problem is that I prefer to wear gloves with fingers, or “convertible” gloves with half-fingers and then a mitten top to fold over them. I also don’t have many if any clothes that match the colour (though they do match my hair!) So I don’t know if I will keep them for myself or give them to someone as a gift.

In any case, a success, and finished very quickly. I’m considering making the baby romper from this issue as well, or just using the “extra” time for finally finish my November project… and/or any of the many other winter WIPs. Stay warm!

December 1967: Appliqué Cats are Lucky

My project for December 1967 a.k.a. December 2025 was an adaptation of a cross-stitch design for a three-piece children’s room set.

“Cross-stitch Cats are lucky” says the caption in the magazine, and I could definitely use some good luck right now. Cross stitch, however, is not lucky for me. I really, really dislike counting tiny boxes on a pattern or tiny holes in a fabric, all of which are impossible to see even with glasses, and the cross-stitch aesthetic is generally not my favourite. I like crewel embroidery and appliqué. Stitchcraft gives three variations on the design, for a cushion, small rug or night-case. I made a slightly smaller bag that can be used for pencils or chargers or knitting/crafting accessories or any kind of little “stuff.”

My backing fabric was from the leg of an old pair of jeans from the upcycling drawer. I used the leg seam as the bottom of the bag and found some lining material to match. Cristanne Miller’s book on Emily Dickinson’s grammar made an excellent straightening guide.

What colour cat? The cats in the pattern are white (rug, on royal blue background), white (nightcase, on light blue background), or blue (cushion, on cream background). I could have gone more realistic, with light grey or charcoal grey or brown. It didn’t seem whimsical enough, though. The design is so cute and cartoony that I found it better to use an entirely unrealistic colour, like the blue cat on the cushion. I had a big piece of pink felt that looked great on the blue jeans, so there it was. I made a cut-out template by photocopying the magazine page enlarged.

I appliquéd the eyes with pieces of white felt and embroidered the pupils, face and whiskers: satin-stitch and stem-stitch for the eyes, stem-stitch for the mouth, a French knot for the nose and individual long straight stitches for the whiskers. I was nervous, because anything with eyes is tricky, but I was so happy with the result! I think I really nailed the happy, lucky cartoon cat vibe.

I tried out a few different ideas for the flowers before committing to sewing anything down. My design didn’t leave a lot of room for seam allowances, so I left off the decorative lines on the sides. A single flower at the bottom right looked good, but unbalanced, so I added two more flowers at the upper left and upper middle. I adapted the bow around the cat’s neck into a more simple collar and left off the bow on the cat’s tail.

I sewed it up with minimal stress, except for the zipper, of course. Ugh, I hate zippers. This one was finicky and ended up a bit wavy, but nothing on earth will persuade me to re-do a zipper, as long as it works at all. It wasn’t until I starting writing this post, two days after the bag was finished, that I saw that I had forgotten to sew down one side of one flower and one side of the collar! Whoops. That’s what happens when you try to sew in northern Europe in December — there is no light anywhere. Can you see it in the photo? I fixed the flower and collar and then the project was really and truly finished.

I am so, so happy with this project. It is so cute! The facial expression is perfect. I dare anyone, even cat haters, to look at this bright pink cat and not smile and feel happy. I would love to keep it for myself but I am going to give it to a cat-loving friend who could use some smiles and happiness right now. That way, it will bring both of us good luck.

Happy December Holidays to all of you, and all the best for 2026.

November 1967: Jaquard Pattern Jumper

EDIT February 3rd, 2026: Finished!

My November 2025 project was the jumper from a “Jaquard Pattern Jumper Suit” from the November 1967 issue of Stitchcraft.

It’s written for Patons Cameo Crepe, a smooth, fine, worsted-twist wool. I decided to make my version in sock yarn, which is smooth and fine but not 100% wool — mine was Lana Grossa Meilenweit, which is 80% wool and 20% polyamide. I prefer not to use synthetic yarns for environmental reasons, but it is also surprisingly difficult to find smooth, “normal” 4ply/ fingering-weight 100% wool in a variety of colours. It’s either too bulky, too hairy, or a mixture of fibres, or variegated colours. Or baby wool, which has a limited pastel colour range.

I was happy with my colour choices. My olive green was a little more grey than the Stitchcraft version, and my jade green more blue (but still a little more green than it looks in the photo). I was not prepared for how very blue it looks when knitted up in pattern, but it’s fine with me.

The stranded jaquard pattern is quite easy and has the advantage of having very short stretches of one colour — no more than three stitches ever — so it makes a very evenly worked wrong side and there was no need to weave in floats. It’s a subtle pattern with not much contrast, but that’s how the original looks as well. I started with the sleeves, to check for size, and made them in the round for speed and ease. I also decided to make a normal ribbed cuff instead of a hem.

I started the sleeve the first time with the hem as written, and didn’t like it — the transition from hem to pattern wasn’t smooth. I started over and got to halfway up the arm while wondering why it was so narrow. Suprise, I had been doing the increases wrong. Started over and did them right, and the fit was perfect.

I decided to make the body with ribbing as well, and in two separate pieces worked back-and-forth instead of in the round. I thought about making it in the round with a steek for the placket, but then I thought a steek might be too bulky (the fabric is nice and flexible in spite of the close stranding) and I could adjust for fit more easily by working the back and front separately.

On the subject of fit, I made the sleeves in the regular second size, for 36-37 inch bust, and 17 inches to underarm instead of 16. The body of these late 60s, unshaped garments always looks well-fitted on the model in the photo, but like a huge floppy sack on me. My calculations tell me that the back piece, even knitted in the smallest size (for 34-35 inch bust) would be 19 inches wide the whole time, from hem to underarm, and anything that wide around the hip/waist area is just going to look awful on me. The question was: should I start off as in the pattern, decrease for waist shaping and then increase up to the bust, or start smaller to keeop the waist narrower from the beginning and just start increasing after the waist?

Since I had decided to make the bottom edge ribbed instead of hemmed, like the sleeves, I went for the second option. Started the back according to the first size and increased up to the second size for the back, and the second size for the front. That will give a different shape than intended, but it will look a lot better on me.

It still went very slowly, and unfortunately I was quite badly ill for much of November and December, so that on many days I didn’t even have the energy to knit. Also, the pattern, yarn and needles were all very small and fine. But eventually, it took shape. I decreased down to the first size again for the shoulders and back neck to get a nice fitted look.

The front bands are interesting: the inside one, where the buttons are, is made in 1×1 rib, and the outside one with the buttonholes is made in stocking-stitch with a facing and double buttonholes. The collar is also made in stocking-stitch, with facings on the bottom and front edges. I thought the facings wouldn’t be enough to stop the stocking-stitch curl, but was pleasantly surprised — the collar lay perfectly. I found some nice, possibly vintage buttons in my stash.

Before blocking, it was quite snug and the sleeves were a bit short (16 1/2 inches). It stretched the right amount in width with a loose block (no pins or stretching) but also stretched out so much lengthwise! I did not expect that from a jaquard pattern. The sleeves stretched from 16 1/2 to 18 1/2 inches, making them just a little bit too long, and the body stretched from 21 to 23 inches, which is about an inch too long. Next time, I’ll try washing it in the machine and putting it in the dryer on gentle cycle for at least a few minutes, which works with every other superwash wool I know.

This project was worth the wait and I’m very happy with the way it turned out. The photos are suboptimal this time, since we’ve been having a lot of snow and it’s hard to get out anywhere during daylight hours where we could get a perfect re-creation of the magazine photo. This was the best light we could get at five o’clock in the evening inside! I’ll try to take some more after the jumper has been washed and blocked again and we have a little more daylight.

October 1967: Babies Button-ups

“Something to laugh about” is Stitchcraft’s caption for the photo of this month’s project: a baby’s cardigan (“button-up”) from October 1967. For once, the babies in the photo are actually happy!

The cardigan can be made “for a boy” or “for a girl” (buttonholes on one or the other side) and you can knit matching trunks “for a boy” — I guess girls need to get used to having a cold bum early, to prepare them for a lifetime of miniskirts with knee socks. In any case, the cardigan and/or set is offered in three sizes, to fit newborns up to ca. 1 year (18-22 inch chest).

The suggested wool is Patons Quickerknit Baby Wool (fuzzy, hairy, 100% wool) or Patons Brilliante (smooth, synthetic). I used DROPS Fabel (sock wool, 25% polyamide) in a shade of bright orange which I had originally bought to make the red-striped dress from September 1967, but which didn’t match with the other colours. It is quite fine and smooth, so for once I actually achieved the tension called for in the pattern: 8 sts and 10.5 rows to the inch.

I made the first size, for whatever baby a friend or colleague has next (always good to have a baby garment in reserve…). The pattern is interesting and one that I had never encountered before:

  • Row 1: sl1, k2, *p1, k3*
  • Row 2: sl1, p2, *k1, p3*
  • Row 3: sl1, *k1, p3* to last 2 sts, k2
  • Row 4: sl1, *p1, k3* to last 2 sts, p2

In other words, a broken 1/3 rib. You would think it would be easy to notice and memorise, but it was surprisingly frustrating and difficult to “read” the knitting. I kept the instructions next to me the whole time.

I made the fronts and back in one up to the armholes, the sleeves separate and flat (the pattern messed with my head enough and I did not want to try to convert it to knitting in the round), and then joined it all together for the raglan decreases. Increasing and decreasing in this pattern was not fun. Even though it is really not a complicated pattern! It just wouldn’t go into my head. It worked out fine in the end, though.

The finished fabric is very three-dimensional and waffle-y and probably quite warm. It also pulls together quite a lot horizontally. I was barely able to stretch it out to an 18 inch chest with blocking, so this will be for a small/newborn baby. On the other hand, the stretchiness means the cardigan will probably grow along with the baby and fit it for a while. I added little white vintage-looking buttons and that was that. I didn’t make the trunks.

All in all, turned out fine and will brighten up some baby’s wardrobe. And it even got done in October! Next month’s project will be a stranded pullover for myself.

Out of Order: Fair Isle Country Cardigan, January 1967

The September 1967 issue of Stitchcraft had three fantastic projects in it that were all too time- and labor-intensive to finish (or possibly even start…) in September, so I concentrated on finishing up this cardigan from the January 1967 issue.

This was one of the projects that I had been looking forward to for years, since I have a 1960s vintage dress from my grandmother that would match it perfectly in colour and style as pictured in the magazine. But for some reason, this project was cursed.

It started with the wool — I wanted to be authentically Fair Isle and make in in Shetland wool, and Jamieson’s of Shetland has a DK wool in a perfectly matching shade of turquoise. There’s a yarn store in a nearby city to me that carries Jamieson’s, so I wrote them an email to order… only to get a phone call saying that the wool couldn’t be ordered at the moment due to international customs negotiations (Damn you, Brexit!). So I thanked them and asked them to cancel the order, ordered some Rauma 3-ply from a different supplier instead, which was fine, and started with that. I chose a more rust-orange instead of “Red Hackle” for the stranded yoke, along with natural white and anthracite.

The cardigan is meant to be knitted in pieces from the bottom up and has a very interesting sleeve and shoulder construction: set-in sleeves but with a round yoke over only the yoke part of the front and back (not a true round yoke as one would find on a “real” Shetland-style garment.) Interestingly, the men’s pullover version of the same design has a traditional round yoke. In any case, I started with the sleeves, to check how the tension and pliability (Rauma 3-ply is sturdy, but can be rather stiff) would work out. It seemed fine.

Then it was time for the fronts and back, which I made in one piece back-and-forth (no steeks, since the only stranding is on the yoke.) I was concerned that the straight-up-and-down, oversized style would look dumpy on me, so made it a size smaller than indicated for my bust measurement and added in some waist shaping. Also, I made the button bands along with the fronts even though they are supposed to be made on a smaller needle, since I hate making vertical button bands and sewing them on afterwards.

It was very boring knitting and mostly sat around in the cabinet while I worked on more exciting projects. (On that note, please excuse the wall of text — I never though to take photos of the work in progress, since nothing interesting happened.) Then, somewhere around this time, I got a call from the yarn shop in the nearby city. “Your order of Jamieson’s DK has arrived!” What? I thought it wasn’t possible to order it? It turned out there was a misunderstanding and they hadn’t cancelled my order, just put it on “pending” until whatever regulations were changed. Well, you can never have too much yarn, I guess…

Back to the cardigan… It seemed fine while knitting, but it was hard to check for fit, and I couldn’t shake the feeling that the wool, although pleasantly lightweight, seemed to stretch more and more width-wise the longer the body got. The real problem came with the yoke. Because of the weird set-in-sleeve-plus-stranded-yoke construction, the stranded work starts a few inches in from the shoulder seam. The seam is unavoidably a bit bulky (DK wool…) and the way the stranded work starts resulted in a weird tension difference that made the shoulder seam stand out in an ugly way and also made the sleeves “balloon” at the top for an almost Victorian leg-o-mutton look. Not a good look for me! Not at all! Also, the stranded part is too long and the neckline very high, making the shoulders too wide. And the rest of the fit wasn’t good either — it continued to stretch width-wise and even having made a smaller size, it was all just huge and baggy. Even the sleeves were too long. To top it all off, in spite of making the button bands along with the body, I didn’t get the spacing right. (I did find nice buttons, at least.)

I tried blocking it into shape, but there was only so much that that could accomplish, and now I don’t really know what to do with it. I thought about removing the sleeves and re-positioning the shoulder seam as one would with a sewn garment, and just cutting down the sides and sewing side-seams, then getting rid of the excess fabric. That would be pretty brutal, and also a lot of work, and I don’t like machine-sewing and cutting hand-knitted garments. I thought about giving it to a friend who has wider shoulders and a larger size than me. I thought about wearing it in the winter and just living with the oversized style, even though it is not my style. I made a matching tam while I was contemplating all of this, and even the tam turned out too big. I considered putting the tam through the washing machine and/or dryer to see what happened (would it felt too much, or just get smaller) and if successful, doing the same with the cardigan.

As of this post, I have still not decided what to do, but if it fits my friend, I think I will give it to her and knit myself another version from the Jamieson’s wool. Perhaps with pink instead of rust for the contrast yoke colour, and not following the pattern, but just making it in a size that fits me the way I want it to fit, and with a traditional round yoke. We’ll see! I do still love the design.

Out of Order: Chevron Dress from April 1967

EDIT: Now with photos!

The April 1967 issue of Stitchcraft had many great designs in it and my favourite was this pink and purple chevron-striped dress on the front cover. And since the August 1967 issue didn’t have any projects that particularly inspired me, I worked on the chevron dress all summer and got it finished just in time for the August blog.

The “easy-line dress is fashion styling for all age groups” and claims to be in “the 30’s Look” — interesting, considering that dresses in the actual 1930s were still much longer, of course, and this dress, while not a mini-dress, falls at least a little bit above the knee. Also, this dress has a typical mid-60s A-line shape and not the typical long and willowy 1930’s silhouette. But the chevron pattern was very popular in the 1930s, as was the dropped waist and the flowy shape.

The pattern is written for plain Patons Beeehive 4-ply (fingering-weight) wool, but I decided to use sock yarn for easier washing and wearing. DROPS Fabel is easy to knit with, inexpensive, and available in a huge range of colours, including an almost-perfect match for the original “Wine” (purple) and “Radiant” (pink). I decided to make it a little bit shorter than in the pattern (third size should be 37 inches), as I expected it would stretch with weight and wearing. That was my only modification.

The shaping is mostly done in the chevron pattern itself — it starts off at the hem with 5 stitches in between the zig-zag increases and decreases, then reduces at intervals to only 2 stitches between at the waist. All further increases and decreases to the bust and after the armhole point are done by increasing and decreasing at the edges. (Contrary to my usual modifications, I knit the dress flat in pieces for more stability, as called for in the pattern.) The sleeves are made entirely in the 2-stitch chevron pattern. There are small knitted-in pockets with flaps on the right side. All the edgings, including the V neck, are made with folded-over and sewn-down stocking-stitch hems.

The chevron pattern makes the fabric quite nubbly, so it wasn’t clear exactly how long the dress would be before blocking. I was afraid I might have made it a little too short (I took 3 inches off the pattern length by adjusting the spacing between skirt decreases) because it fell quite a bit above the knee before blocking and the proportions seemed off. Also, the sleeves were a bit shorter than “bracelet” length and a bit tight at the hem. Blocking smoothed it out well, though — maybe even a bit too well! I didn’t pin it or anything, just hand-washed and laid it out flat as I usually do, and it is now actually 37 inches long and the sleeves are long sleeves. The fit in width is fine.

I’m guessing it stretched so much because the wool is superwash. The only solution I have ever found for the problem of superwash-stretch is to put the garment in the dryer (maybe a nice reader of this blog has a less dangerous idea?) I didn’t dare to do it with this dress at the very first blocking after putting so much work into it and being so happy with the final result, but I might cautiously try it next time I wash it. I’m happy with the fit the way it is, but it would look snappier and more authentic if it were just a bit shorter and if the sleeves were truly bracelet length.

As always, we had fun with the photos! I don’t know how the models were able to twist their backs up so severely and still look relaxed and pretty.

July 1967: Baby Talk

My project from the July 1967 issue of Stitchcraft was the “matinee jacket” from this jacket-and-dress set for a baby.

I had some nice Slow Wool Lino (sadly discontinued but alive and well in my stash drawer) that worked well for it — fine and soft, all-natural and machine-washable. I was a bit ambivalent about making baby clothes in such a drab shade of greyish-brown, but I hear that parents these days prefer neutral colours for babies? It will certainly match with everything.

The tension is supposedly 9 3/4 stitches to an inch over pattern (!) which is supposed to correspond to 7 sts/inch in plain stocking-stitch. I can get 7 sts/inch in stocking-stitch with Slow Wool Lino but the stitch pattern stretches. It is not difficult in itself — basically an eyelet rib on a reversed stocking-stitch background — but was unusually tricky to work increases and decreases in, even though it keeps the same number of stitches in each row, and it was clear that the tension would be completely off even before blocking, so I reduced the number of stitches.

I was so frustrated with the comparatively easy decreases on the “skirt” part and increases on the sleeves (which also ballooned out in an annoying way) that I decided to make the yoke in plain stocking-stitch, similar to the dress from the same pattern. I considered making a round neck like on the dress, or possibly embroidering the yoke afterwards with some little flowers in a contrasting colour to offset the drabness of the brown.

After consulting with the good people on the All Things Vintage forum on Ravelry, I kept the v neck, and when it was done, I didn’t think embroidery was necessary. I had already decided to add a couple of buttonholes at waist/armhole level instead of the unpractical ribbon tie from the pattern, and I found some little white fabric-covered buttons (possibly vintage? maybe just look like it?) in the button box, which perked up the colour with a bit of contrast and looked very sweet and old-fashioned. Here are some photos from before and during blocking:

I was not so impressed by this pattern and ended up making a lot of changes. But the finished product is soft, warm, practical, will match with everything, can be worn in all seasons and will “grow along with” a baby, so I think everyone, including the baby, will be quite pleased with this gift. The recipient is a colleague whose baby should arrive in November, so it was finished well on time for that, as well as on time for the blog. So all in all, a satisfactory project.

In other July 1967 news, I still want to make this dress from the same issue and even bought wool for it! If I ever make it through the “naughty pile” of WIPs, I might be able to start it sometime…

June 1967: Daisy Motif Peg Bag

My project from the June 1967 issue of Stitchcraft was a “peg bag” adorned with simple embroidery.

“What is a peg bag?”, some of those who dry their laundry on a rack indoors or in an electric dryer may ask. As you can probably tell from the photo, it is a bag to hold laundry pegs a.k.a. clothespins so that they are close at hand while you are hanging up your clean laundry on a line to dry. The design from this issue had a folded-over top into which you insert a wooden coat hanger to hang it up while you work, as well as a matching apron for maximum laundry-hanging style which I didn’t make this time, but will keep in mind for later.

The base fabric is supposed to be orange or gold coloured — I used leftover dark grey from last month’s “crab” cushion. It is supposed to be lined with gingham — I used leftover green fine corduroy from last month’s “fish” cushion. The only thing I had to buy was more embroidery thread — I had enough white and black, but not enough yellow or green.

Not having a transfer as usual, I just drew the daisy on a piece of paper freehand and copied it onto the fabric with carbon transfer paper. For the chevron-and-loop-stitch borders, I drew two parallel lines with V’s in between for the chevrons. The embroidery was not quite as simple as the design would lead you to believe. The white outlines of the daisies are done in couching stitch — laying down a thread and tacking it down with tiny stitches along its length. Easy in theory, but tricky in practice. In retropsect, I could have glued down the outline threads with water-soluble glue before couching them, to make them stay in place better. (Do any of you do this?)

The yellow centers are also couched, or actually woven — you put down slightly loose satin stitches in one direction and weave cross-threads through in the other direction. It gives a marvelous texture, but I was working with 6 strands and the cross-threads were prone to either split or skip over the ones they were supposed to be weaving through. The outline around the centers is black chain-stitch and the leaves and stems are satin and chain-stitch — except that I didn’t read carefully enough and did the stems in stem stitch. Also, I think two different shades of green got mixed up in my green thread stash? But it gives a nice subtle shading effect. The borders are chevron stitch with loop stitches.

The difficult part of this project was the construction, particularly the lining. I had to rip out the top-pocket seam more than once and re-position it to make all the right and wrong sides come out correctly. When I finally got it right, the lining did not stay in perfectly smoothly, but i will live with it. Also, the corduroy-ish fabric is not really a good lining choice, as it picks up every tiny bit of fuzz floating around while also producing its own. The colour is good, though!

I inserted an old-fashioned wooden coat hanger and noticed that the lining “caught” on one side, so did some more adjustments until it fit better. Voilà. It looks better in real life — the camera makes weird shadow patterns. My only complaint, besides my inability to sew straight lines, is that the finished bag is quite big — how many pegs / pins are you really going to put in it? But it can also be useful for hanging in the hallway / coat rack area to hold gloves, accessories, cat toys or whatever.

I have both an electric dryer and a drying rack, but no outside space to hang up laundry, so I will give this bag to someone who has a garden with a clothesline. The intended recipient also wears hats and fingerless gloves and has two cats, so the bag will find a use in any case.

Not the most exciting project I have ever made, but fun, cute and useful.

May 1967: Fish and Crab Cushions

Ahoy! It’s springtime at the Stitchcraft Sixties and what could be more appropriate than some accessories for the garden? I don’t have a garden, or even a balcony, but I do love appliqué and these May 1967 designs with “modern shapes in brilliant colours of felt on crash” that “make practical and gay deckchair cushions.”

The shapes are a fish and a crab, and the “brilliant colours” unfortunately don’t show up in the black-and-white photo. The fish is turquoise, dark green and lime green felt on lime-coloured “crash” (heavy burlap-type linen) and the crab is orange, magenta and light coral on light grey crash. Both use black fabric for the backing. I used the colours from the pattern with the fish on a somewhat more lightweight almost-corduroy cotton, and the crab on a darker grey heavy upholstery/decorating cotton. For the backing, I used upcycled jeans in light blue (fish) and dark blue (crab), and I lined both cushions with upcycled shower curtain to better damp-proof them in the northern European summer.

The shapes were suprisingly difficult to trace and cut out without a transfer — hard to get the fish pieces to line up perfectly, and the seemingly random-shaped crab leg segments to come together properly. I drew the fish outline on the backing-fabric paper pattern, then cut out the entire fish as a paper pattern based on that, then cut out the segments.

I love that some of the pieces on both cushions were cut out with pinking shears, but then I forgot to do it and had to buy more fabric and cut all the pinked pieces on the fish out again. Sigh.

The actual appliqué was very fast and easy. In the pattern, it says to do it on the machine, which of course would have been even faster, but I like working by hand. I used a small running stitch instead of and over-edge whipstitch, which I would normally use.

I flat-lined the finished appliqué and back pieces with the shower curtain material (I did use the machine for that) and made them up into cushion covers with zippers — not specified in the pattern, but I wanted the cushion covers to be removable for washing.

The finished size was about 17.5 x 14.5 inches, as in the pattern, which is about 45 x 37 cm. I didn’t want to make up cushions, so I bought two 45 x 45 cm ready-made cushions, which adapted themselves to the rectangular shape well enough.

It was an easy, fun project and I absolutely love the bright, 1960s colours and friendly, cartoon-like “modern” shapes. I also like sea animals, so perfect. Sadly, I have nowhere to put them and so cannot keep them for myself, but will give them away to friends for birthdays and/or housewarming gifts. Then I can visit the friends and the cushions.

Hope your Spring is going swimmingly!

April 1967: Check pattern Shell

EDIT May 26, 2025: Finished! I had to wait for the photos but it was worth it. Scroll down to see…

My April 2025 project was this “shell” (sleeveless top) in a stranded chequerboard pattern — one of three “summer shell” patterns in the April 1967 issue of Stitchcraft, along with a polo-neck bouclet and a crochet lacework design. (And shells. Listening to shells, because shell, get it? Yes, we got it, thanks.)

The wool in the pattern is Patons Cameo Crepe, a very smooth, twisted fingering-weight wool. I chose Lana Grossa Ecopuno, which I used for this “shaded blouse” and this sleeveless cardigan a couple of years ago. Though not as smooth as a crepe-twist yarn, it’s soft, light and not too warm, and available in many very pretty colours. I chose a dark green and pale, slightly seafoam-tinged blue, similar to the original colours but with more contrast.

The tension in the pattern is 8 stitches to the inch in pattern, which I can’t get even with fine yarn, so I made the smallest size (for 32-33 inch bust) to fit me (38 inch bust) and calculated that it would come out with around 36 inches in the bust, i.e. two inches of negative ease instead of the 1-2 inches of positive ease in the pattern. I hear you out there saying “Never, ever knit a stranded pattern with negative ease!!!” but it can and should sometimes be done! The yarn is loose and drapey, even in a non-diagonal stranded pattern like this one, and even two inches of negative ease doesn’t look the least bit tight.

Which brings us to the shaping question: all three “shells” in the issue show the new longline silhouette — hipbone length and unshaped from hem to bust. If you look closely at the photos, you will notice that the poses often involve a hand on the back waist, a hand on the back, arm behind the back, elbow pointing at waist level… the things you do to make you look like you have a waist in your long, unshaped garment! I never make unshaped tops for precisely this reason — they look like a sack on me, as they tend to do on all but the skinniest or curviest figures. Having had good experiences with longer tops shaped from hip to bust, I started the top with even fewer stitches at the hip and increased up to the number in the small pattern size after the waist. I also made the top in the round from hem to armhole shapings.

To test the check pattern, I made a little phone cosy in a different wool (DK weight), Since the pattern has no diagonal lines, I was afraid it would pull together awkwardly . That was a concern with the DK sample, so I was very careful to strand loosely with the Ecopuno (another reason for sizing down) and had no problems. I did, however, make a mistake in the pattern, to be fixed with duplicate stitch because I’m too lazy to rip back that far.

It went wonderfully up until the front part above the armholes, where in spite of my careful calculations, I ran out of the light blue yarn. No problem, I had bought it at my local wool shop right in my neighbourhood, so popped over to buy another ball… But no! The shop is changing management and has been selling off all the inventory before the first of May! They still had some Ecopuno, but not in the right colour, so I had to order more online. Argh!

The new wool arrived and I finished the top easily enough. Of course, the new wool was a different dye lot and the one time it makes a difference… and it was on the front piece, too. The change line got less noticeable after blocking and letting dry. Also, the pattern tricks the eye into not seeing it.

My knit-night friends and I recreated the magazine photos. Here’s the black-and-white one:

And here is the magnum opus, where one knitting colleague photoshopped me into the original photos. Is it me, or is it the model?

I am very, very happy with this project — and the photos!

March Excursion: Snow Daisies

Welcome to Spring! Is it snowing where you live? The March 1967 issue of Stitchcraft had some nice designs, but nothing that was fast, easy or practical enough for my knitting life at the moment, so for this month’s post I’ll write about a cardigan I finished in mid-February: the Snow Daisies cardigan from the Spool Cotton Company’s issue No. 189: “Women’s Sweaters: America at Work and Play” from 1942. The booklet with all the patterns is available for free here.

The “Snow Daisies” cardigan is touted as a “heavy cardigan for outdoors”. Knitted somewhat oversized (esp. for 1940s sweater standards) in thick wool, it has “plenty of room for a sweater underneath.” What you don’t see in the magazine photo is the fact that not only the sleeves, but also the back is made in 2×2 ribbing. This was an excellent design feature on many “sport” garments from the first half of the 20th century, allowing for generous movement without extra fabric to flop around and get in the way of your golf swing or ski poles or whatever. The front is made in reverse stocking-stitch with an open cable on each side, and decorated with embroidered daisy flowers. It’s a nod to all the “Bavarian”, “Tyrolean”, “Alpine” etc. traditional southern German and Austrian styles, though of course an American pattern from 1942 doesn’t use those words as I imagine they did not want the association.

I made my version in Hjertegarn New Life, a very interesting recycled wool — if I understood correctly, it’s reclaimed from older knitted items. Mine was 65% recycled wool and 35% recycled “other” fibres (synthetic, I guess?). It felt like strong, nice wool, tough but not too scratchy.

My tension was a little larger than the pattern and I wanted the cardigan to not fit too loosely, so I adjusted the stitch counts. The sleeves were fine, though the ribbing didn’t pull in as much as I thought it should. I guess that comes from wool that is only 2/3 actual wool and 1/3 mysterious “other”? So I made the back even narrower than I had calculated. It was too narrow. I made extra panels on the sides to make up for it. On the front, I placed the cables slightly differently to couter-balance having fewer stitches. I forgot to do one extra cable twist in the center twist part, but if you can’t see it in the photo, I won’t tell you where it is. The daisies were easy to embroider on.

I was not so happy with the final result. The overall look is quite square — the ribbed shoulders add bulk in an area where I am plenty wide enough. Worse, the ribbing just doesn’t pull in at all — it expands horizontally, especially after washing and with wearing, as ribbing is not supposed to do. I took out the extra side panels, which helped a little. I’m just not happy with the wool, though. It’s too bulky and not springy enough. Also, the button band is “wavy”, though I think that might be a design feature, since it looks like that in the photo, too?

(Not having any winter sports gear, here I am posing with a croquet mallet and ball…)

I’ll see what I can do with it, but I might end up giving it away.