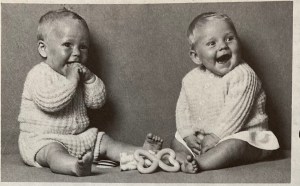
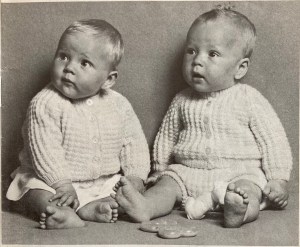
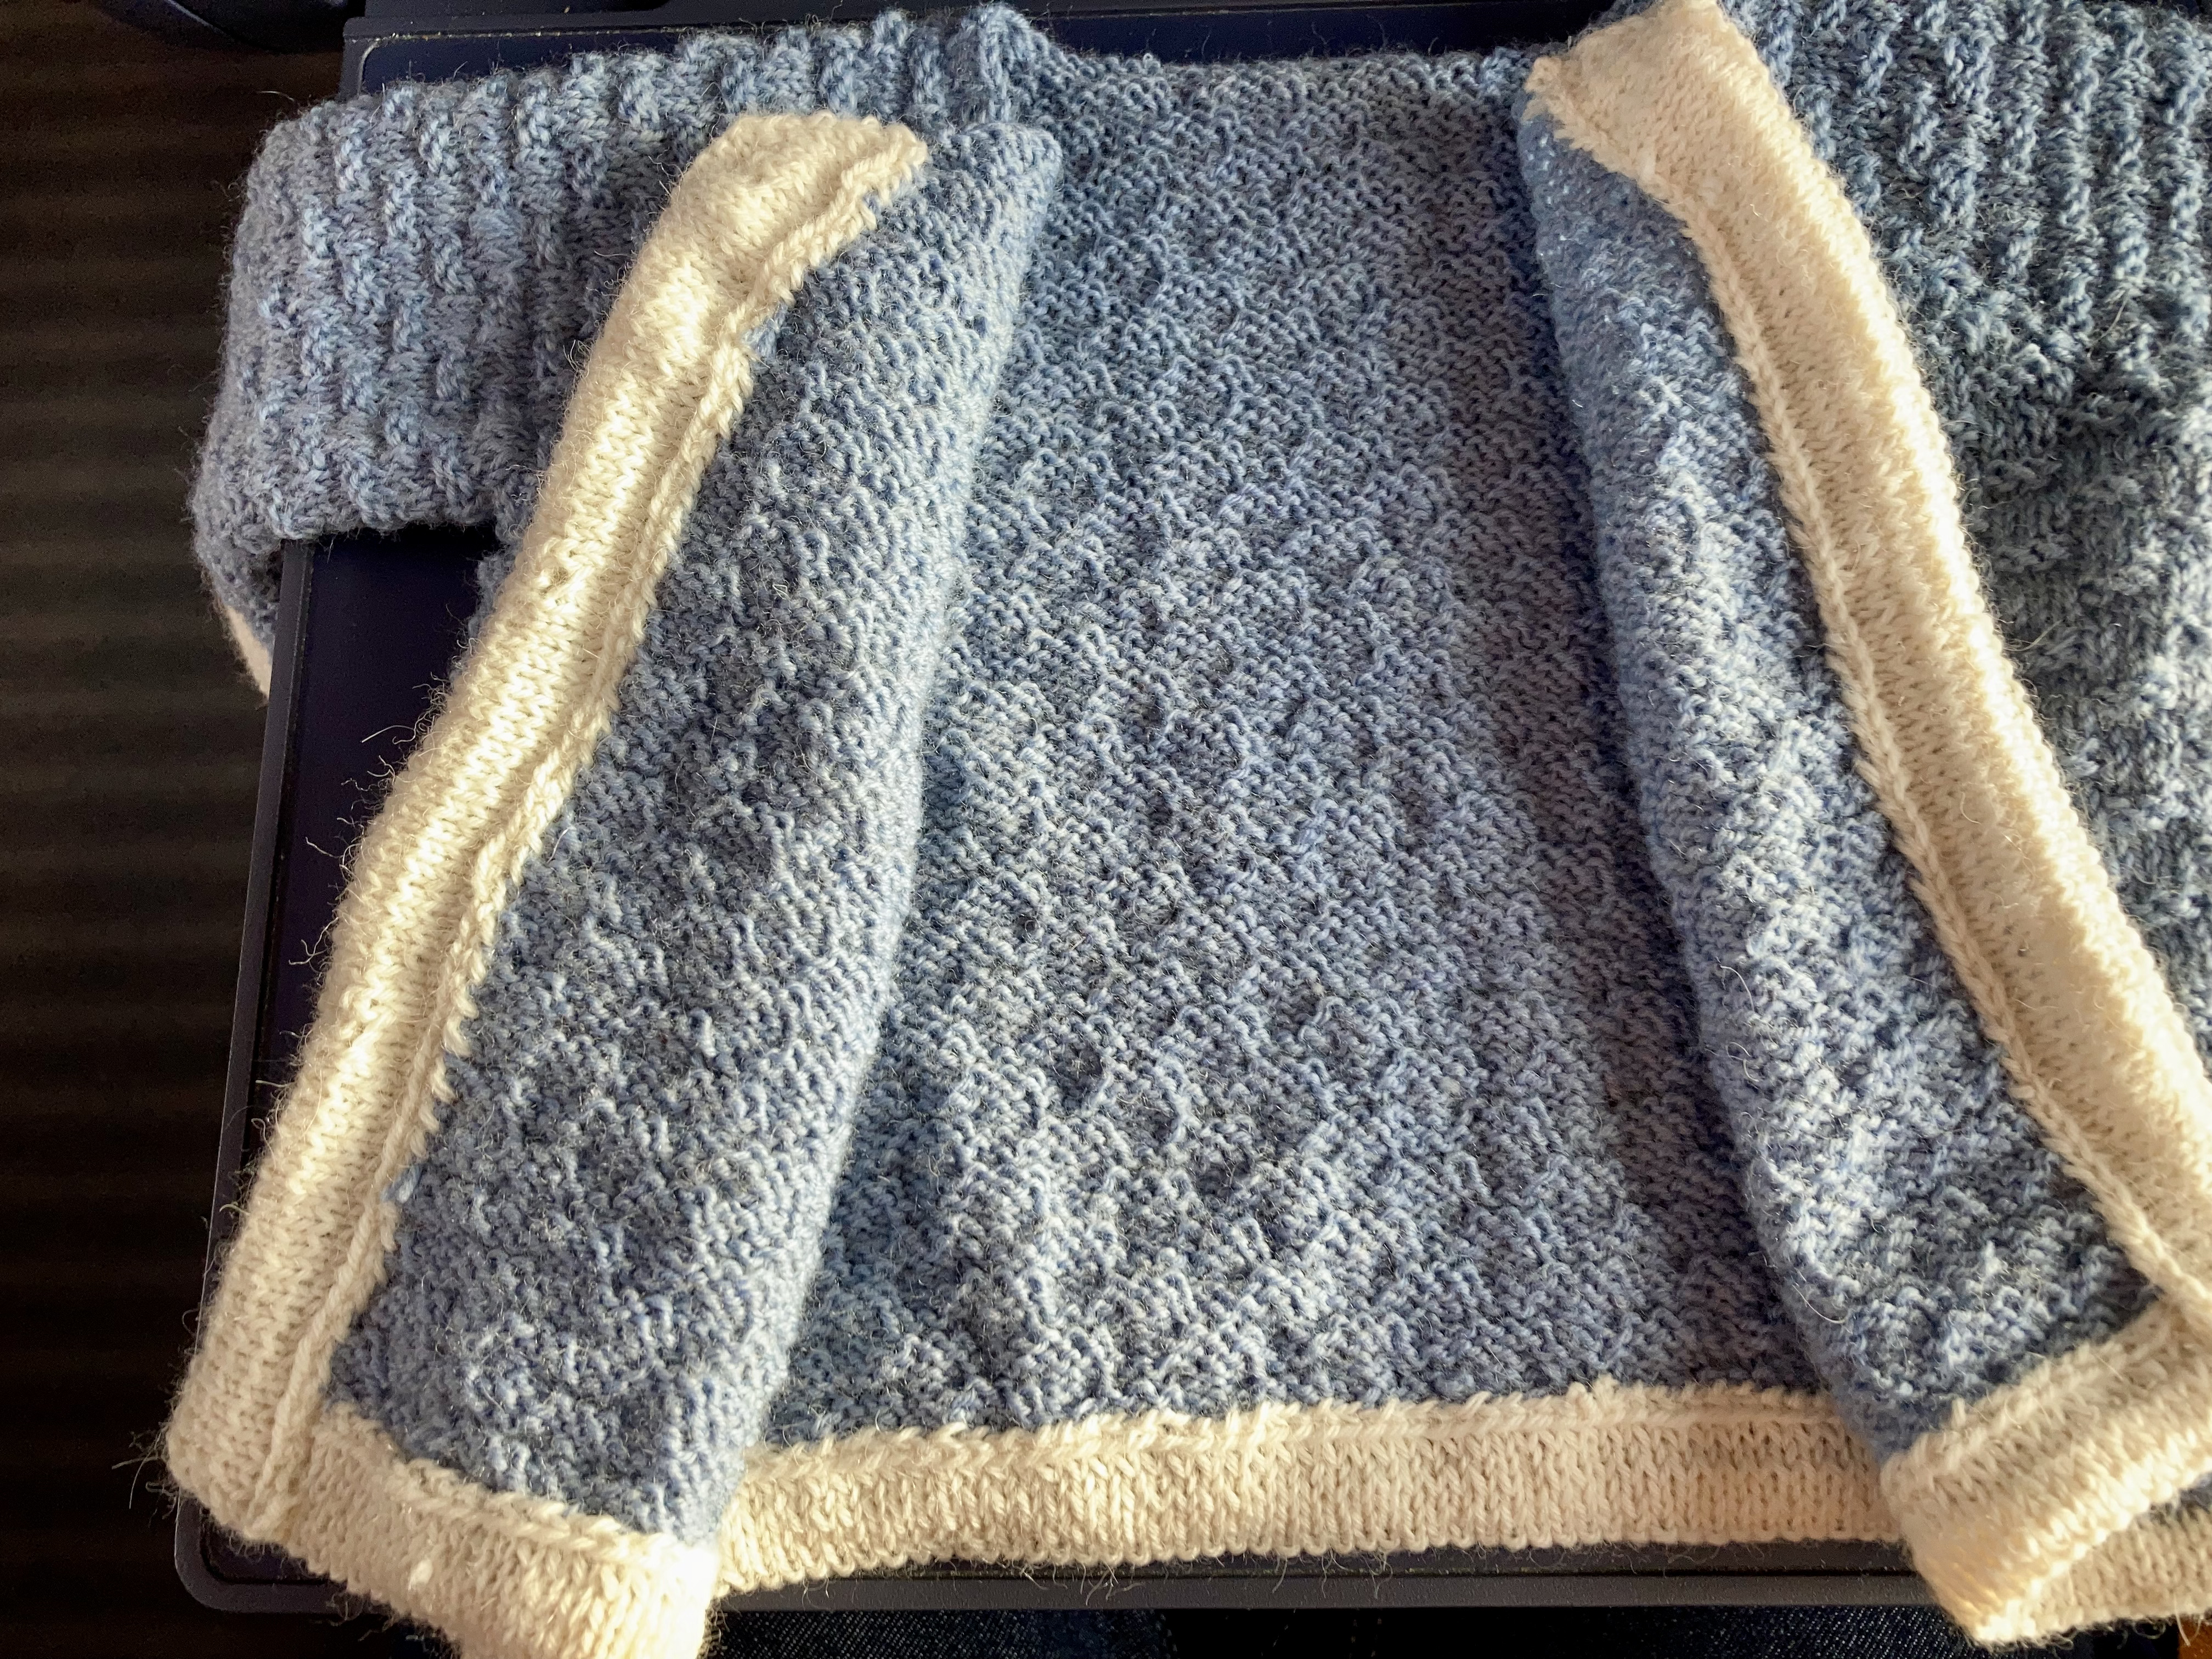
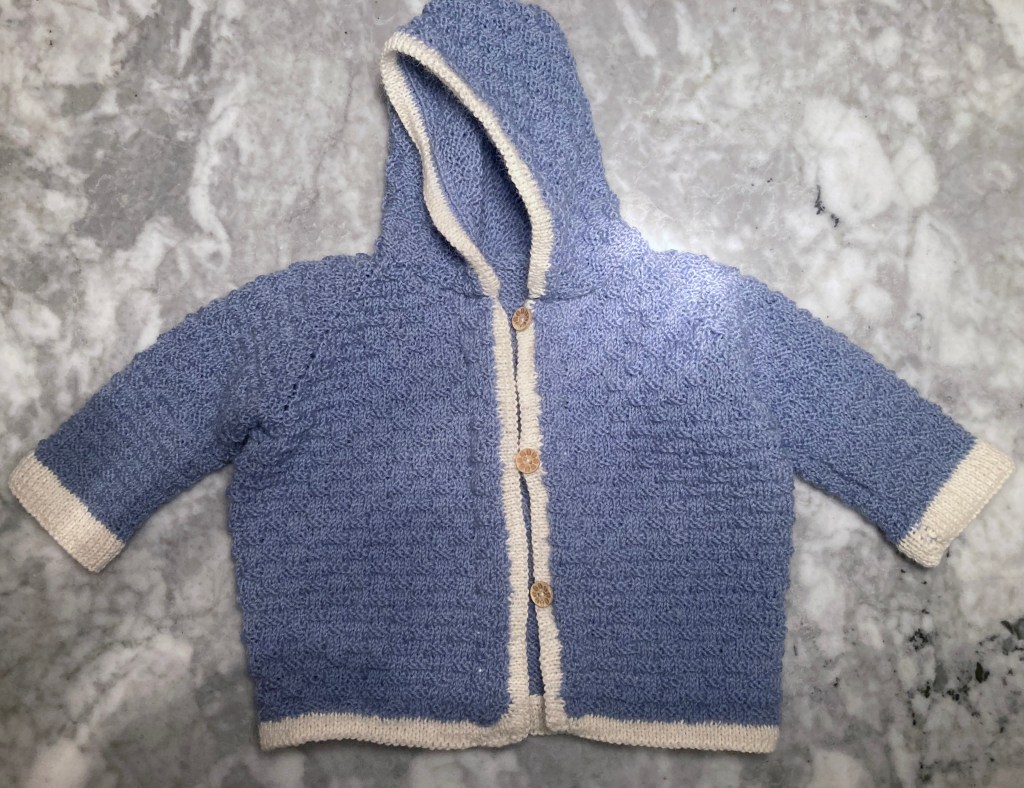
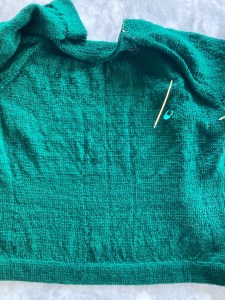
“Something to laugh about” is Stitchcraft’s caption for the photo of this month’s project: a baby’s cardigan (“button-up”) from October 1967. For once, the babies in the photo are actually happy!
The cardigan can be made “for a boy” or “for a girl” (buttonholes on one or the other side) and you can knit matching trunks “for a boy” — I guess girls need to get used to having a cold bum early, to prepare them for a lifetime of miniskirts with knee socks. In any case, the cardigan and/or set is offered in three sizes, to fit newborns up to ca. 1 year (18-22 inch chest).
The suggested wool is Patons Quickerknit Baby Wool (fuzzy, hairy, 100% wool) or Patons Brilliante (smooth, synthetic). I used DROPS Fabel (sock wool, 25% polyamide) in a shade of bright orange which I had originally bought to make the red-striped dress from September 1967, but which didn’t match with the other colours. It is quite fine and smooth, so for once I actually achieved the tension called for in the pattern: 8 sts and 10.5 rows to the inch.
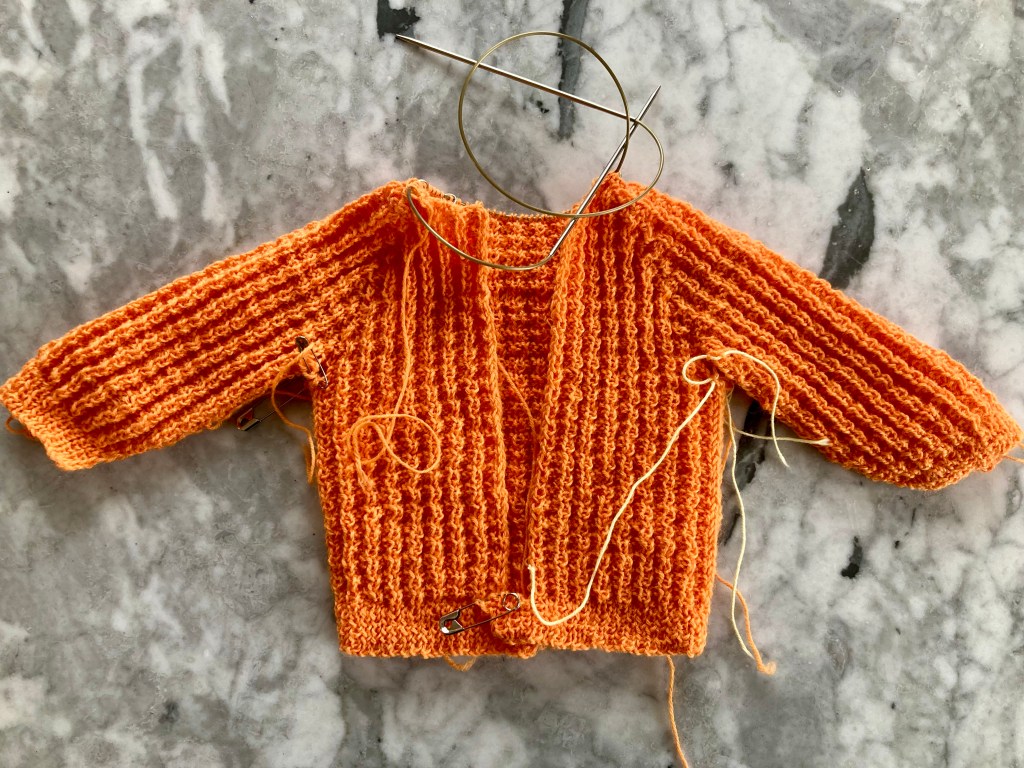
I made the first size, for whatever baby a friend or colleague has next (always good to have a baby garment in reserve…). The pattern is interesting and one that I had never encountered before:
Row 1: sl1, k2, *p1, k3*
Row 2: sl1, p2, *k1, p3*
Row 3: sl1, *k1, p3* to last 2 sts, k2
Row 4: sl1, *p1, k3* to last 2 sts, p2
In other words, a broken 1/3 rib. You would think it would be easy to notice and memorise, but it was surprisingly frustrating and difficult to “read” the knitting. I kept the instructions next to me the whole time.
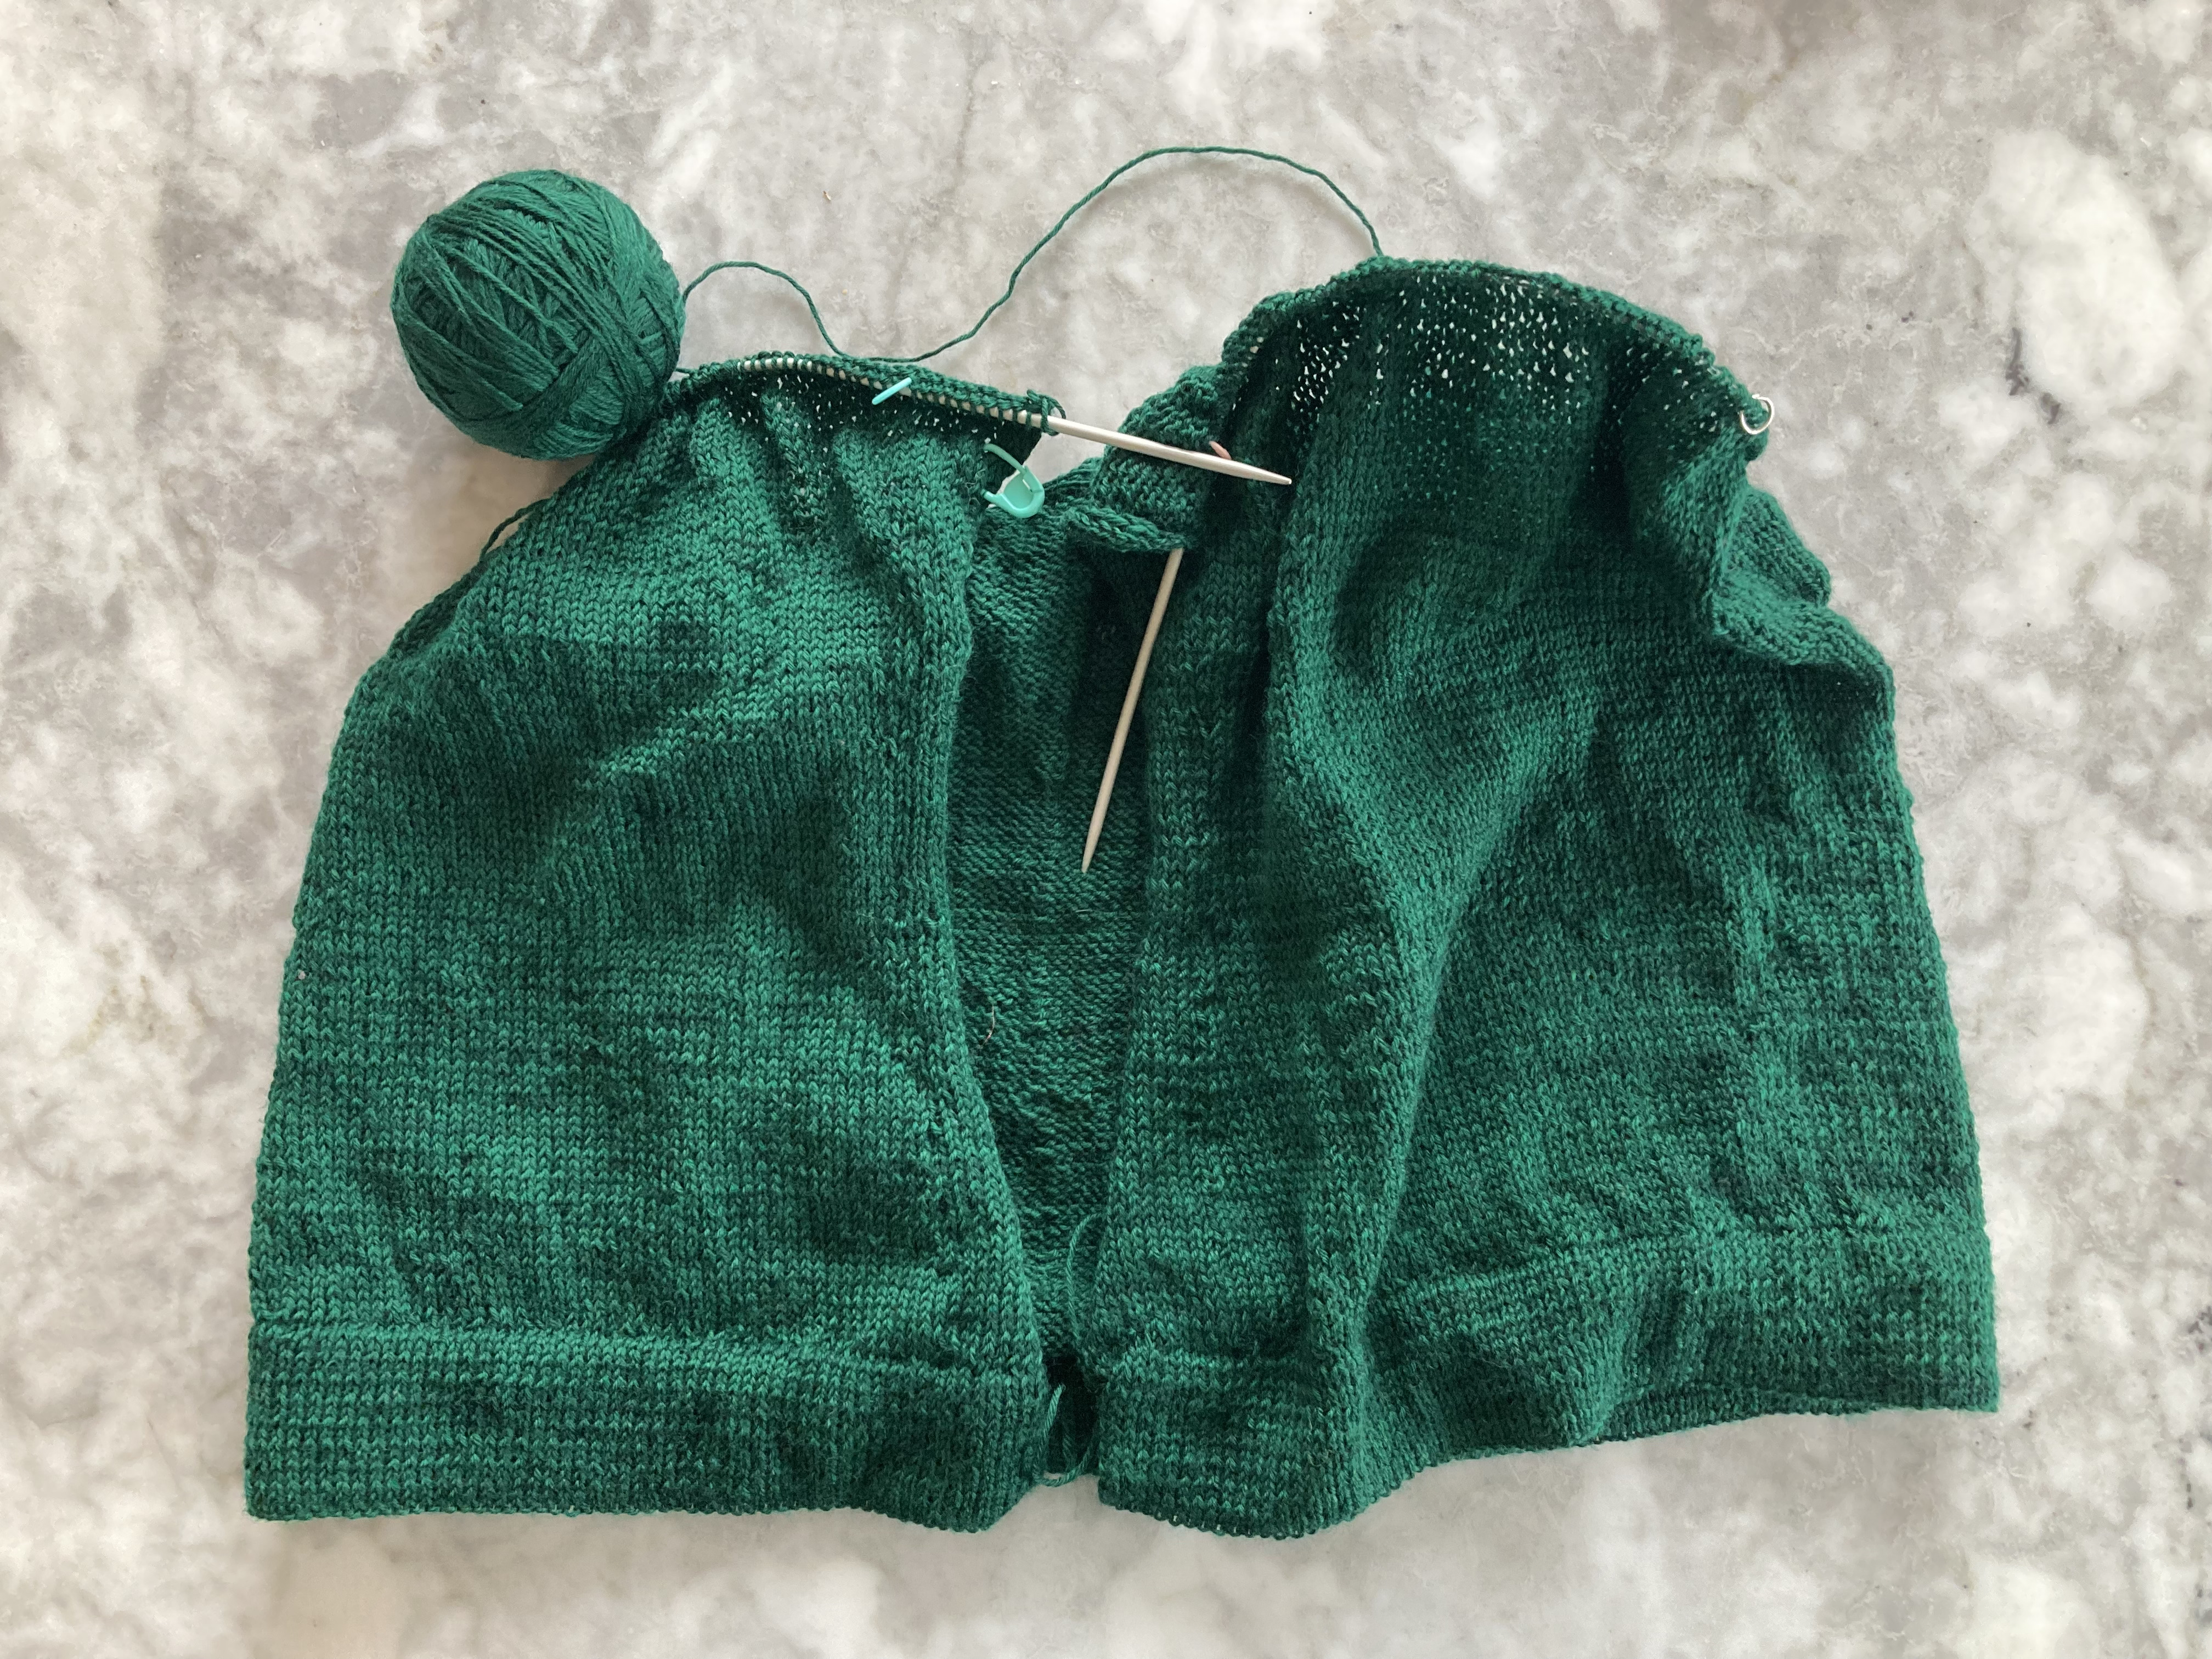
I made the fronts and back in one up to the armholes, the sleeves separate and flat (the pattern messed with my head enough and I did not want to try to convert it to knitting in the round), and then joined it all together for the raglan decreases. Increasing and decreasing in this pattern was not fun. Even though it is really not a complicated pattern! It just wouldn’t go into my head. It worked out fine in the end, though.
The finished fabric is very three-dimensional and waffle-y and probably quite warm. It also pulls together quite a lot horizontally. I was barely able to stretch it out to an 18 inch chest with blocking, so this will be for a small/newborn baby. On the other hand, the stretchiness means the cardigan will probably grow along with the baby and fit it for a while. I added little white vintage-looking buttons and that was that. I didn’t make the trunks.
All in all, turned out fine and will brighten up some baby’s wardrobe. And it even got done in October! Next month’s project will be a stranded pullover for myself.
Welcome to Spring! Is it snowing where you live? The March 1967 issue of Stitchcraft had some nice designs, but nothing that was fast, easy or practical enough for my knitting life at the moment, so for this month’s post I’ll write about a cardigan I finished in mid-February: the Snow Daisies cardigan from the Spool Cotton Company’s issue No. 189: “Women’s Sweaters: America at Work and Play” from 1942. The booklet with all the patterns is available for free here.
The “Snow Daisies” cardigan is touted as a “heavy cardigan for outdoors”. Knitted somewhat oversized (esp. for 1940s sweater standards) in thick wool, it has “plenty of room for a sweater underneath.” What you don’t see in the magazine photo is the fact that not only the sleeves, but also the back is made in 2×2 ribbing. This was an excellent design feature on many “sport” garments from the first half of the 20th century, allowing for generous movement without extra fabric to flop around and get in the way of your golf swing or ski poles or whatever. The front is made in reverse stocking-stitch with an open cable on each side, and decorated with embroidered daisy flowers. It’s a nod to all the “Bavarian”, “Tyrolean”, “Alpine” etc. traditional southern German and Austrian styles, though of course an American pattern from 1942 doesn’t use those words as I imagine they did not want the association.
I made my version in Hjertegarn New Life, a very interesting recycled wool — if I understood correctly, it’s reclaimed from older knitted items. Mine was 65% recycled wool and 35% recycled “other” fibres (synthetic, I guess?). It felt like strong, nice wool, tough but not too scratchy.
My tension was a little larger than the pattern and I wanted the cardigan to not fit too loosely, so I adjusted the stitch counts. The sleeves were fine, though the ribbing didn’t pull in as much as I thought it should. I guess that comes from wool that is only 2/3 actual wool and 1/3 mysterious “other”? So I made the back even narrower than I had calculated. It was too narrow. I made extra panels on the sides to make up for it. On the front, I placed the cables slightly differently to couter-balance having fewer stitches. I forgot to do one extra cable twist in the center twist part, but if you can’t see it in the photo, I won’t tell you where it is. The daisies were easy to embroider on.
I was not so happy with the final result. The overall look is quite square — the ribbed shoulders add bulk in an area where I am plenty wide enough. Worse, the ribbing just doesn’t pull in at all — it expands horizontally, especially after washing and with wearing, as ribbing is not supposed to do. I took out the extra side panels, which helped a little. I’m just not happy with the wool, though. It’s too bulky and not springy enough. Also, the button band is “wavy”, though I think that might be a design feature, since it looks like that in the photo, too?
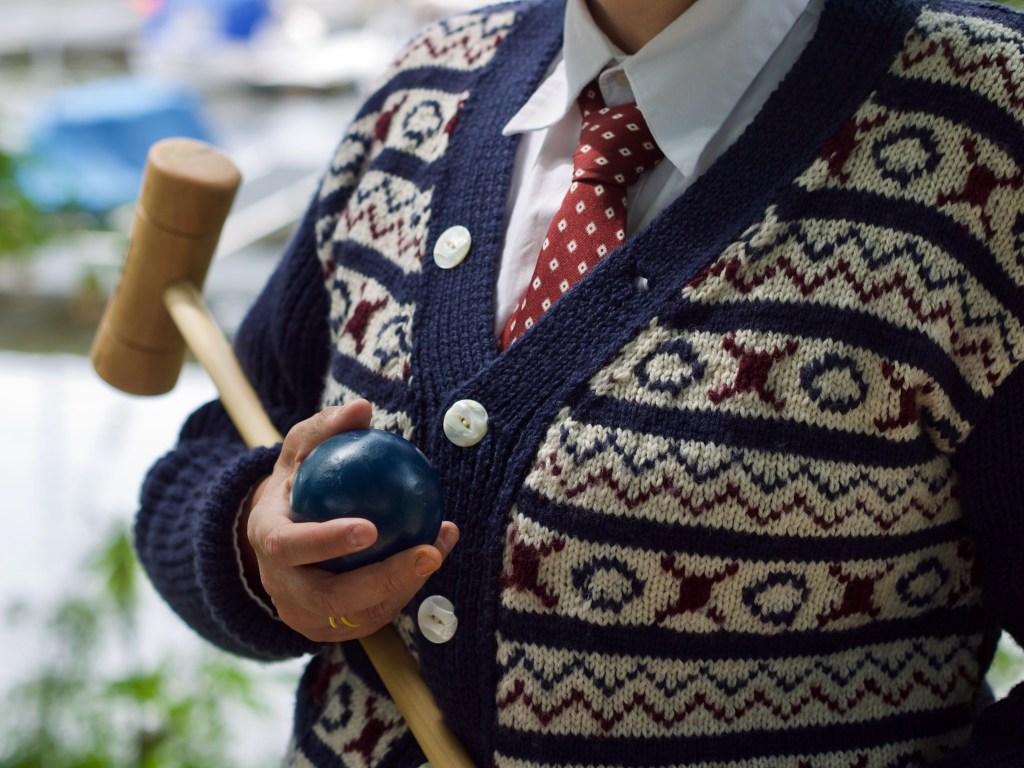
(Not having any winter sports gear, here I am posing with a croquet mallet and ball…)
I’ll see what I can do with it, but I might end up giving it away.
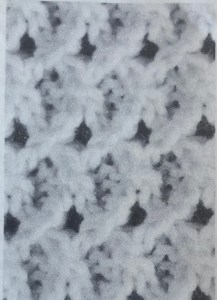
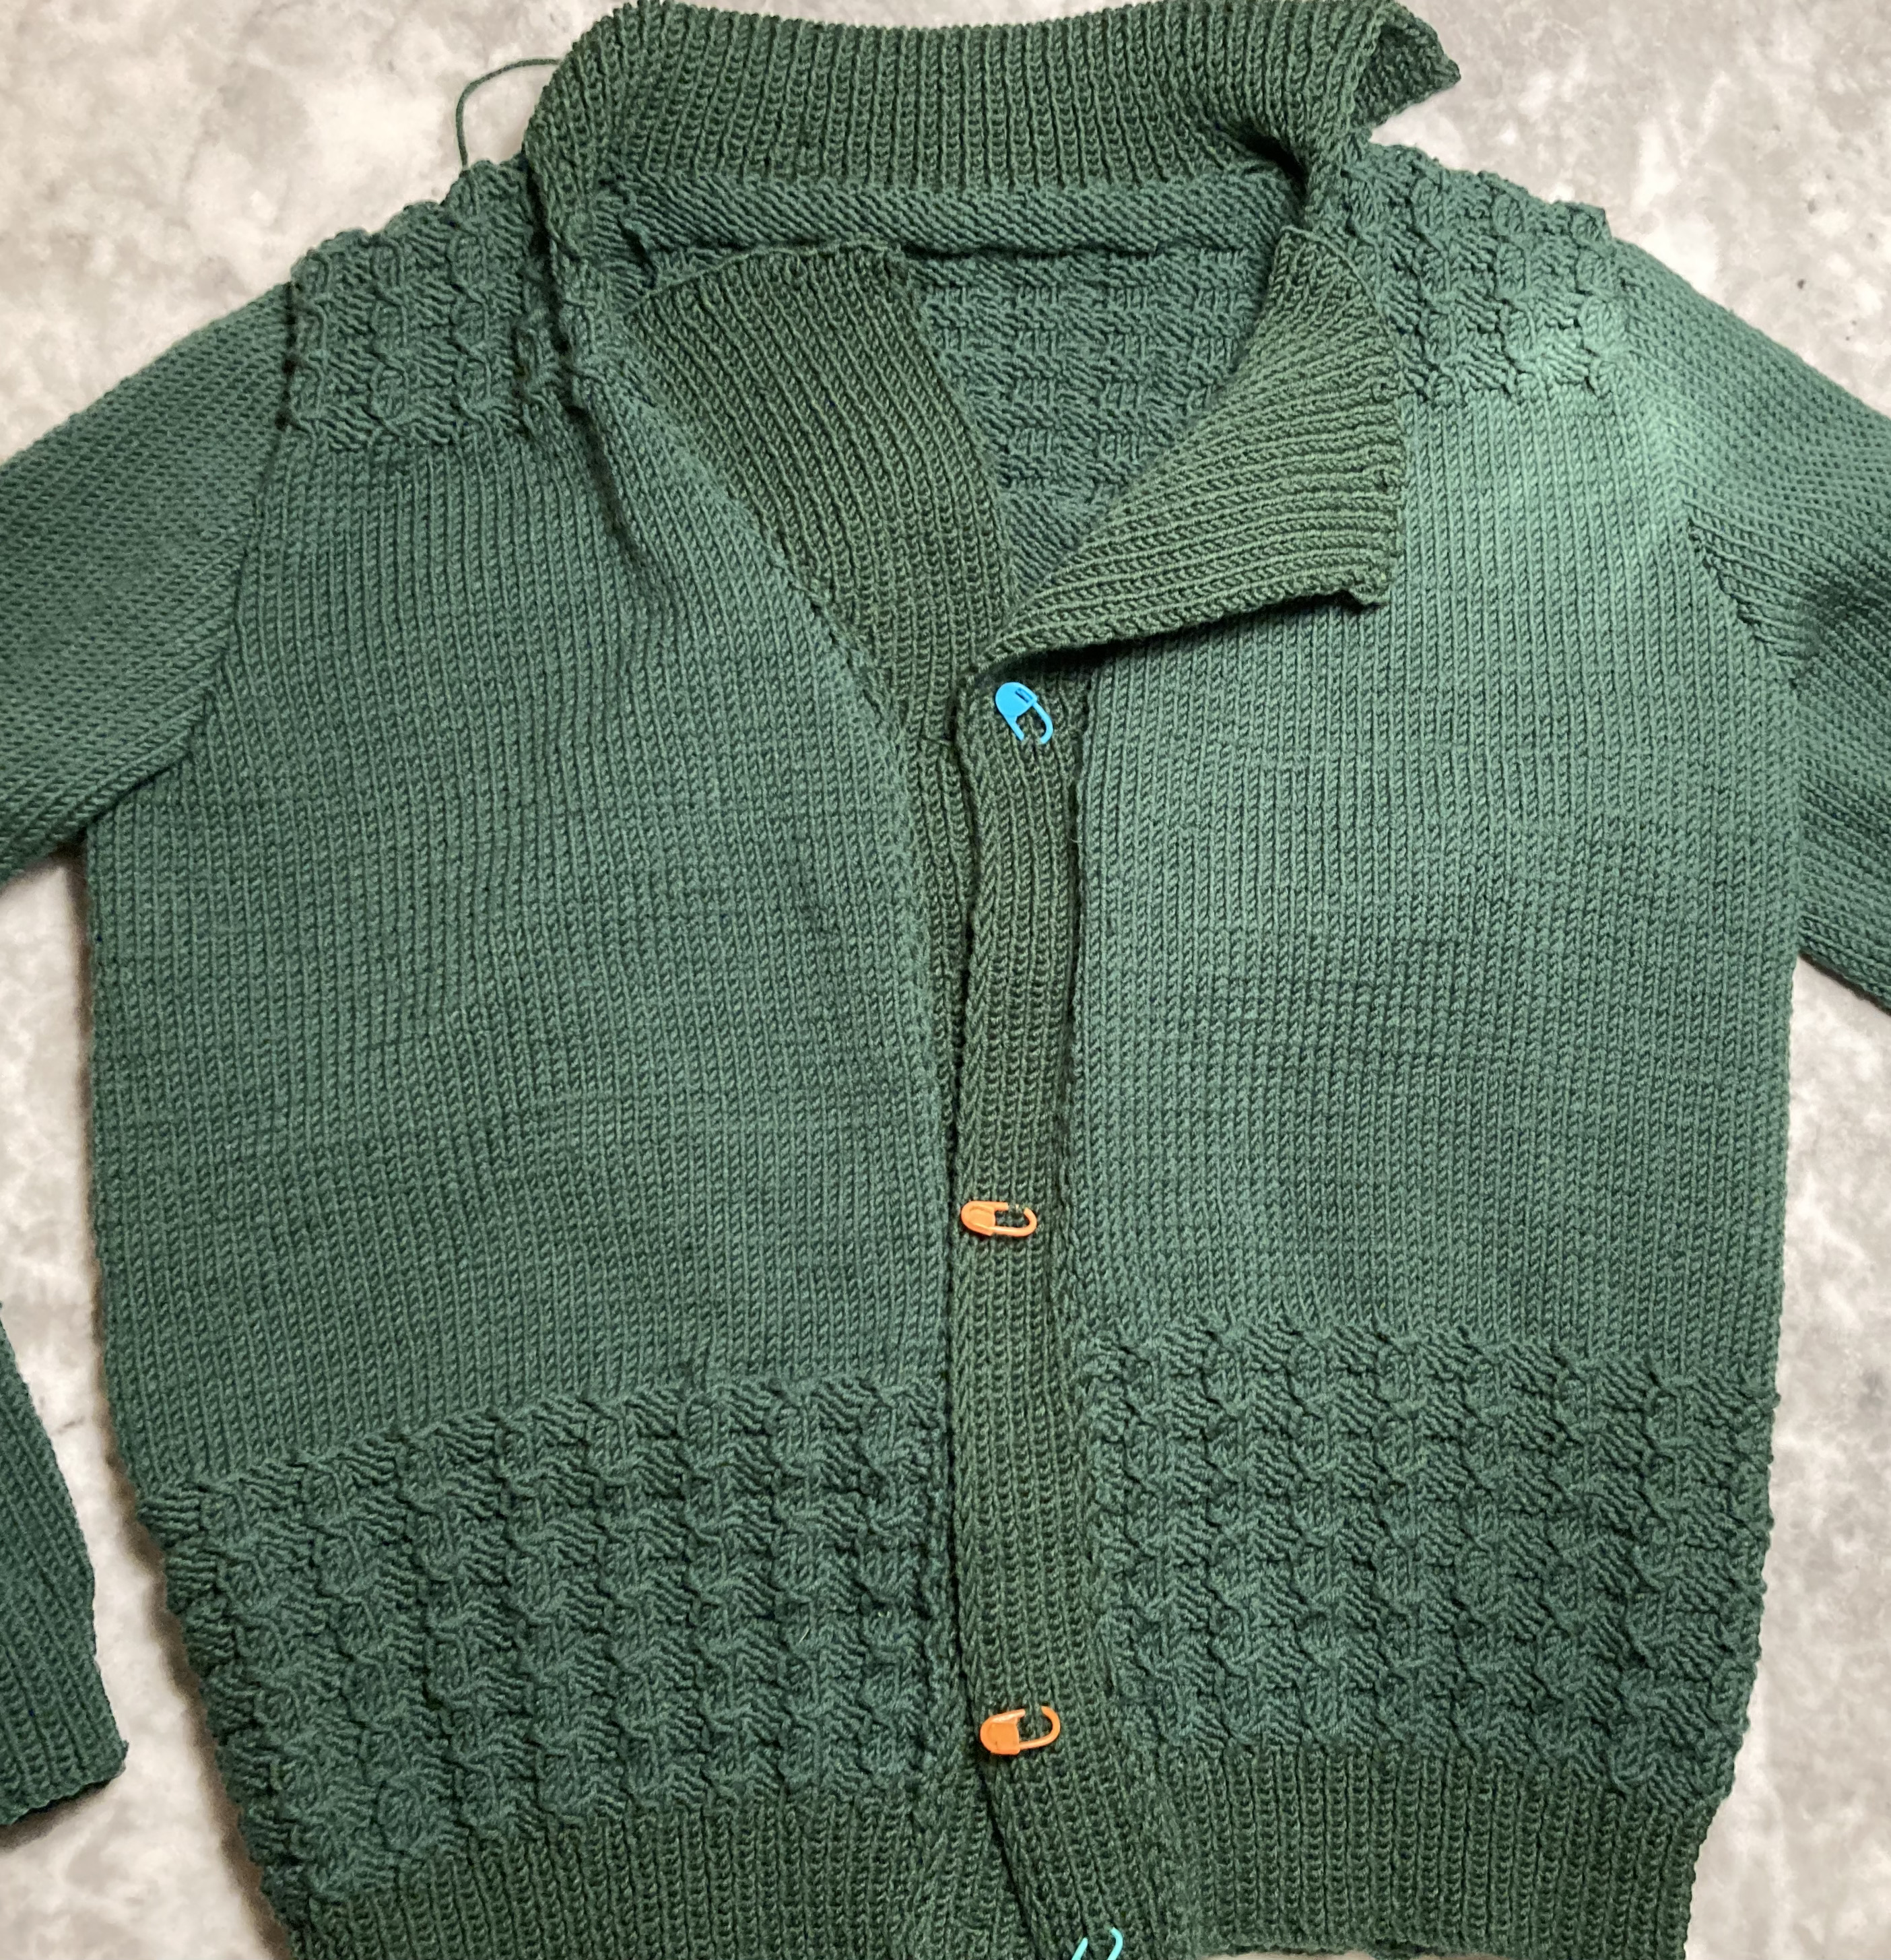
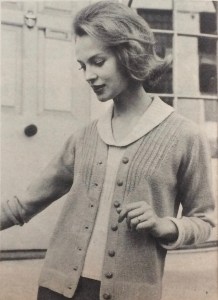
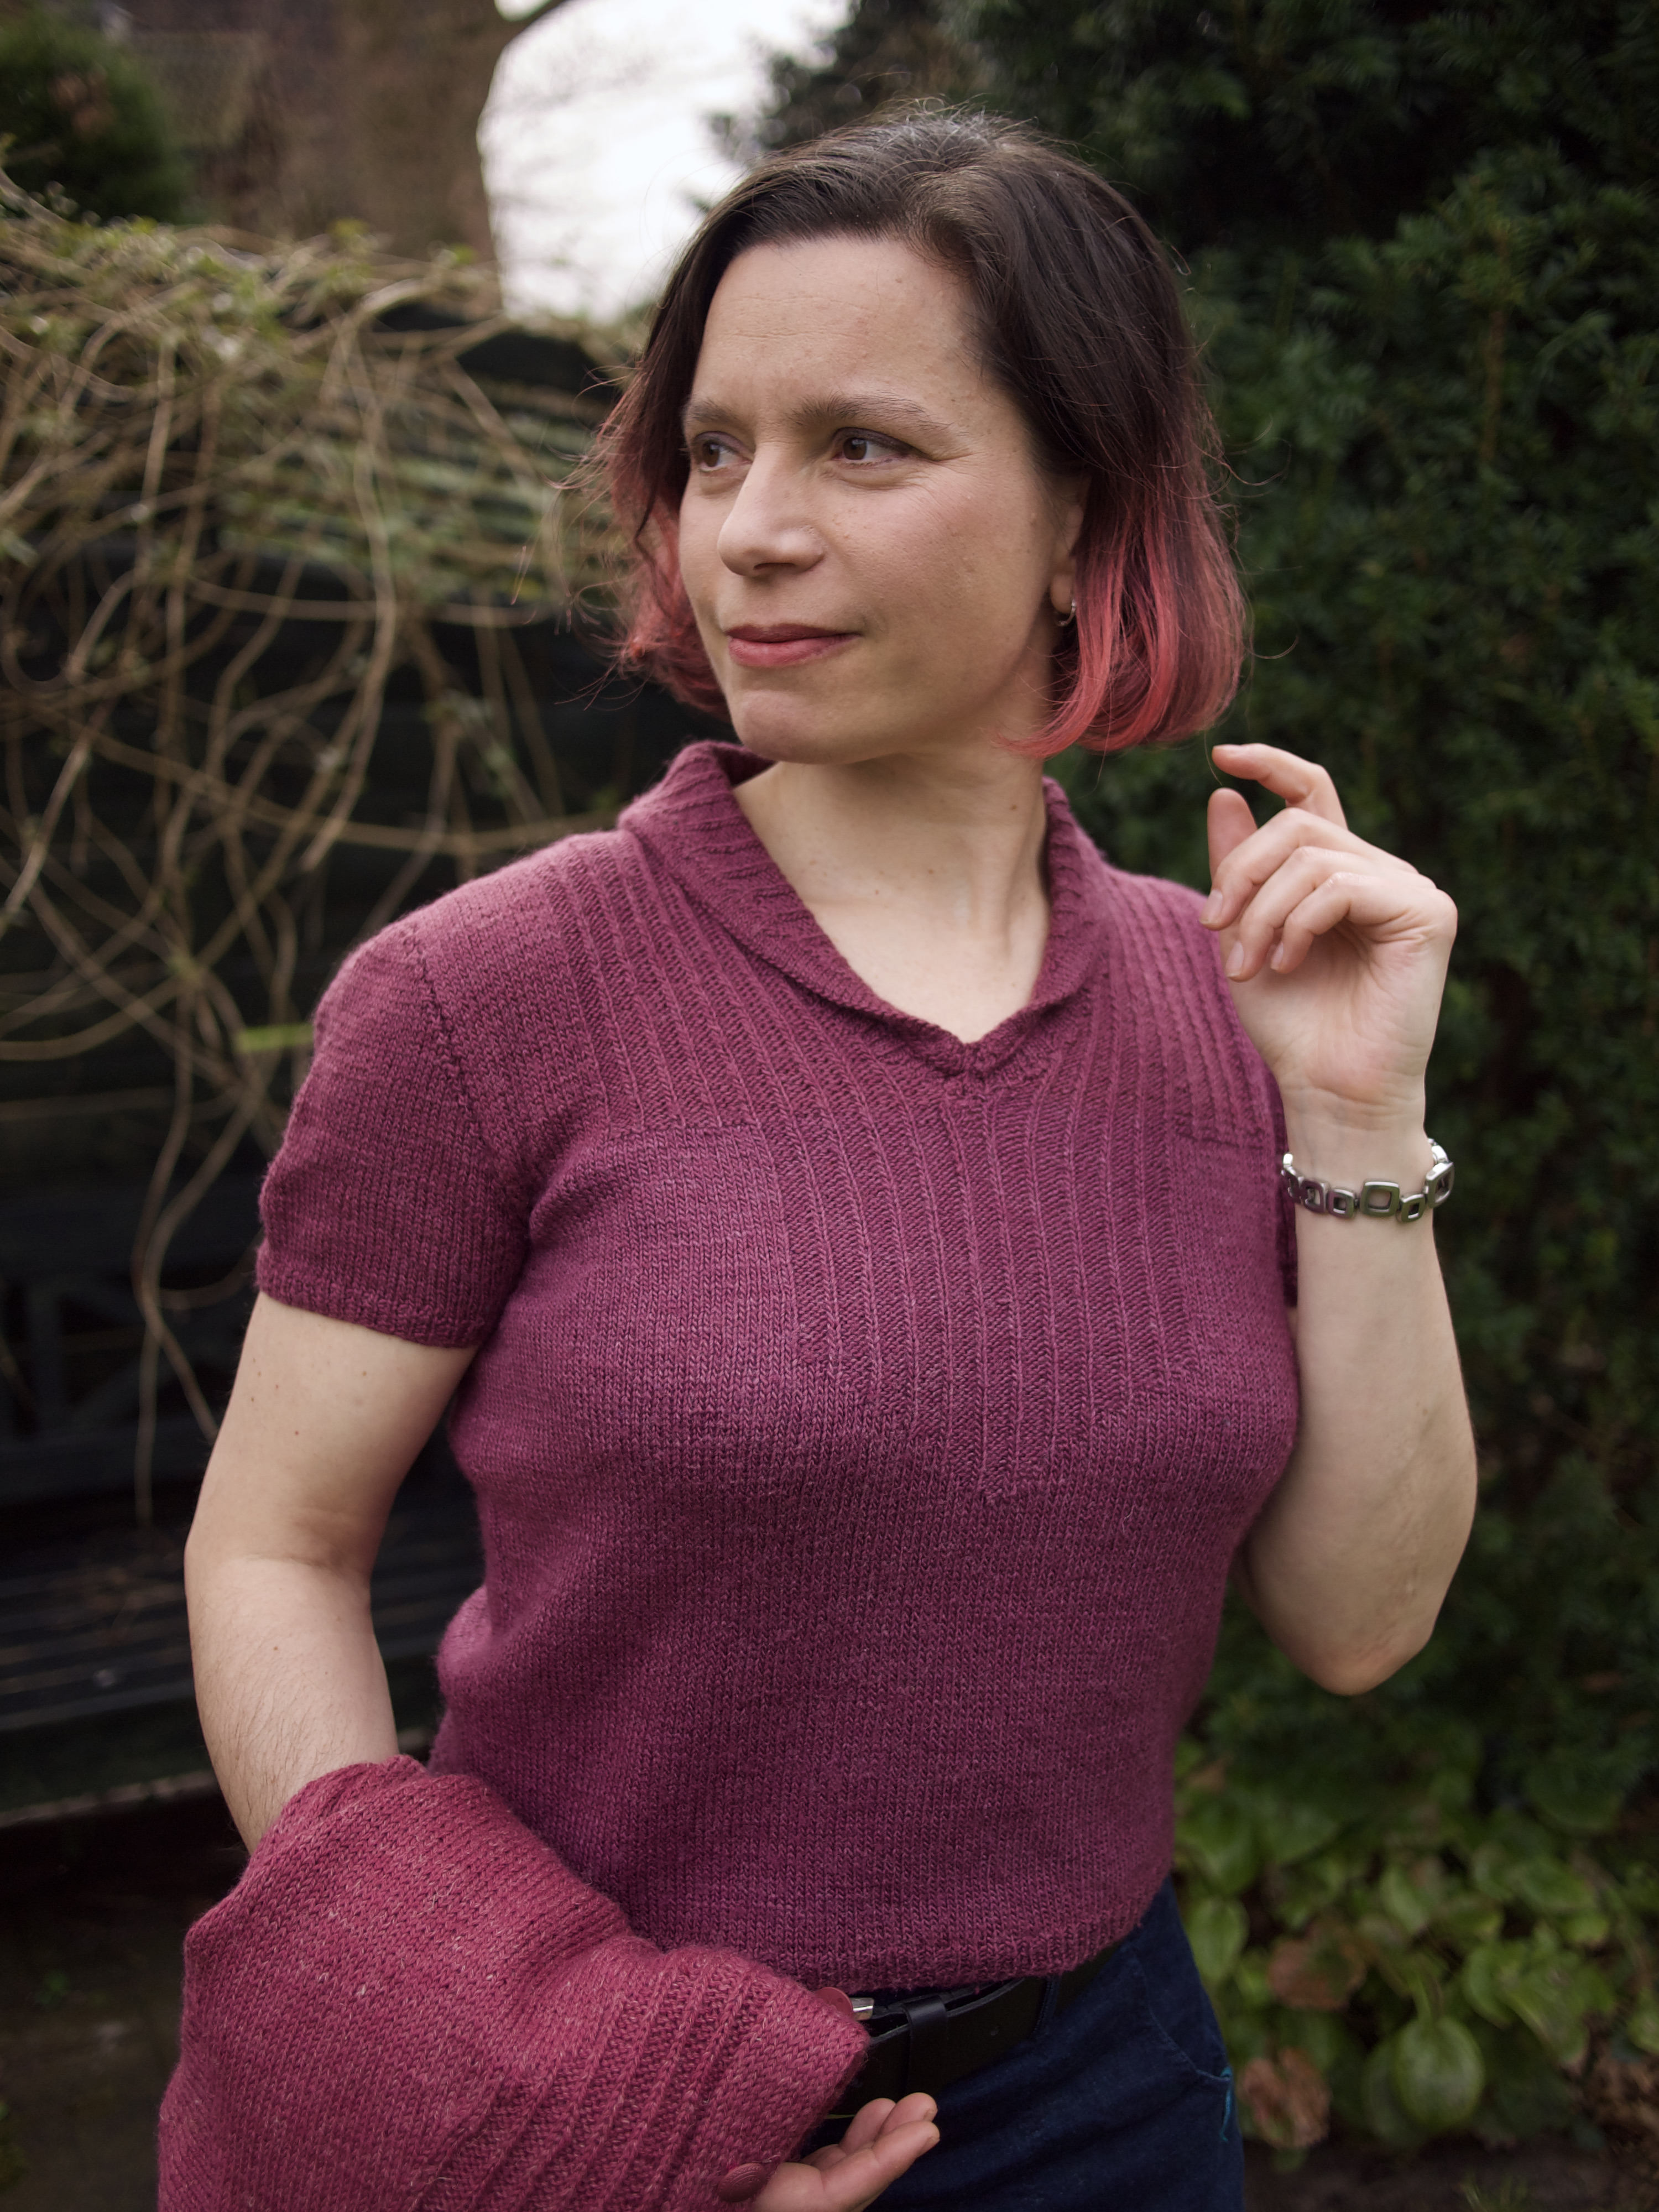
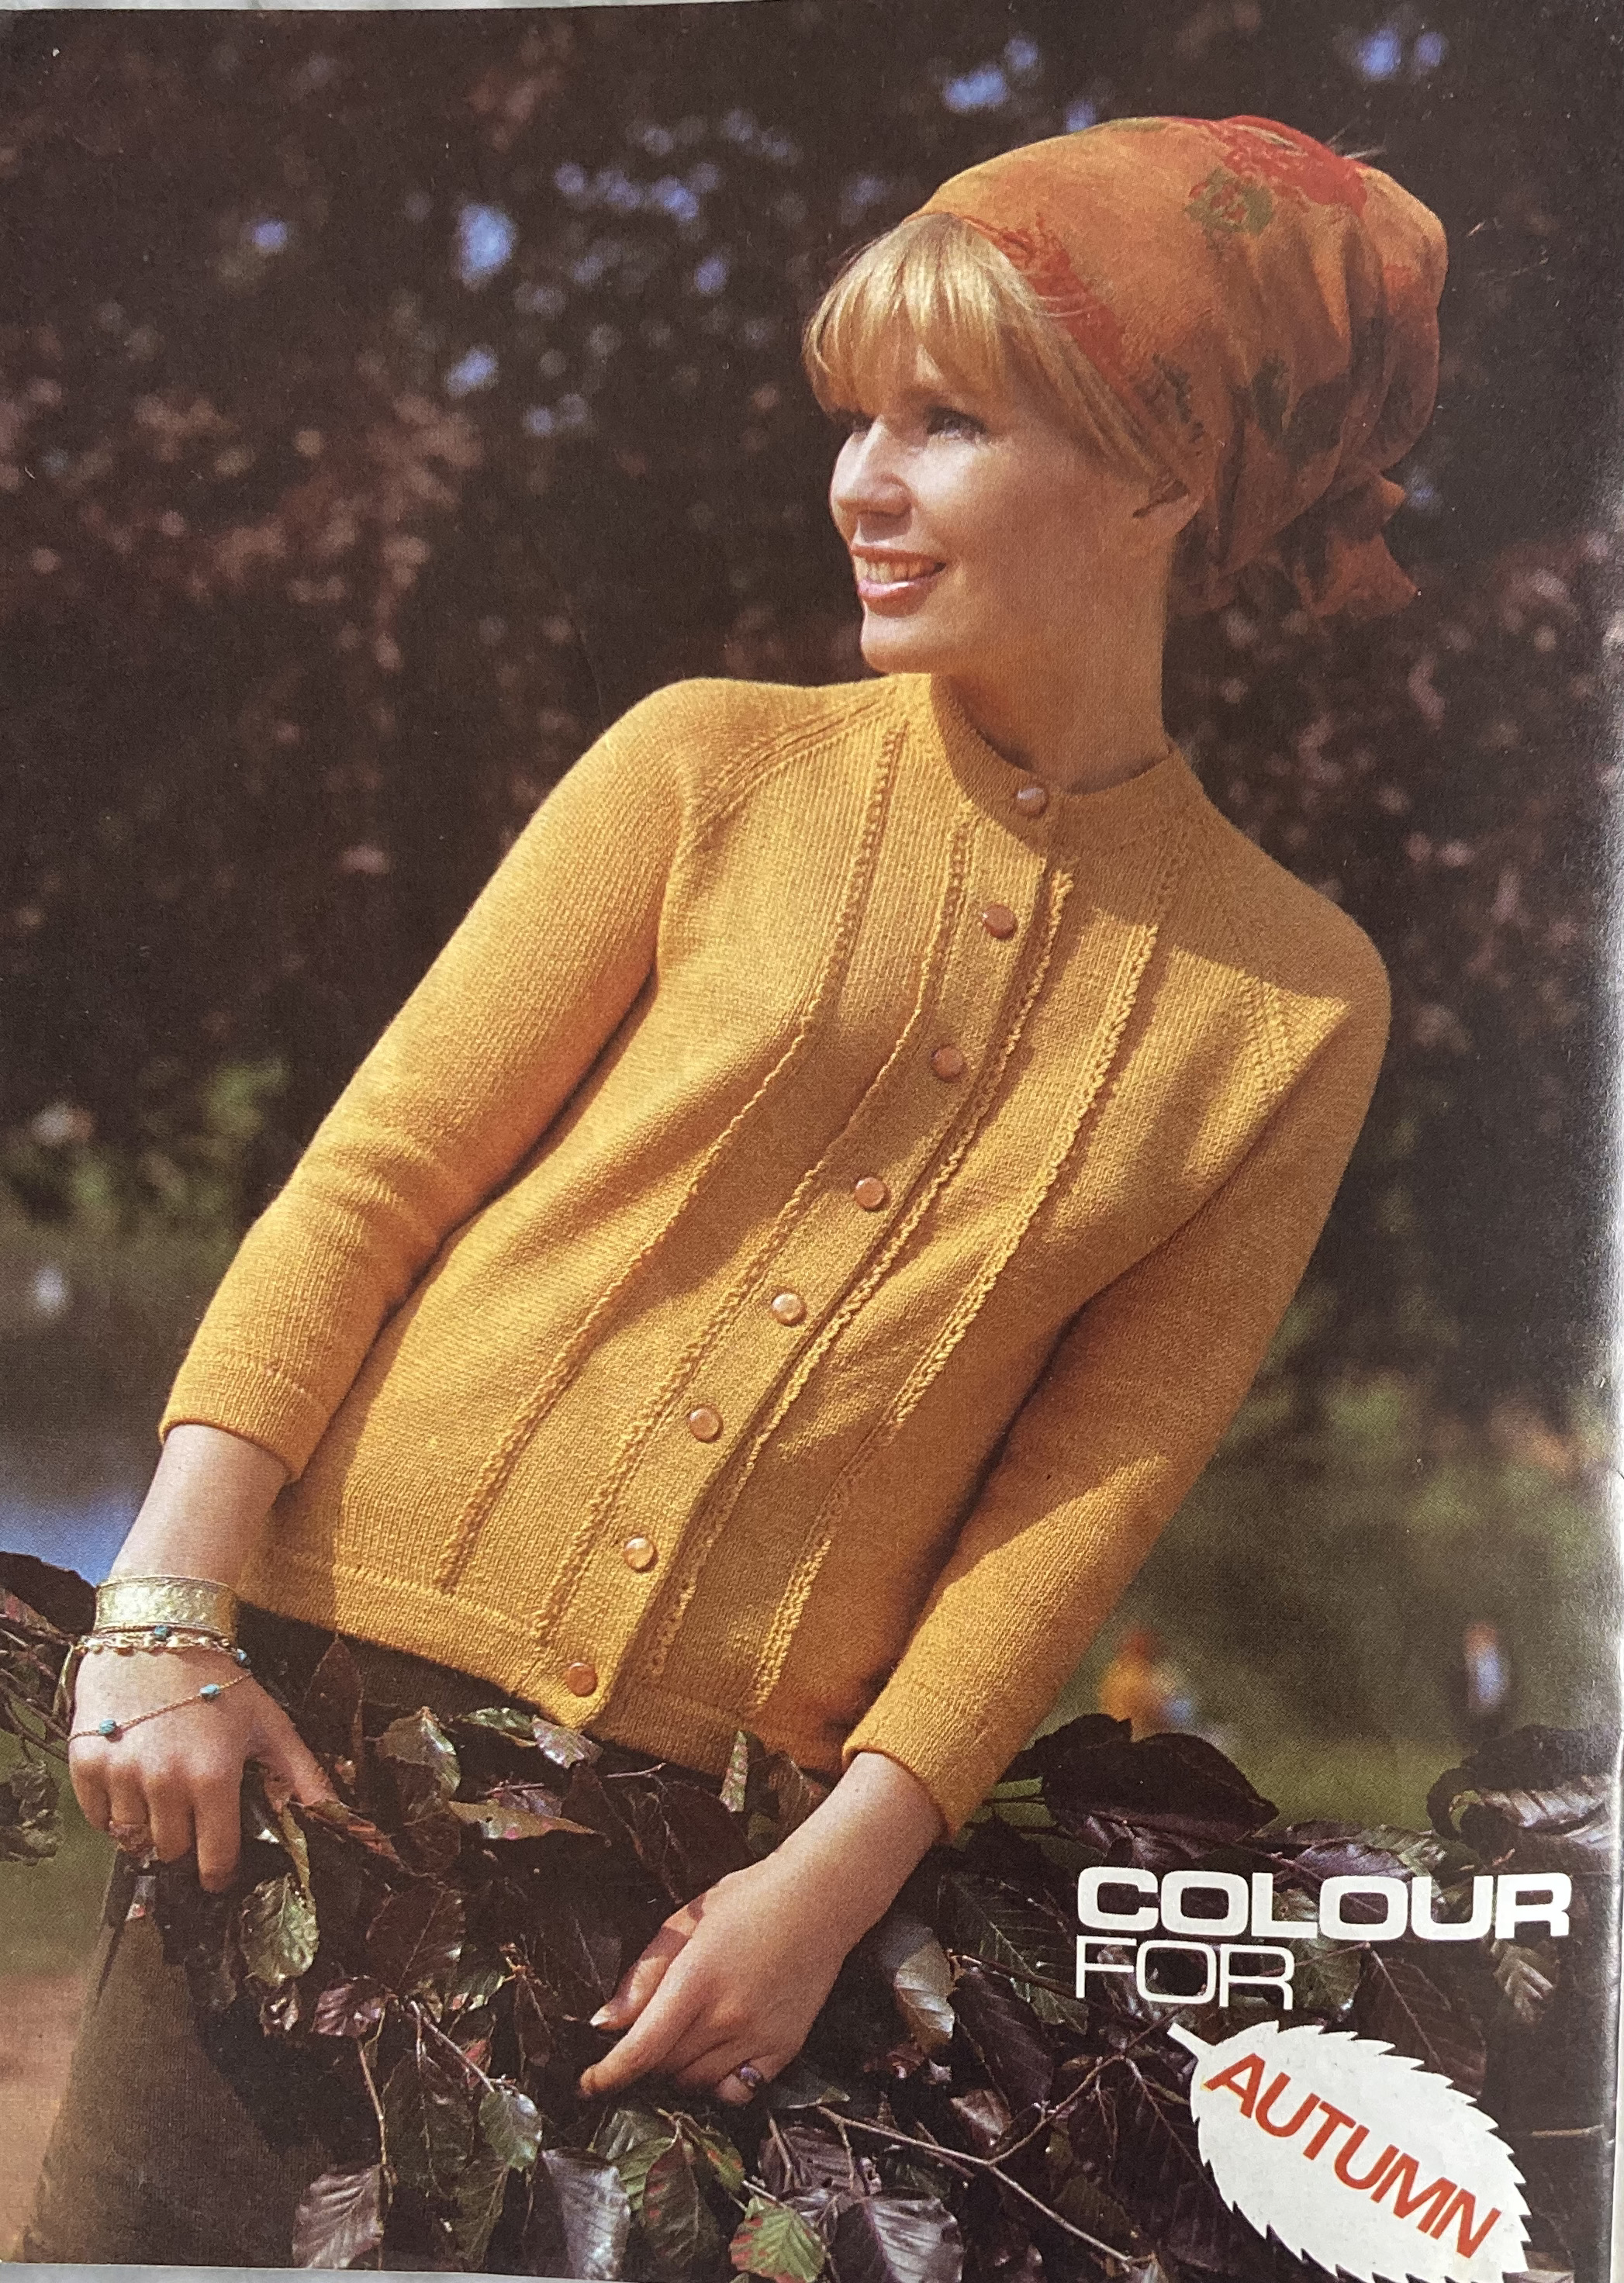
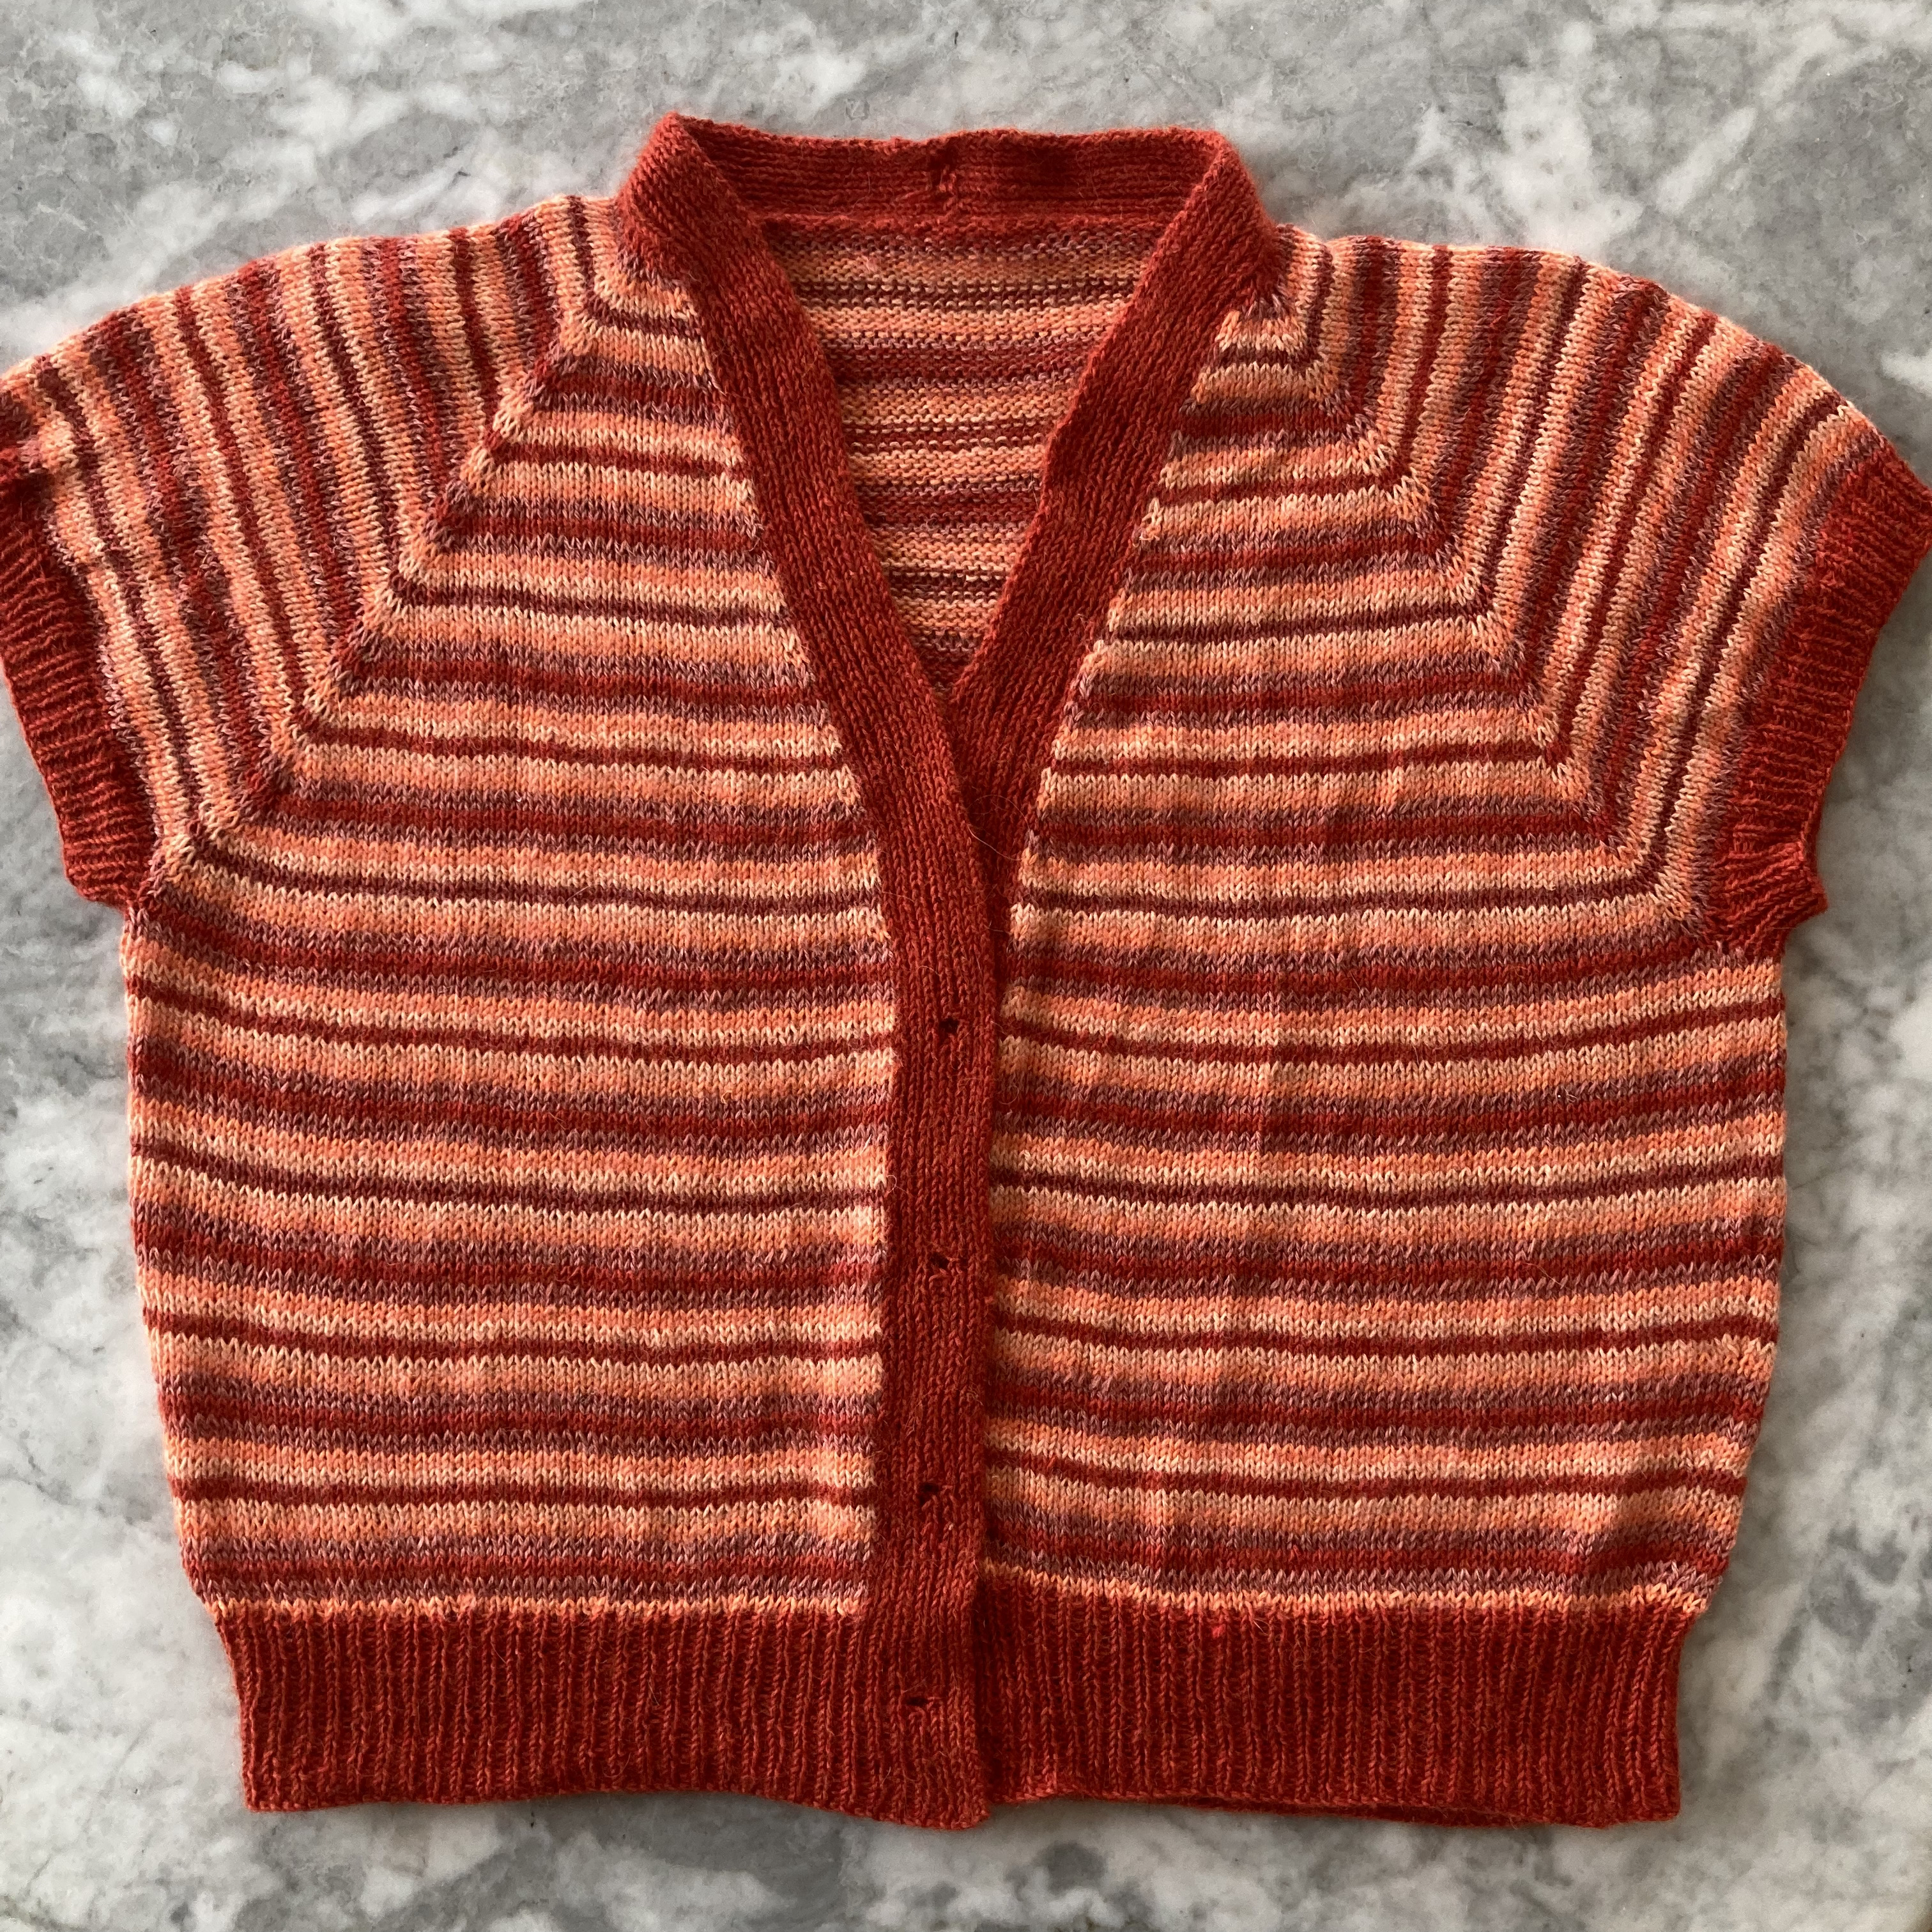
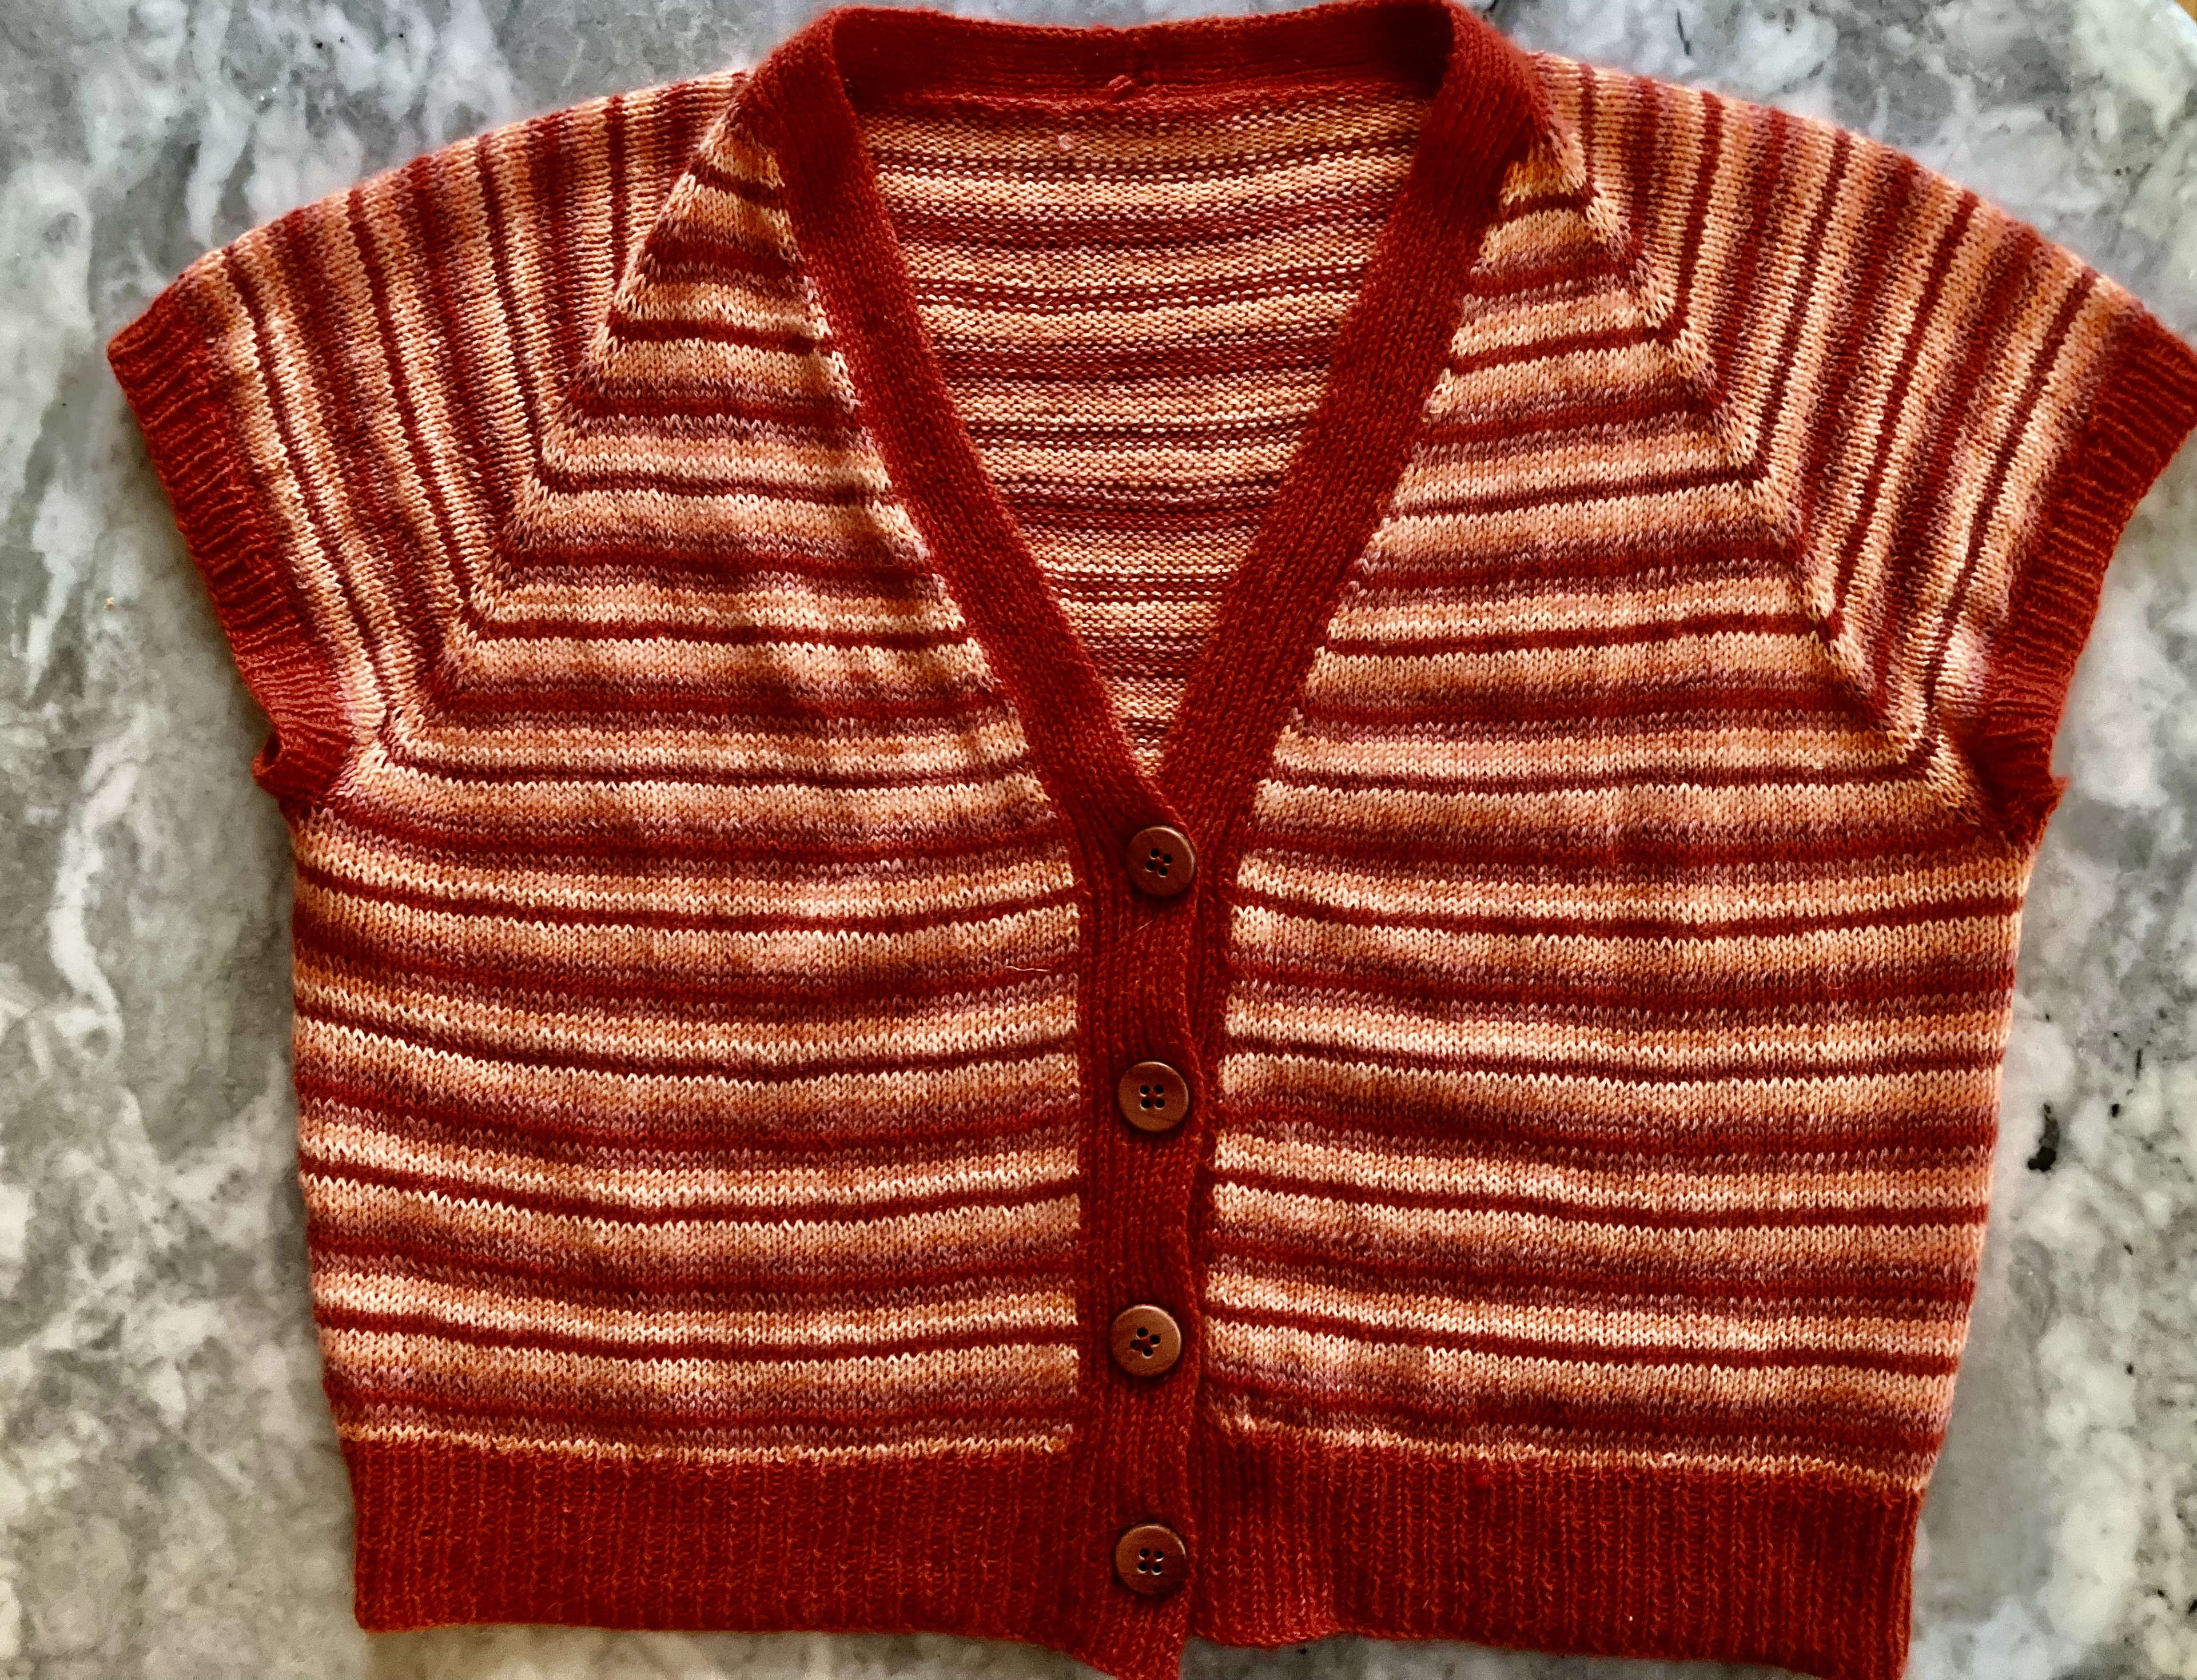
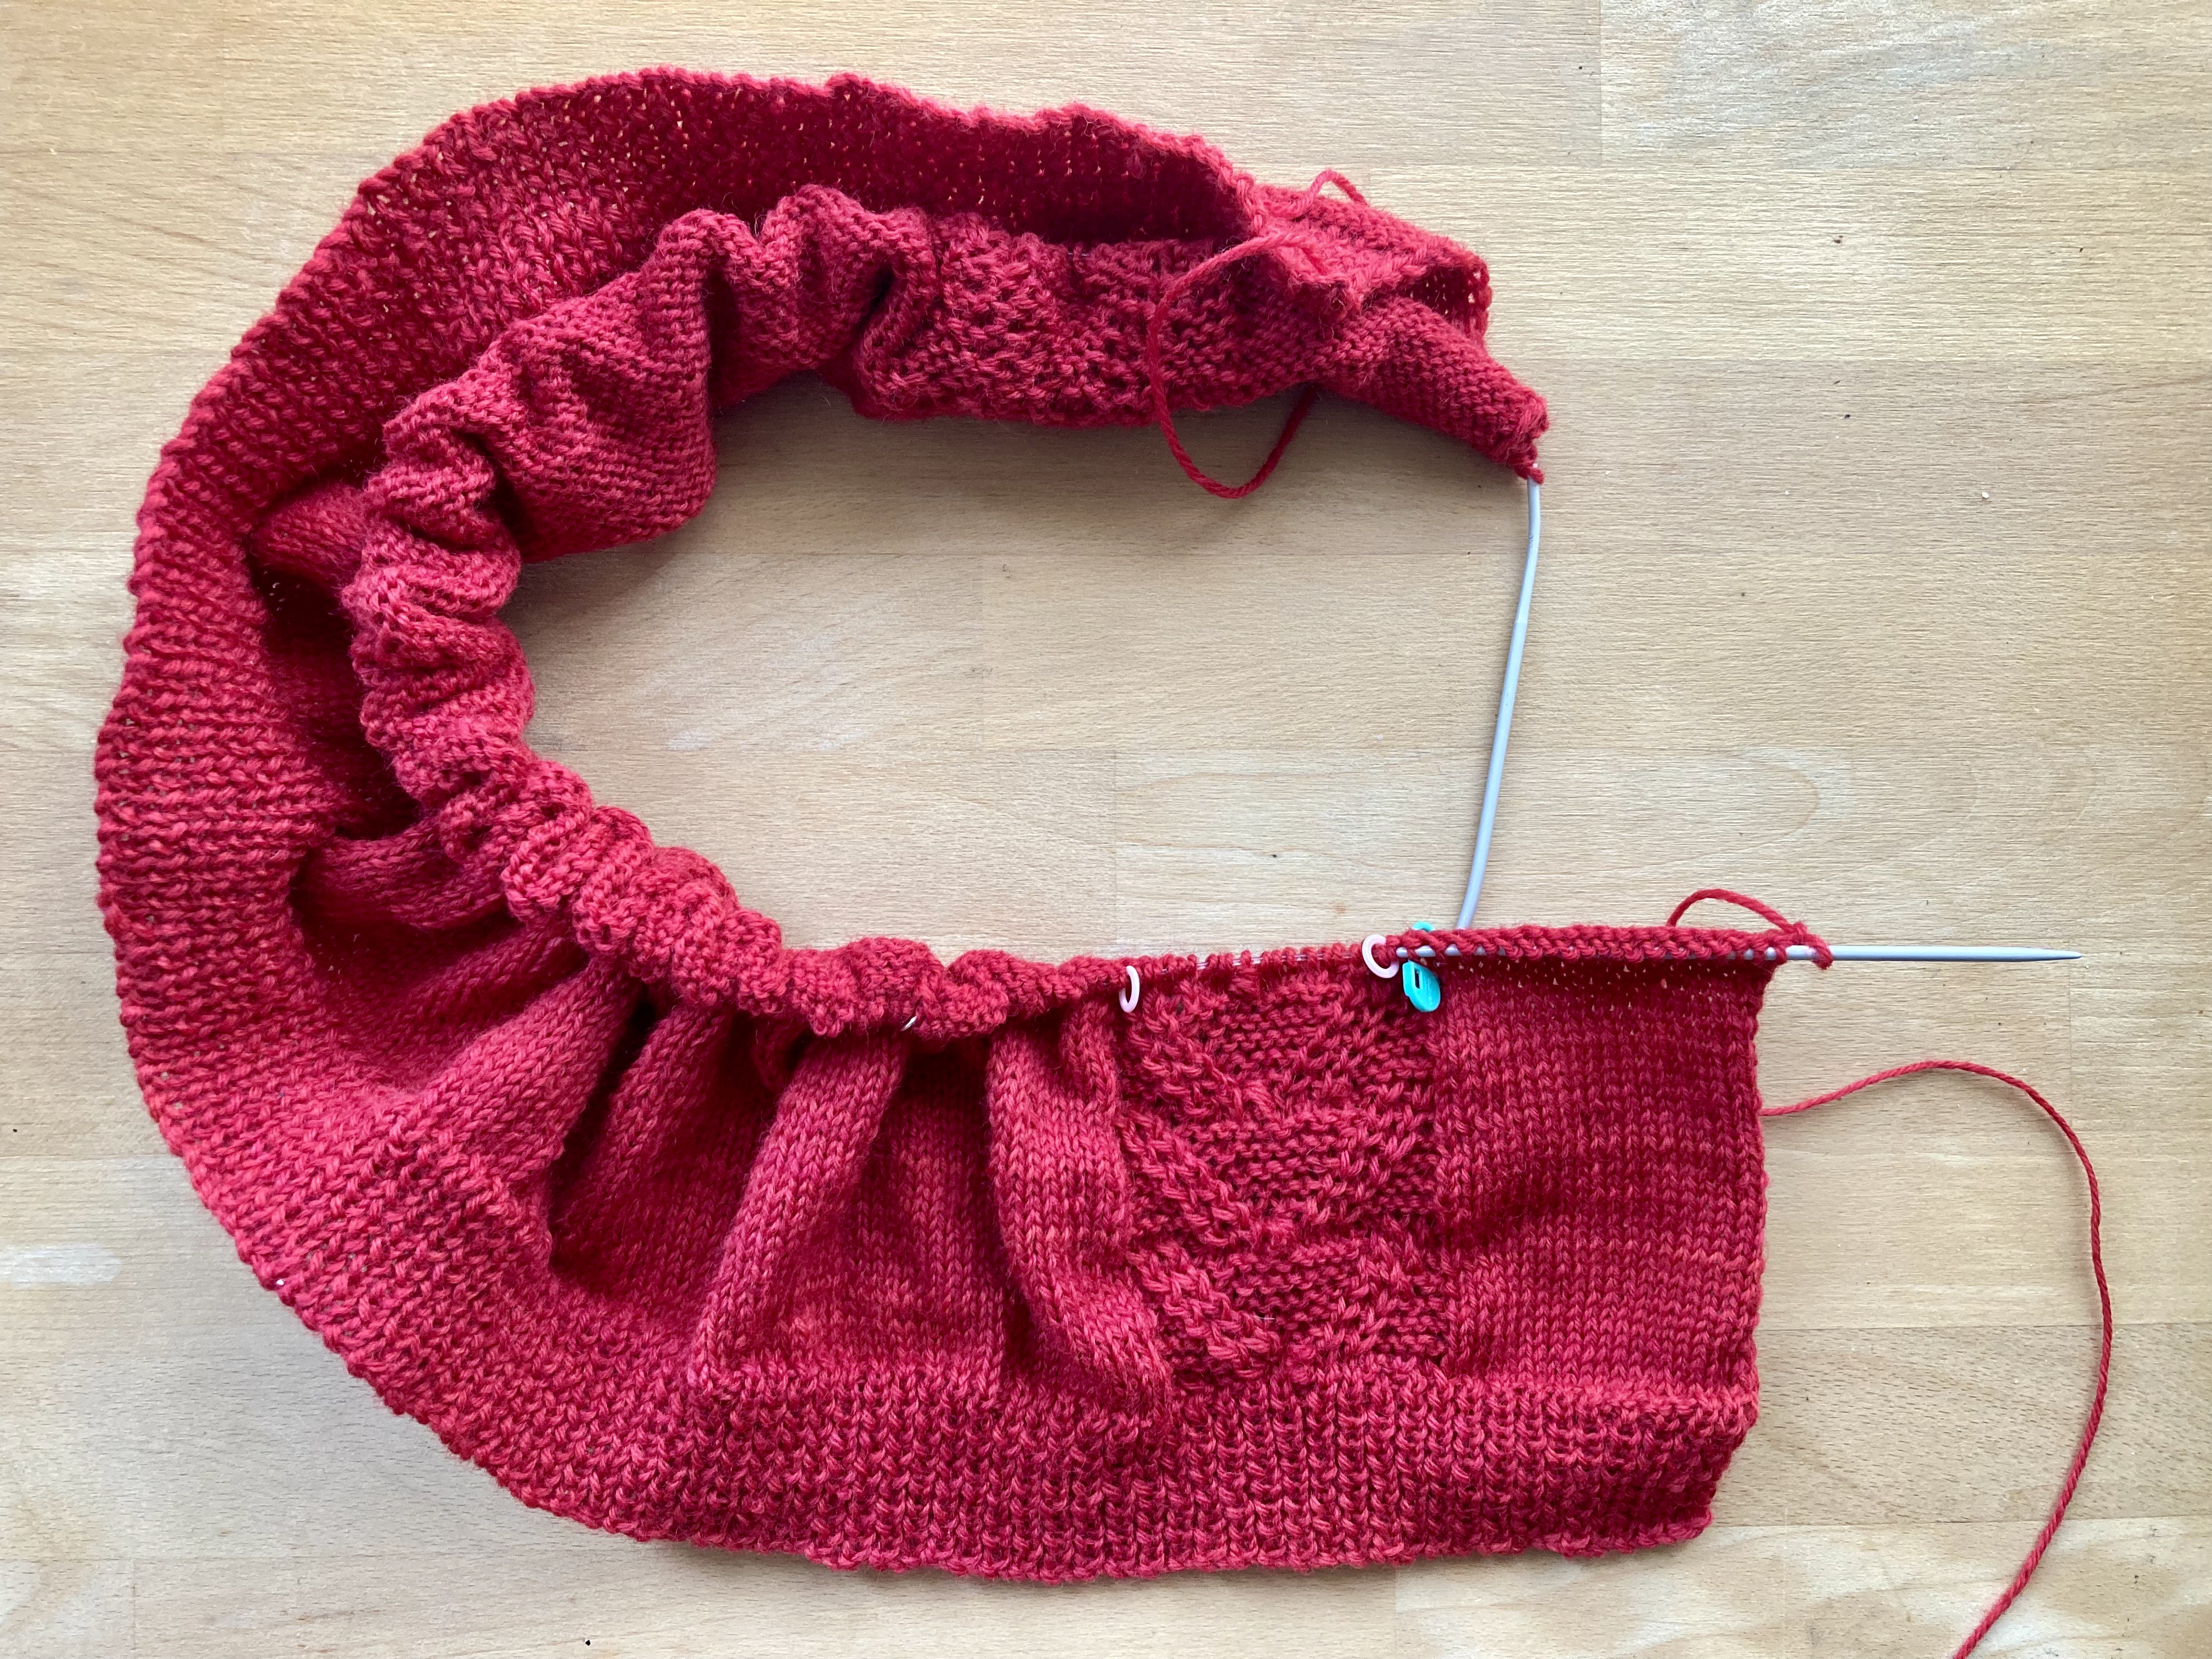
The February 1967 issue of Stitchcraft picked up the trend for knitted work that looks crocheted with a “mini-cardigan” featured on the back cover. Interestingly, it bucks the other, longer-lived trend for oversized and shapeless garments, being more close-fitting and just above hip length. (Though more on that later…) The construction of the cardigan is quite basic, with no shaping in the body (the pattern makes it conform to shape nicely… though more on that later) and a plain, high neck. The edgings are actually crocheted.
It’s designed to be made in Patons Totem Double Crepe, a very smooth, worsted-spun 100% wool that shows the pattern well. A merino wool or something like Lana Grossa Cool Wool would have be the most appropriate modern equivalent. but I was still trying to reduce my stash and I had 200 grams of Drops Lima that I could add to that and hopefully buy just the right amount to use everything up. Lima is less smooth than it “should” be for this cardigan, since it’s 35% alpaca, but it’s spun tightly enough and anyway, I like it and it works. The color is more “loden” green than it appears in my photos. For some reason it doesn’t photograph very well — I’m guessing that the three-dimensionality of the stitch pattern messes up the automatic light sensors.
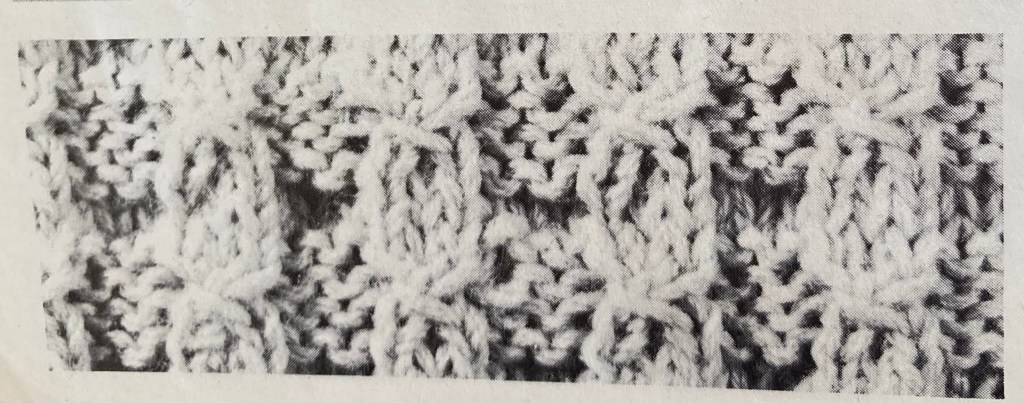
The pattern is sort of based on 2×2 rib, overlaid with twisted stitches and double yarn-overs to give a trellis effect. It was also very slow to knit, with twisted stitches on both RS and WS rows and a fairly large number of stitches per row, as it pulls together quite a lot. The fabric it makes is both stretchy and clingy, and quite warm in a thermal-blanket type of way, as well as being very heavy. I calculated it out from the Totem DK yarn weight and started with 600 grams. That started to look like it wouldn’t be enough at all, and I was on tour and hadn’t packed all of the wool, so I bought another 150 grams while on the road. That was, of course, more than necessary and now I have almost 150 grams extra. So much for destashing!
Apropos pattern, here it is:
Tw2L = k into back of 2nd st, then front of 1st st, slip off tog
Tw2R = k into front of 2nd st, then front of 1st st, slip off tog
Tw2M = p into front of 2nd st, then front of 1st st, slip off tog
Row 1: p2, *k2, p2*
Row 2: k2, *p2, k2*
Row 3: p2, *Tw2L , p2*
Row 4: as Row 2
Row 5: p1, *k2tog, bring wool forward to front of work, wrn, sl1-k1-psso*, k1
Row 6: k1, p1, *(k1, ktbl) into the two new loops, Tw2M* to last 4 sts, (k1, ktbl) into the two new loops, p1, k1
Row 7: p1, *Tw2L, Tw2R*, p1
Row 8: as Row 4
For whatever reason, I couln’t make Row 6 work the way it was supposed to. There were two “extra” loops from the yarn-overs in Row 5, but the way they lay on the needles made it impossible to knit the first and then ktbl the second. I tried making the yarn-overs in the other direction on Row 5 and that didn’t work either. What did work was k1tbl, k1 on Row 6. I’m guessing the designer held her needles differently or did the yo / wrn from another direction.
After the ribbing (on 3.5 mm needles), it is supposed to be knit on 4.5 mm needles. I started with 4 mm needles, since I didn’t want to yarn to stretch out too much. That seemed too tight, so I switched to 4.5 mm needles after a couple of inches on both the sleeves and the body. I finished the sleeves at the end of February and the rest on the long tour with many plane and train rides, making the back and fronts in one piece.
Somewhere near the end of the fronts, I re-read the pattern and realised that I had been knitting it wrong all along! After one pattern repeat, you are supposed to repeat rows 3-8. I repeated the whole pattern, rows 1-8. So my stitch pattern was slightly elongated vertically. It honestly didn’t look much different from the pattern close-up photo in the magazine, though.
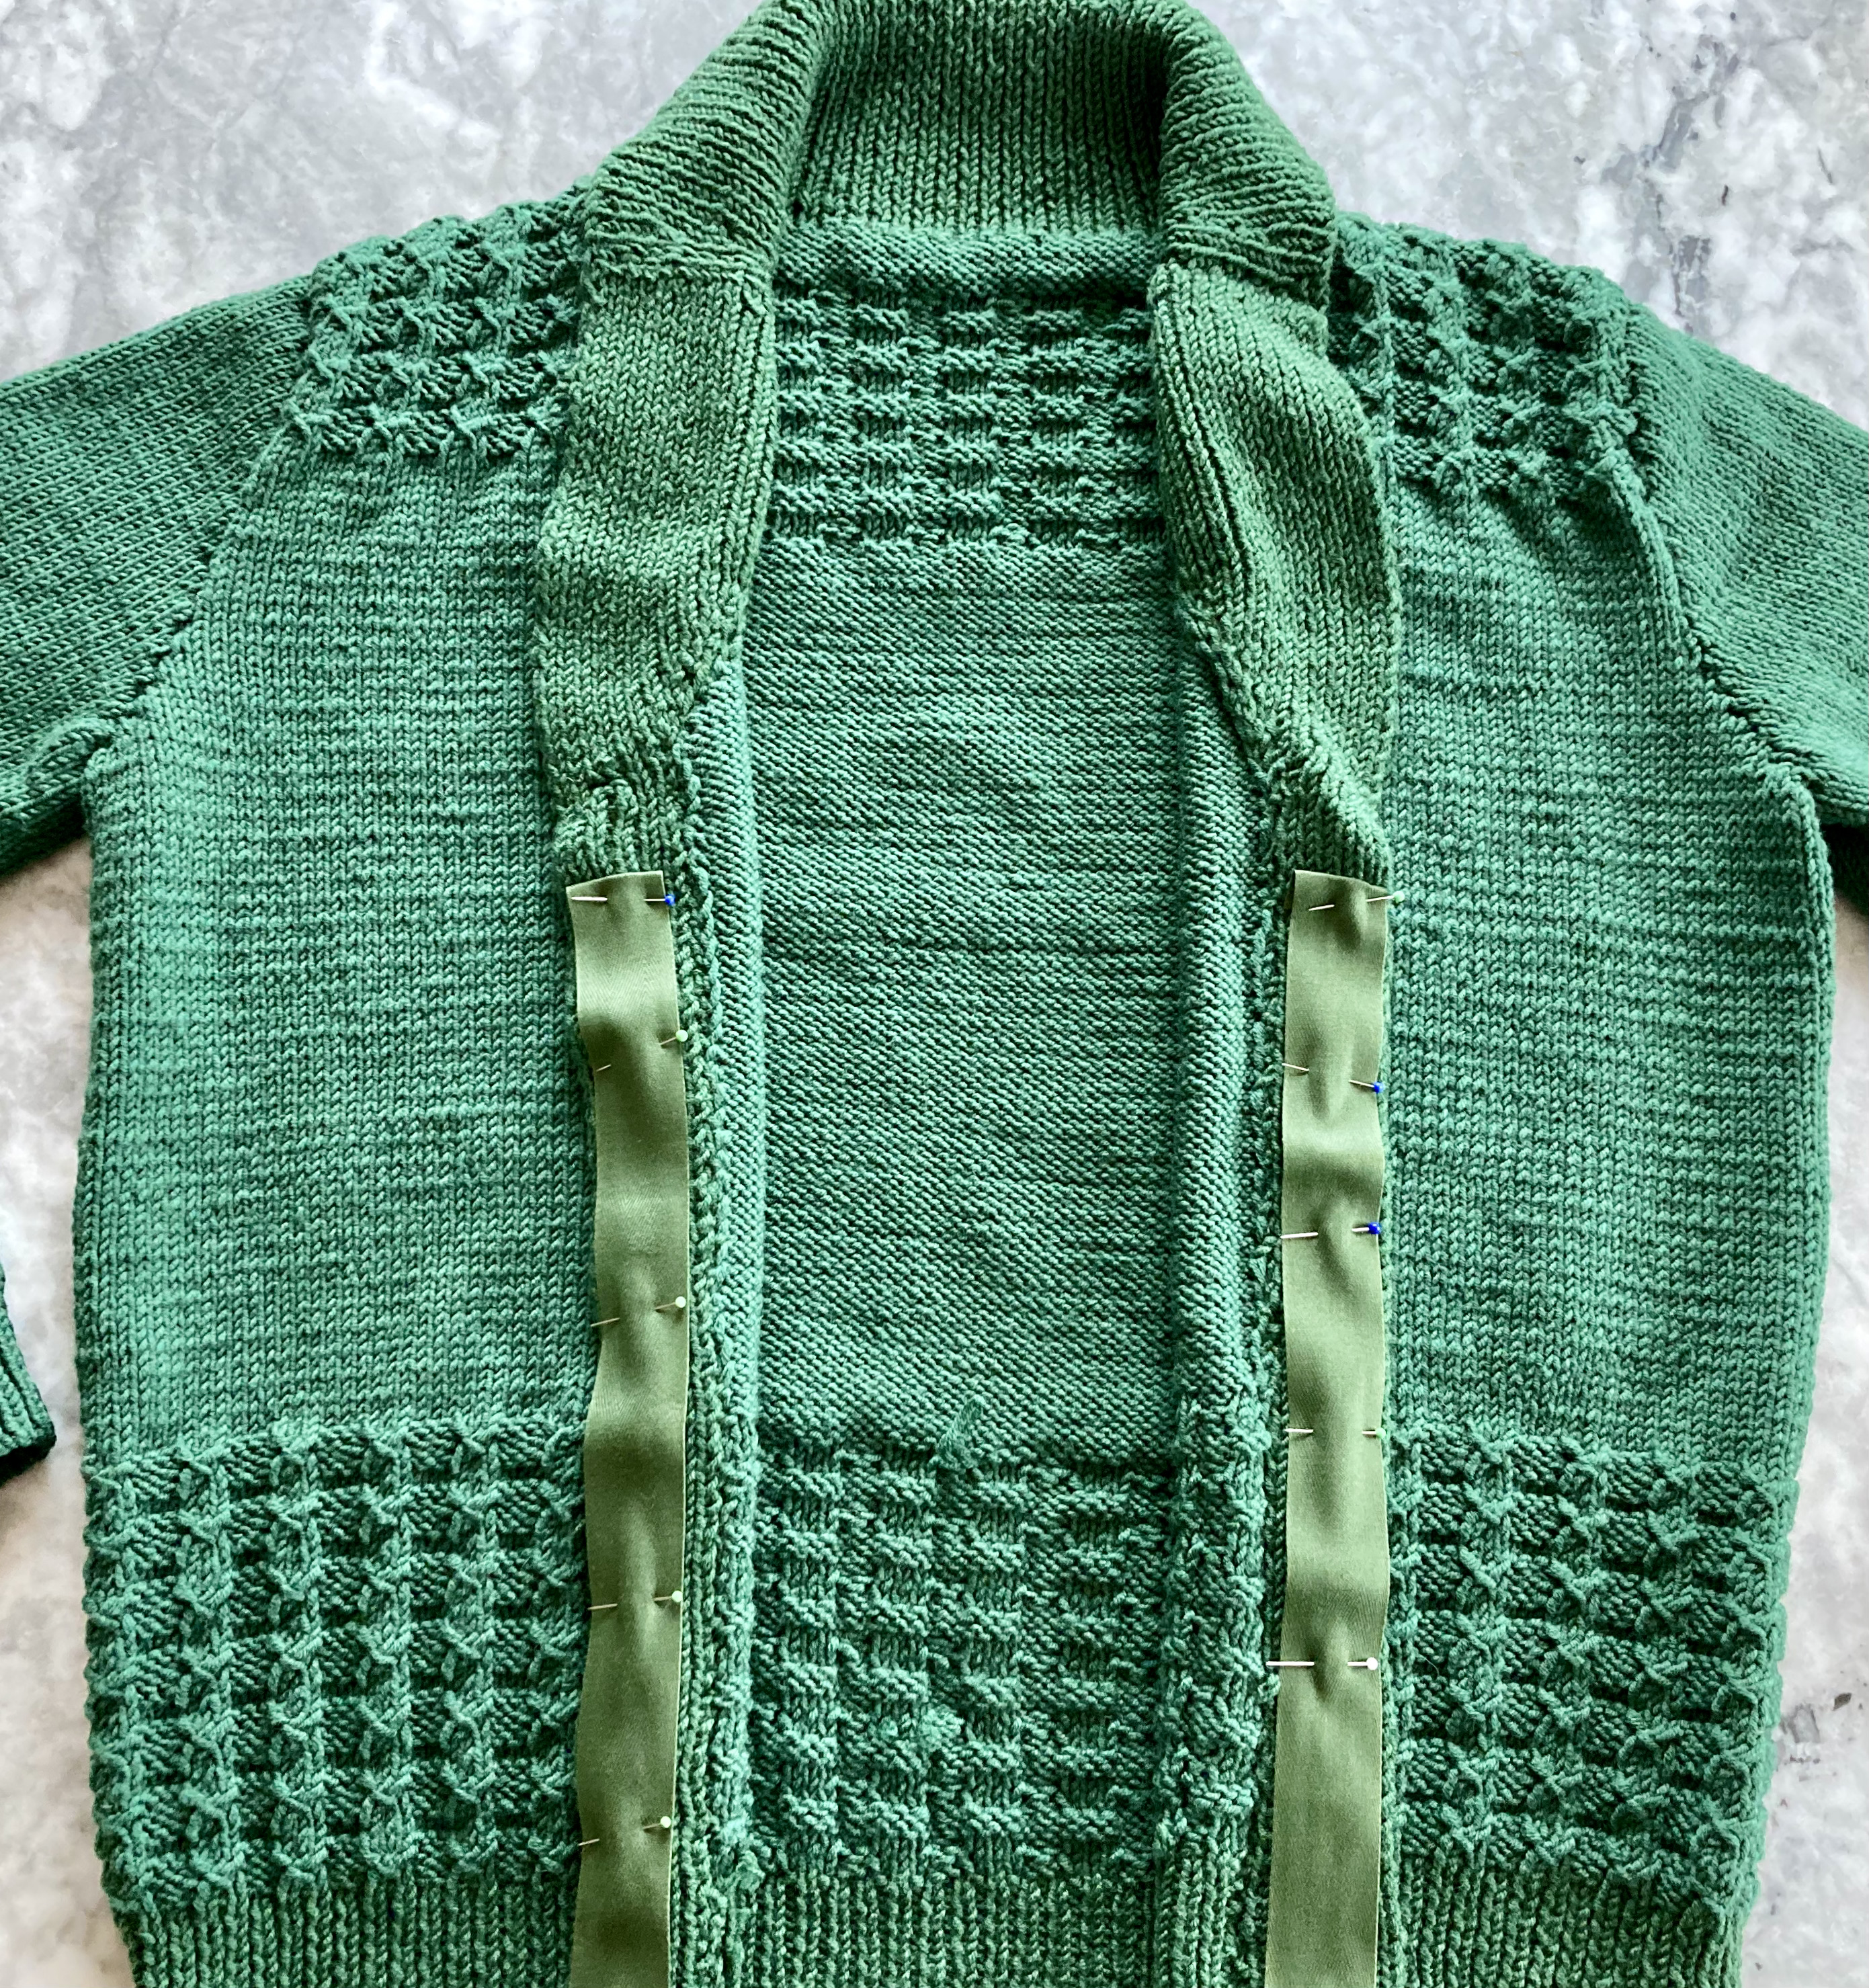
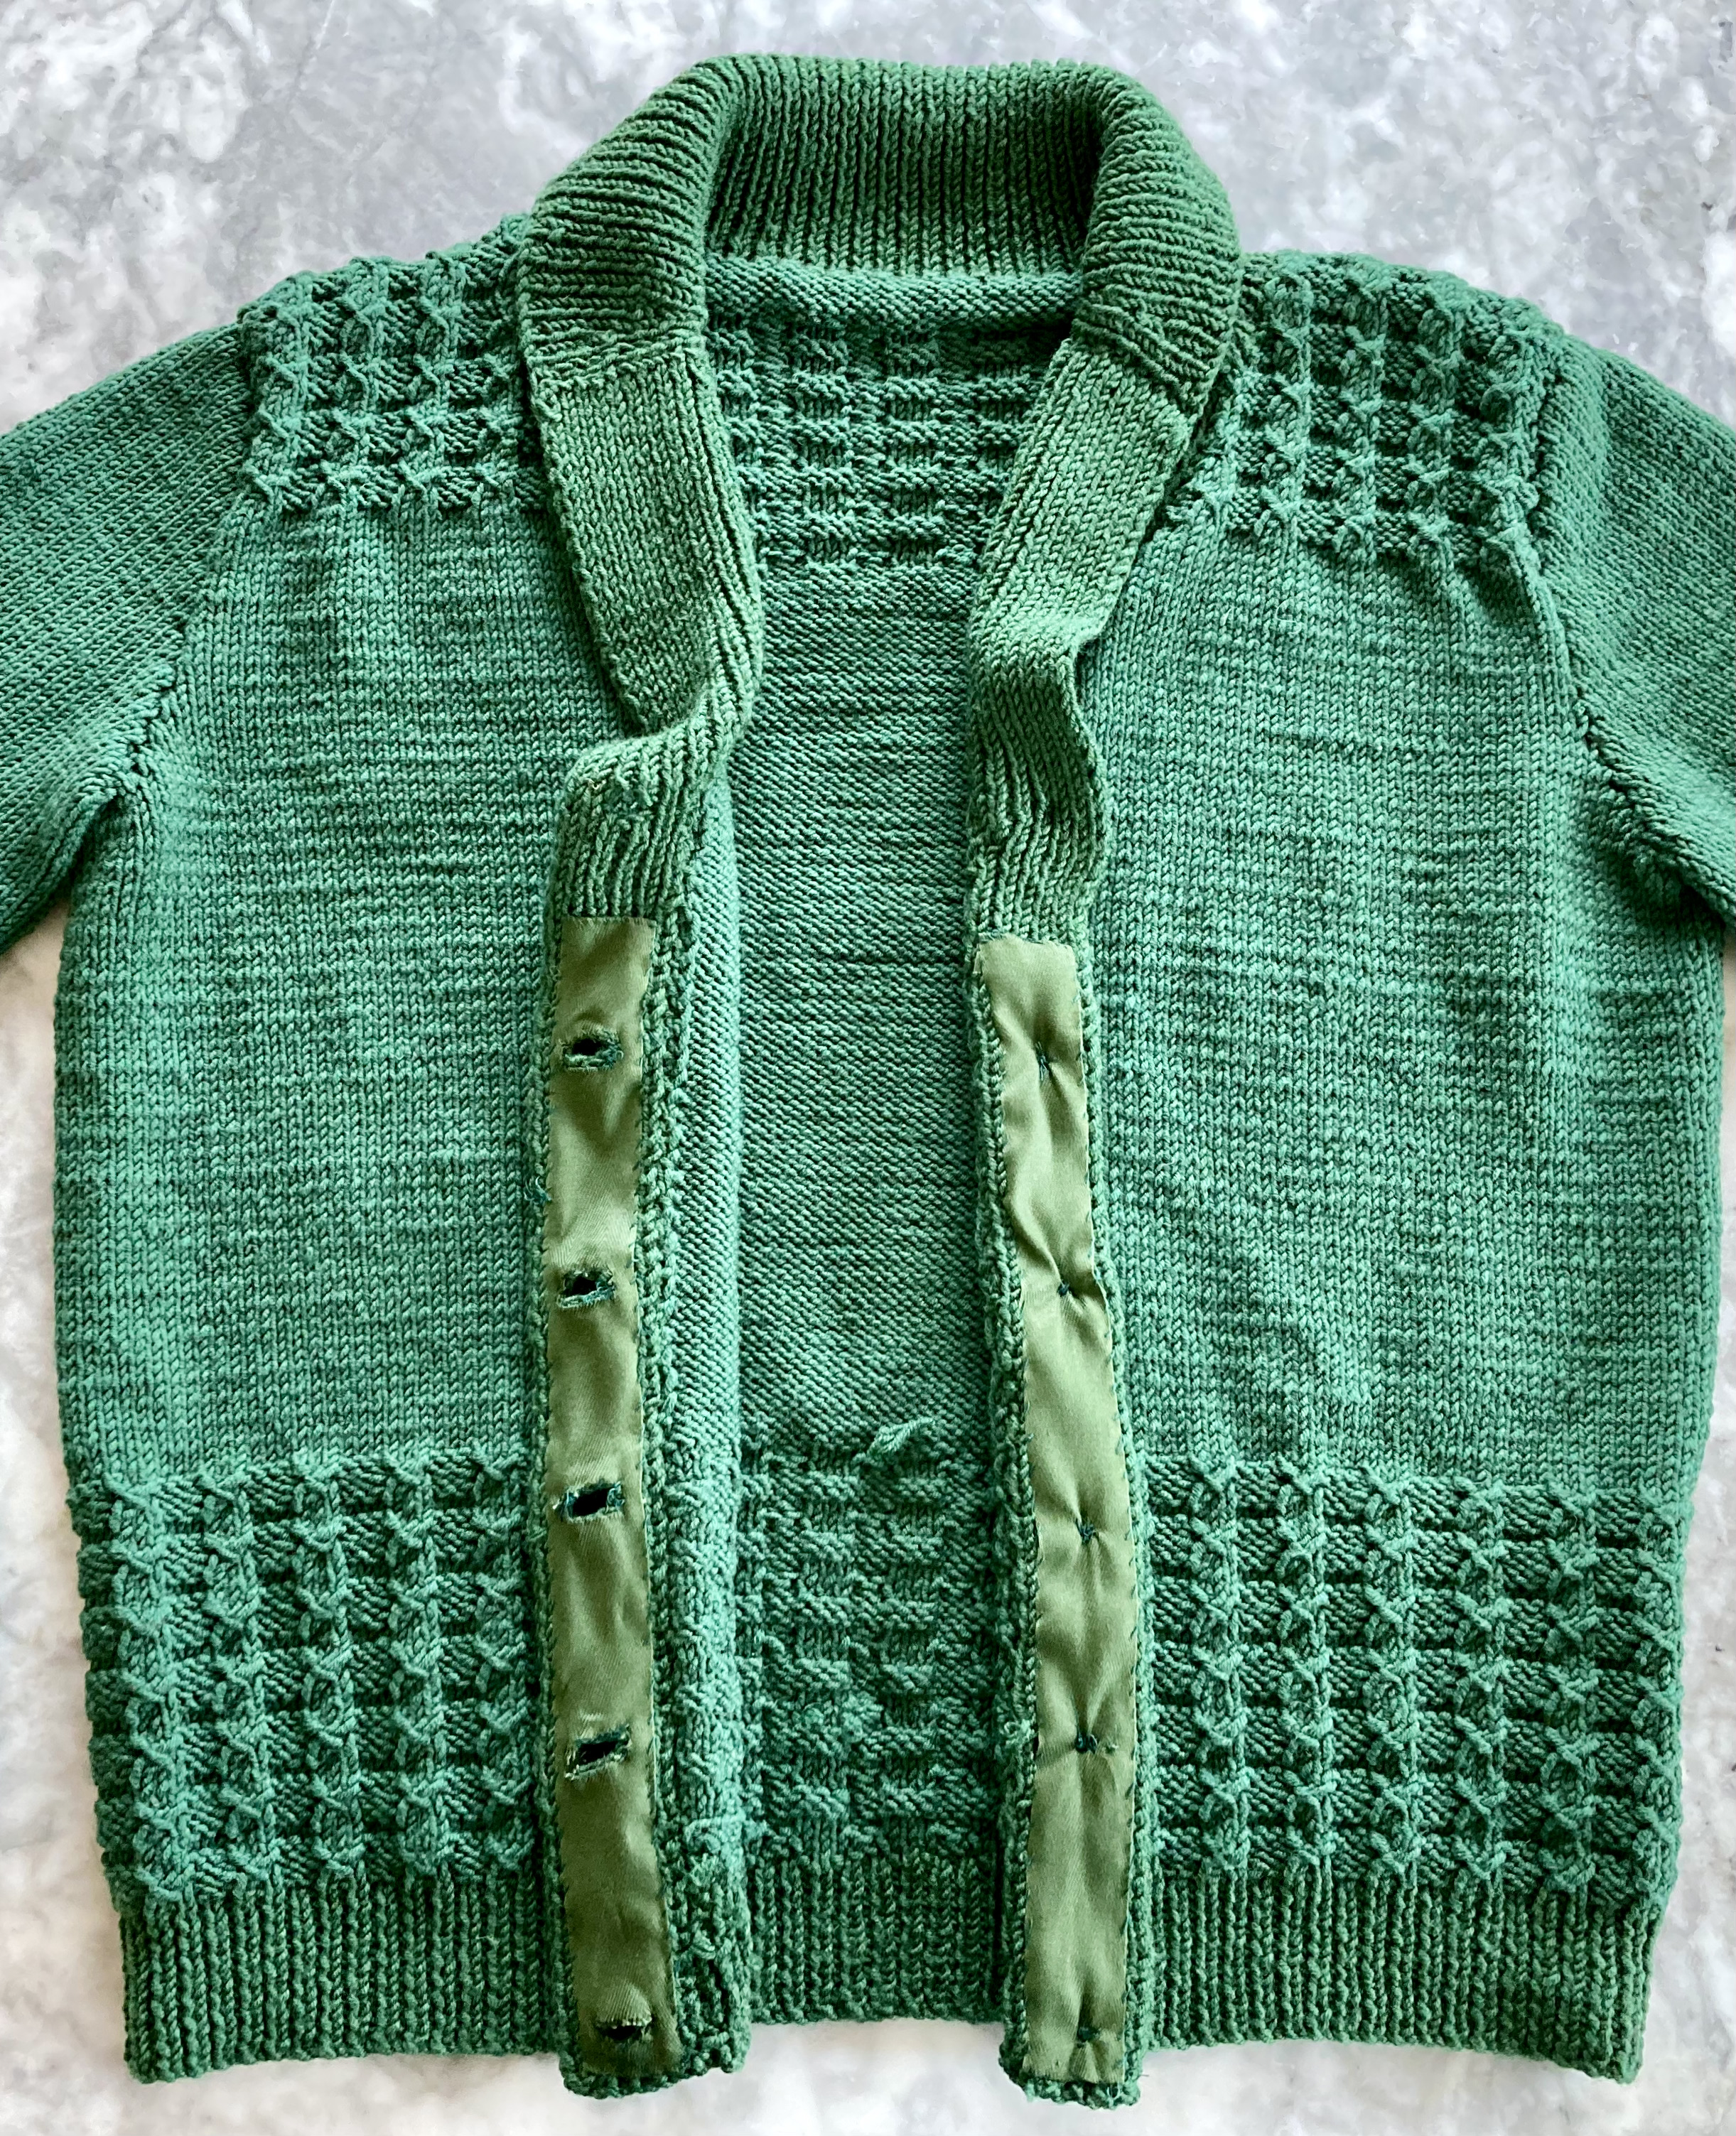
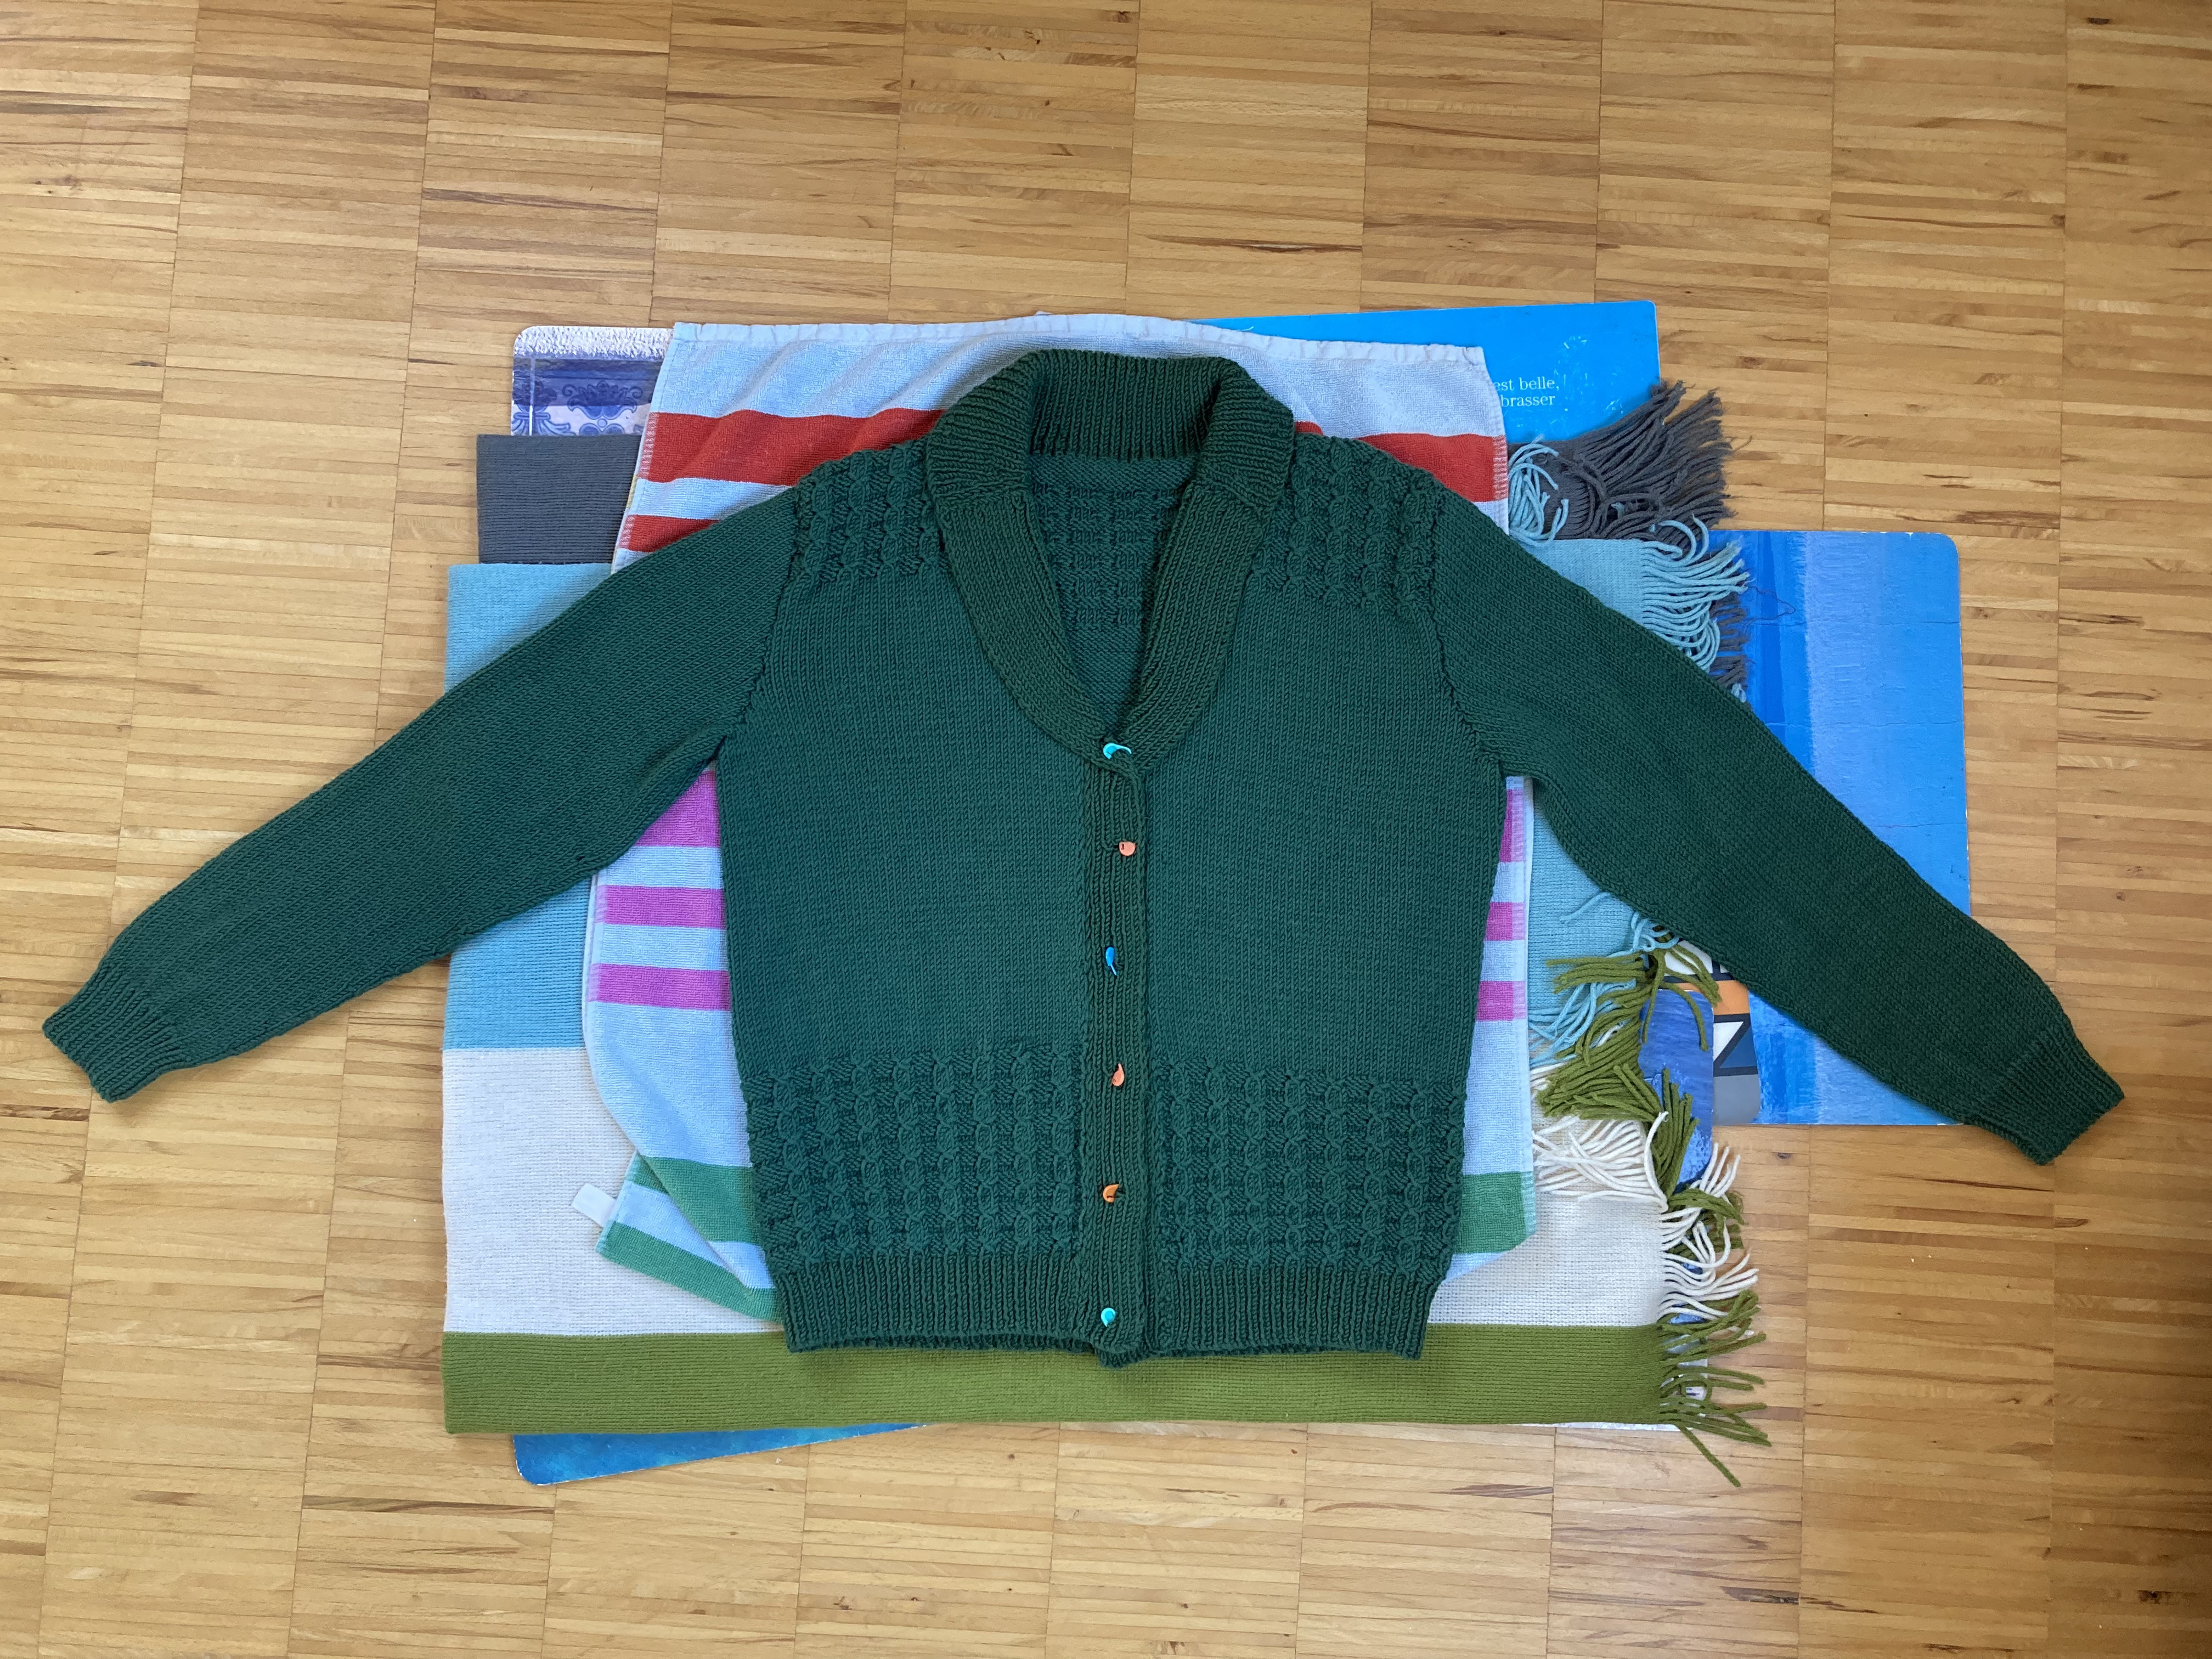
The jacket seemed to be knitting up a bit larger than I wanted, but I couldn’t try it on properly until it was finished. It was a little bigger and floppier than I wanted (so heavy!) but the pattern would make it pull in tighter… right? right? No! I made the (crocheted) borders nice and tight in the hopes they would rein it in… not enough. After blocking, it just ballooned in all directions and ended up too big for me — I don’t like the “oversized” look. I decided to sell it or give it to a good home, and luckily a fellow knitter from my knitting group liked it and bought it from me.
Sadly, this project was more frustrating and less successful than I wanted. The sizing did not work out, the wool was too heavy, I made the stitch pattern wrong… there were just too many problems. On the up side, I love the pattern and the colour, the wool is warm and soft and cosy, and I even found incredible buttons that match the colour and style perfectly. Most importantly, my knitting friend is happy to have the cardigan, so I guess “all’s well that ends well.”
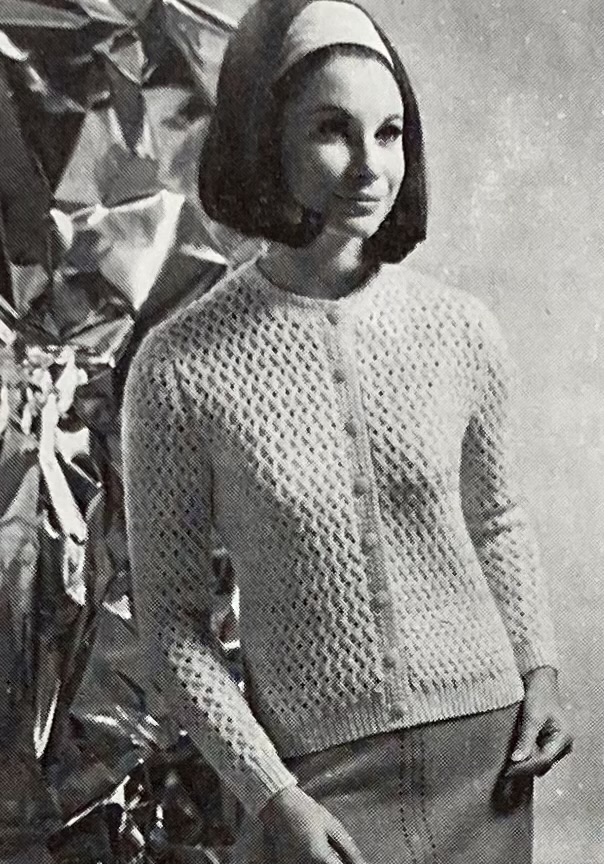
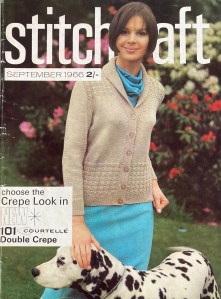
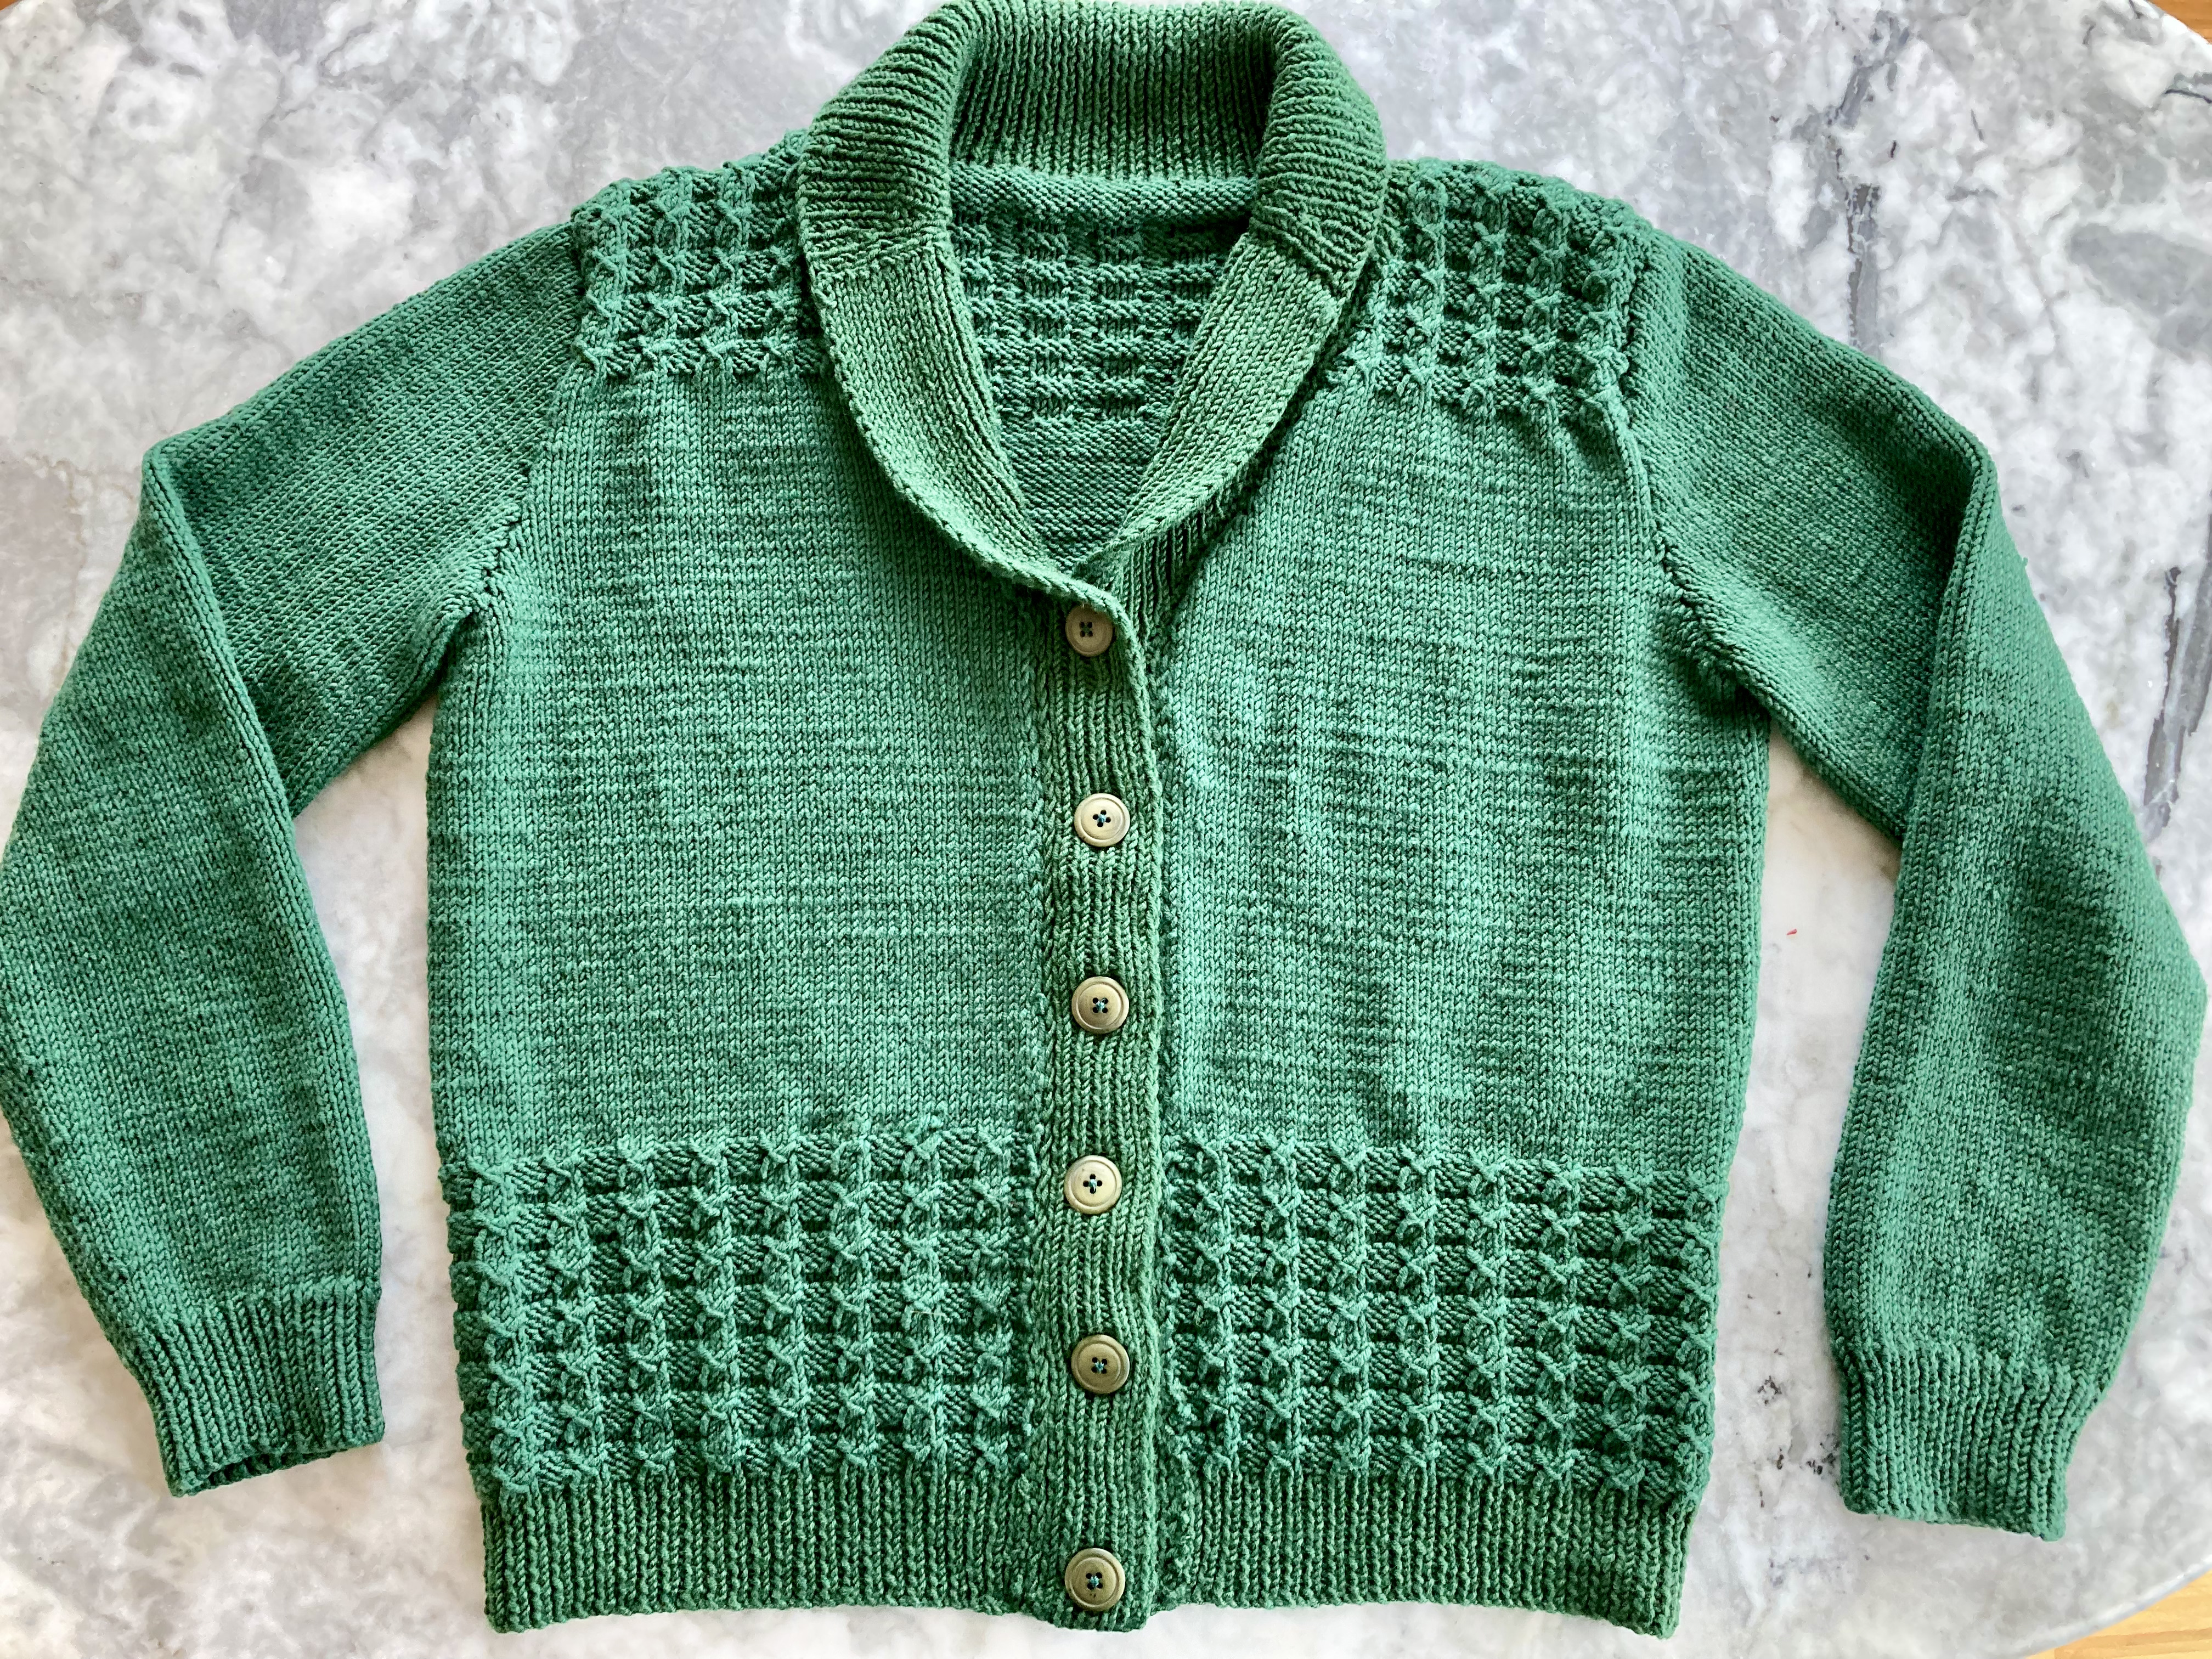
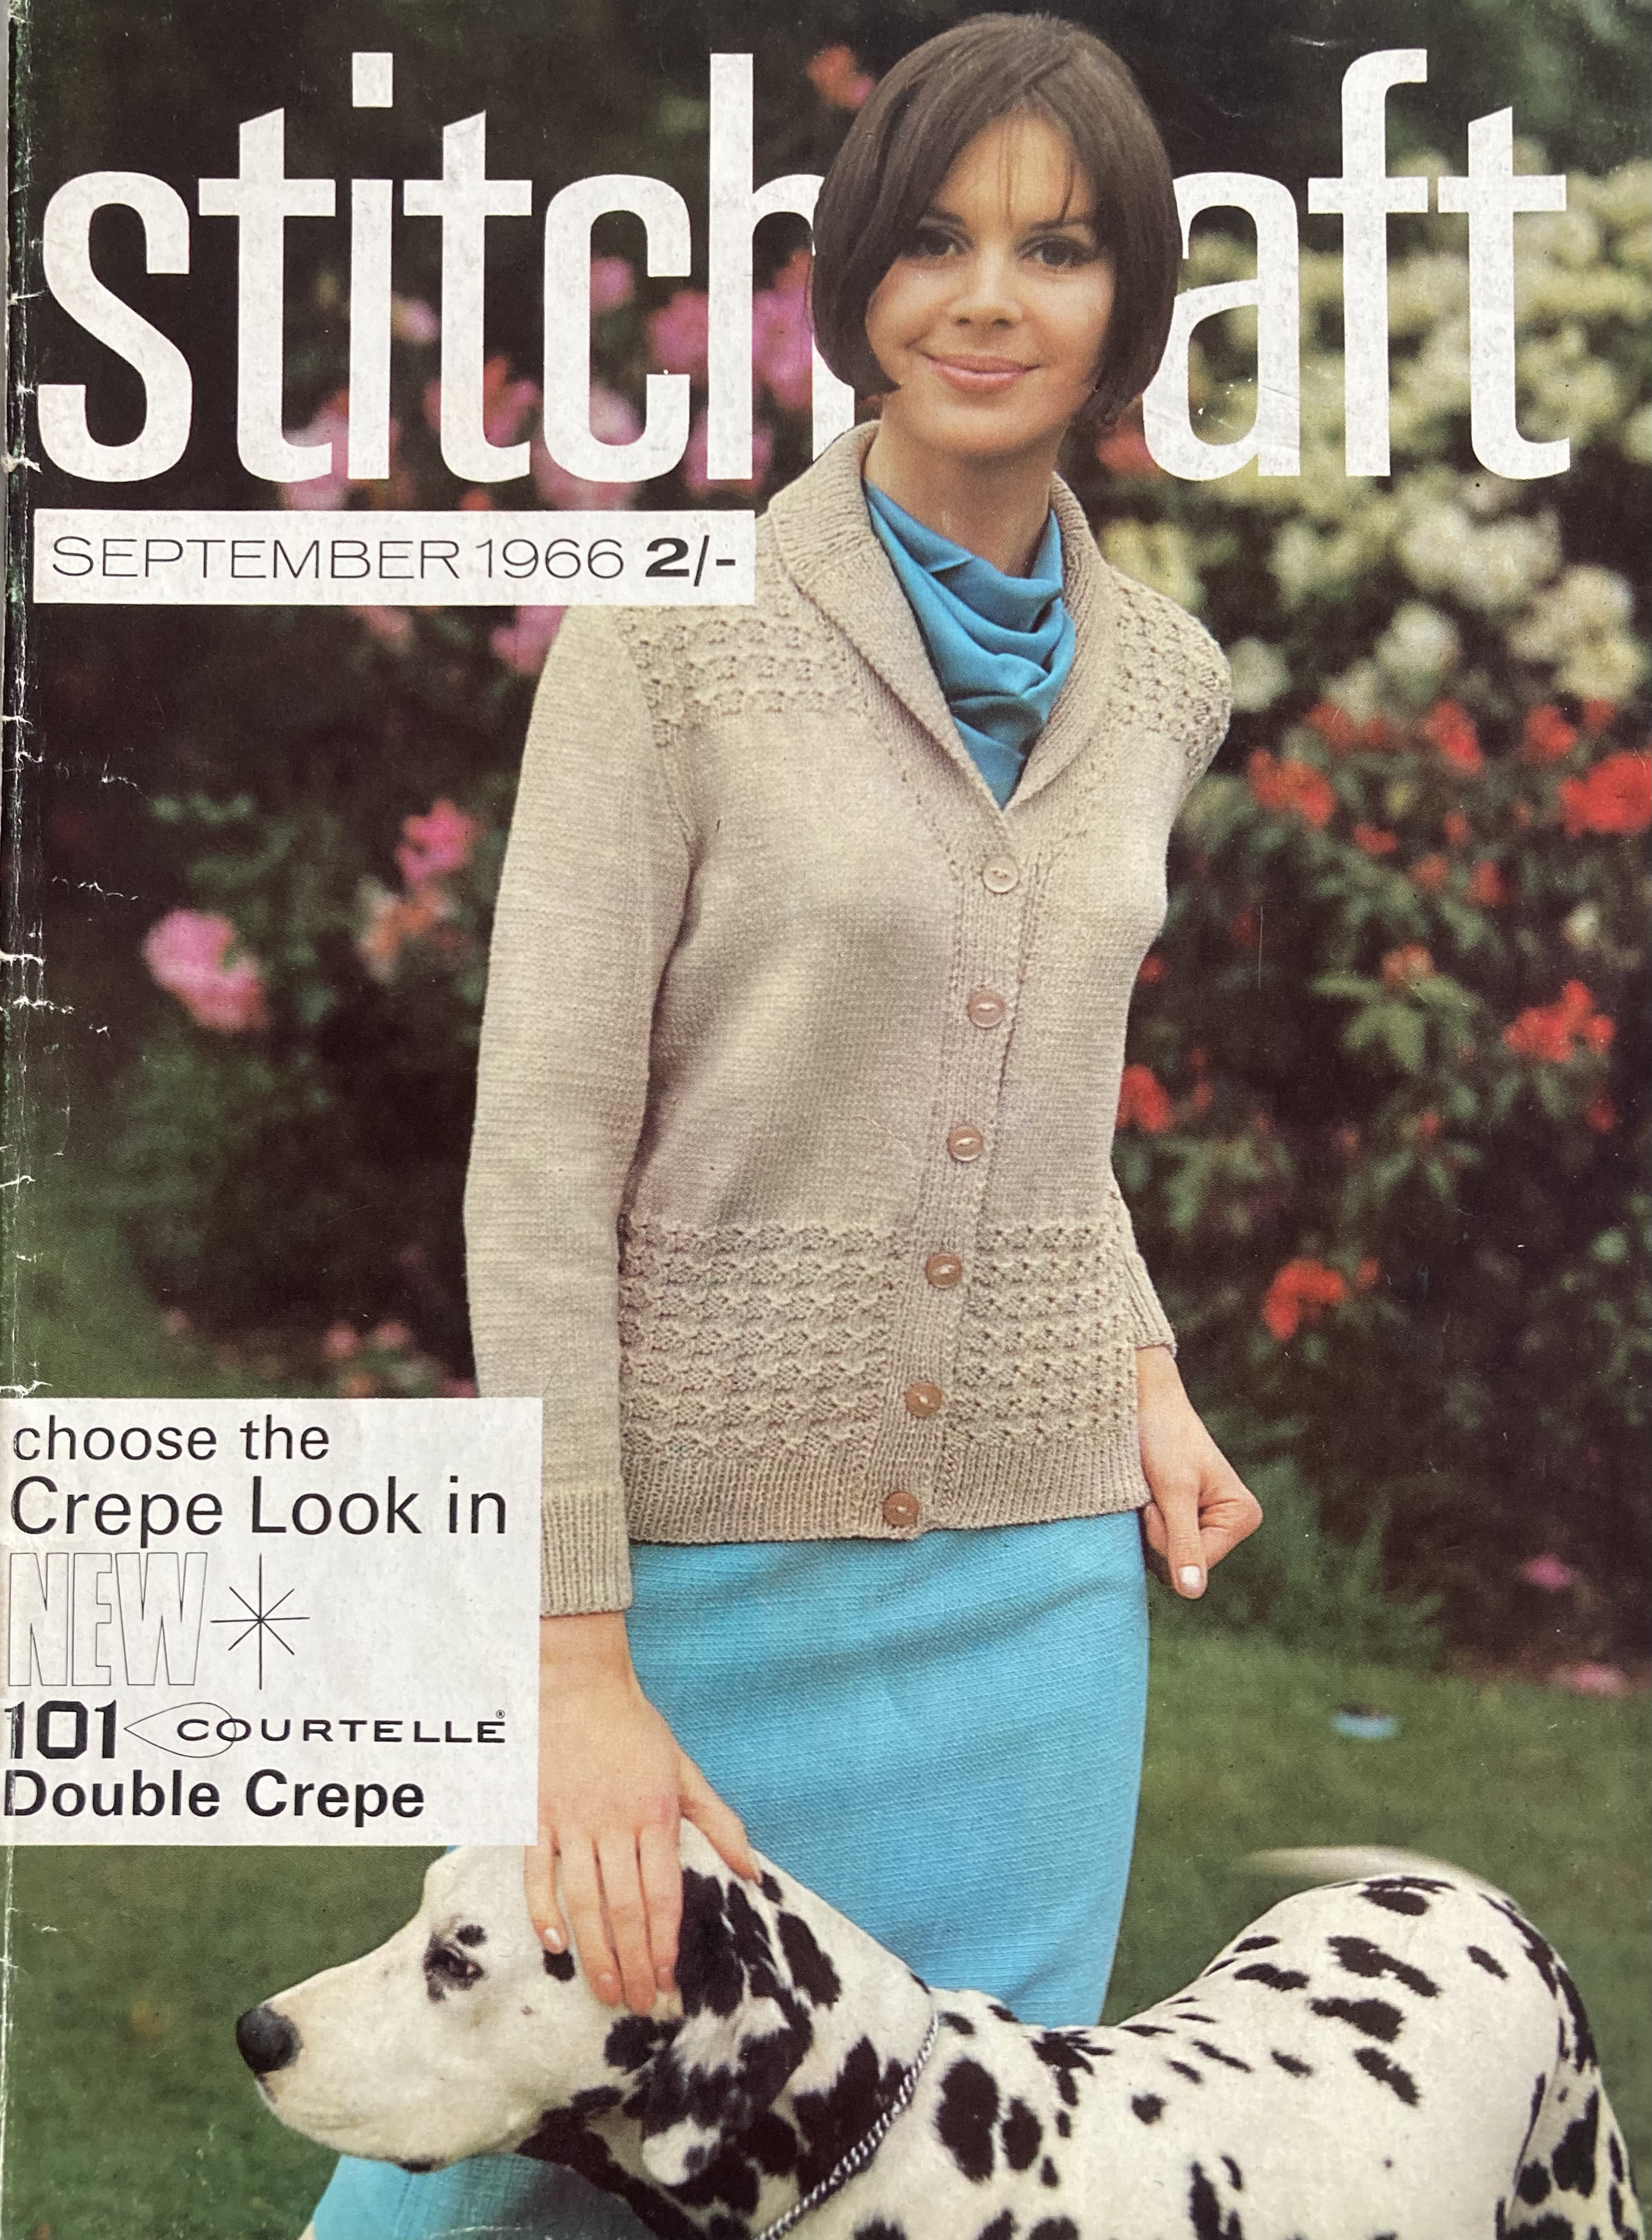
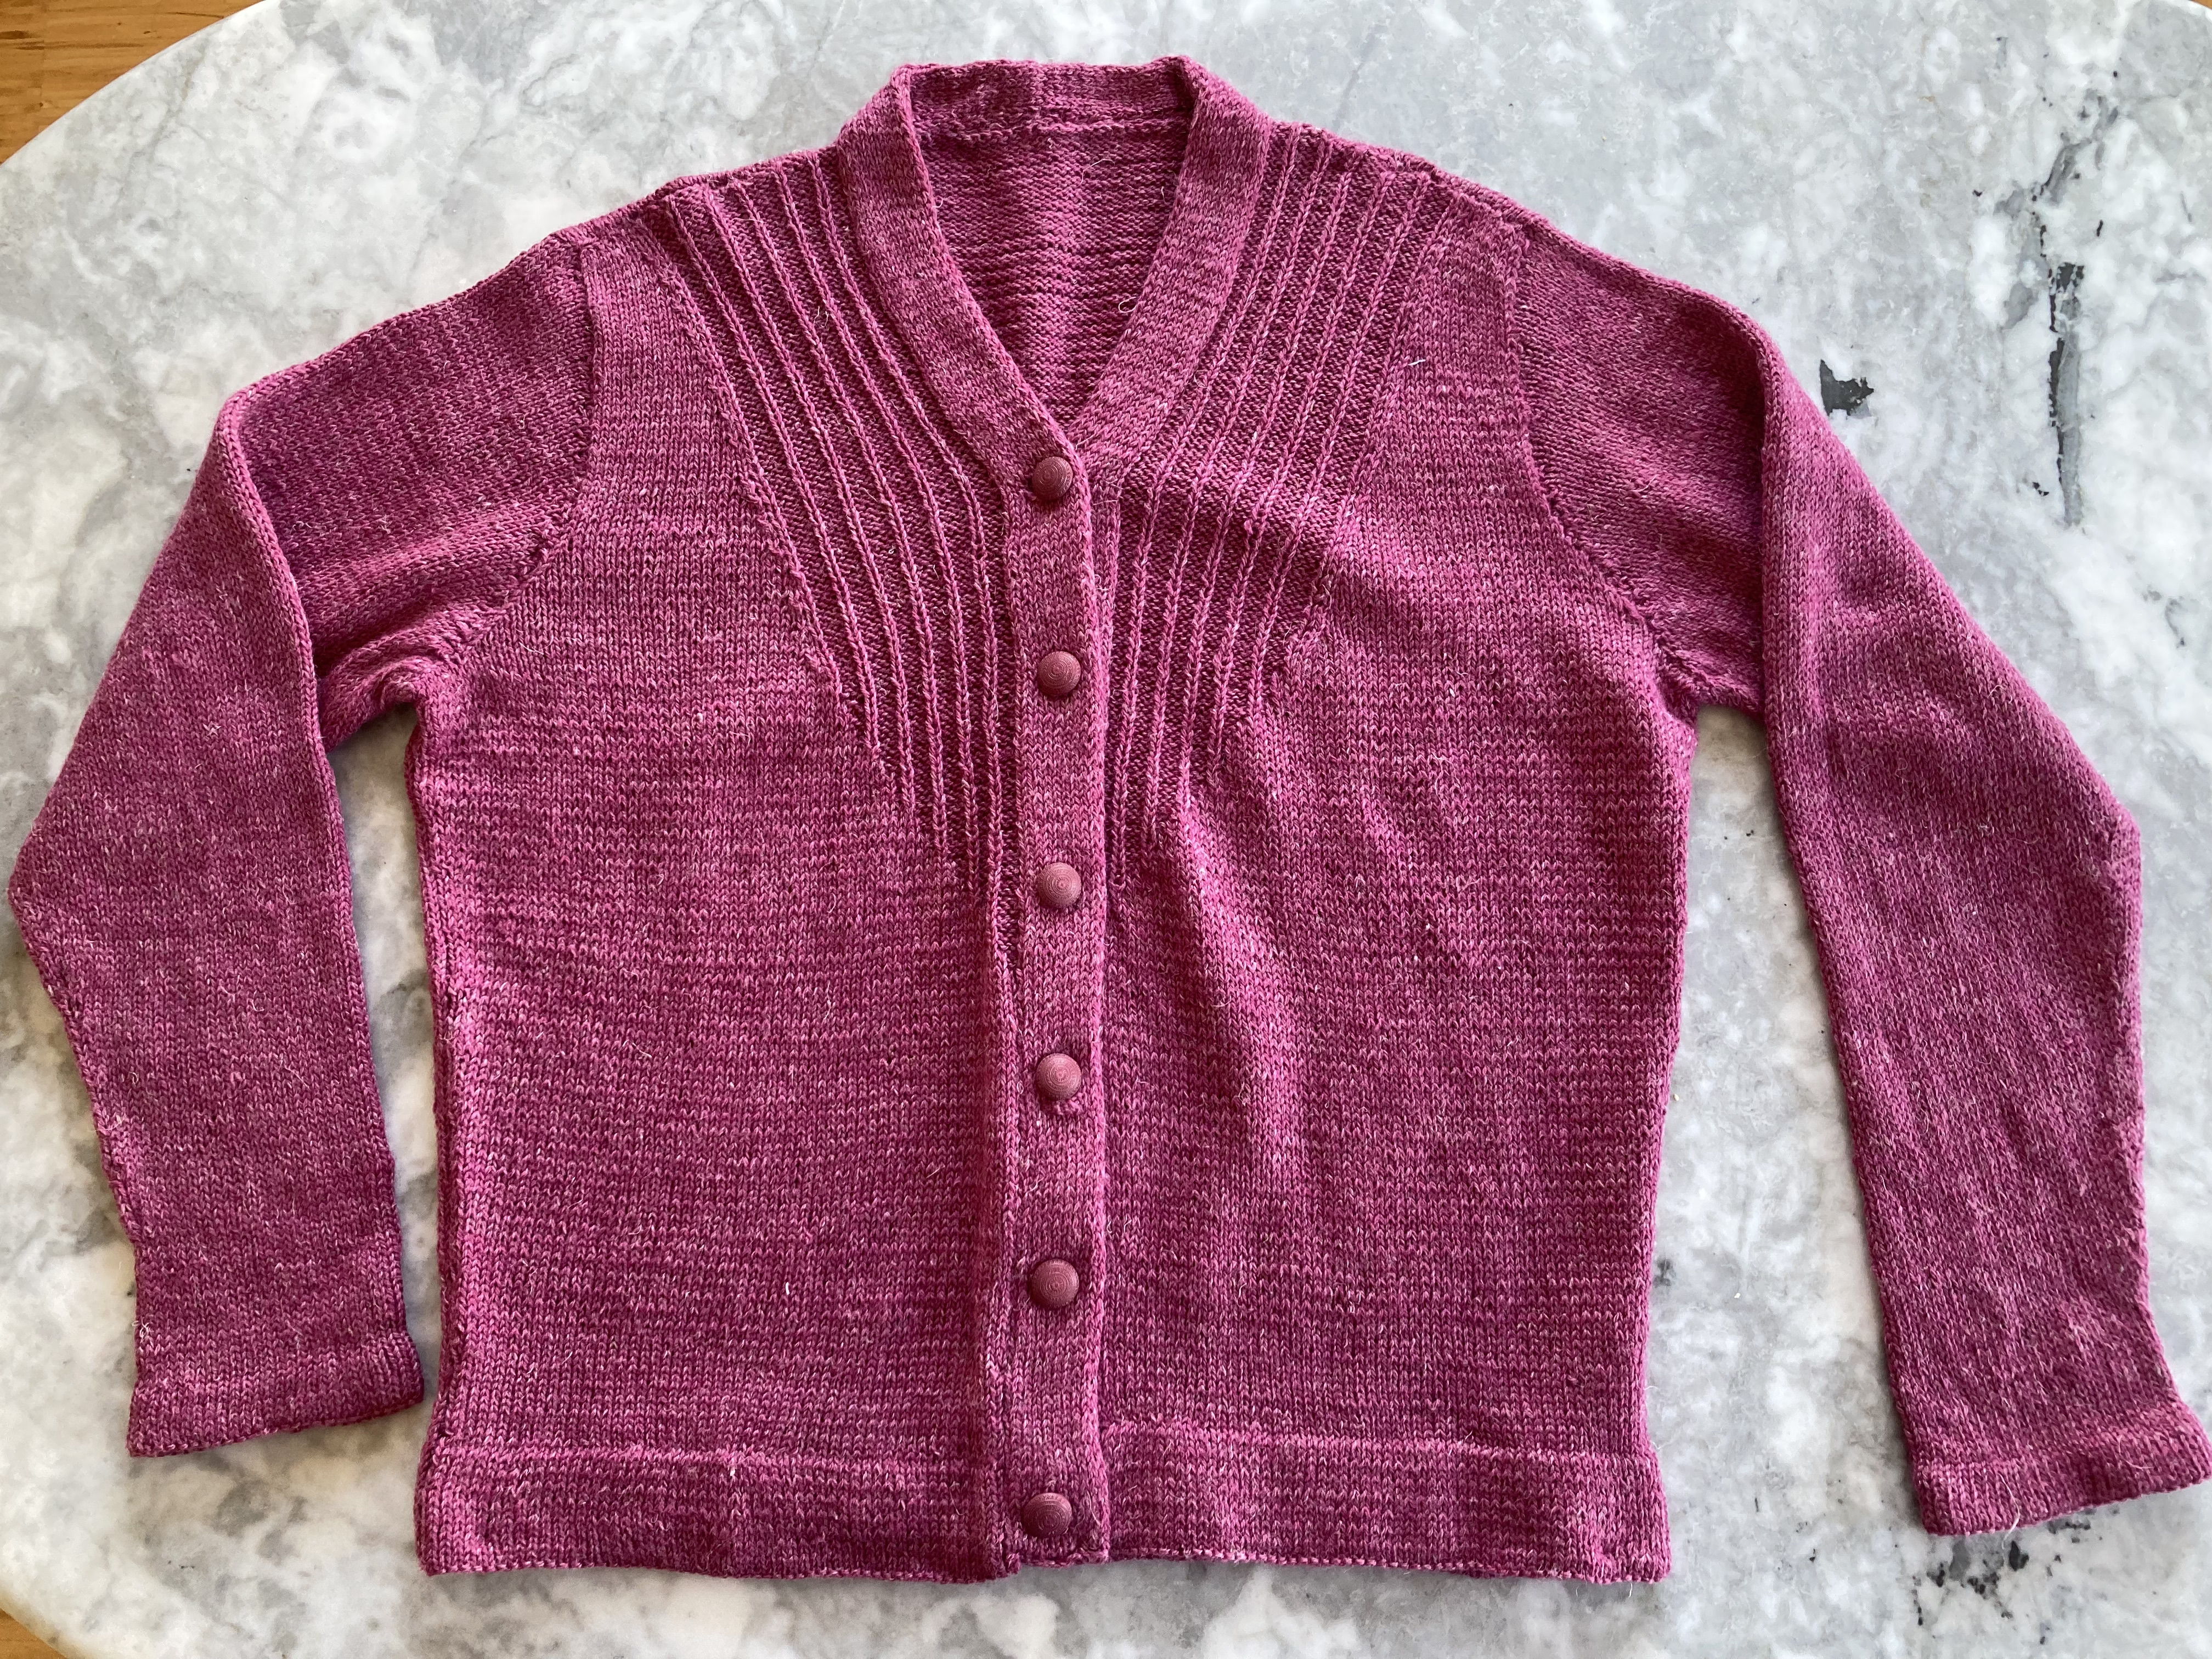
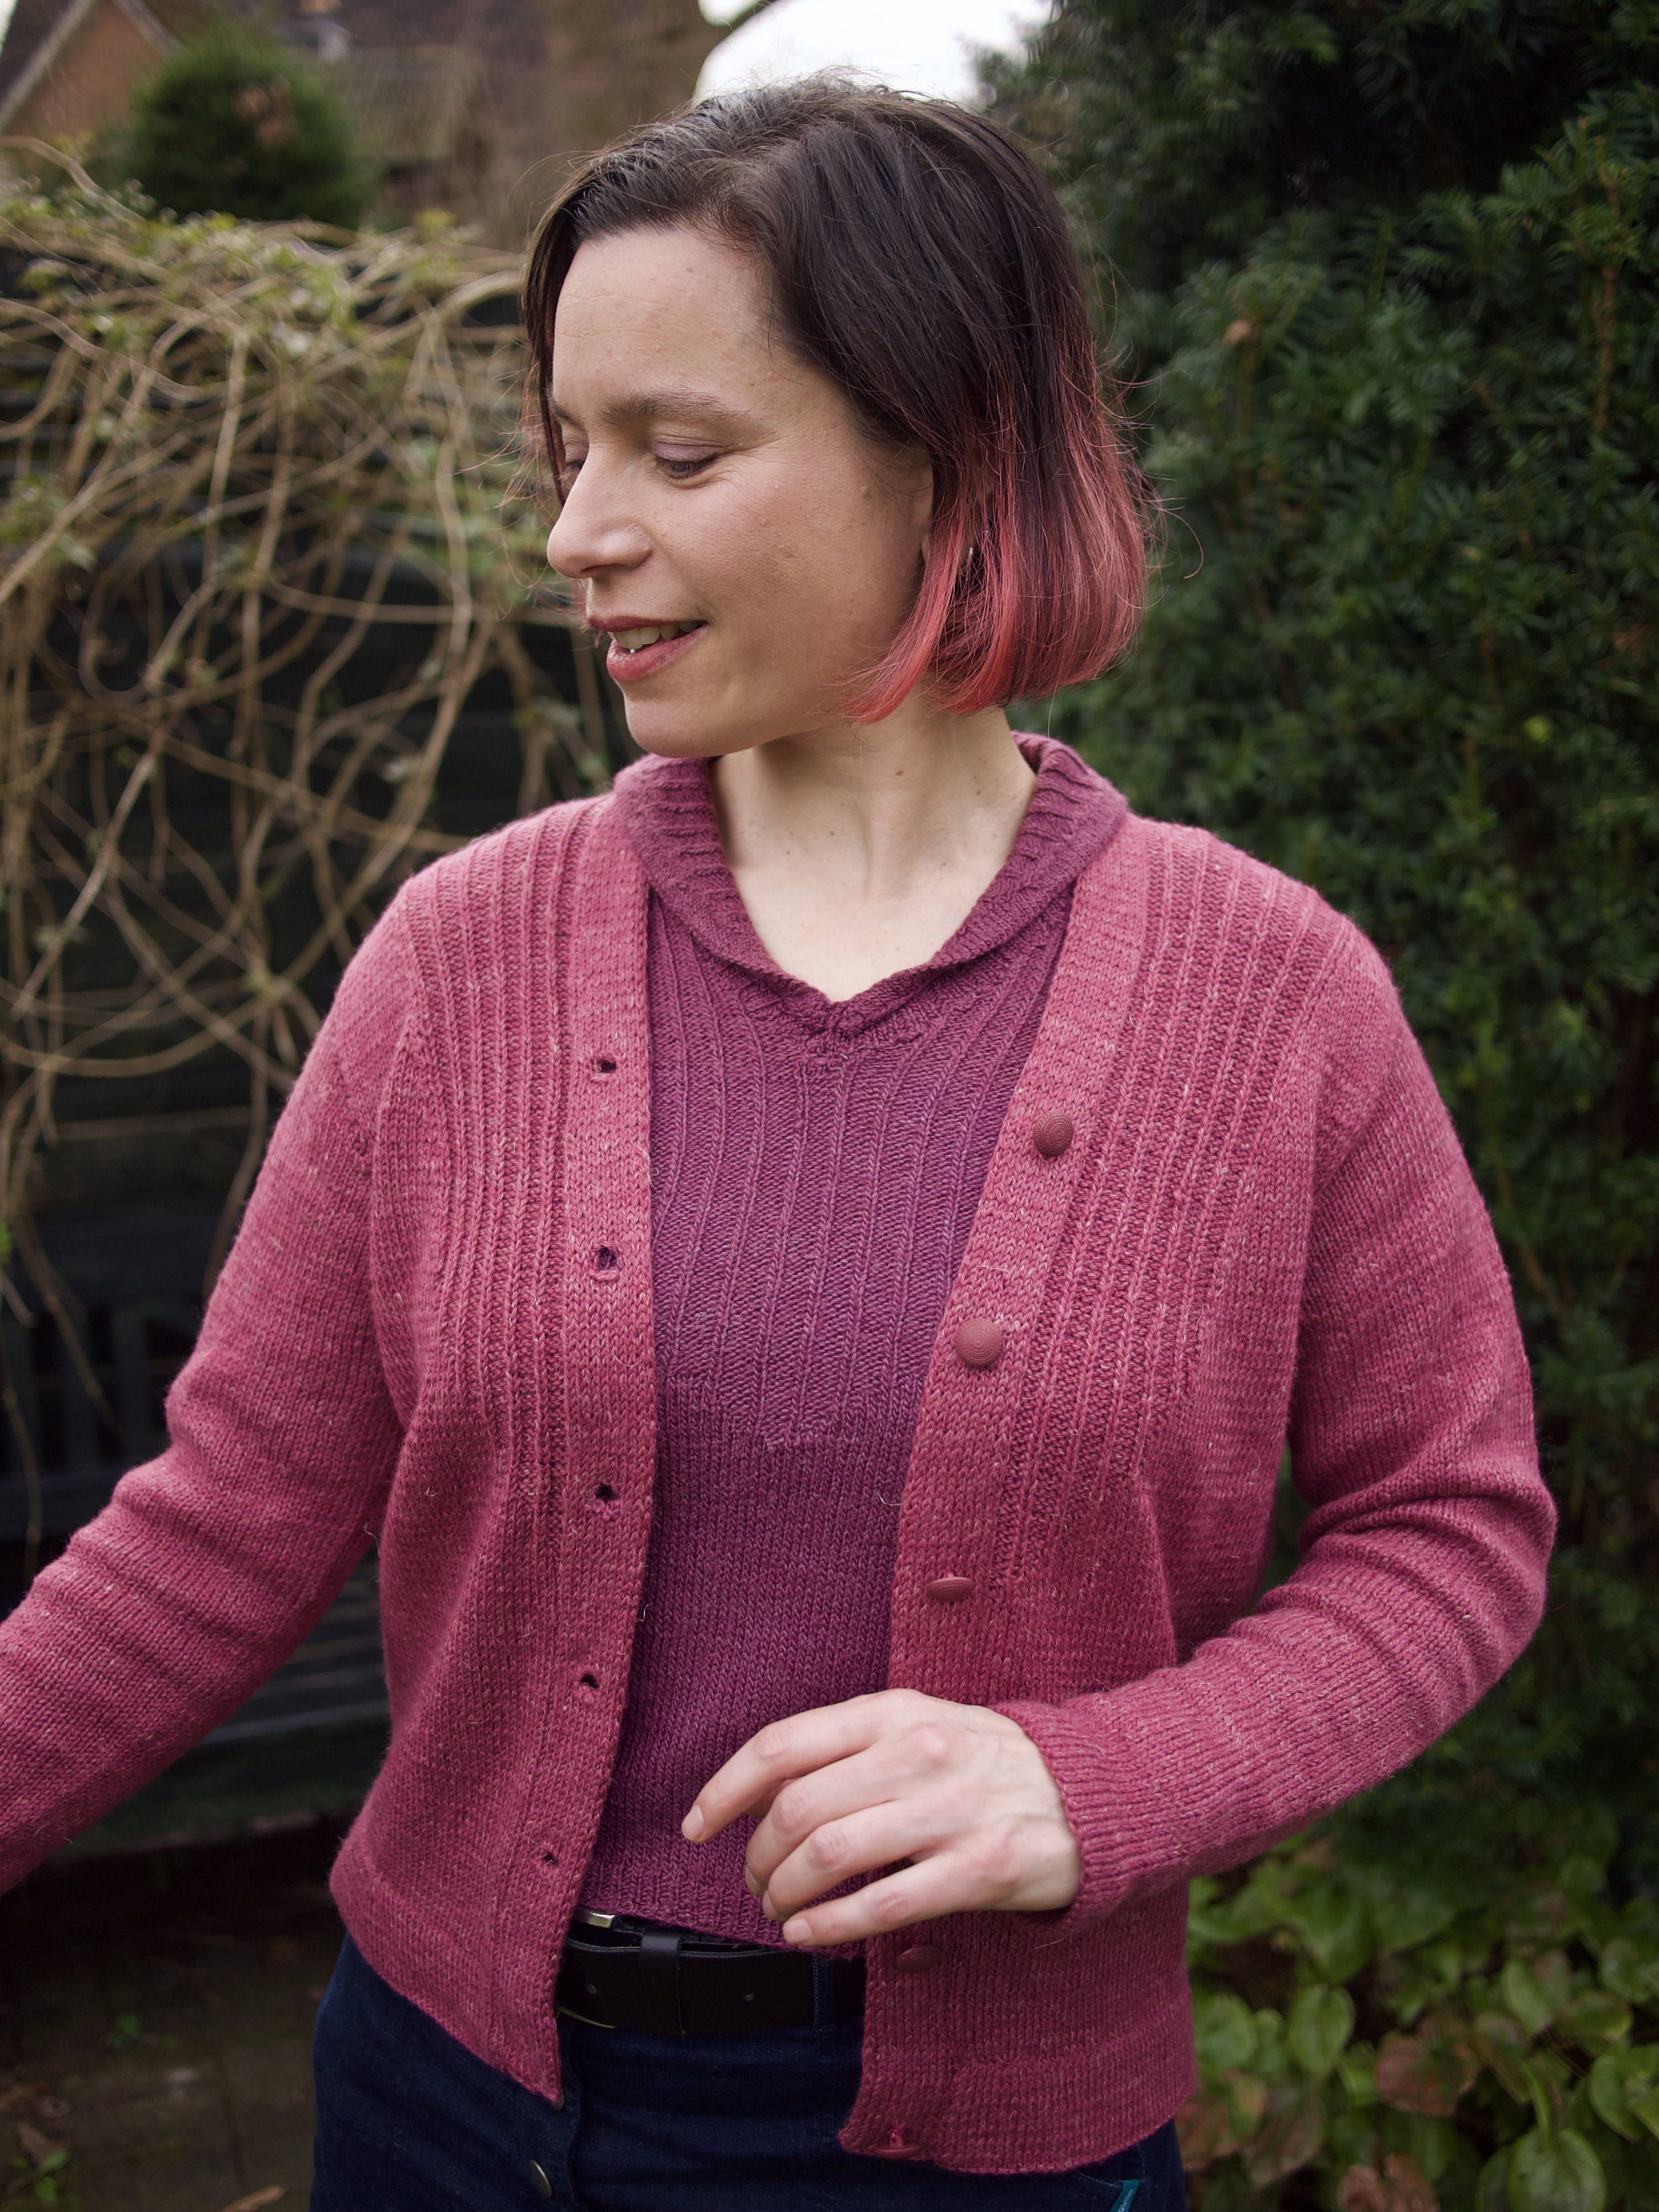
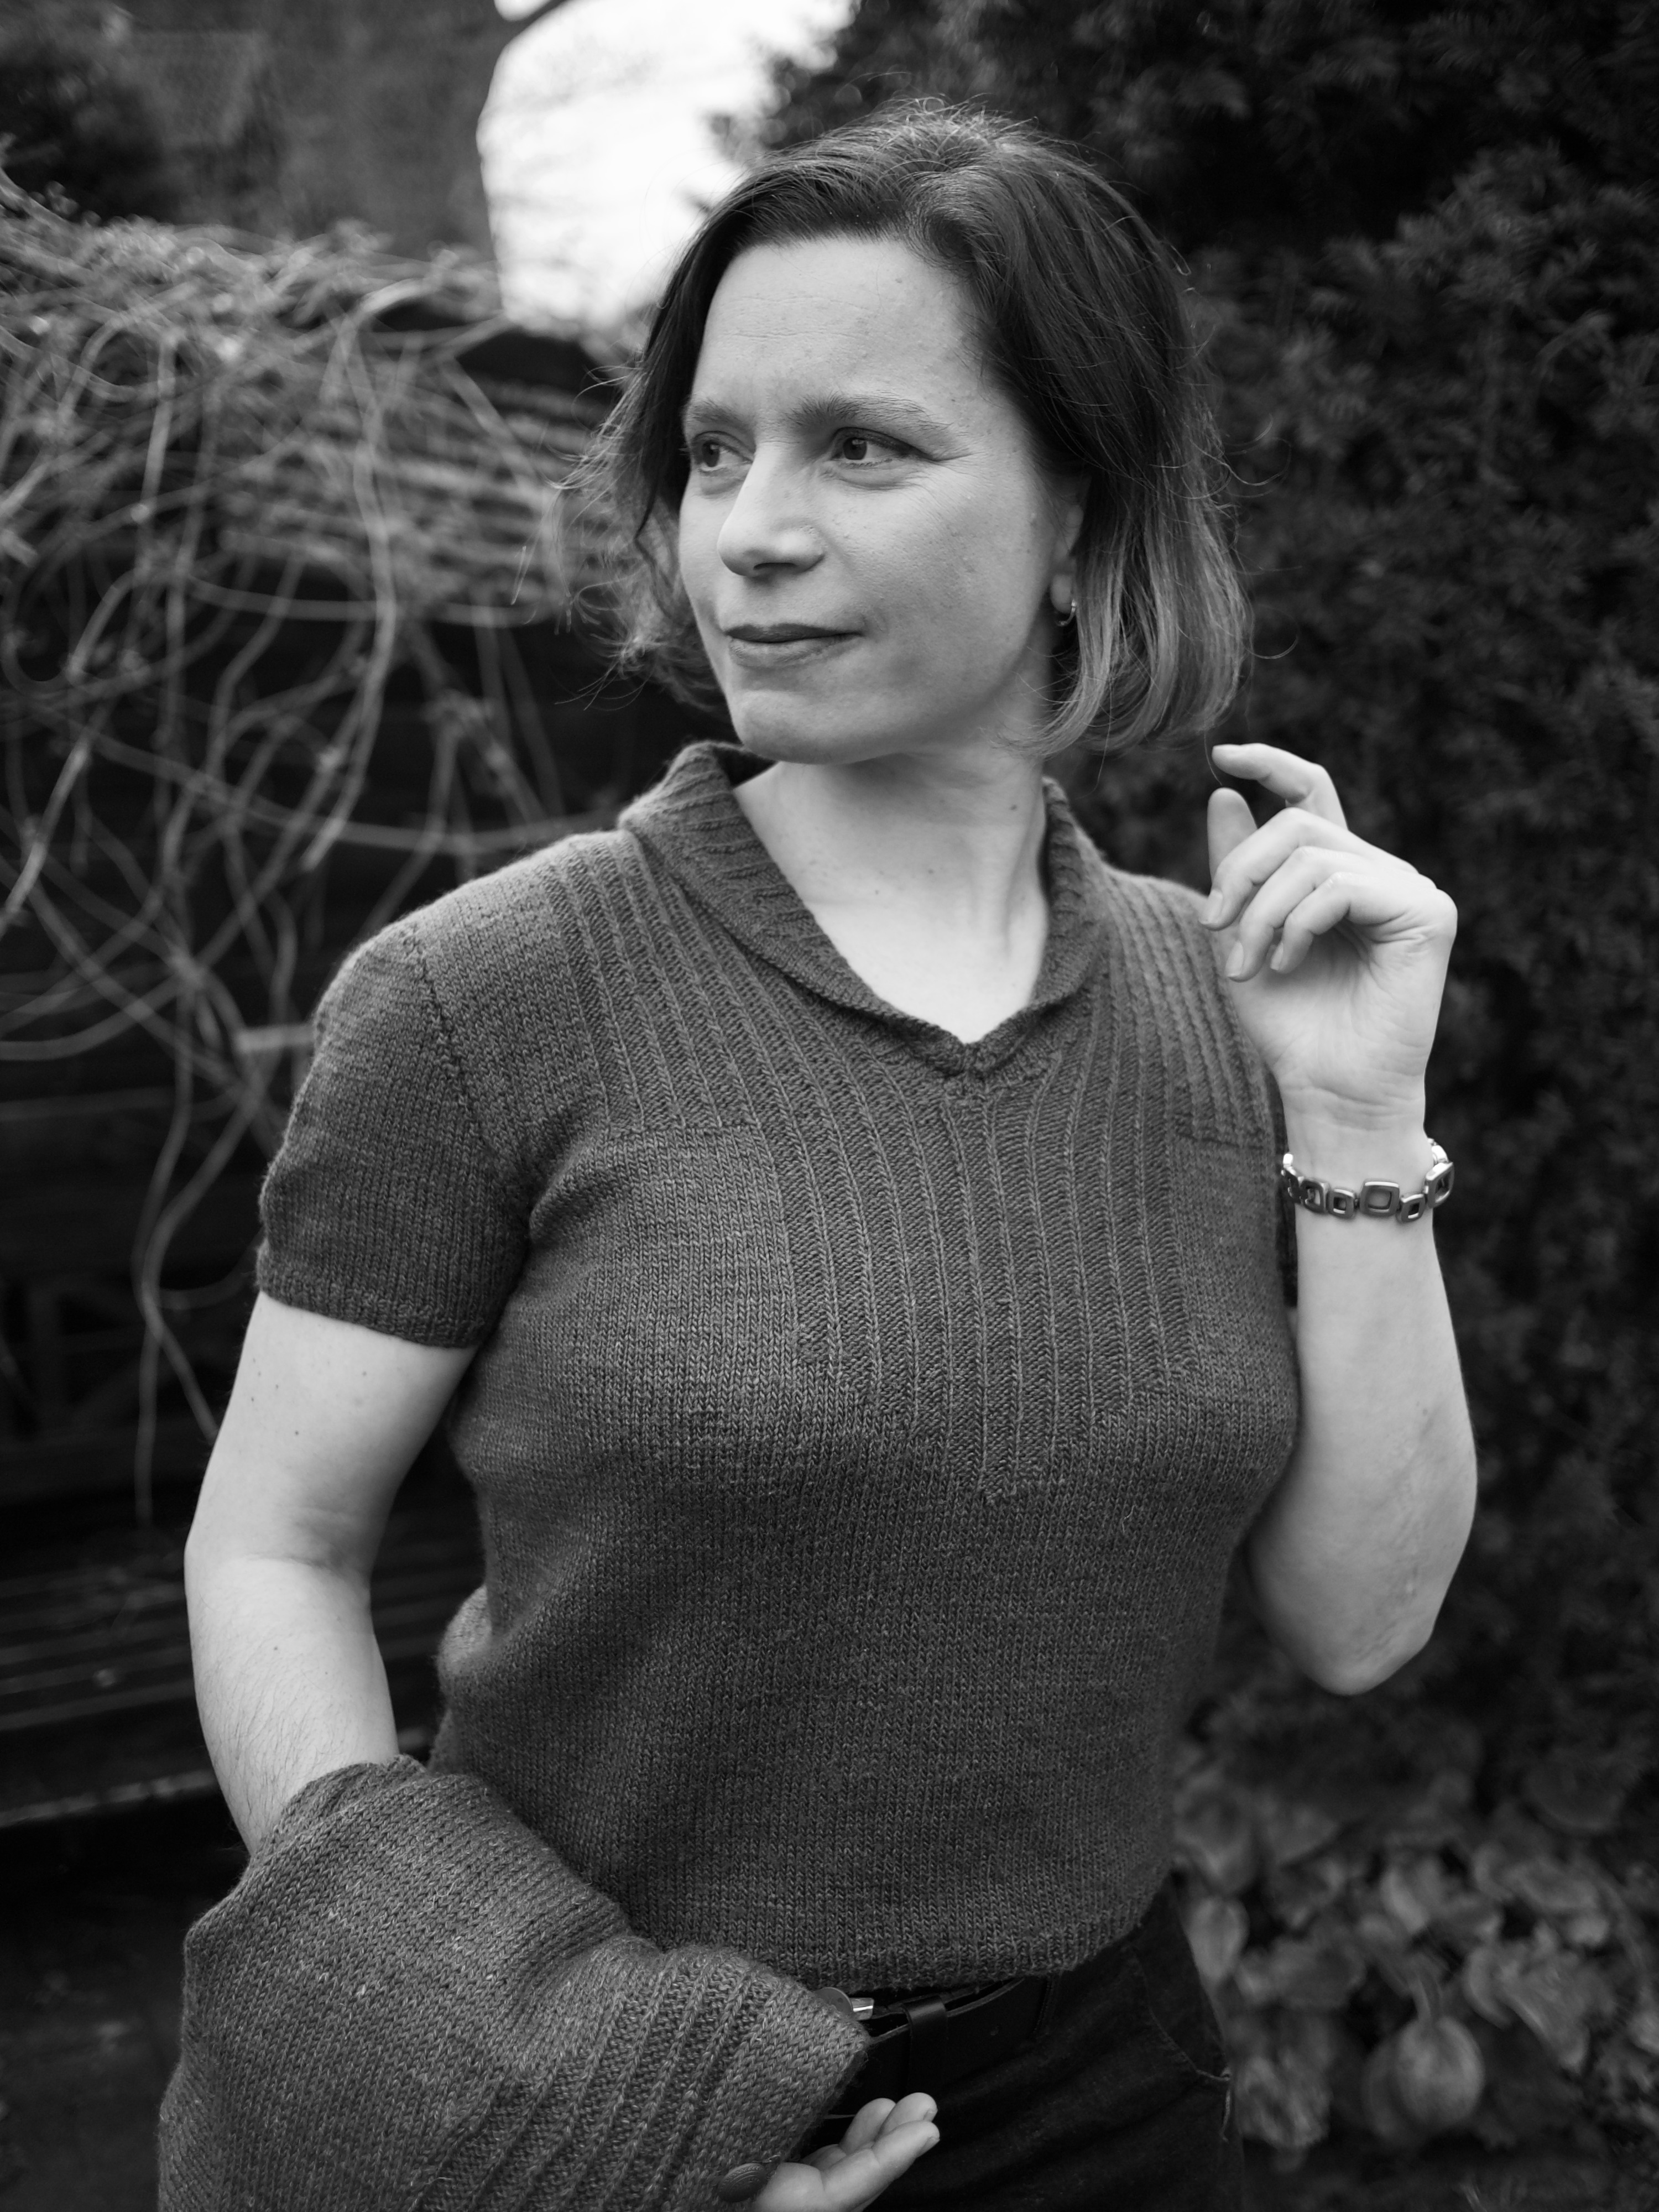
My September project was the cardigan from the twin-set in “crepe look” featured on the cover of the September 1966 issue of Stitchcraft.
The original version is made in Patons 101 Courtelle Double Crepe, a “new” (in 1966) 100% synthetic yarn. I prefer real wool and chose Schachenmayr Merino Extrafine 120, a smooth, tightly-plied merino that gives the “crepe look” very nicely. It seems to be a bit thicker that the Patons 101 Courtelle — the wool is supposed to have a tension of 5.5 stitches to the inch on (old UK) number 8 needles (4mm / US 6) and I got 5.25 stitches to the inch. I didn’t want to use a smaller needle, as the 4mm needles felt right for the wool and gave a good texture, so I made the smallest size (35-36 inch bust) instead of the otherwise-correct second size (37-38 inch bust) in the longest length (22.5 inches from shoulder).
I started with the sleeves, which I prefer to do in order to 1) check how size, tension and fit are going and 2) get the boring part out of the way first. The sleeves are made in plain stocking-stitch and I made them in the round to work faster and avoid seams. The sleeve length from underarm is supposed to be 16 inches for all sizes and judging from the photos, hits at about “bracelet length” i.e. not quite long to the wrist. I prefer long sleeves to go all the way to the wrist, but I have also made sleeves longer than required and had them turn out too long after blocking, or because the underarm depth was larger than expected. These finished sleeves fit before blocking just above the wrist at the expected underarm depth, and there was enough width to adjust if necessary.
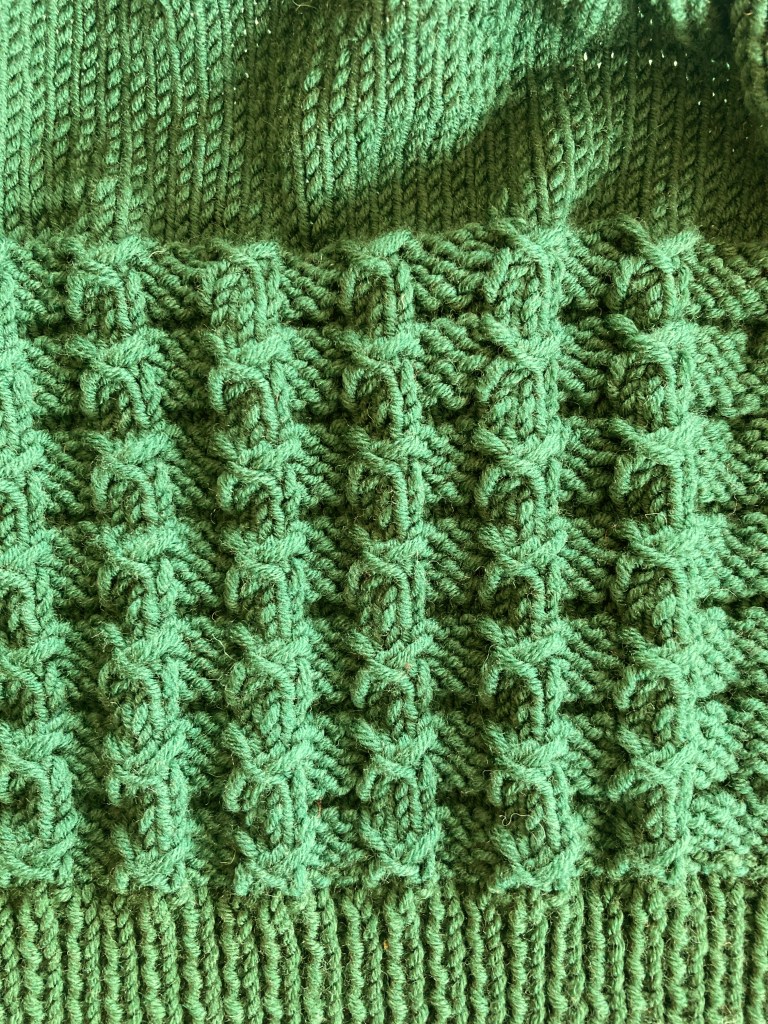
The body of the cardigan features an interesting twisted-stitch pattern both on the fronts and back between hem ribbing and low waist, and at the top of the yoke.
The pattern is
1st row (RS): p3, *k3, p3* to end
2nd row: k3, *p3, k3* to end
3rd row: *p3, take wool to back, sl1 knitways, k next 2 sts tog without taking them off the needle, then k 1st of those sts, slip off needle and pass sl st over 2 rem sts*, rpt to last 3 sts, p3
4th row: *k3, p1, pick up horizontal loop below next st and purl it [i.e. m1 in the lower horizontal “bar”], p1* rpt to last 3 sts, k3
5th row: K
6th row: P
The twist rows are much easier to do than the description makes it sound. When you see the stitches on the needle, it’s quite clear. The background makes horizontal bands of rib and stocking-stitch and the overall effect is pleasantly squishy and nubbly.
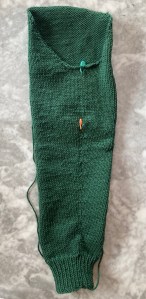
After seven patterns, you switch to stocking-stitch, and that is where I found myself as of September 27, 2024, when I first wrote this post. I made the fronts and back in one piece and had a few long train trips since then, so it went quickly enough.
Unfortunately, there wasn’t enough yarn of the right colour in the store when I bought it, so I had to order more and of course, the new balls of yarn were from a different dye lot. I hardly ever have a problem with that, as many brands have very consistent dye lots, but of course the one time it’s a problem, it’s a problem! The new yarn had a much yellower-browner tinge than the old. I planned ahead to make the ribbing and collar in the new yarn and hoped to have enough of the old to make the complete body and sleeves minus ribbing. That actually worked, after unraveling the original swatch, and I had only a tiny little ball of the old yarn left over.
The ribbing and collar are mostly made separately, picking up stitches on the back neck for the back collar part only. The ribbing is knitted in vertical bands and sewn on, the collar horizontally and then you sew them together “with a very neat seam”. Hahahaha well, I did my best. The back collar has a couple of short rows at the end, to give it a nice roll. I added facing bands to the ribbing to help it keep its shape, and found some nice matching buttons.
(N.B. The real colour is more like the photo on the upper left. My computer and I are not good at colour correction).
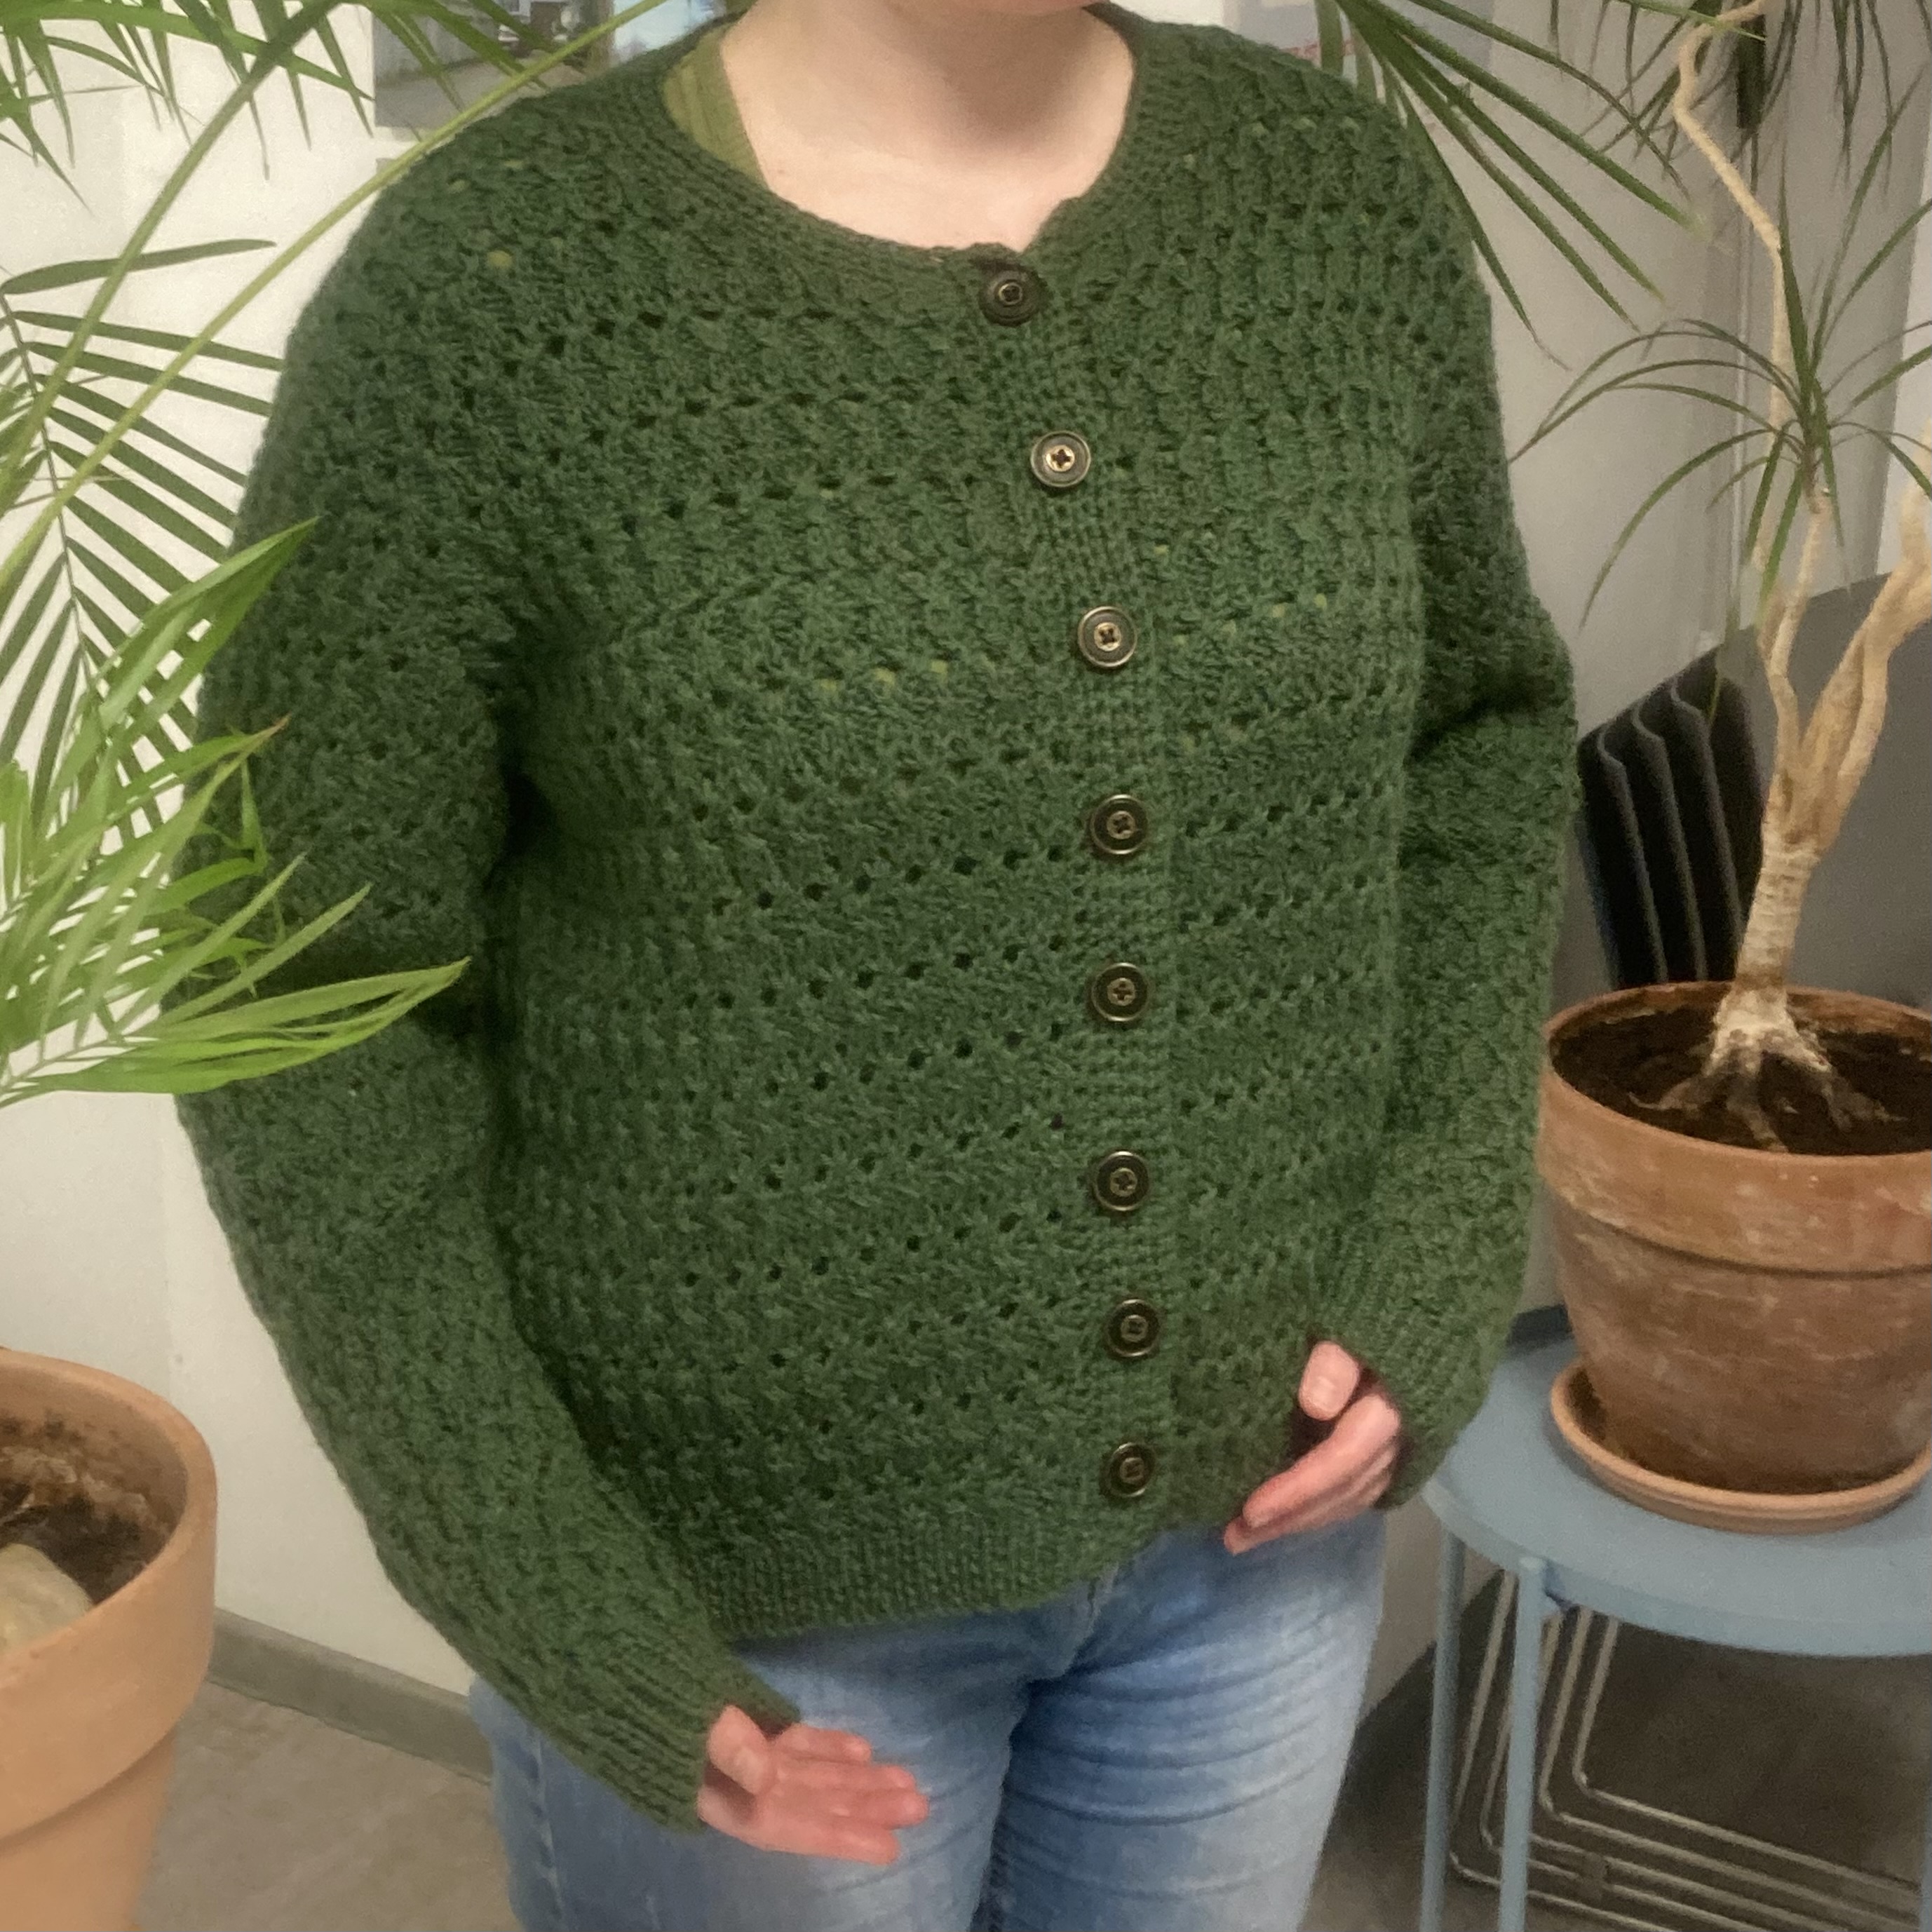
The finished cardigan fit OK after blocking, just a little stiff and scrunchy. It stretched way out with blocking. The yarn is not labeled “superwash”, but it says on the band that it can be washed in the machine at 40 degrees C, so I’m guessing it is superwash-treated and they just didn’t say so. It certainly behaves like superwash in its stretchiness. I actually liked it better when it was a little stiff, but as it is 100% wool, it will always shrink a little with subsequent washings. And it is nice and soft, I’ll give it that!
The finished fit was fine. I prefer more fitted clothes, but that’s not the 60s style. The colour is beautiful — hard to reproduce in a photo, but a nice woodsy green. It will match many dresses in my closet. And the two-tone effect from the different dye lots worked out fine — I mean, you definitely see that the colours are different, but it looks deliberate. The sleeve length was just a little bit on the long side, but that will change with subsequent washings, I am sure, and I can always fold the cuff back. So all in all, I am quite happy with this project.
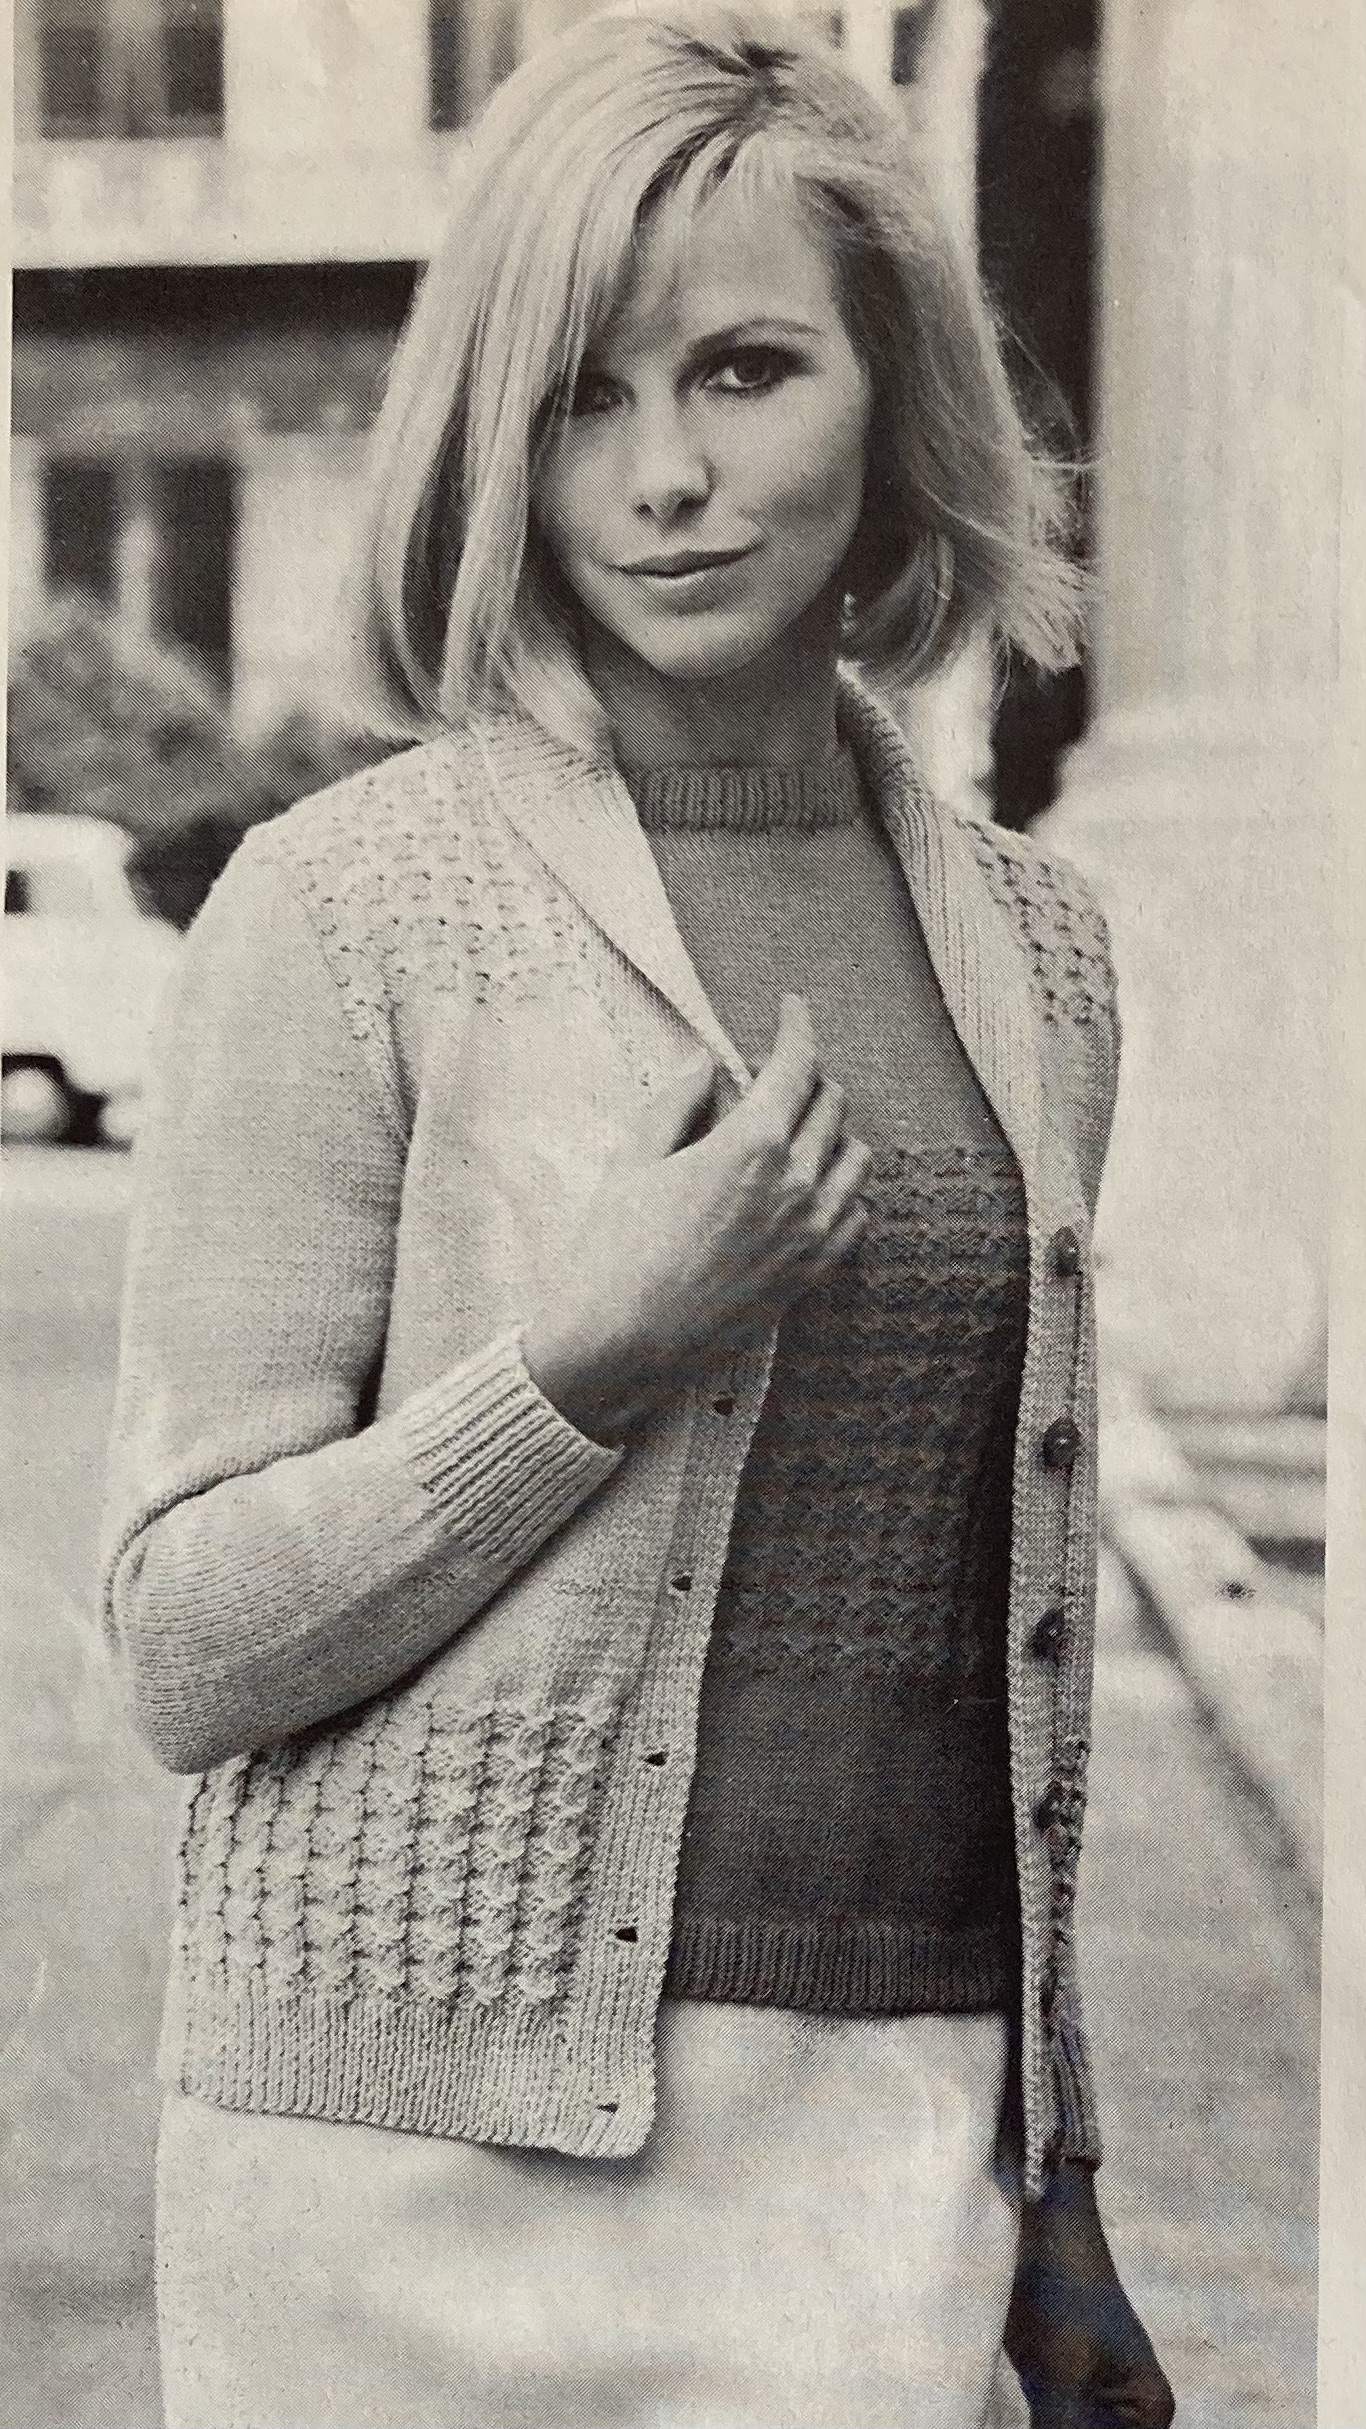
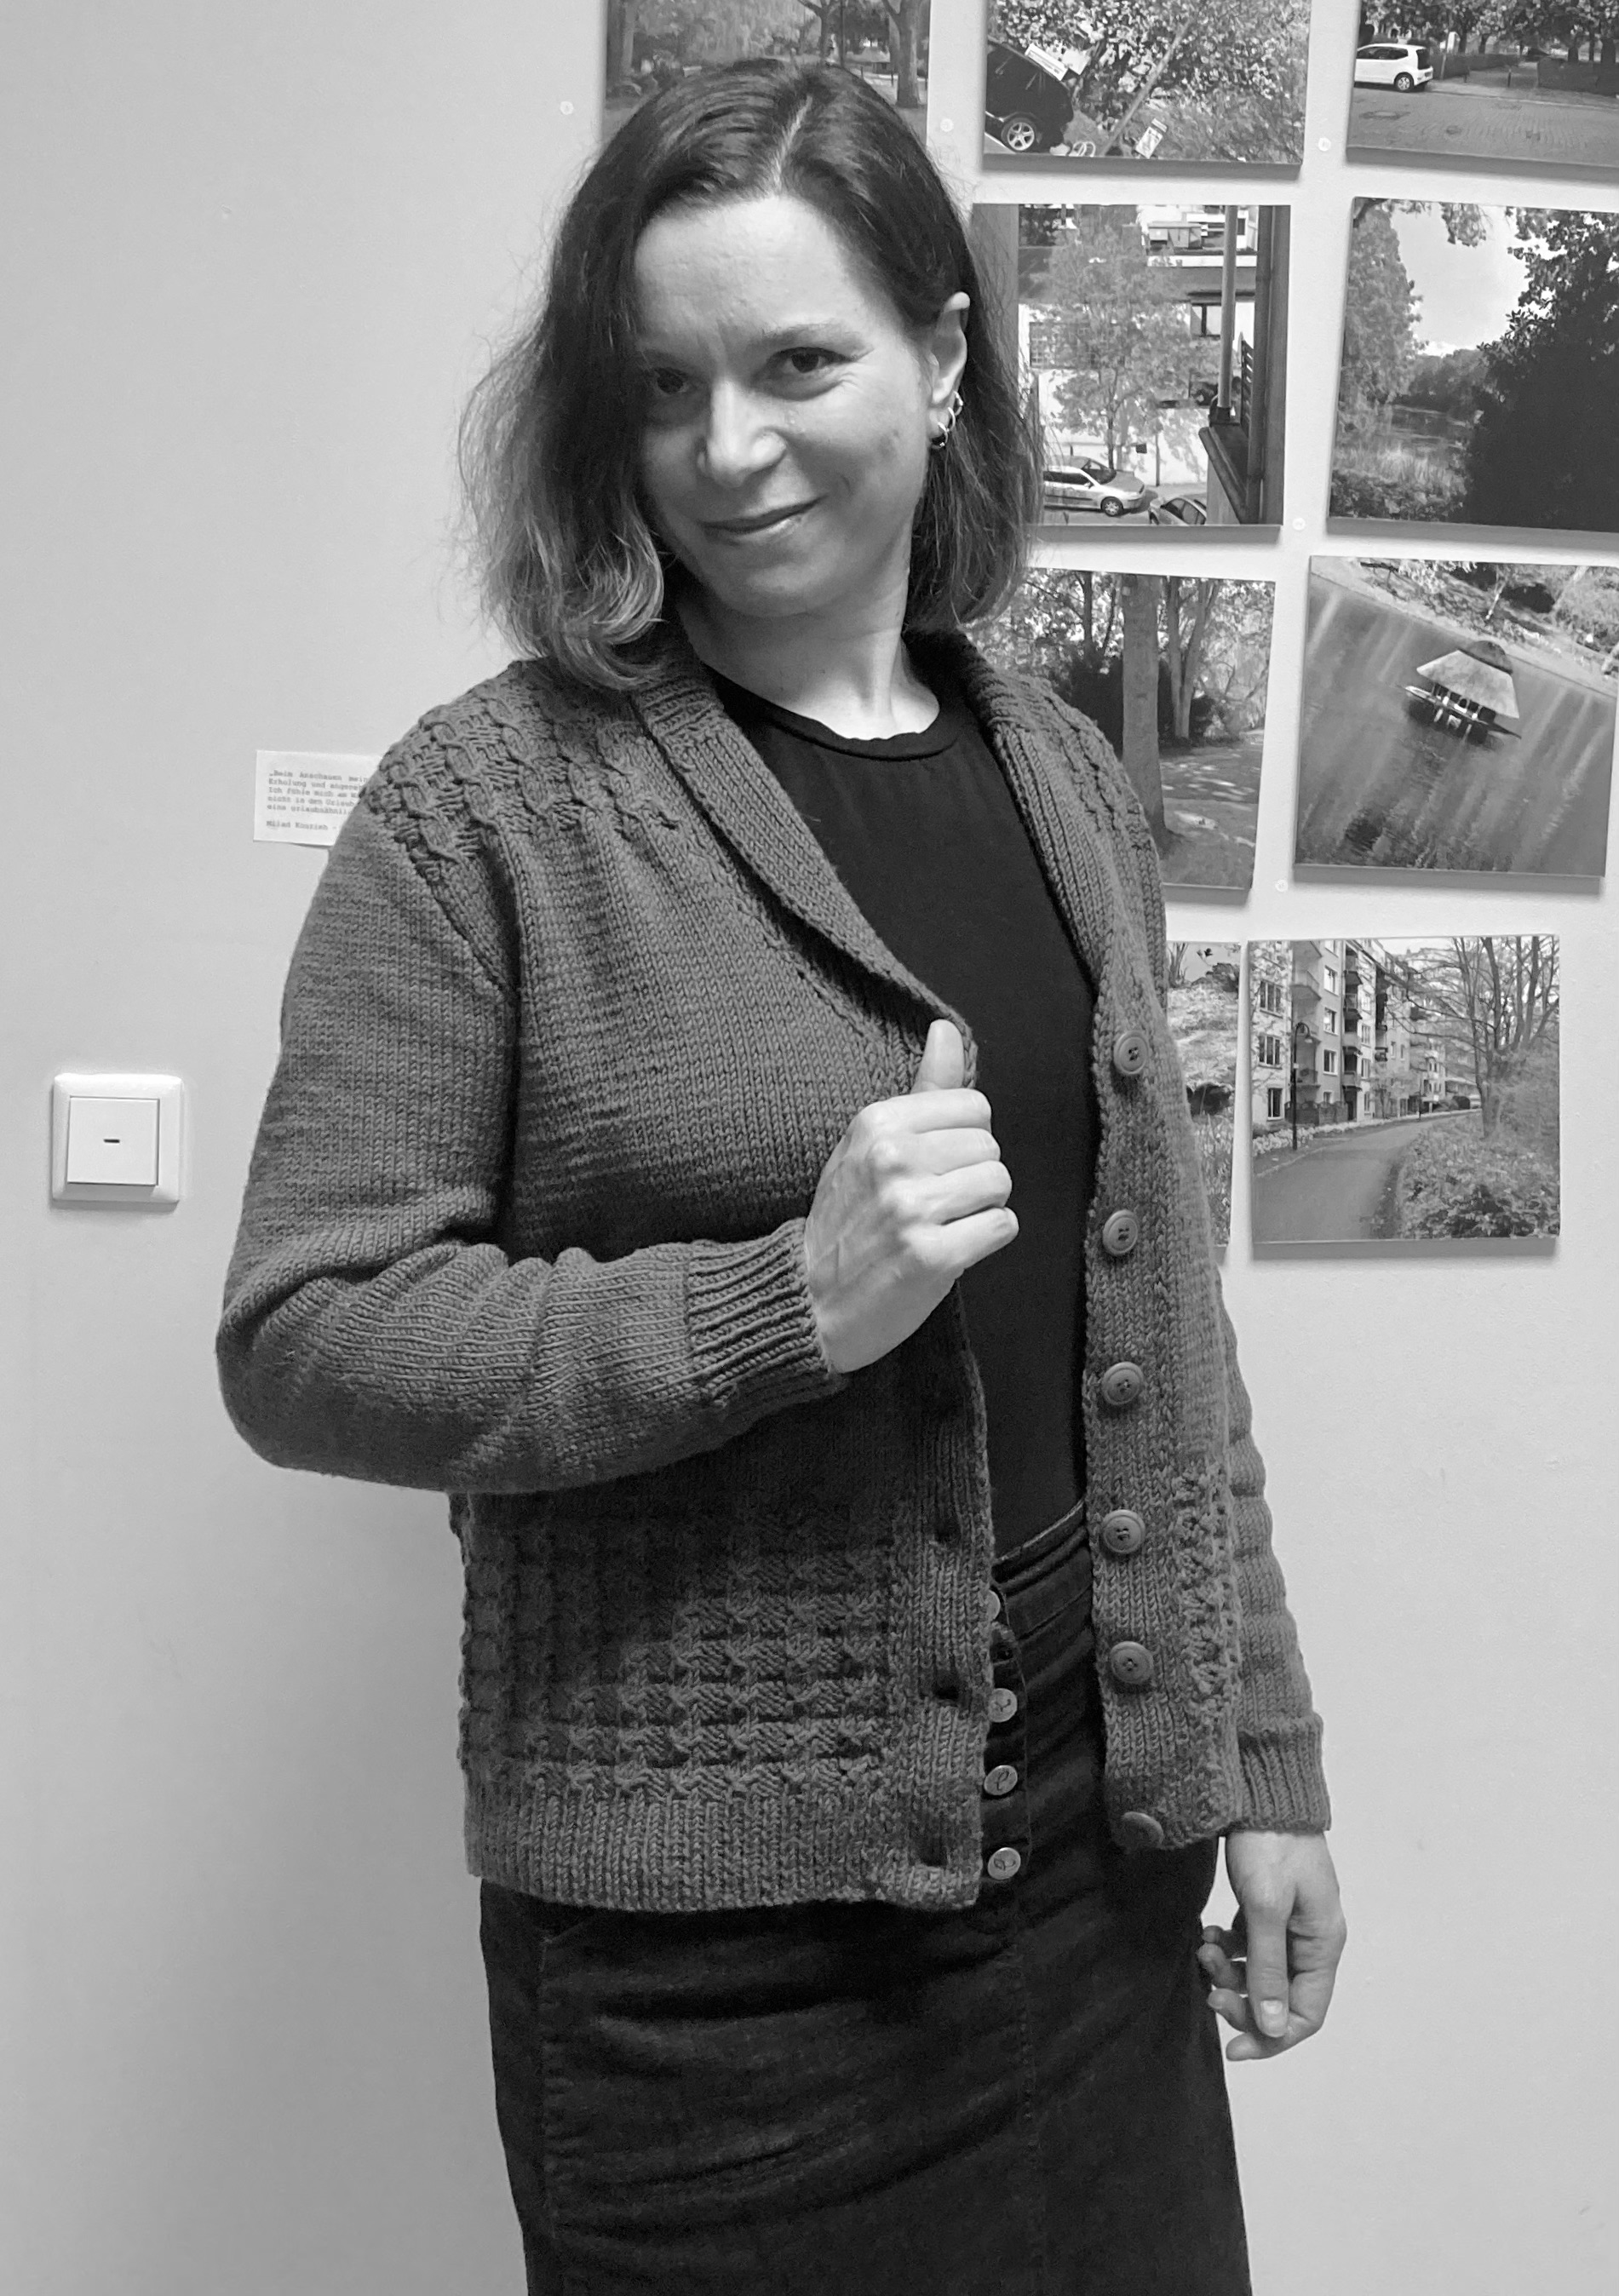
As always, we tried to reproduce the photos… with neither a real park by daylight, nor a dog. I think I nailed that sultry look from the black-and-white photo, though!
That’s all for this project! Time to start the October one…
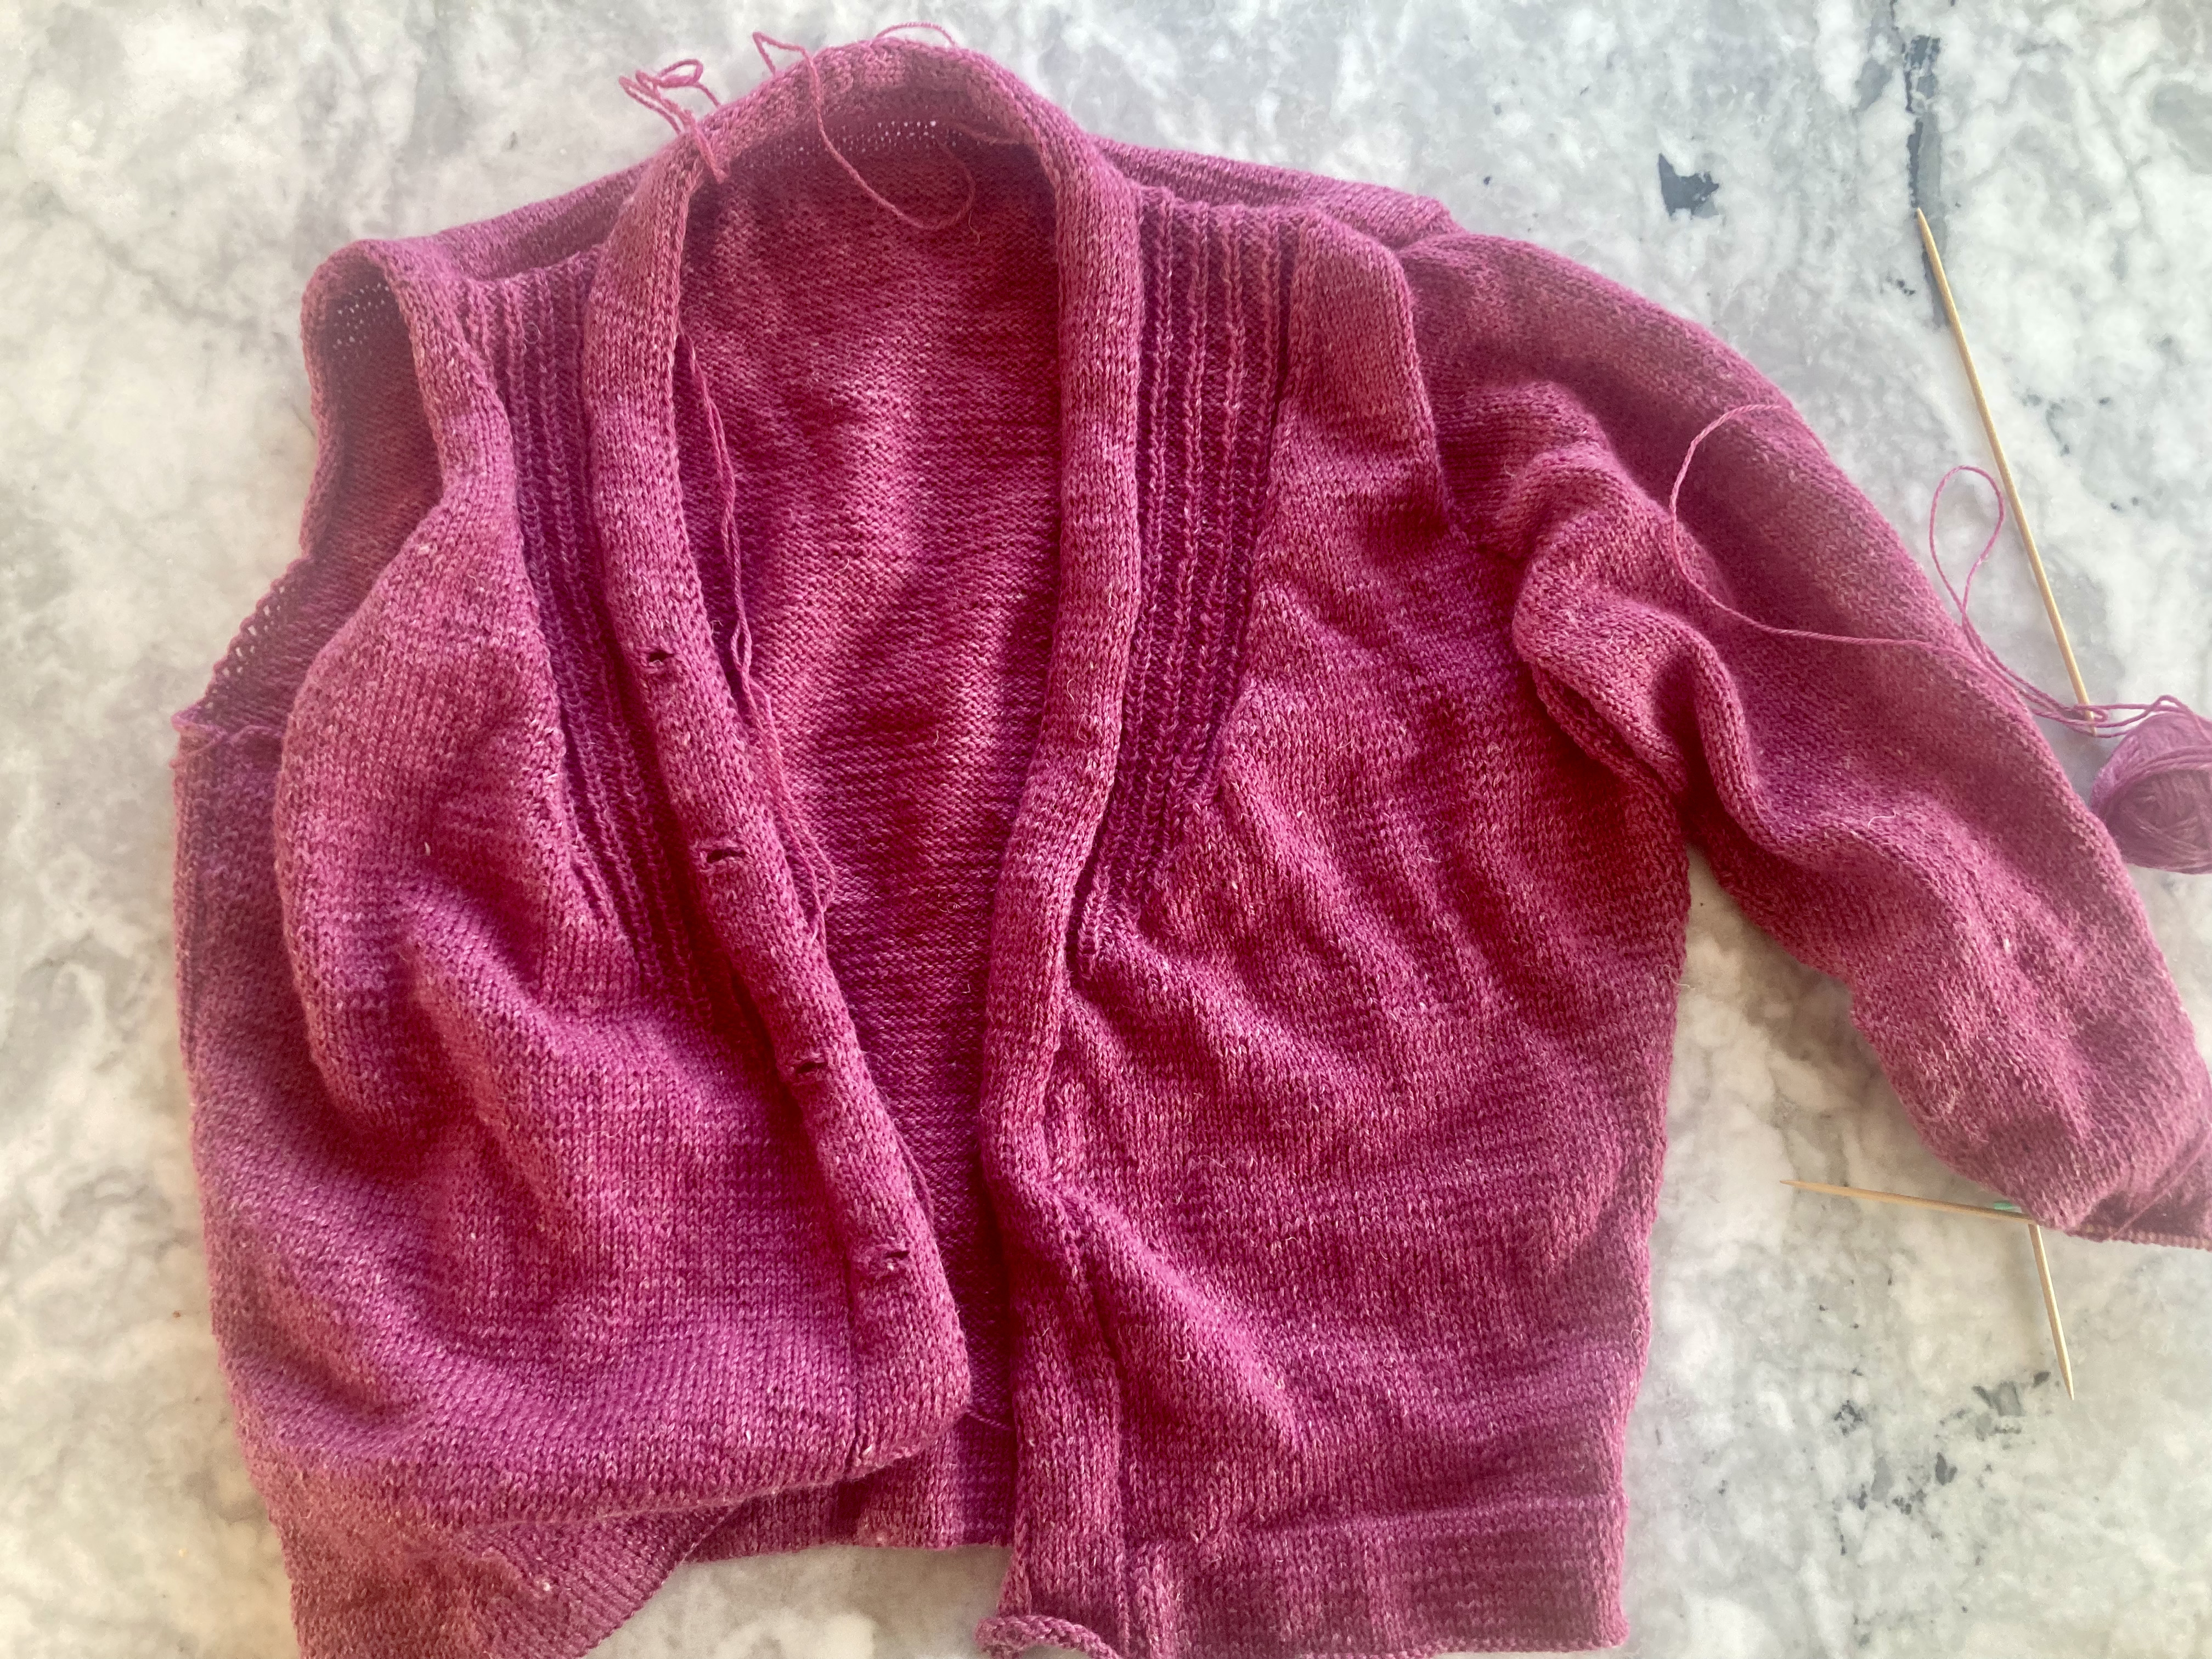
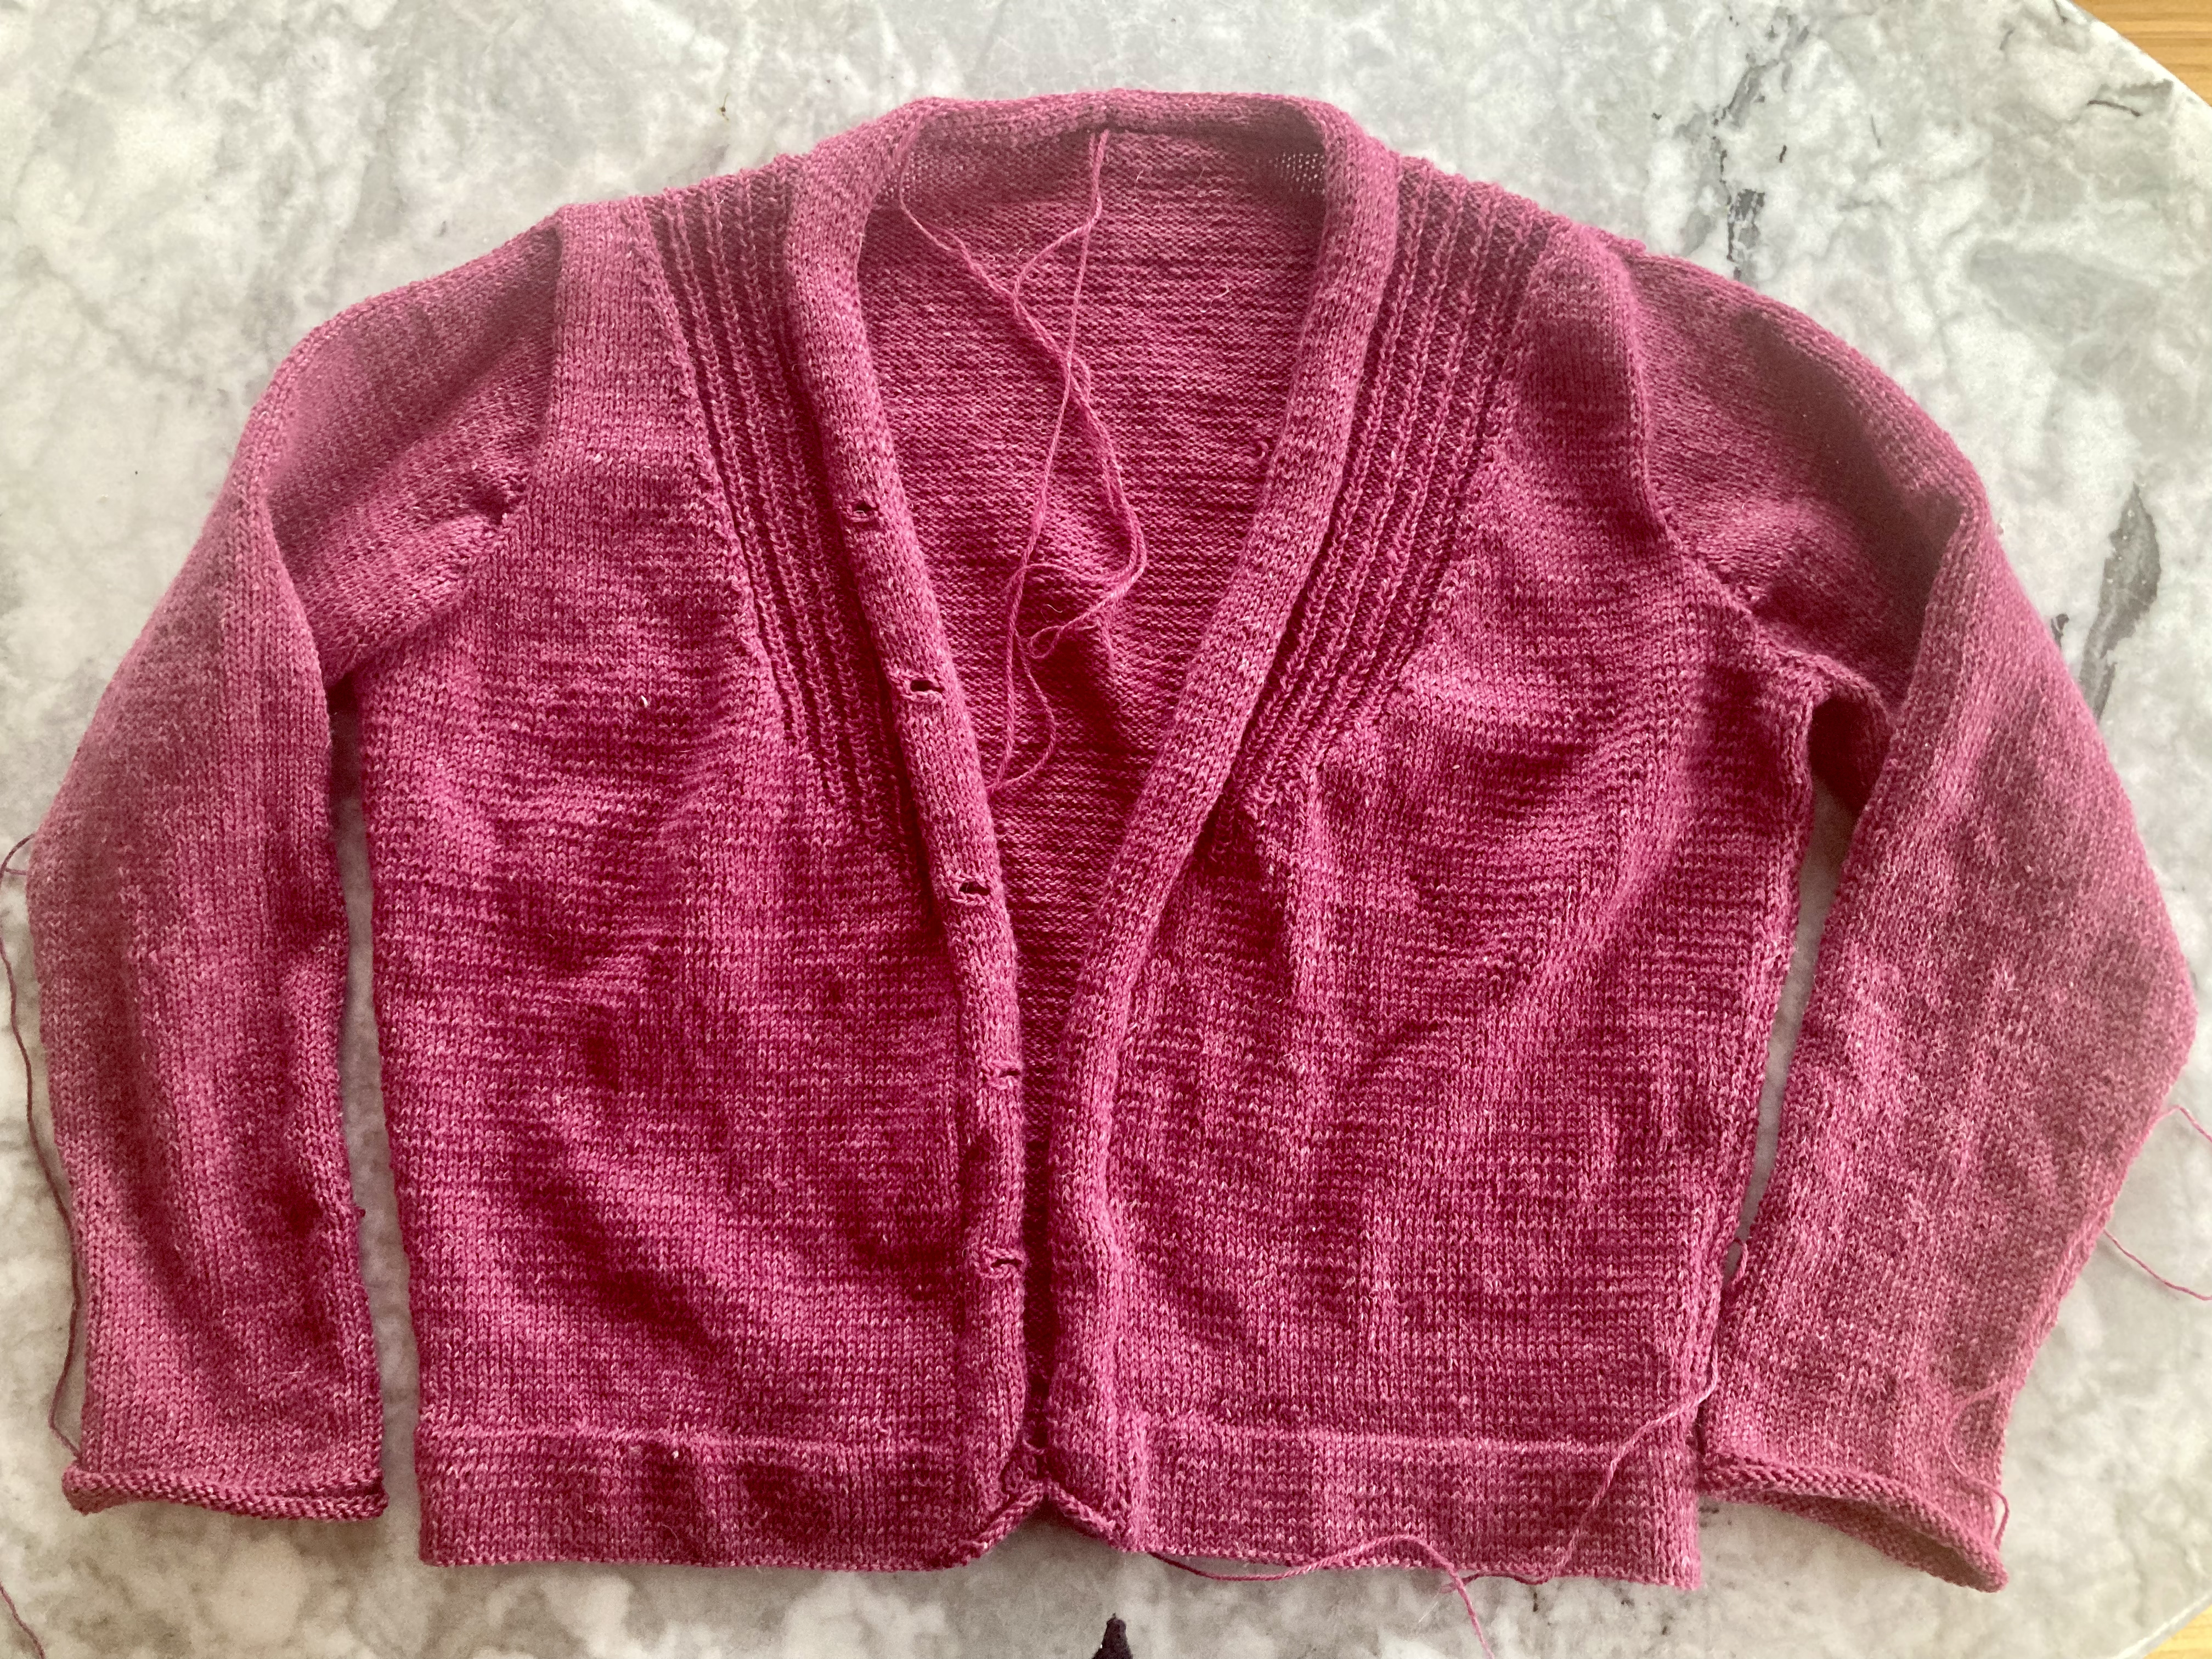
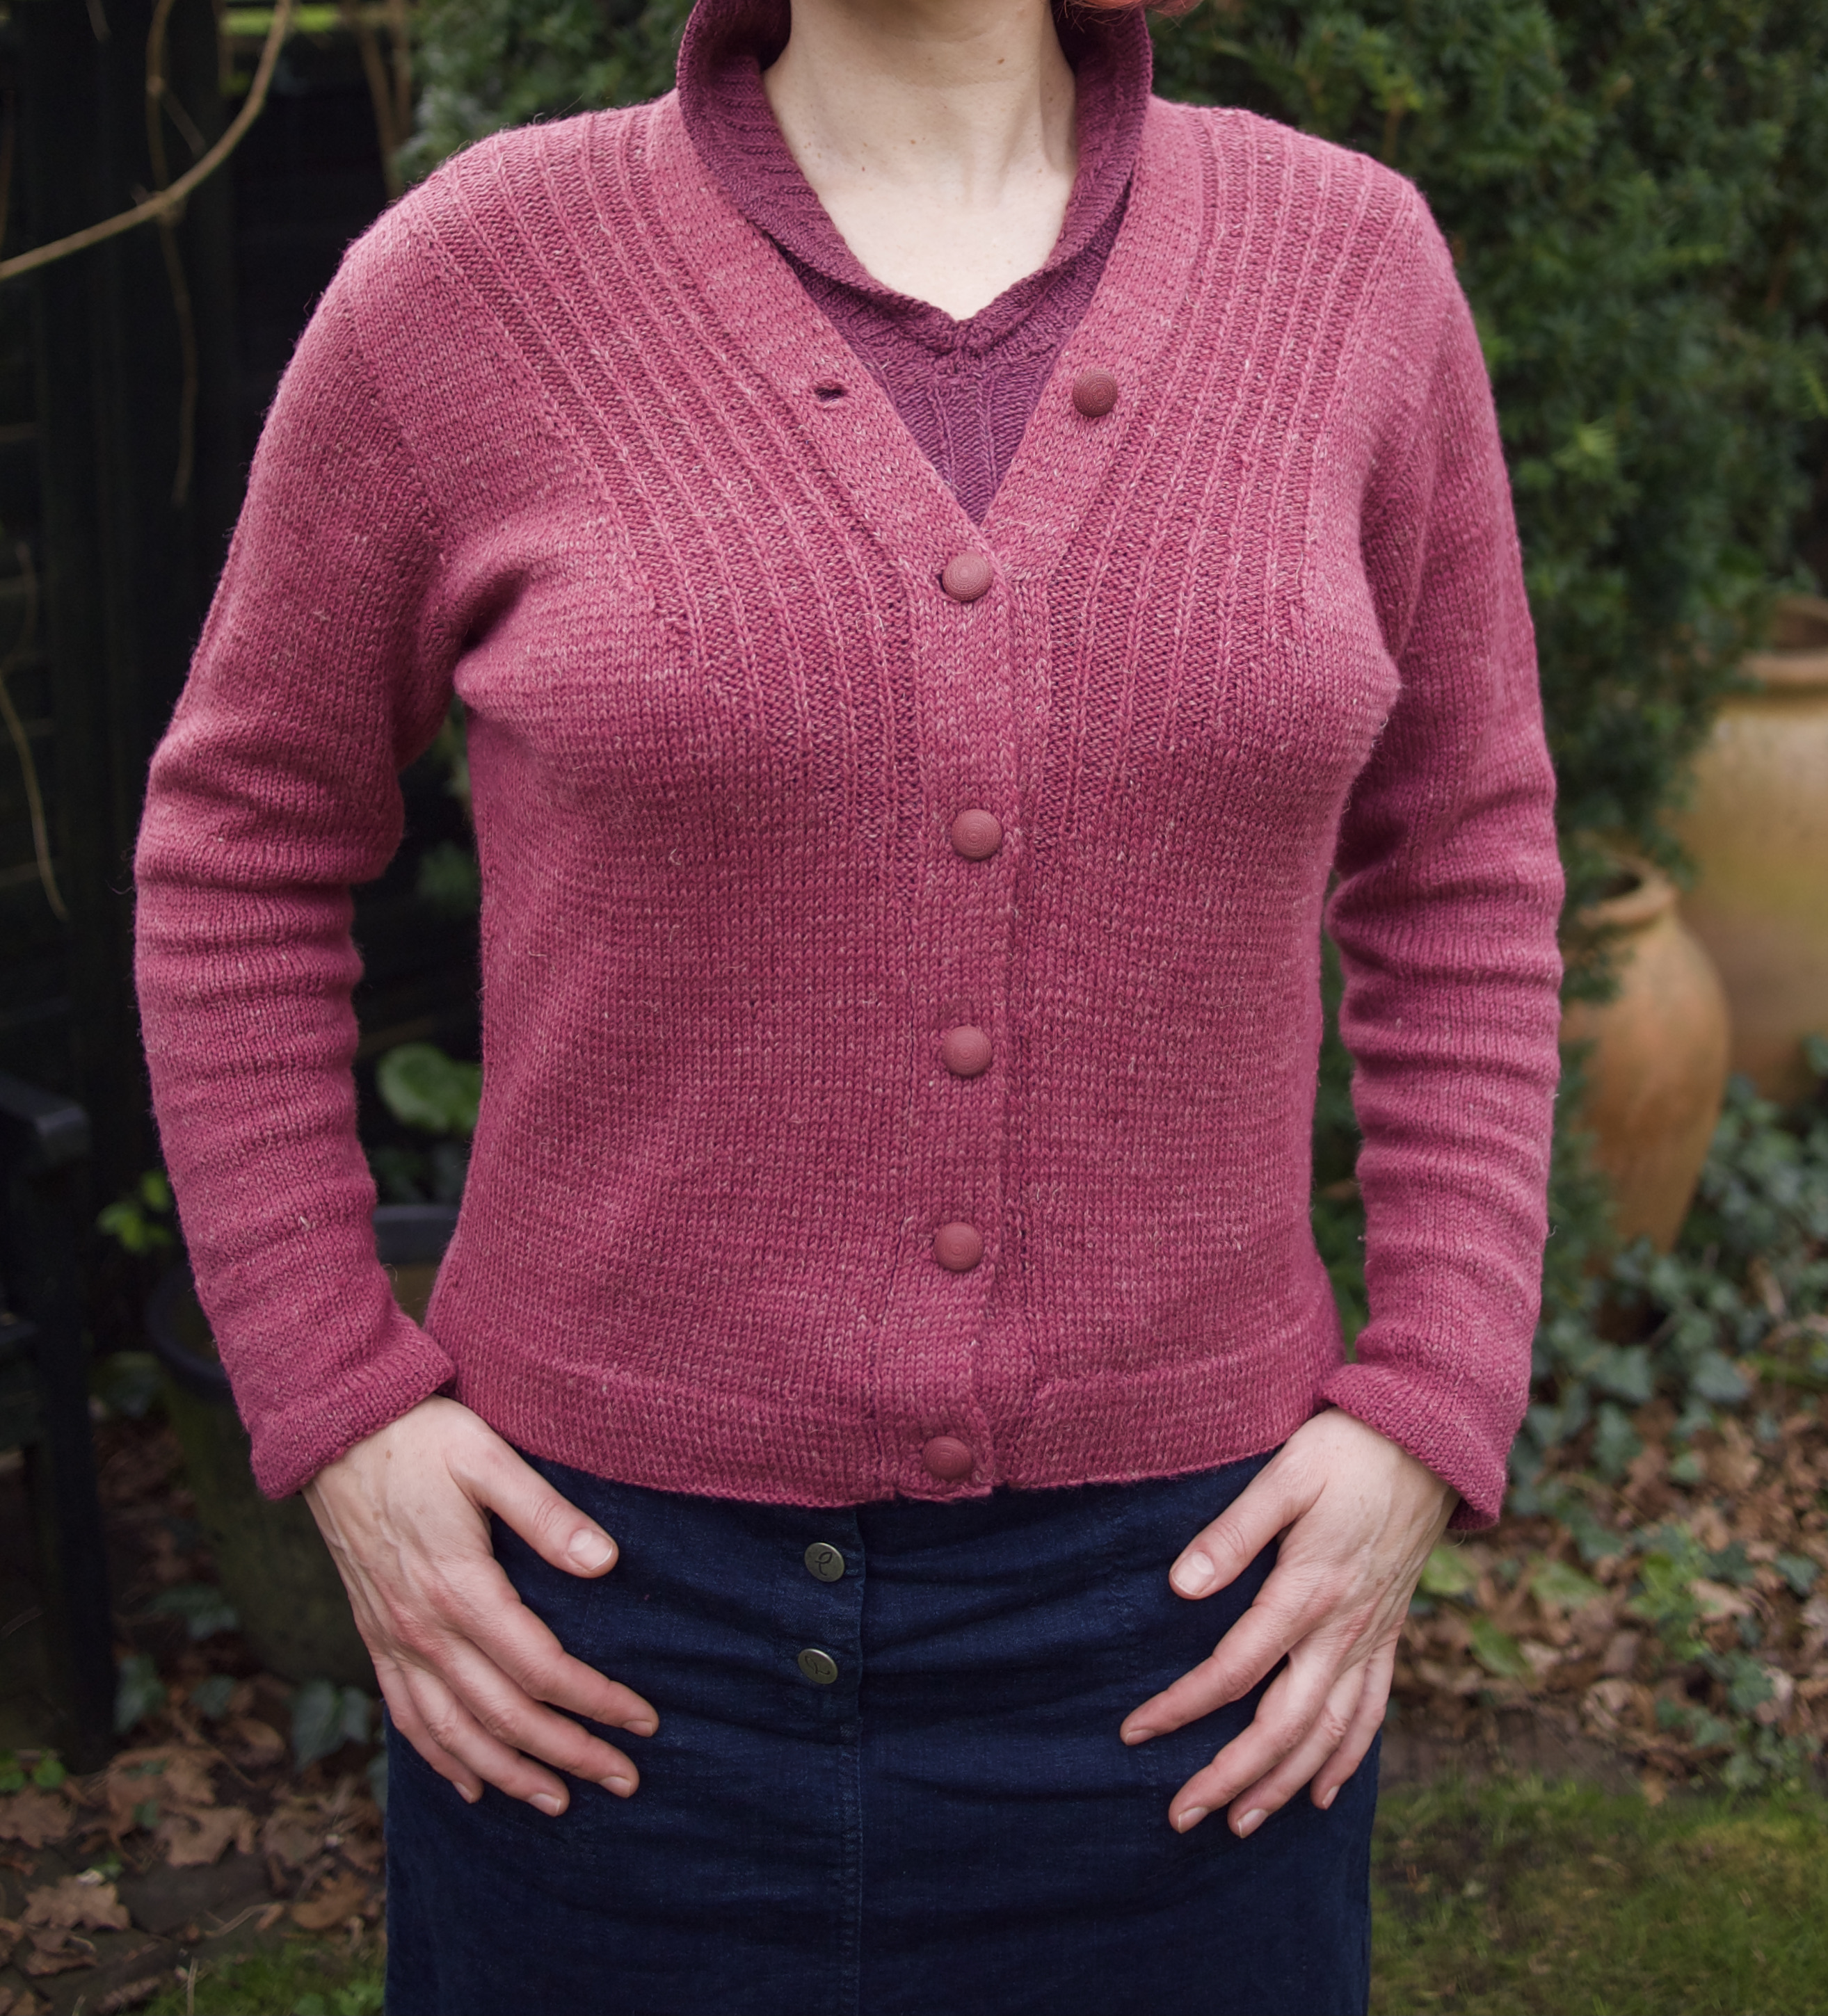
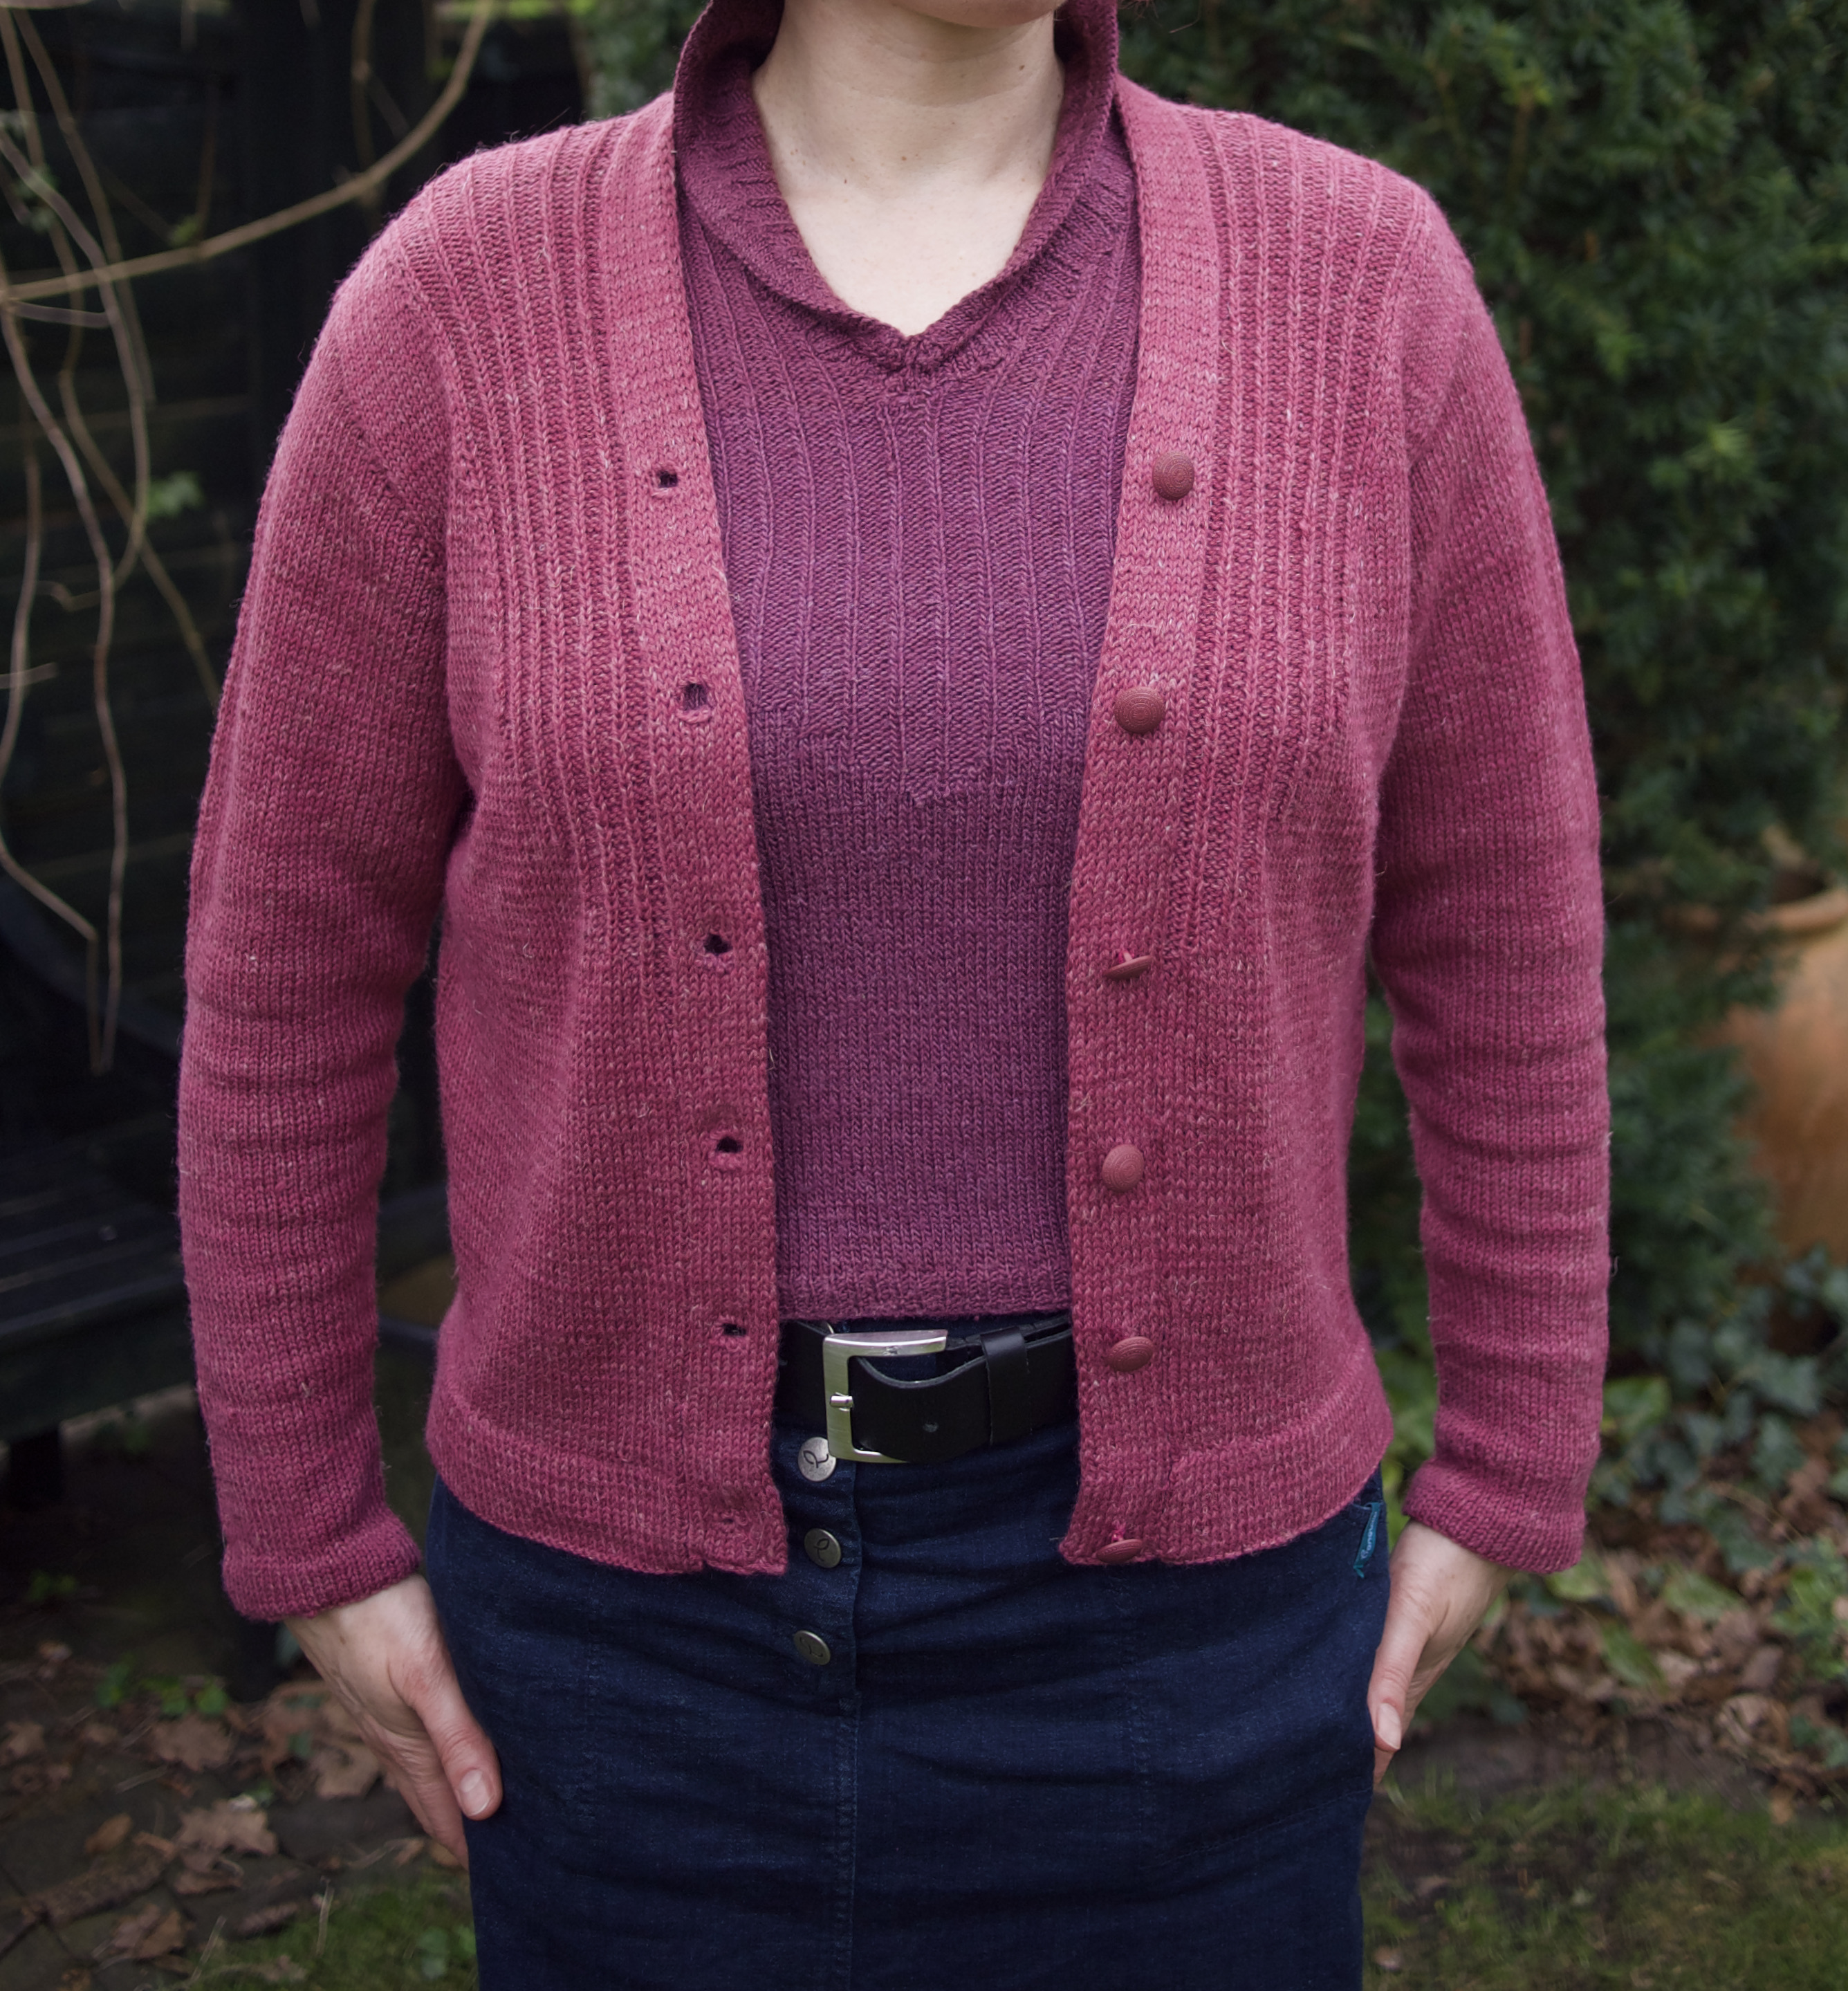
The March 1966 issue of Stitchcraft didn’t have any projects that particularly called to me, and I am still in destash/finish up old projects mode. So this month, I finally finished the cardigan to the “Softly Fitting” twinset from January 1962.
The original twinset is made in two different colours of the same wool: Patons Cameo Crepe “French Green” for the cardigan and “Pearl Frost” for the jumper. I had already made the jumper in Concept by Katia Silky Lace in a more blue-ish shade of purple, and had 300 grams of wonderful Lana Grossa Slow Wool Lino in stash in a slightly more reddish shade of purple. The two purples harmonised quite well, and although the yarns are different compositions, they are both the same weight and have a similar drape and softness.
Like many designs from the mid-1960s, the cardigan has stocking-stitch hems at the bottom edge and sleeve edge, as well as double front bands. Both hems and bands are made easier by working one purl row on the right side (hems) or one slip stitch every other row at the same stitch (bands) to make a fold line. I made the body hem by knitting one stitch from the live stitches together with one stitch from the cast-on edge all across the piece — nerve-wracking, but saves sewing it later.
The cardigan itself is very easy — stocking-stitch with a little bit of rib detail on the yoke, and set-in sleeves — but the challenge for me was making sure that I had enough yarn. Slow Wool Lino has unfortunately been discontinued, and I bought the wool at a buy-up-whatever-we-have-left type of sale, so the chance of finding any more in the right colour was minimal. 300 grams should be enough, I thought, even for a cardigan with double front bands and a stocking-stitch hem. But to be sure, I knit the front bands together with the fronts and back in one piece and finished the bands around the back neck before starting on the sleeves. Then I knit the sleeves top-down, picking up around the armhole and dividing the remaining wool exactly in half. That way, if I ran out of wool, the sleeves would just be “bracelet length”, which wouldn’t bother me.
What can I say… it was perfect! I hd to use a little bit of the leftover Katia from the jumper to finish the underside of the hem on one sleeve (invisible) and sew down the sleeve hems and front bands (also invisible). Thus the yarn was de-stashed perfectly. The sleeves were in fact bracelet length after knitting, then stretched to normal long length after blocking. (I didn’t even have to pin them, they grew by themselves.) To top it all off, I went down to my local yarn store / mercerie and immediately found buttons that perfectly matched in size, colour and style.
As always, we had fun re-creating the original poses from the magazine.
In the “normally posed” photos, neither I nor the photographer noticed that the collar of the jumper was sticking up. Normally, it overlaps the non-collared cardigan elegantly, as in the other photos. We’ll try to take some more pictures in the next few days if it ever stops raining.
Really happy with this twin set and I’m sure it will get a lot of use this spring. The combination of lightweight wool-silk and lightweight merino-linen makes both pieces very adaptable to changing temperatures, warming and cooling as needed. The pattern was easy and I would recommend it to anyone.
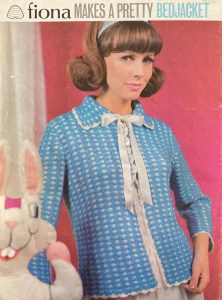
It’s been another month of much knitting and comparatively little to show for it. There was a wonderful bed-jacket in a cute, spongy slip-stitch pattern in the November 1965 issue that I very much wanted to make. I thought I had the perfect yarn (DROPS Lima) and chose green and black for the colours — very much my taste — and started on a swatch to better understand the stitch pattern. I made it correctly, but it didn’t look good. I tried with different wool and different colours. Still didn’t like it. The way the two colours played with each other didn’t harmonise and didn’t give the effect I wanted. I couldn’t make it work with the wools I had and didn’t want to make it in baby blue and white (I don’t wear white). On top of it all, I had a pile of endless WIPs at home and two pregnant colleagues, one whose baby was probably being born just in time for this blog post at the end of November, and another due in January. So I decided to put the bed jacket plans on ice and make some baby things instead.
For the November colleague, I made a simple baby blanket in thick cotton yarn of the “dishcloth” variety. The pattern wasn’t vintage — just the traditional crochet “American square” motif with white edge and different colour centres — but the yarn actually was! A couple of years ago, another colleague (not the pregnant one) had to clear out her mother-in-law’s flat after the elderly lady moved to a nursing home, and gave me a huge bag of yarns that had been left behind. In that sense, the blanket does have a vintage connection, though this type of craft cotton honestly hasn’t changed much in fifty years. Here’s the finished product:
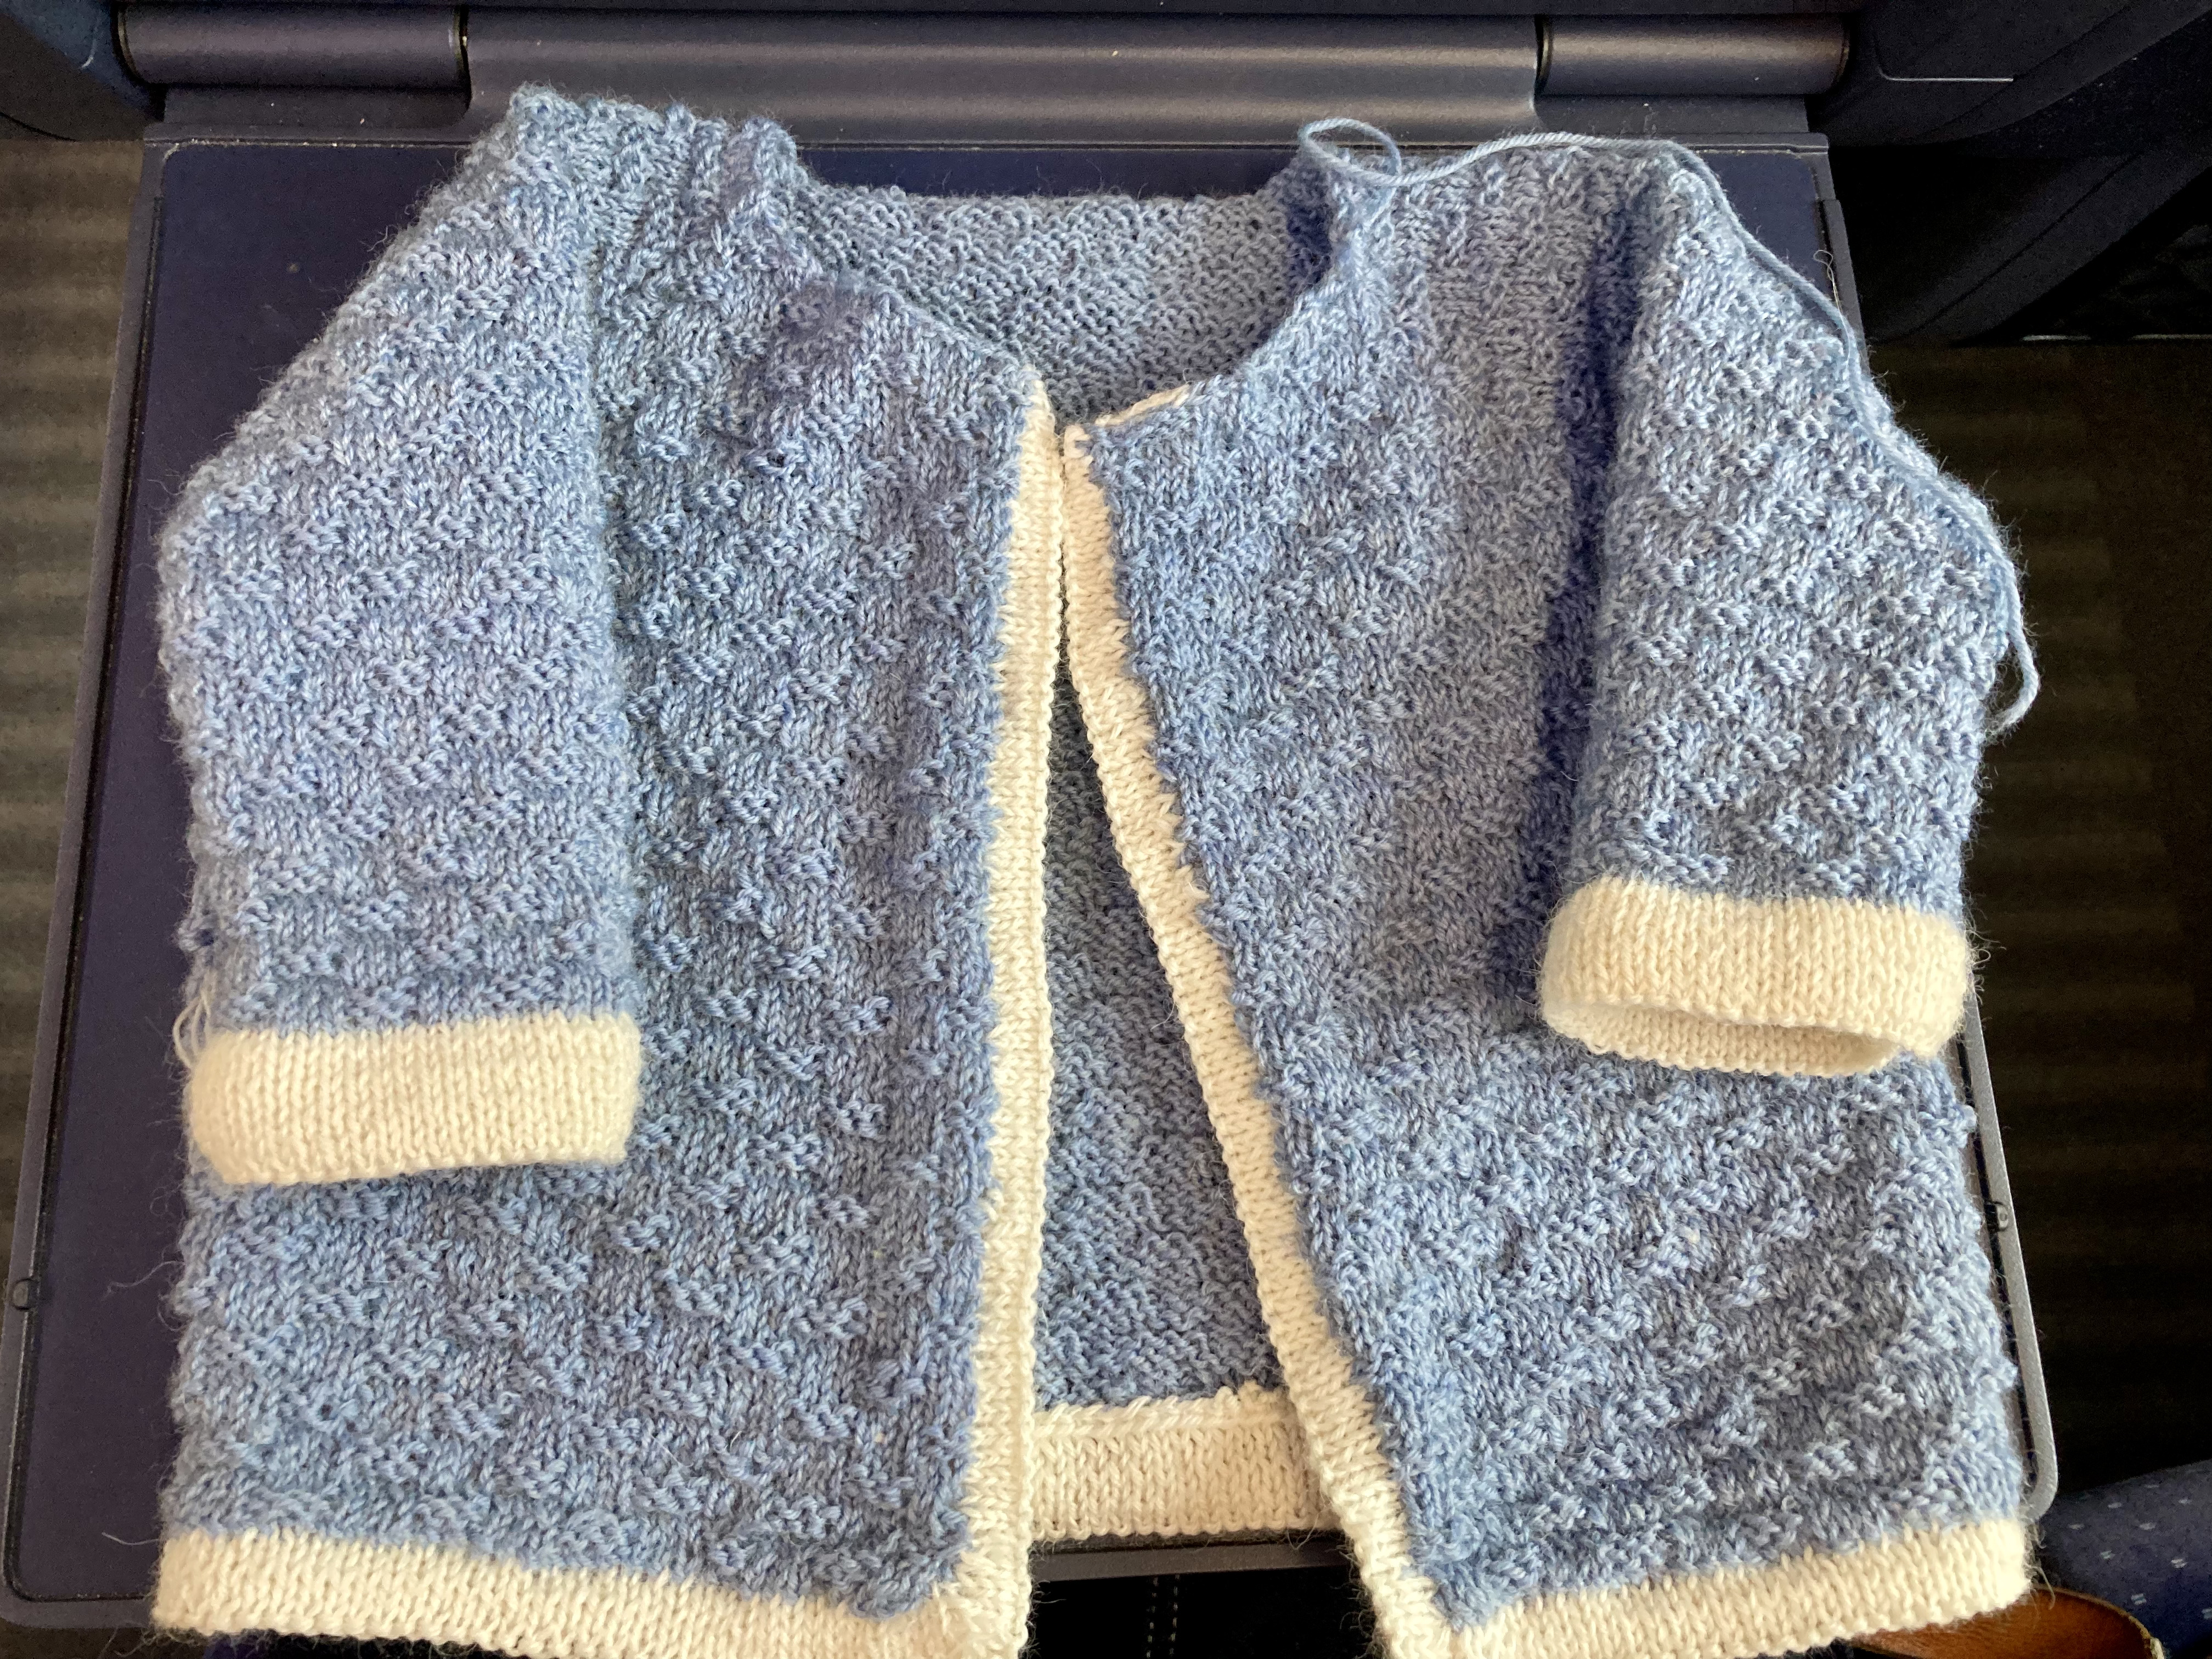
For the January baby, I looked through a few earlier Stitchcrafts from the 1950s, which often had the best baby patterns, and found an intriguing hooded “pram-coat” jacket from the October 1956 issue. I say “intriguing” because it had some unusual design aspects, like the front hem facings that fold under to make a hidden button band, the wide-edge hood and the turned-back-and-crocheted-on sleeve cuffs. I still had some light blue and white-ish Lana Grossa Meilenweit from the March 1964 Slipover for a Smart Tot — probably not enough for the whole jacket with hood, but I thought I might make the sleeves in dark blue (left over from the same project).
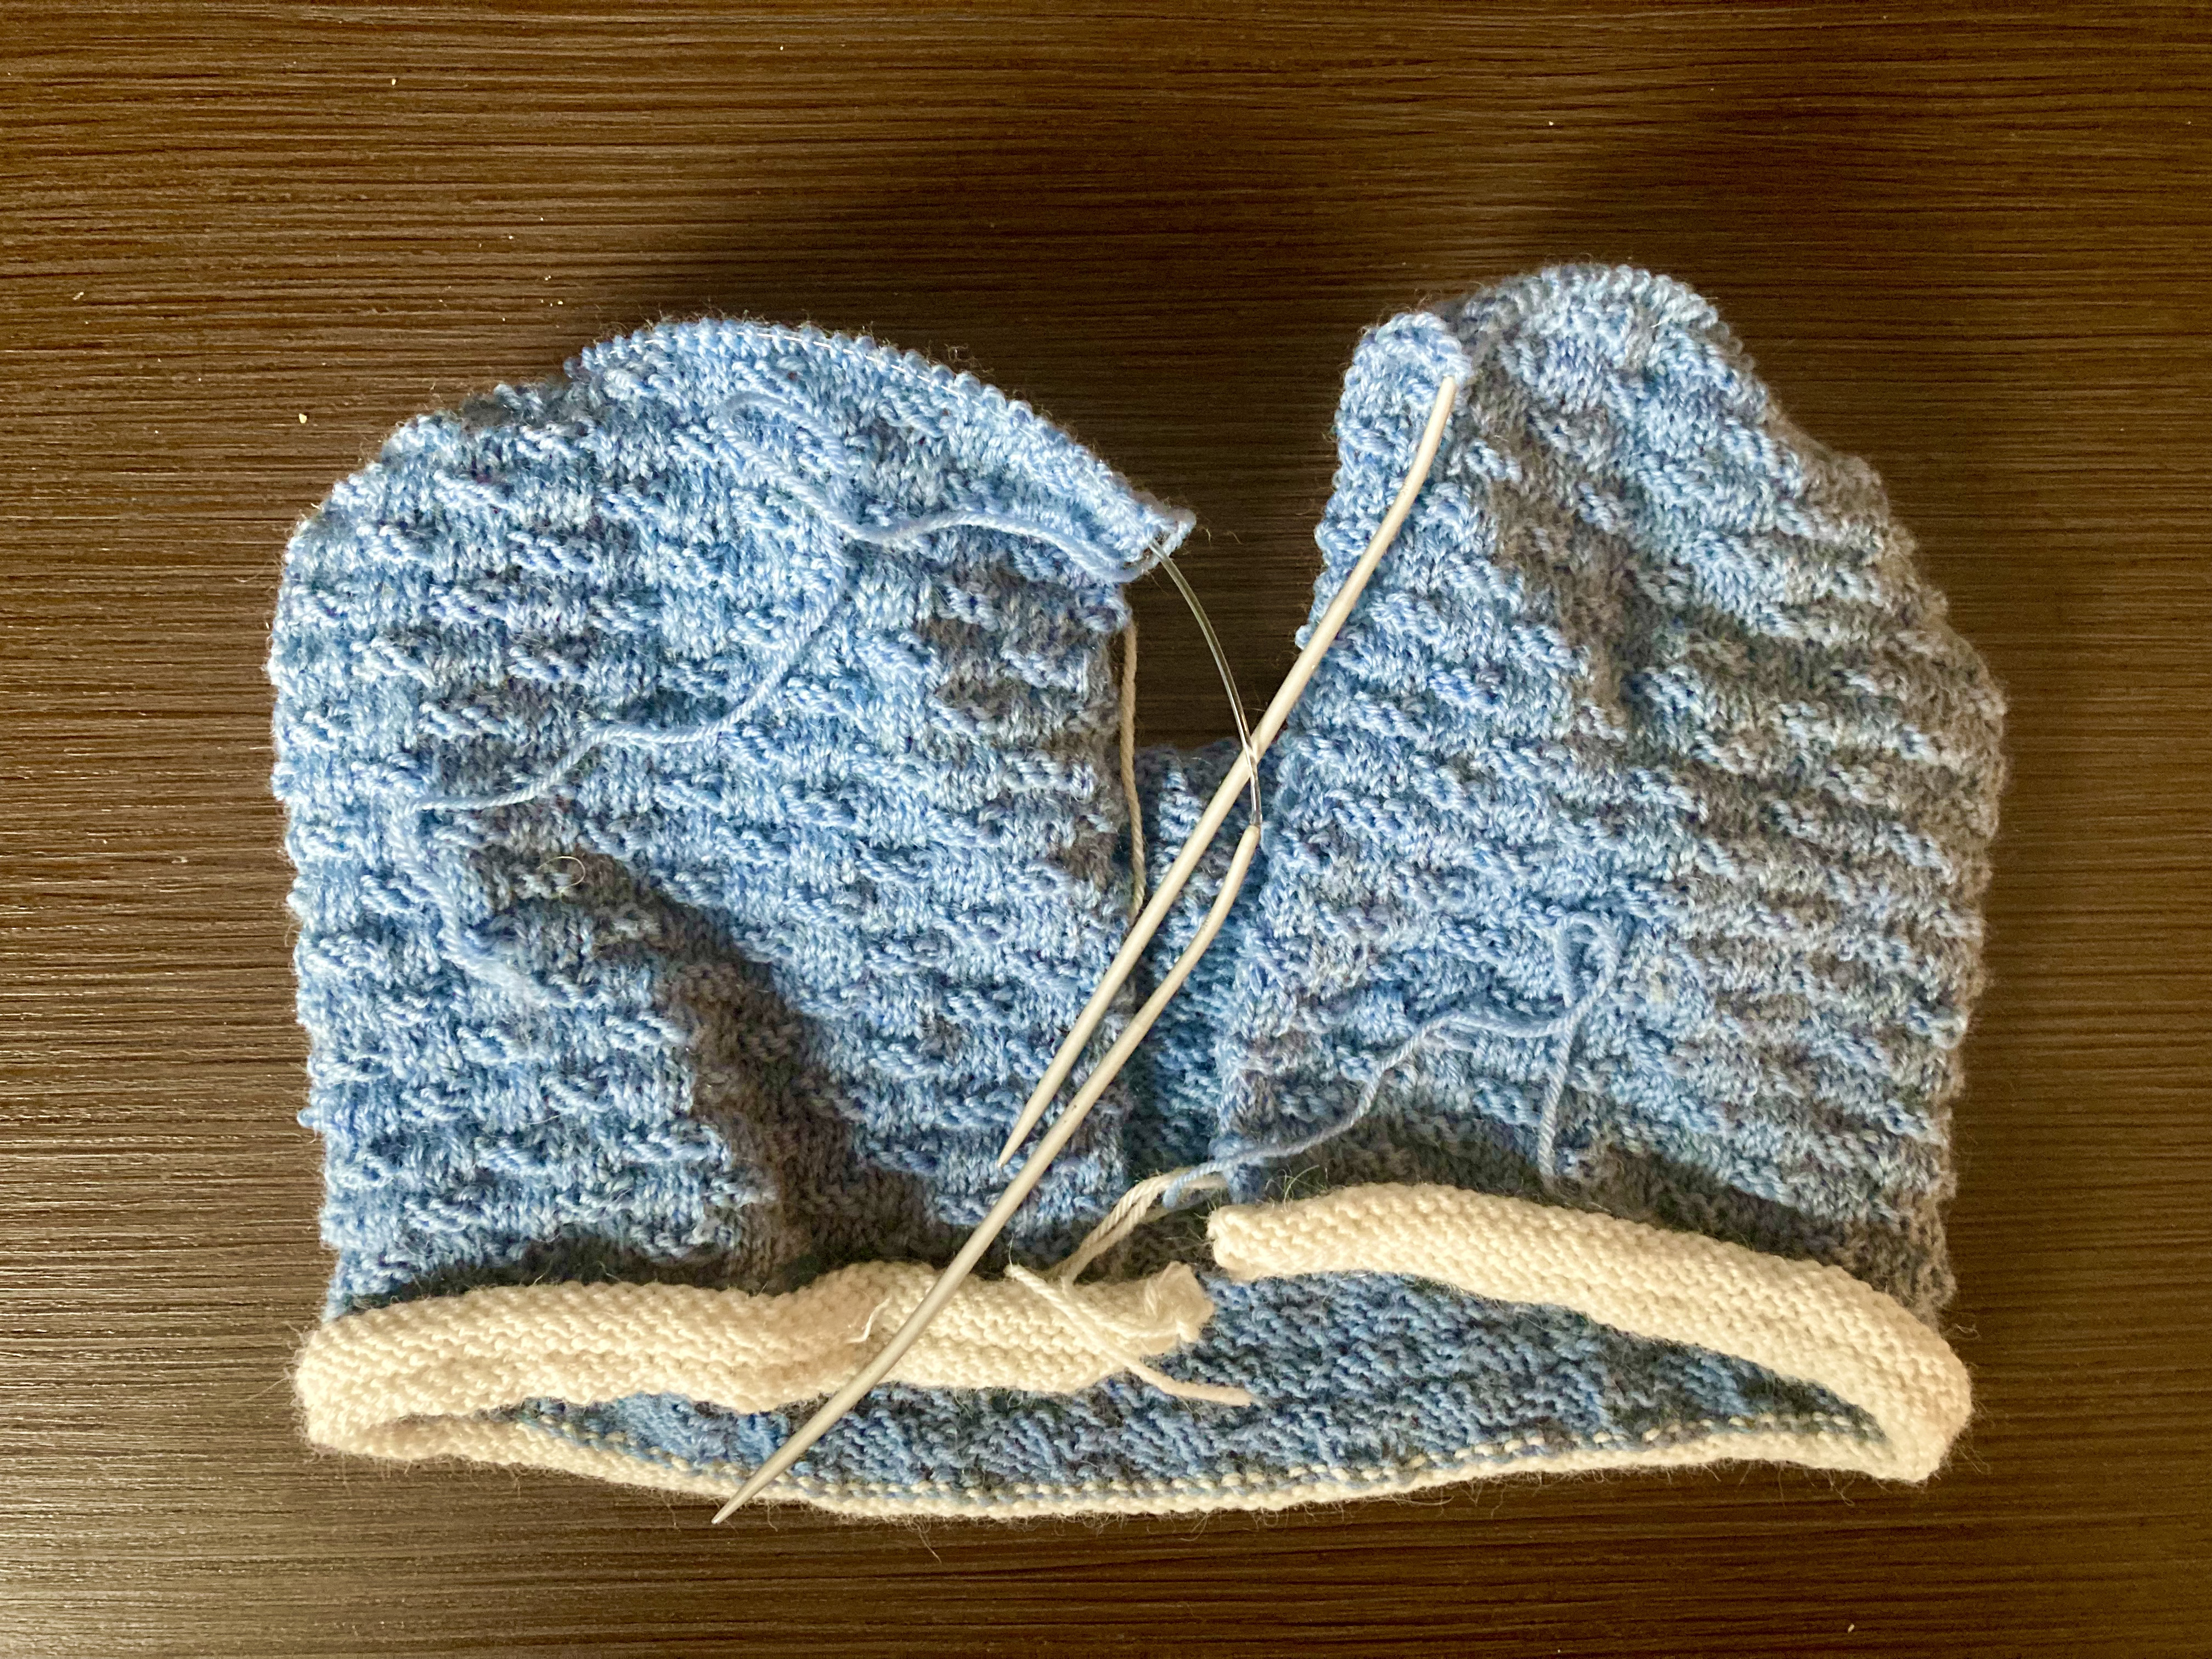
The stitch pattern is a nice basket-weave over 3+3 stitches, with 2 rows of stocking-stitch interspersed to even it out a bit. There isn’t supposed to be a hem at the bottom, but it curled so badly, even in the basket-weave pattern, that I picked up stitches from the cast-on and made one with a purl row for turning. Similarly, the sleeve cuffs were supposed to be knit separately, sewn on later, turned back and then crocheted over, but why so much effort? I made a hem the same way. Continuing in the spirit of saving time and energy, I made the fronts and back in one piece up to the armholes, the sleeves flat and two at a time on one needle, and the raglan yoke in one piece back and forth. There wasn’t enough light blue to even make the whole fronts and back, so I bought more to the whole thing in light blue, as in the pattern.
Of course it occurred to me, when halfway finished, that I could have made the bed-jacket pattern after all, just adjusted the size and yarn to fit a baby... and then it would have had the same colour scheme as the original, too. Too late! What can I say. My brain had been occupied with too many “real-life” things.
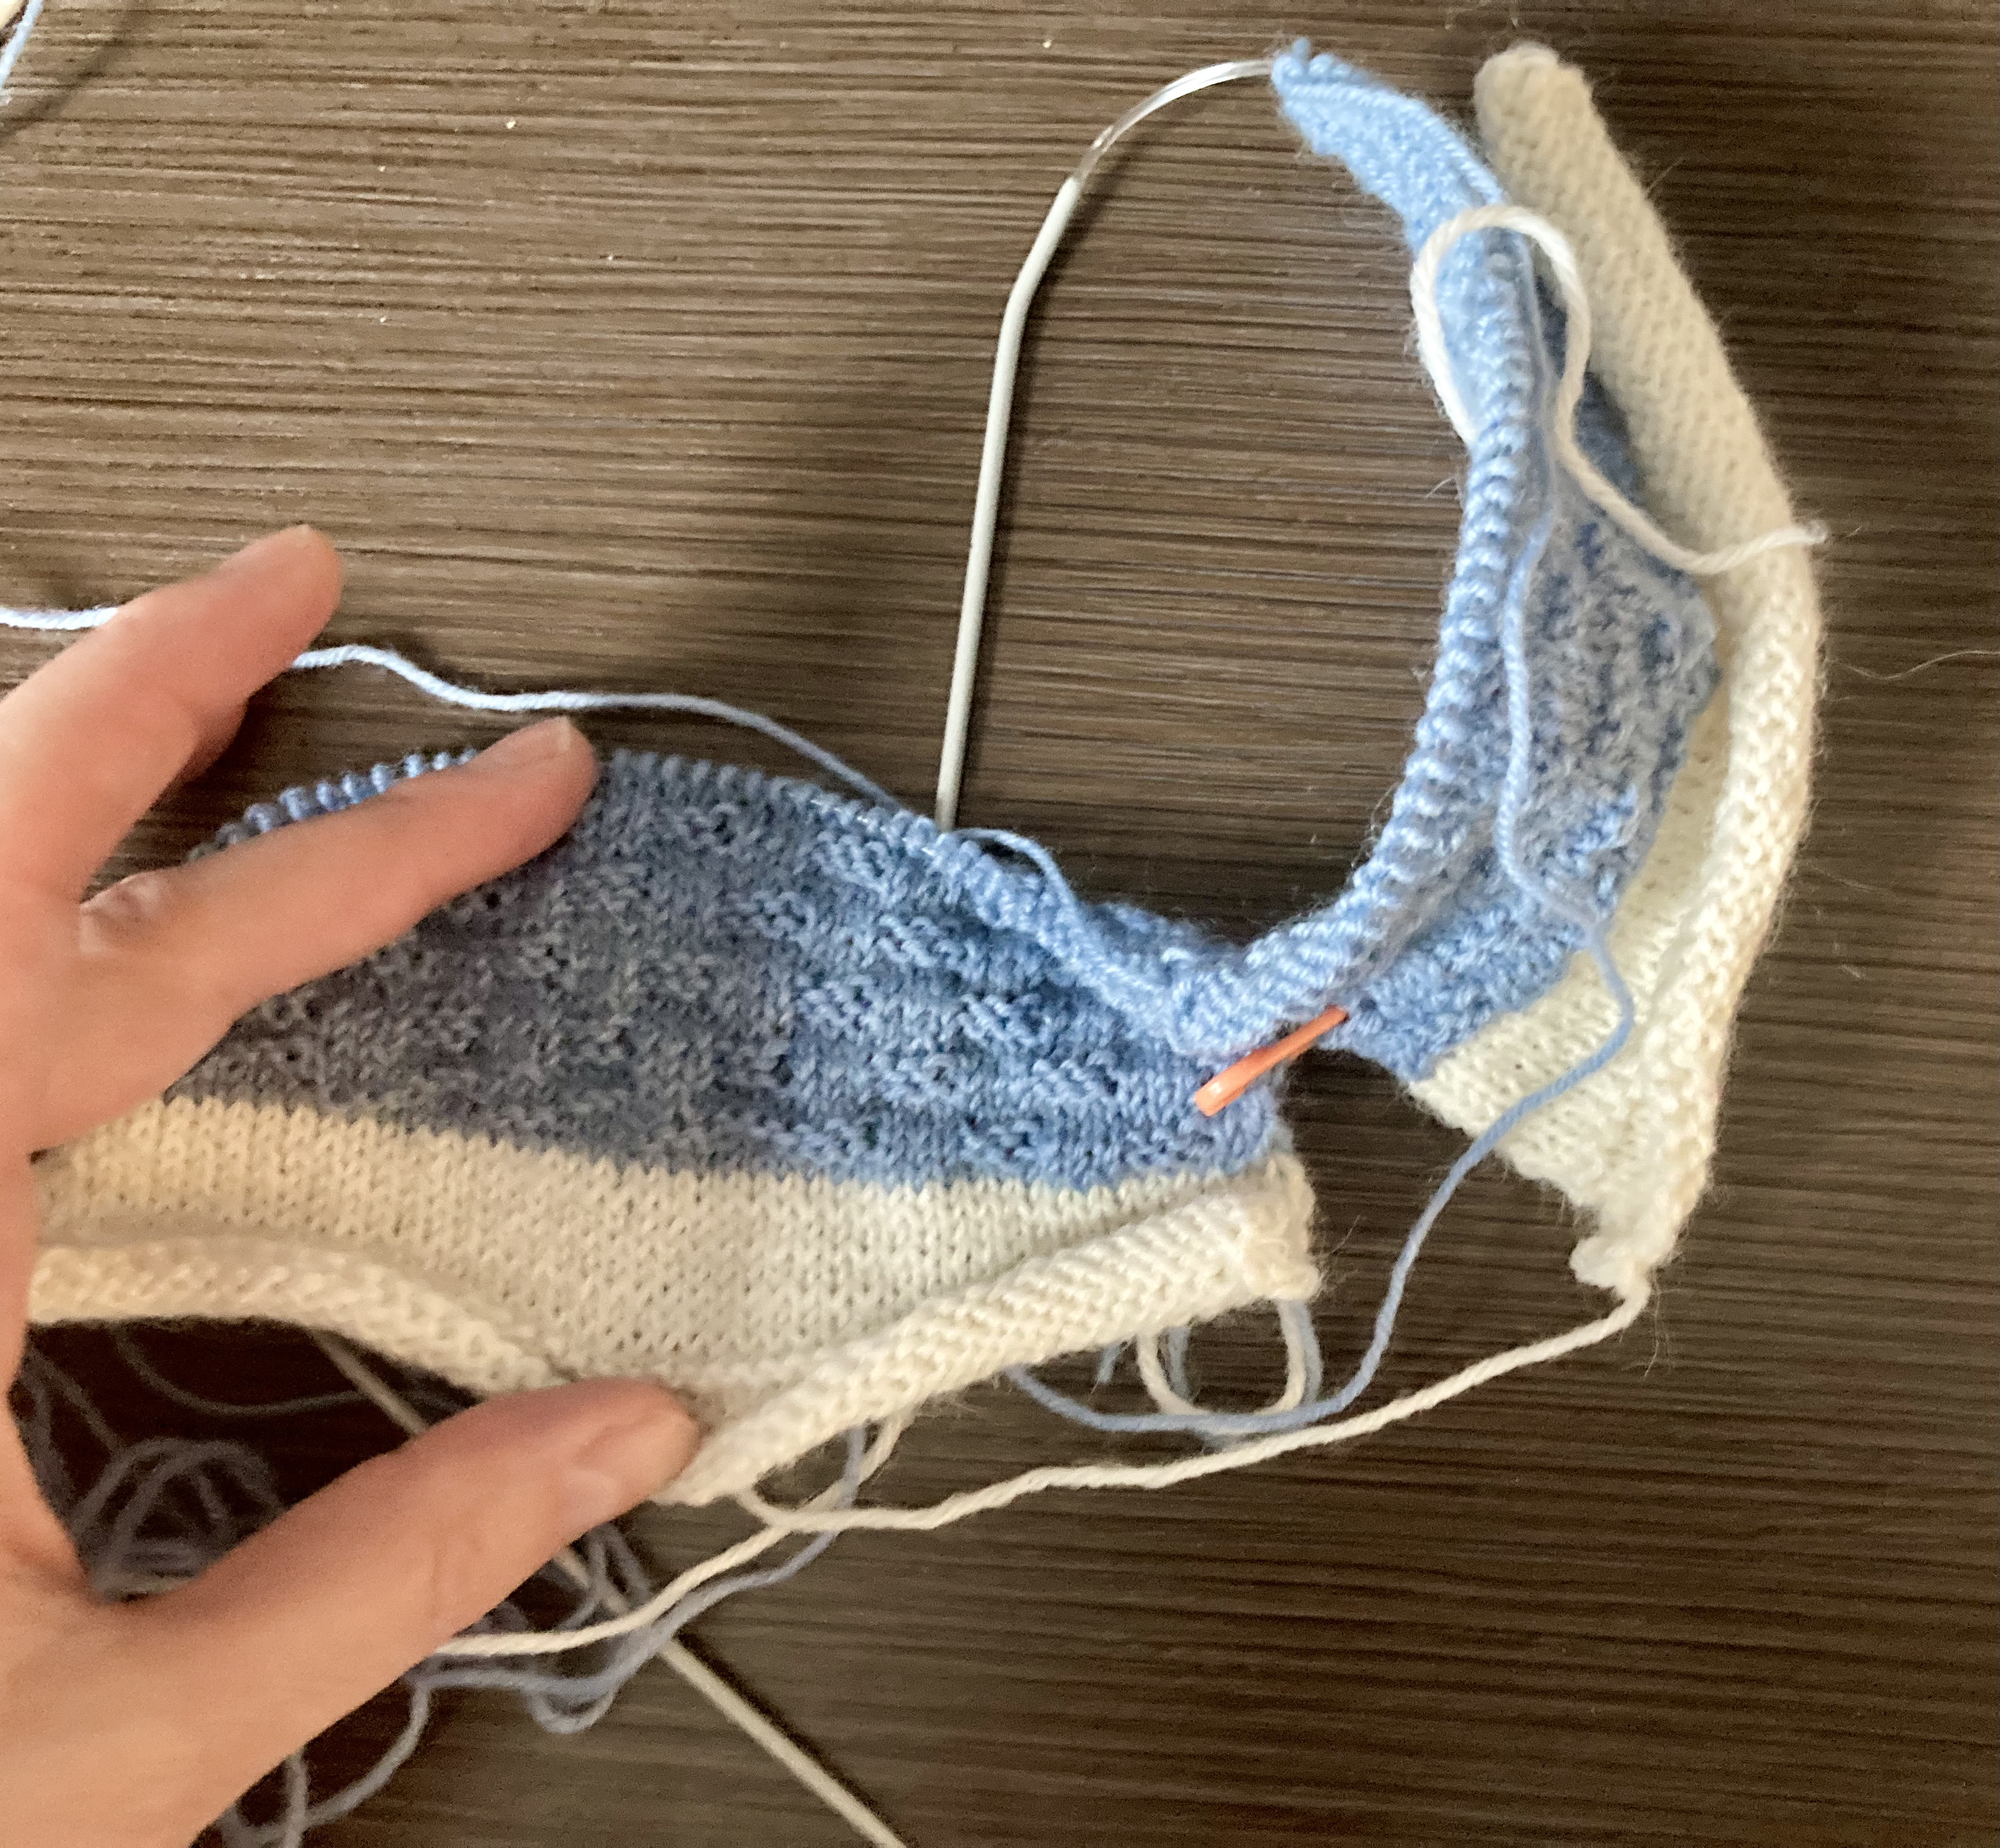
Part of those real-life things included a lot of work-related travel on trains, which has the advantage of giving me lots of time to knit — and the disadvantage of not being able to take good in-progress photos. Here are some of the jacket after completing the body and knitting the front bands, with a lovely background of train floor. The front bands are picked up and knitted horizontally in the usual way and folded under, so double thickness, and the buttonholes are only on the inside part of the fold, so that they are hidden when the jacket is buttoned. There are increases at the neck edge to make a sort of top facing in the front “corners” where the hood join ends.
The hood is made in a separate piece from the brim to the neck, with short rows to round out the top part. Here again, the instructions said to make the hood in blue first and pick up for the facing later. I could have just cast on with white and made the facing first to avoid having to pick up along the cast-on edge later, but I was happy not to, since I had limited white wool — I ran out and had to switch to blue for the under-facing part (after the fold). That wasn’t a problem and the white wool remnant has now been successfully de-stashed.
I added lightweight wooden buttons. The covered-button design didn’t really convince me, in the end, since I imagine it will be unnecessarily difficult to button up if the baby is squirming around, and the doubled facings are a little bulky even in 4-ply, fingering-weight wool. That said, the facings will put up with a good amount of wear and tear. The finished jacket is really cute and should fit a larger baby in the first few months as an “outdoor” pram jacket, or maybe a six-month old as a cover-up on cooler summer days.
I hope the my colleagues will be happy with this baby jacket! The mother is herself an expert knitter and seamstress, so the bar was set high. But I’m quite satisfied and I think they (and the baby, of course) will be too.
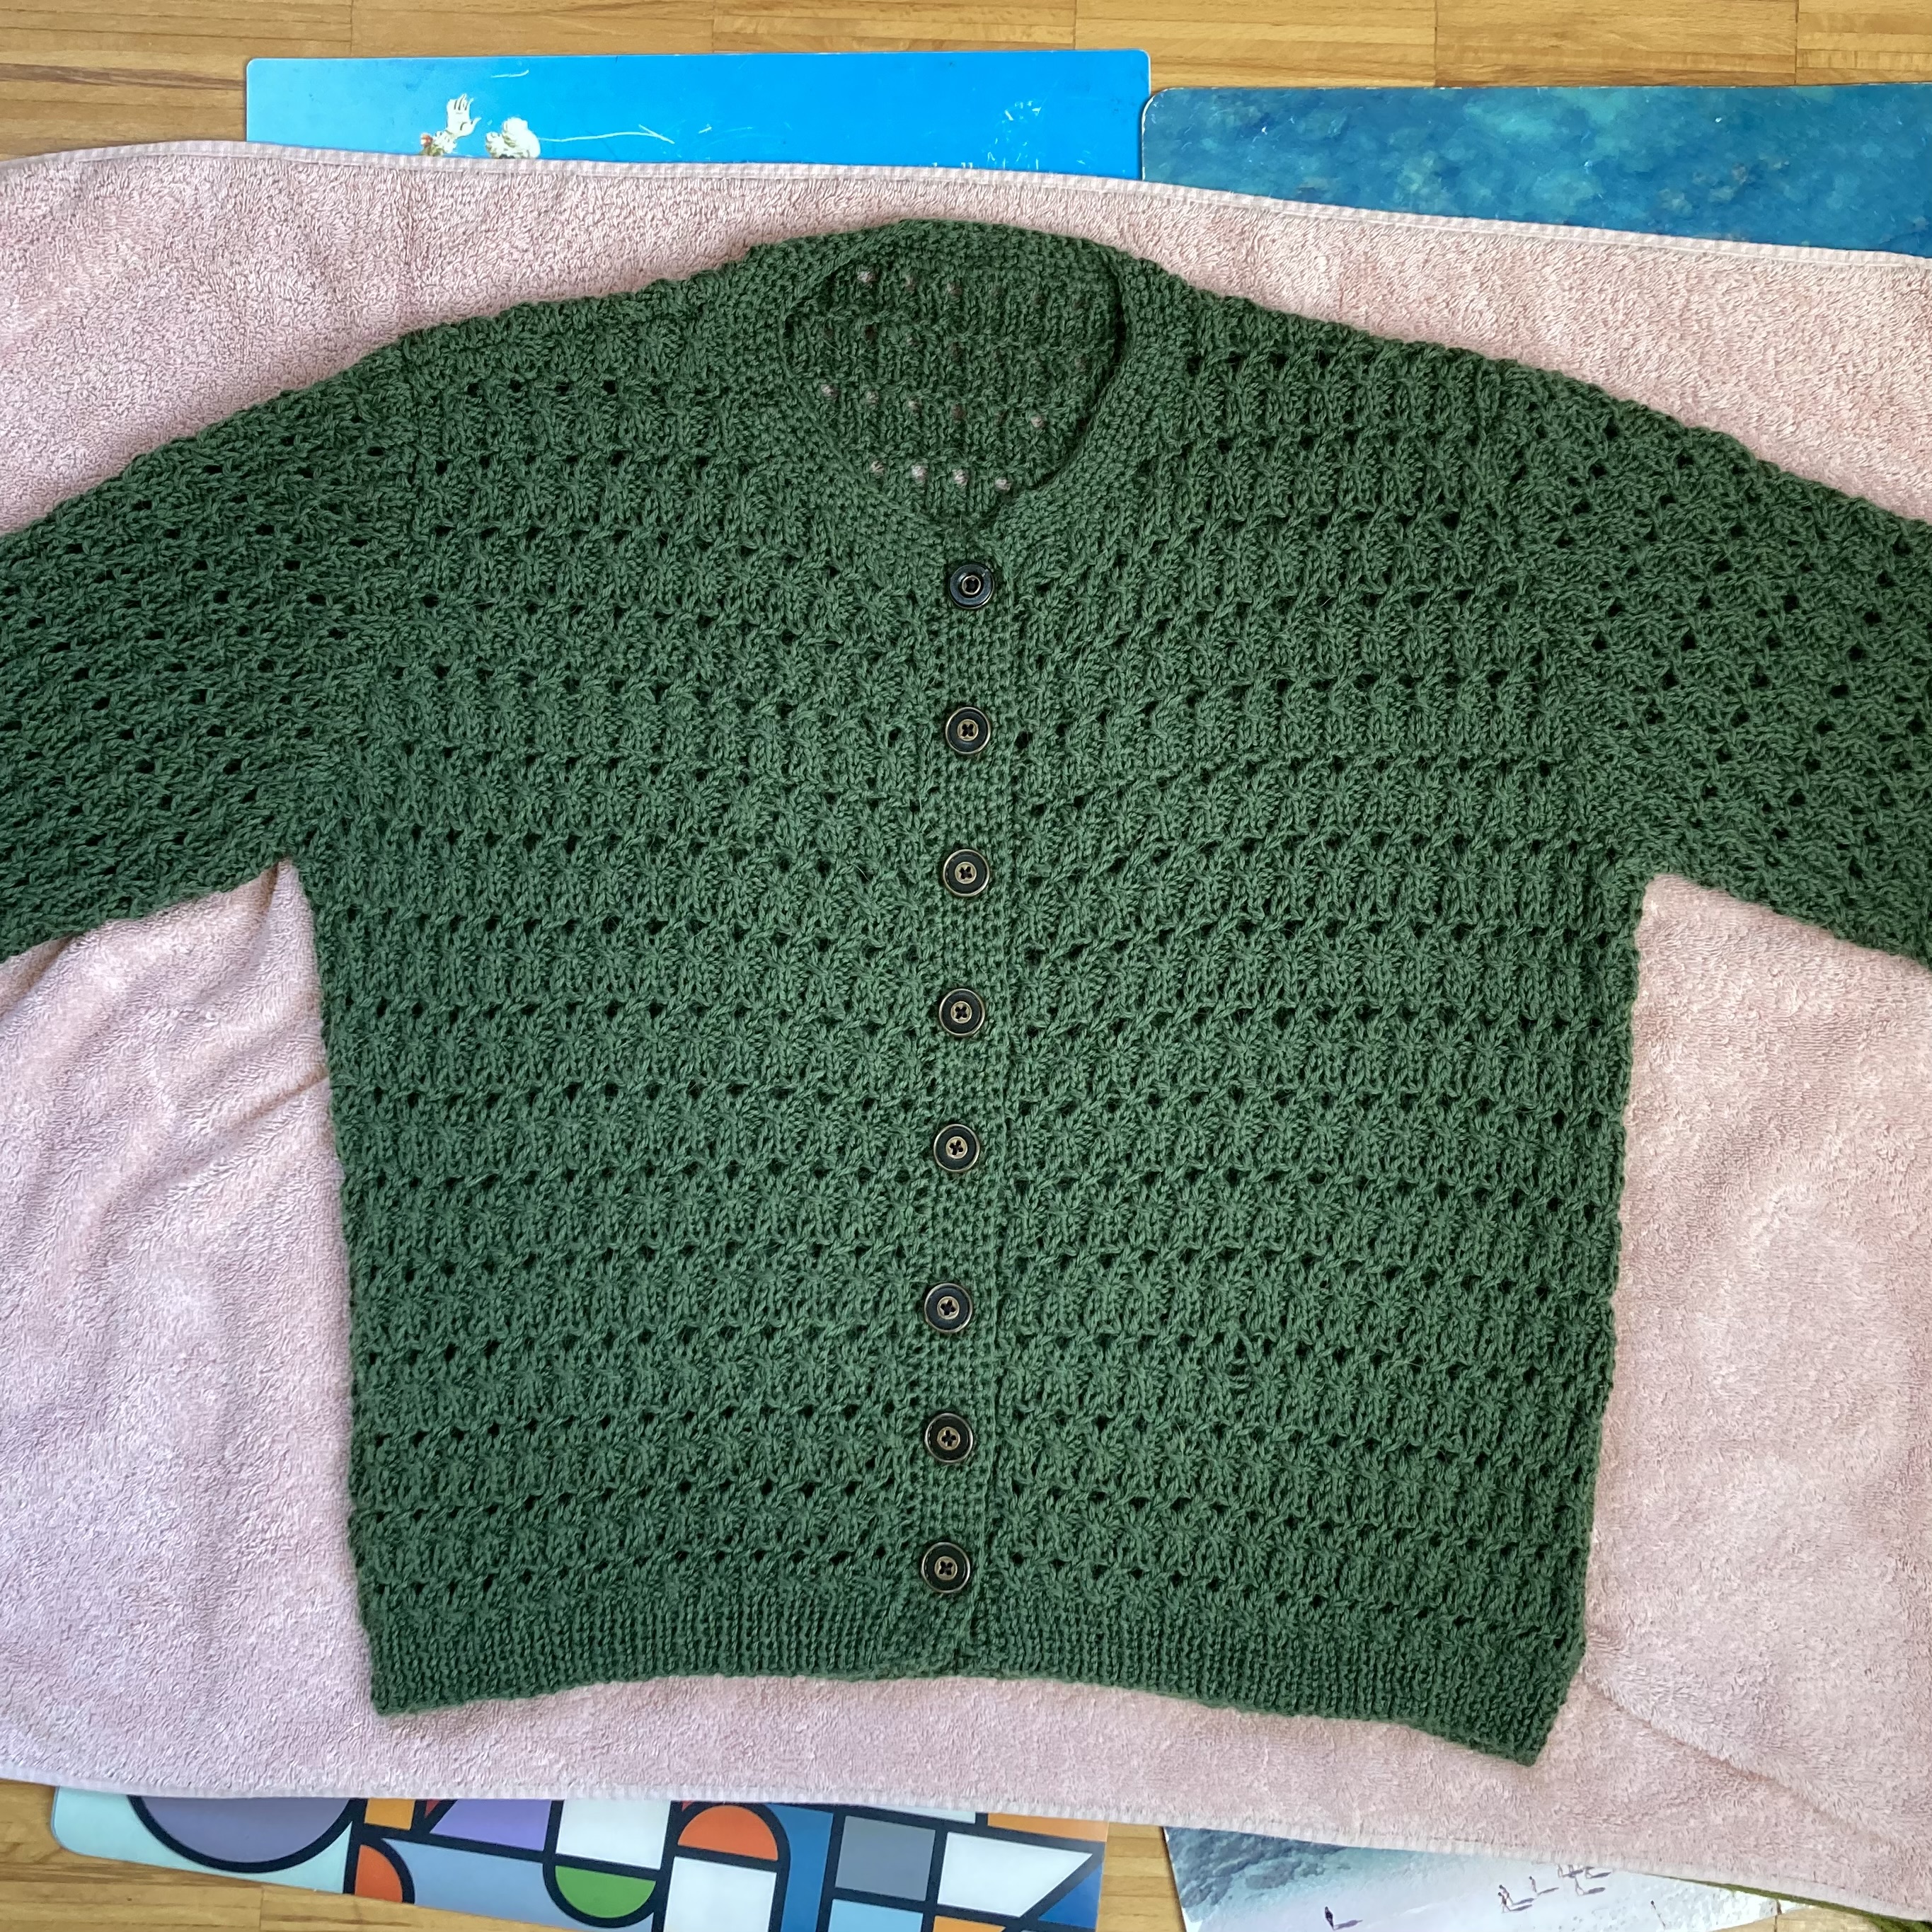
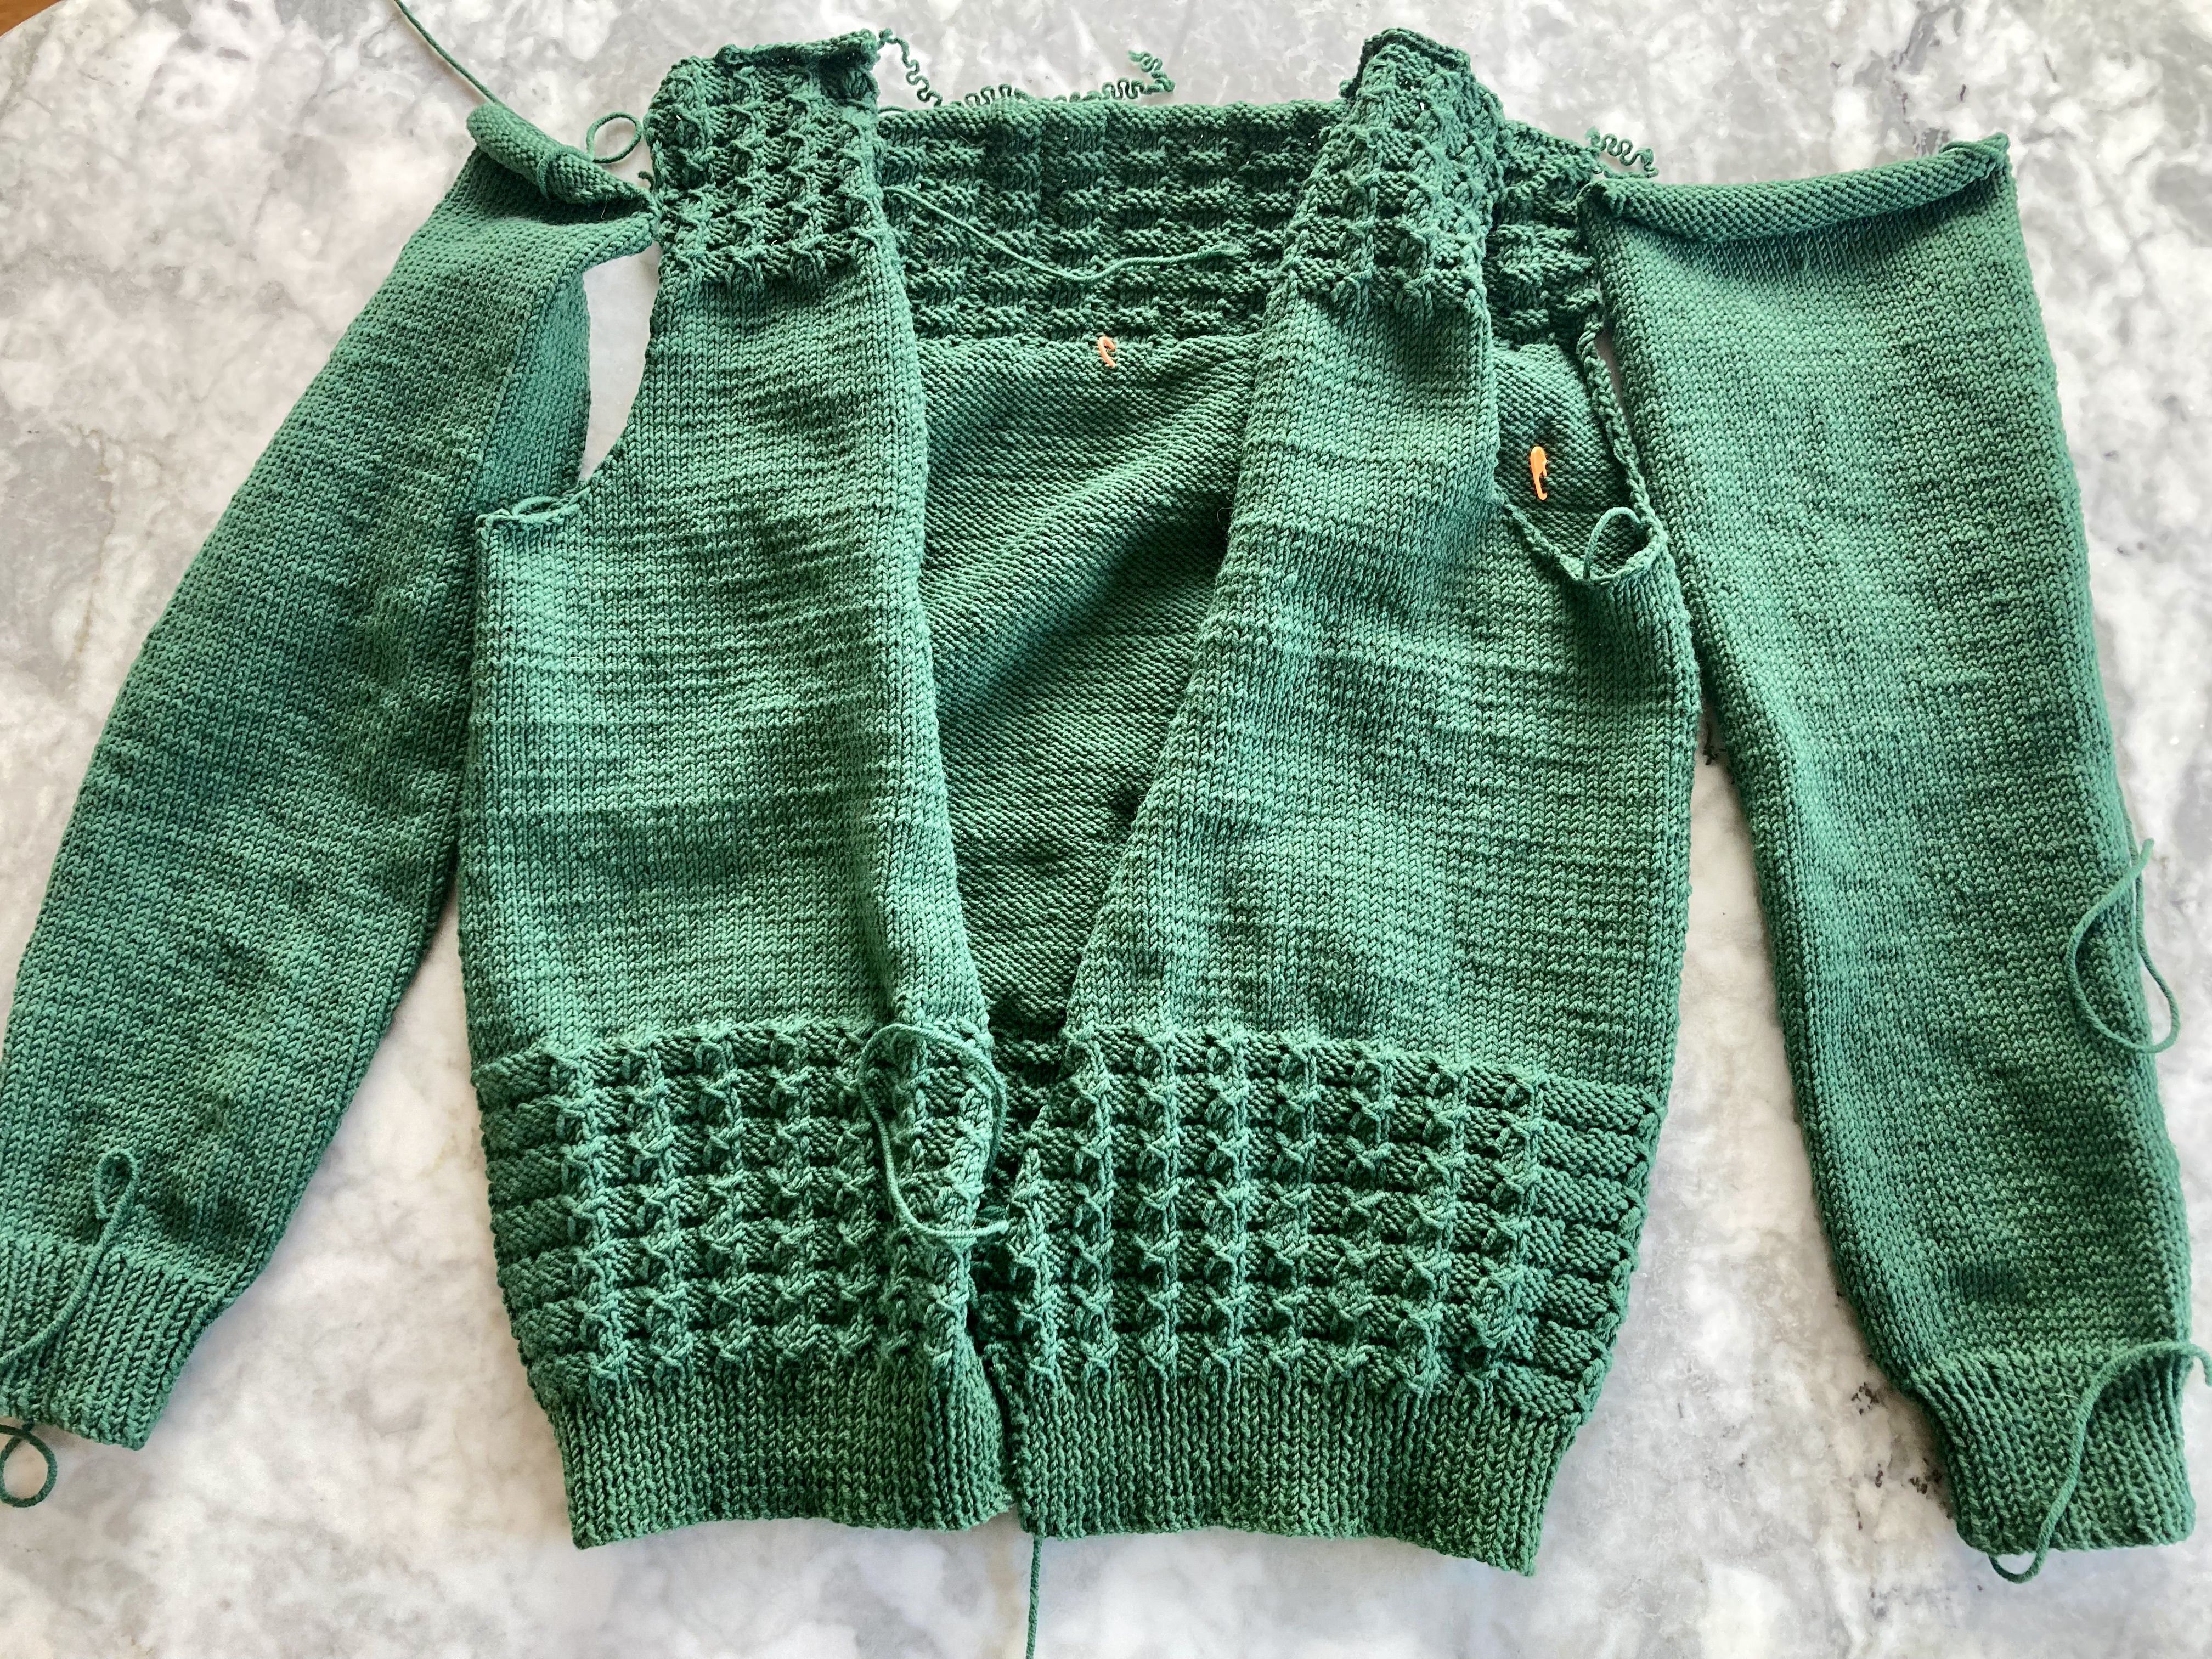
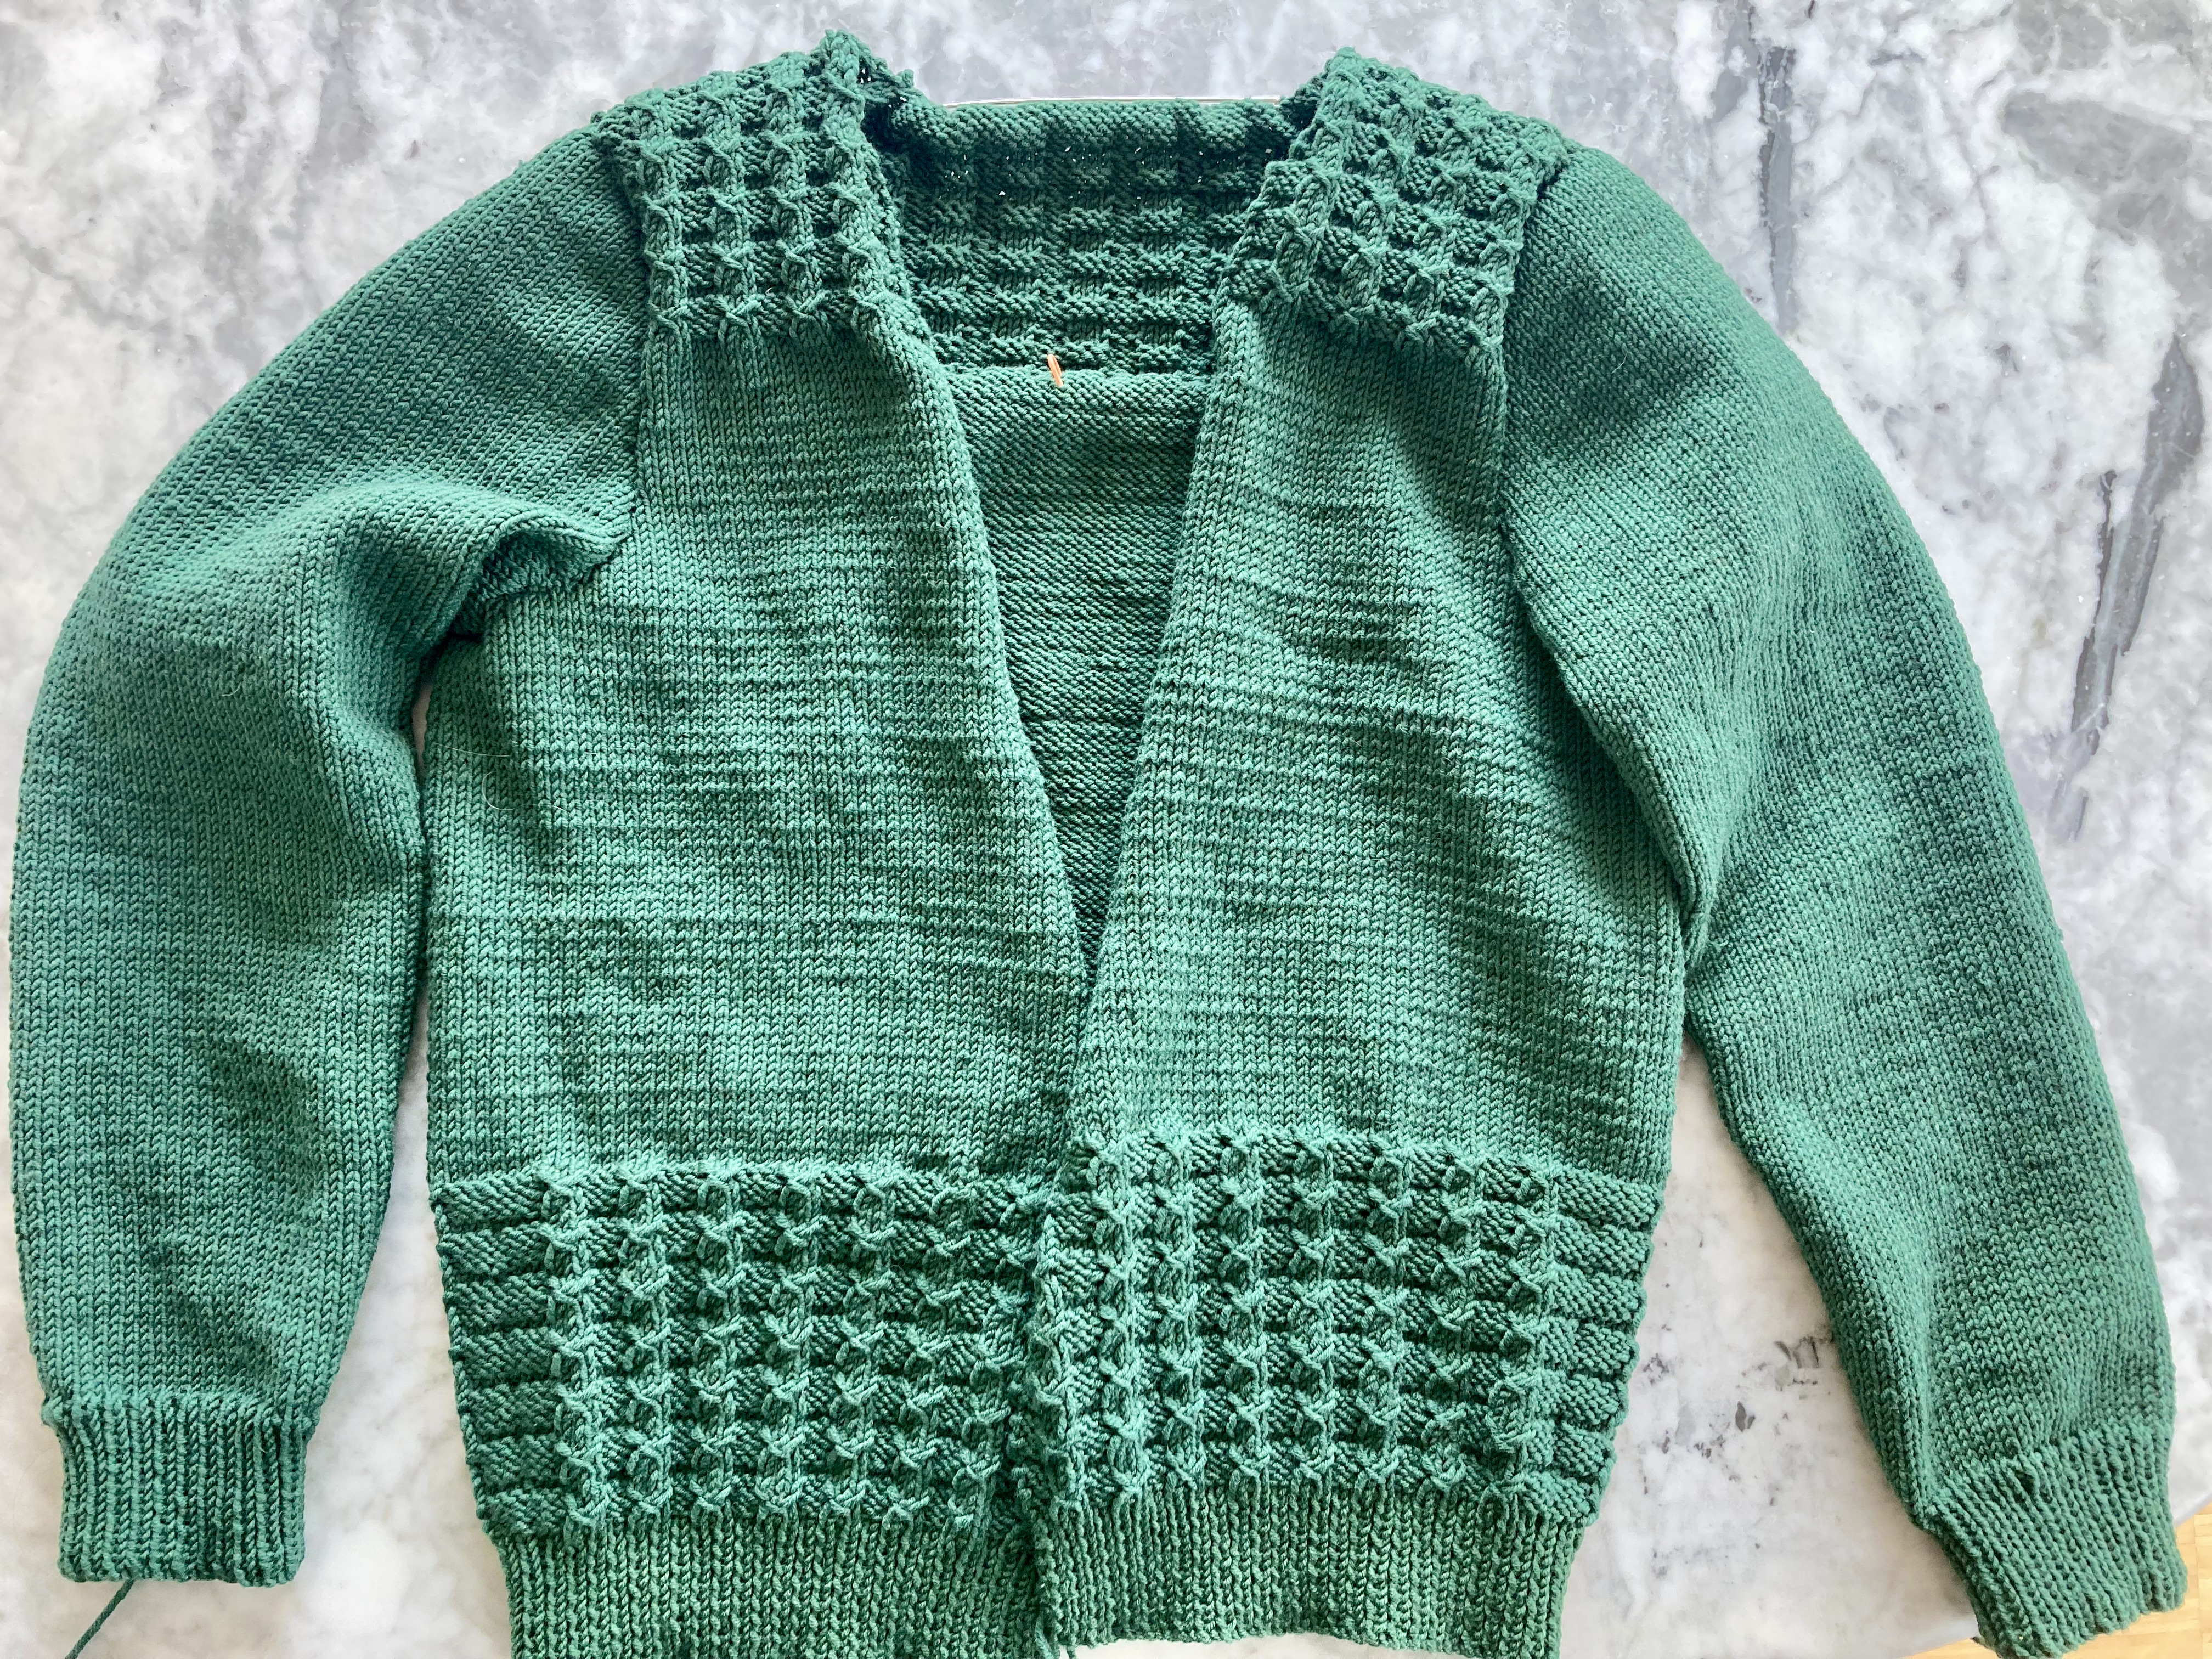
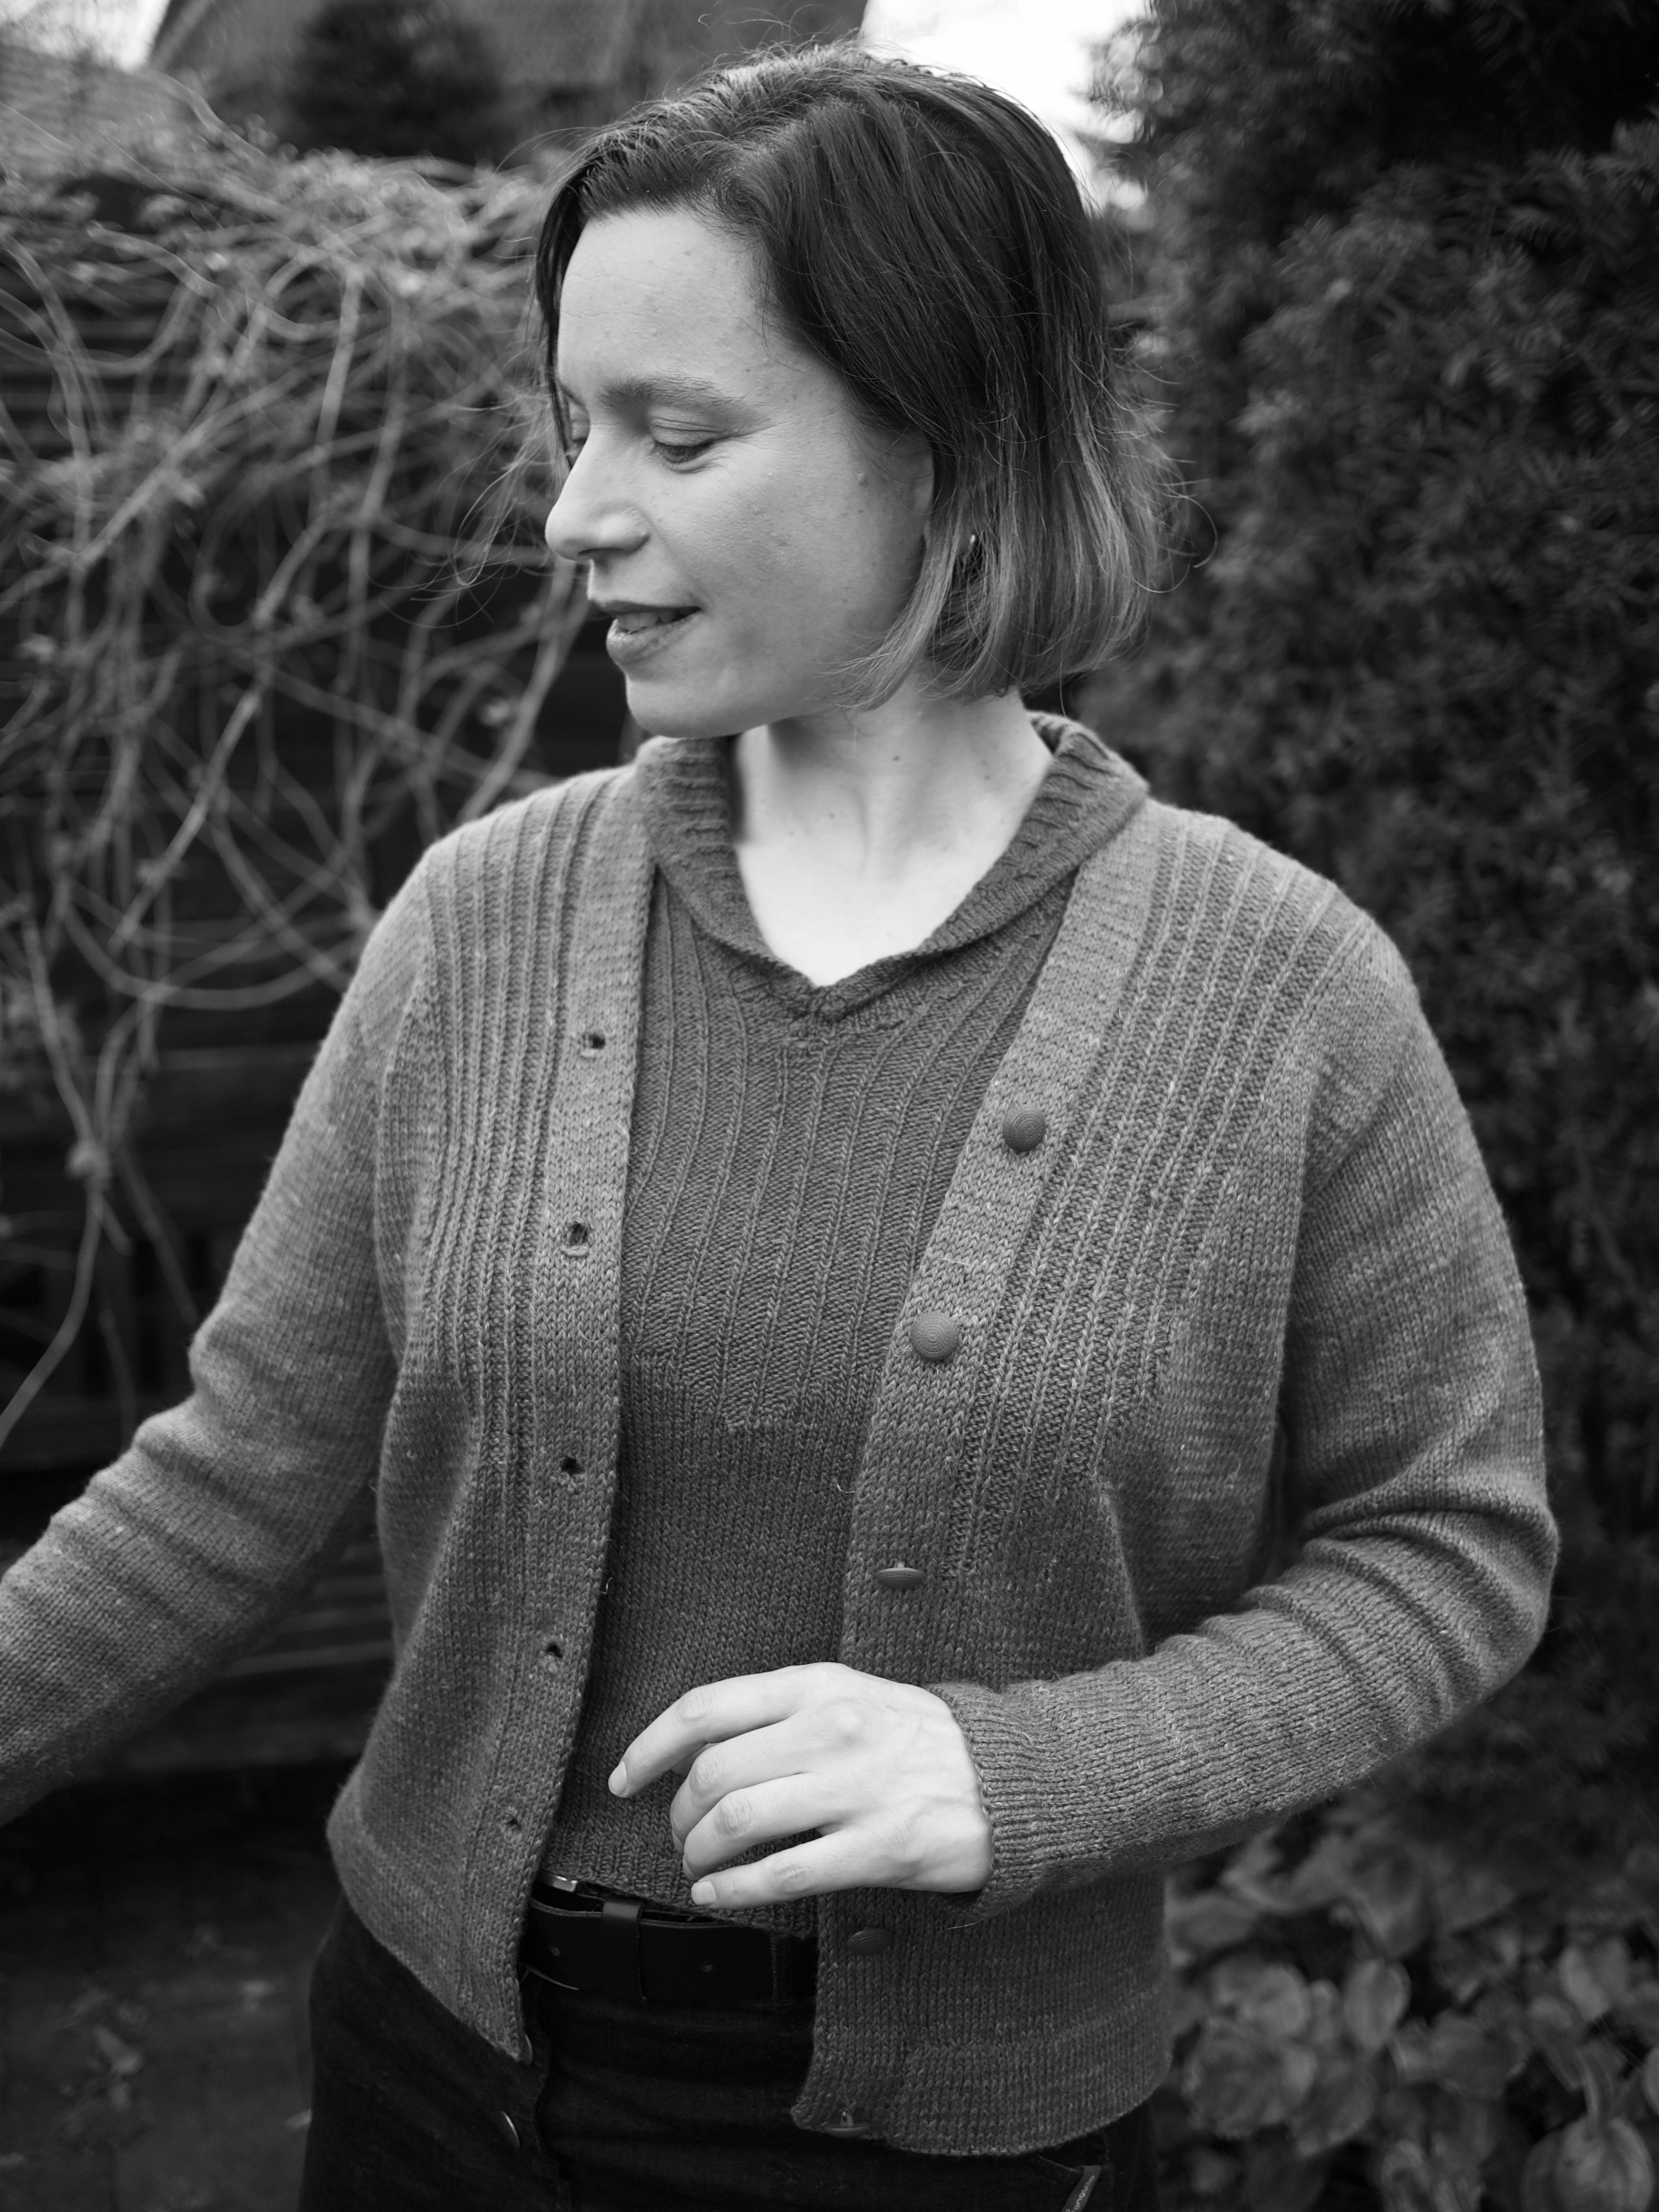
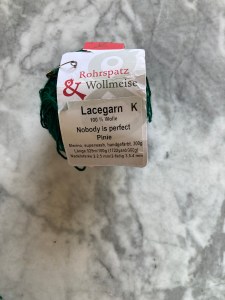
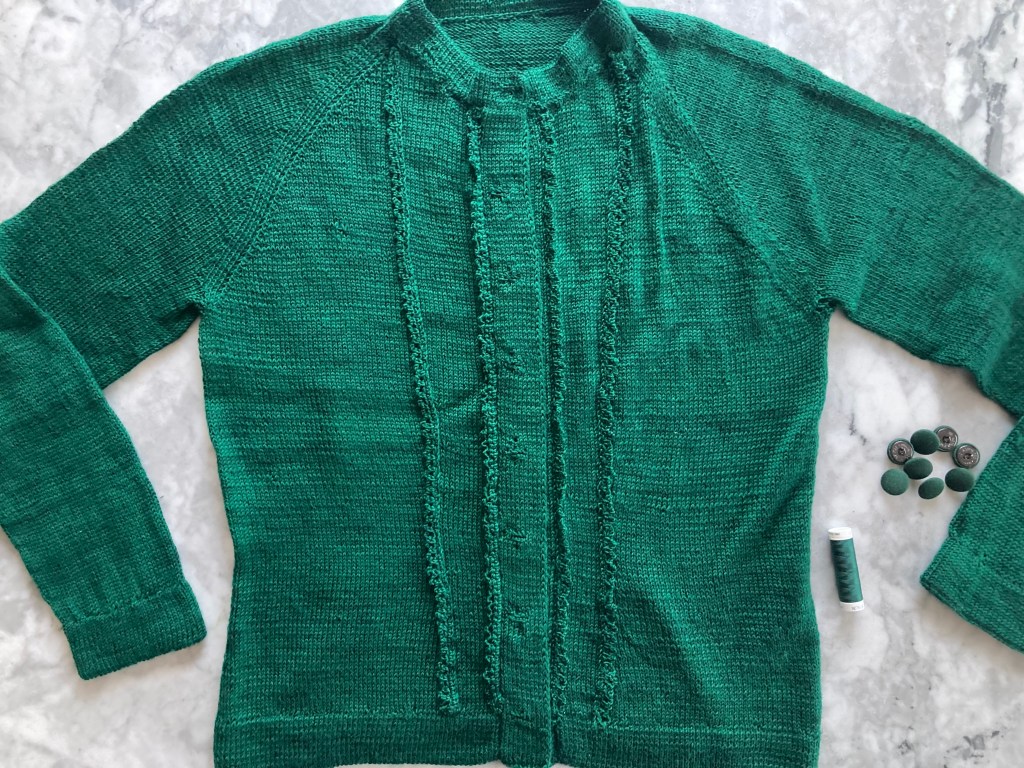
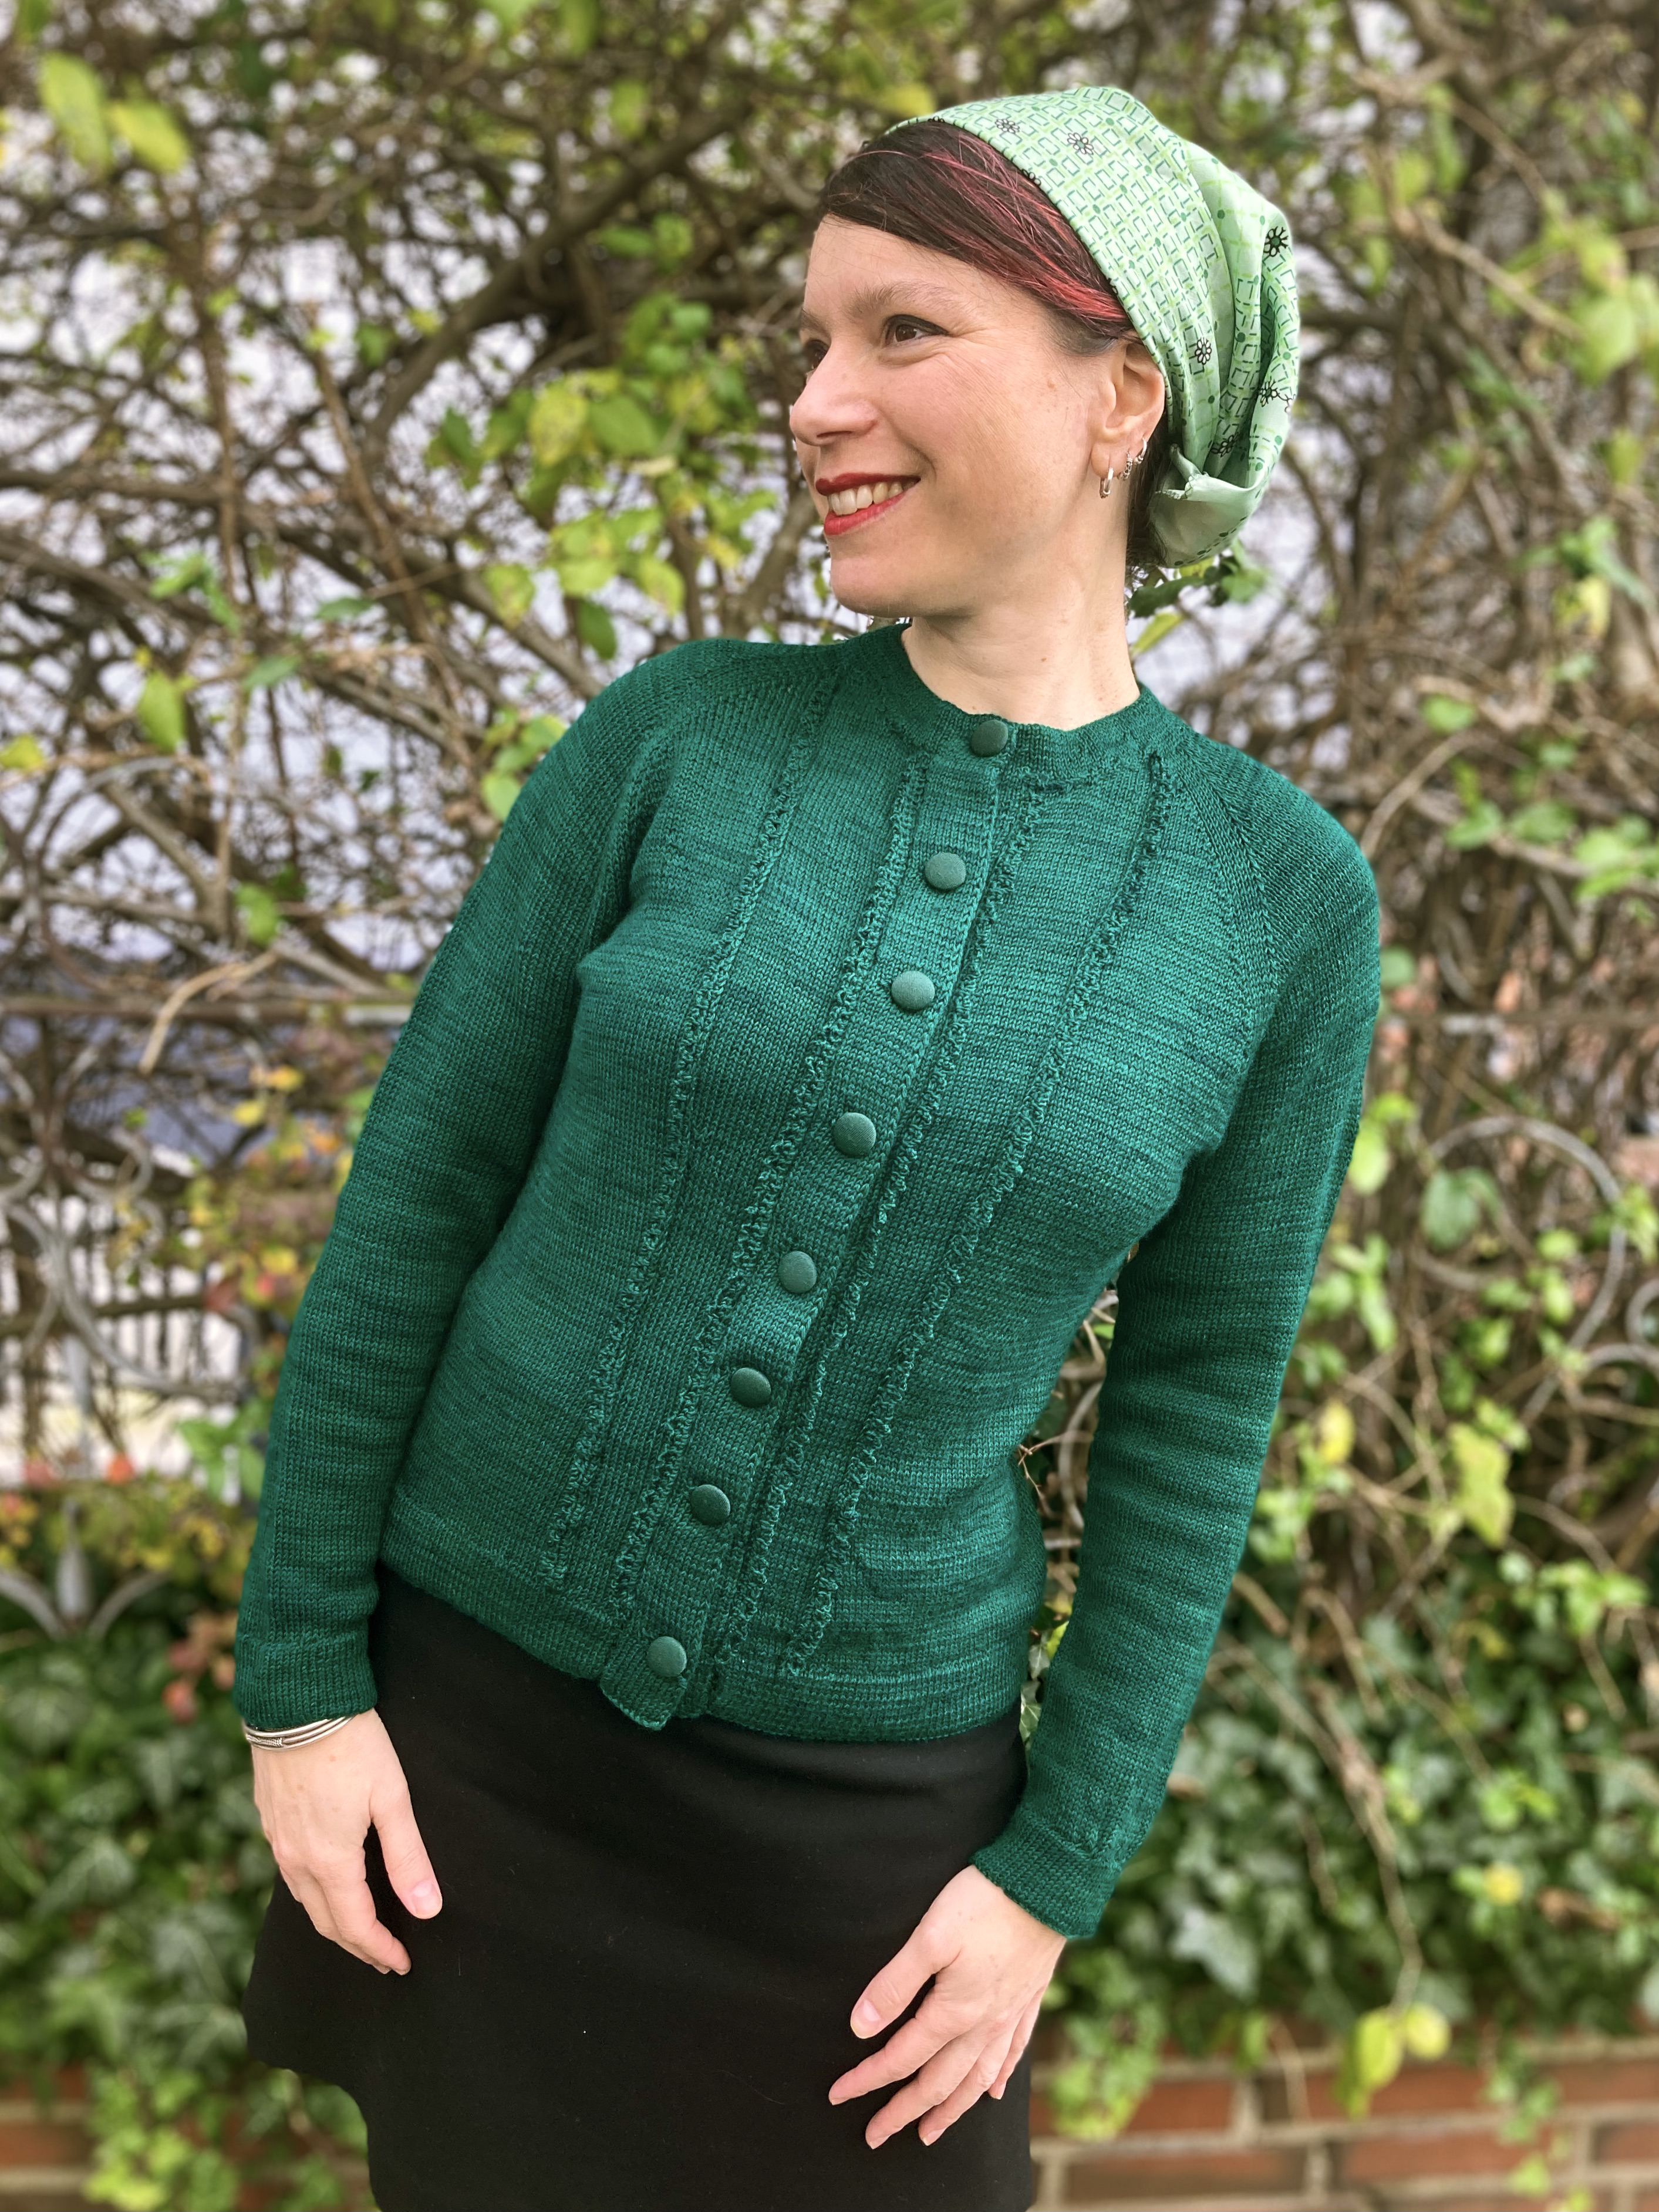
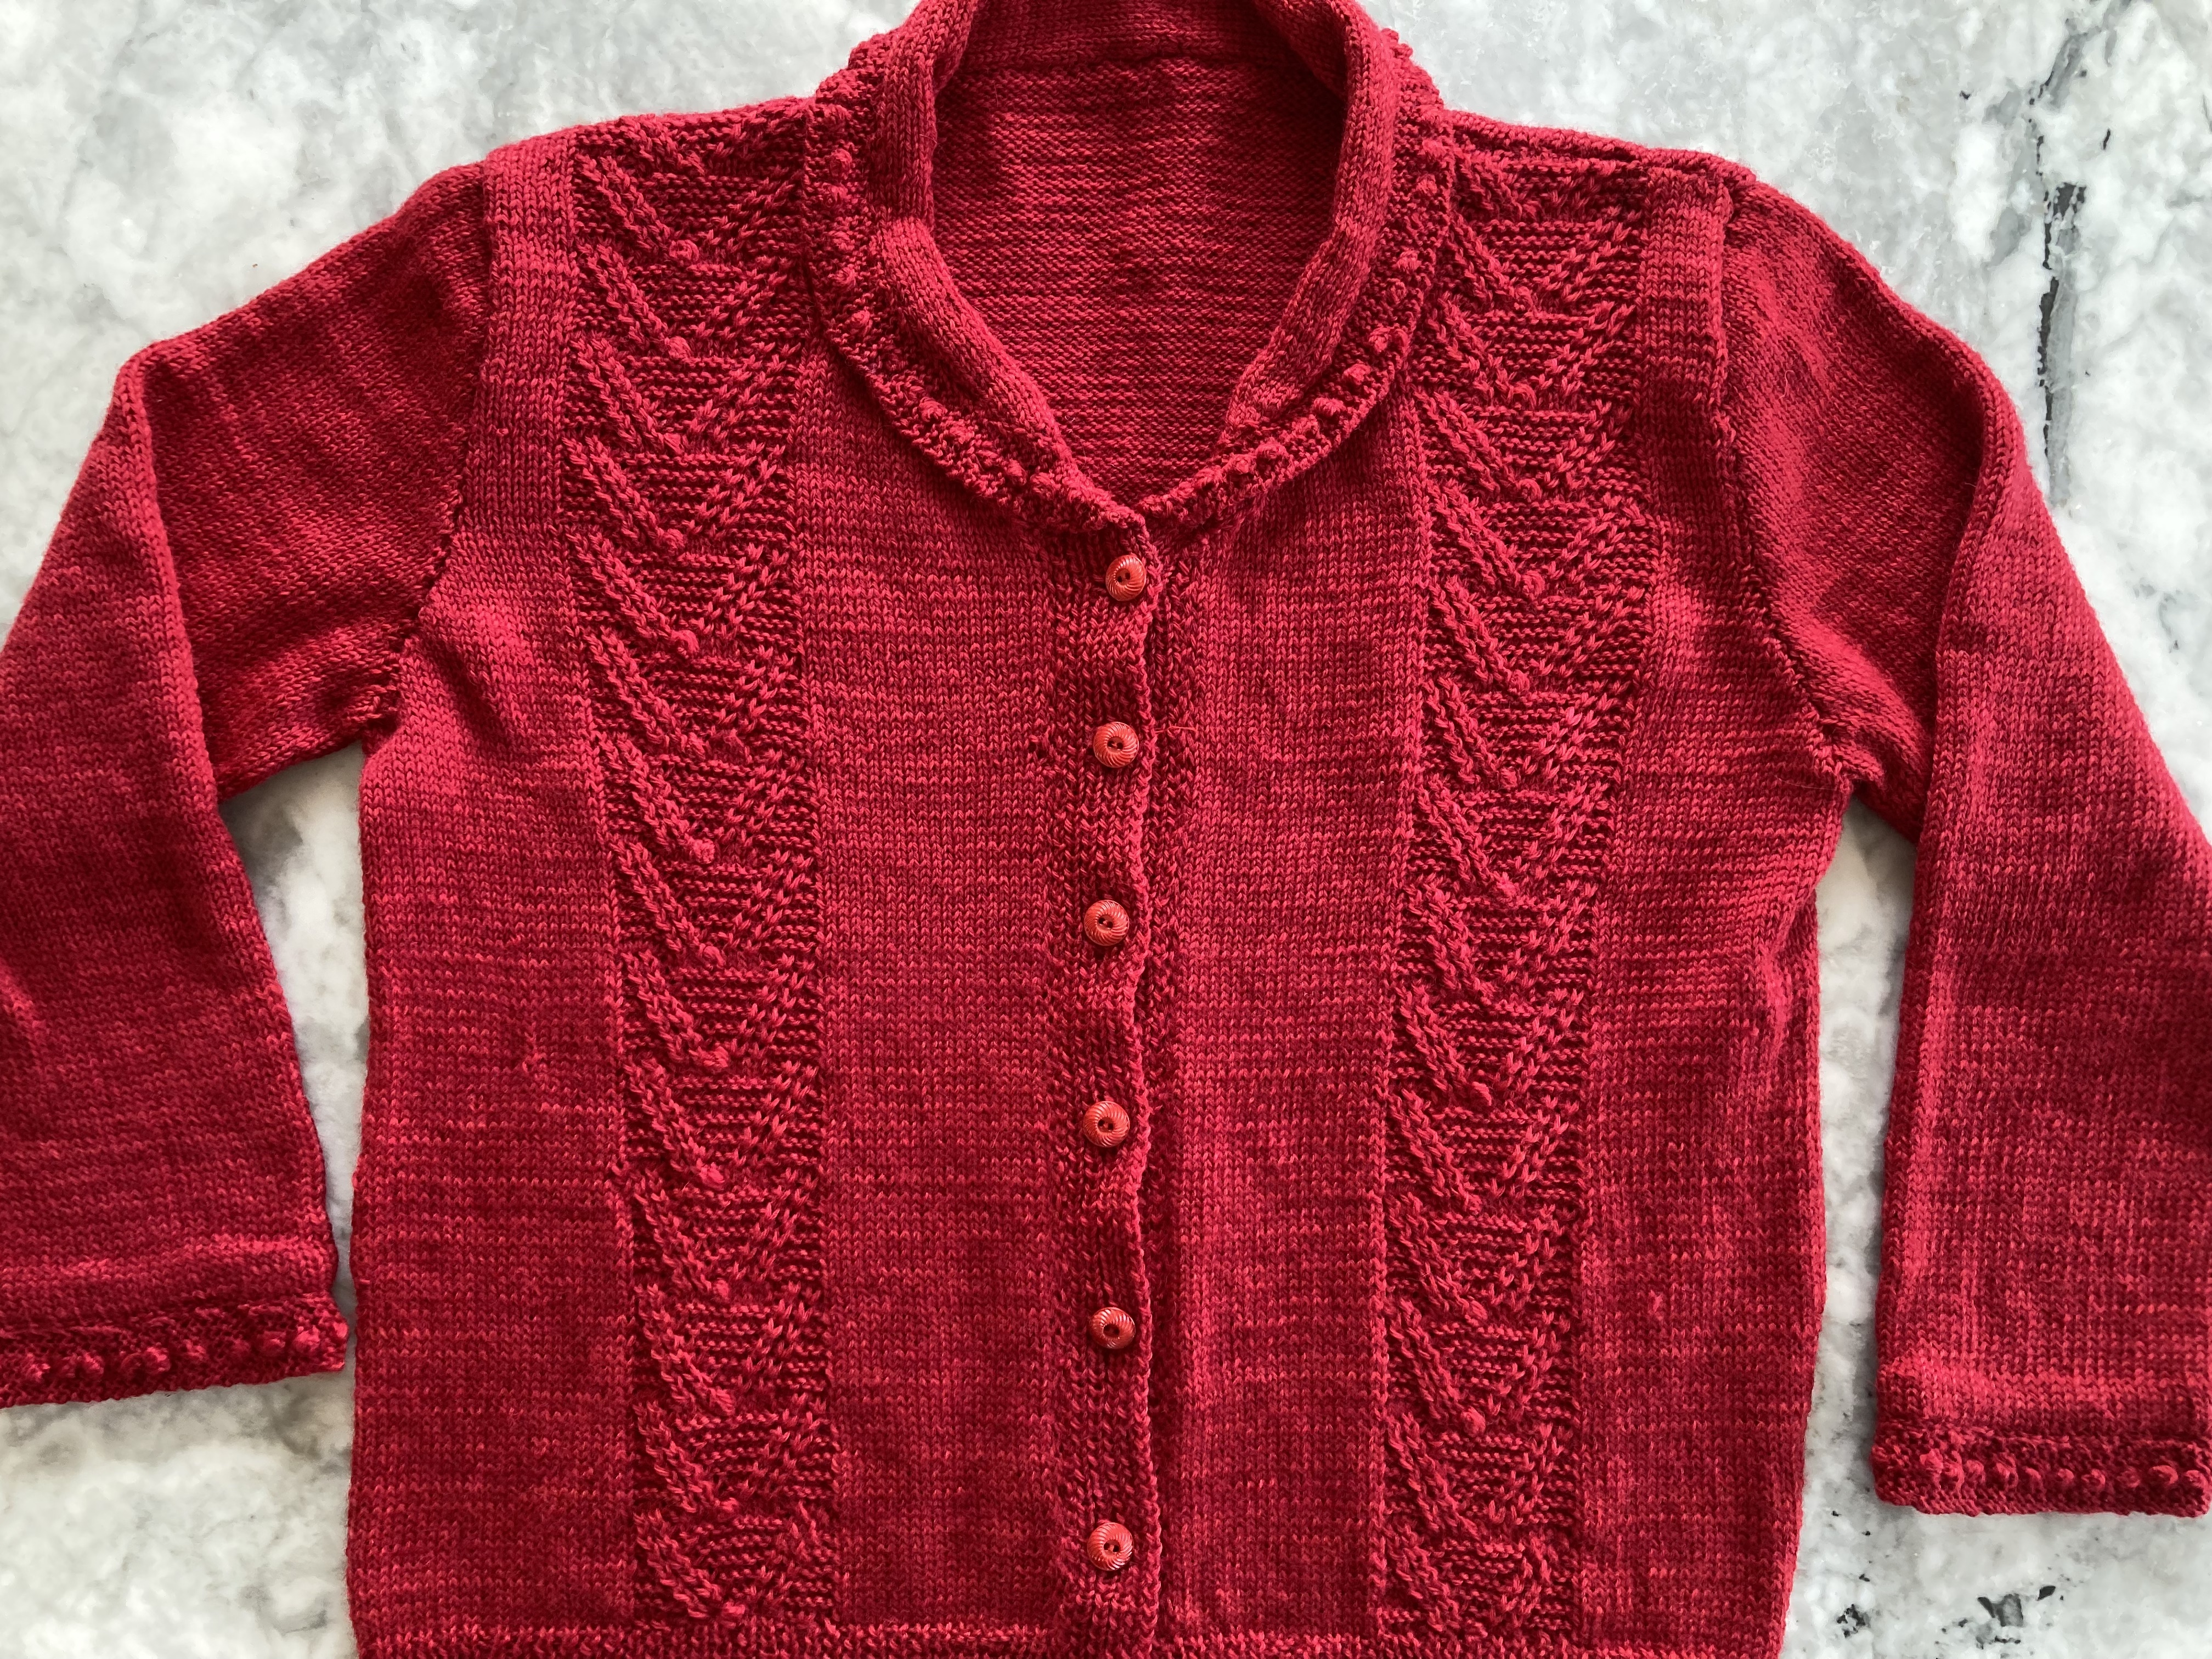
This month’s project was the simple, yet elegant “Cardigan with Picot Trims” from the October 1965 issue. It is made in stocking-stitch with 3/4 length raglan sleeves and hems at the lower edge, front bands, cuffs and neck. The fronts are then trimmed with simple crochet picot edging and the back is left plain.
It was the perfect project for the Rohrspatz & Wollmeise “Lacegarn” wool (100% merino wool, superwash, hand-dyed) that I had bought at the Sulinger Wollfest this past summer. The pattern calls for Patons Beehive 4-ply, so a little thicker than my laceweight, but that meant that for once, I could use the intended needle size and get the intended tension (7 sts and 9 rows/inch on No. 10 (3.2g mm) needles — I used 3 mm and it worked perfectly.) The yarn is glorious, with its deep, glowing green colour, which is deepened by the slight marling that results from the hand-dying process. This hank (300 g) was even discounted due to possible knots, breakages or dying errors, but there were none of any of those that I could find.
I had resolved to never again make a garment with a stocking-stitch hem in lightweight wool, since in my experience it stretches out horizontally and the whole garment shrinks vertically, turning even a slim long-line into a boxy tent. In an attempt to counteract it, and to avoid the ballooning back and general dumpiness of 1960s unshaped style, I added some waist shaping, decreasing every 6 rows to just below my natural waist, knitting 2 inches plain and then increasing up to the required number of stitches. I decided to make the decreases not at the sides, where one would expect, but 12 stitches in from each front edge (where the picot trim is sewn on later) as well as 12 stitches in from each back side edge and 12 stitches in from the middle back symmetrically. Yes, this meant I decreased twice as many stitches on the back as on the fronts. And it worked! The back fits well without being too tight or ballooning out over the waist and the front has an elegant curve. Plus, the picot trims will cover up the decrease/increase line on the fronts.
In that vein, I increased up to the correct amount of stitches for the second size on the fronts, but kept the back at a stitch count between the first and second sizes, to allow the front to be wider than the back even before allowing for the extra inch or so of the front bands. The sleeves (which I actually knit first) were a bit tight, so I went ahead and increased up to the third size. I also made them longer. The 14 inches specified in the pattern for 3/4 length is closer to elbow length on me, and didn’t look quite right. I increased to 16 inches, which gives a nice “bracelet” length.
I made the raglan decreases as intended — sleeves decreasing every 4th row at first, then every other row, and always every other row for the fronts and back. Of course, the counts didn’t match exactly, since the stitch counts were from different sizes. Also, I wanted the neckline to sit a little lower and I was concerned that the yoke might be too long — I didn’t check row tension, but it seems to be not 9 rows/inch. I ended up making the initial neckline decrease about an inch below where it would have been in the pattern, ending where it fit the best and just making some extra decreases on the last row to pull the back neck in a bit for the neckband.
The front bands are made separately and sewn on. I guess I could have knitted them with the fronts and back, which I made in one piece anyway, but I didn’t think of it in time. And anyway, making them separately meant I could make them on smaller needles. For once, I got the spacing of the buttonholes right! Stitchcraft always tells you to make the button band first, sew it on as you go, then mark the places for the buttons with büpins and make the buttonholes on the other band to correspond. It does not always work as well as you think it should.
After the button bands and the neck band were finished, and the underarm seams grafted (terribly. So terribly. I can not seem to master the Kitchener stitch no matter how it is taught), it was time for the picot trims. I thought it might be possible, and easier, to crochet them directly onto the fabric instead of making them separately and sewing them on, as the pattern indicates. I tried it on a swatch, crocheting into the horizontal bar between stitches and working into 2 of every 3 rows. That gave a good length, but also made the trim stand up straight instead of lying flat to the side as it should have. So I crocheted the trims separately and sewed them on, handily covering up the line of decreases and increases from the waist shaping in the process.
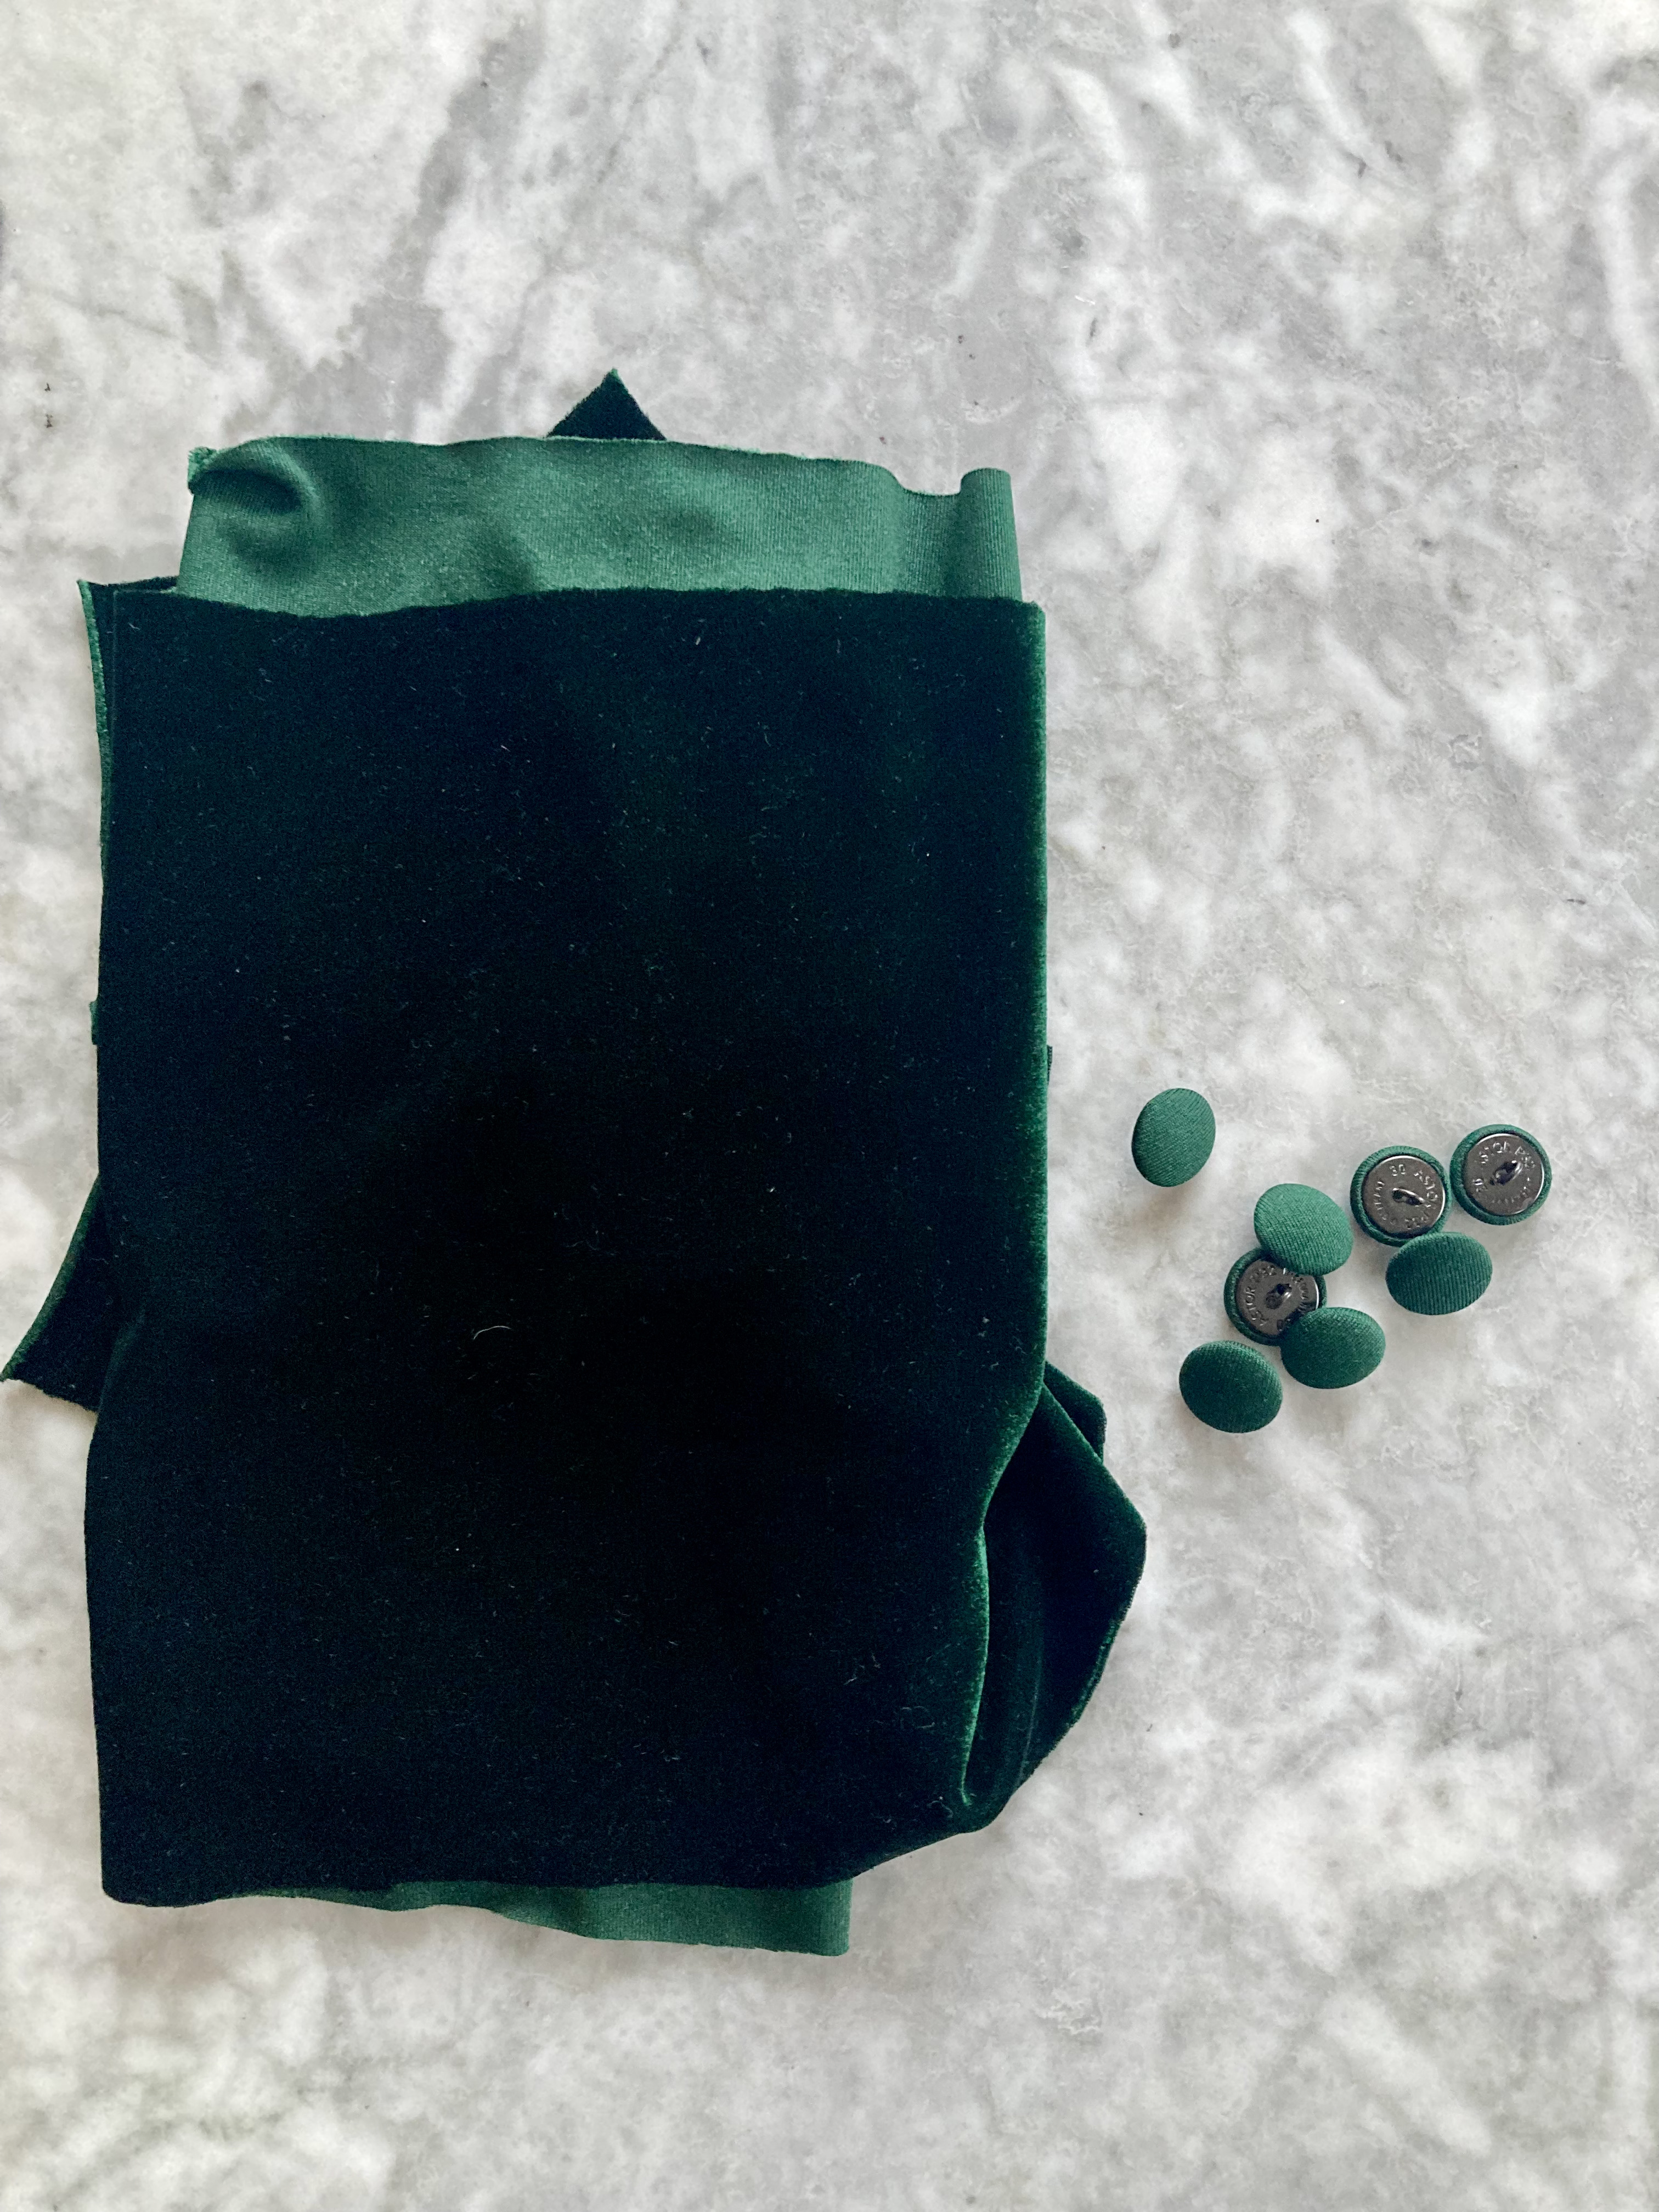
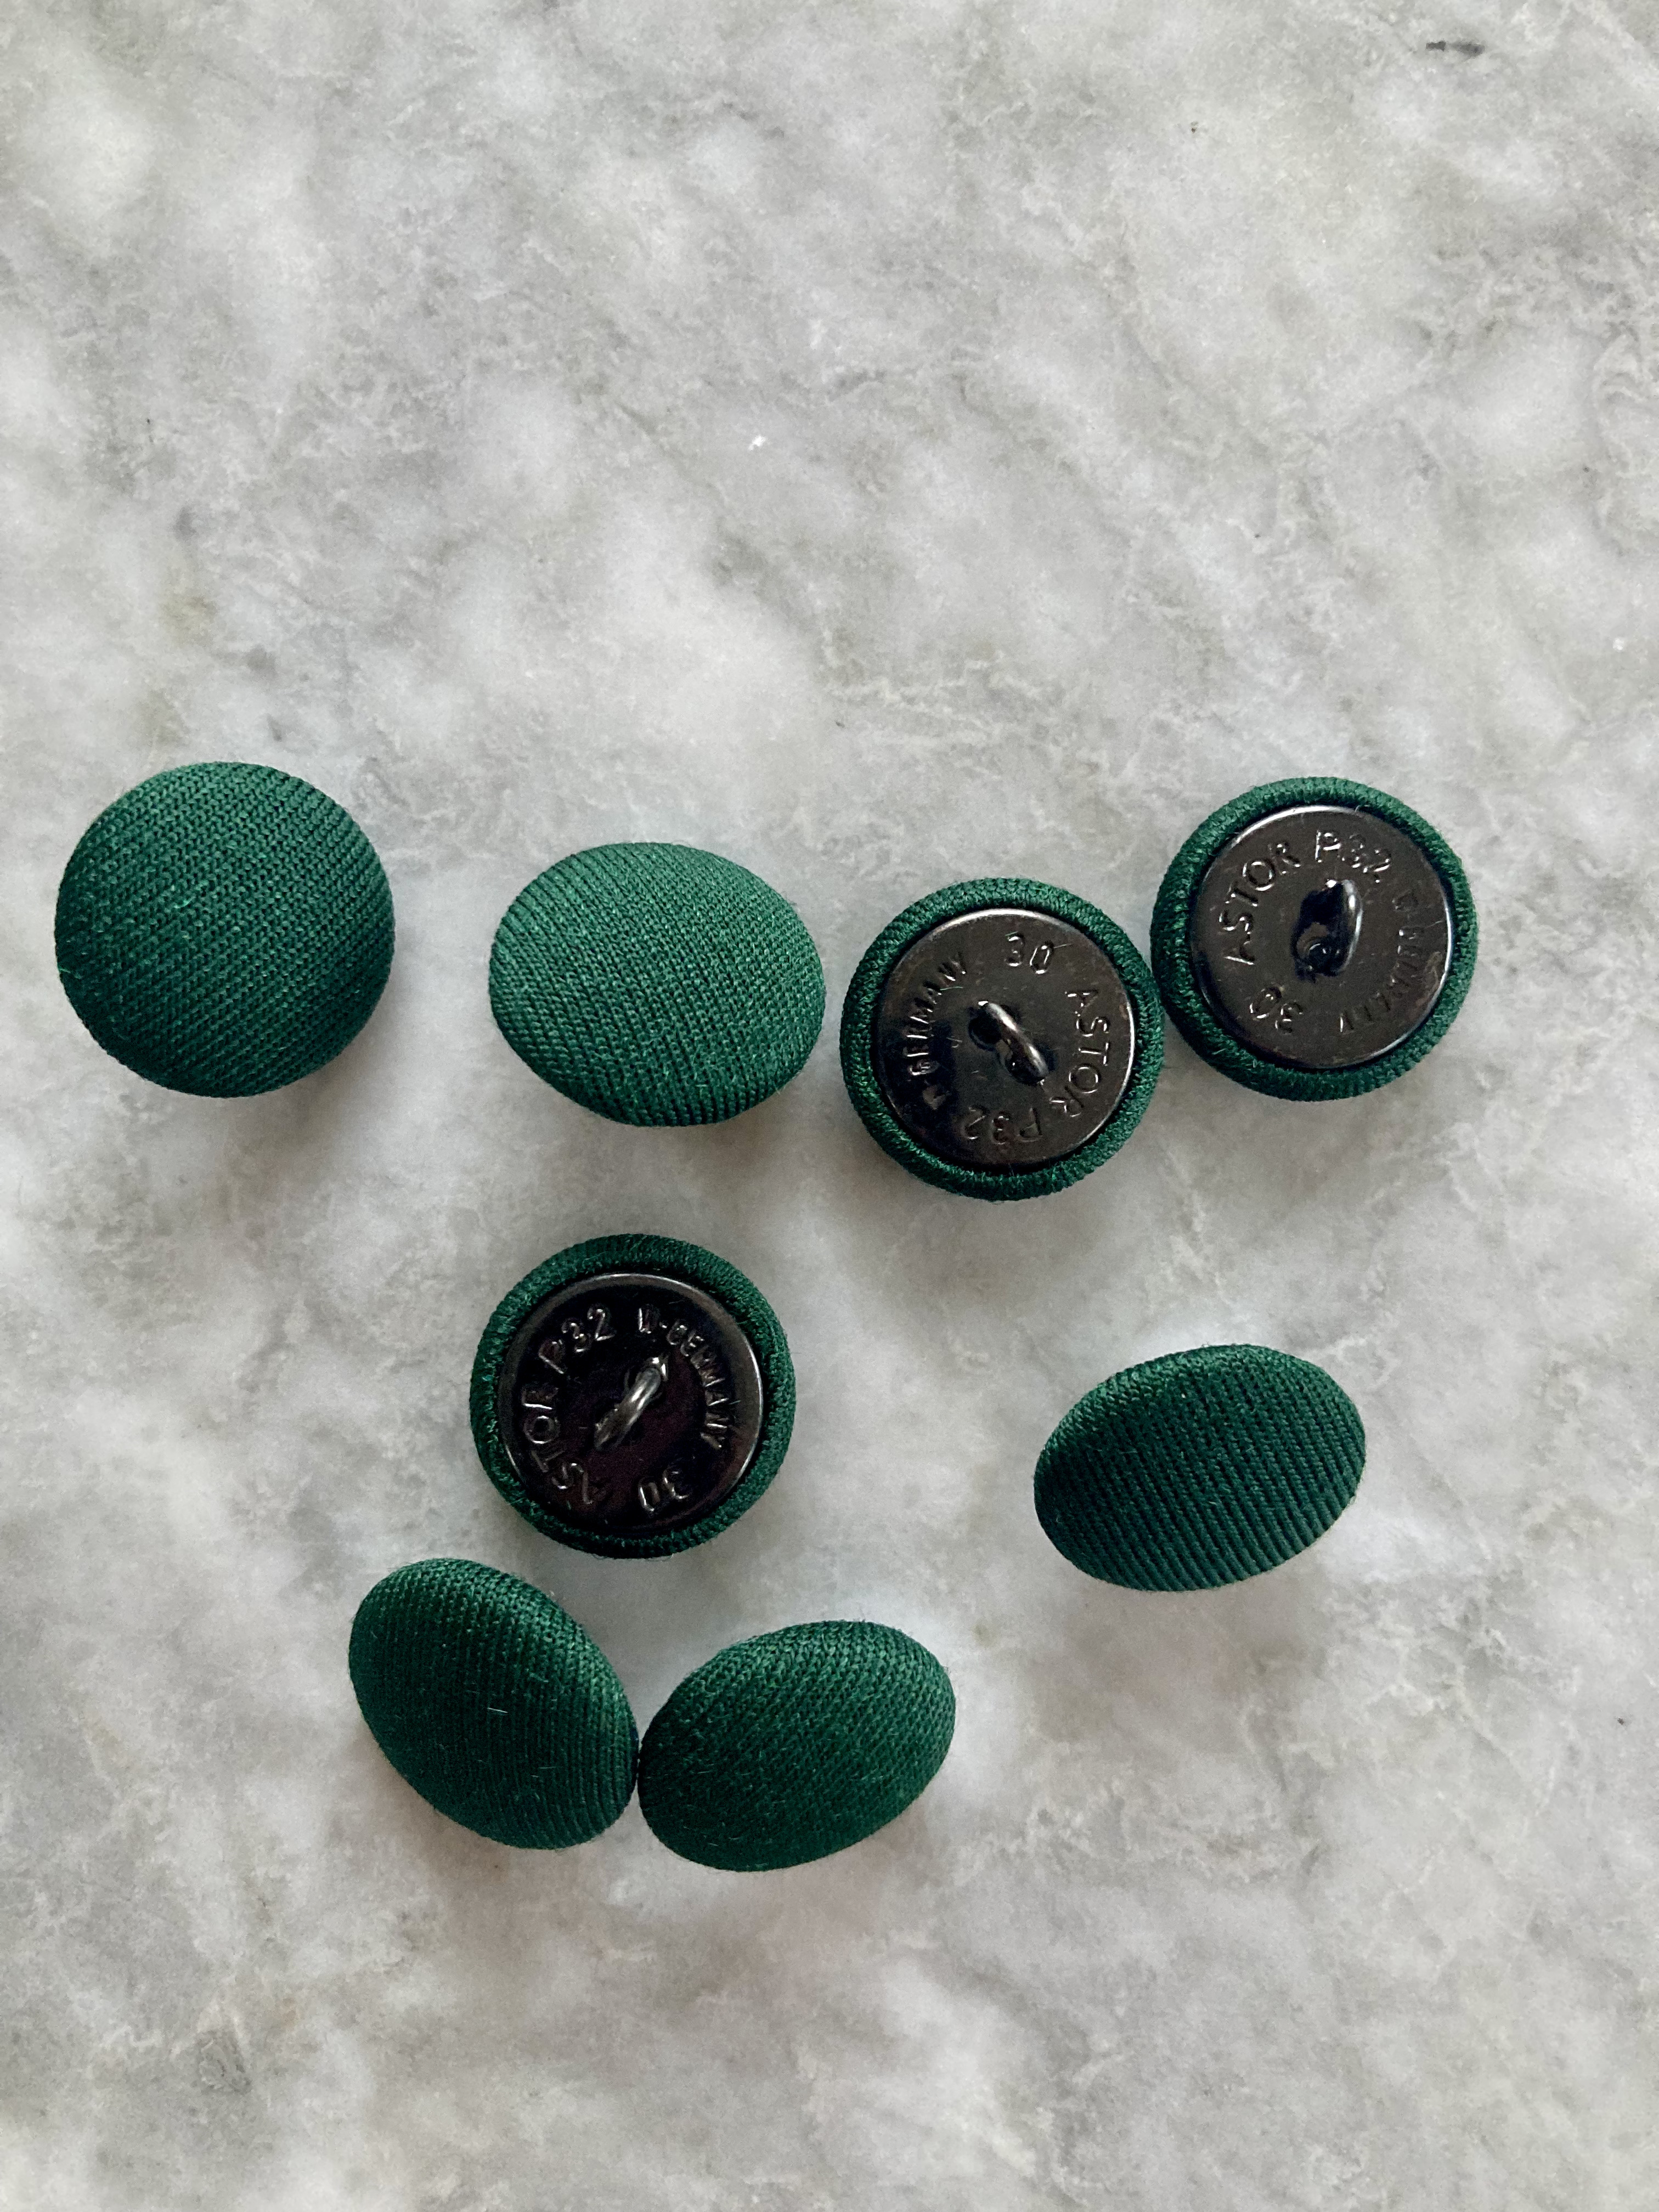
That left the buttons! Which were, strangely, the most difficult part. I wanted round, flat buttons with a back hook (not holes), as in the photo. So very 60s and in my opinion, they really make the outfit. But neither the colour of the wool (a deep, slightly blue pine green, none of the photos here really do it justice) nor the style of button seem to be in fashion. I looked at different stores, online button shops, vintage buttons on ebay… Nothing close. Luckily, my local wool/sewing shop can cover buttons with fabric if you have the right fabric. What do you know, this colour is not in fashion for fabric either! I finally found some gorgeous green stretch velvet and used the wrong side (not the velvet side) for the fabric buttons. Perfect.
In fact, everything about this project was perfect. The fit is perfect and the waist shaping worked perfectly. The sleeves blocked out to exactly long-sleeve length. The wool is wonderful, the colour is wonderful, and the finished blouse looks exactly like the photo except for the colour choice. I even managed to twist my back into almost as hard an S-curve as the model in the photo… (Rotating the finished photo helped too.)
My project from Stitchcraft’s June 1965 issue was inspired by this design for a striped orange cardigan made with “Fuzzy-Wuzzy” (3-ply angora/wool blend) yarn.
I say “inspired by” because I saw the project as a way to use up the different shades of orange wool I used in my “Shaded Blouse” project from last month, as well as the leftover pink from my “Clarel” and even a little bit of leftover orange from this lovely 1961 sleeveless top I made a few years ago. I figured I could just make narrow stripes until the first colour ran out and then see how to best finish the cardigan.
In order to do that effectively, I changed the construction from the standard bottom-up-in-flat-pieces in the pattern to a V-neck made in one piece from the top down, vertical ribbing included. That meant starting with the ribbing for the back neck, then picking up stitches across the long edge and the two short edges to make the curve, then keeping the ribbing in the dark orange colour from then on, using the same needles and two balls of wool for the two sides. It was a little tricky at first, but it was worth it to not have to play “yarn chicken” with the amount of orange needed for the ribbing at the end.
The “Fuzzy-Wuzzy” wool in the pattern is 3-ply and supposed to be knitted at 8 stitches to the inch. My wools were modern fingering/4-ply and I got a nice, even 7 stitches to the inch on 3 mm needles, so I adjusted the stitch counts, increasing up to the smallest size instead of my normal second. I remembered that this wool tended to shrink in blocking, so I wasn’t worried when it seemed generously sized — but maybe I should have been! The cardigan turned out wider than it needed to be, and if I had been able to use less yarn, I could have made the cardigan longer.
I ran out of the light peach yarn first and hardly had any dark orange left at that point, so had to buy another ball of the dark orange to finish off the ribbing (so much for the idea of using up scraps…). I expected to not want to wear or keep the finished garment, since the “cropped and boxy” look is not a great one on me. (It is, however, currently in fashion, so I figured I could sell the cardigan.) Strangely, though, I love it! It looks playful and fun and does not me look nearly as squared-off-and-put-in-a-box as I thought it would. The wool-silk-linen blend yarns and cap sleeves make it a perfect-temperature top for slightly cooler summer days.
I still have a bit of most of the yarns left over. Hat? “Shaded” mitts? Little cowl or scarf? I don’t know. I’ll edit this post if I make something matching!
Since the June 1964 issue of Stitchcraft didn’t have any projects that I really wanted to make, I thought I would share another non-Stitchcraft, non-1960s “blast from the past” project that I recently completed.
A little back story: for the last couple of years, one of the wonderful mods from the “All Things Vintage” group on Ravelry has been transcribing serial stories from 1920s newspapers and posting them, one chapter a day. She supplements them with posts of photos or postcards from the era, as well as clippings from the same newspapers with advertisements, fashion advice, and all kinds of details that give context to the stories. The stories themselves are often quite hare-brained in terms of plot (the authors had to keep readers interested through 100+ chapters, so cliffhangers and ridiculous plot twists abound) but thoroughly entertaining, and give a lot of insight into social mores and lifestyles of the time.
As you might expect, we (the group’s members) enjoy these stories immensely and add to the entertainment by guessing the outcome or the next plot twist, making insightful or humorous comments on the characters and action, or adding our own spin-off ideas to the story (one member even re-wrote a chapter in the style of a post from the popular moral-advice-seeking “AITA” subreddit.) Out of all this fun, the idea was born to have a Knit-Along / Crochet-Along relating to the current story, where participants could make an item of clothing that one of the characters might have worn, and explain how the item would fit that character’s personality.
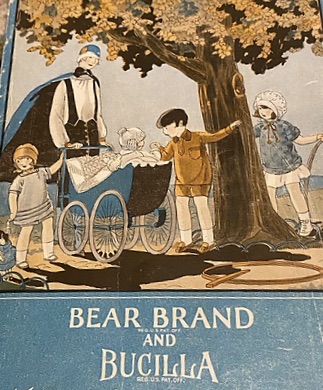
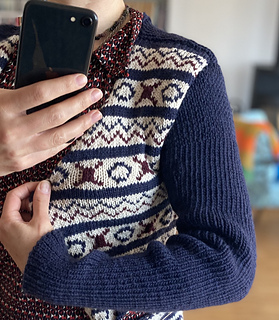
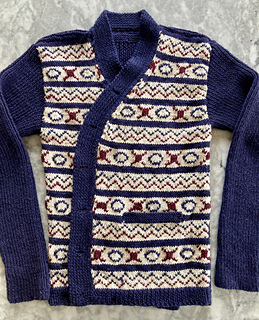
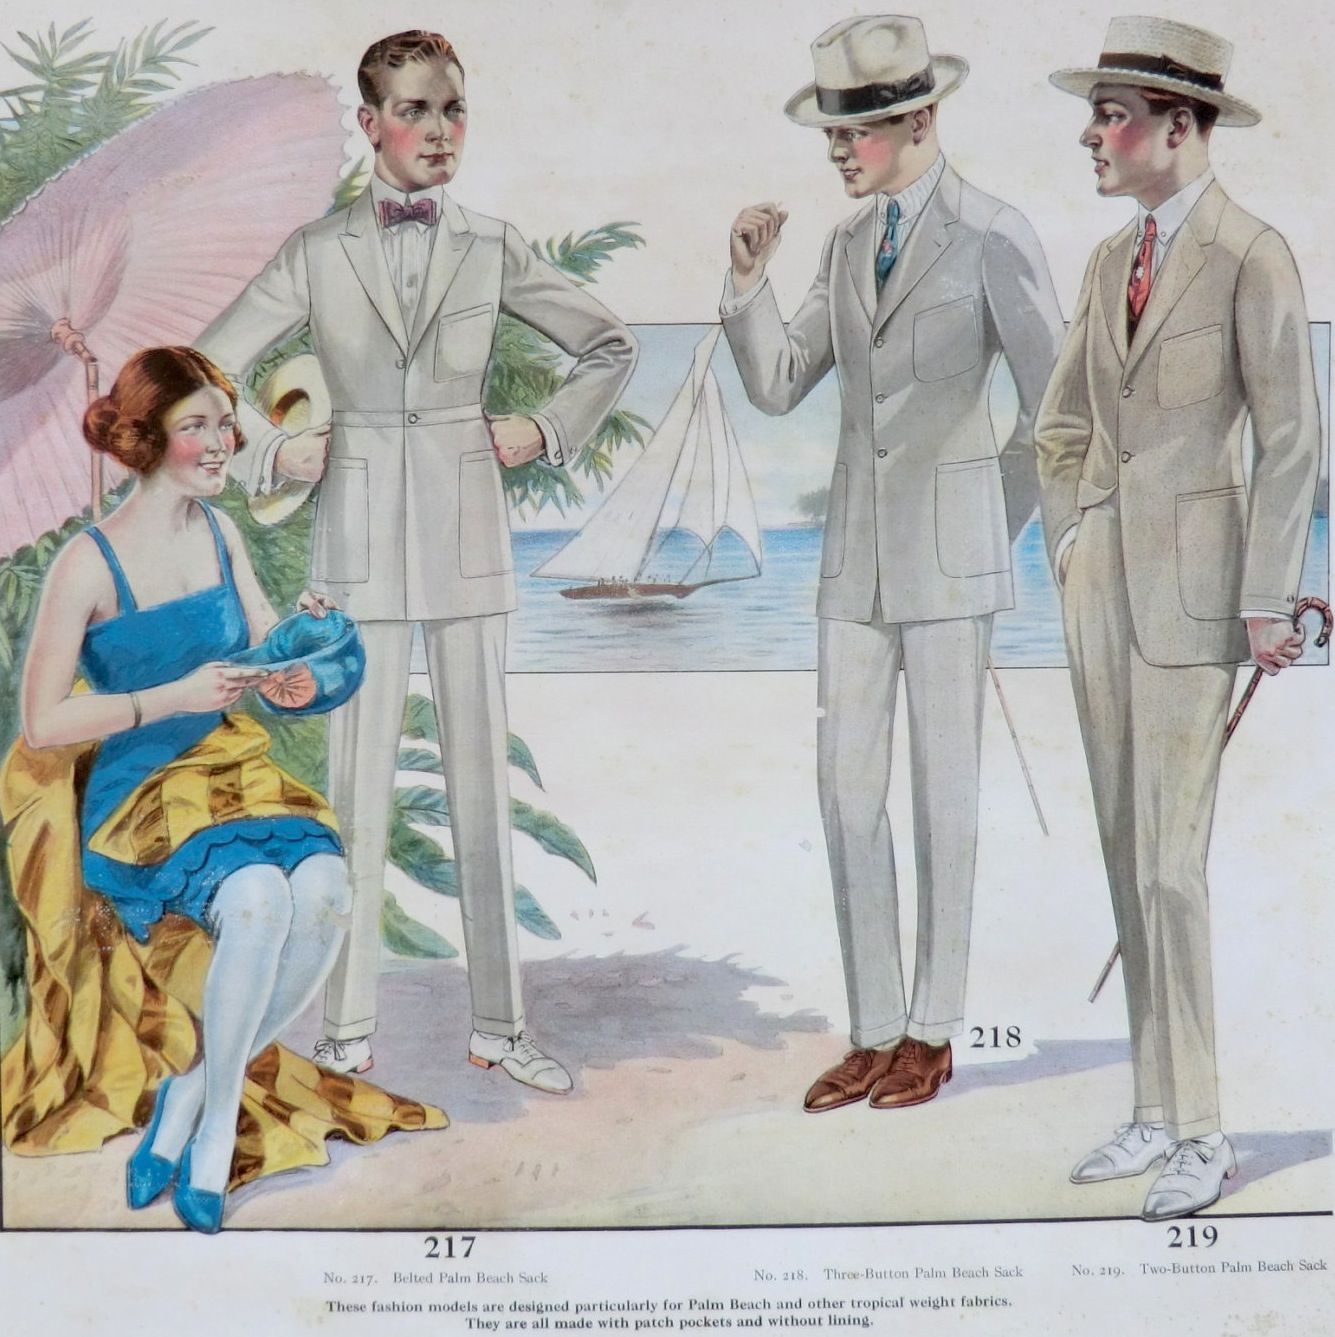
For my part, I love the stories but don’t usually knit items from the 1920s — unshaped, flowing upper-body garments make me look like I am wearing a sack. I do like the Fair Isle patterns which were enjoying a renaissance at the time, so looked for some of those, thinking I might make a slipover/vest/waistcoat for myself. Then a fellow All Things Vintage member helped me find the pattern shown above, which I knew would perfectly suit a friend of mine who is a huge 1920s fashion aficionado. Isn’t it dashing?
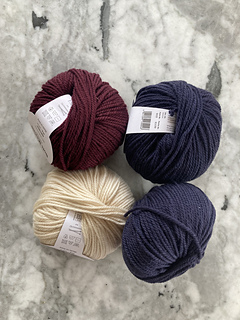
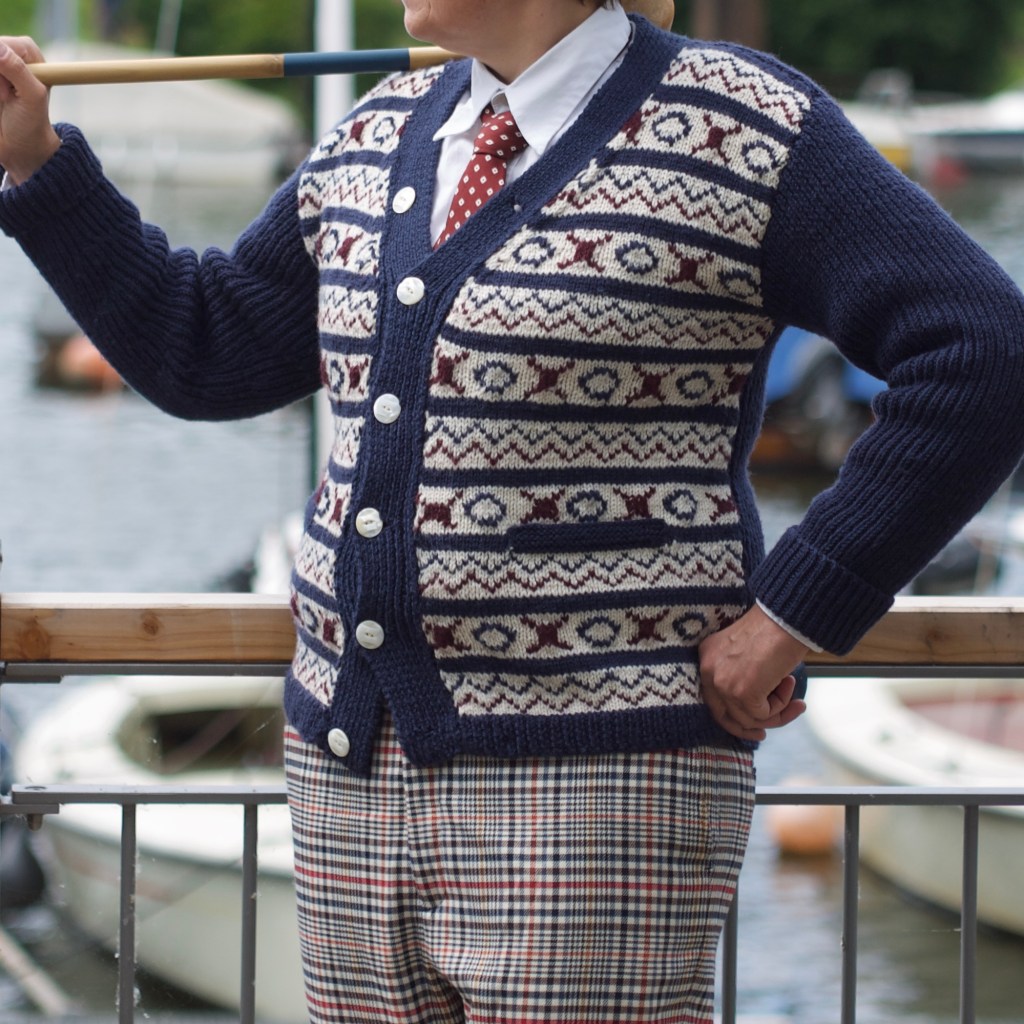
The pattern, from 1923, is written for Bear Brand Bucilla wool in stripes of fawn and brown, with additional contrast motifs in “Henna”. My friend did not want a beige and brown cardigan but did want a period-appropriate colour scheme, so we settled on navy blue and white with burgundy-red contrast, a popular “sport” combination of the time. My yarn was “Soft Merino” by Wolle Rödel, a very normal, easy-to-knit-and-care-for DK 100% wool.
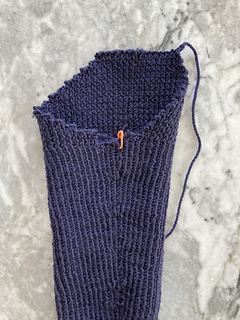
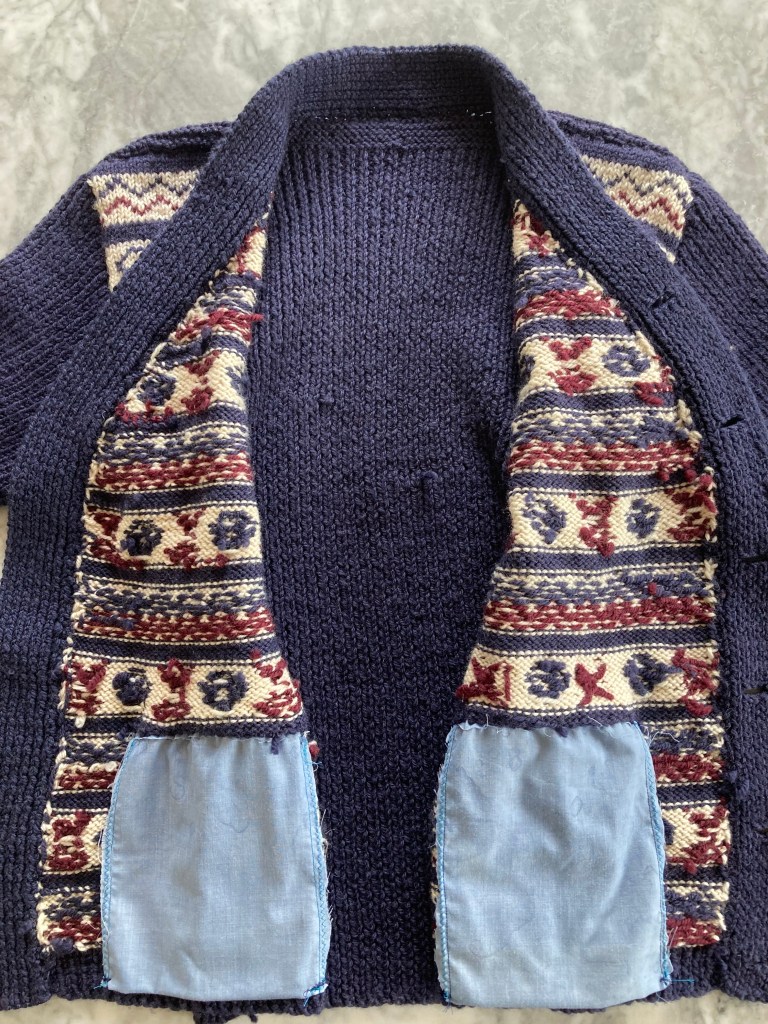
The pattern was full of surprises, starting with the back, which is knit entirely in single-colour 1×1 ribbing. It is consequently very narrow, much more so than the wearer’s back, but stretches with movement. I was convinced it would make the cardigan too tight, or make the bands gap too much in the front, but the ribbing has enough “give” that it works out perfectly with the flat-knit Fair Isle fronts. The overall effect is sleek and slim-fitting, but allows for plenty of easy movement — I can see why it was intended to be worn for playing golf or other sports with lots of upper-body movement.
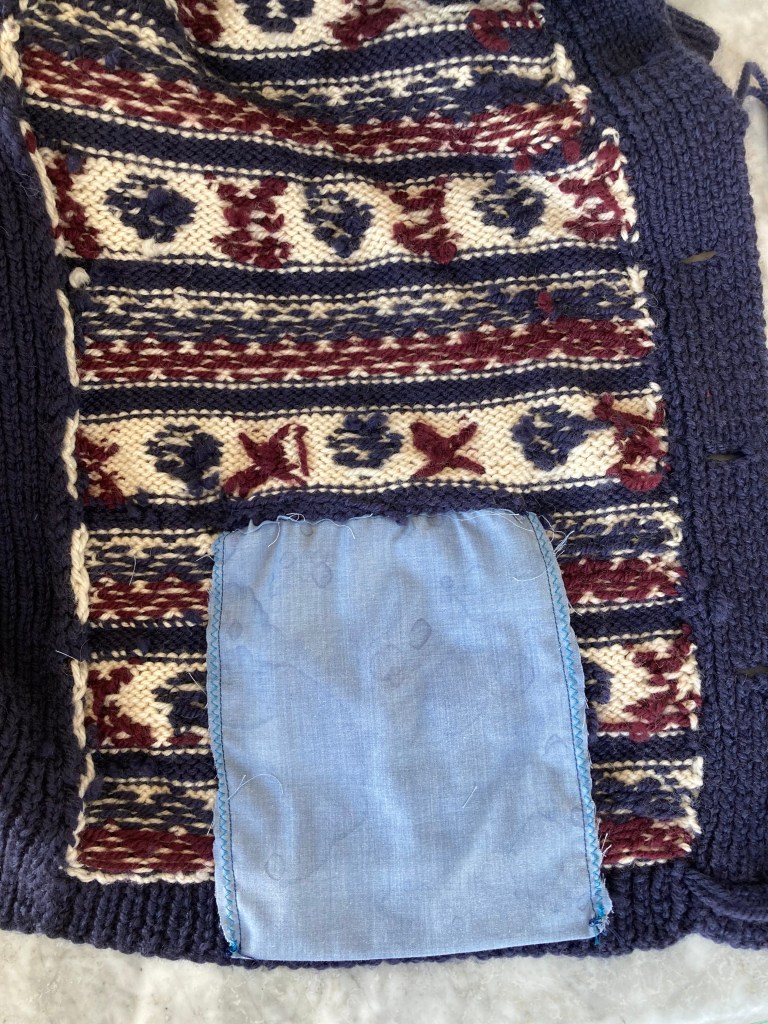
Speaking of those Fair Isle fronts, though… a closer read-through of the pattern revealed that they are not supposed to be knit in stranded Fair Isle technique. You are supposed to knit them in plain stripes and them embroider the motifs on later using Swiss darning aka duplicate stitch! I was truly flabbergasted to see that, as I had assumed the 1920s interest in stranded knitting designs extended to stranded knitting technique. Not so — in fact, as I learned, many other “Fair Isle” designs of the time were also produced via duplicate stitch embroidery.
I like embroidery on knitwear in moderation, but all the motifs on both fronts of the entire jacket was too much for my liking. I experimented with different techniques on the first couple of stripes — should I strand all three strands across the whole row (bulky and the dark colours show through the white background)? Not strand at all, but make each motif in intarsia using separate short lengths of wool (so many ends to weave in)? Strand the colour for one set of motifs across the row and embroider the other (worst of both worlds?) Interestingly, making all the motifs in intarsia technique and weaving in the ends turned out to be the least amount of effort, so that was my choice.
The sleeve cap construction was fascinating. Because the back is done entirely in ribbing and the front in flat colourwork, the front and back pieces have a naturally different shape above the armhole even though the bind-offs and decreases are symmetrical. The sleeve cap accounts for this by casting off three stitches every other row on the front-facing sleeve side and one on the back sleeve side. That made a very lopsided sleeve cap which fit perfectly into the lopsided armhole. Wow. I would never have thought of designing a sleeve cap like that, but it makes perfect sense and produces a very neat, squared-off shoulder.
For a final surprise, the pockets are not knitted, as I am familiar with from 1950s and 1960s pocketed garments, but made of “some strong fabric” and sewn in. Thinking along with the sportswear theme, that makes sense if you are going to put a heavy golf ball in your pocket — a knitted pocket would sag under the weight, but the woven fabric (I used a bit of cotton-poly ex-pillowcase from the upcycling drawer) keeps its shape nicely. The pockets were made extra large by request and it was surprisingly difficult to sew them in place, but they turned out fine.
And that was that! The story, by the way, was “The Involuntary Vamp” by Mildred K. Barbour, published in 1921 in the Washington Herald, and concerns itself with the adventures of young Diana Langley, who was “cursed” by her aunt Marjorie with the “gift” of “lure” — all the men are after her, but the only one she really wants (Stephen Dale, an older friend of the family) cannot marry her, as insanity runs in his family. So she marries another man out of spite, jumps off her honeymoon train in the southwestern U.S. desert with a different man, gets semi-kidnapped by yet another man, gets away and finds sanctuary with yet another man (and his sister) who we later find out is responsible for the whole hereditary insanity situation… or non-situation, as it turns out (did I mention that the plots of these stories are often ridiculous, but thoroughly entertaining?) and then has more adventures before being united with Stephen Dale, who is actually quite mentally healthy and was in love with her the whole time. Diana’s first-husband-out-of-spite has meanwhile conveniently died, leaving the happy couple free to marry!
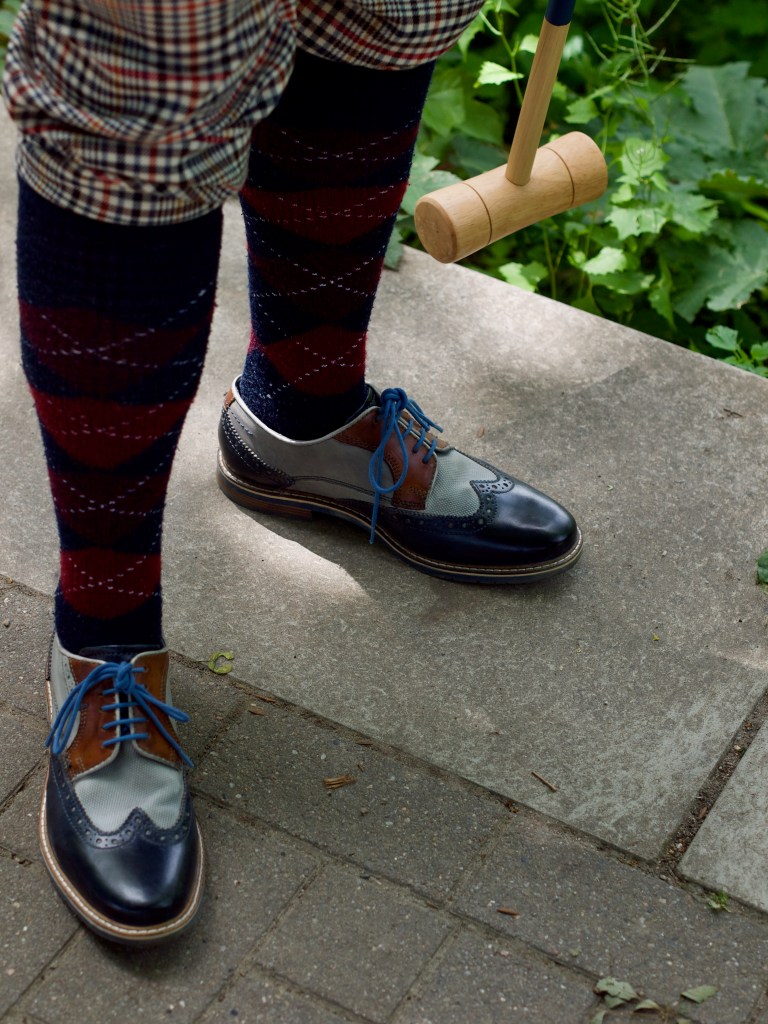
The Stephen Dale in the story is quite rich (of course), has a yacht and participates in all the usual 1920s upper-class sports, so here is my “Stephen Dale” wearing his all-purpose sport cardigan to play a round of croquet on a lovely leisurely Sunday afternoon:
There are such nice details in the cardigan, from the turned-up ribbed sleeves to the neat pocket flaps. The buttons are real mother-of-pearl, vintage buttons from the 1920s.
And with that, they boated off into the tropical sunset! May all your adventures have such a happy ending.
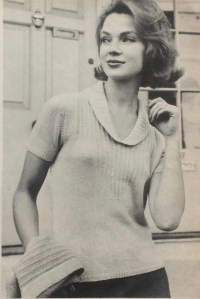
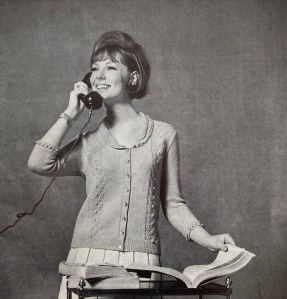
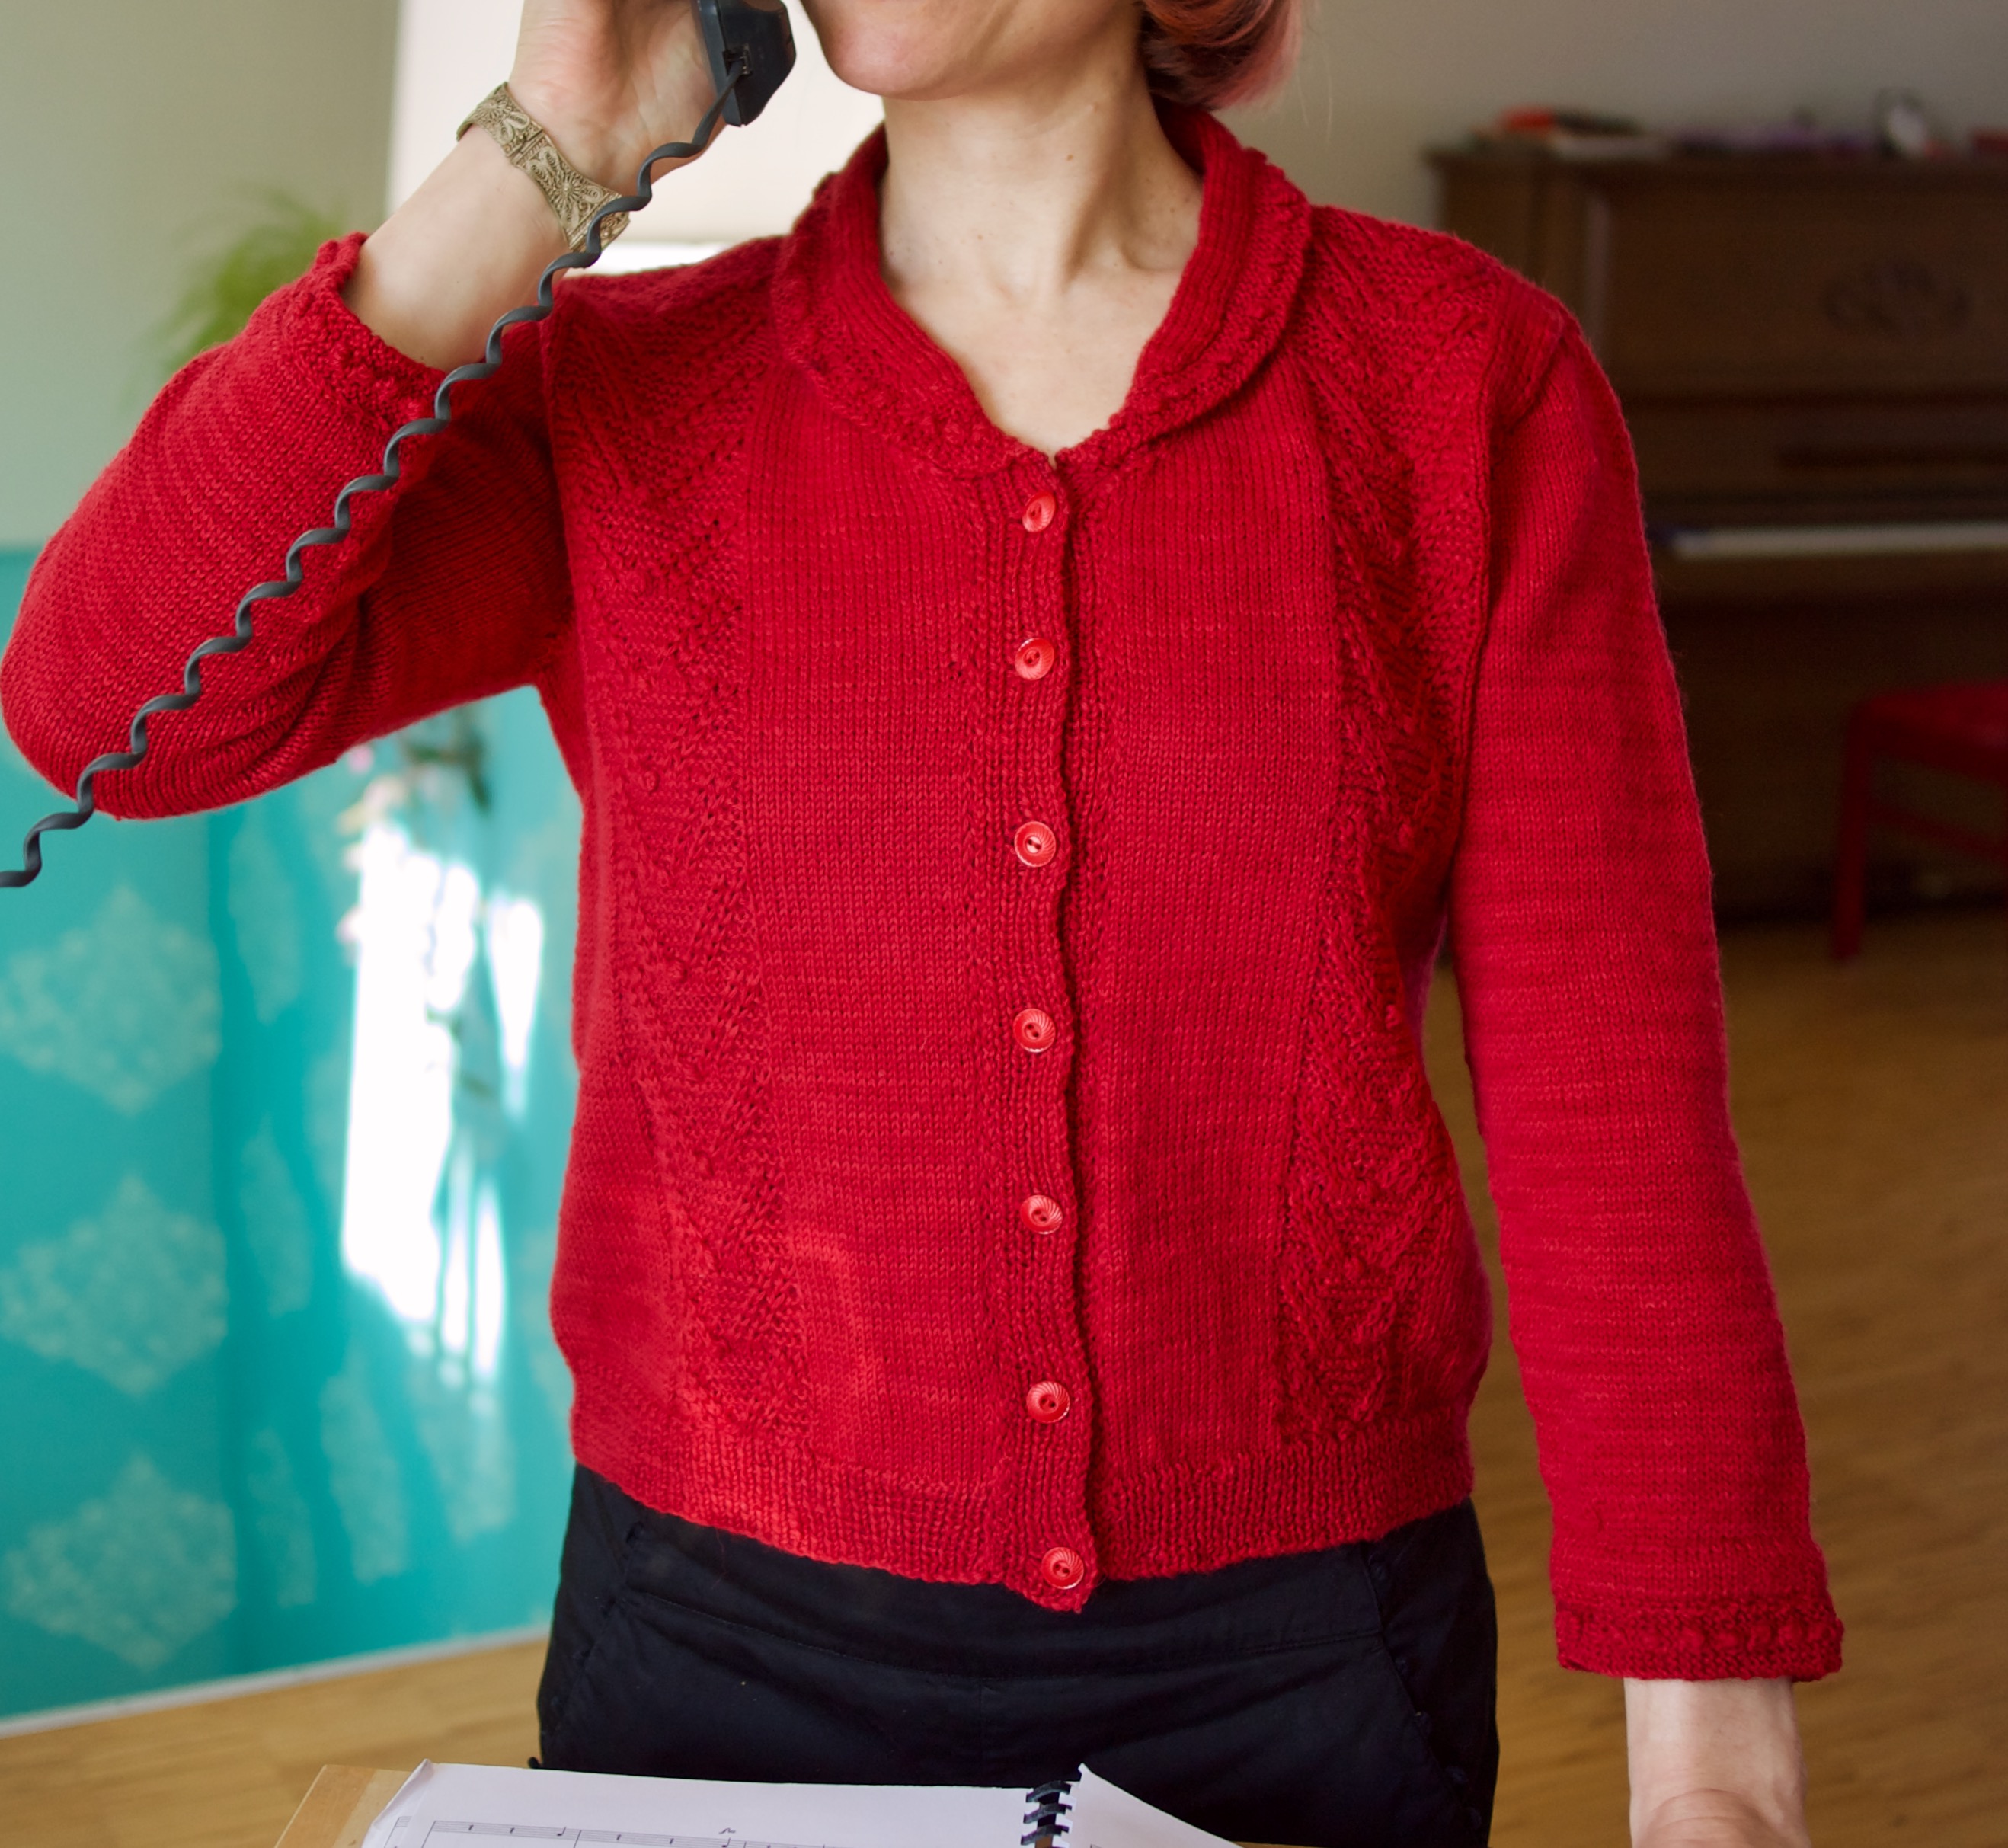
My May project was this elegant little cardigan “for warm, sunny days” with a cute, easy bobble design on the front panels and decorating the collar and sleeve borders.
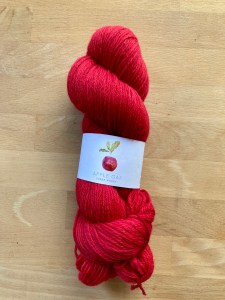
It’s actually meant as a blouse, knitted in 4-ply “Nylox” wool-synthetic blend at 7 stitches to the inch, but my version is a slight bit heavier and warmer, made with “Softwool” from the wonderful Apple Oak Fibre Works, whose production site / shop I was lucky enough to be able to visit in Ireland a few months ago. It is an amazing, all-natural plant-based dyeing company with a completely circular, no-waste production system. They even grow their own dye plants. The “Softwool” that I bought is dyed with cochineal for a bright cherry red colour and otherwise untreated (not superwash).
My swatch gave me 6.5 stitches to the inch, so I calculated it out with the pattern to make the second size (intended for 34-35 bust at 7 sts/inch, I am a bit bigger than that.) I started with the sleeves, to check that the modified gauge actually worked, and it did, but the body (which I made in one piece up to the armholes to save time and increase symmetry) was more complicated. I measured after a few inches and seem to be getting 7 stitches per inch, but at the same time, it was way too wide when I measured it. I trusted the gauge and kept going, and it turned out fine. Strange!
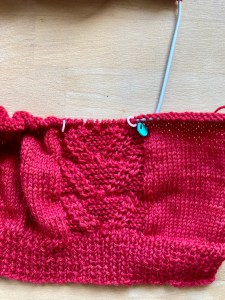
The bobble pattern is cute — two rows of twisted stitches “grow” out from a bobble made on the first row of the 12-row pattern. I don’t make bobble patterns much, but if I do, the only technique I knew until now was to knit 5 (or more) stitches in the back and front of one stitch, then cast those stitches off. This pattern says to
K into next st, turn and cast on 4, then k. into back of each of these 5 sts., cast off 4.
I couldn’t make that work and look nice! The bobble was floppy and the turning and casting on was awkward. After the first two, I used my method, which used the same number of stitches and looks fine.
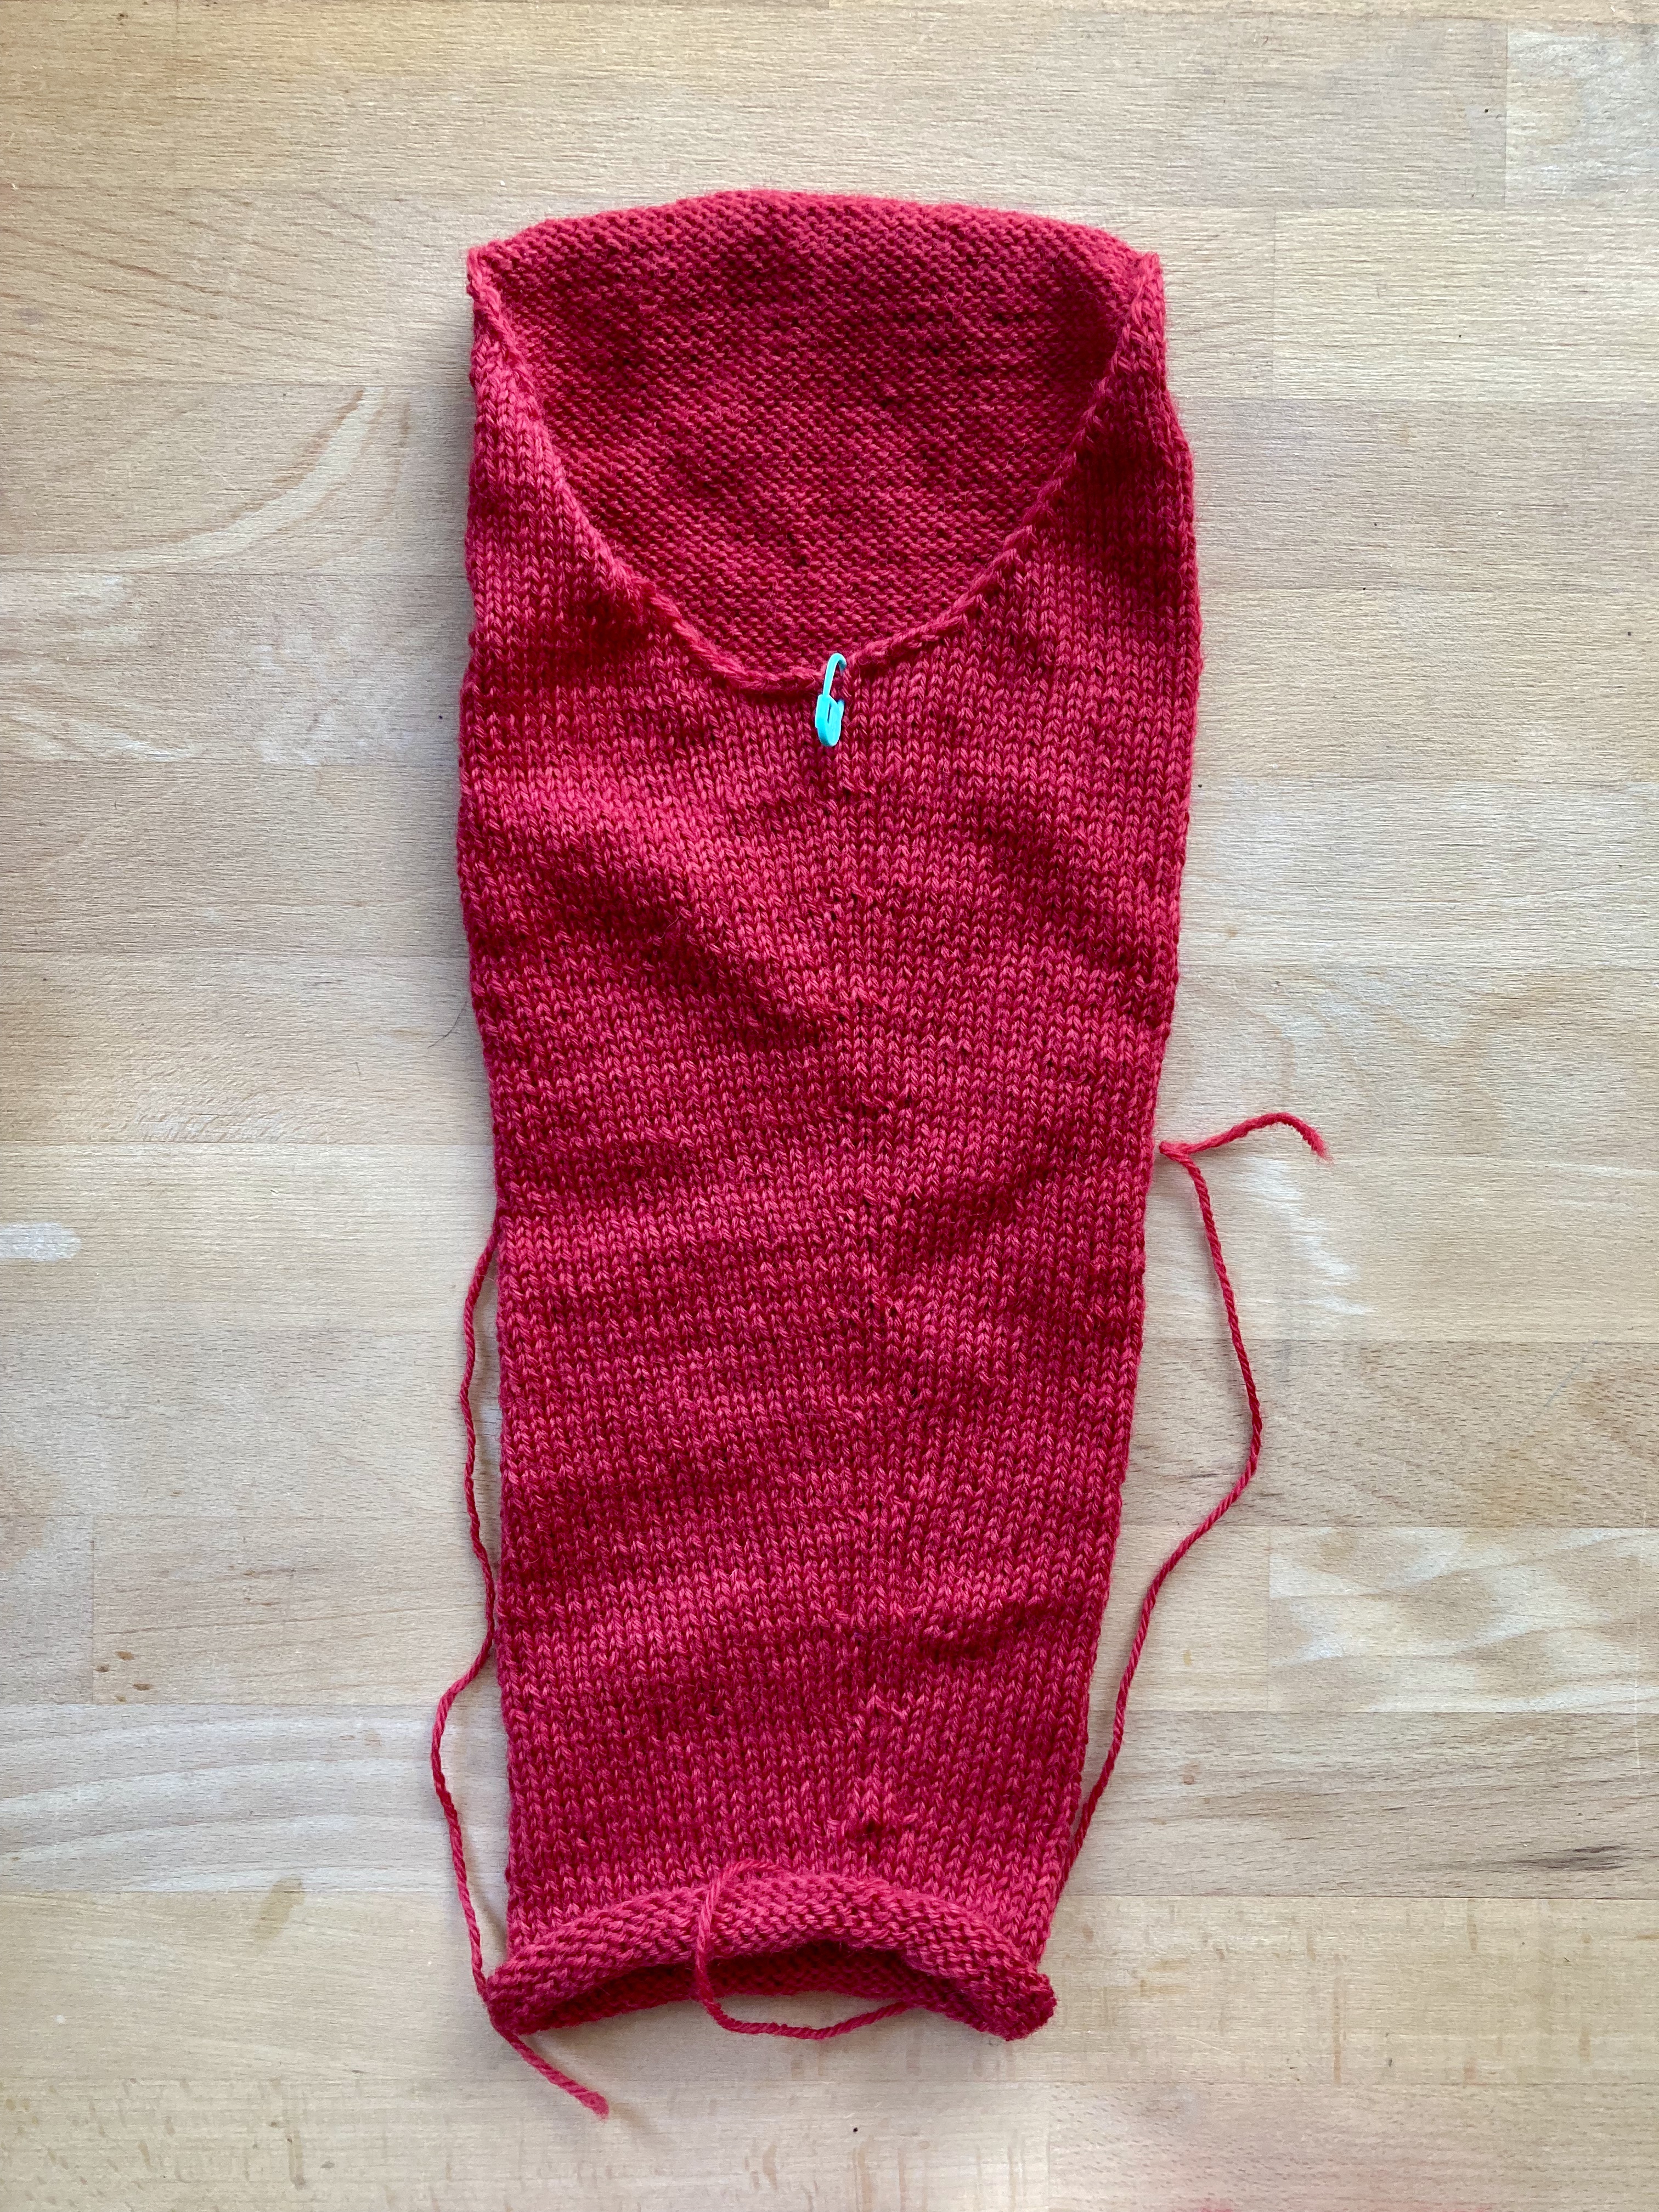
The 3/4 length sleeves are finished off with a strip of bobble pattern. The collar was quite tricky. I like a collar which is picked up around the neckline and knitted on. This one is sewn as a separate piece (in very curly stockinette stitch), then you make another separate collar border piece with the bobble strip pattern from the sleeve edgings, then sew border and main piece together and sew that on. It was not easy to make it come out right and have it sit properly flat, but blocking helped a lot and in the end, it was fine.
I have an event on June 18th for which we are supposed to wear red, and I hardly have any red clothing, so I worked hard to get this cardigan finished in time and got it done a week early!
As always, we had fun re-creating the booklet photo. My telephone has a more modern shape, but it is old enough to still have a cord. What doesn’t exist at all any more are telephone books, so I substituted some thicker music scores.
I’m really happy with the way this turned out and will look forward to wearing it a lot. The only thing I might do is add some facing ribbon to the buttonhole bands to keep them from stretching.
This has nothing to do with Stitchcraft, neither is it vintage, but I had a design published in a brand-new magazine and just wanted to share that with all of you.
The Valiant Tailoress takes its name from the Grimm Brothers’ fairy tale “The Valiant Tailor” (or “the Gallant Tailor” or “Brave Little Tailor”, original title Das tapfere Schneiderlein) and combines sewing, knitting and crochet to create outfits that look great together. The theme of the first edition is “The Enchanted Forest” and was, fittingly, photographed in the beautiful Black Forest area of Germany.
I hesitate to call it a “magazine” because it is really a book — 260 pages long on glossy paper, with articles on unusual fibres, traditional hat-making, different techniques for lining a sleeveless dress, and pages and pages of gorgeous photos. Seriously, even if you don’t knit, crochet or sew, you could use it as a coffee-table book — it’s that beautiful. The knit/crochet patterns are excellently tech edited with full charts, schematics etc. and the sewing patterns are printed on real paper.
My design was a long, lacy cardigan called “Lemon Leaves” and was paired perfectly with a floral bustier dress.
As an only semi-professional designer (I’ve had one other pattern published until now, a stranded tam and mitts set in Knit Now magazine), I was really honoured that my design was chosen to be part of this project. And I love the idea of combining sewing and knitting/crochet in one publication! In a way it does tie back to vintage publications like Stitchcraft that combined knitting and crochet with embroidery, tapestry, rug-making, etc.
The Valiant Tailoress is available to purchase in print form from their website, www.valiant-tailoress.com. It’s published in Switzerland (in English) and can be shipped around the world.
It was very difficult to get a project going this month. The October 1962 issue of Stitchcraft didn’t have any designs that interested me and I had been trying to finish up some larger, non-vintage projects in time for the cold-weather season. But inspiration came from a good friend of mine, who politely reminded me that, way back when I made this “charming blouse”, I had casually offered to knit one for her if she ever wanted one, and wouldn’t this be a good time to make it for her? I agreed! So this month’s project echoed the one I made then. Here are photos from that issue and the finished project:
The original blouse, from the July 1960 issue, was designed for “larger”, curvier figures (37-38 or 39-41 inch bust) and featured horizontal bust darts, which was very unusual for knitting patterns of the time. I was intrigued to see how the bust darts would turn out, since I don’t usually make them on garments for myself. As I probably could have guessed, the bust darts were not only unnecessary for me, but actually negatively impacted the fit — since I am not busty enough to fill out the darts, the front of the blouse was too long compared to the back. That didn’t particularly bother me, but I did note it for future projects.
My friend has a more suitable figure for this design, and her version turned out even better. I used the same wool (Juniper Moon Farm Herriot Fine) in a lovely tweedy green colour, and (by request) without a collar or contrasting colour bands along the front.
It turned out perfectly and we were both very happy with the result. Since we’re not meeting indoors and it was still too cold for her to wear just a blouse outside (even a warm knitted one), I’ve only got her selfies for now, so I’m sorry if it’s hard to tell what the finished product looks like. When it’s warm enough to do a socially distanced outdoor photo shoot, we can hopefully get some better photos! According to her it fits perfectly, and it’s obviously a fantastic colour for her.
My friend, by the way, is the wonderful opera and concert singer Andrea Lauren Brown. We have all been out of work for a solid year now due to the pandemic, but you can definitely still buy her CDs, which I heartily recommend to all of you who love classical music. Seriously, she’s amazing.
My April project was the cardigan jacket, a.k.a. “matinee coat” from Stitchcraft’s April 1962 layette set “for an Easter baby.” The set included a dress, the jacket, bootees, a bonnet and a blanket to use as a pram cover, plus a sewn “pin-tidy” made out of a tiny baby doll with flannel and satin “skirts” to hold the safety pins for baby’s cloth nappies. The pin-tidy is a bit “uncanny valley” for my taste, but the knitted items are all lovely.
My knitting group has a gift exchange game every December and my prize this last year was 100 grams of Opal “Beautiful World” 4-ply sock yarn, 75% wool, 25% polyamide, multicoloured. I don’t like multicoloured yarns, but hey, a gift is a gift and I knew I would find a use for it! Sock yarn works well for baby things, being washable and non-felting, and 100 grams was the perfect amount for the jacket. The colour is unusually dark for a baby garment, but I don’t this the friend whose baby-to-be I knit it for will mind — they wear a lot of black themselves. (Side note: I did make an all-black baby cardigan for a black-clothed metal fan father-to-be friend once, and he was thrilled, because he knew he would never find one in a store. Take note, baby clothing designers — there is a market out there!)
The construction is a simple dolman, made in pieces from the bottom up with cast-on sleeves. The button band is made with a slip-stitch hem and the stitch pattern in the lower part is an easy broken welt:
Row 1: (RS) knit
Row 2: *k2, p 6* to last 2 sts, k2
Rows 3 and 4: knit
I even found seven buttons — one extra! — in my stash that fit the buttonholes and the style really well (my local stores are still closed).
My only worry is that the neck is too tight. It looks awfully small. Of course, they can just leave the top button open if they have to.
The baby will arrive in June and I will “see” my friend next week (i.e. non-contact delivery of present, perhaps we will literally see each other through a window or something). I hope everything works out for them as well as this project did for me!
There’s always somebody having a baby, and I do try to make something nice for all my friends’ and colleagues’ newborns. Sometimes I don’t manage to finish something until they are out of the newborn stage, which is why it’s nice to have patterns for larger babies! This dolman-sleeve cardigan, made in the smaller size, should fit a 22 inch chest, which should be fine for this particular eight- or nine-month old.
I wasn’t and am not convinced that dolman sleeves are good for babies or anyone else (so much fabric flappage) and originally I thought about converting the pattern to set-in sleeves, but in the end I was just too lazy, so dolman sleeves it was. I guess it does have the advantage of being wide enough no matter what, and easy to get the baby’s arms into the sleeves. Given that, I’m surprised it’s so short! If it were made longer, it would fit longer without the baby getting a cold belly.
The little leaf motifs up the front sides are quite easy and don’t require any cabling or special fuss. You just work into one stitch 5 times on one row, then work those 5 stitches in stockinette (on the reverse-stockinette background) for a few rows before closing off the leaf with decreases. The lace strips on the sides are plain yo, k2tog alternating with k2tog tbl, yo, worked on the right-side rows.
I used Jamieson’s wonderful Shetland Spindrift from a multicoloured stash that I had bought from a nice person on Ravelry. Some may say that Shetland wool is too tough for babies, but it does get softer with washing and since it won’t be worn against the skin, I think it will be fine. The colour — Buttermilk — is really beautiful, a pale yellow ever-so-slightly marled with shades of pink and winter white.
If I remember correctly, the buttons came from a Christmas fair somewhere some years ago and hadn’t found the right garment yet. I only had three and the pattern calls for five, but I preferred the buttons I had to any new ones I might find.
All in all, a quick and easy project that will hopefully keep the baby warm and make its parents happy.
I do have a project from the May 1961 issue and will post about it soon, but it won’t be done by the end of May. In the meantime, I made a very cute coat for a friend’s child from the January 1976 issue of Stitchcraft, using the leftover yarn from the red and blue dress I finished last month.
The pattern — “Fashion for Tots” — encompasses a single-breasted coat with patch pockets and a collar in contrasting trim, and a pixie hat with the contrast colour in the ribbing. The coat has an A-line shape and raglan sleeves and is given in three sizes, to fit a 22-23, 24-25 or 26-27 inch chest measurement. I made the smallest size, for a two-year-old with a 21 1/2 inch chest, so hopefully it will fit for a while even if it doesn’t get used very much in the summer.
As usual, you’re supposed to make everything in separate pieces, and for once, I almost did! That is to say, I made the back, fronts and sleeves up to the raglan underarm join in pieces, then made the raglan yoke all in one piece working back and forth. Sewn raglans always look so messy (when I make them…), so it was worth it for that, and making the rest in pieces gave the sides some stabilising seams and didn’t take any longer than making the body in one piece working back and forth would have done.
The coat has a cute mitred hem at the bottom, which makes a neat join into the button bands. The collar and pockets are made separately and sewn on, and the collar has an interesting two-piece mitred construction to get the two different colours to make clean corners. The pockets are in twisted mock-cable rib.
I noticed that it wasn’t quite going to work out with the total amount of yarn in the proper colour scheme, so I played with the amounts of red and blue and ended up just perfectly using up the rest of the red with a few metres left over should the coat ever need repairing. Of course, that meant I couldn’t make the hat. The project was fast and fun, though, so who knows, maybe I’ll make another one when January 1967… wait, when will that be again… January 2025 ?!? comes around. If we’re all still here! Hang in there and stick around.
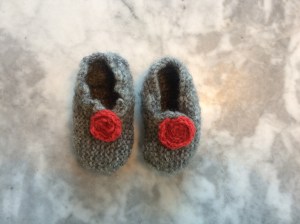
After January’s time- and labor-intensive pullover for me, I wanted to make something quick and easy in February. And there’s always a friend, colleague, or relative having a baby, so I made this simple ” Tiny Cardigan” from the cardigan and slipper set.
The wool was Lang Nova, a wonderfully fluffy and very light wool-camelhair-nylon mix. There are 180 metres in 25 grams! It is essentially made of air, but softer and warmer. I suspect it is not very hard-wearing and probably pills and breaks easily, but babies grow so fast that it will hopefully be outgrown by the time it falls apart. My swatch grew exponentially with blocking, so I converted the pattern to a larger gauge. Then the finished garment didn’t grow much at all with blocking, so it ended up more like newborn size. I hope the parents send out a birth announcement as soon as the baby arrives…
The cardigan has a basic bottom-up raglan construction with the twisted ribbing featured in January’s Snowflake Sweater. I made it in one piece from the bottom up to avoid seams, and was so busy trying to read the front, back, and sleeve directions simultaneously while working the yoke that I forgot to make the little twisted-rib sleeve insertions that would have made this otherwise very basic jacket a little bit more interesting. Whoops! But by the time I realised my mistake, it was already almost done, and I have a feeling this wool really does not like to be frogged. I pepped up the plain marble-grey colour of the jacket with some red flower buttons.
And there it is! I had to buy a second skein of wool to finish the cardigan and now have some left over, so I might as well make the slippers, seeing as the baby hasn’t arrived yet.
ETA: I went ahead and made the slippers, adding a flat spiral of red i-cord instead of a pom-pom.


 My April project was the cardigan jacket, a.k.a. “matinee coat” from Stitchcraft’s April 1962 layette set “for an Easter baby.” The set included a dress, the jacket, bootees, a bonnet and a blanket to use as a pram cover, plus a sewn “pin-tidy” made out of a tiny baby doll with flannel and satin “skirts” to hold the safety pins for baby’s cloth nappies. The pin-tidy is a bit “uncanny valley” for my taste, but the knitted items are all lovely.
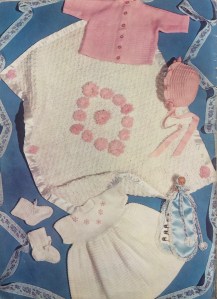 The colour is unusually dark for a baby garment, but I don’t this the friend whose baby-to-be I knit it for will mind — they wear a lot of black themselves. (Side note: I did make an all-black baby cardigan for a black-clothed metal fan father-to-be friend once, and he was thrilled, because he knew he would never find one in a store. Take note, baby clothing designers — there is a market out there!)
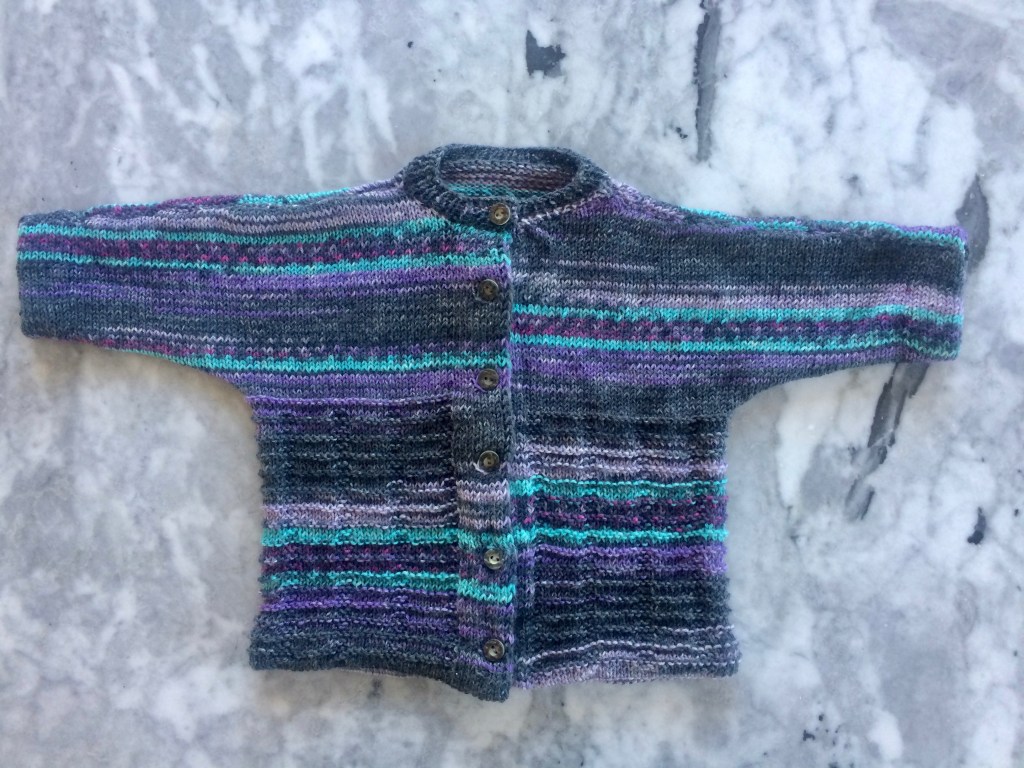
 There’s always somebody having a baby, and I do try to make something nice for all my friends’ and colleagues’ newborns. Sometimes I don’t manage to finish something until they are out of the newborn stage, which is why it’s nice to have patterns for larger babies! This dolman-sleeve cardigan, made in the smaller size, should fit a 22 inch chest, which should be fine for this particular eight- or nine-month old.
 The little leaf motifs up the front sides are quite easy and don’t require any cabling or special fuss. You just work into one stitch 5 times on one row, then work those 5 stitches in stockinette (on the reverse-stockinette background) for a few rows before closing off the leaf with decreases. The lace strips on the sides are plain yo, k2tog alternating with k2tog tbl, yo, worked on the right-side rows.
 I used Jamieson’s wonderful Shetland Spindrift from a multicoloured stash that I had bought from a nice person on Ravelry. Some may say that Shetland wool is too tough for babies, but it does get softer with washing and since it won’t be worn against the skin, I think it will be fine. The colour — Buttermilk — is really beautiful, a pale yellow ever-so-slightly marled with shades of pink and winter white.
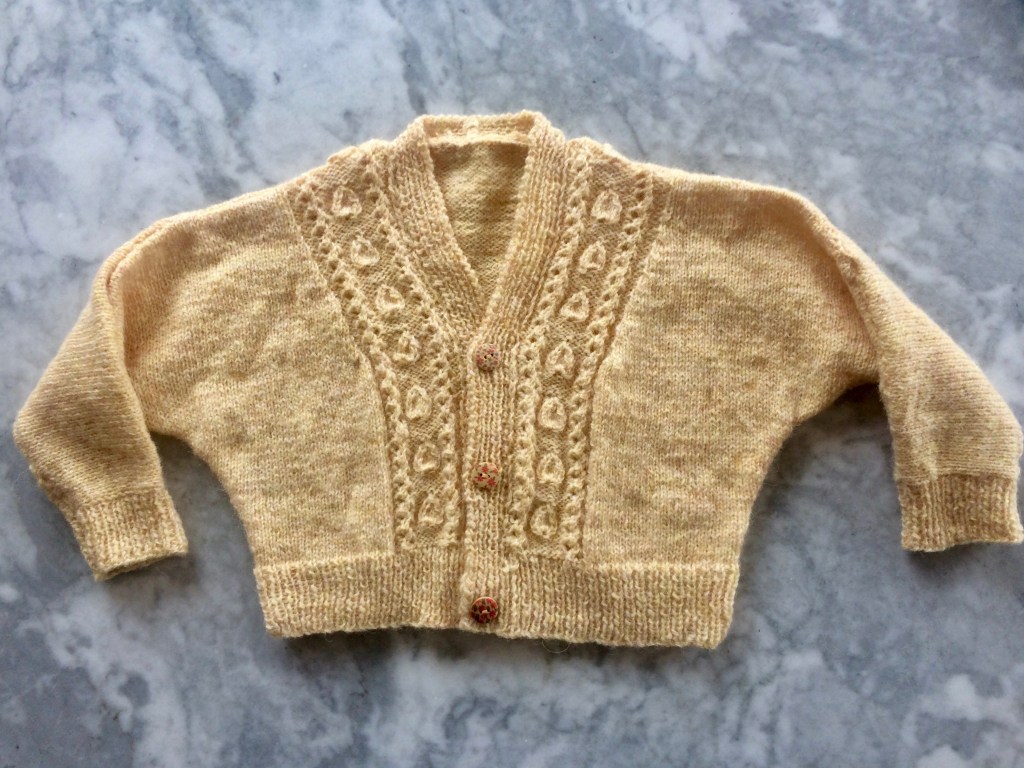
 I do have a project from the May 1961 issue and will post about it soon, but it won’t be done by the end of May. In the meantime, I made a very cute coat for a friend’s child from the January 1976 issue of Stitchcraft, using the leftover yarn from the
 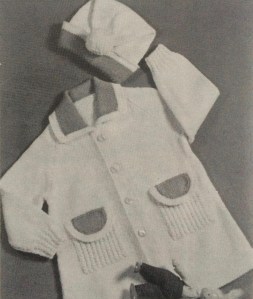 As usual, you’re supposed to make everything in separate pieces, and for once, I almost did! That is to say, I made the back, fronts and sleeves up to the raglan underarm join in pieces, then made the raglan yoke all in one piece working back and forth. Sewn raglans always look so messy (when I make them…), so it was worth it for that, and making the rest in pieces gave the sides some stabilising seams and didn’t take any longer than making the body in one piece working back and forth would have done.
 I noticed that it wasn’t quite going to work out with the total amount of yarn in the proper colour scheme, so I played with the amounts of red and blue and ended up just perfectly using up the rest of the red with a few metres left over should the coat ever need repairing. Of course, that meant I couldn’t make the hat. The project was fast and fun, though, so who knows, maybe I’ll make another one when January 1967… wait, when will that be again… January 2025 ?!? comes around. If we’re all still here! Hang in there and stick around.
 After January’s time- and labor-intensive pullover for me, I wanted to make something quick and easy in February. And there’s always a friend, colleague, or relative having a baby, so I made this simple ” Tiny Cardigan” from the cardigan and slipper set.
 The cardigan has a basic bottom-up raglan construction with the twisted ribbing featured in January’s