 “Easter Greetings” from Stitchcraft, April 1962! According to “editress” Patience Horne, “everyone is getting that “out-of-doors” feeling”. I and my fellow compatriots from 2020 have had a very much in-doors feeling for the last few weeks, as we watch Spring unfold from our quarantine windows.
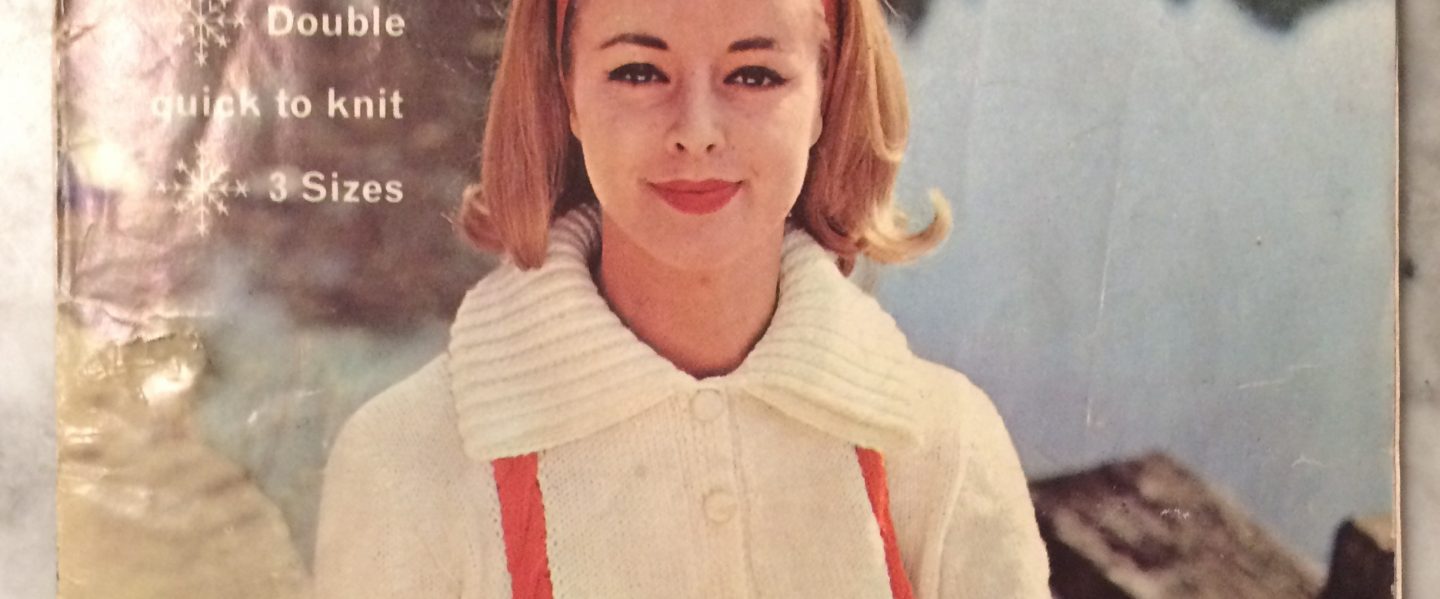
Back in 1962, the whole family can sport matching waffle-stitch pullovers and cardigan jackets for those inevitable country rambles. All three cover-photo designs are made in bulky Big Ben wool at 3 1/2 stitches to the inch. Those who prefer double-knitting weight wool can make a men’s pullover in “slip-on shirt style for sailing and tennis” (with sporty illustration!), a buttonless women’s jacket, or a “crunchy” cabled pullover. Roll-necks or rolled collars are gradually eclipsing the larger, pointier collars of the years before.


There’s also a “travel set” of jumper, cardigan and two skirts to take on your spring holiday, made in both plain green and a marled two-tone green that appears to be one of the early multi-colour yarns just starting to come onto the market around this time, but is actually made by holding one strand of each of the two colours together . The child’s striped V-neck pullover seems like a good way to use up all the leftover yarn.


Even the baby of the family, or a baby-to-be, can expect a lovely Easter present in the form of a dress, bonnet, jacket, bootee and blanket set — plus a “pin tidy” to hold all the safety pins that will fasten our 1962 baby’s cloth nappy in place. The blanket is also made in Big Ben (ensuring it will be done in time for baby’s arrival), while the other garments are made in the usual 3- or 4-ply baby fingering wool.
 Springtime also means spring cleaning, and Easter means presents and
 bizarre sorry bazaar novelties (honestly, with some of the designs it’s hard to tell the difference.) Here’s an intriguing “splash panel” to hang on the bathroom wall. As with the elaborately embroidered “finger plates” for doors, its utility evades me. Why would anyone hang a hand-embroidered tapestry on the bathroom wall, for the express purpose of being splashed with soap and toothpaste and who knows what else, which would therefore need to be taken down and (hand!)-washed frequently, rather than just… wipe down the tile wall? I do like the fish design, though!
The pineapple (-ish) motif cushion, embroidered flower-of-the-month iris, latch-key and crocheted rugs are less interesting, but the Easter novelties — a stuffed polka-dot giraffe, a hedgehog pincushion (brilliant), a chicken egg cosy and a knitted lamb with mascara and eyebrows — do not disappoint. A crocheted altar cloth and a set of versatile cross-stitch animal motifs round out the homewares selection. Finally, there’s a great surprise on the inside back cover: a set of embroidered and appliquéd place mats and matching cushion with a chess-set motif! That’s actually quite a lot of fun.


I hope you are all staying sane and healthy in these unfortunate times. May you all have enough projects to keep you busy and enough non-physical-proximity games to keep you happy. Two friends of mine will be expecting babies in the summer, so my Stitchcraft project for April will be the jacket from the baby set. Hang in there, everyone!
 Greetings from the Covid-19 lockdown! March 1962’s project sports the headline “Ready for the Easter Parade” in the magazine, but there are definitely not going to be any Easter parades in March 2020. I hope all of you, dear readers, are staying healthy and staying home.

 There are three seasons in the Stitchcraft year: autumn, Christmas and “holidays”, which start in March and continue until about September. Of course, most people take their holidays in the summer, but the beauty of knitting (or editing a knitting magazine) is that you can technically be knitting for them any time of the year, if you knit slowly enough. And so, the March 1962 issue of Stitchcraft, (motto: “Knit for Spring”) can already promise us “the fun of holidays to plan for.”


 No, it’s not the menu choice for tonight’s dinner, don’t worry. My February 1962 was a little embroidered… animal , originally designed for a toddler’s “feeder” and which I adapted into a bag for vegetables/small projects/”stuff”. I say “animal” in this vague way because it is referred to as a “Squirrel” in the instructions, followed by more specific instructions on how to embroider the supposed squirrel’s beak and feathers. I can maybe, maybe forgive enough poetic license to call a squirrel’s mouth a “beak”, and the creature’s fluffy tail could be mistaken for a squirrel’s, but feathers… no. It also looks suspiciously like a chicken in the photo! So, not a squirrel, but a chicken and a proofreading error.


 I hang out a lot in the “All Things Vintage” forum on
 Adding to the frustration: as always, no matter how small the needles or how thin the wool, I could not knit tightly enough to get the minuscule gauge, which itself was only given as a “life-size” photograph in the pattern. Of course, I am also larger than the 34-35 inch bust given in the pattern, but how much larger the garment, calibrated for how much larger the gauge? Right, lots of calculations, estimations, measurements upon measurements, and just plain guesswork. Plus the thing pulled together either more or less, horizontally or vertically, as it got larger — my gauge swatch (a pocket lining) was utterly useless. I had to start three times.

 Put on your best traveling suit, pack your Aeros and have your Kodak Instamatic in hand, because it’s February 1962 and Stitchcraft is going to Paris! This month’s issue features Paris-inspired designs (whatever that means) and extra pages in colour to show off the latest knitwear against a backdrop of Parisian tourist classics.


 UPDATE AND EDIT February 25, 2020: Project finished!
 There were only two problems. Problem number one: Concept Silky Lace is only available in colours I don’t wear (shades of white and pastel) as well as orange (great, but I used it for the other project), a sort of light jeans blue (OK, but not exciting) and purple. Purple is not my best colour, but given the limited choice and the fact that I really wanted to use this specific yarn, I went with it. That led to problem number two: there were only two balls of it in the store and they had to order more. Unsure whether the two additional balls I ordered would be from the same dye lot or if it would make a difference if they weren’t, I started by making the sleeves with the yarn I had, and waited.
 It took more than two weeks for the yarn to arrive, so I was woefully behind. Also, the yarn that arrived was from a different dye lot, so I wasn’t sure how to camouflage the colour changes or if I even had to. After making the ribbing for the body in the “old” yarn and the body (stockinette stitch, and I decided to do it in rounds to go faster) with the new yarn and not noticing any difference, I just used up the old yarn and moved onto the new in the fancy-yoke part. It worked fine and didn’t make a stripe — thank you Katia for your excellent colour-match dye work.
 Once the project got started, it was finished very quickly. I was worried about the size, as it seemed to stretch quite a lot width-wise and I though it would be too wide and baggy. Once it was bound off and sewn, it was fine. I made it an inch longer in the body than it said to make it in the pattern, but I could have made it even longer — people were really short fifty years ago!?! Blocking helped stretch out the length.


 Happy New Year, everyone! It’s 2020 in my real world and 1962 in my blog world. Where will Stitchcraft take us?


 Technically, it was more of a “star-spangled burlap bag”, but that doesn’t have quite the same ring to it. Happy December, everyone! The 1961 festive holiday season, as envisioned by Stitchcraft magazine, involved at least a couple of glamorous parties and evenings out, for which this white satin drawstring clutch bag could be the perfect accessory.
 wink, and who knows if they had been treated with some kind of additional preservative chemical), I drew the motifs onto the bag with a wax embroidery-transfer pen, tracing around different sizes of button to get the circles, and embroidered them using leftover bits of pink and green embroidery cotton. I decided to forego the pearls and sequins and just made French knots instead. I also didn’t care too much about perfect symmetry or absolutely “clean” lines — I wanted it to look a little bit rough and homemade.


 It’s that time of year again and December 1961’s issue has a lovely festive cover photo featuring matching father-son jumpers and a freshly-cut-down Christmas tree with holly branches. The jumpers are meant to be made in flat pieces with only the yoke worked in the round, but everything about them other than that is in the traditional Norwegian style, with a small snowflake pattern on the body and sleeves and a round yoke with tree and star patterns. I like that the jumpers’ pattern theme and colour choice are not so very specifically Christmas-y that they couldn’t be worn at any other time, or by people in our more diverse and modern times who don’t celebrate or don’t care much for Christmas and would just like a nice warm jumper with a wintery flair.


 Children of all ages can look forward to practical, yet stylish winter garments — a knitted outdoor play-suit for toddlers in warm, bulky Big Ben, a smart fine-knit twin-set for girls of varying ages (sizes from 26-30 inch chest) and a wonderful knitted dress in a two-colour slip-stitch pattern that fits right into the tweed trend. The photo caption claims that Alison (the young model) is “warm as toast” but of course, her legs are going to be cold! She still seems pretty happy, though.


 Post updated on December 28, 2019: Finished!
 The pattern calls for Patons Rimple DK (nubbly wool with synthetic) in black and Patons Totem DK (smooth “crepe” wool) in “Oakapple”. I admit I had never heard of an an oak apple before and looking at the black-and-white photo, it’s it’s hard to tell what exact colour was used — but it’s obviously some kind of whitish-beige. Which, as it turns out, is pretty much the colour of at least some kind of real
 The knitting itself was a dream, though — so nice to work in DK after the fingering-weight projects of recent months past. It knitted up fast and easily and the fabric feels good in the hands. The pattern is quite clear and simple. Even the set-in pockets with flaps and the buttonholes (such a nightmare, always) were successful and the buttonholes evenly spaced. (I used the method that Stitchcraft always suggests: make the side without buttonholes first, then mark the button positions with pins and make the buttonholes to correspond. With a repeating pattern like this one, you can count the rows between buttonholes quite accurately.)
 After putting it together and blocking, the back piece had stretched width-wise, the sleeves had stretched length-wise and the sleeve cap didn’t fit well. Also, the shoulders were too wide. What to do? I didn’t want to cut the knitted fabric, nor do everything over. My solution: I re-sewed the sleeve caps in where the shoulder and sleeve line should have fallen, then tucked the resulting extra fabric in towards the neck on the front piece to make a sort of built-in shoulder pad. I normally hate shoulder pads and rip them out of everything I buy, but in this case it turned the droopy, sloppy-looking shoulder into a crisp, tailored-looking one. I’m so sorry I forgot to take a “before” picture — the change was pretty dramatic.
 To fix the back width, I added two vertical darts. That wasn’t as elegant as it could have been if I had knitted them in, but it was fine. The sleeve-cap changes pulled the sleeves in a little shorter, so I just finished the cuffs with the same binding that I used for the rest. The buttons are modern, but aren’t they perfect? I even remembered to buy a few extra.
 November is such a grey month, so it’s nice to see that Stitchcraft‘s November 1961 issue has the theme “Colour Flair”, featuring speckled yarns and a center page in colour. The issue showcases “Bracken Tweed”, Patons’ new double knitting wool. Bracken Tweed was one of the early multicolour yarns, mixing flecks of a lighter colour in with main strands of a darker colour to achieve a tweed effect. At its debut in 1961, it was 100% wool; with the change from ounces to grams in the late 1960s, the fiber content was changed to 60% wool and 40% acrylic.


 There’s always somebody having a baby, and I do try to make something nice for all my friends’ and colleagues’ newborns. Sometimes I don’t manage to finish something until they are out of the newborn stage, which is why it’s nice to have patterns for larger babies! This dolman-sleeve cardigan, made in the smaller size, should fit a 22 inch chest, which should be fine for this particular eight- or nine-month old.
 The little leaf motifs up the front sides are quite easy and don’t require any cabling or special fuss. You just work into one stitch 5 times on one row, then work those 5 stitches in stockinette (on the reverse-stockinette background) for a few rows before closing off the leaf with decreases. The lace strips on the sides are plain yo, k2tog alternating with k2tog tbl, yo, worked on the right-side rows.
 I used Jamieson’s wonderful Shetland Spindrift from a multicoloured stash that I had bought from a nice person on Ravelry. Some may say that Shetland wool is too tough for babies, but it does get softer with washing and since it won’t be worn against the skin, I think it will be fine. The colour — Buttermilk — is really beautiful, a pale yellow ever-so-slightly marled with shades of pink and winter white.
 October 1961 gives us “Colour for autumn” with “special fashion features” and a great center spread with colour photos. “I always think October is a nice friendly month,” writes “editress” Patience Horne on the facing page, and I have to agree.
 stitches play a prominent role in this month’s issue, starting with the partner-look pullover and cardigan on the front cover. Both are made in the same drop-stitch rib pattern — basically 2×2 ribbing, but you drop a stitch down 3 rows every 4th row and pick it up again in the next row to make a long vertical rib. Children get twisted-rib raglan pullovers to keep their upper bodies nice and warm while their legs freeze in tiny shorts and mini-skirts, typical for the era.


 September’s project (finished only one day late) was this extremely 1960s crocheted green rug with black, white and orange embroidered spots (they “add a modern touch”) and fringe. Loved it!
 Felting wool, like rug wool, is bulky, mostly unprocessed, coarse and strong, so that was my first thought… but would it felt with use or washing? I decided to take the chance, since it’s easy to find, inexpensive and there happened to be some in the perfect colour at my local yarn shop. It’s the exact same shade of green as
  The crochet part was easy — just rounds of double crochet with regular increases — and went very quickly. You can see that the wool I ordered was from a different dye lot than the first skeins from the store, but I don’t mind. The embroidery was a bit tedious and the fringe posed a new problem: this type of old-fashioned cotton sew-on fringe is very much not in fashion and hard to find in stores these days. I hate buying things on the Internet, so I asked my friendly wool-shop owner from the store where I bought the wool what she thought, or if it could be ordered through the store. She suggested hand-knotting the fringe with cotton yarn in a similar colour to the rug. (the fringe in the original seems to be white or a lighter colour). I was eager to get the thing done and not wait for more elements to arrive, so I did it. I like the result! It’s stringier than the original, of course, but it makes the rug look like a sort of friendly amoeba. I like that.
 Wash-blocking it gently in cold water worked well and did not felt the wool. Also, it is going to live under my coffee table where it won’t get much foot traffic, so I’m not worried.
 “Knitting with an Autumn Theme” is the motto of this month’s Stitchcraft from September, 1961. Knowing that September is the month where many knitters take up their needles again after not wanting to handle wool in the hot summer, I would have expected a “bumper issue” with extra ideas, new fashions from Paris, more colour photographs and so on. Not the case! It has more or less the same mix of “chunky”, bulky garments and easy homewares that we saw in the summer issues.
 probably will never be my style). The kid’s coat looks cosy and fun to wear, and the “gay sweaters for him and her” in a Norwegian-style pattern are warm, practical and unisex. I imagine the boatneck collar on an unshaped front must scratch horribly across the neck, though.


