December 1967: Appliqué Cats are Lucky

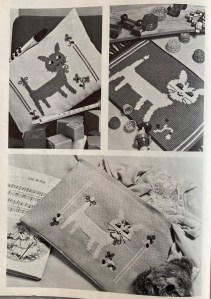
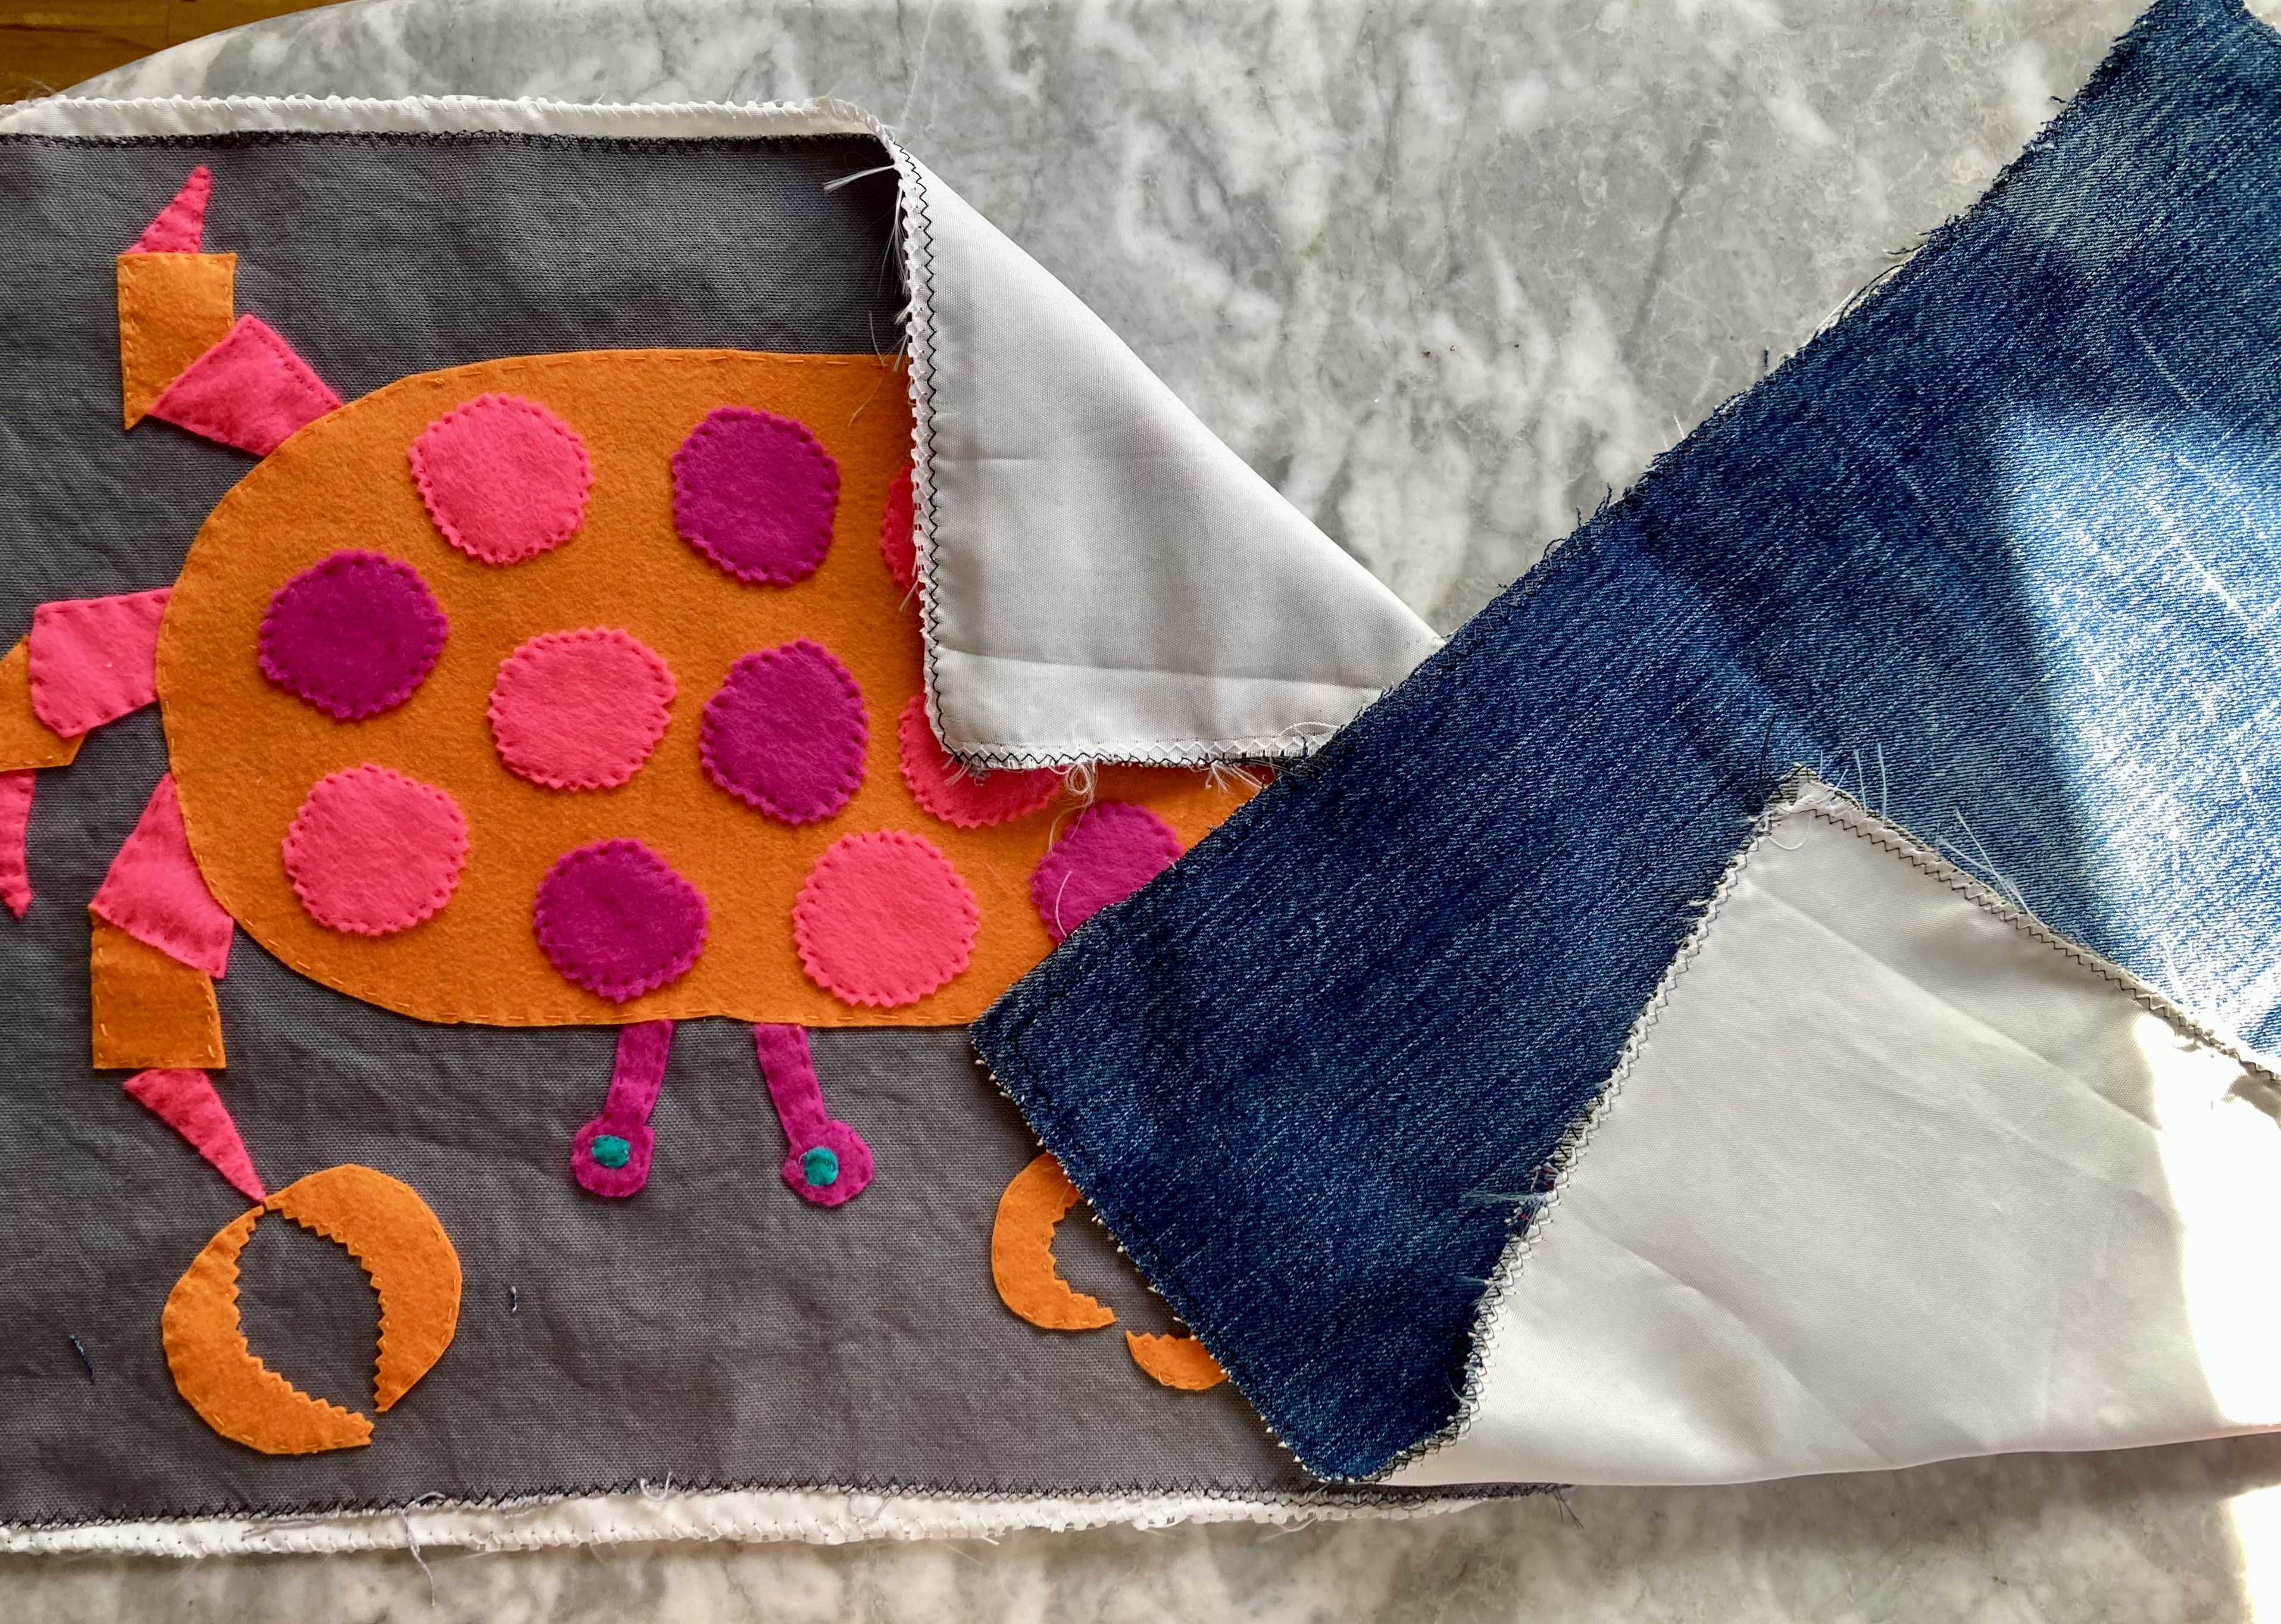
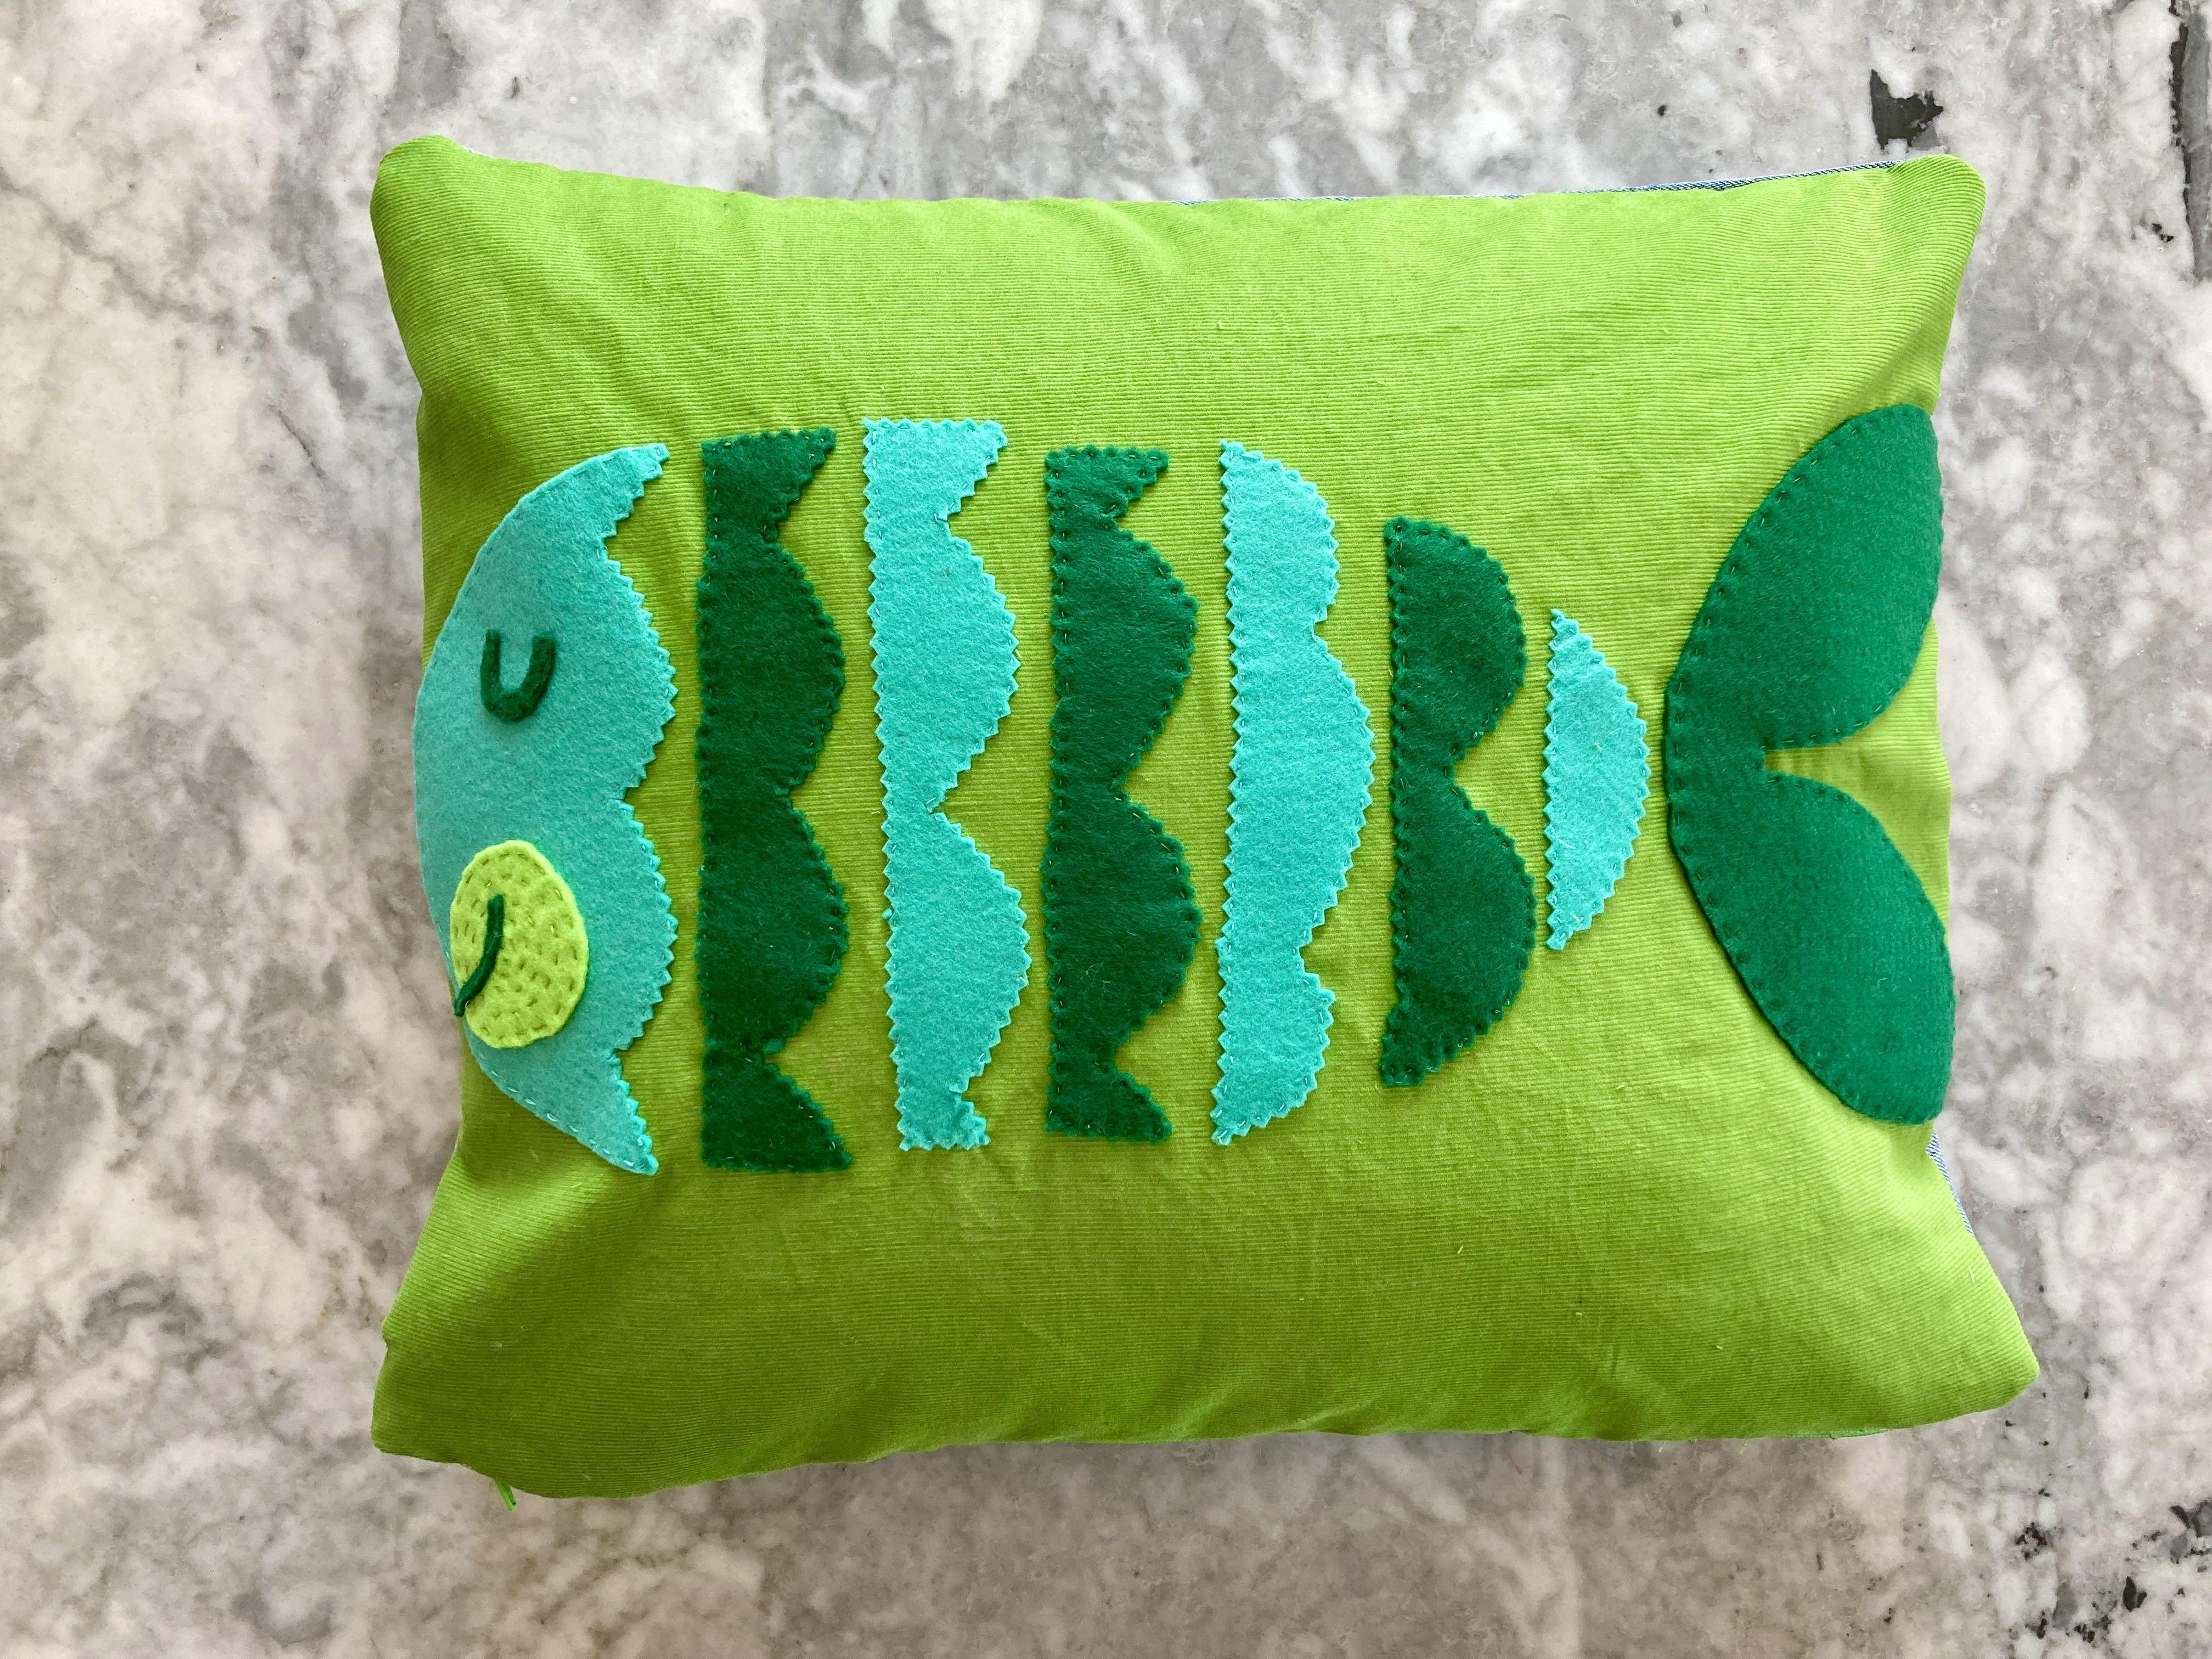
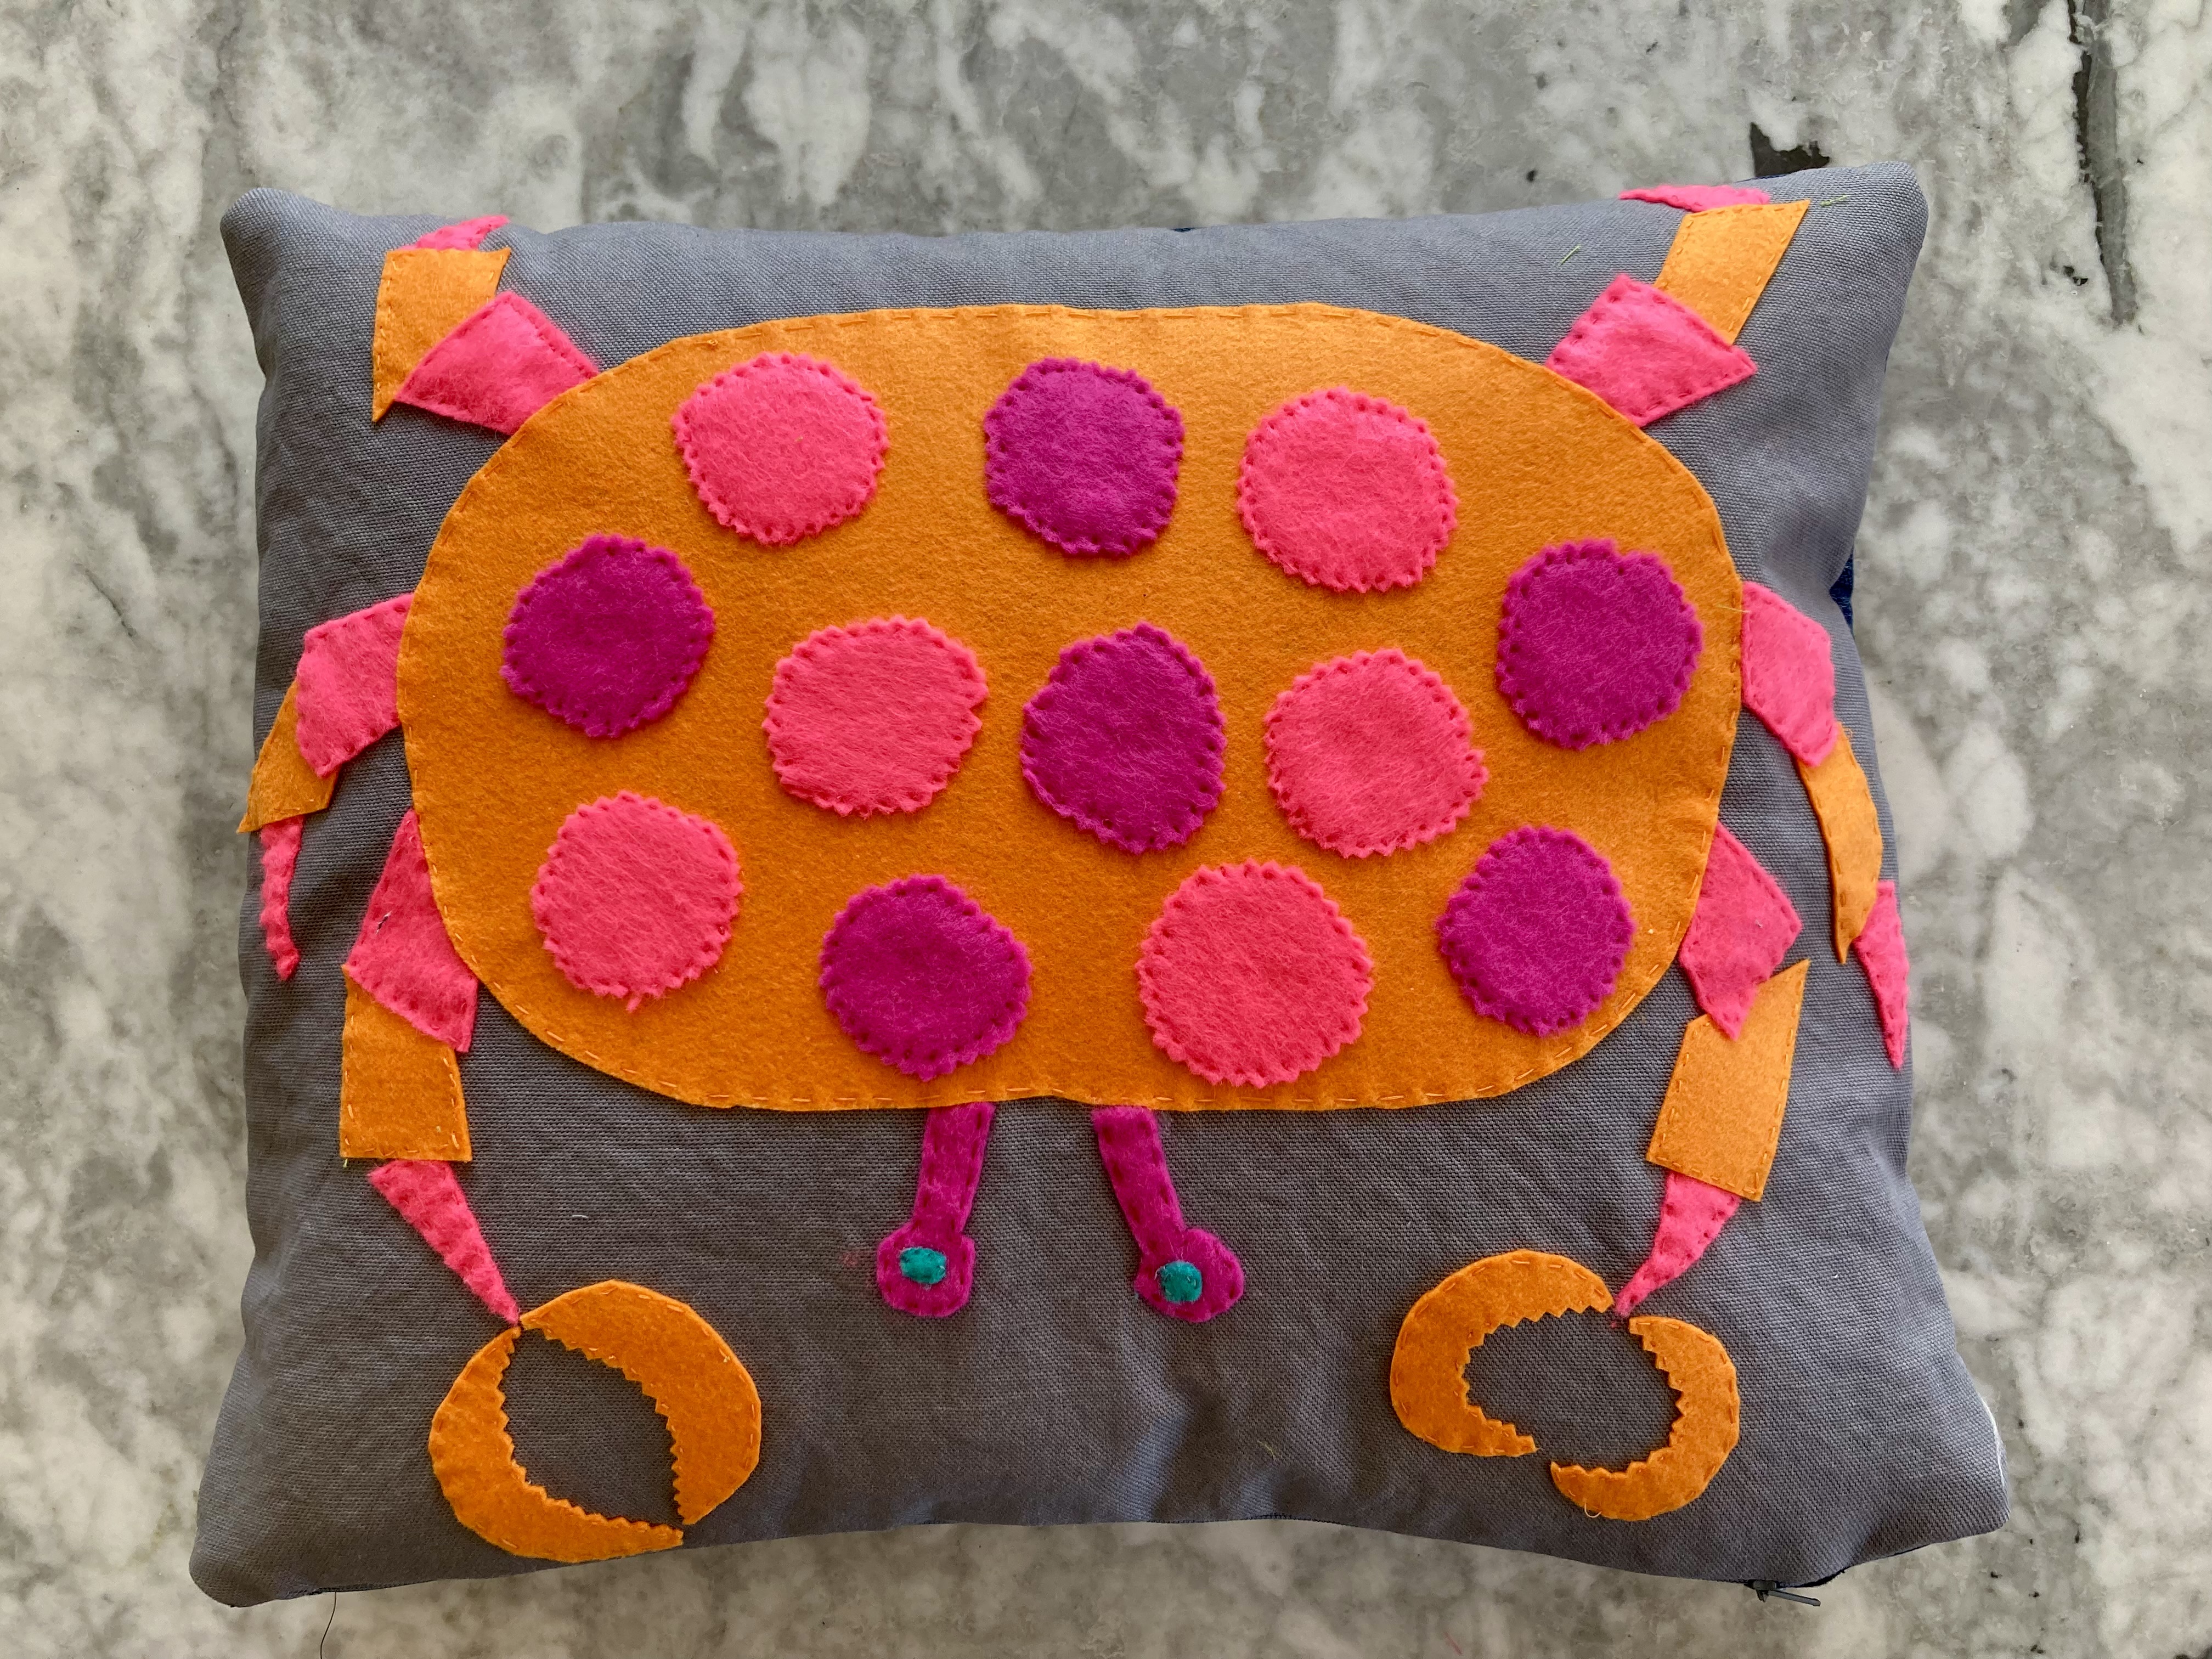
My project for December 1967 a.k.a. December 2025 was an adaptation of a cross-stitch design for a three-piece children’s room set.

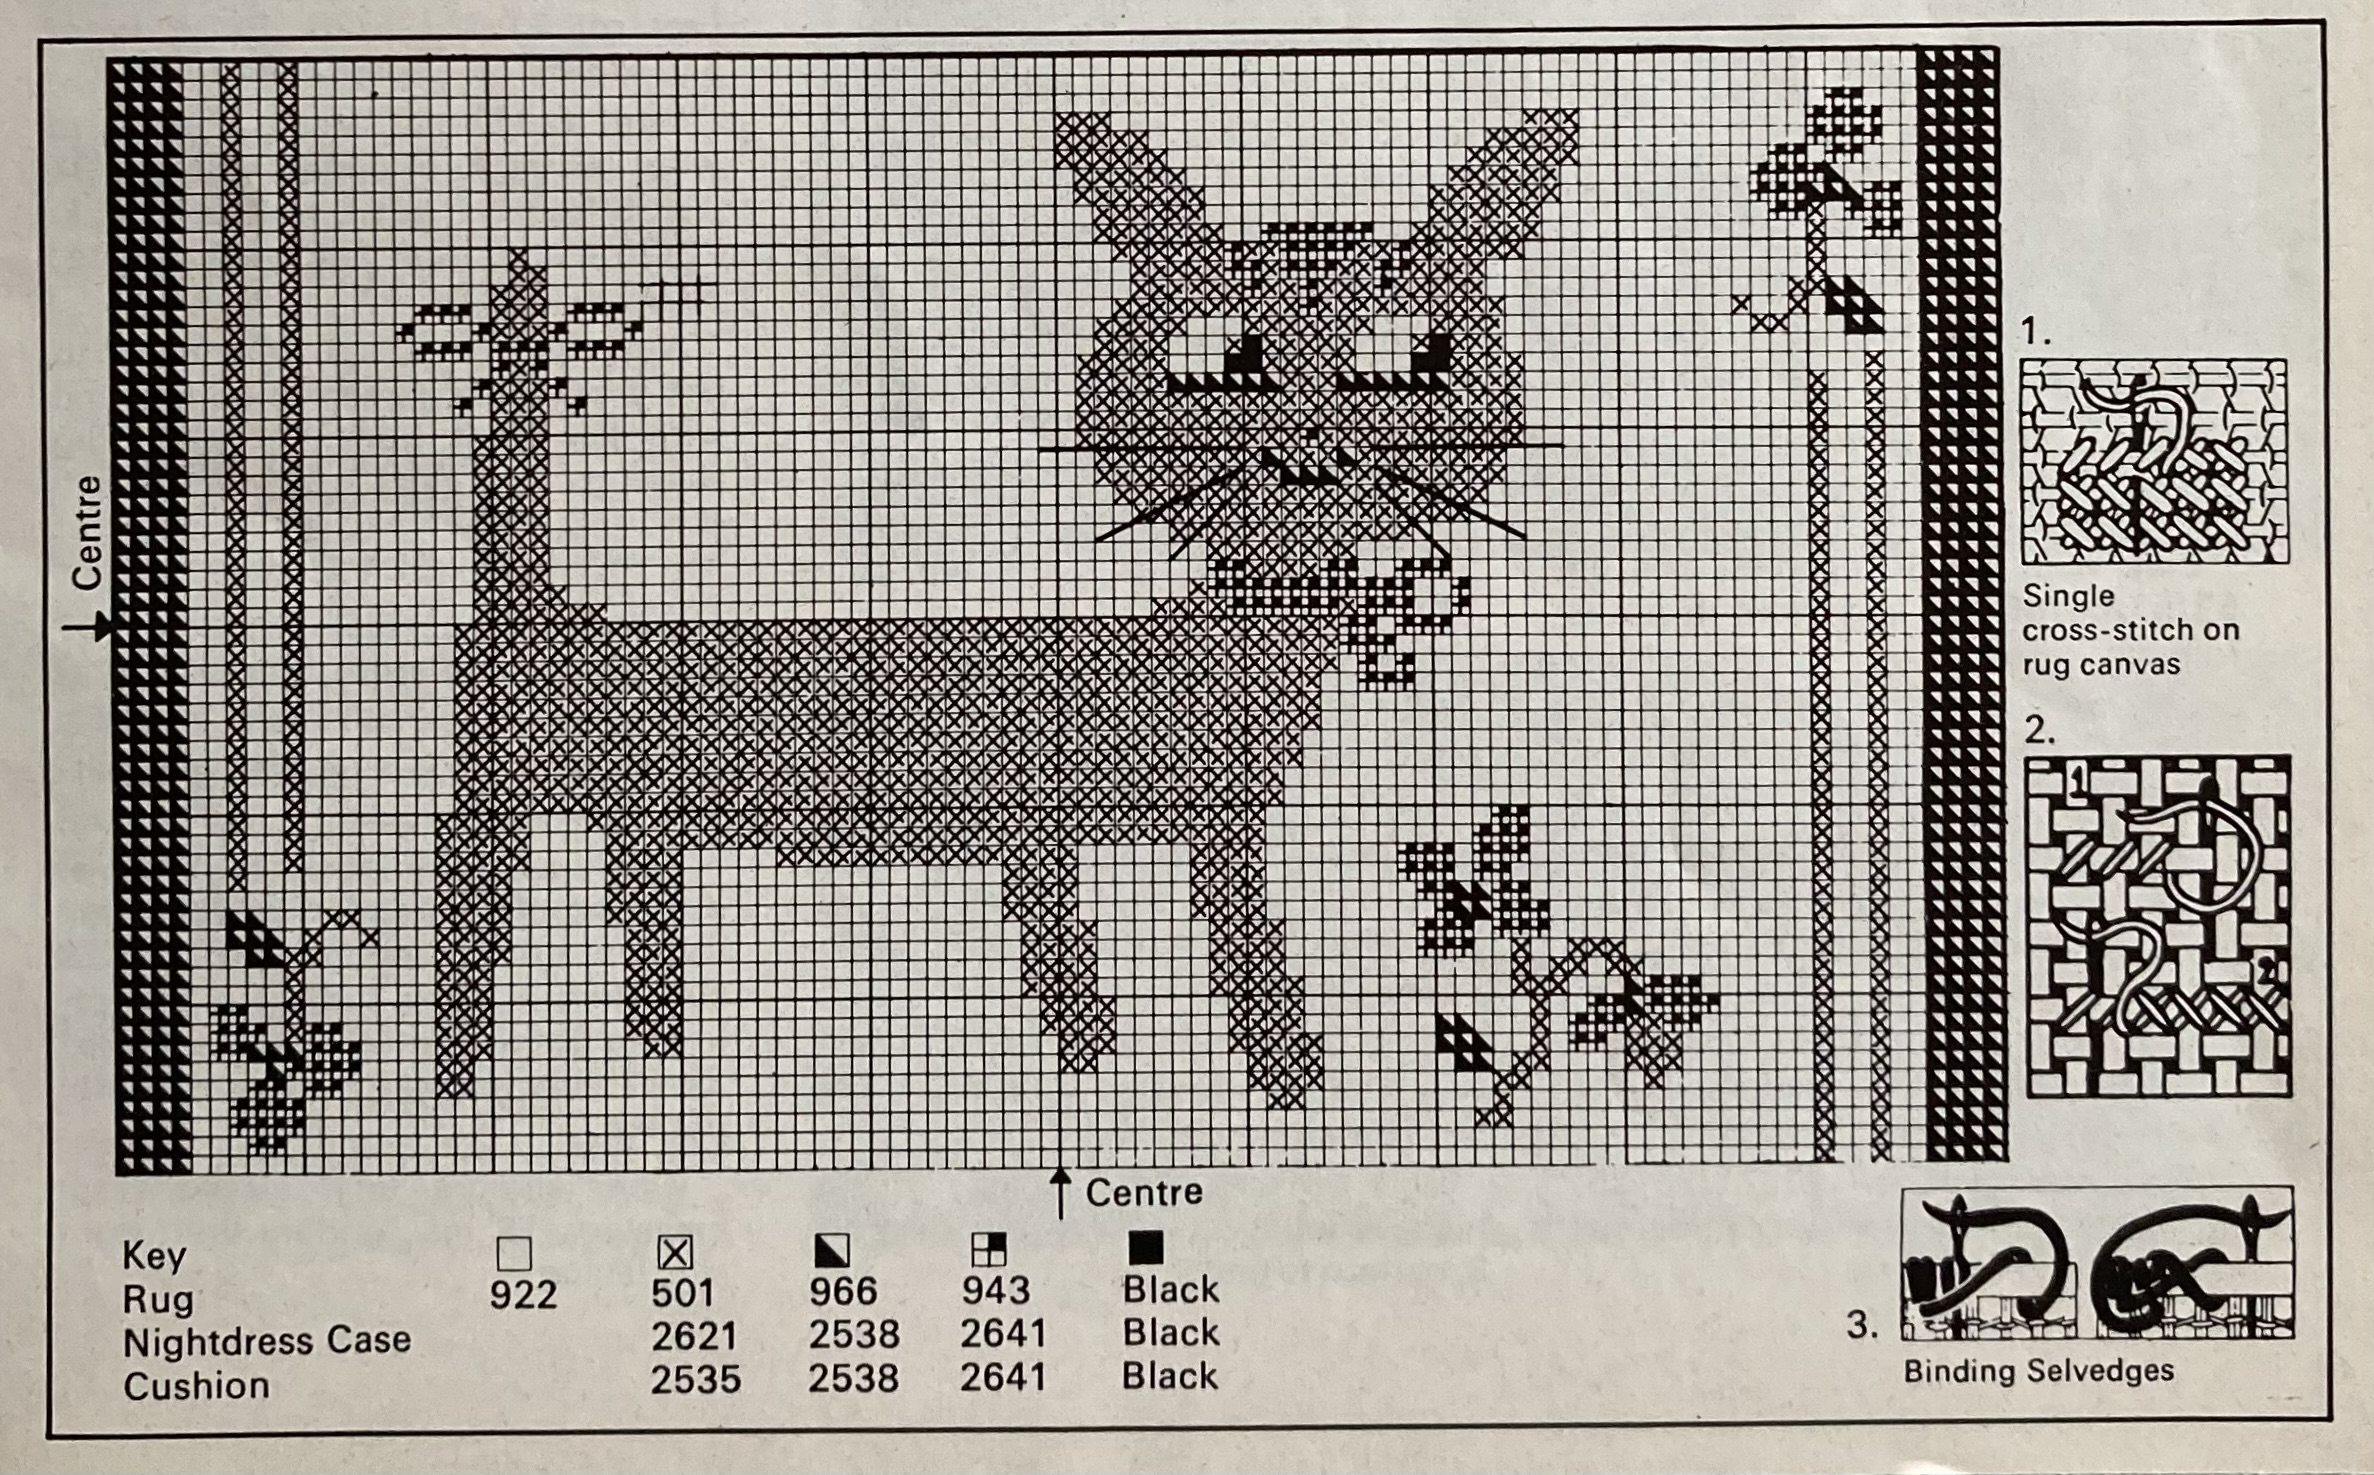
“Cross-stitch Cats are lucky” says the caption in the magazine, and I could definitely use some good luck right now. Cross stitch, however, is not lucky for me. I really, really dislike counting tiny boxes on a pattern or tiny holes in a fabric, all of which are impossible to see even with glasses, and the cross-stitch aesthetic is generally not my favourite. I like crewel embroidery and appliqué. Stitchcraft gives three variations on the design, for a cushion, small rug or night-case. I made a slightly smaller bag that can be used for pencils or chargers or knitting/crafting accessories or any kind of little “stuff.”

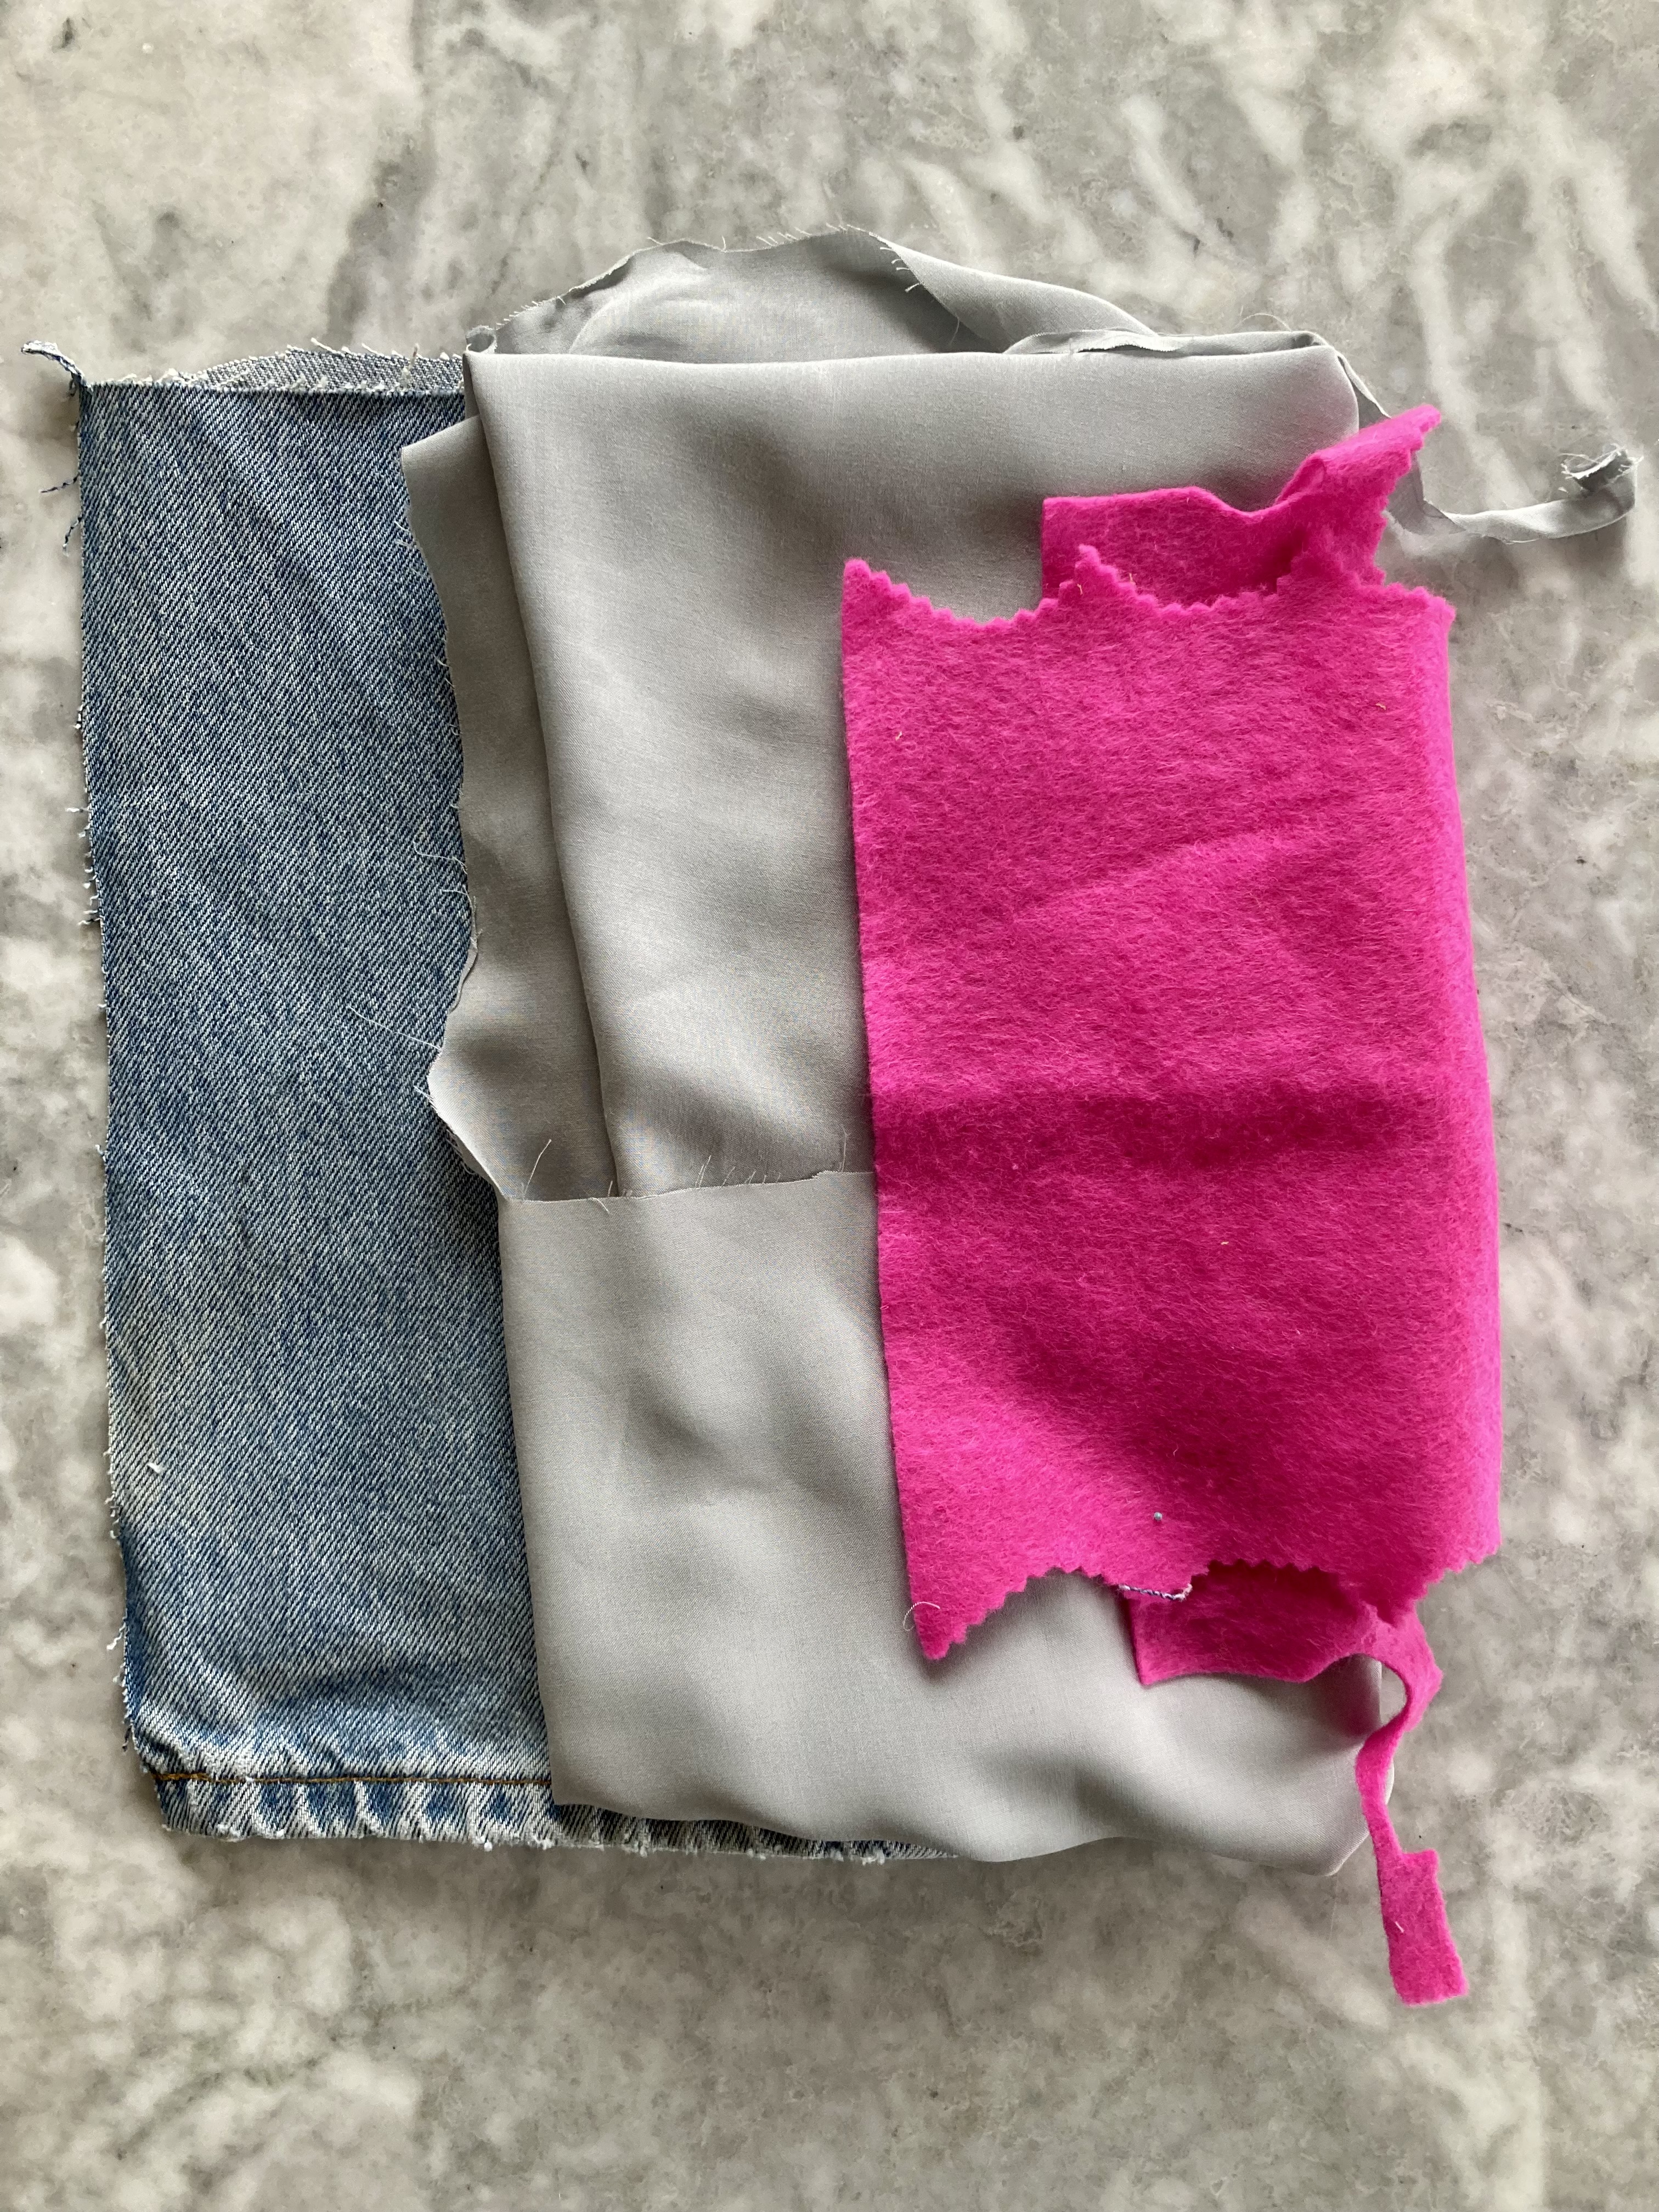
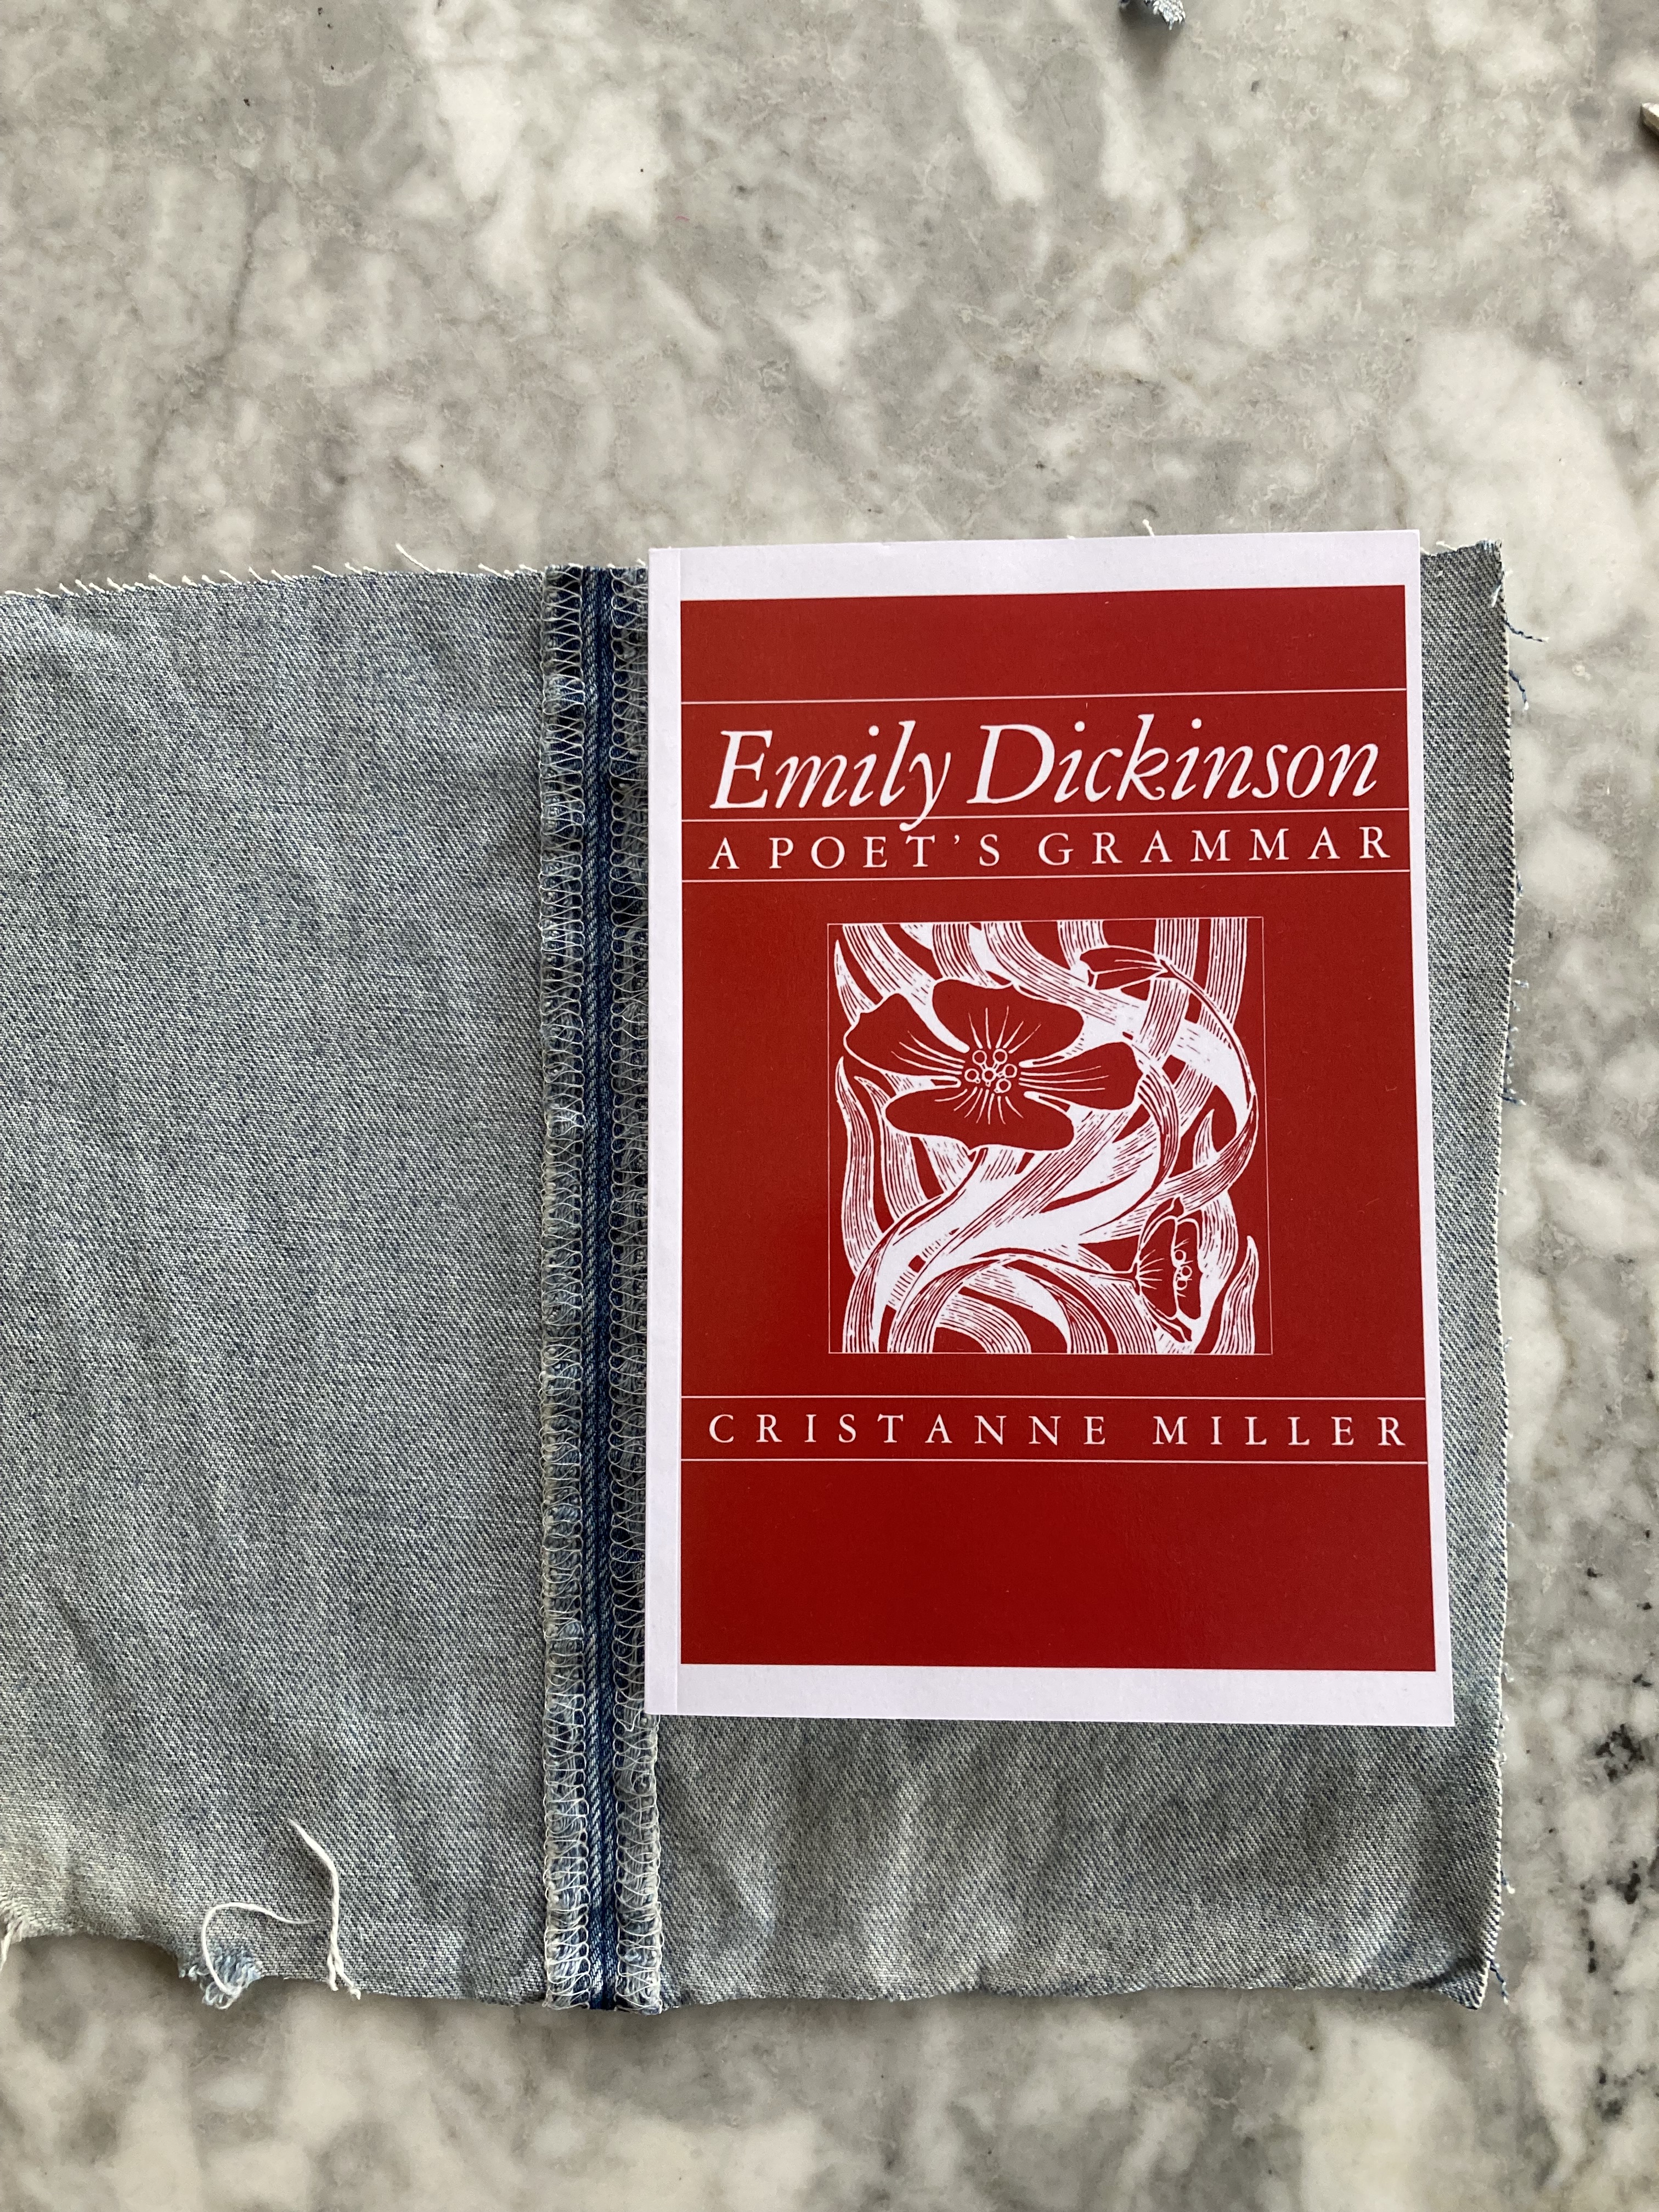
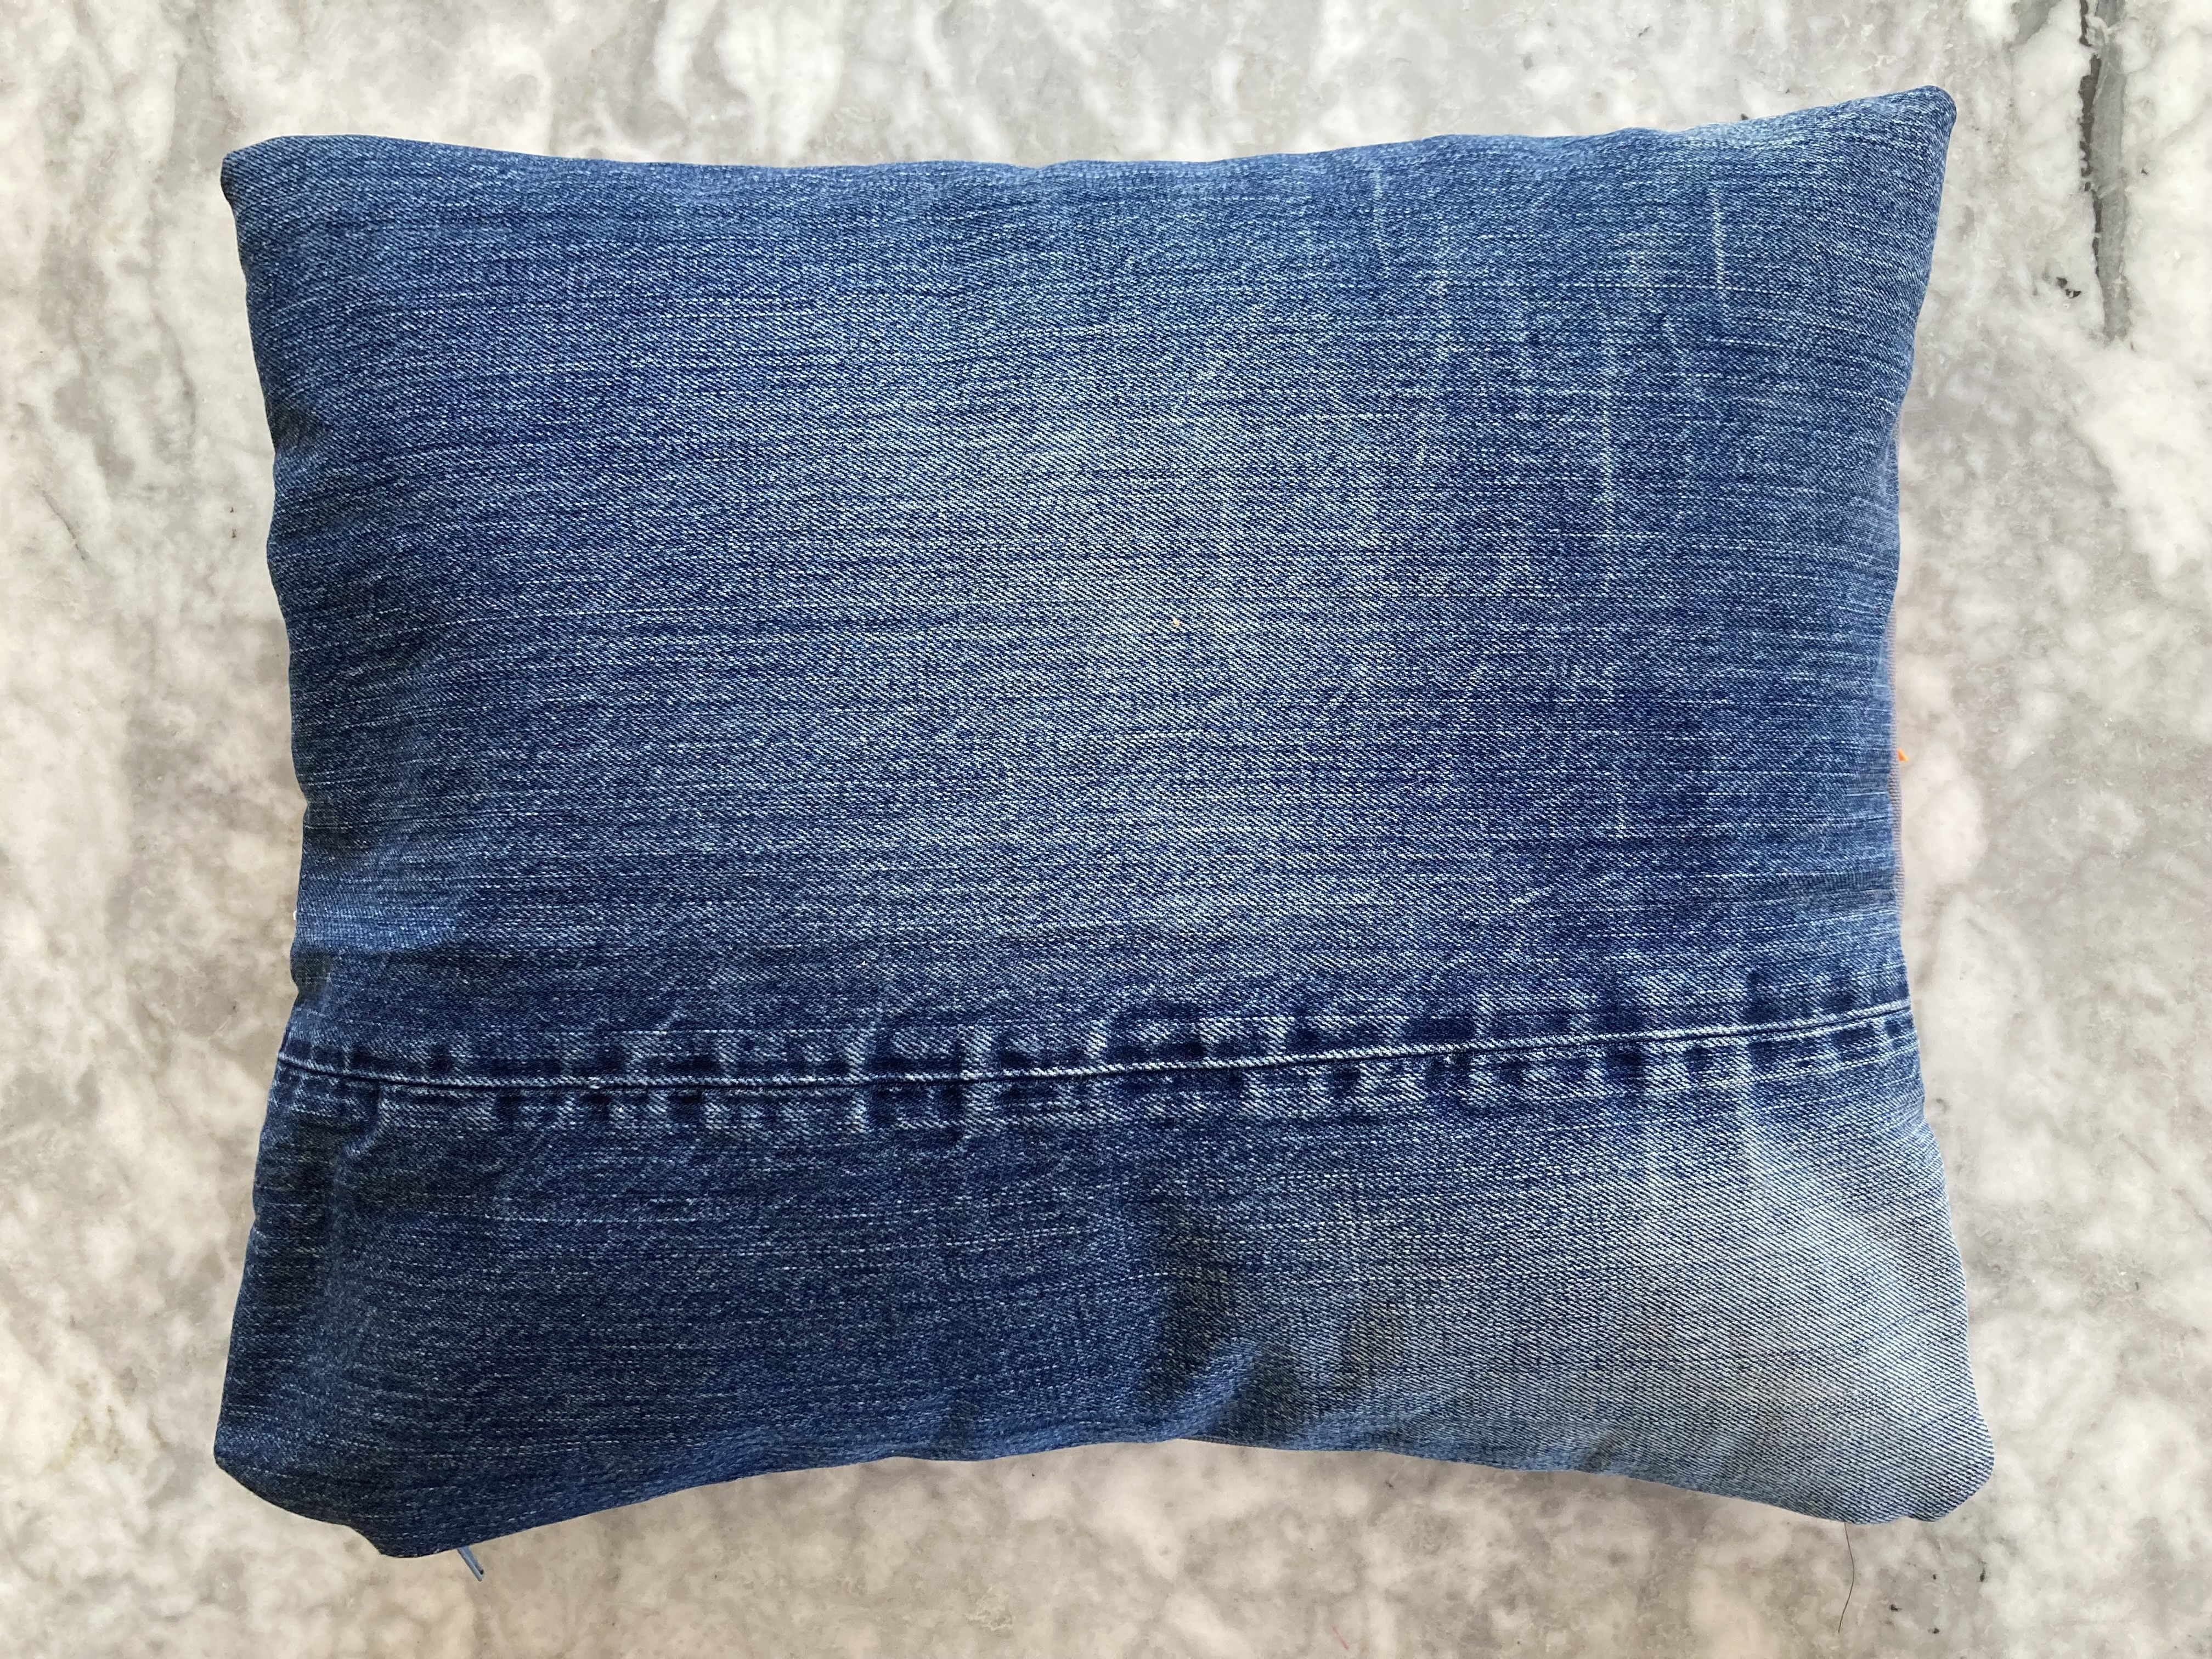
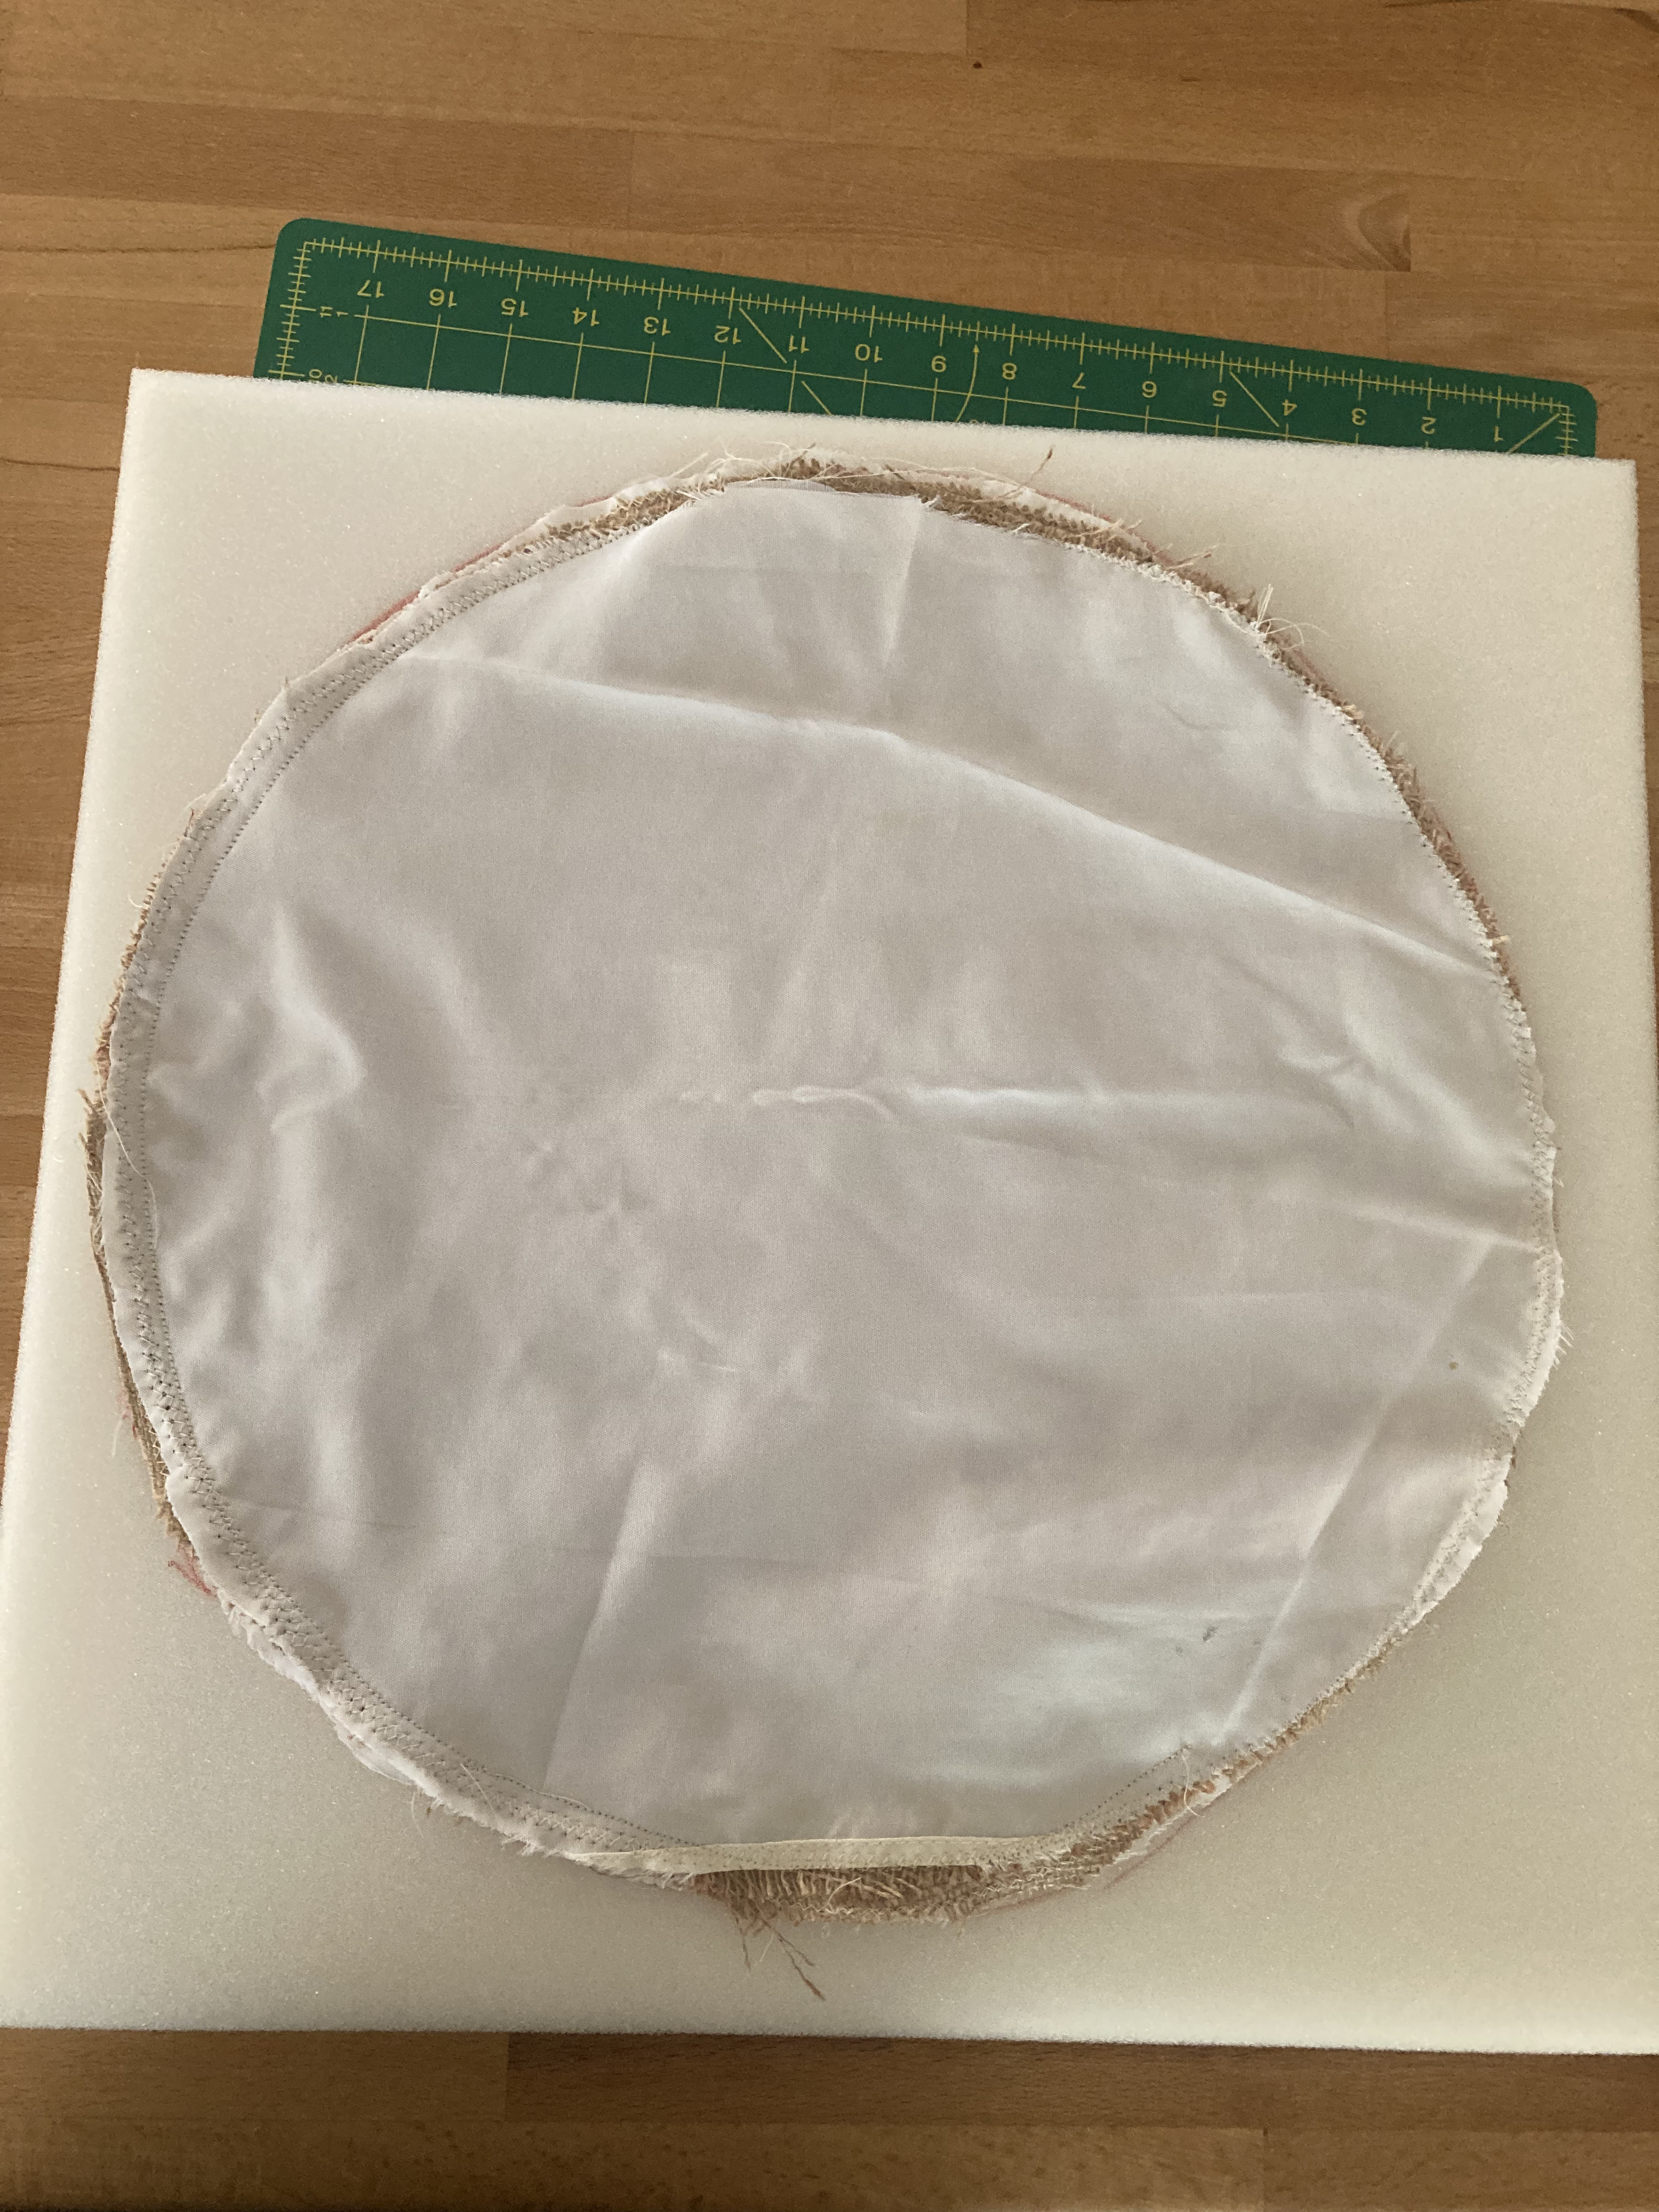
My backing fabric was from the leg of an old pair of jeans from the upcycling drawer. I used the leg seam as the bottom of the bag and found some lining material to match. Cristanne Miller’s book on Emily Dickinson’s grammar made an excellent straightening guide.

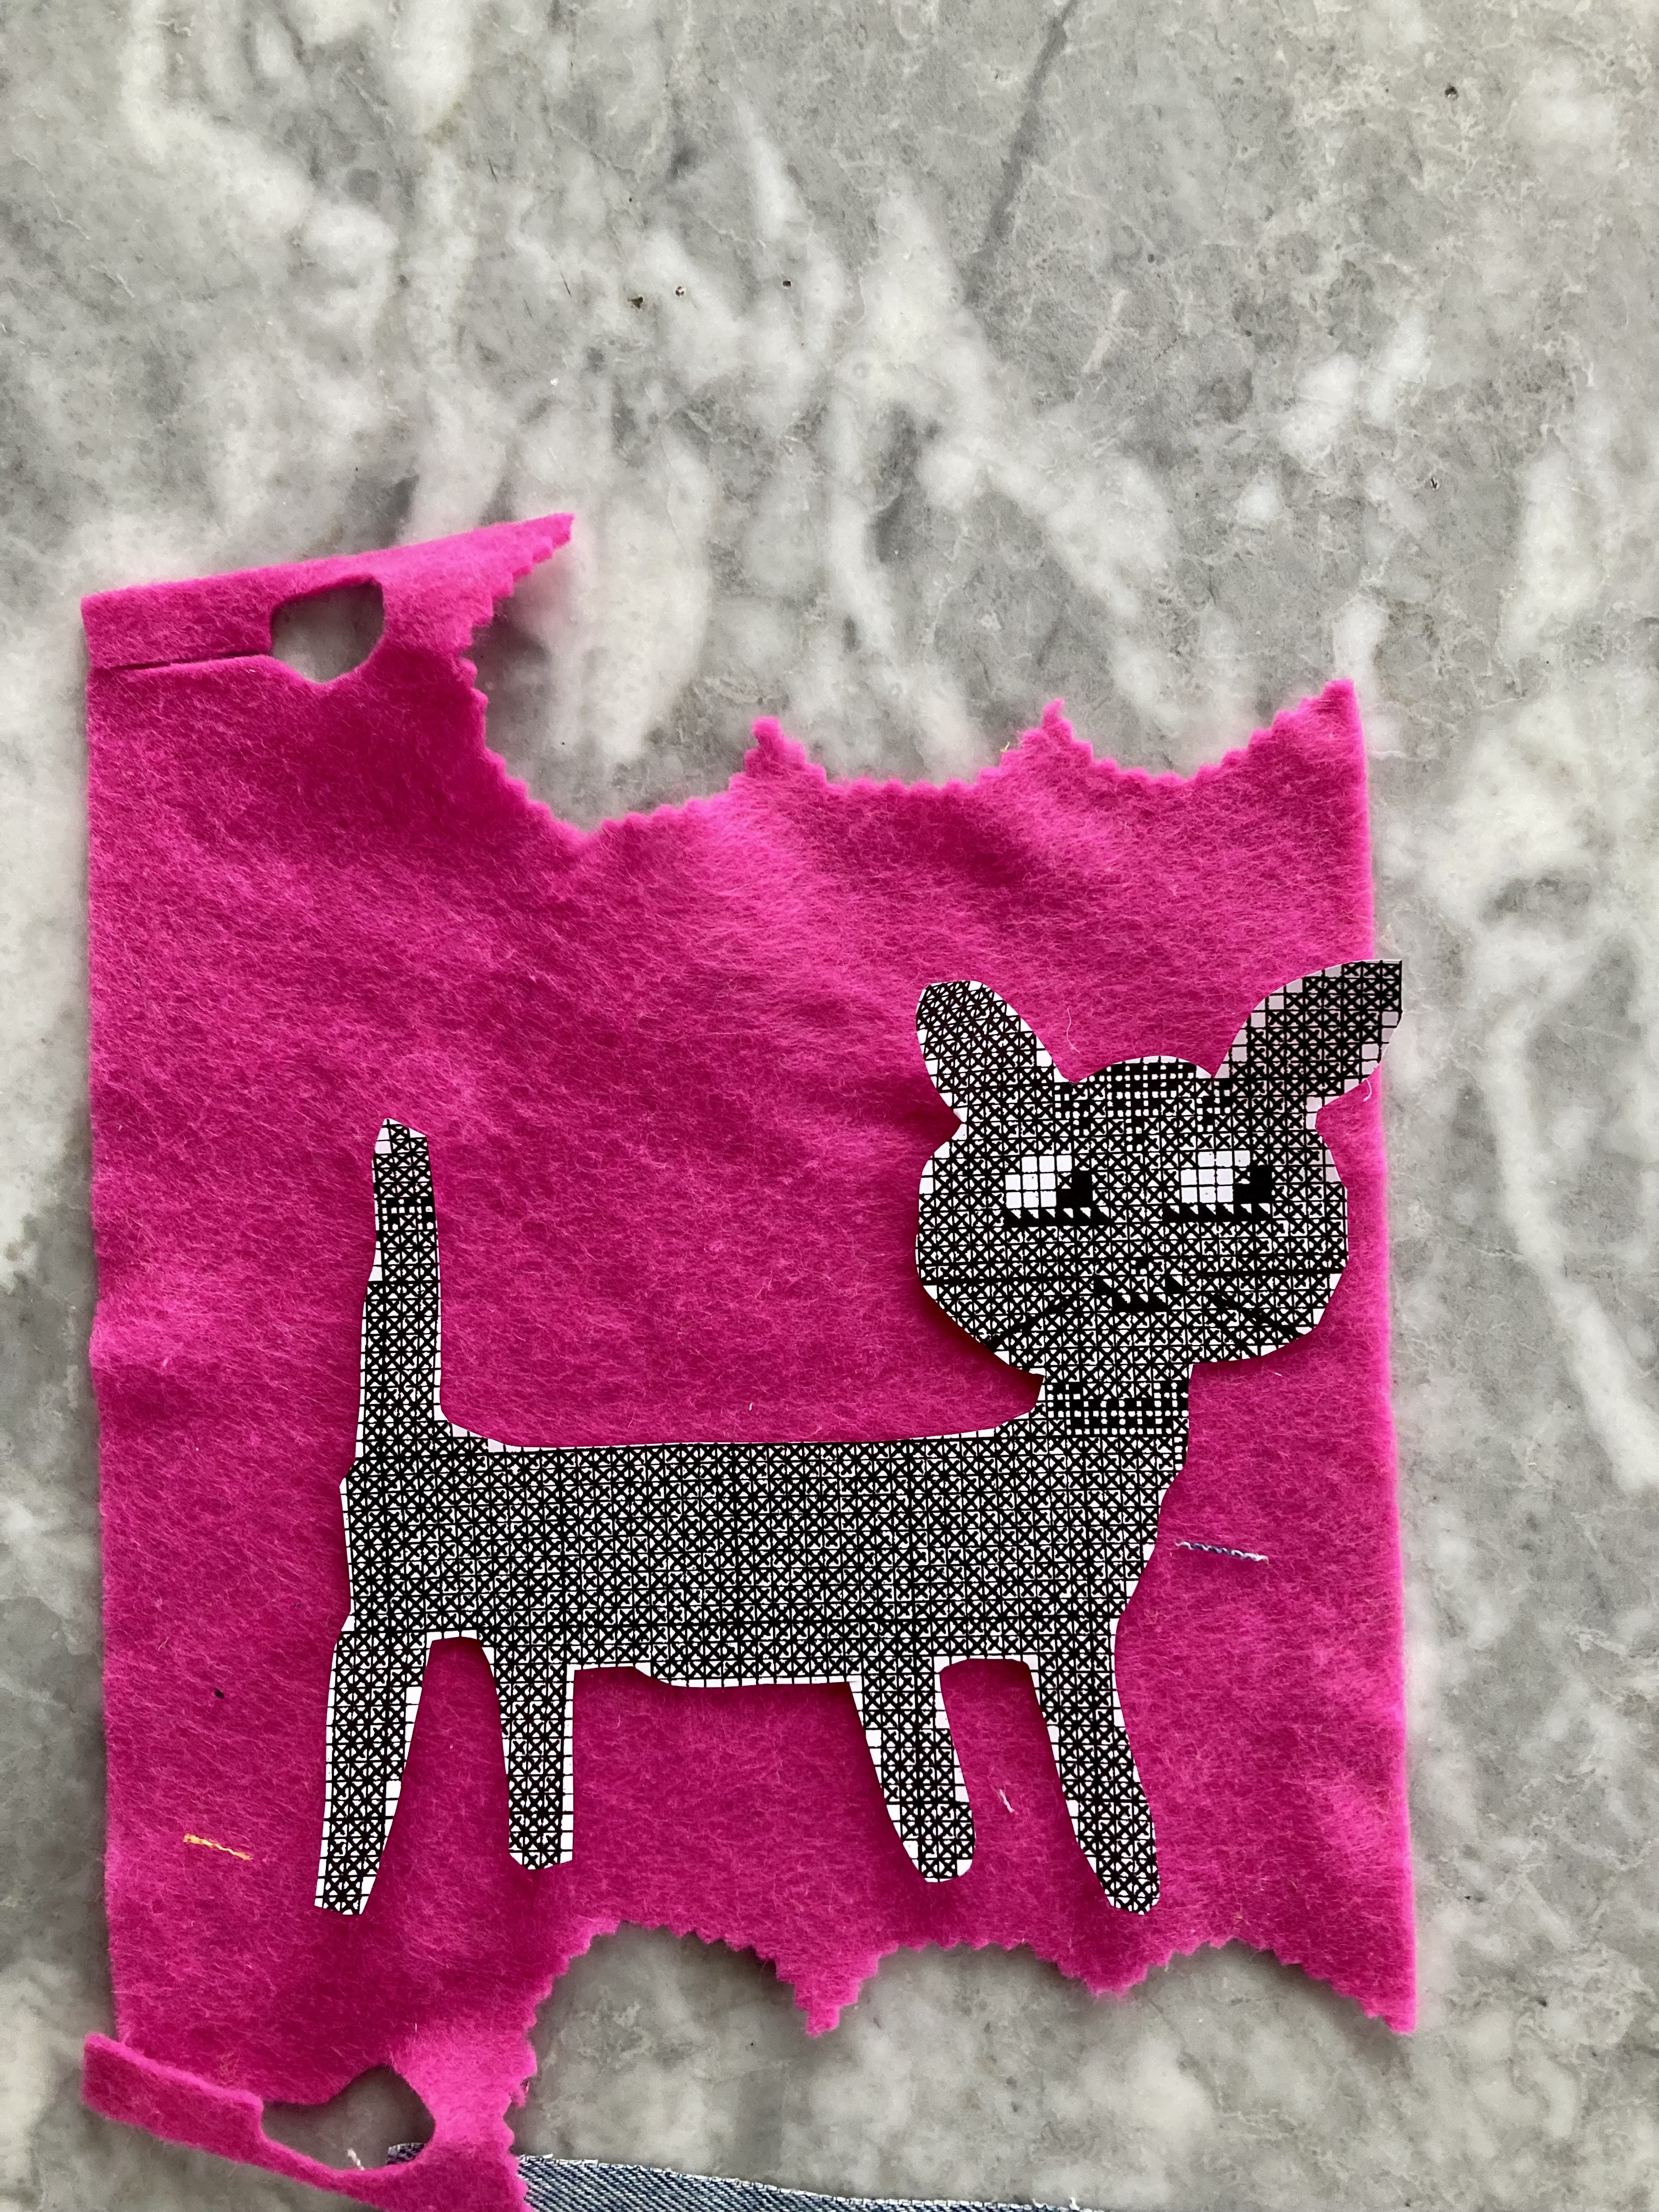
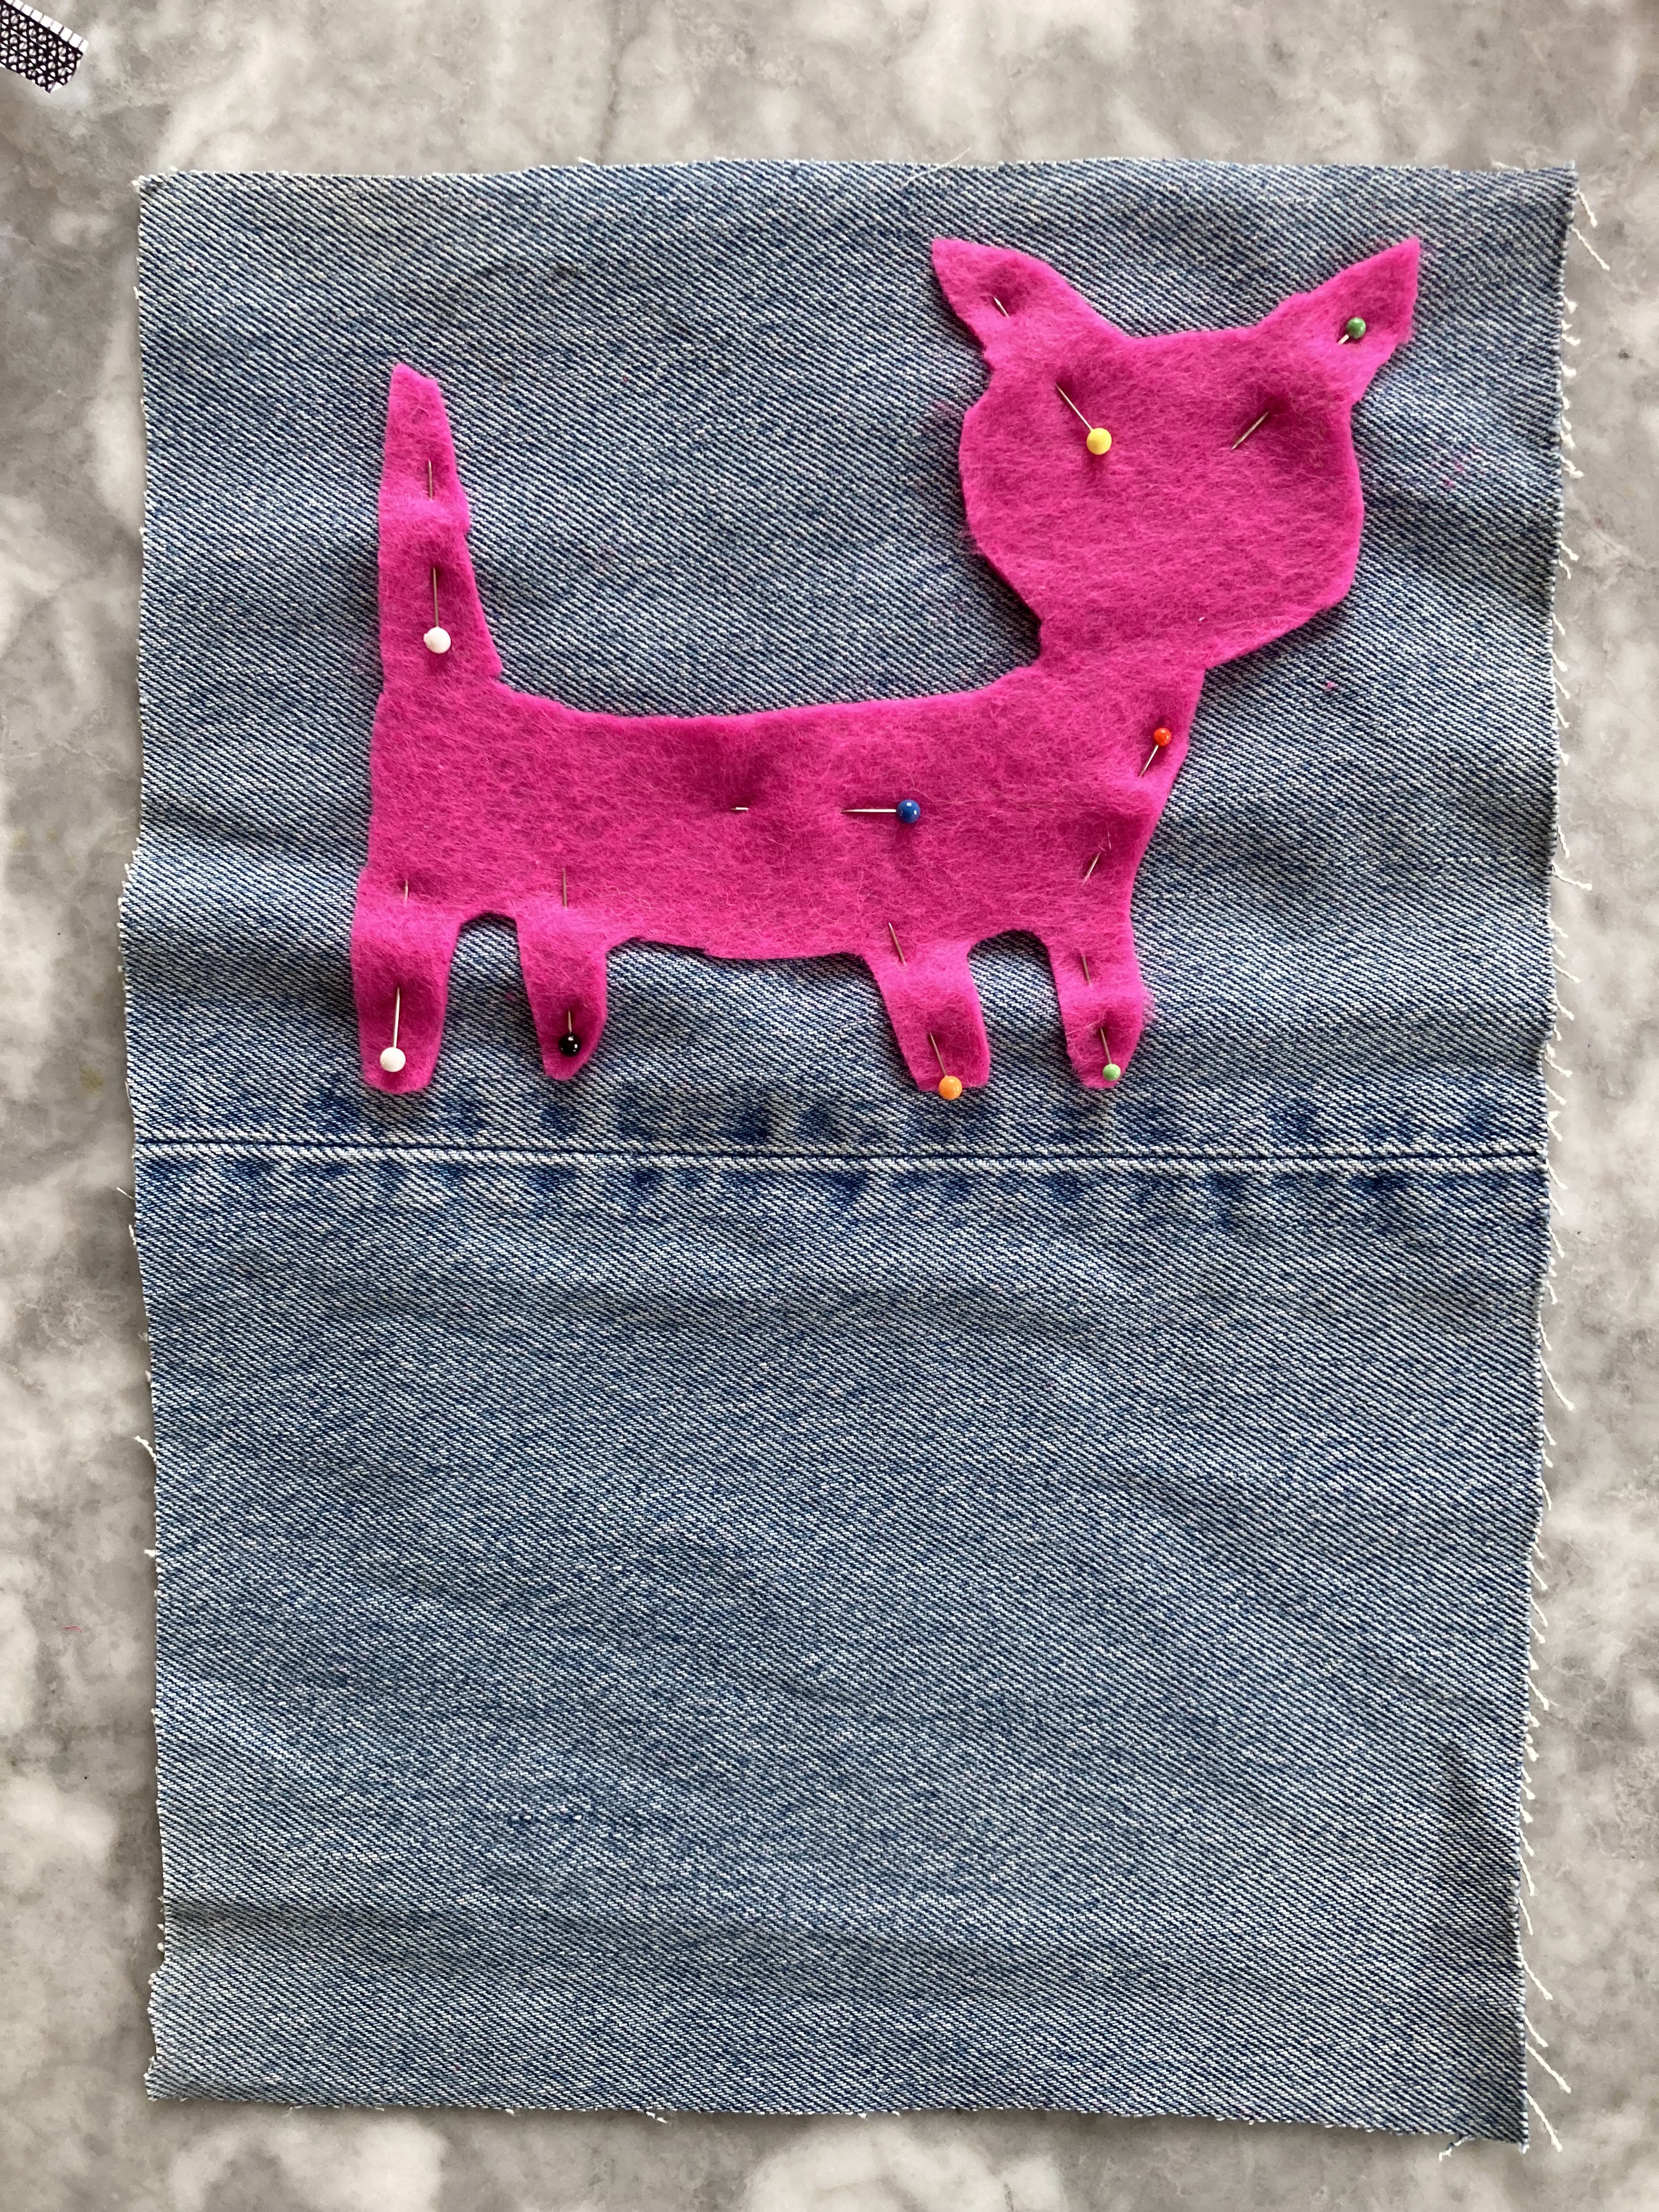
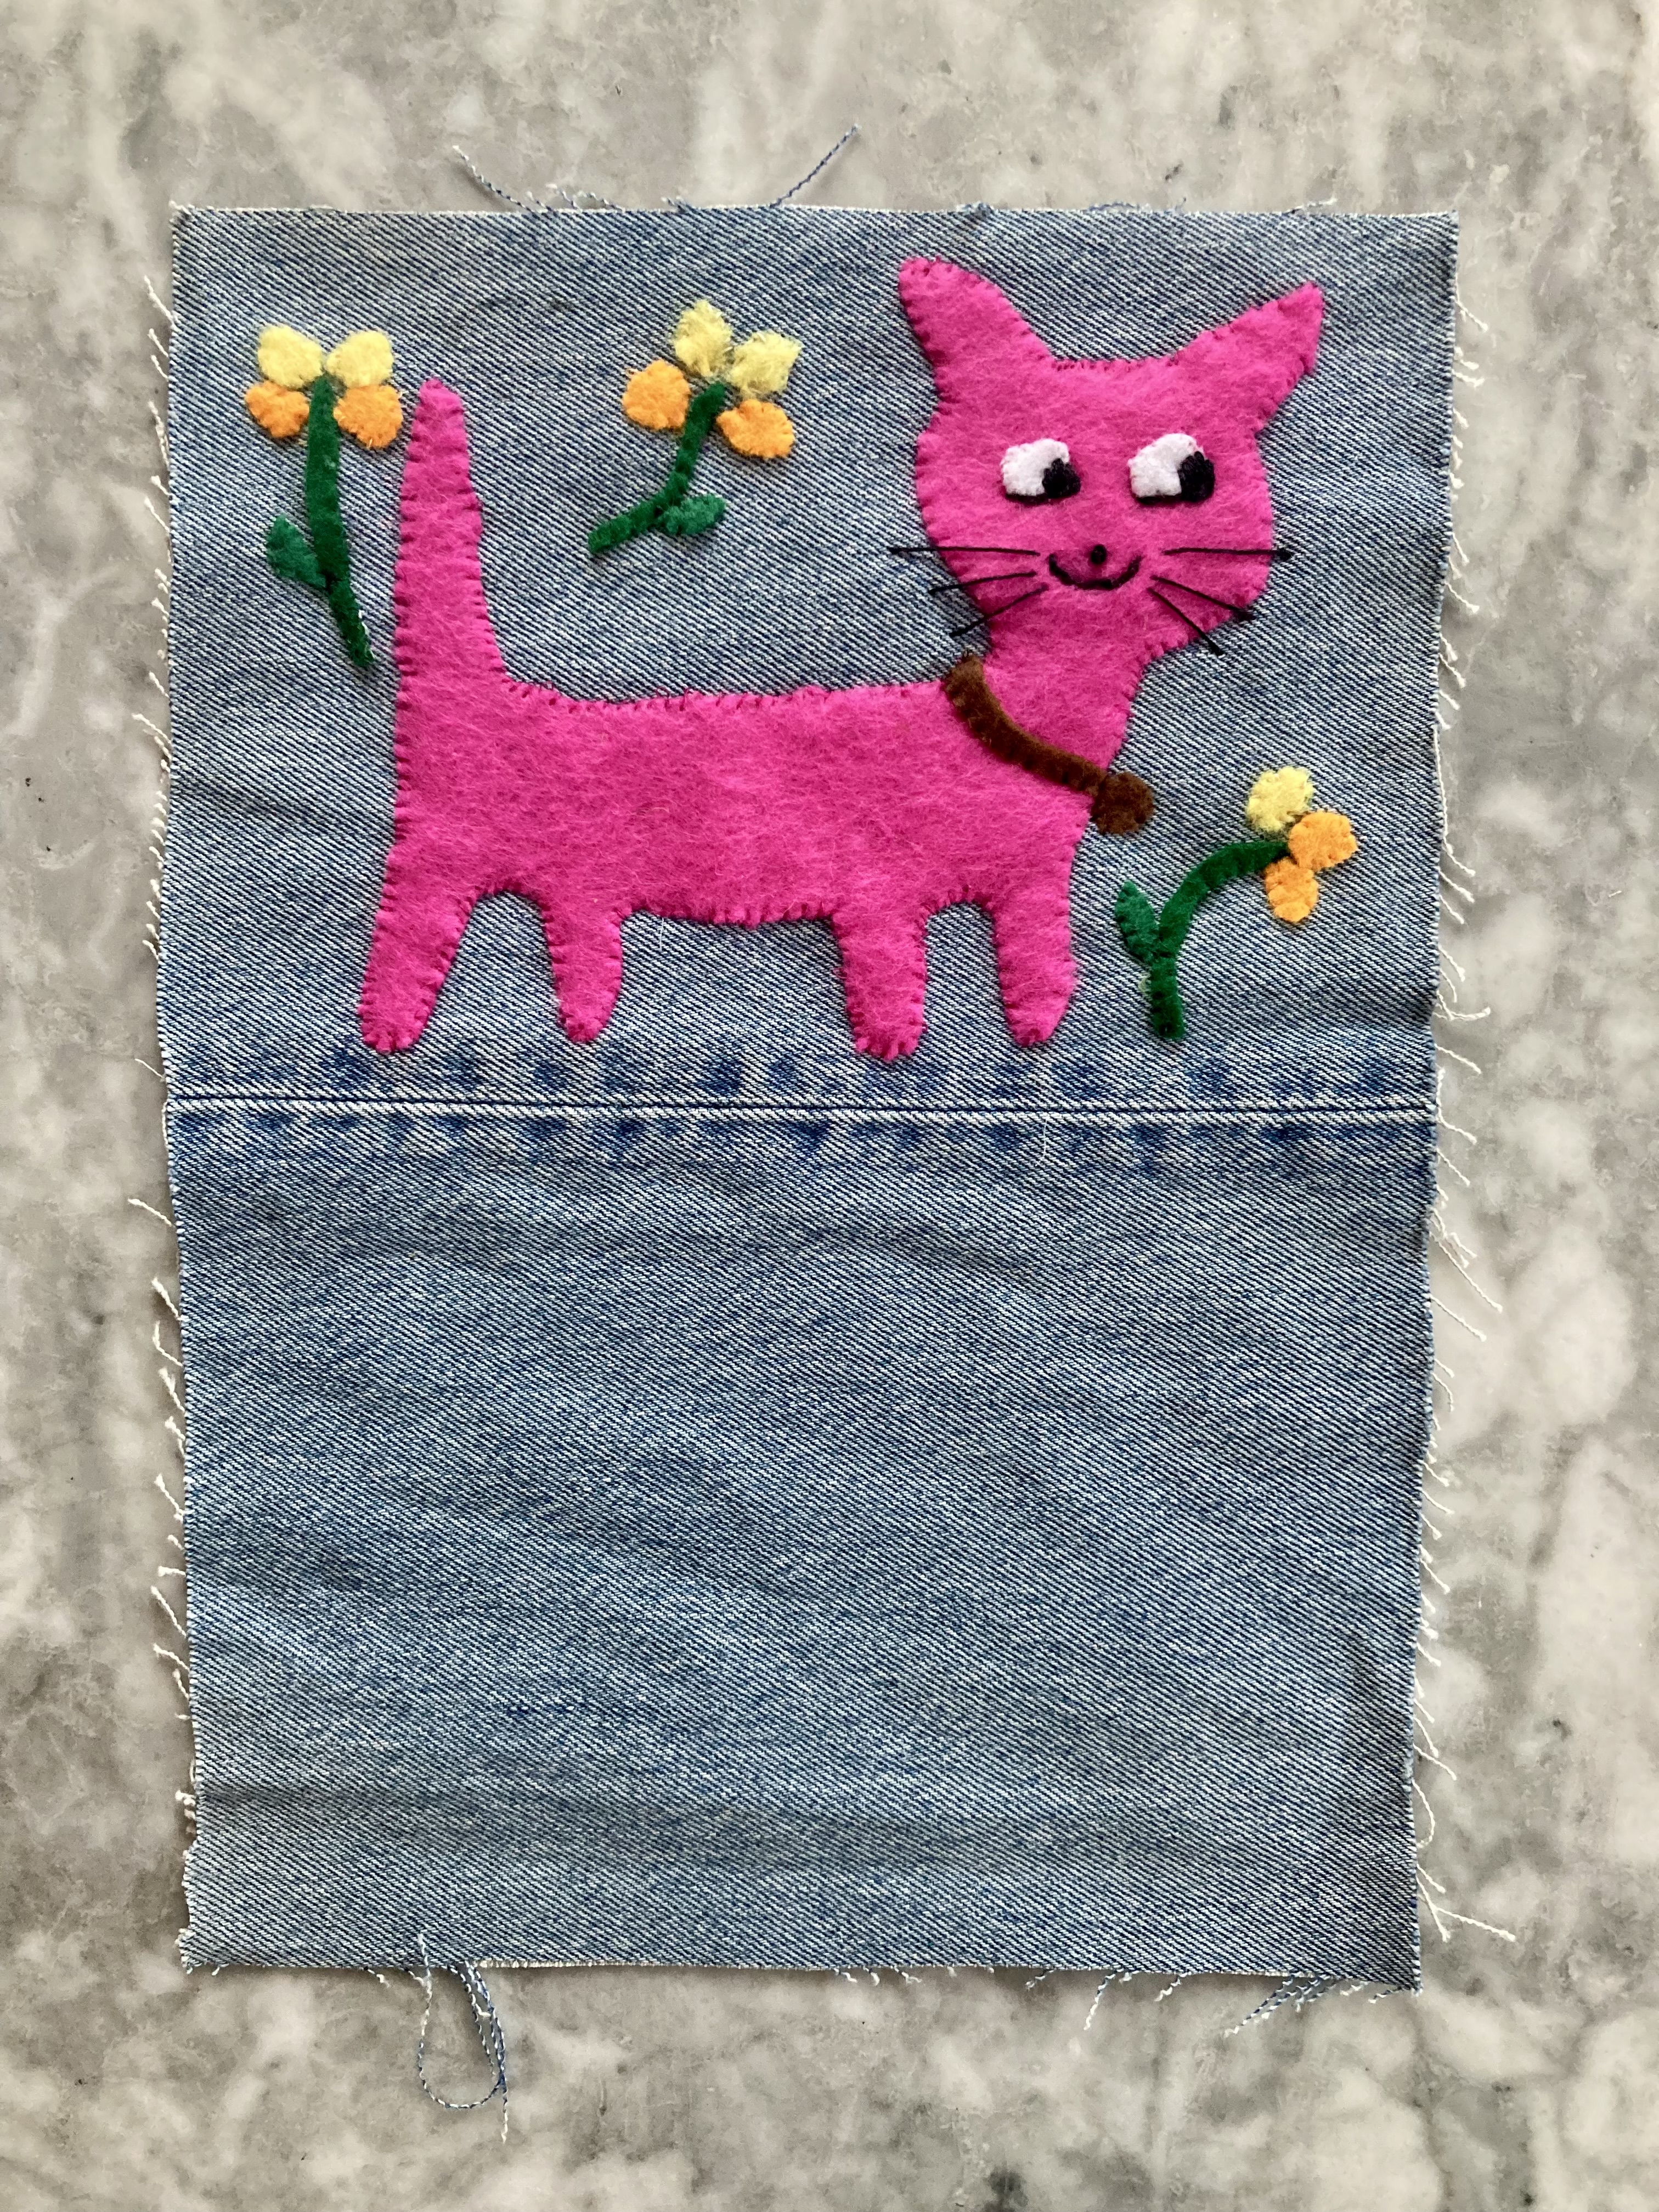
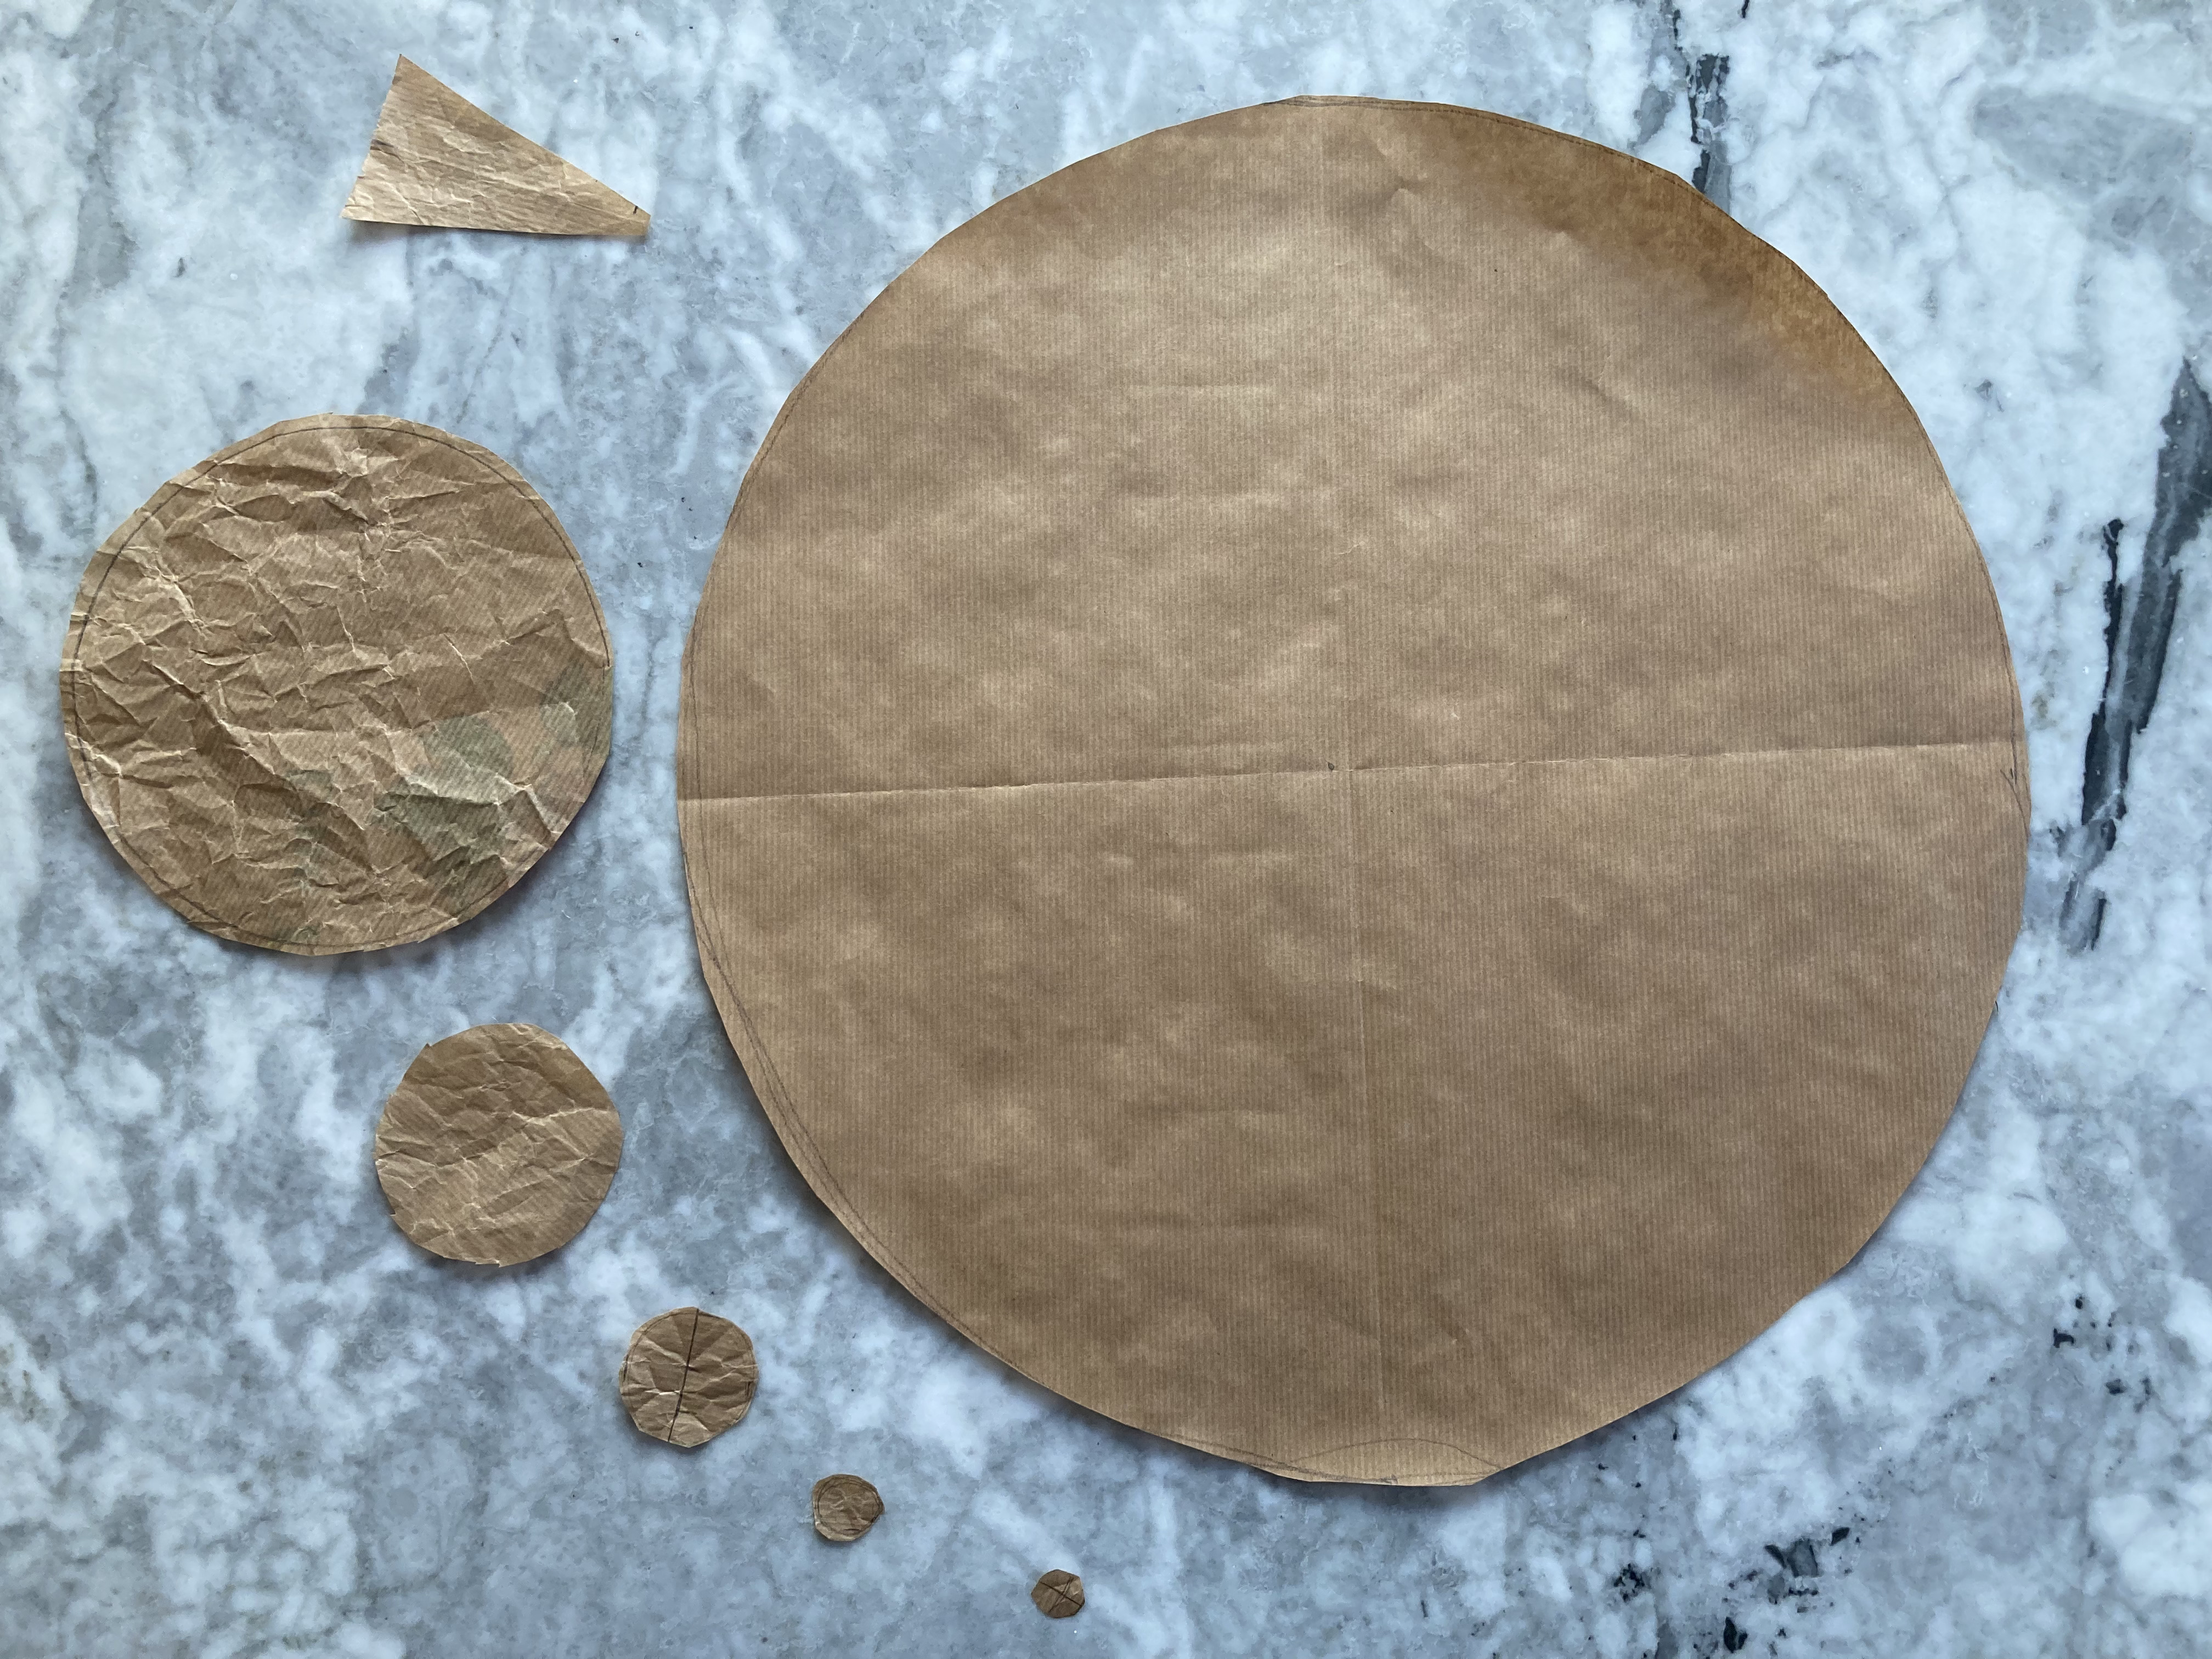
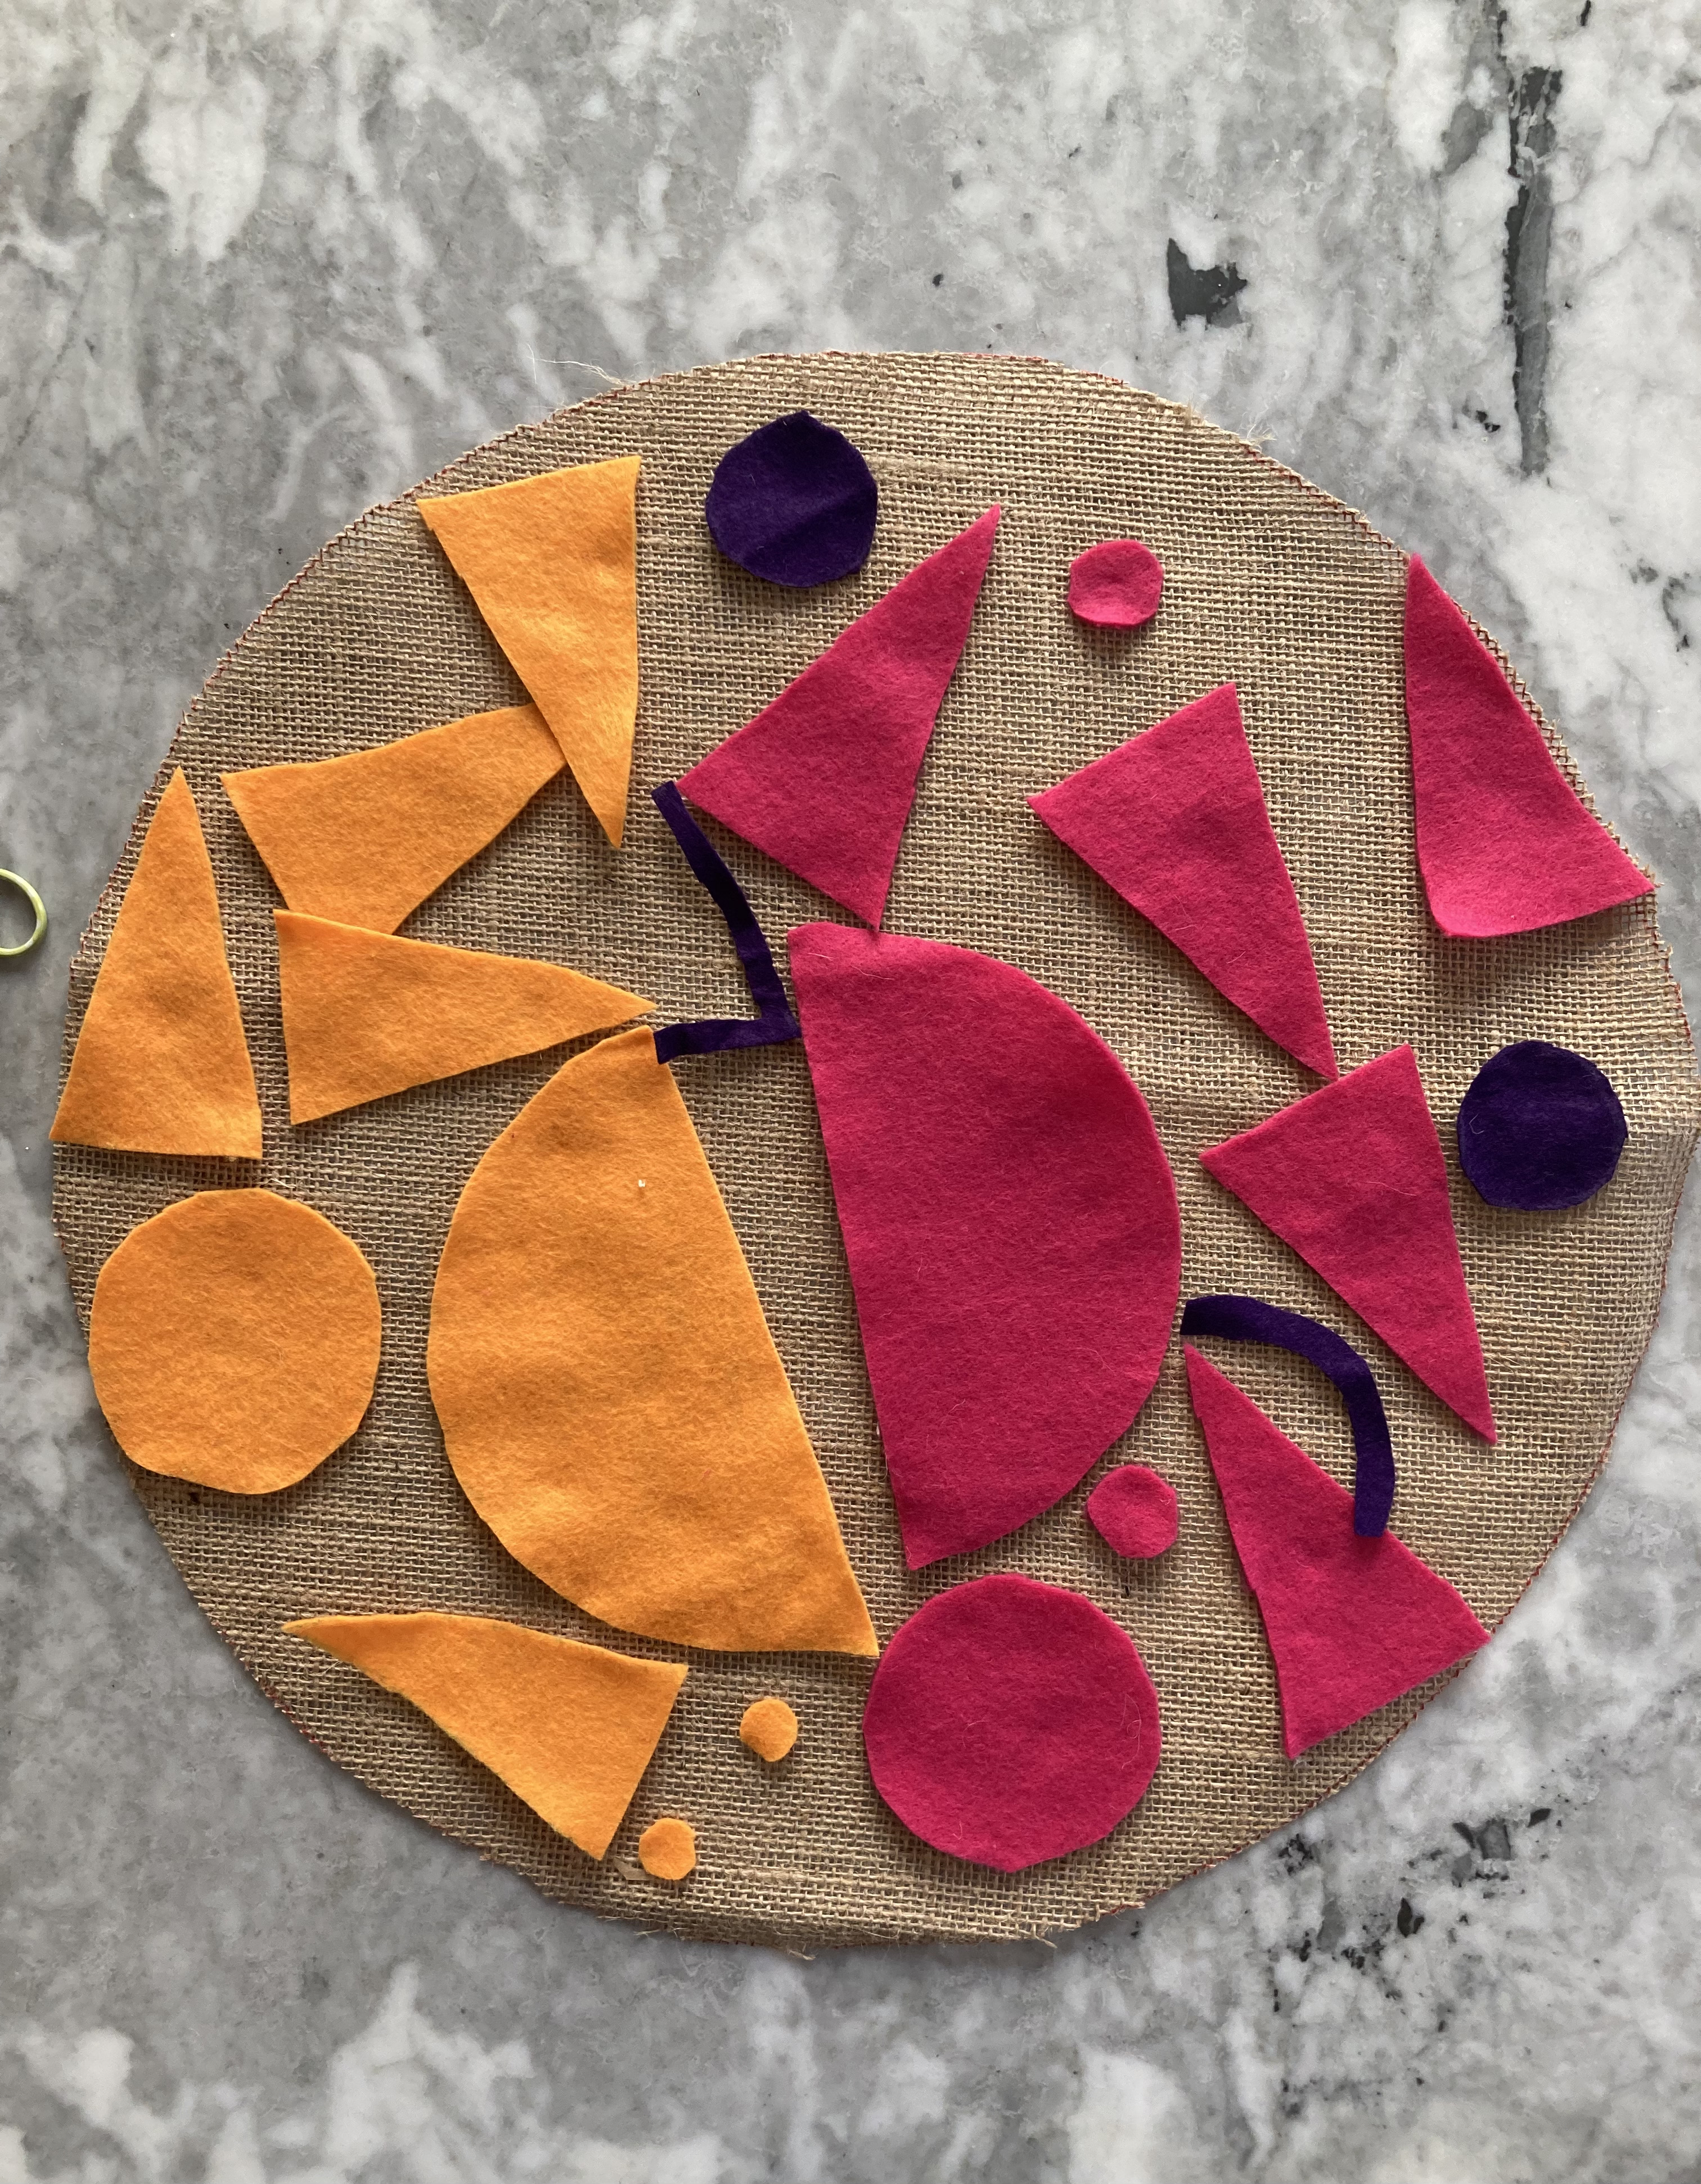
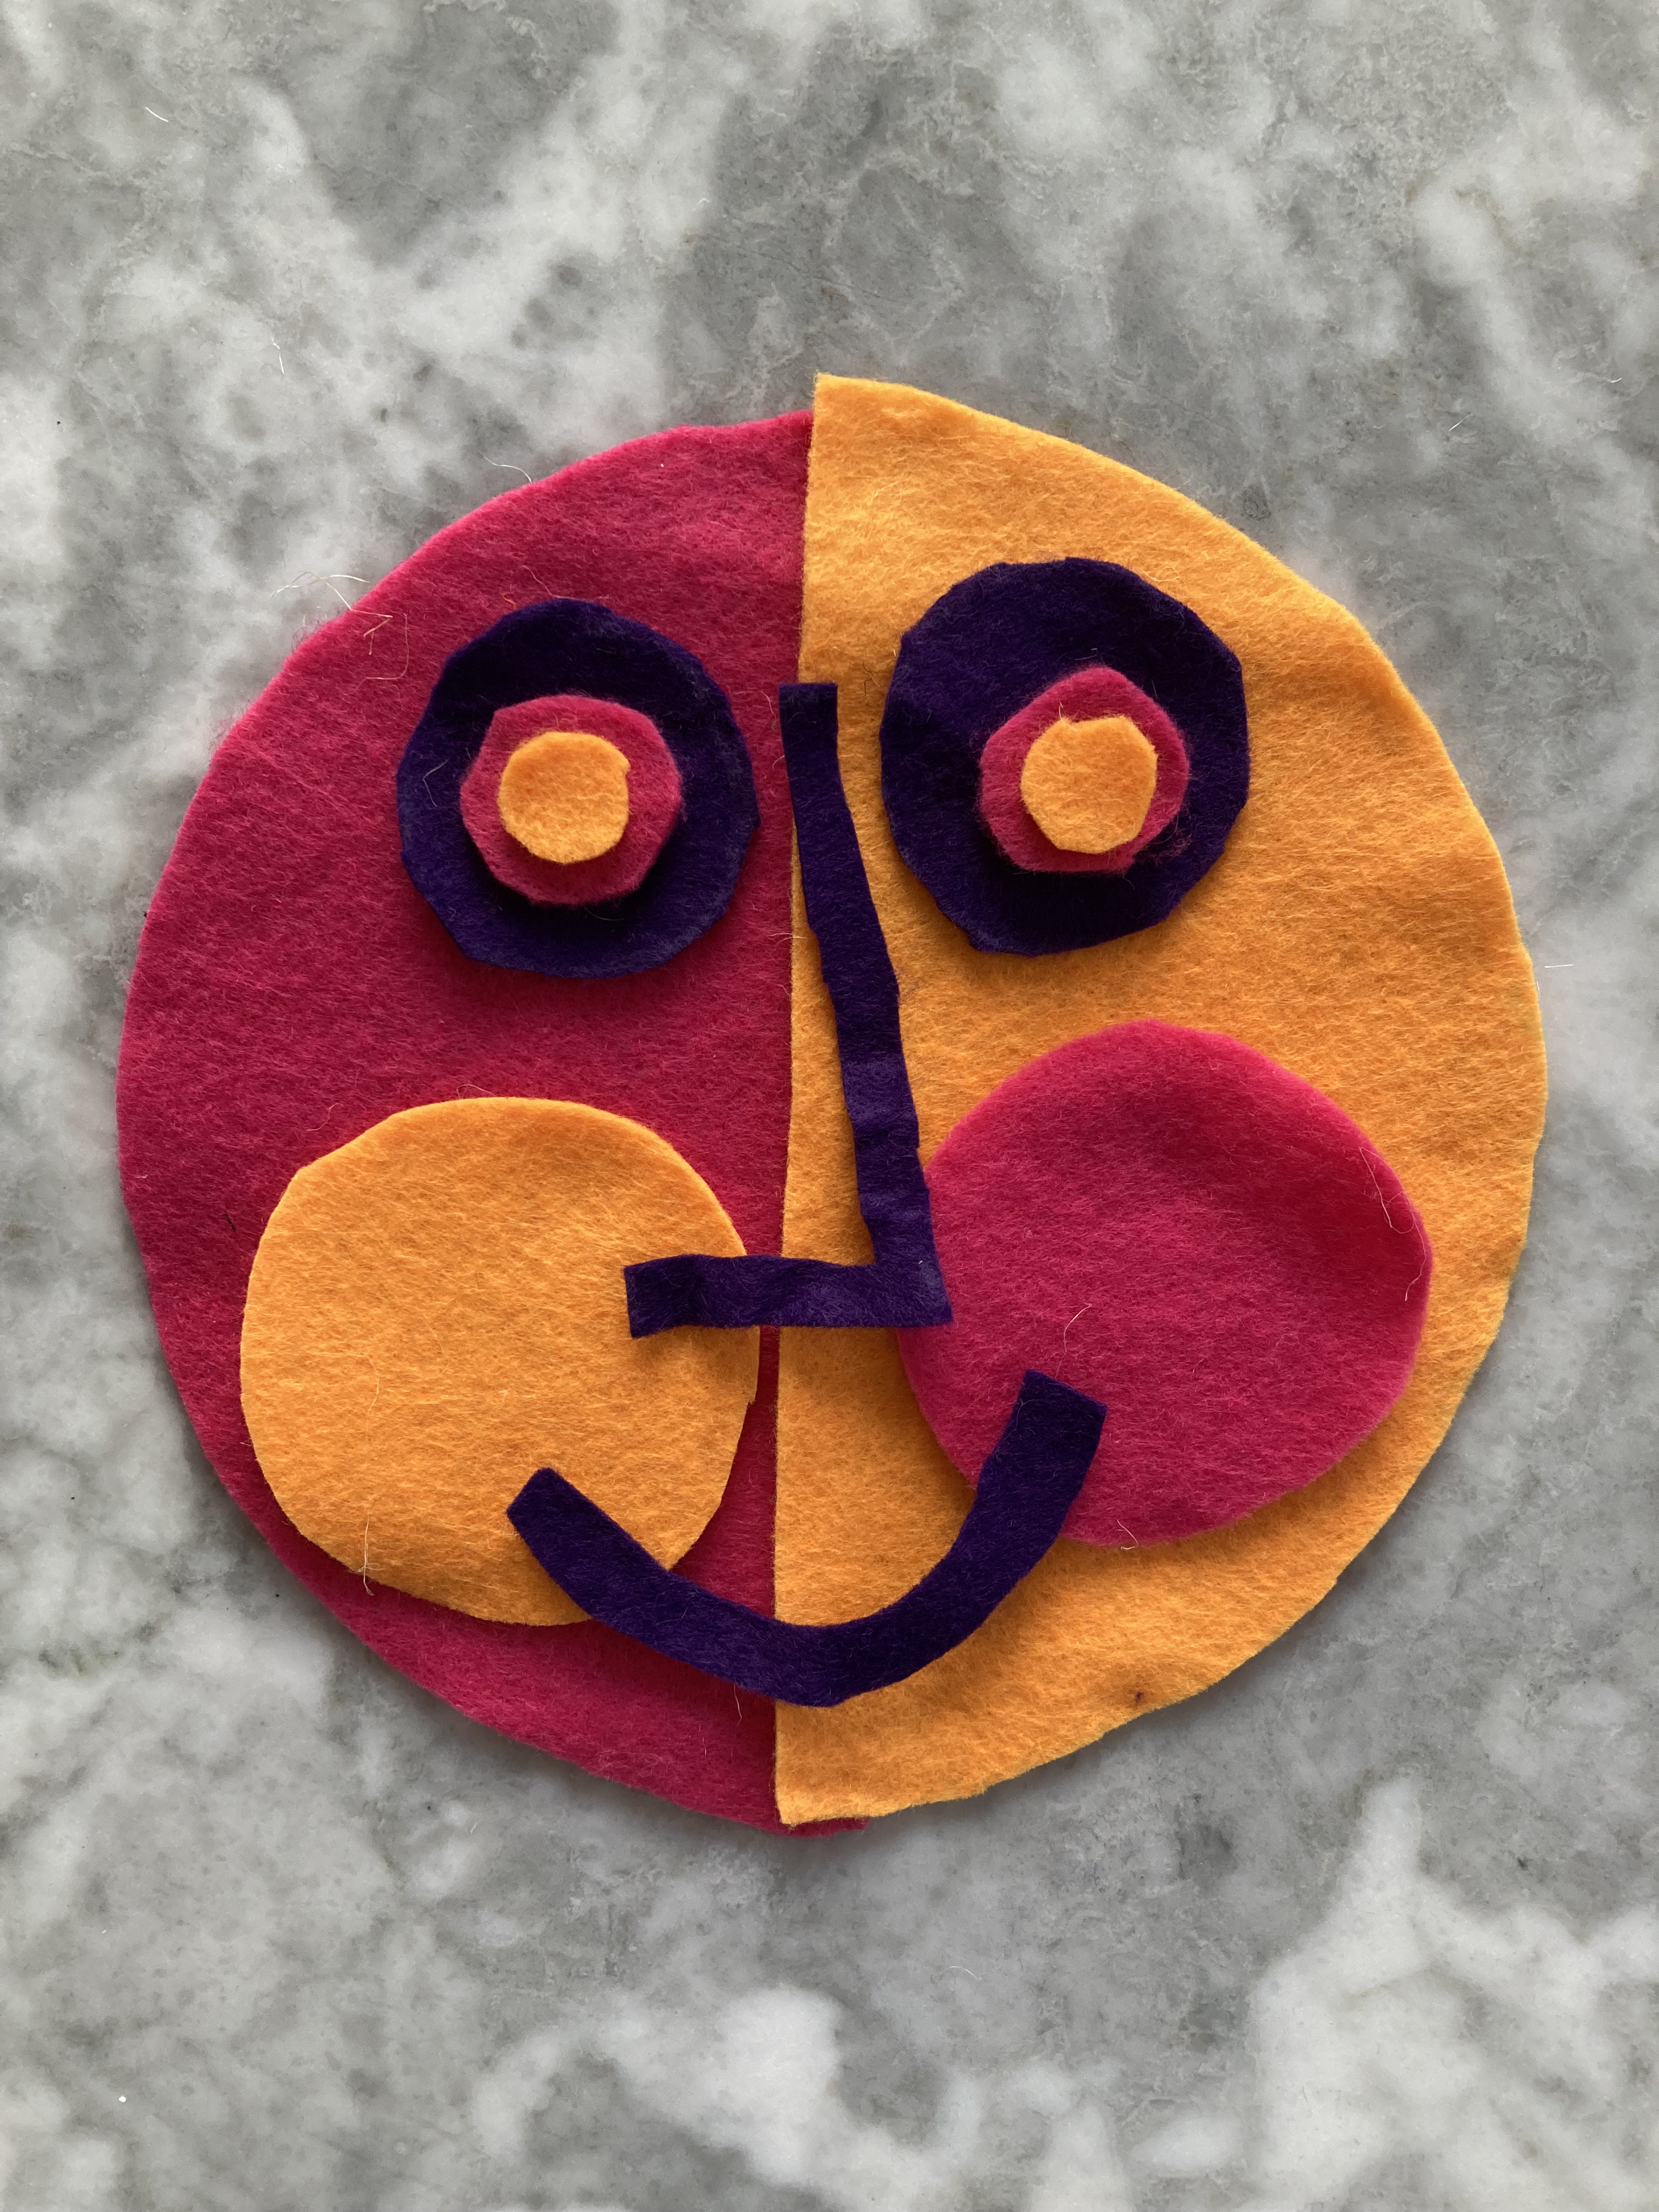
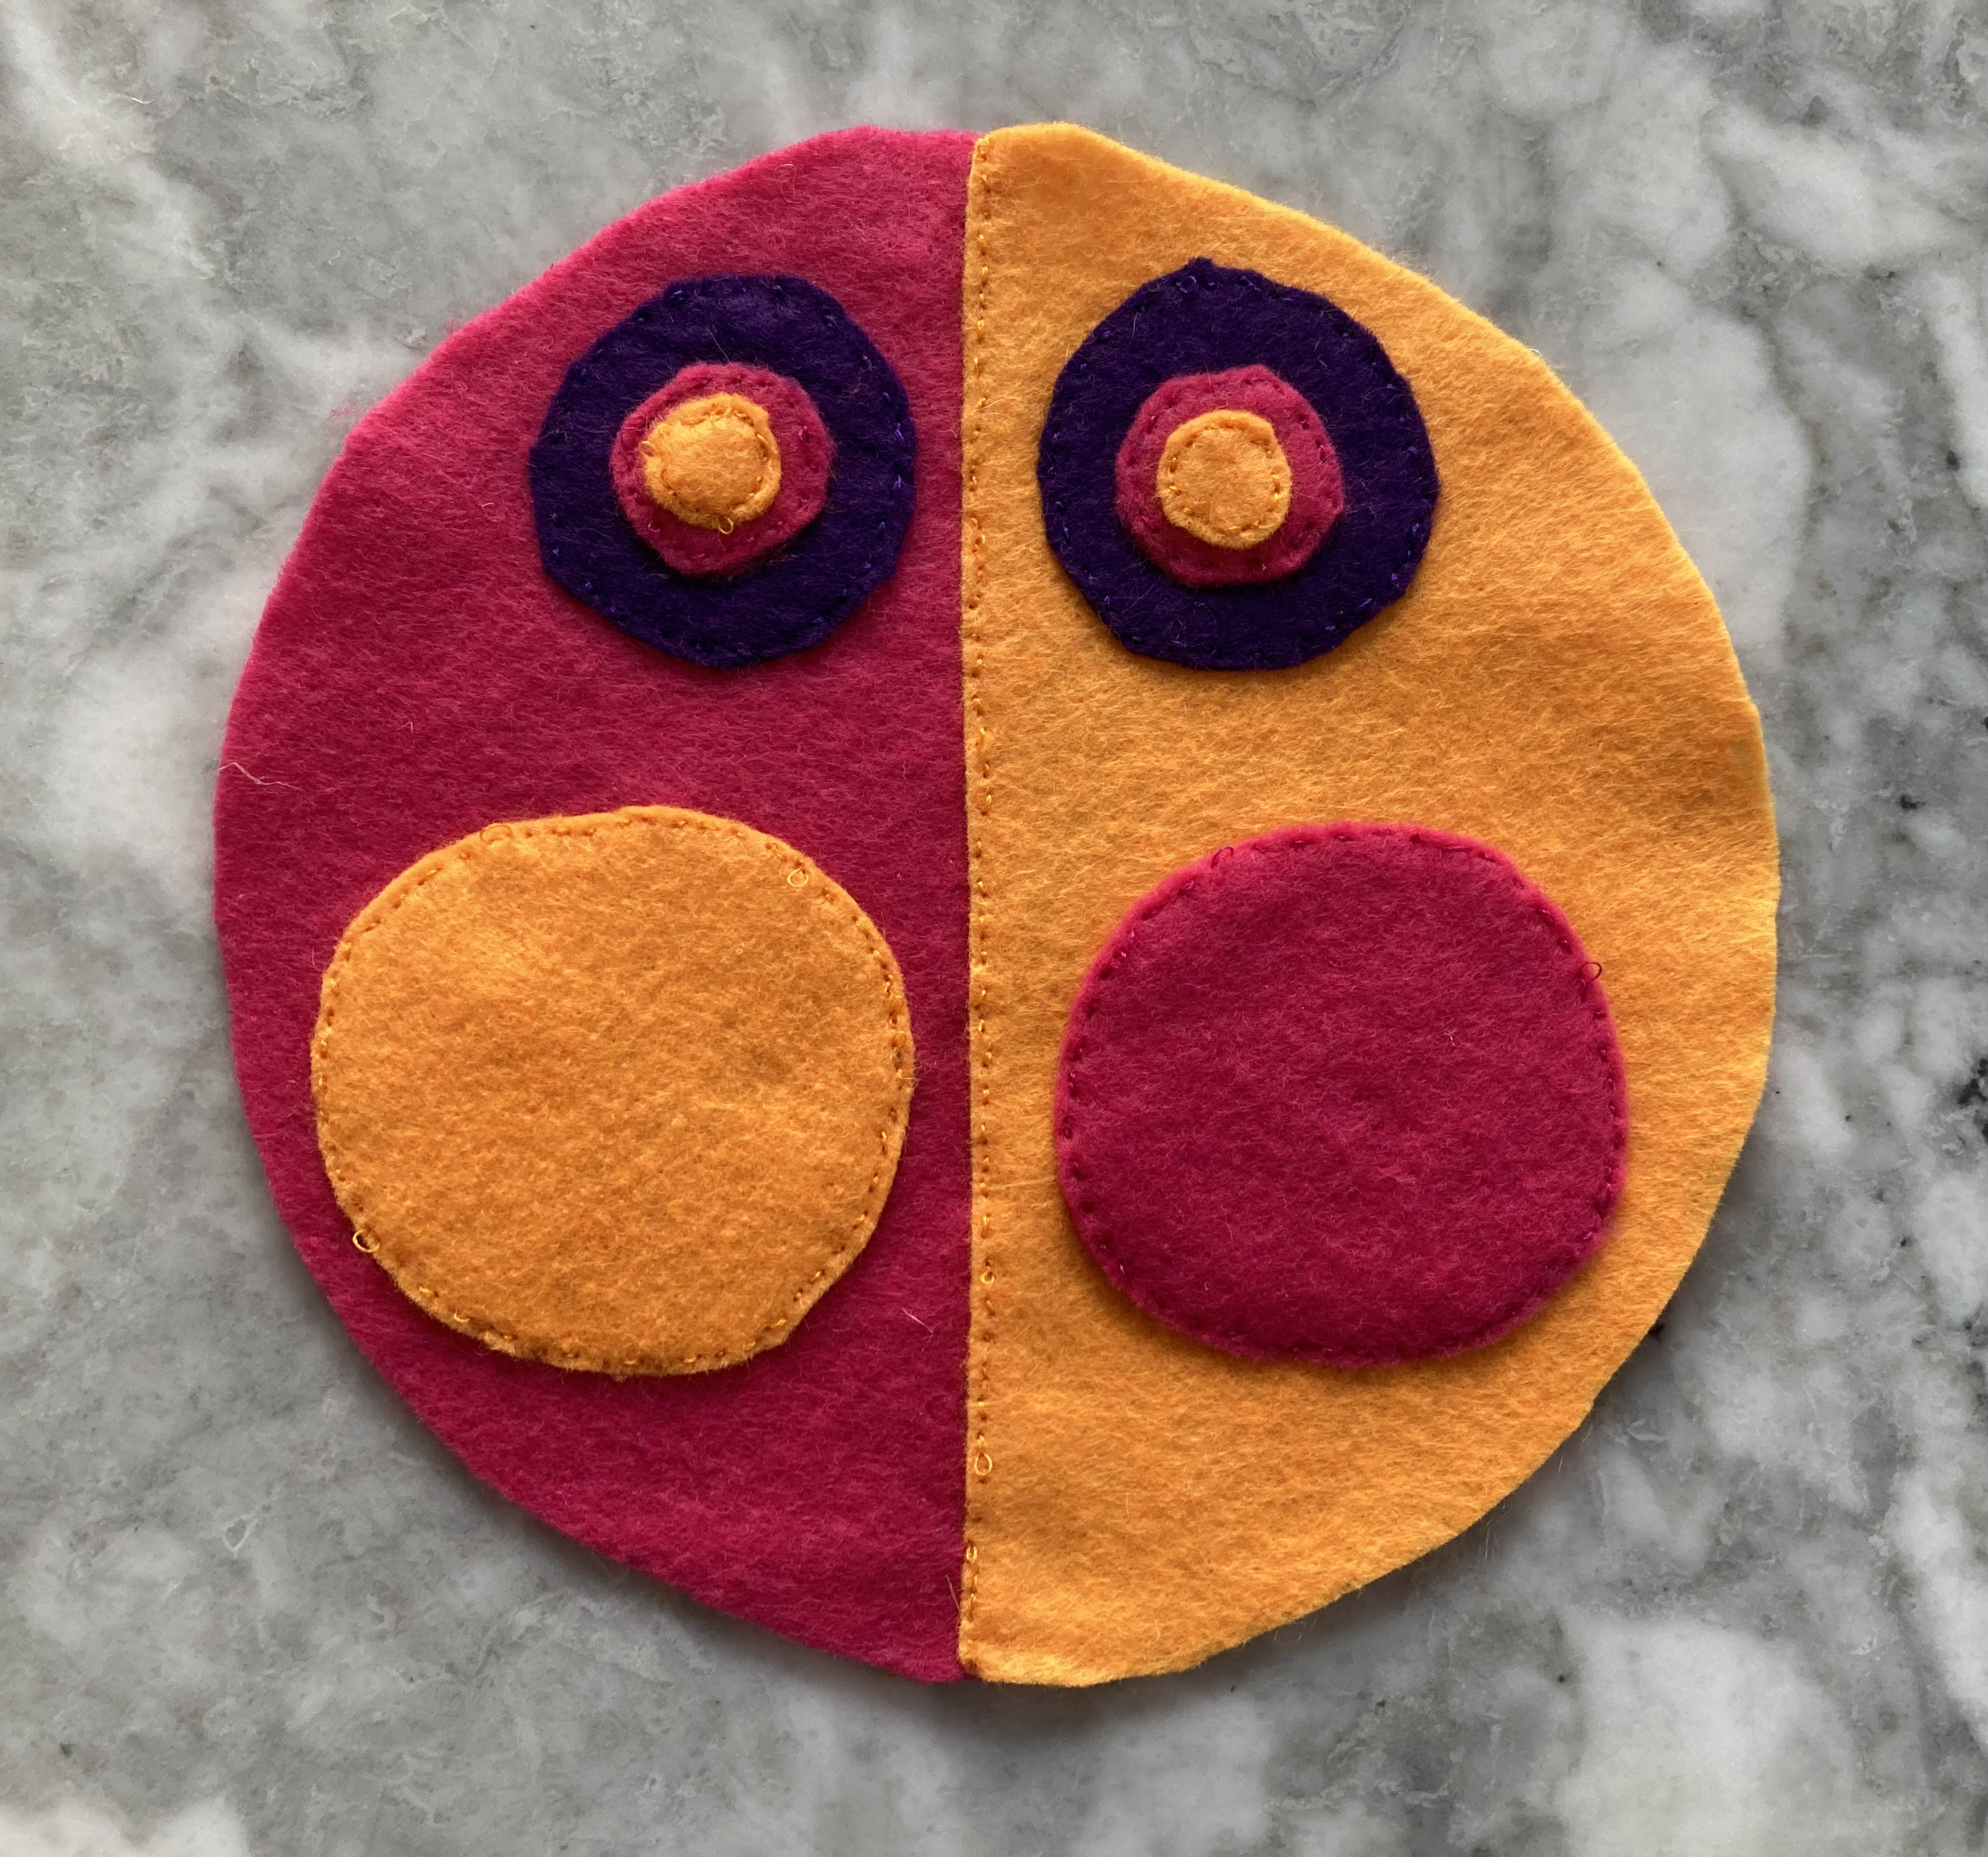
What colour cat? The cats in the pattern are white (rug, on royal blue background), white (nightcase, on light blue background), or blue (cushion, on cream background). I could have gone more realistic, with light grey or charcoal grey or brown. It didn’t seem whimsical enough, though. The design is so cute and cartoony that I found it better to use an entirely unrealistic colour, like the blue cat on the cushion. I had a big piece of pink felt that looked great on the blue jeans, so there it was. I made a cut-out template by photocopying the magazine page enlarged.

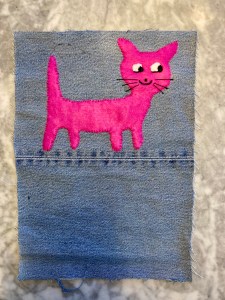
I appliquéd the eyes with pieces of white felt and embroidered the pupils, face and whiskers: satin-stitch and stem-stitch for the eyes, stem-stitch for the mouth, a French knot for the nose and individual long straight stitches for the whiskers. I was nervous, because anything with eyes is tricky, but I was so happy with the result! I think I really nailed the happy, lucky cartoon cat vibe.

I tried out a few different ideas for the flowers before committing to sewing anything down. My design didn’t leave a lot of room for seam allowances, so I left off the decorative lines on the sides. A single flower at the bottom right looked good, but unbalanced, so I added two more flowers at the upper left and upper middle. I adapted the bow around the cat’s neck into a more simple collar and left off the bow on the cat’s tail.

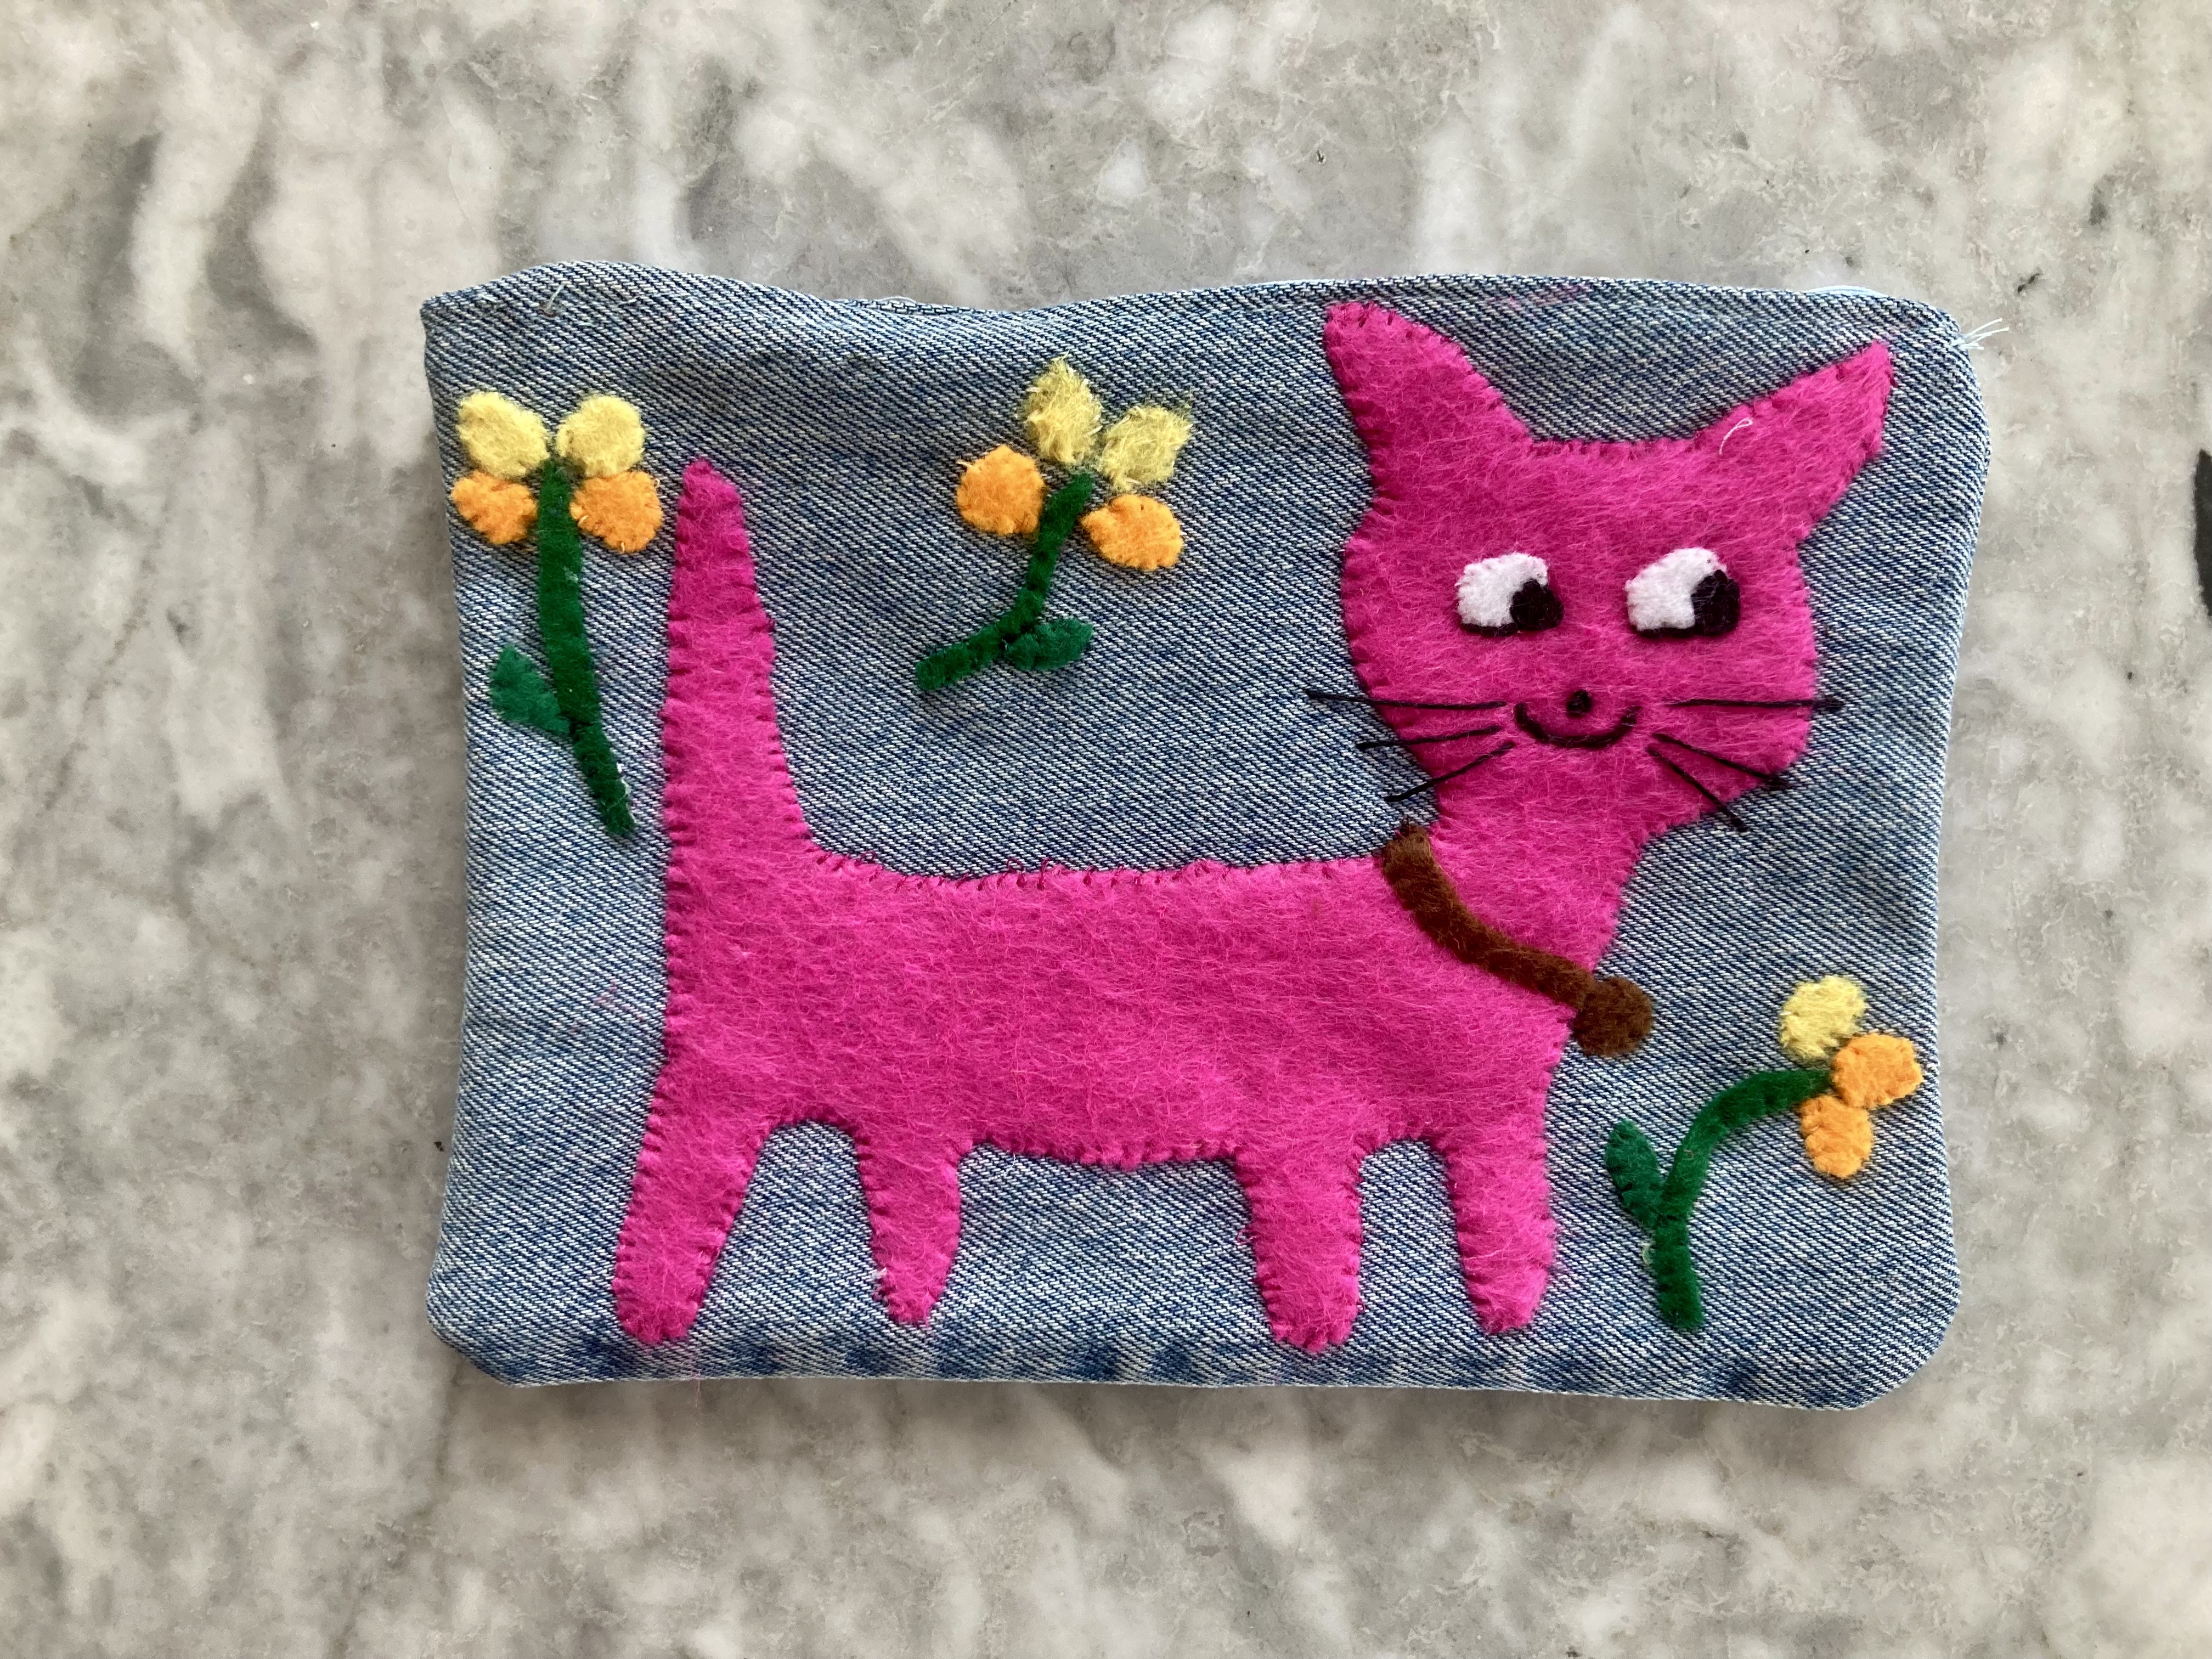
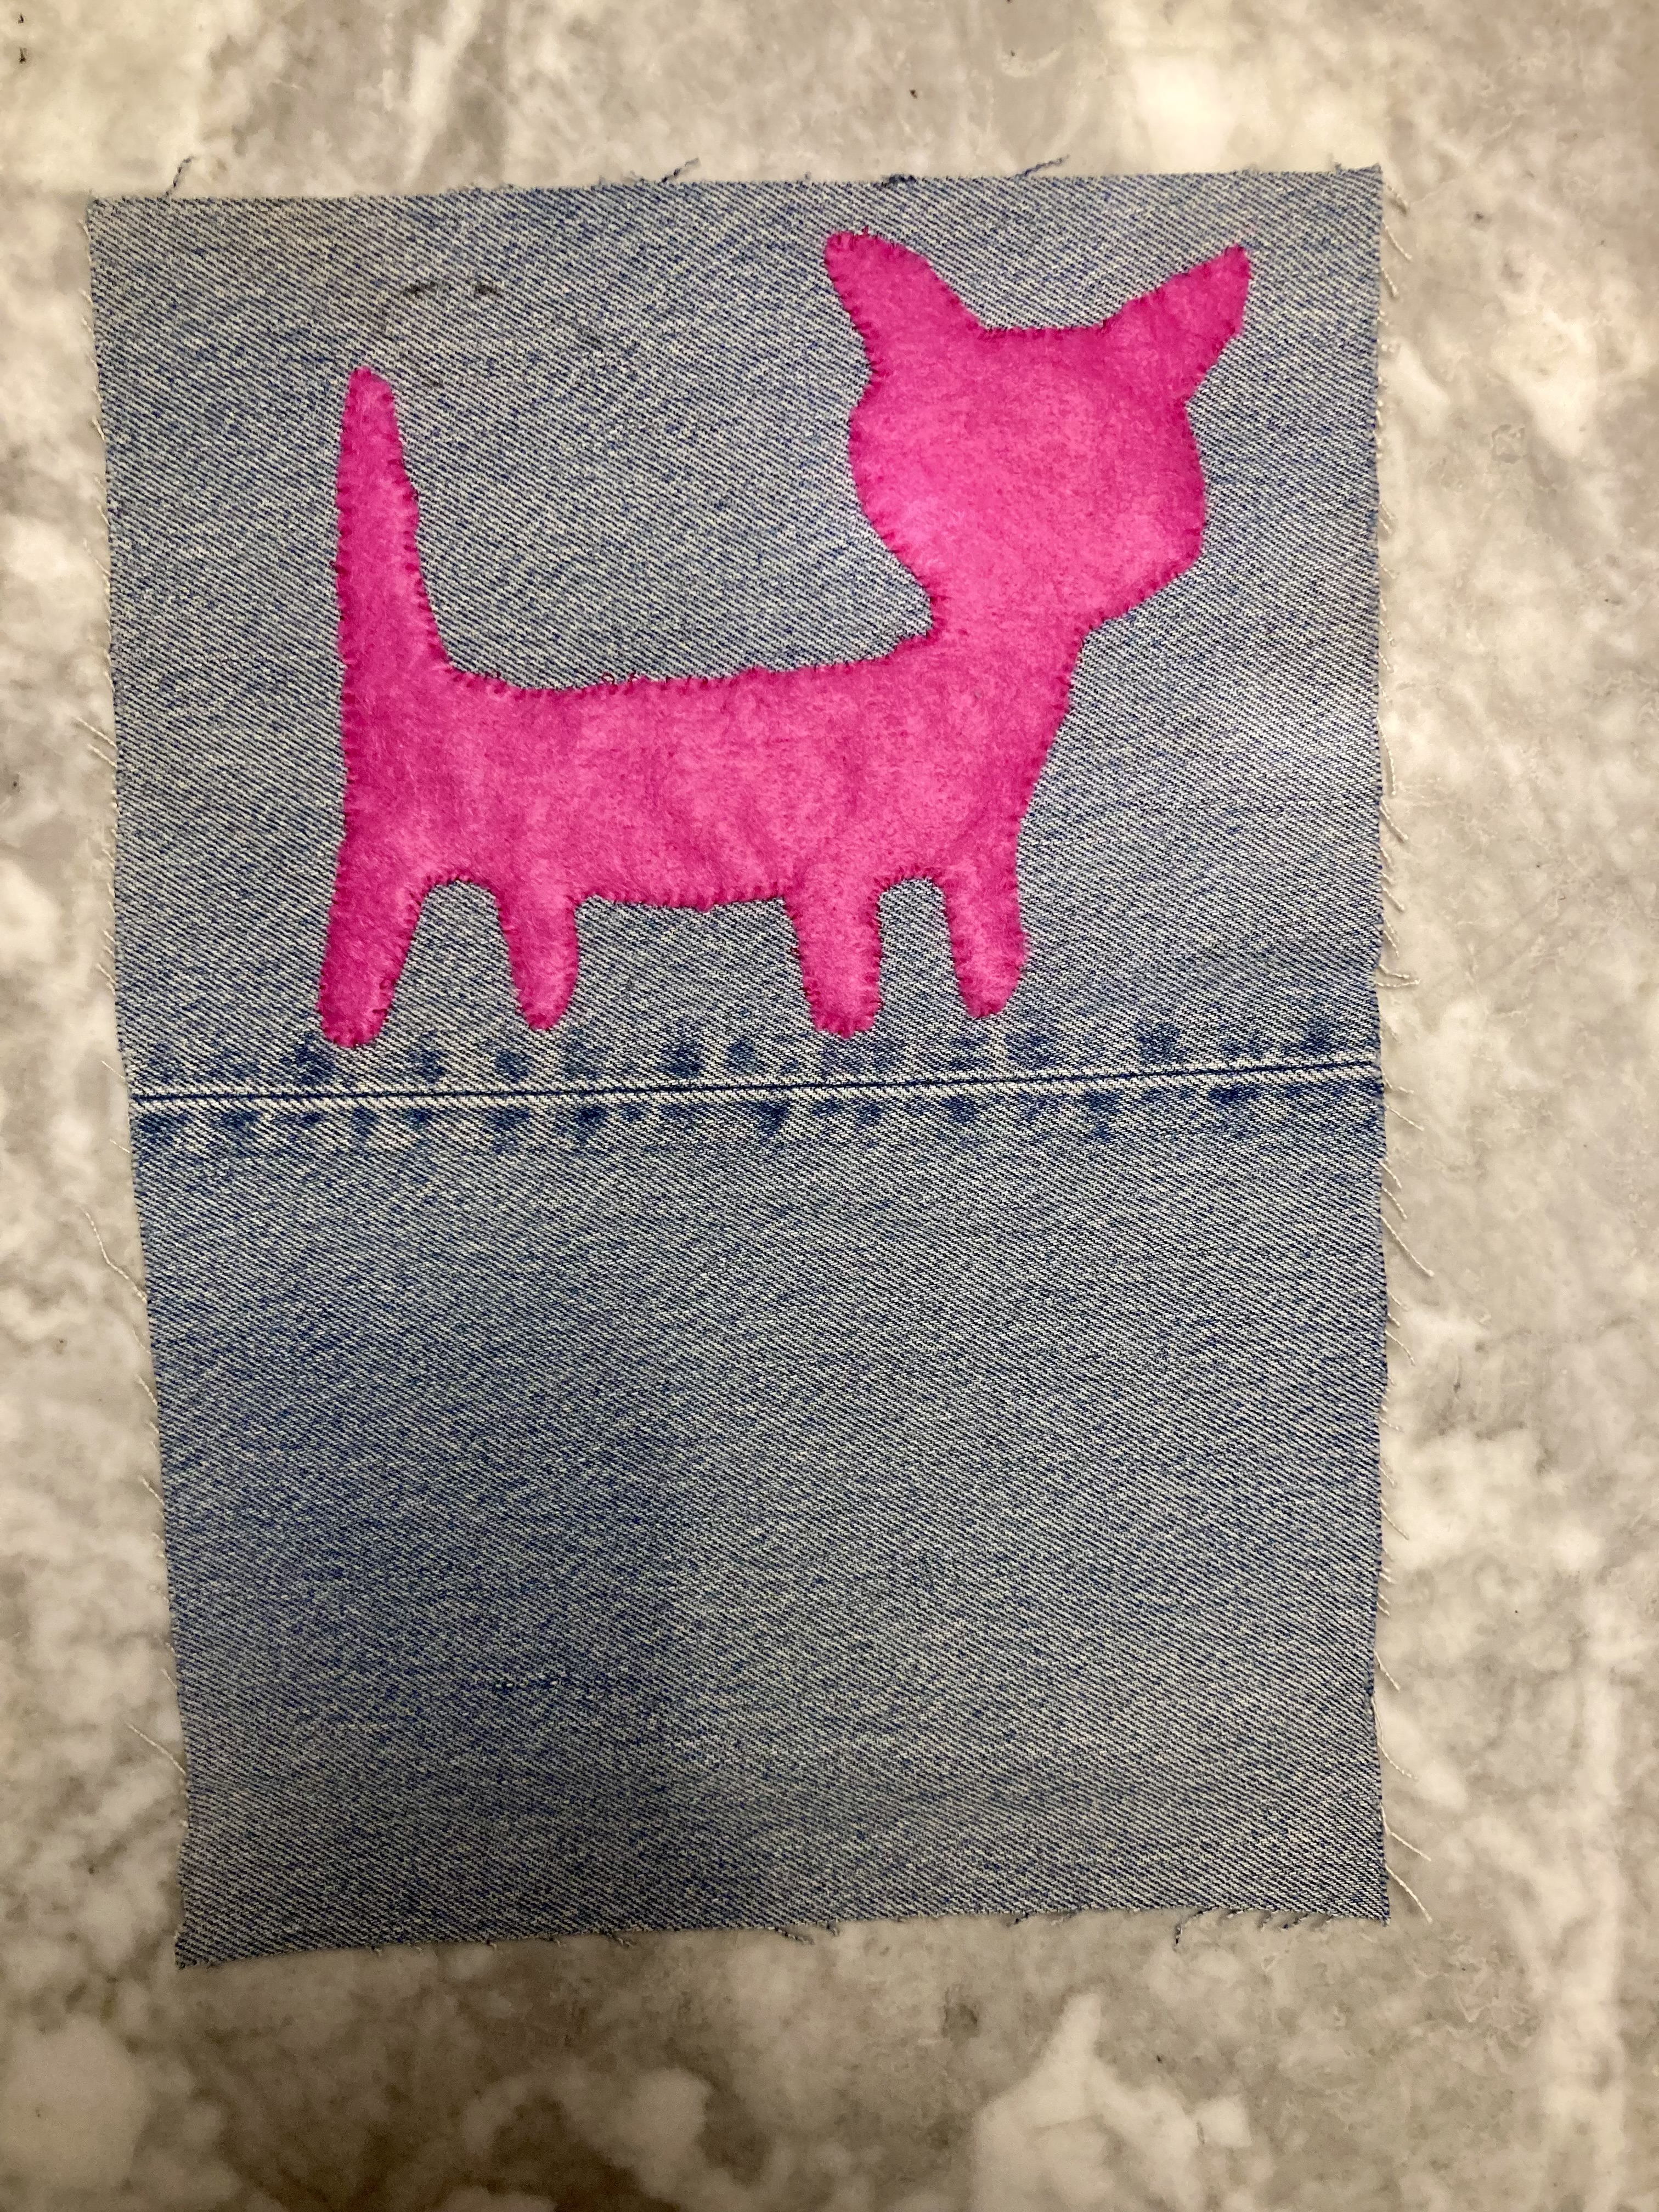
I sewed it up with minimal stress, except for the zipper, of course. Ugh, I hate zippers. This one was finicky and ended up a bit wavy, but nothing on earth will persuade me to re-do a zipper, as long as it works at all. It wasn’t until I starting writing this post, two days after the bag was finished, that I saw that I had forgotten to sew down one side of one flower and one side of the collar! Whoops. That’s what happens when you try to sew in northern Europe in December — there is no light anywhere. Can you see it in the photo? I fixed the flower and collar and then the project was really and truly finished.

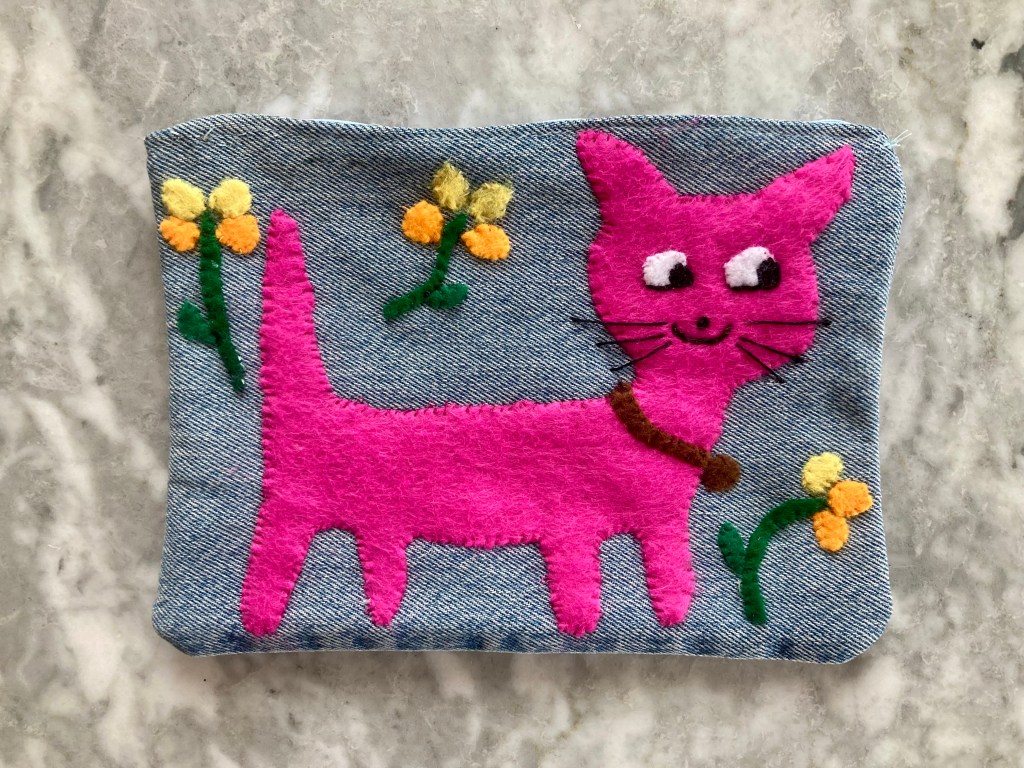
I am so, so happy with this project. It is so cute! The facial expression is perfect. I dare anyone, even cat haters, to look at this bright pink cat and not smile and feel happy. I would love to keep it for myself but I am going to give it to a cat-loving friend who could use some smiles and happiness right now. That way, it will bring both of us good luck.

Happy December Holidays to all of you, and all the best for 2026.

May 1967: Fish and Crab Cushions

Ahoy! It’s springtime at the Stitchcraft Sixties and what could be more appropriate than some accessories for the garden? I don’t have a garden, or even a balcony, but I do love appliqué and these May 1967 designs with “modern shapes in brilliant colours of felt on crash” that “make practical and gay deckchair cushions.”

The shapes are a fish and a crab, and the “brilliant colours” unfortunately don’t show up in the black-and-white photo. The fish is turquoise, dark green and lime green felt on lime-coloured “crash” (heavy burlap-type linen) and the crab is orange, magenta and light coral on light grey crash. Both use black fabric for the backing. I used the colours from the pattern with the fish on a somewhat more lightweight almost-corduroy cotton, and the crab on a darker grey heavy upholstery/decorating cotton. For the backing, I used upcycled jeans in light blue (fish) and dark blue (crab), and I lined both cushions with upcycled shower curtain to better damp-proof them in the northern European summer.

The shapes were suprisingly difficult to trace and cut out without a transfer — hard to get the fish pieces to line up perfectly, and the seemingly random-shaped crab leg segments to come together properly. I drew the fish outline on the backing-fabric paper pattern, then cut out the entire fish as a paper pattern based on that, then cut out the segments.

I love that some of the pieces on both cushions were cut out with pinking shears, but then I forgot to do it and had to buy more fabric and cut all the pinked pieces on the fish out again. Sigh.

The actual appliqué was very fast and easy. In the pattern, it says to do it on the machine, which of course would have been even faster, but I like working by hand. I used a small running stitch instead of and over-edge whipstitch, which I would normally use.

I flat-lined the finished appliqué and back pieces with the shower curtain material (I did use the machine for that) and made them up into cushion covers with zippers — not specified in the pattern, but I wanted the cushion covers to be removable for washing.

The finished size was about 17.5 x 14.5 inches, as in the pattern, which is about 45 x 37 cm. I didn’t want to make up cushions, so I bought two 45 x 45 cm ready-made cushions, which adapted themselves to the rectangular shape well enough.

It was an easy, fun project and I absolutely love the bright, 1960s colours and friendly, cartoon-like “modern” shapes. I also like sea animals, so perfect. Sadly, I have nowhere to put them and so cannot keep them for myself, but will give them away to friends for birthdays and/or housewarming gifts. Then I can visit the friends and the cushions.

Hope your Spring is going swimmingly!

August 1966: Flower Design Veggie Bag

Lovely sparkling colours of simple flower heads, show up beautifully on dark linen. Just a circular cluster of the flowers look very effective on a cushion or workbag.

My August 1966 / August 2024 project was this fun and easy embroidery design featuring a flower whose name, at least, was unfamiliar to me: the tongue-twisting Mesembryanthemum. The name encompasses an entire genus of plants, native to southern Africa, of which some species are succulents and others more “flowery” types. The species that inspired the embroidery is presumably M. crystallinum, aka “iceplant”, which I have encountered without knowing what it was called. Now I know!

The pattern is for a cushion or workbag, and the flowers are meant to be worked in wool embroidery on black linen. I have too many cushions and workbags already, so I adapted the design to make another little bag to buy and transport unpackaged fruits and vegetables from the farmers’ market, organic supermarkt, etc. (Here’s an overview of previous embroidered bag projects.) I bought a bunch of old money bags at an antique sale a while ago, which I upcycle and decorate for this purpose.

The flattish flowers with slender petals translate well to easy embroidery — the flowers are all worked in straight stitches, with French knot centres, and the little leaf details are loop stitches. I used scraps of cotton floss instead of wool, since the bag will be used and washed frequently. N.B. the tangled mess in the box of embroidery thread is not my doing! I inherited a big handful of embroidery cotton scraps from someone downsizing their elderly relative’s home. It proved very useful for this project, as I was able to match the colours from the pattern (white, maize, orange, mauve, violet, light pink, light magenta, magenta, spice pink, and plum, plus olive for the leaves) fairly accurately without having to buy anything new. Also, “spice pink” is listed in the materials section, but not included anywhere in the instructions. The colours in the photo are not accurate, either — what looks like sky blue and light turquoise is actually navy blue (my version of “violet”) and white.

The positions and colours of the individual flowers are given on a separate page in the magazine, which was practical as of course I didn’t have (or would have been able to use) a transfer. I had to adapt it anyway to fit the rectangular bag, but kept to the schematic as well as possible. Looking back, I could have balanced it out better by making the second flower from the bottom on the left side purple or orangey-pink instead of white, but whatever. I used my approximation of “plum” plus a sort of brick orange and medium brown for the French knot centres, using up the colours I only had little bits of. I finished off the bag with a button — always nice to find a use for that interesting, but singular button from the 10-cent random button bowl.

And that’s it! This was the perfect upcycling project — I made something useful and sustainable from 100% re-used and/or vintage materials. I love using these bags and can’t wait to show this new one to the cashier at the organic supermarket who always takes a second to admire them. I should make the next one for her.

June (July) 1966: Garden Cushion

The June 1966 issue of Stitchcraft had multiple projects that interested me and the July 1966 issue not really any, so I made another project from the June issue this July. It was one of those designs that I have been looking forward to for a long time and was thrilled to finally make it — a cushion “for sunny days in the Garden”. Very bright, very psychedelic (is this what Stitchcraft meant when they wrote “Get ready for High Summer”?) and very, very 60s! I love it! Here’s some music to listen to while you read this post!

It’s made with felt appliqué on hessian fabric in orange and magenta with purple facial features. I really wish the magazine had a colour photograph. There was no need to send away for a transfer even at the time, as the dimensions of the cut-out circles and wedges are clearly described in the instructions and there’s a little schematic in the back pages to help. You simply cut paper patterns for circles in different diameters (7 cut in half, then 3, 1 1/4, 3/4 and 1/2 inches), plus a long triangle wedge pattern (3 1/2 inches long by2 1/2 inches wide at the base). The measurements of mouth and nose are described carefully as well, and there you have it. Here are my paper patterns, arranged to look like a spaceship entering a very well-organised solar system, and the cut-out felts, arranged to look like a 1980s new-wave pizza.

The appliqué is supposed to be done on the machine. I weighed the time factor of stitching by hand versus the bother factor of making bobbins in 3 colours that I would not otherwise use and switching them out constantly, and decided to stitch the felts on by hand with a small back-stitch. It was actually quite relaxing and probably didn’t take a whole lot longer than if I had dome it on the machine.

The hessian background is 17 inches in diameter. You were supposed to use a contrasting linen for the back piece, but I had plenty of hessian and no suitable backing linen, so I made both sides in hessian. Always the up-cycler, I also finally had a use for the old (well-cleaned) shower curtain in the craft drawer. I flat-lined the hessian with it, making the background fabric stronger and less see-through and, more importantly, protecting the inside of the cushion from getting damp in my rainy climate. Stitchcraft actually occasionally recommends lining “outdoor” projects with plastic in some other issues, and I had been looking forward to trying it out.

The inner pad is a piece of foam rubber that I ordered in a block and cut into a circle of the proper size with a carpet knife. It was not as easy to cut as I had imagined! I had to saw away at it quite a bit and the finished edge looked rather chewed, but it worked. As far as sewing it together… now, if I were really smart, of course I would have made the back circle in two pieces with an overlap in the middle, so the cushion would be removable. (It didn’t say to do that in the instructions, but it would have been smart!) Alas, I did not think of that option in time, so I kept the opening as small as possible and sewed it up by hand after putting the foam cushion in.

And it was done! WAIT, NO! After it was all finished, I took another look at the big photo in the magazine and saw that there was supposed to be a lot more decorative stitching on the “cheeks” and “rays”. Oh well! The cushion was finished and sewn up, so there it was. Note to self: if I make it again, I’ll stitch the appliqué on the machine with the decorative bits and organise the cushion back better. Still 100% happy with it, though.

I don’t have a garden, or even a balcony, so this will be a present for a friend.

P.S. Does it remind anybody of this classic anti-nuclear power sticker? (Though the logo design is later, from 1975.)

P.P.S. It was so cloudy and overcast the day after I finished the cushion that I had to wait another day to photograph it — there wasn’t enough light to get a good picture. As I write this blog, we’re having a thunderstorm. So much for sunny summer! At least the cushion gives me all the light and warmth I need.

Edit 15. August 2024: Here’s a photo of the cushion in its new home!

May 1965: Primroses and Violets

For this month’s project, I couldn’t decide whether to make the pretty 3-colour “Shaded Blouse” (knowing that I have plenty of knitted tops, and that I would have to buy yarn for it when I am trying hard to reduce my stash) or adapt the tablecloth/dressing-table set embroidery pattern for another vegetable bag (quick, easy, useful, environmentally friendly and reduces the stash of embroidery thread and yet-unembroidered bags). Spoiler: I made both, so the stash balance will remain even. The top will take a little while, so here’s the veggie bag in the meantime.

The pattern is a design of yellow primroses and purple violets, but not in the same “bouquet” — there’s an option for a tablecloth with the primrose sprays in the corners and the smaller, individual violets scattered across the middle surface, or a “cheval set” for your dressing table with one large mat (2 primrose sprays and 2 violets) and two small mats (one violet each.) I chose to just make the primrose spray.

The bag is one of several that I bought at an antique sale a few years ago for a euro each. They are literally old moneybags, formerly used to transport money to and from the German national bank (hence the “Deutsche Bundesbank” and date printed on it; this bag was apparently from January 1997.) After 2002, the German Bundesbank replaced the old bags with newer and better ones (better in the sense that they presumably fulfilled new security regulations for the Euro) and you can now buy the disused old bags at antique markets, via ebay, etc. How they got from the bank to there, I do not know, but would love to find out. (If you are an expert in the sale and trade of disused moneybags, please share your wisdom in the comments — I genuinely would like to know.)

Anyway, apart from the fascinating can of worms that is their origin story, the bags are the absolute best for buying vegetables at the grocery store, farmers’ market etc, being made of a very thick linen (?) fabric and just the right size for small amounts of things like mushrooms, green beans, shallots, etc. Because they are both tough and easily washable (of course I washed them thoroughly before starting to use them for food items — money is literally filthy) they are particularly good for sandy or earthy vegetables like the aforementioned mushrooms, new potatoes, or the kind of carrots that I like to eat, which are grown in peat and therefore quite “dirty” (but taste better than regular carrots).

The actual embroidery pattern was not difficult. Of course, I had no transfer, since I would have had to order it in the mail in 1965. But it was no problem to sketch out the flower spray from the photo. I used transfer paper to transfer the design onto the fabric. The ink was quite faint, so I went over it with a ball-point pen (washable), which worked well enough. There were instructions in the magazine and even a helpful close-up of the stitches, which were all extremely easy: satin stitch for the petals, blanket stitch for the leaf outlines and stem stitch for everything else. I ran out of light yellow after embroidering half of the flowers, and the new skein I bought was one colour-shade different. You can tell if you look closely, but I don’t think it’s a flaw — it gives the flowers a little more depth.

This is the third “Bundesbank” bag that I’ve embroidered, as well as another bag of regular cotton fabric. I used the other bags to buy stuff at the local organic supermarket last week and the cashier stopped in the middle of my checkout to say, “I’m sorry, I just need to take a second to admire this beautiful work.” That was sweet! If I ever get enough of these made, I’ll probably start selling them.

Stay tuned for the “shaded blouse”!

August 1962: Gladioli

August was a pretty blah month this year, what with the never-ending Covid-19 pandemic and associated long-term isolation, illness and unemployment. My knitting motivation is sub-par and the August 1962 issue of Stitchcraft didn’t have any projects in it that really inspired me. Still, I’ve been trying to turn the situation into an “opportunity” to save money and free up space by finishing WIPS and making new projects from stash.

This month’s embroidery flower was the gladiolus, with a special extra design of wild orchids. I chose the gladioli and embroidered them on another one of the recycled moneybags that I bought at an antique market last year. They really do make excellent sturdy little bags for buying small amounts of potatoes, mushrooms or other vegetable items, and with a zipper on the top they would even be good for buying and storing things like beans and lentils in bulk. They also work well as small project bags — I kept this WIP in the bag that I made in December.

The colours that I had in the embroidery-thread scrap box were more or less accurate to the pattern (mauve, mid-mauve, violet, yellow, gold, dark green and light green.) Also, the stitches are technically not very hard to do: the petals are long-and-short buttonhole (blanket) stitch outlined in stem stitch with straight-stitch center lines and satin stitch centres, the buds are satin stitch, the stems are stem stitch and the leaves are fishbone stitch. I like the effect of the dainty flower embroidery on the rough burlap fabric, too.

On the critical side… I am really not that great at embroidery, especially when I don’t have a transfer and I’m working with fabric like this, on which I can’t draw a design outline very well. I drew a few straight lines and dots with a pencil and improvised from there. Also, since the fabric is already made up into a bag, it’s difficult to use a hoop properly or work on the lower edge. The buttonhole/blanket stitch is a strange choice for the flowers, if you ask me — they look very scraggly! (Just like my real plants at home, ha ha.)

I left the top edge unfinished for now, as I couldn’t decide whether to make a simple button closure like on the other embroidered money bag, a fold-over buttoned closure, or a drawstring. (I don’t have a zipper of the right length on hand and I’d like to stay on the “no-buy” wagon for as long as possible, but it would be the most practical solution.)

I still have plenty more of the bags, so I can keep making one every time a little embroidery project presents itself.

February 1962: Squirrel or Chicken?

IMG_3058
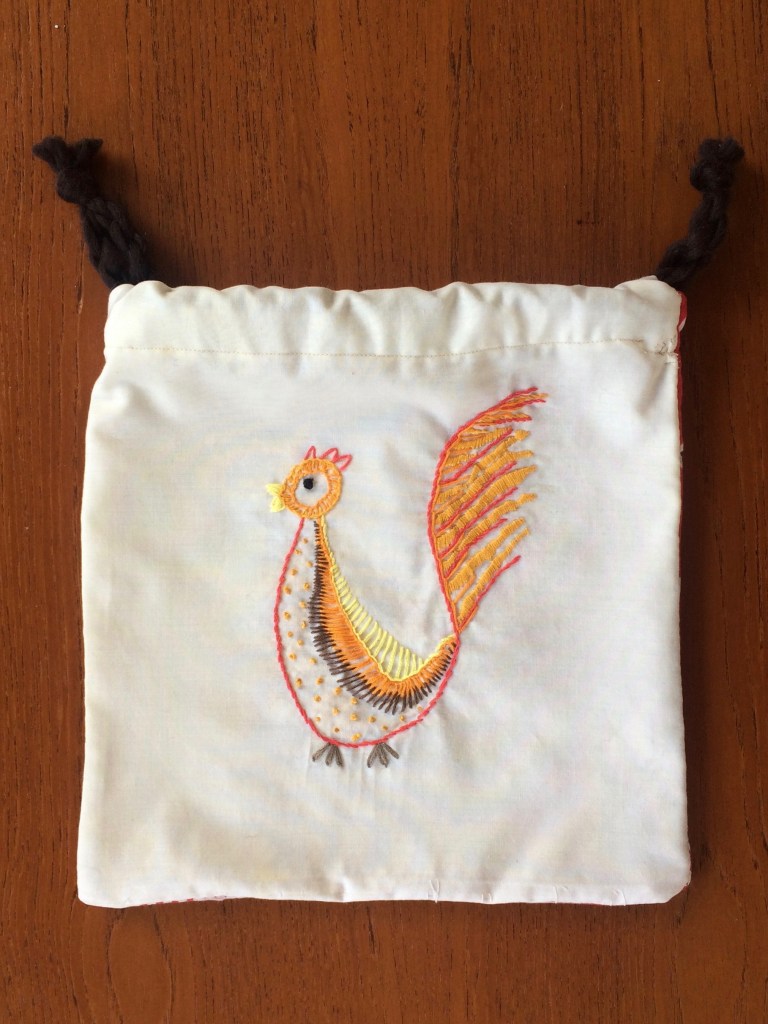
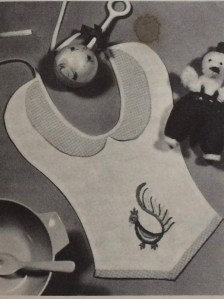
No, it’s not the menu choice for tonight’s dinner, don’t worry. My February 1962 was a little embroidered… animal , originally designed for a toddler’s “feeder” and which I adapted into a bag for vegetables/small projects/”stuff”. I say “animal” in this vague way because it is referred to as a “Squirrel” in the instructions, followed by more specific instructions on how to embroider the supposed squirrel’s beak and feathers. I can maybe, maybe forgive enough poetic license to call a squirrel’s mouth a “beak”, and the creature’s fluffy tail could be mistaken for a squirrel’s, but feathers… no. It also looks suspiciously like a chicken in the photo! So, not a squirrel, but a chicken and a proofreading error.

The photo is about as vague as the animal’s species, so I followed the instructions as best I could and then, ahem, winged it from there. Obviously, I did not have a transfer, so I just drew an approximation of the shape on the fabric with a pencil.

The fabric was up-cycled from a tattered pillowcase and an old red bandana. I embroidered the chicken on one thickness of pillowcase fabric and then flat-lined that piece with another piece of the same fabric for more stability and to keep the back side of the embroidery from fraying. The embroidery floss was all leftover bits and the cord is monk’s cord made from scraps of felting yarn, so this was a 100% up-cycled / didn’t have to buy anything new project, in keeping with the environmentally friendly cloth vegetable bag idea.

IMG_3124

It looks quite “homemade” — my embroidery skills are still far from professional level — but cute and very 1960s. I have a friend who actually keeps chickens in her garden and gets most of her food from them, the garden or food-sharing, so obviously this will be a present for her. I think she’ll appreciate it.

December 1961: Star-Spangled Theatre Bag

IMG_2976
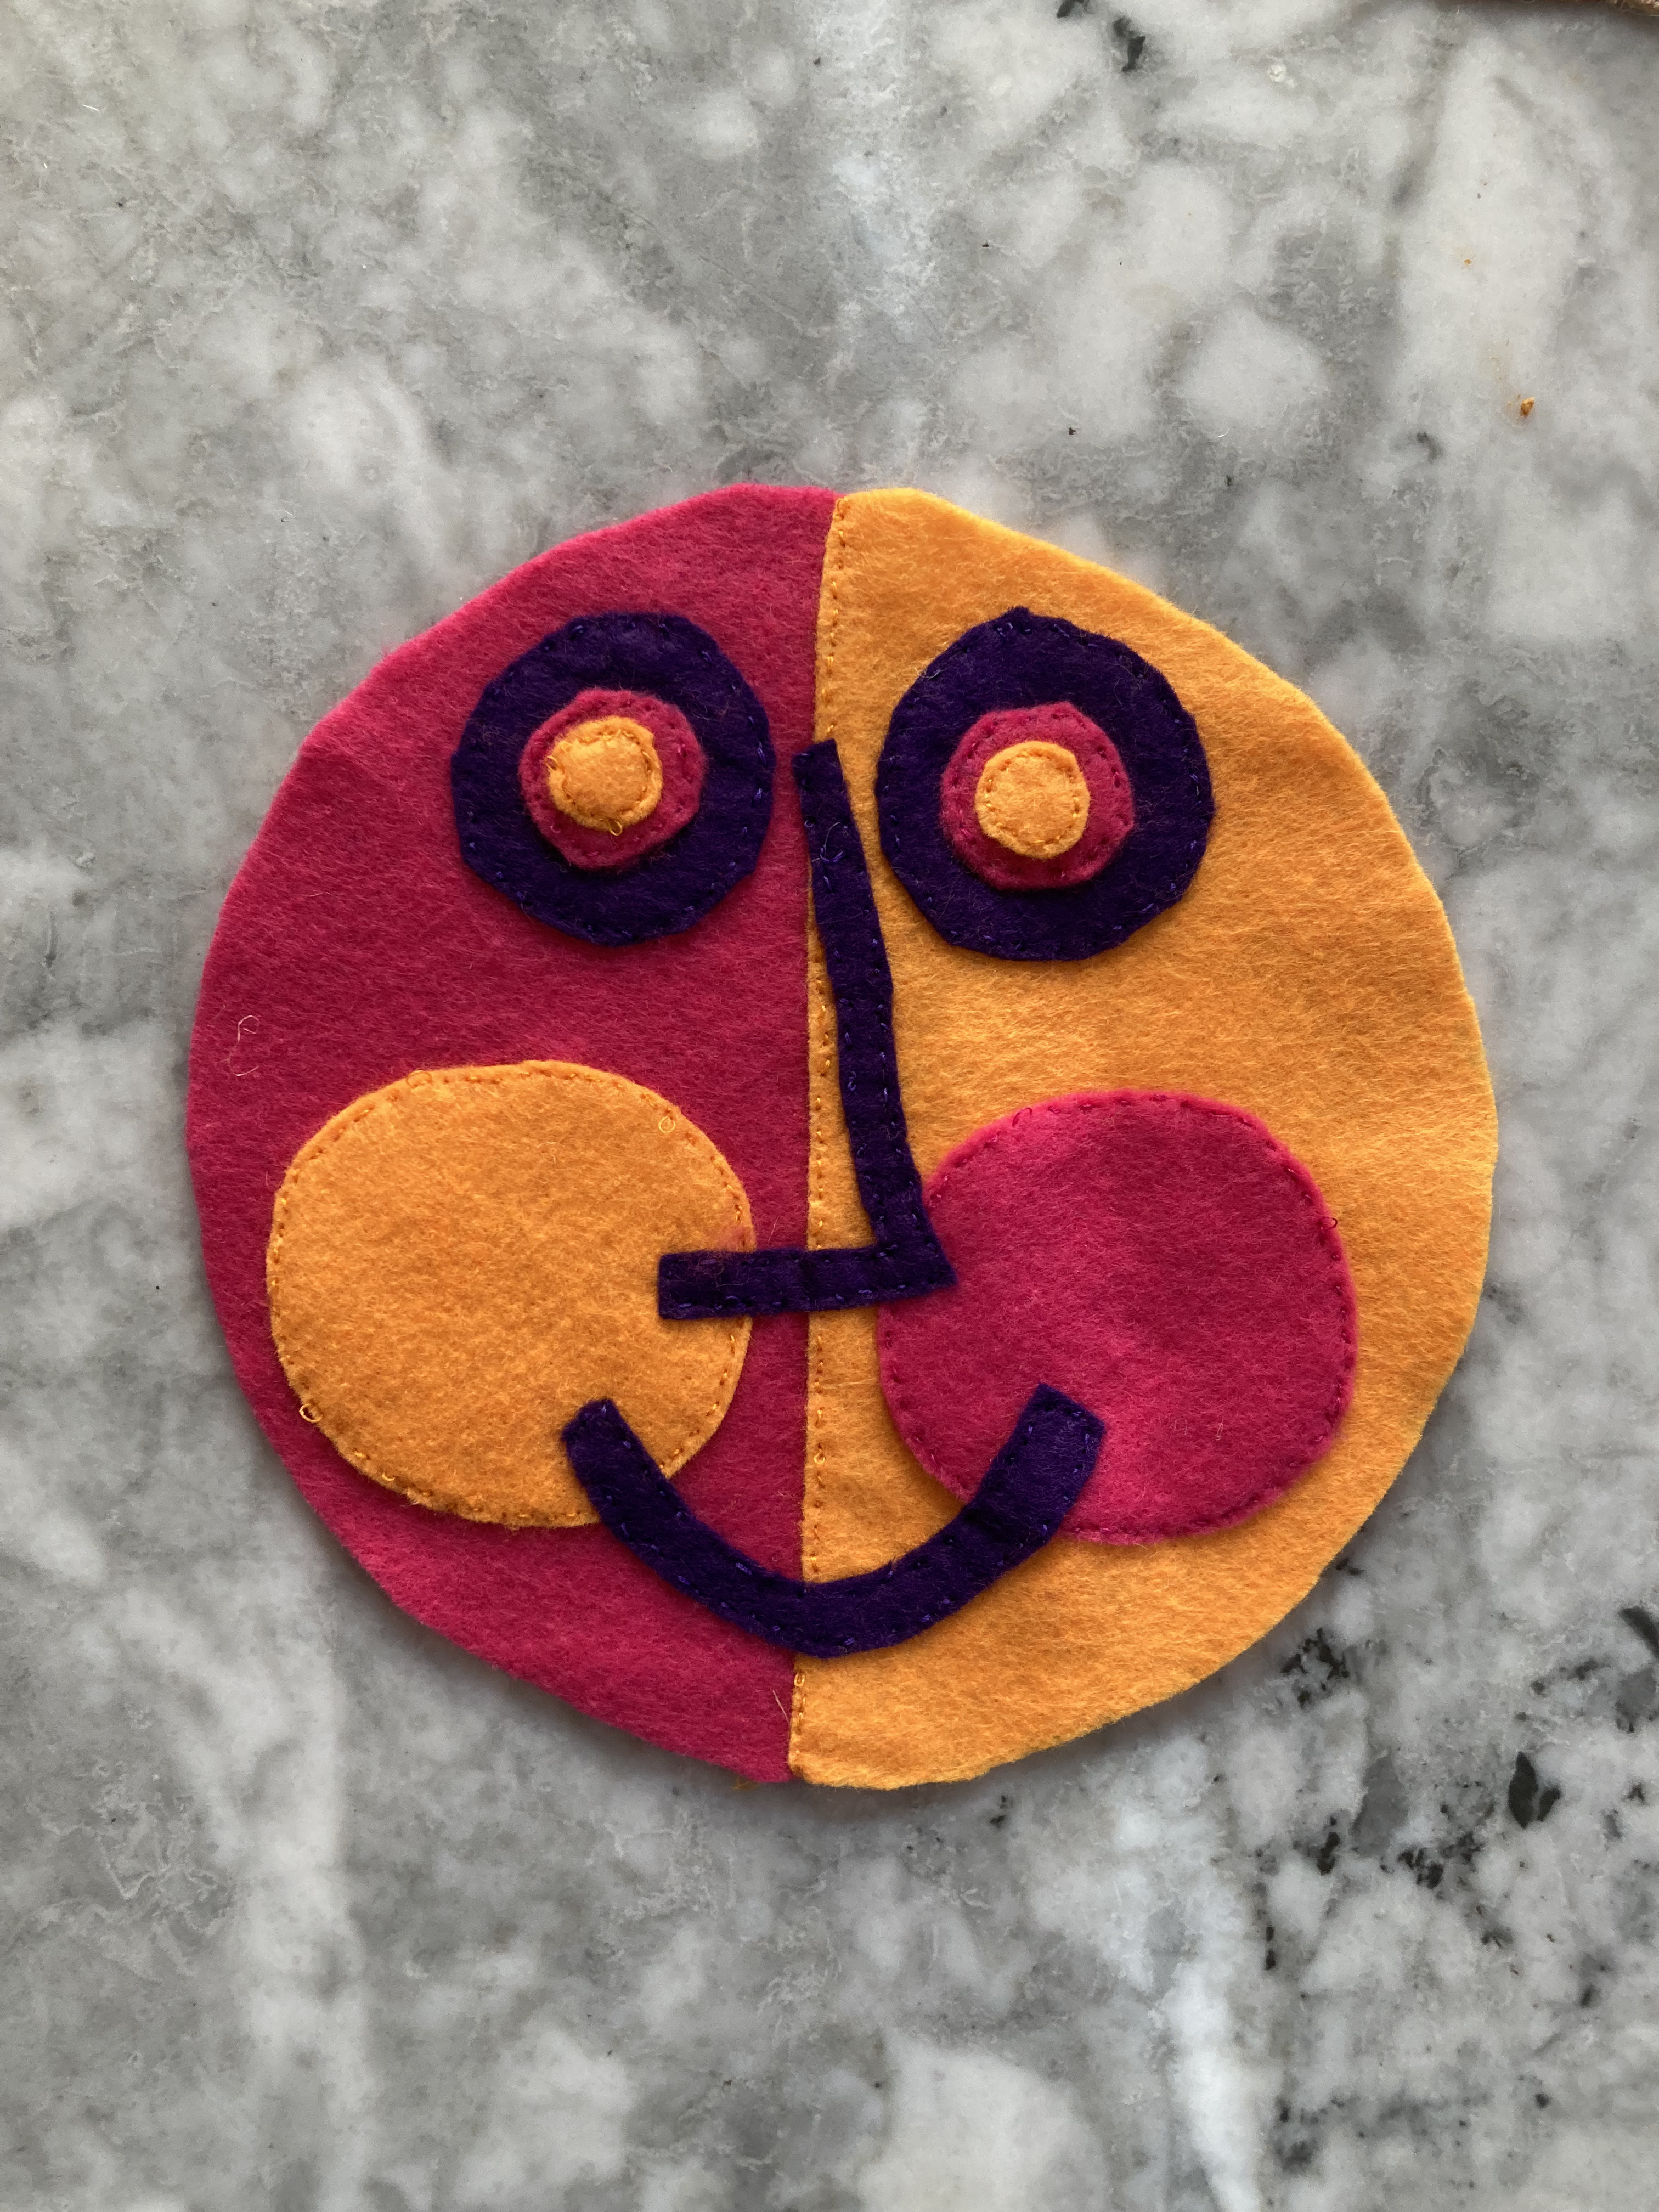
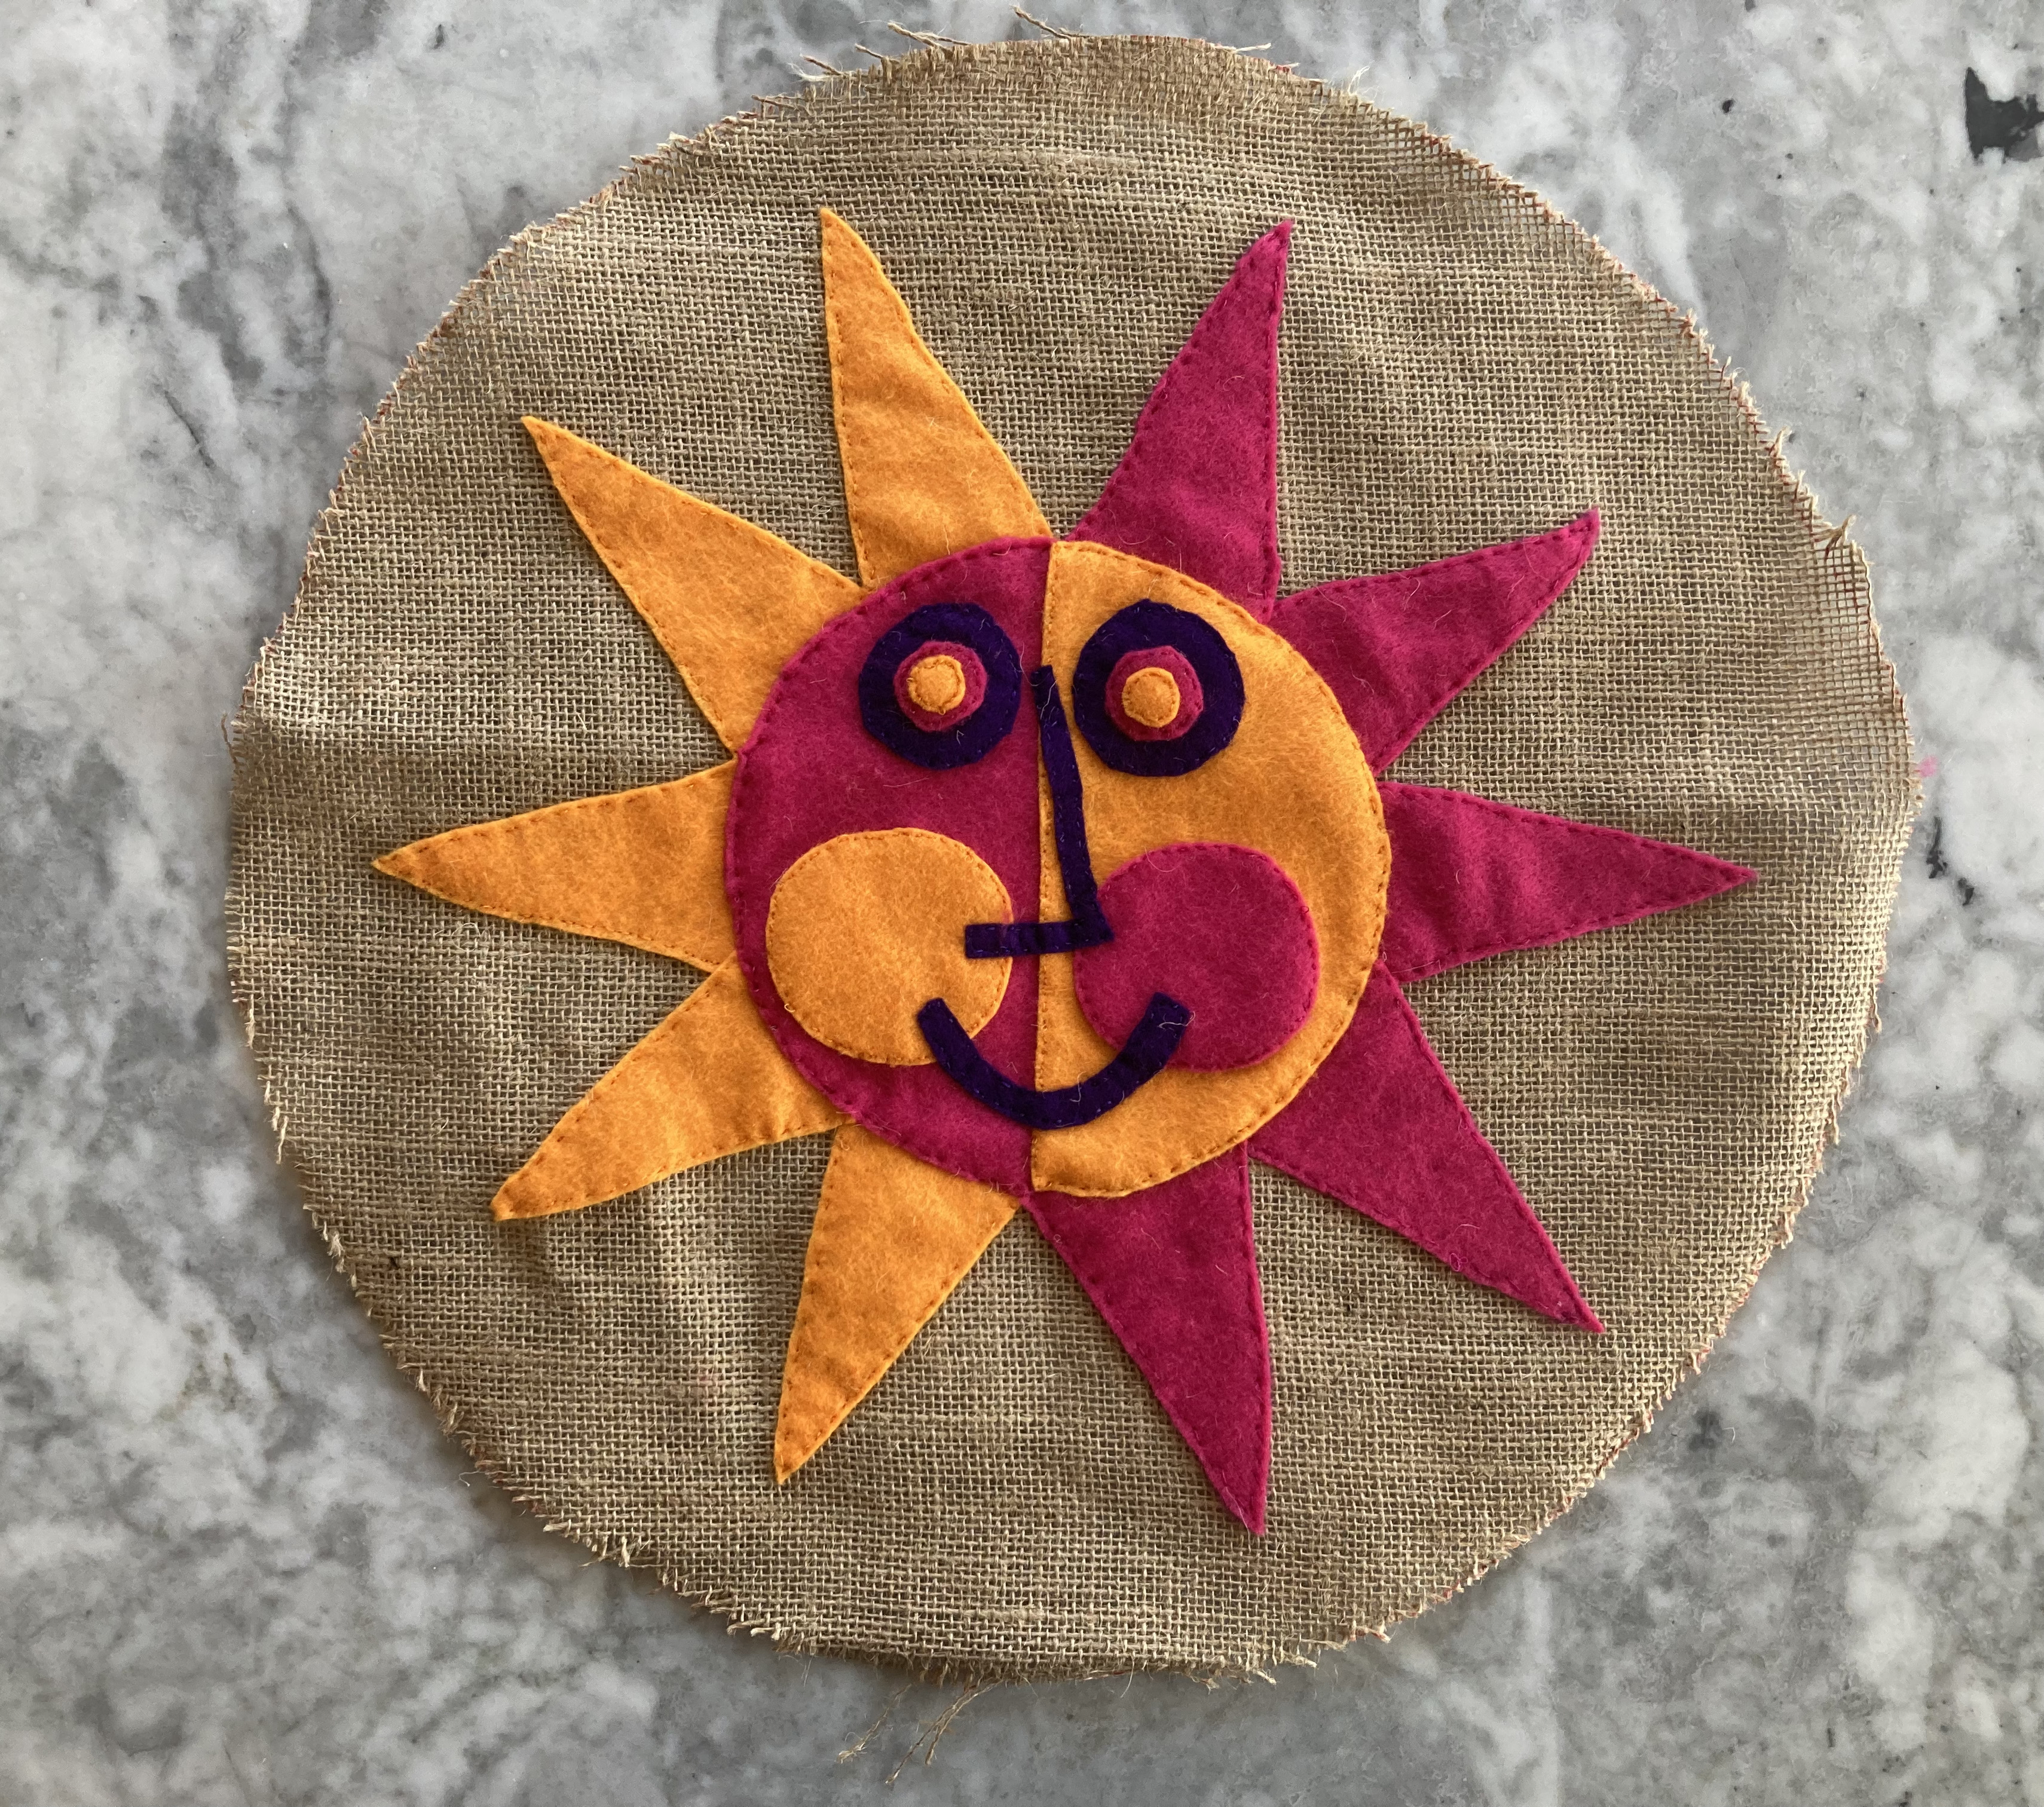
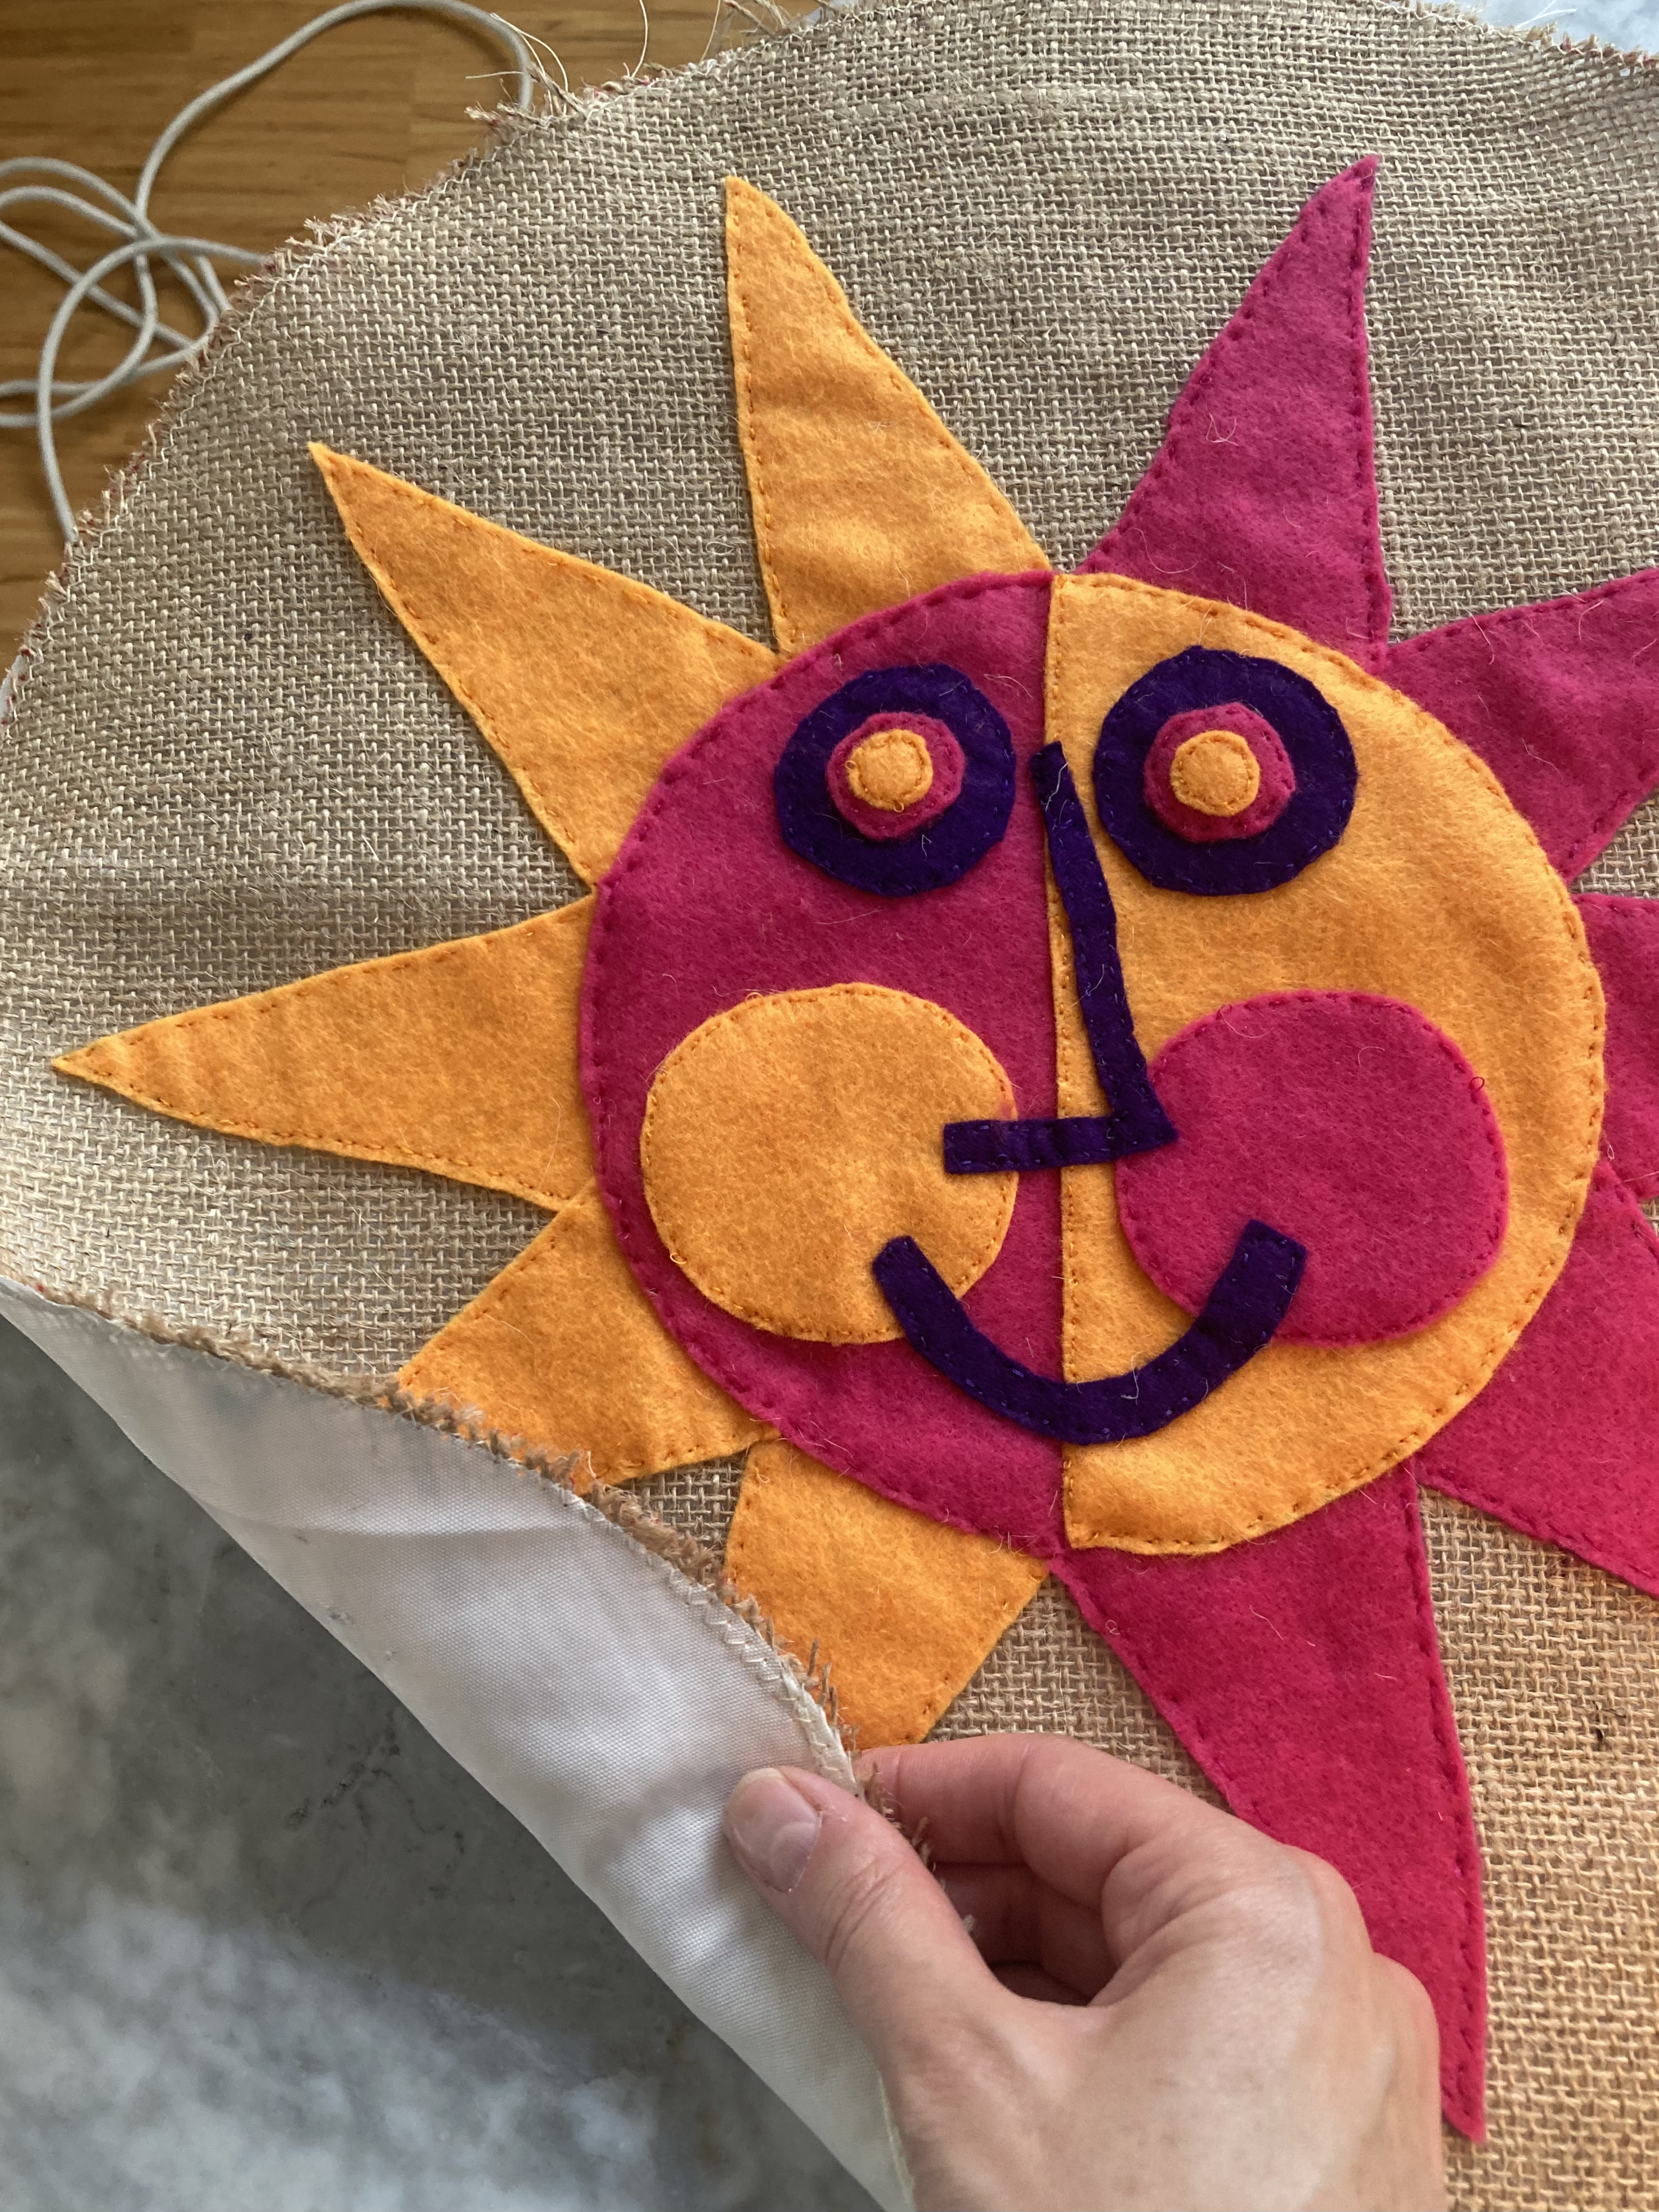
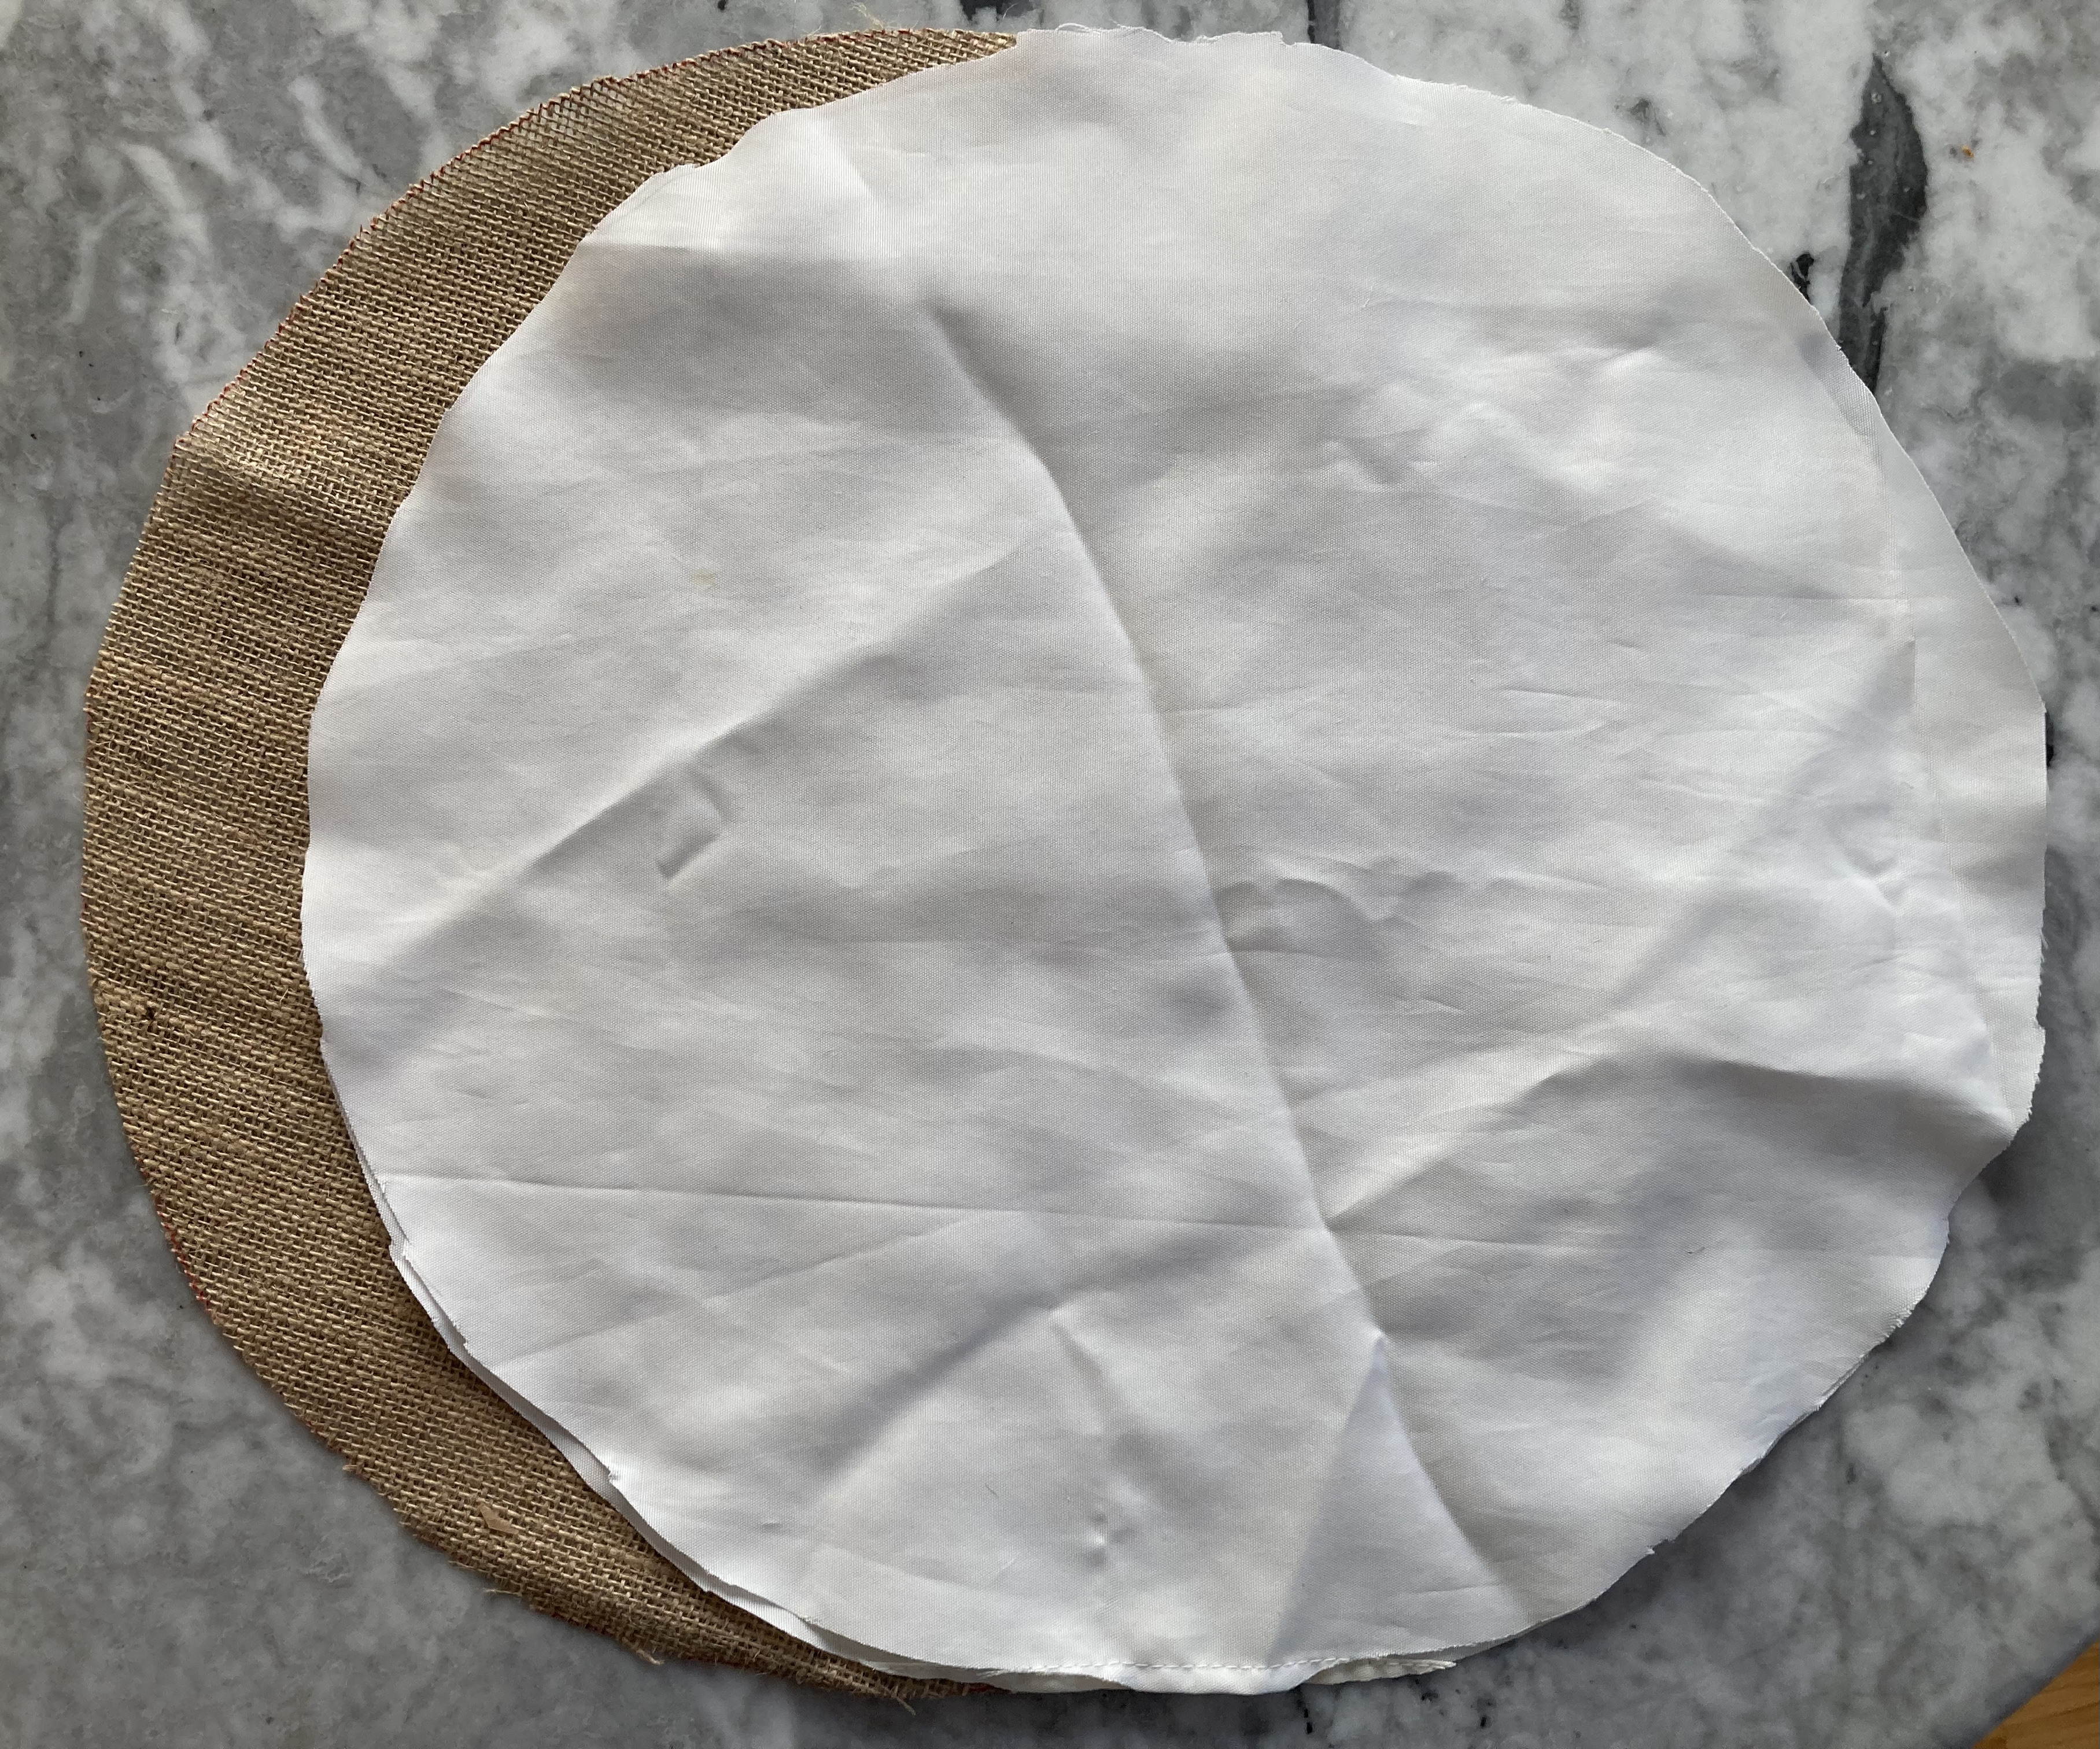
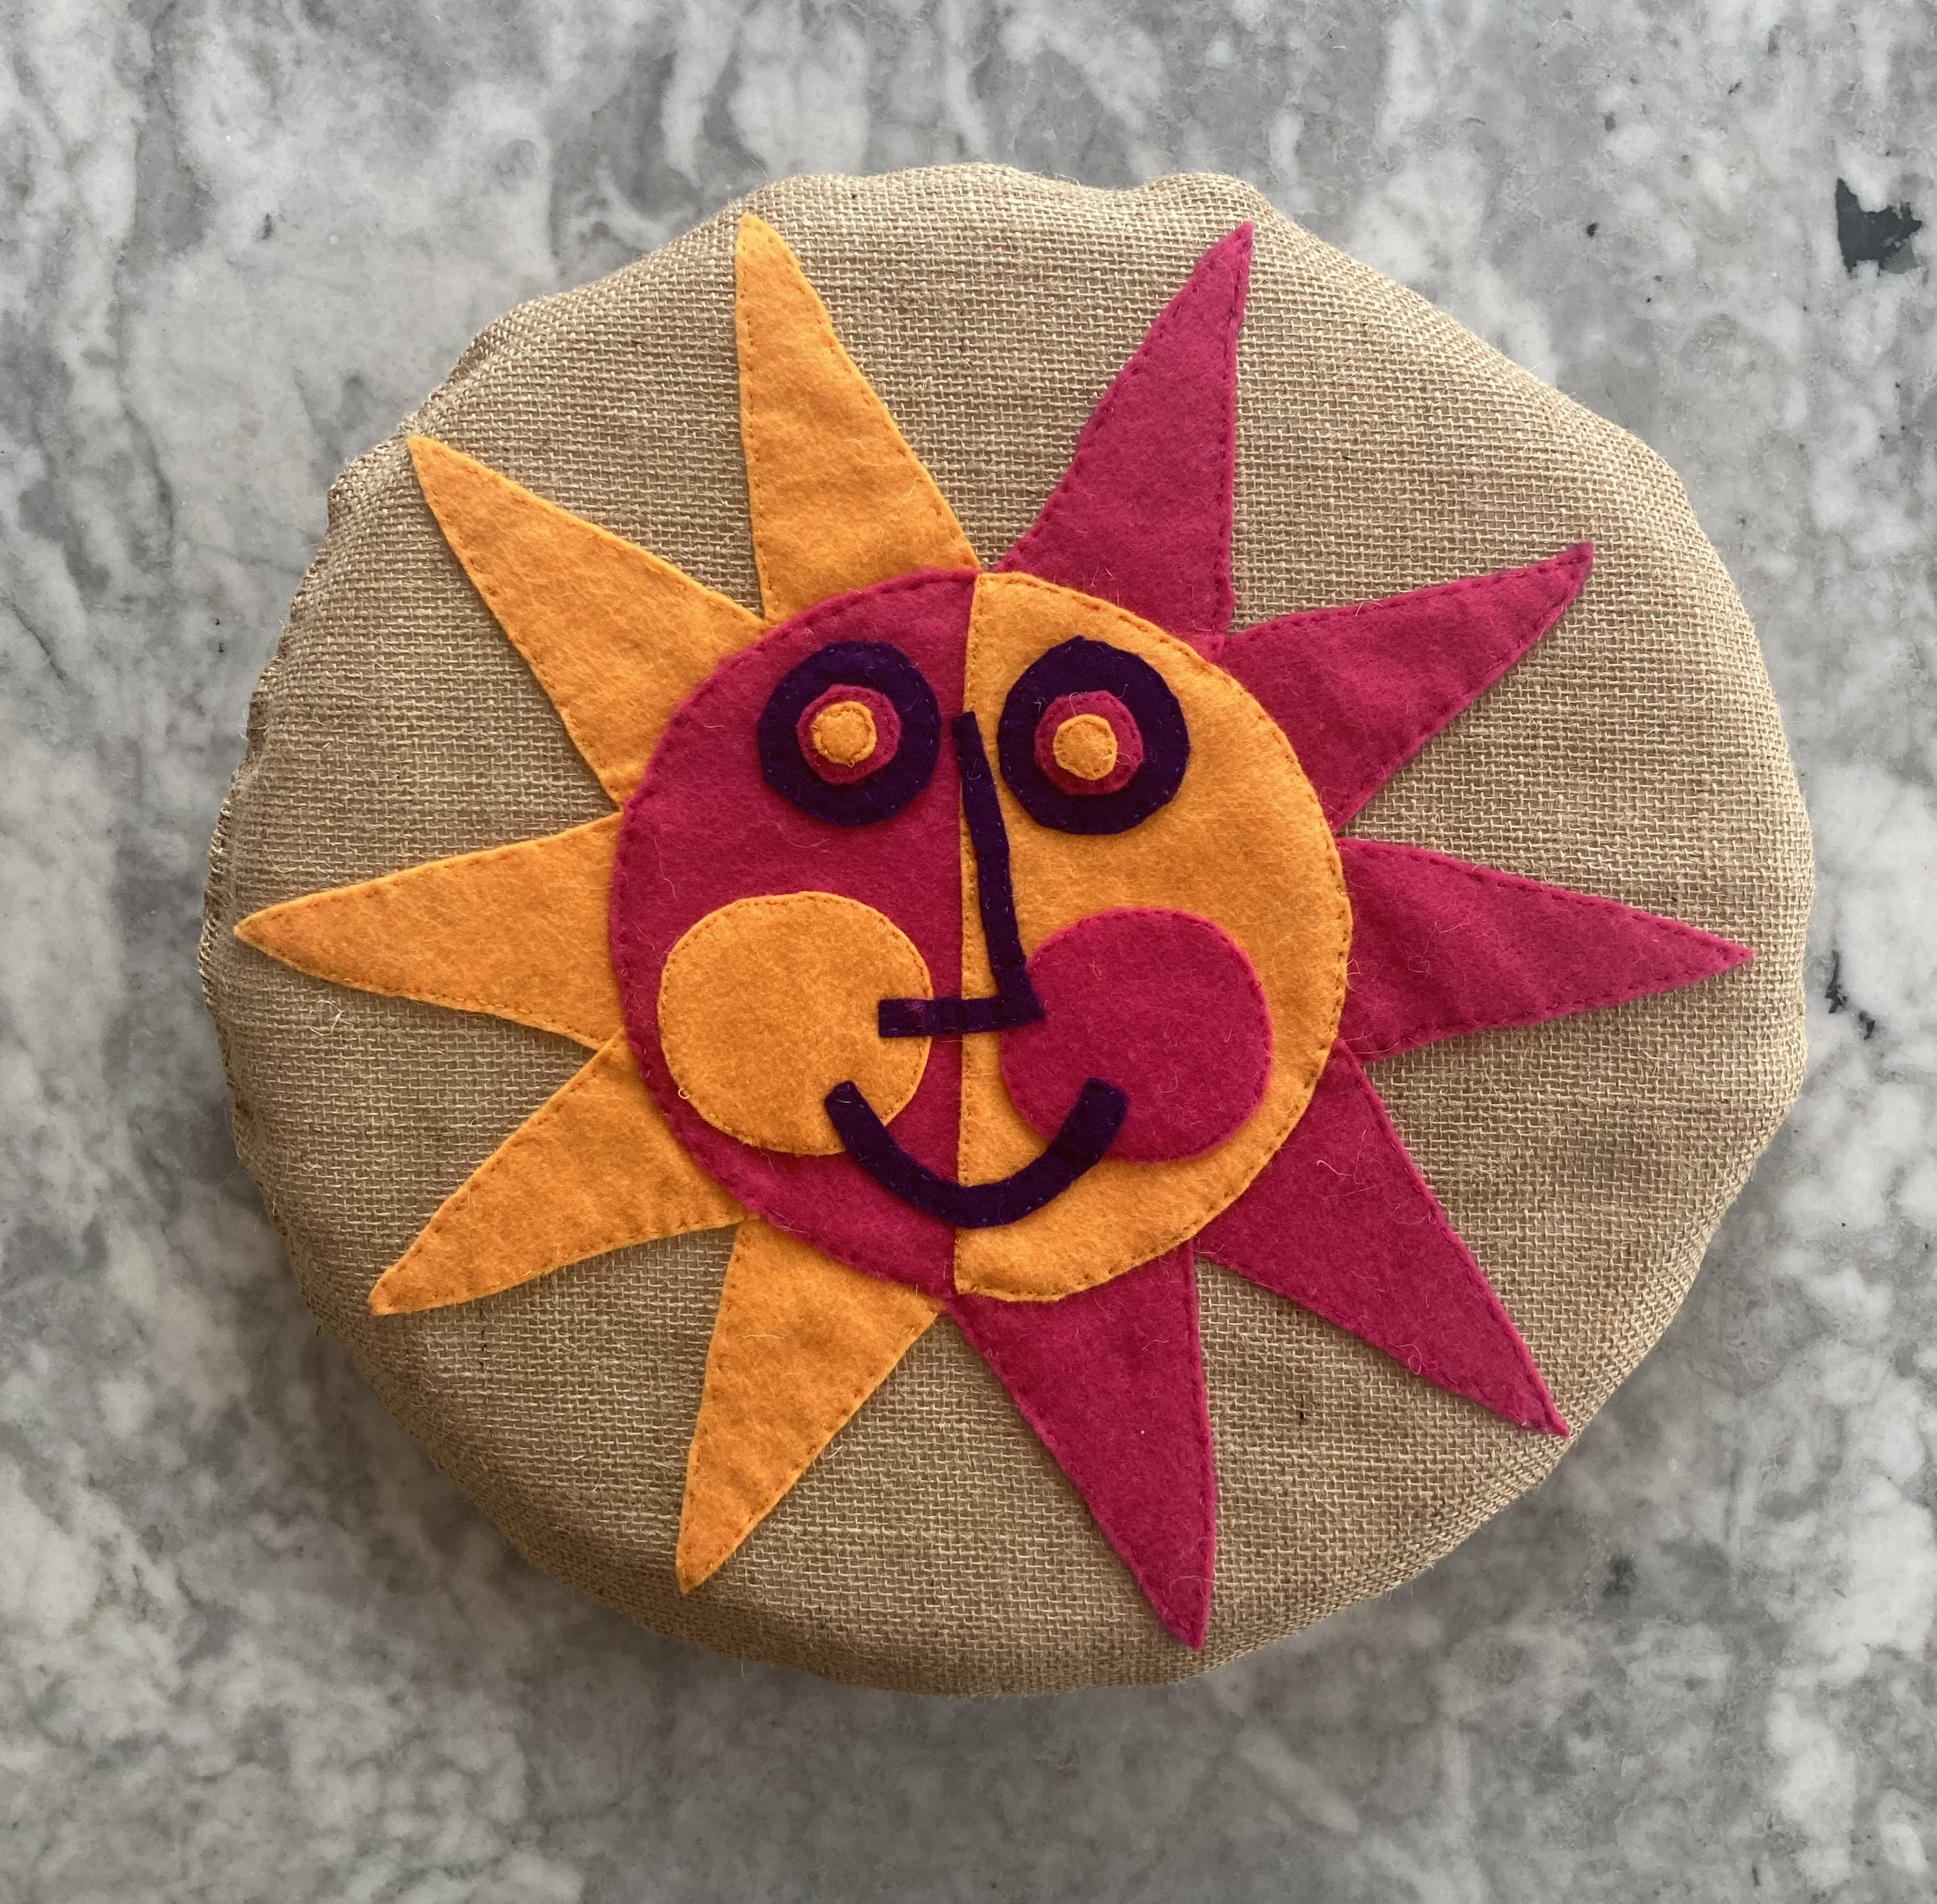
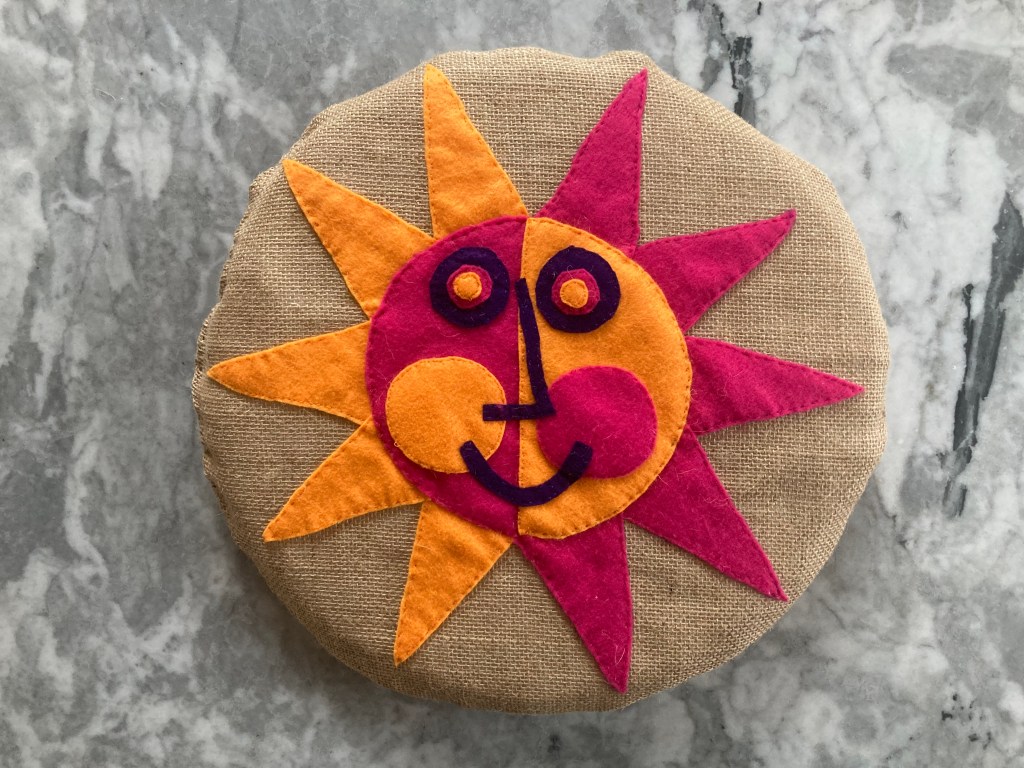
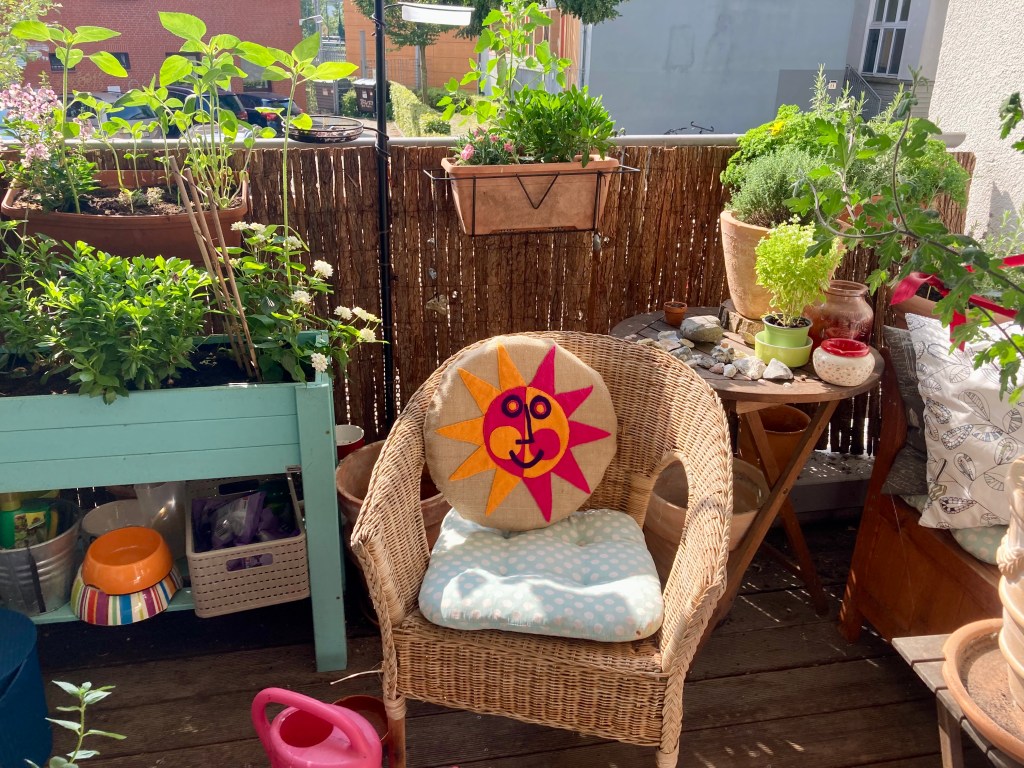
Technically, it was more of a “star-spangled burlap bag”, but that doesn’t have quite the same ring to it. Happy December, everyone! The 1961 festive holiday season, as envisioned by Stitchcraft magazine, involved at least a couple of glamorous parties and evenings out, for which this white satin drawstring clutch bag could be the perfect accessory.

My holiday season was going along festively enough, but I actually have a couple of vintage evening bags and clutches, should I need one to feel glamorous, and I don’t need a white satin anything. I did love the embroidery design, which features pearls and sequins sewn into flowery “star” motifs in various shades of pink and green. The motifs look very “modern” in that 1960s way — abstract and spiky, but also dainty and bright. What could I embroider them onto?

As it turns out, a few weeks ago I found myself at an antiques fair in Hamburg, Germany, and one of the stands was selling literal moneybags — sacks of burlap linen in different sizes that had been used by the German federal bank to transport money and were then at some point taken out of circulation. The material is very sturdy, finer and more tightly woven than coffee or potato sack burlap, but with a similar feel. The bags were also in perfectly good condition in spite of their age and use — each one is printed with a date, and many of them were from the 1990s. At the very modest price of one Euro each, I went ahead and bought ten of the smaller size (approximately 18 centimetres wide by 30 long).

IMG_3011

So … what to make of them? (Literally.) More vegetable bags? Gift sacks? Little knitting project bags? All of the above? Whatever their use(s), at least one of the bags was going to be star-spangled. Putting fine, pretty flowery embroidery on a coarse natural-fiber sack was a fun idea for a style-mix experiment that I couldn’t resist. After thoroughly machine-washing and steam-ironing the bags (“money is dirty” as the seller said with a IMG_2998wink, and who knows if they had been treated with some kind of additional preservative chemical), I drew the motifs onto the bag with a wax embroidery-transfer pen, tracing around different sizes of button to get the circles, and embroidered them using leftover bits of pink and green embroidery cotton. I decided to forego the pearls and sequins and just made French knots instead. I also didn’t care too much about perfect symmetry or absolutely “clean” lines — I wanted it to look a little bit rough and homemade.

Originally, I wanted to put in a zipper at the top, but didn’t have one to upcycle, so I just made a buttonhole and found a button from the “singles” jar. I might change the button over to the back side of the bag to make a fold-over top closure if stuff falls out, but I preferred the way the bag looked from the front with the single button.

And that was it! I like the result. It’s goofy and incongruous and has a vintage feel in a few different ways. I had already used a few of the other bags as non-embroidered gift bags, so I’ll keep this one for myself as a project bag for small projects, or possibly a vegetable bag. Star-spangled Brussels sprouts, anyone?


August 1961: Dainty Rose sprays

IMG_2721
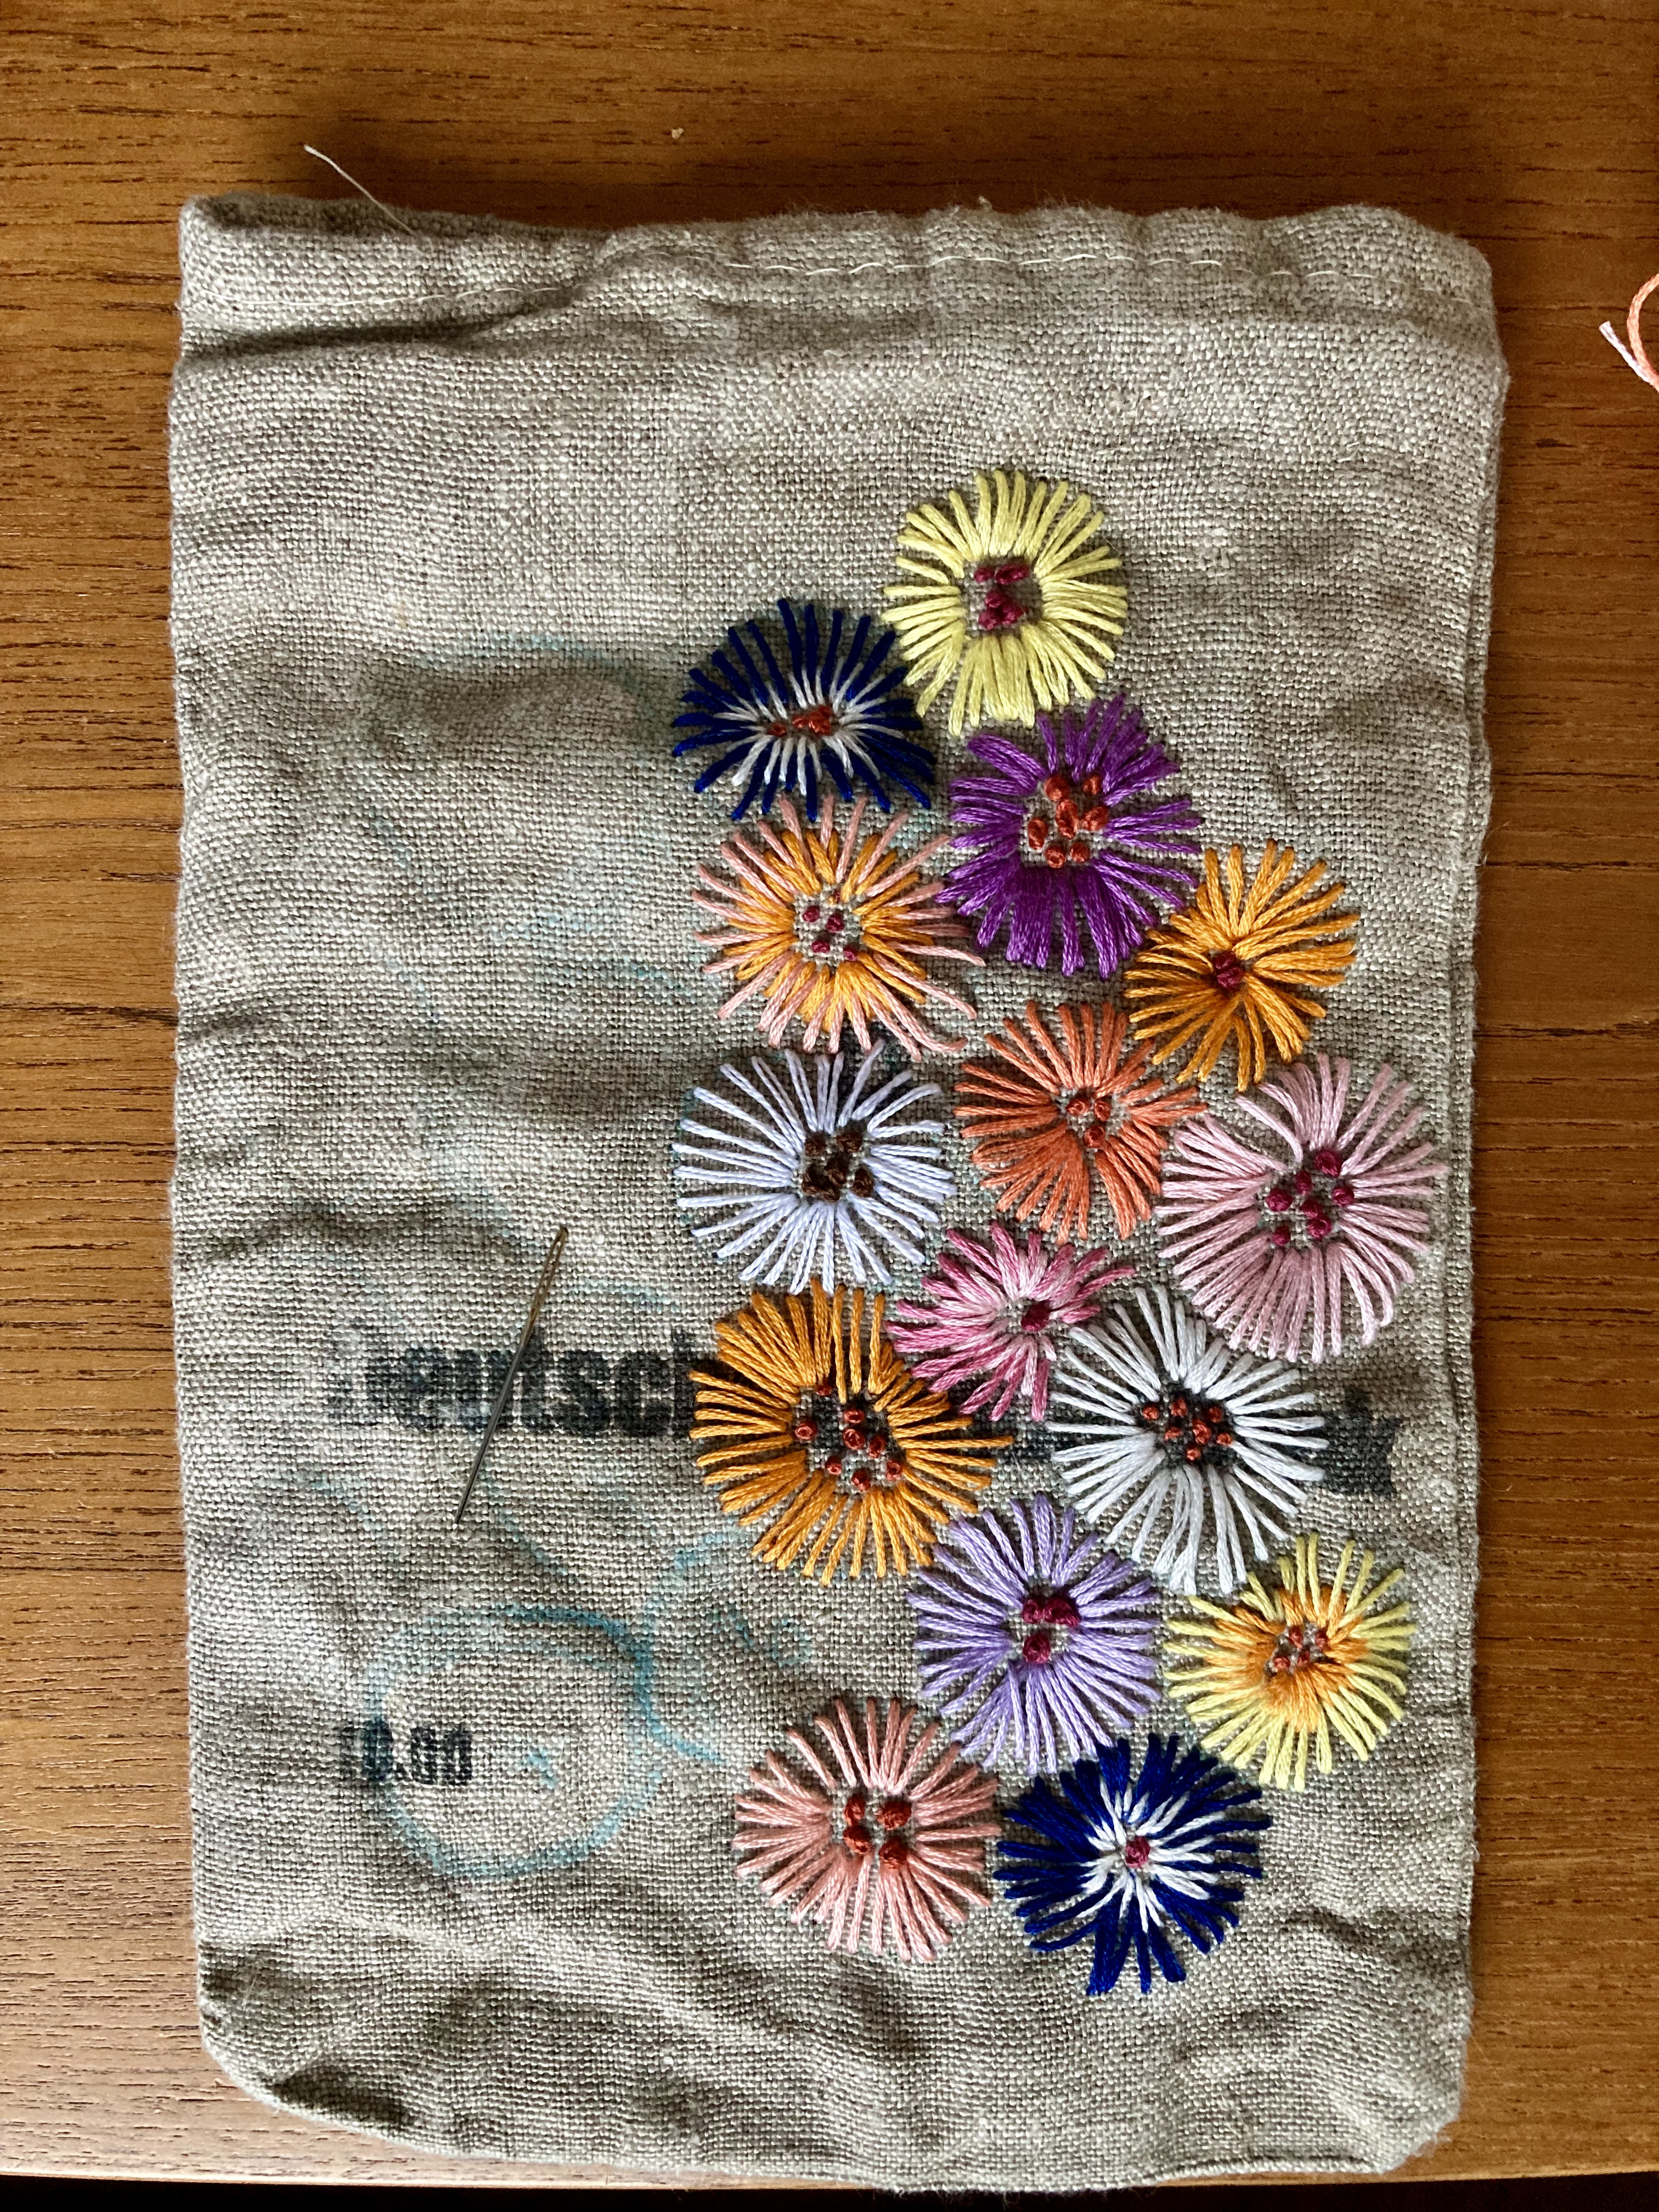
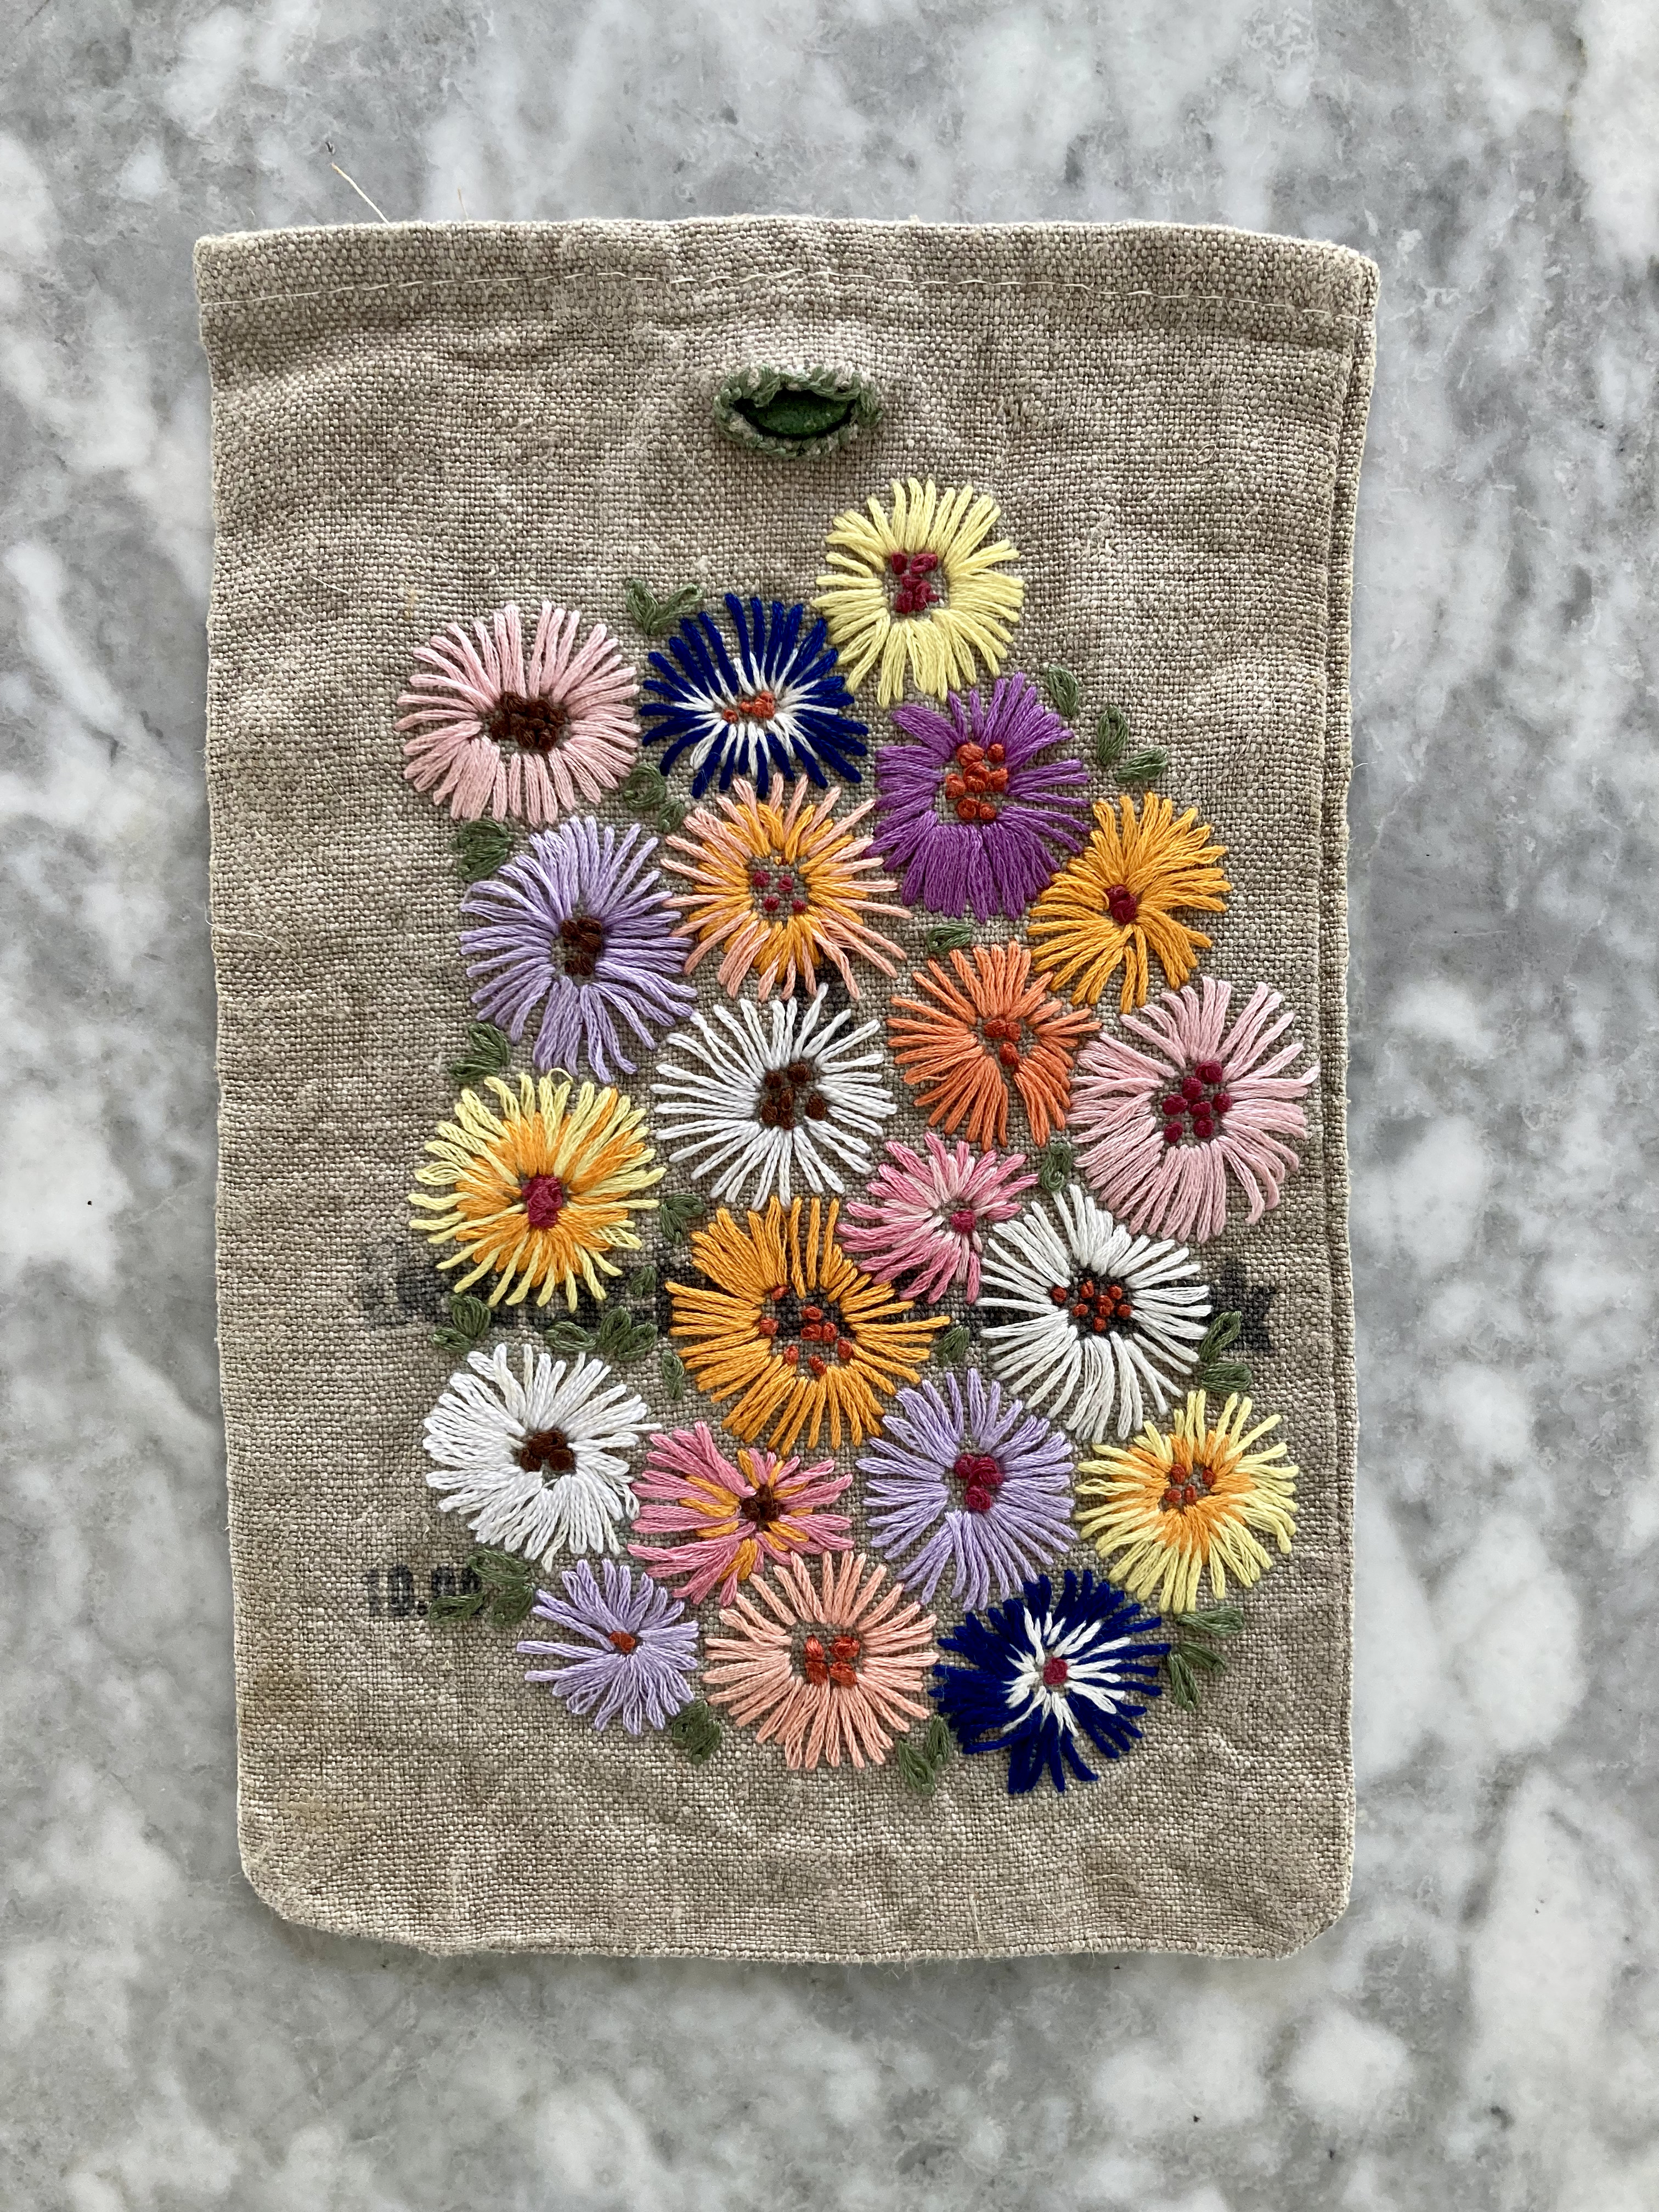
Stitchcraft‘s August 1961 “Late Summer” issue had multiple cute, easy embroidery and tapestry projects. Mine was this little set of rose sprays. To show the versatility of the designs, the magazine usually had directions for and photos of the designs made on different items: a cushion and/or tray cloth, for example. Overall, there was a huge range of homewares that could potentially be embroidered: an apron, a place mat, a chair-back, a wall hanging, a “nightie case”, a project bag, a finger plate, a fire screen, even a room divider or a waste-paper basket cover. This issue added a new idea to the mix: the rose-spray design on a lampshade, complete with a pattern to cut out, sew and fringe the lampshade cover itself.

IMG_2762
Close-up photo from the magazine. Sadly, there was no colour photo.

I don’t need an embroidered lampshade (or finger plate, or fire screen, or tray cloth, or chair-back, or waste-paper basket cover etc. etc.) and I have plenty of cushions and project bags, so I’m often at a loss when I see a nice embroidery pattern and don’t know what to put it on. I’ve made a couple of tablet cosies for myself or for presents for friends, or useful little bags to store “stuff”, but there are limits. I guess I could sell whatever I don’t need, but haven’t gone that route yet. So what to make?

Vegetable bags.

I stopped using plastic bags for vegetables long ago, which wasn’t difficult as I pretty much only buy vegetables at the farmer’s market or organic supermarket, both of which put vegetables in little paper bags (for small or sandy things like mushrooms, potatoes or little tomatoes) or don’t package them at all (I just put them into my basket/cloth shopping bag loose). I try to re-use the paper bags, but my best bag of all is a little linen drawstring sack that originally held soapberry nuts for washing laundry. It’s tough, washable and the perfect size for holding the right amount of potatoes or green beans or whatever. And both the organic supermarket and, incredibly, the regular supermarket in my neighbourhood have now stopped offering even little paper bags for vegetables, so time to make more bags!

IMG_2749
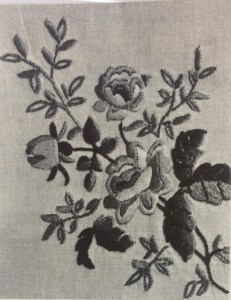
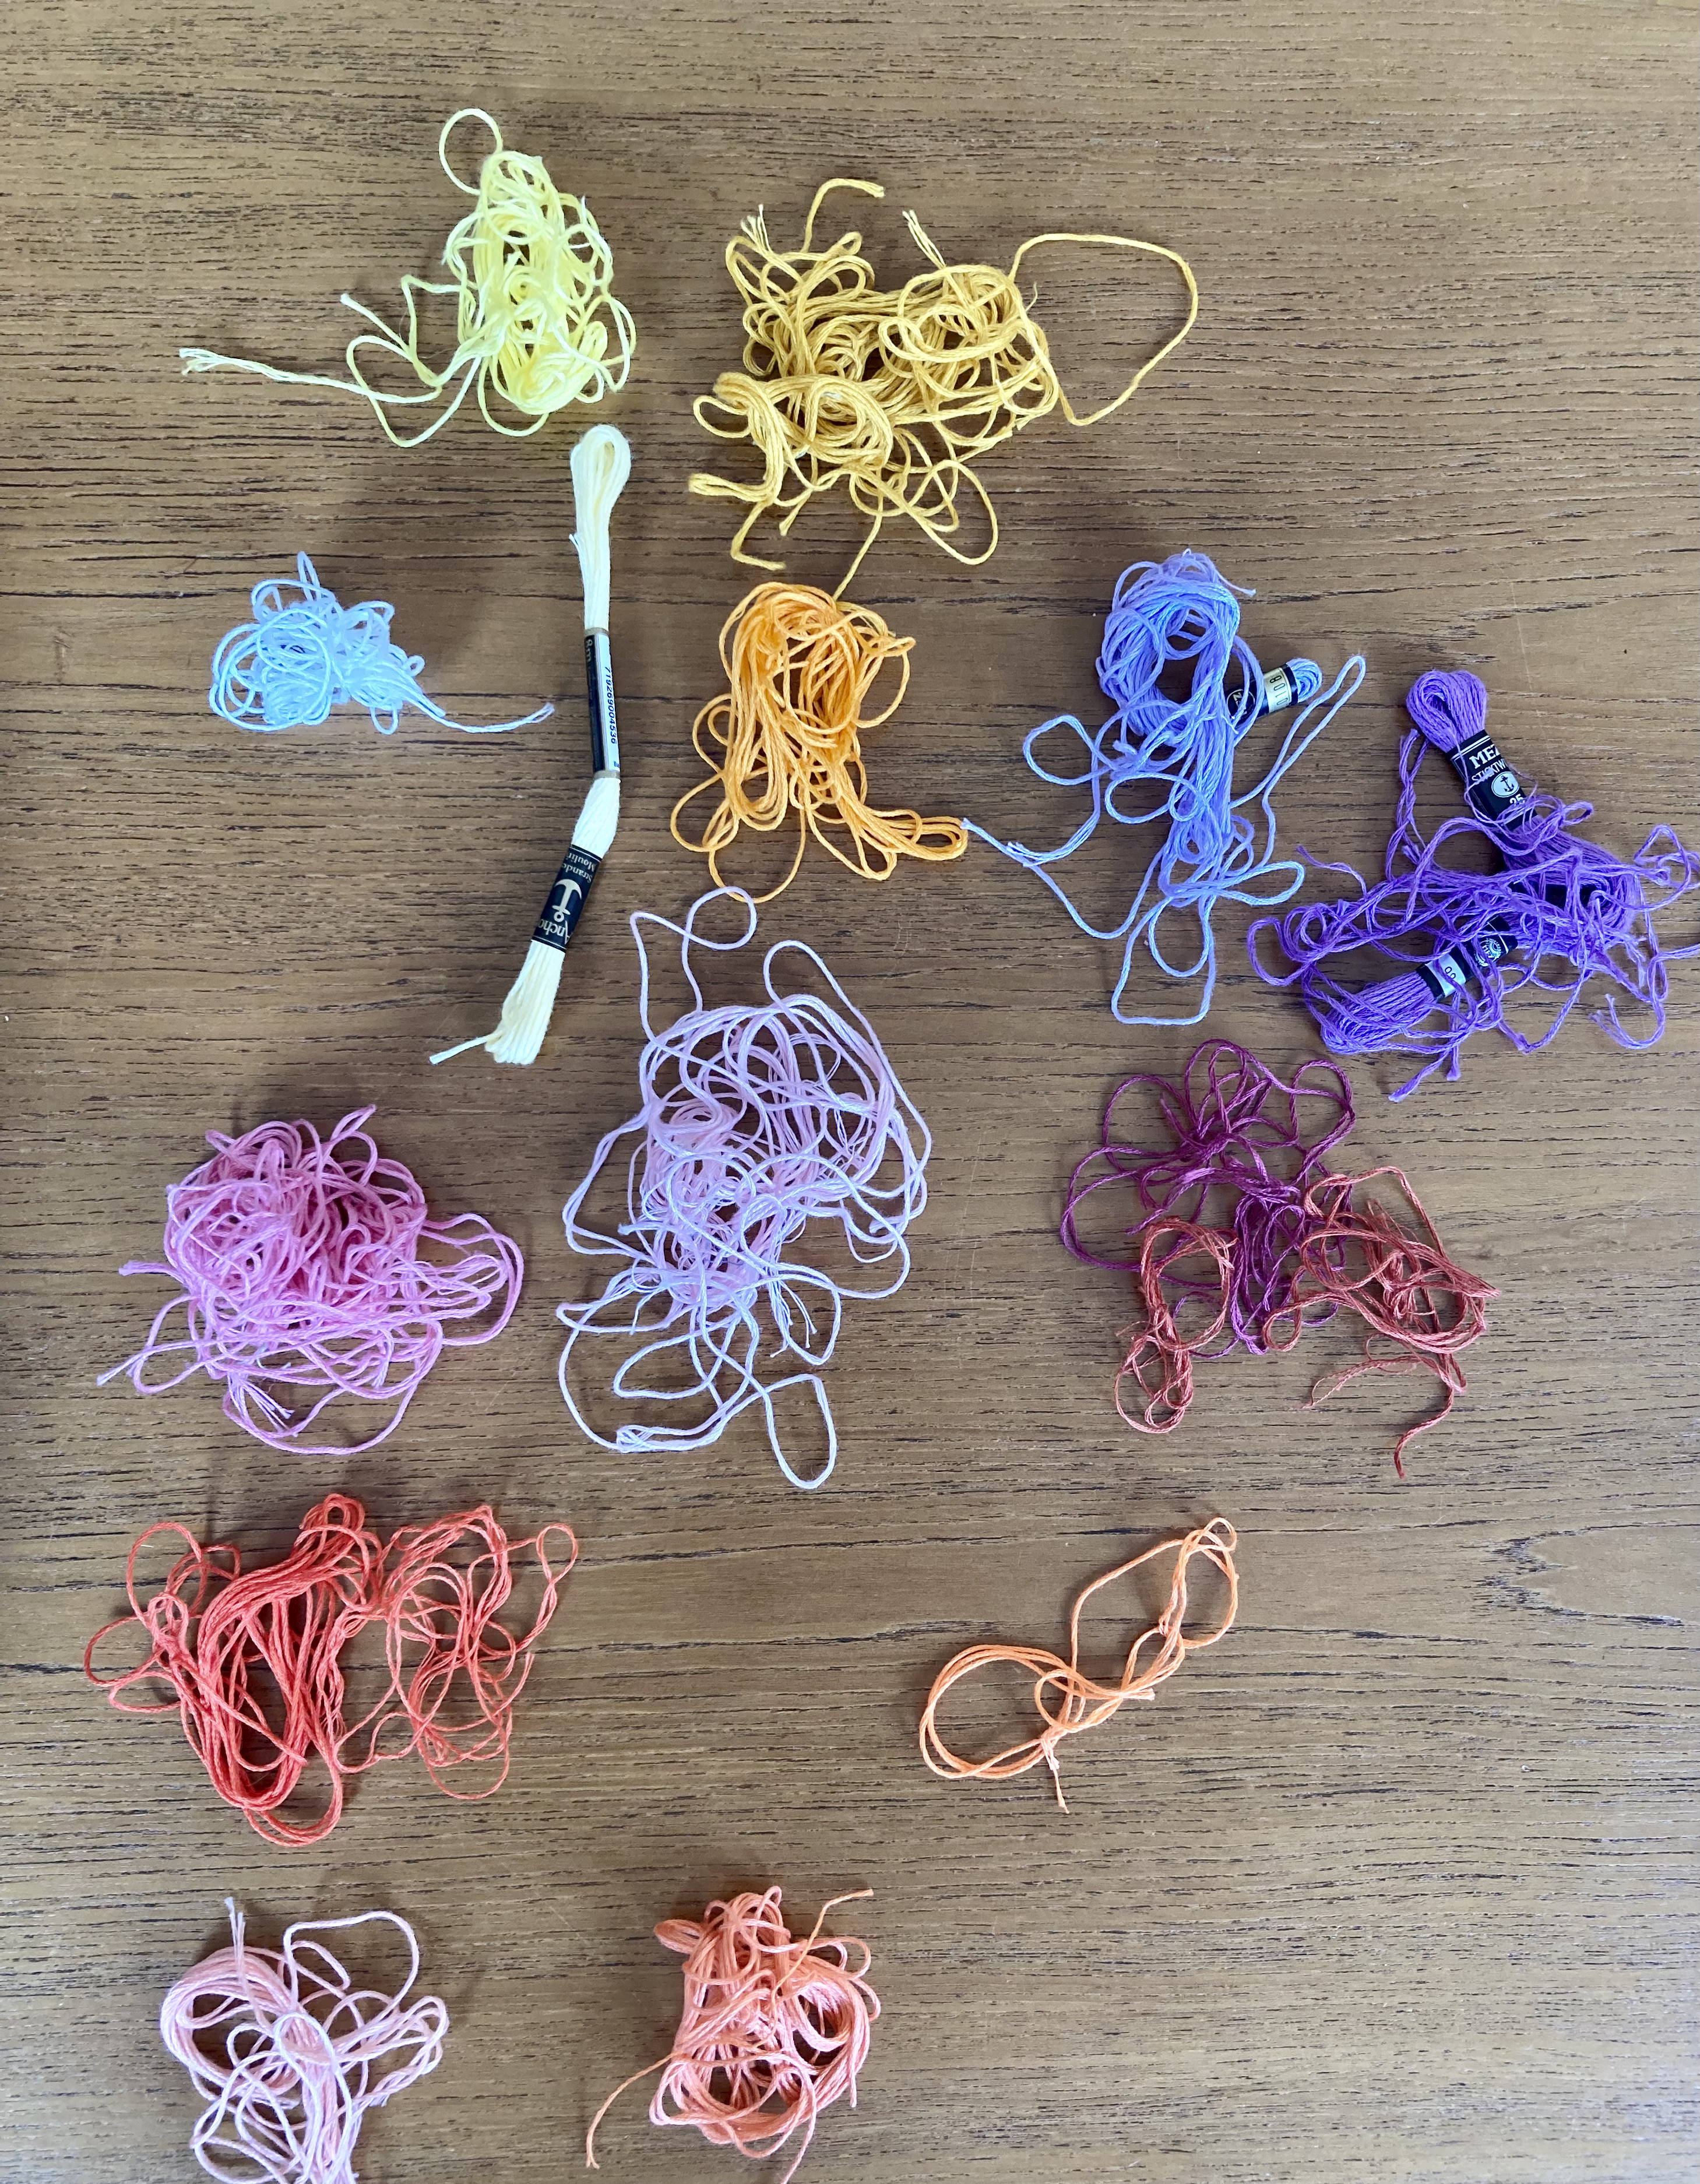
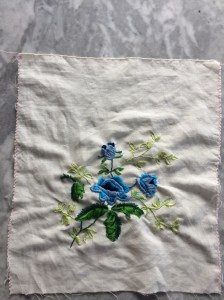
Of course, they don’t have to be embroidered, but why not? Cotton embroidery floss is machine-washable even at high temperatures and I have plenty of scraps and bits of plain linen or cotton materials that can be put to good purpose. The bag I made for this August project was made from a piece of linen from shoes, yes, shoes that a friend bought (the shoes came wrapped in this piece of fabric in the shoe box instead of in paper.) I had enough embroidery floss on hand, so this was an almost 100% up-cycled / didn’t have to buy anything new project. (I say almost because I bought the cord for the drawstrings — then realised I could have made monks’ cord or i-cord from leftover cotton yarn. Next time…)

IMG_2756The design is of blue roses, which don’t exist in the natural world but can be created by putting white roses in blue-tinted water for a few days. (Interestingly, this low-tech process is much more successful than trying to create blue roses via genetic engineering, which so far has only made purplish-lavender roses.) I think blue is an interesting colour choice for embroidered roses, because of course when you see blue flowers you don’t automatically think of roses. I love how the colours turned out though. The stitches are easy stem-stitch, satin stitch and long-and-short stitch. Of course I didn’t have the transfer, but the design was easy enough to copy onto the fabric freehand.

I’m really, really happy with this and look forward to making more unnecessarily pretty, but necessarily environmentally friendly vegetable bags in the future.

IMG_2757