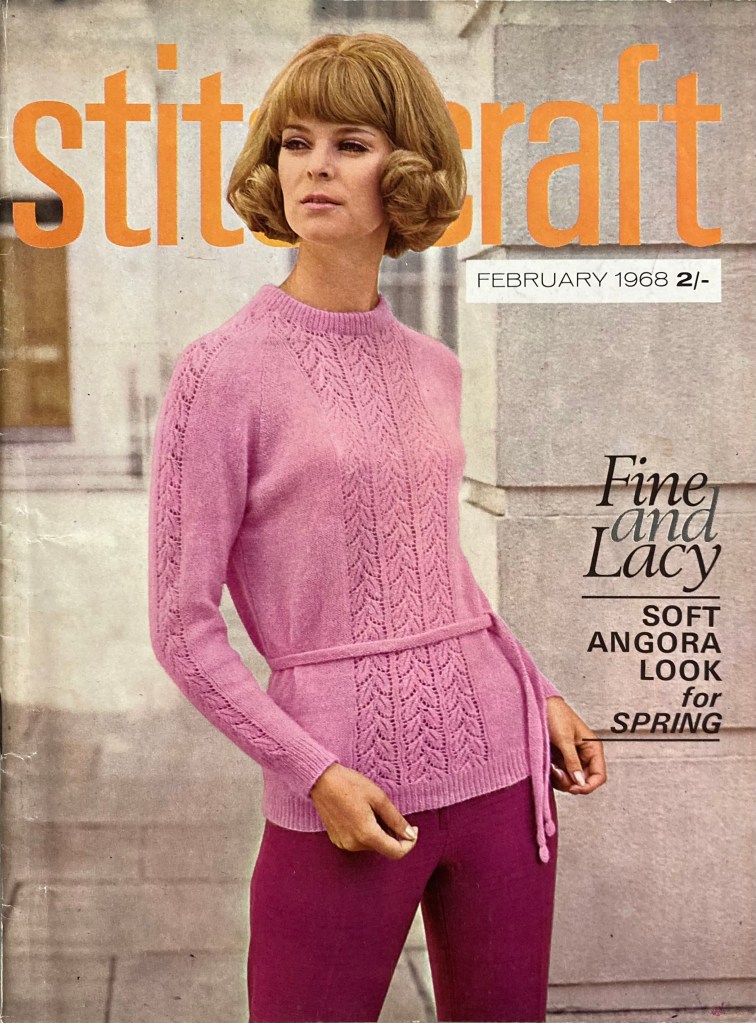
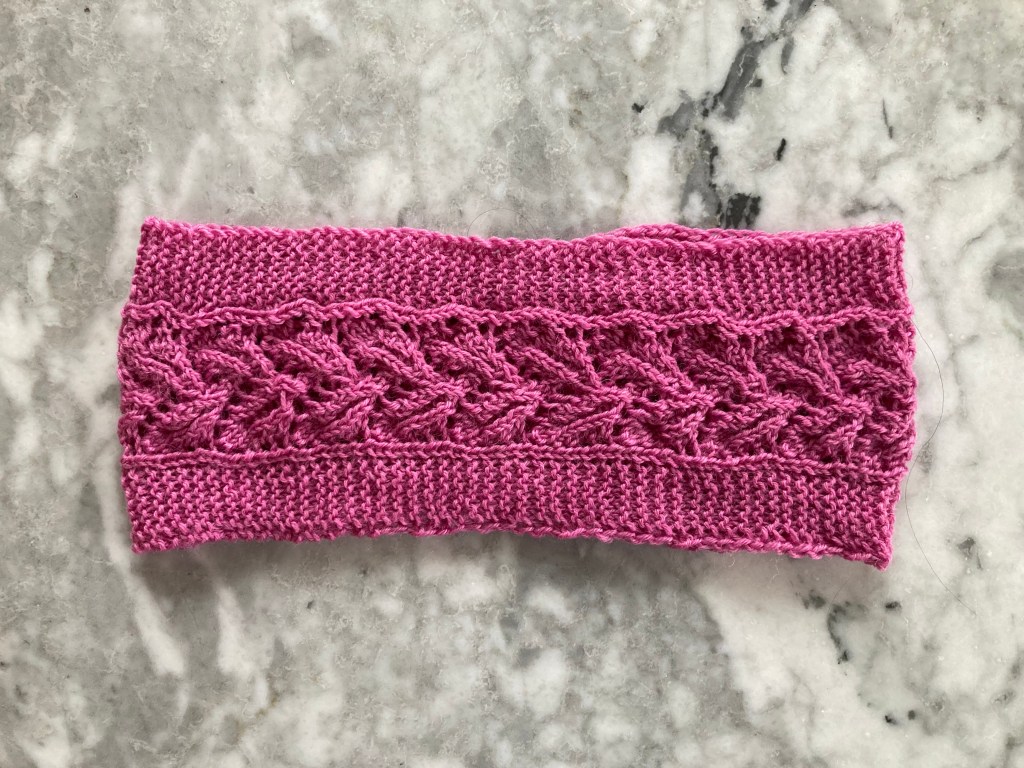
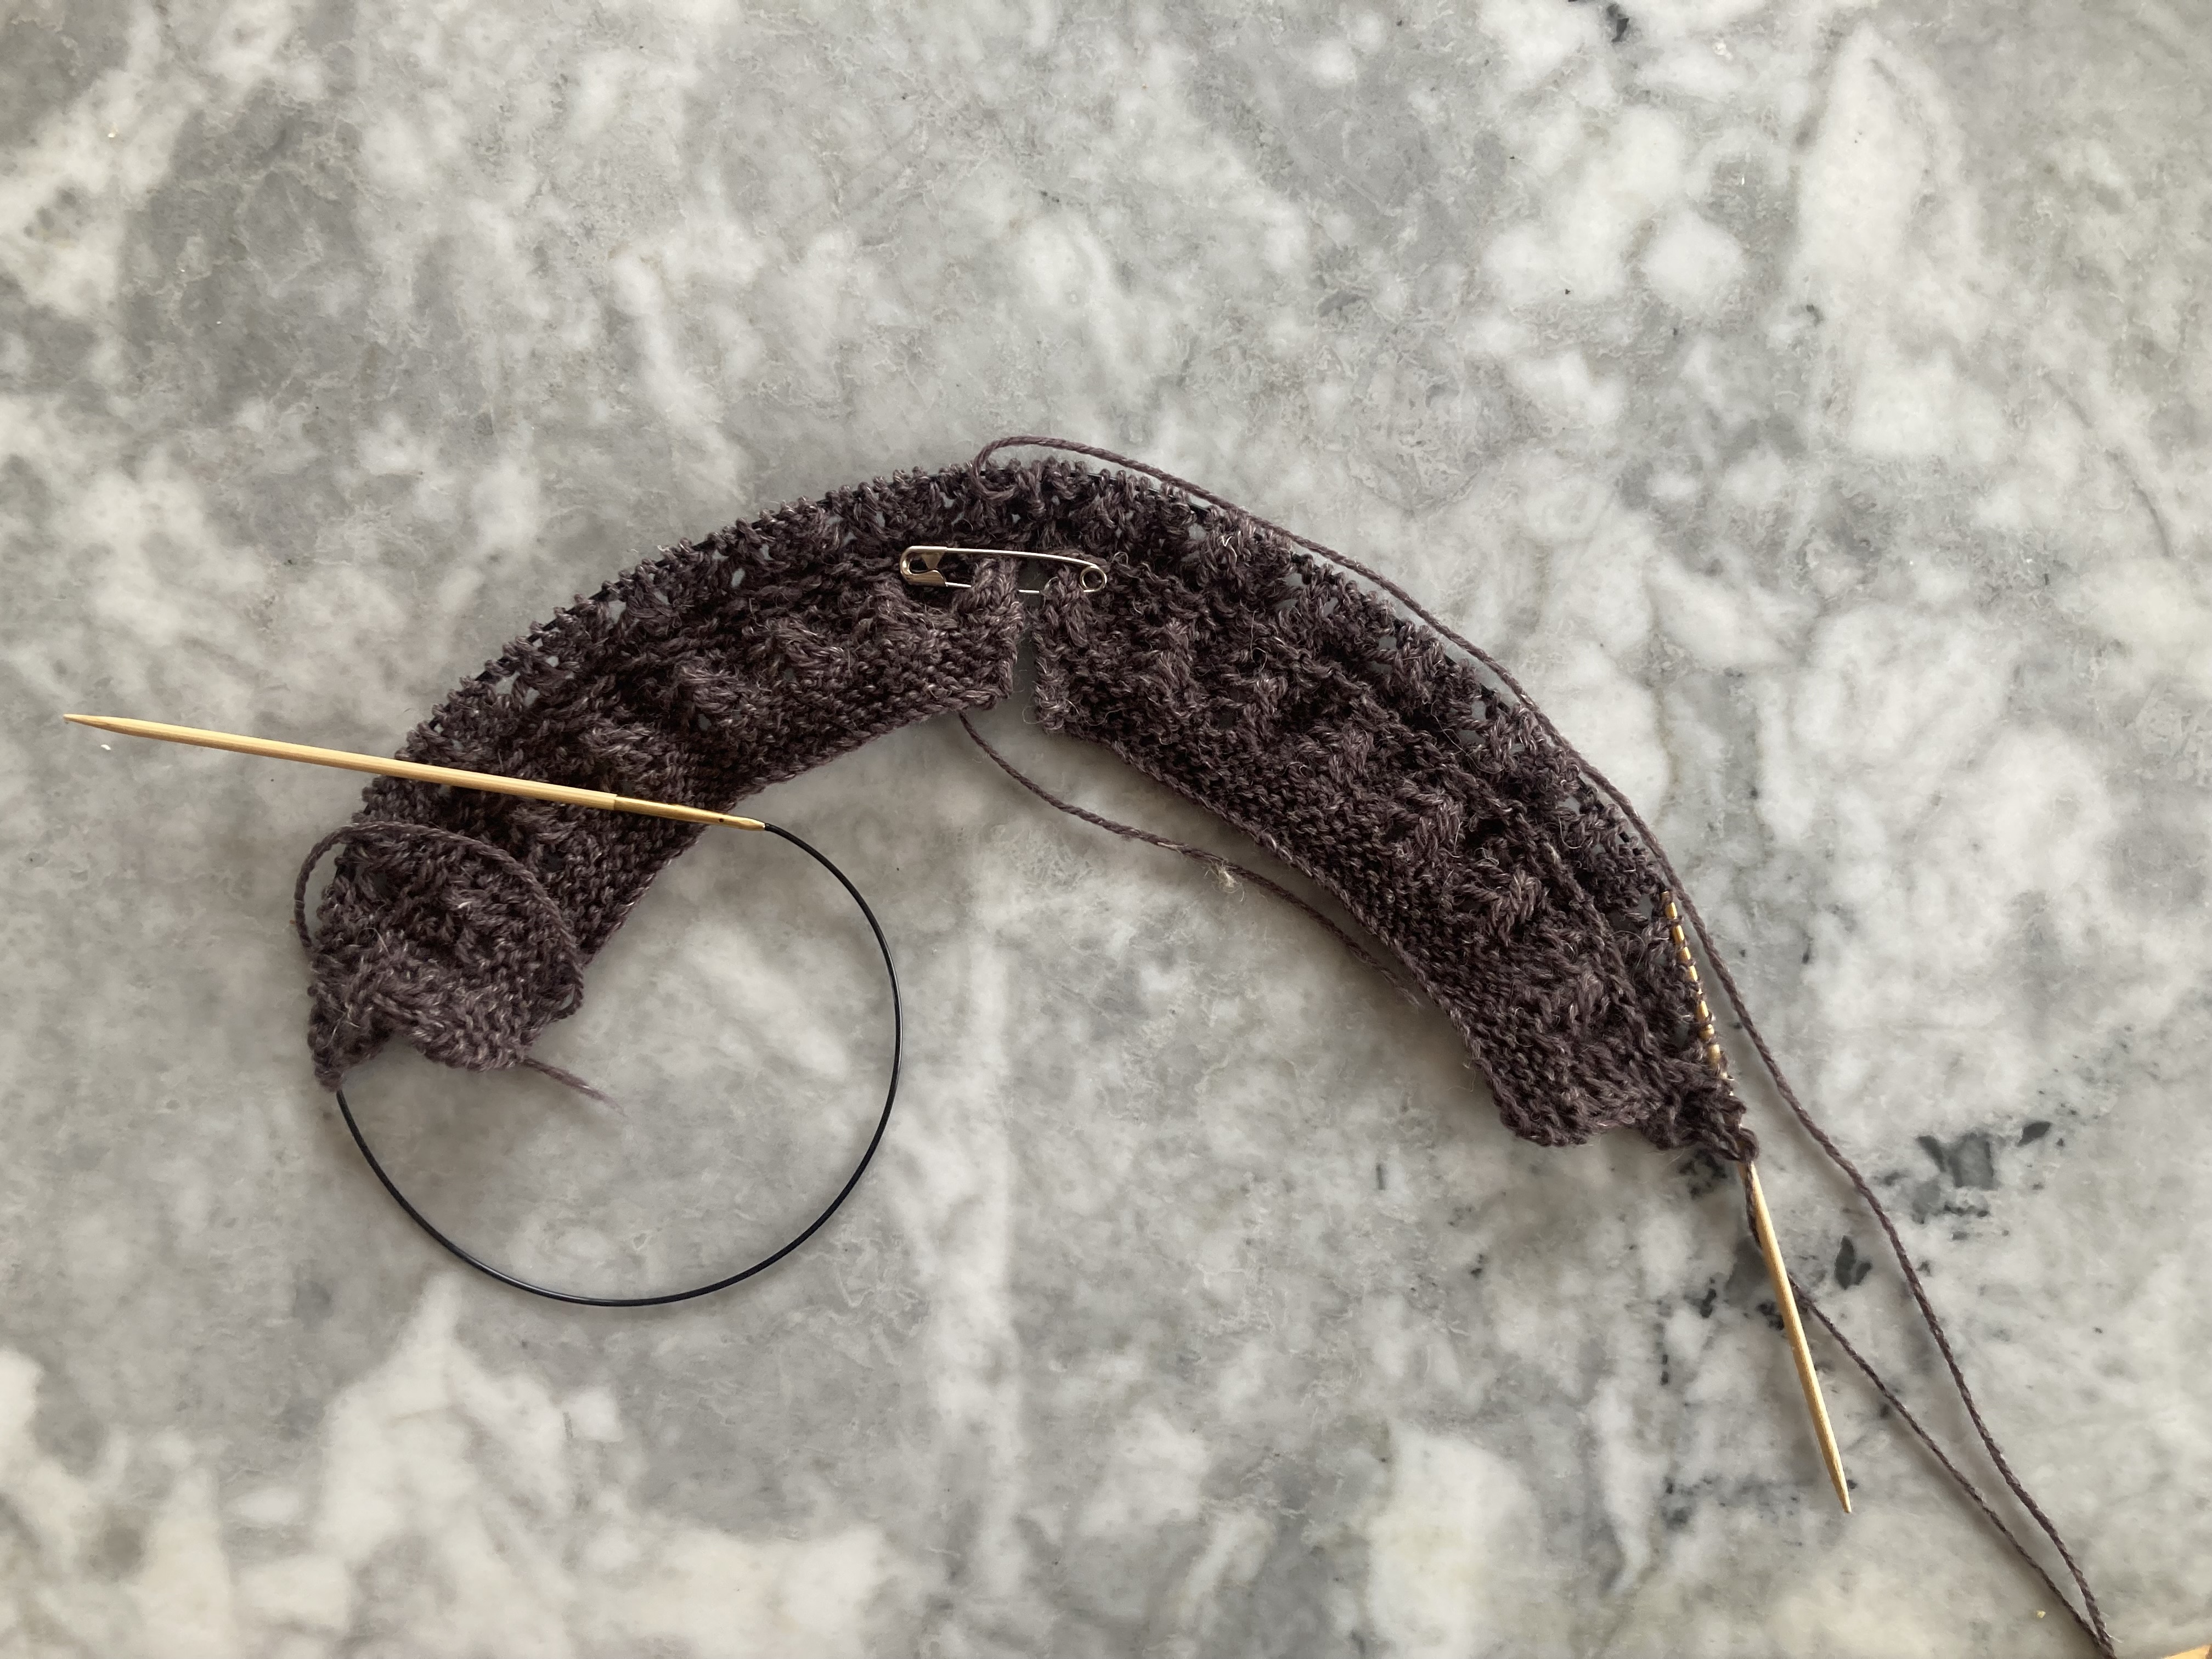
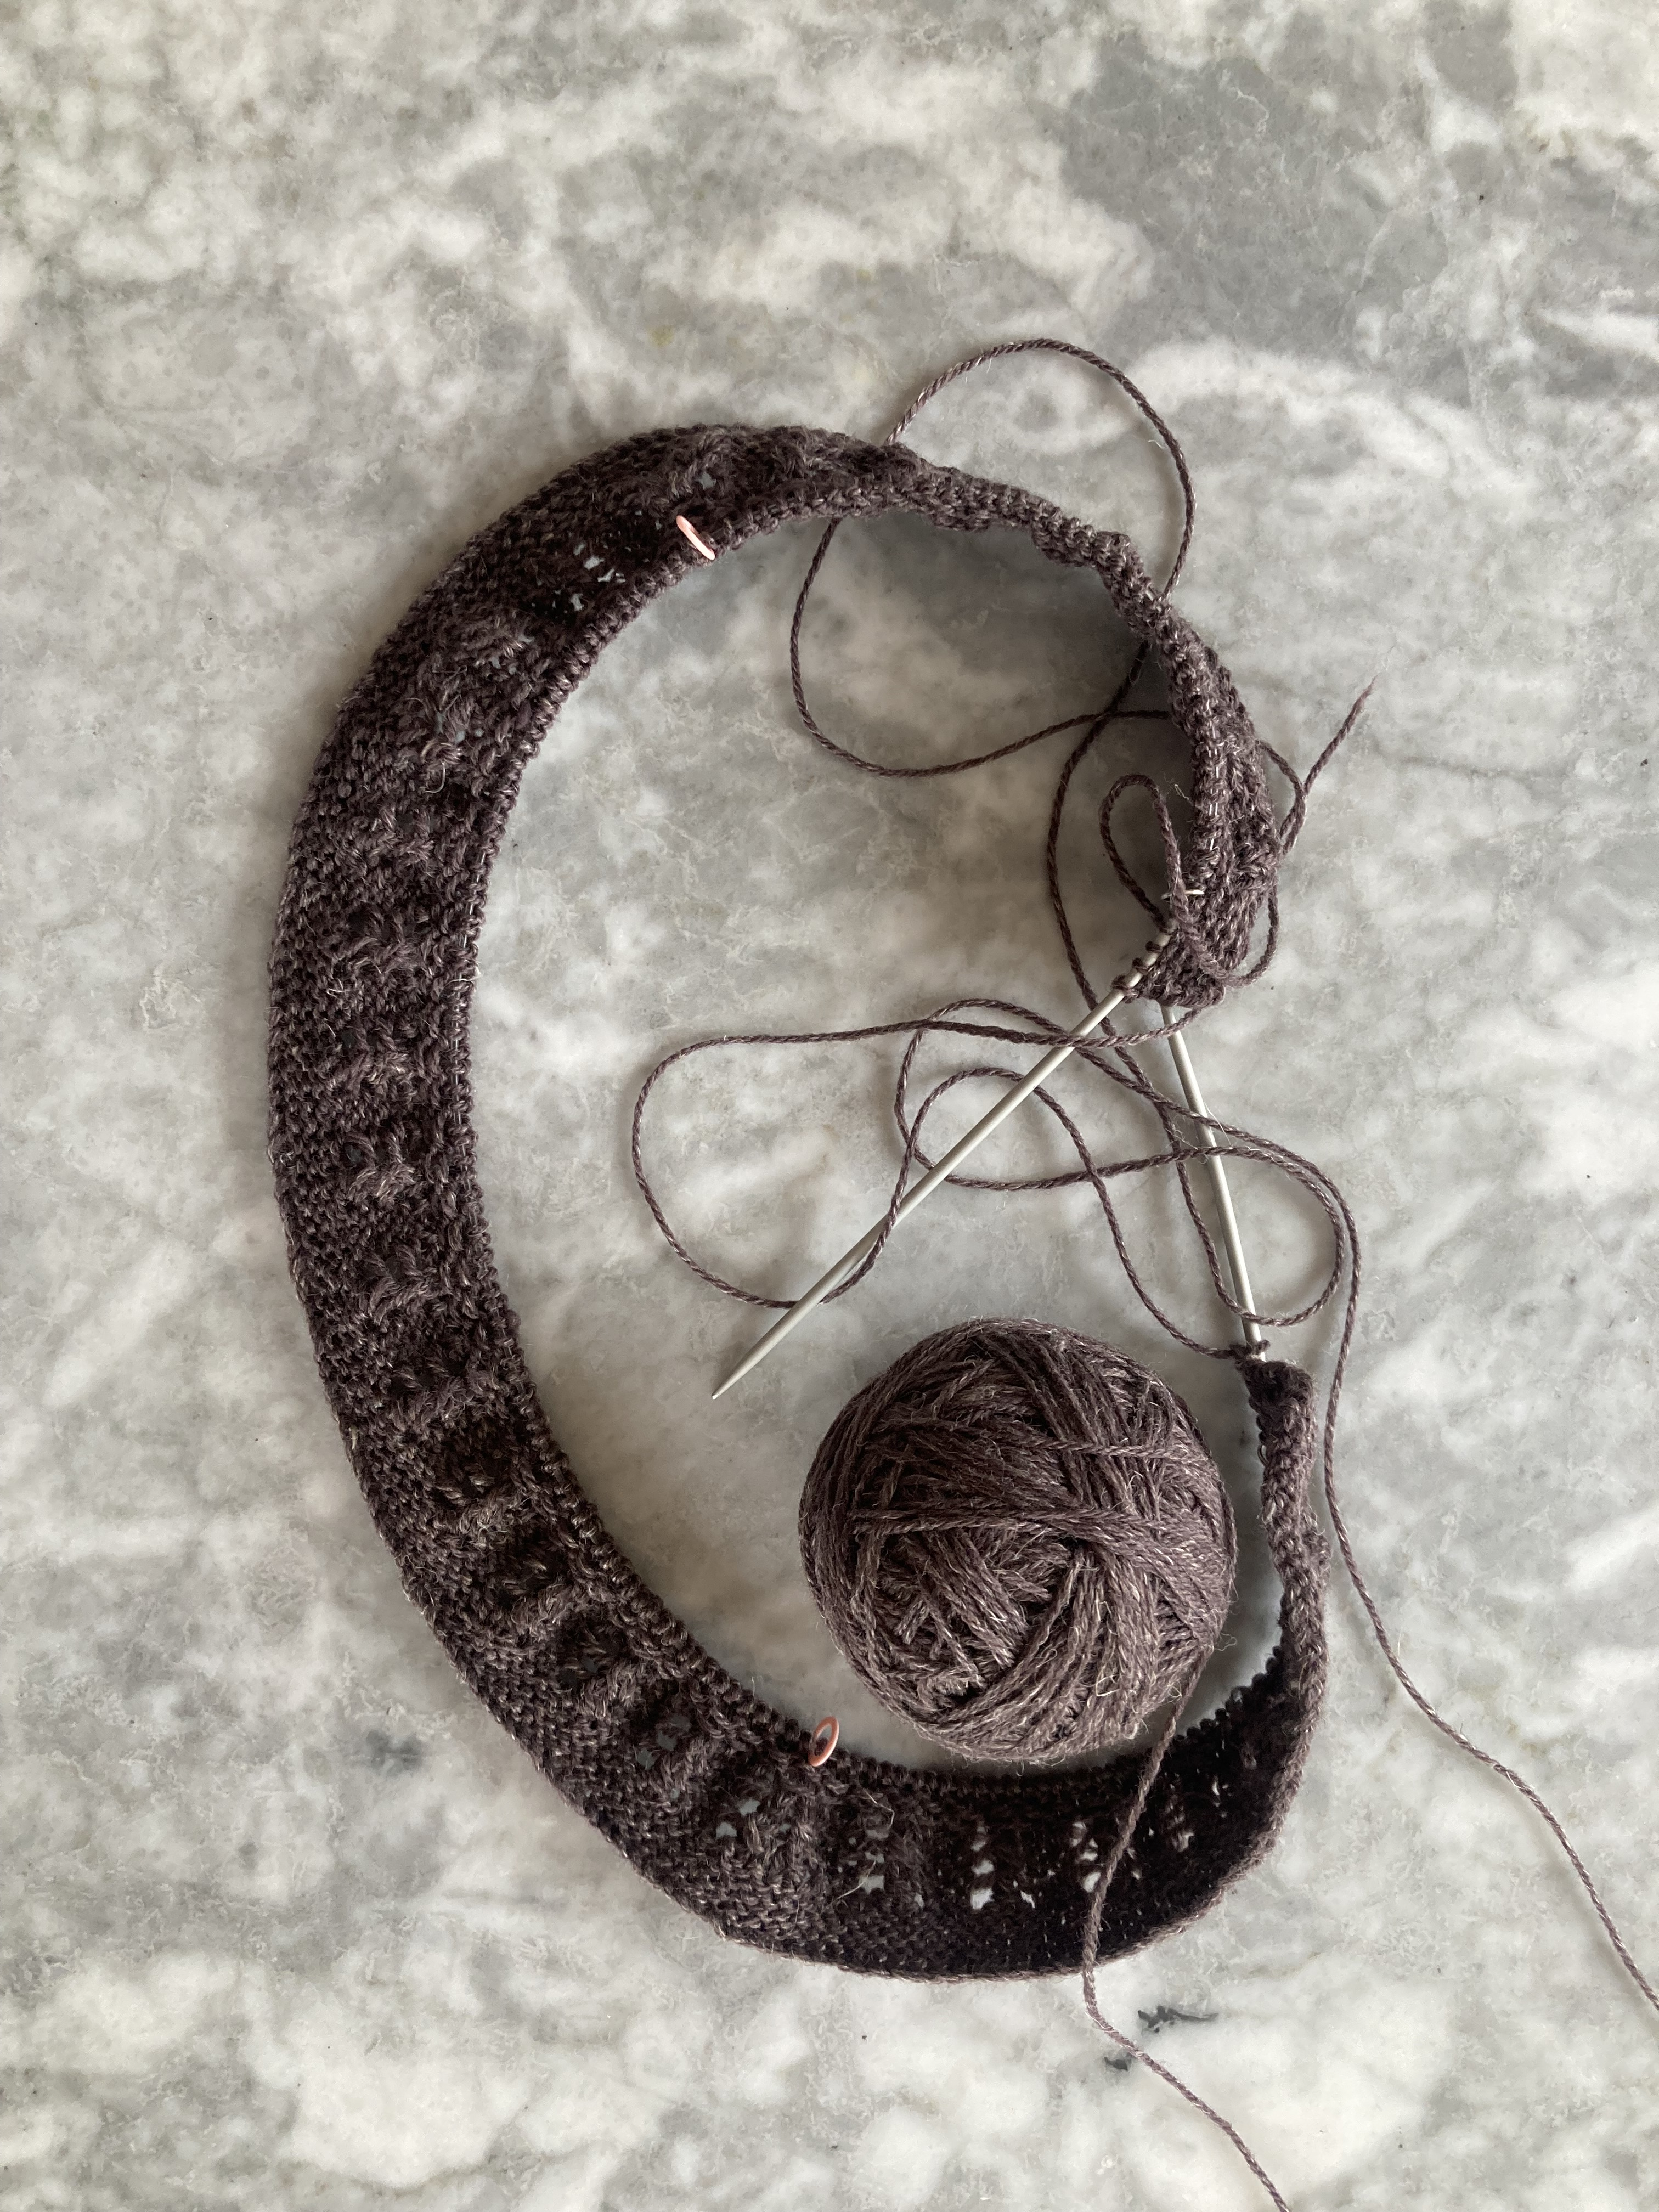
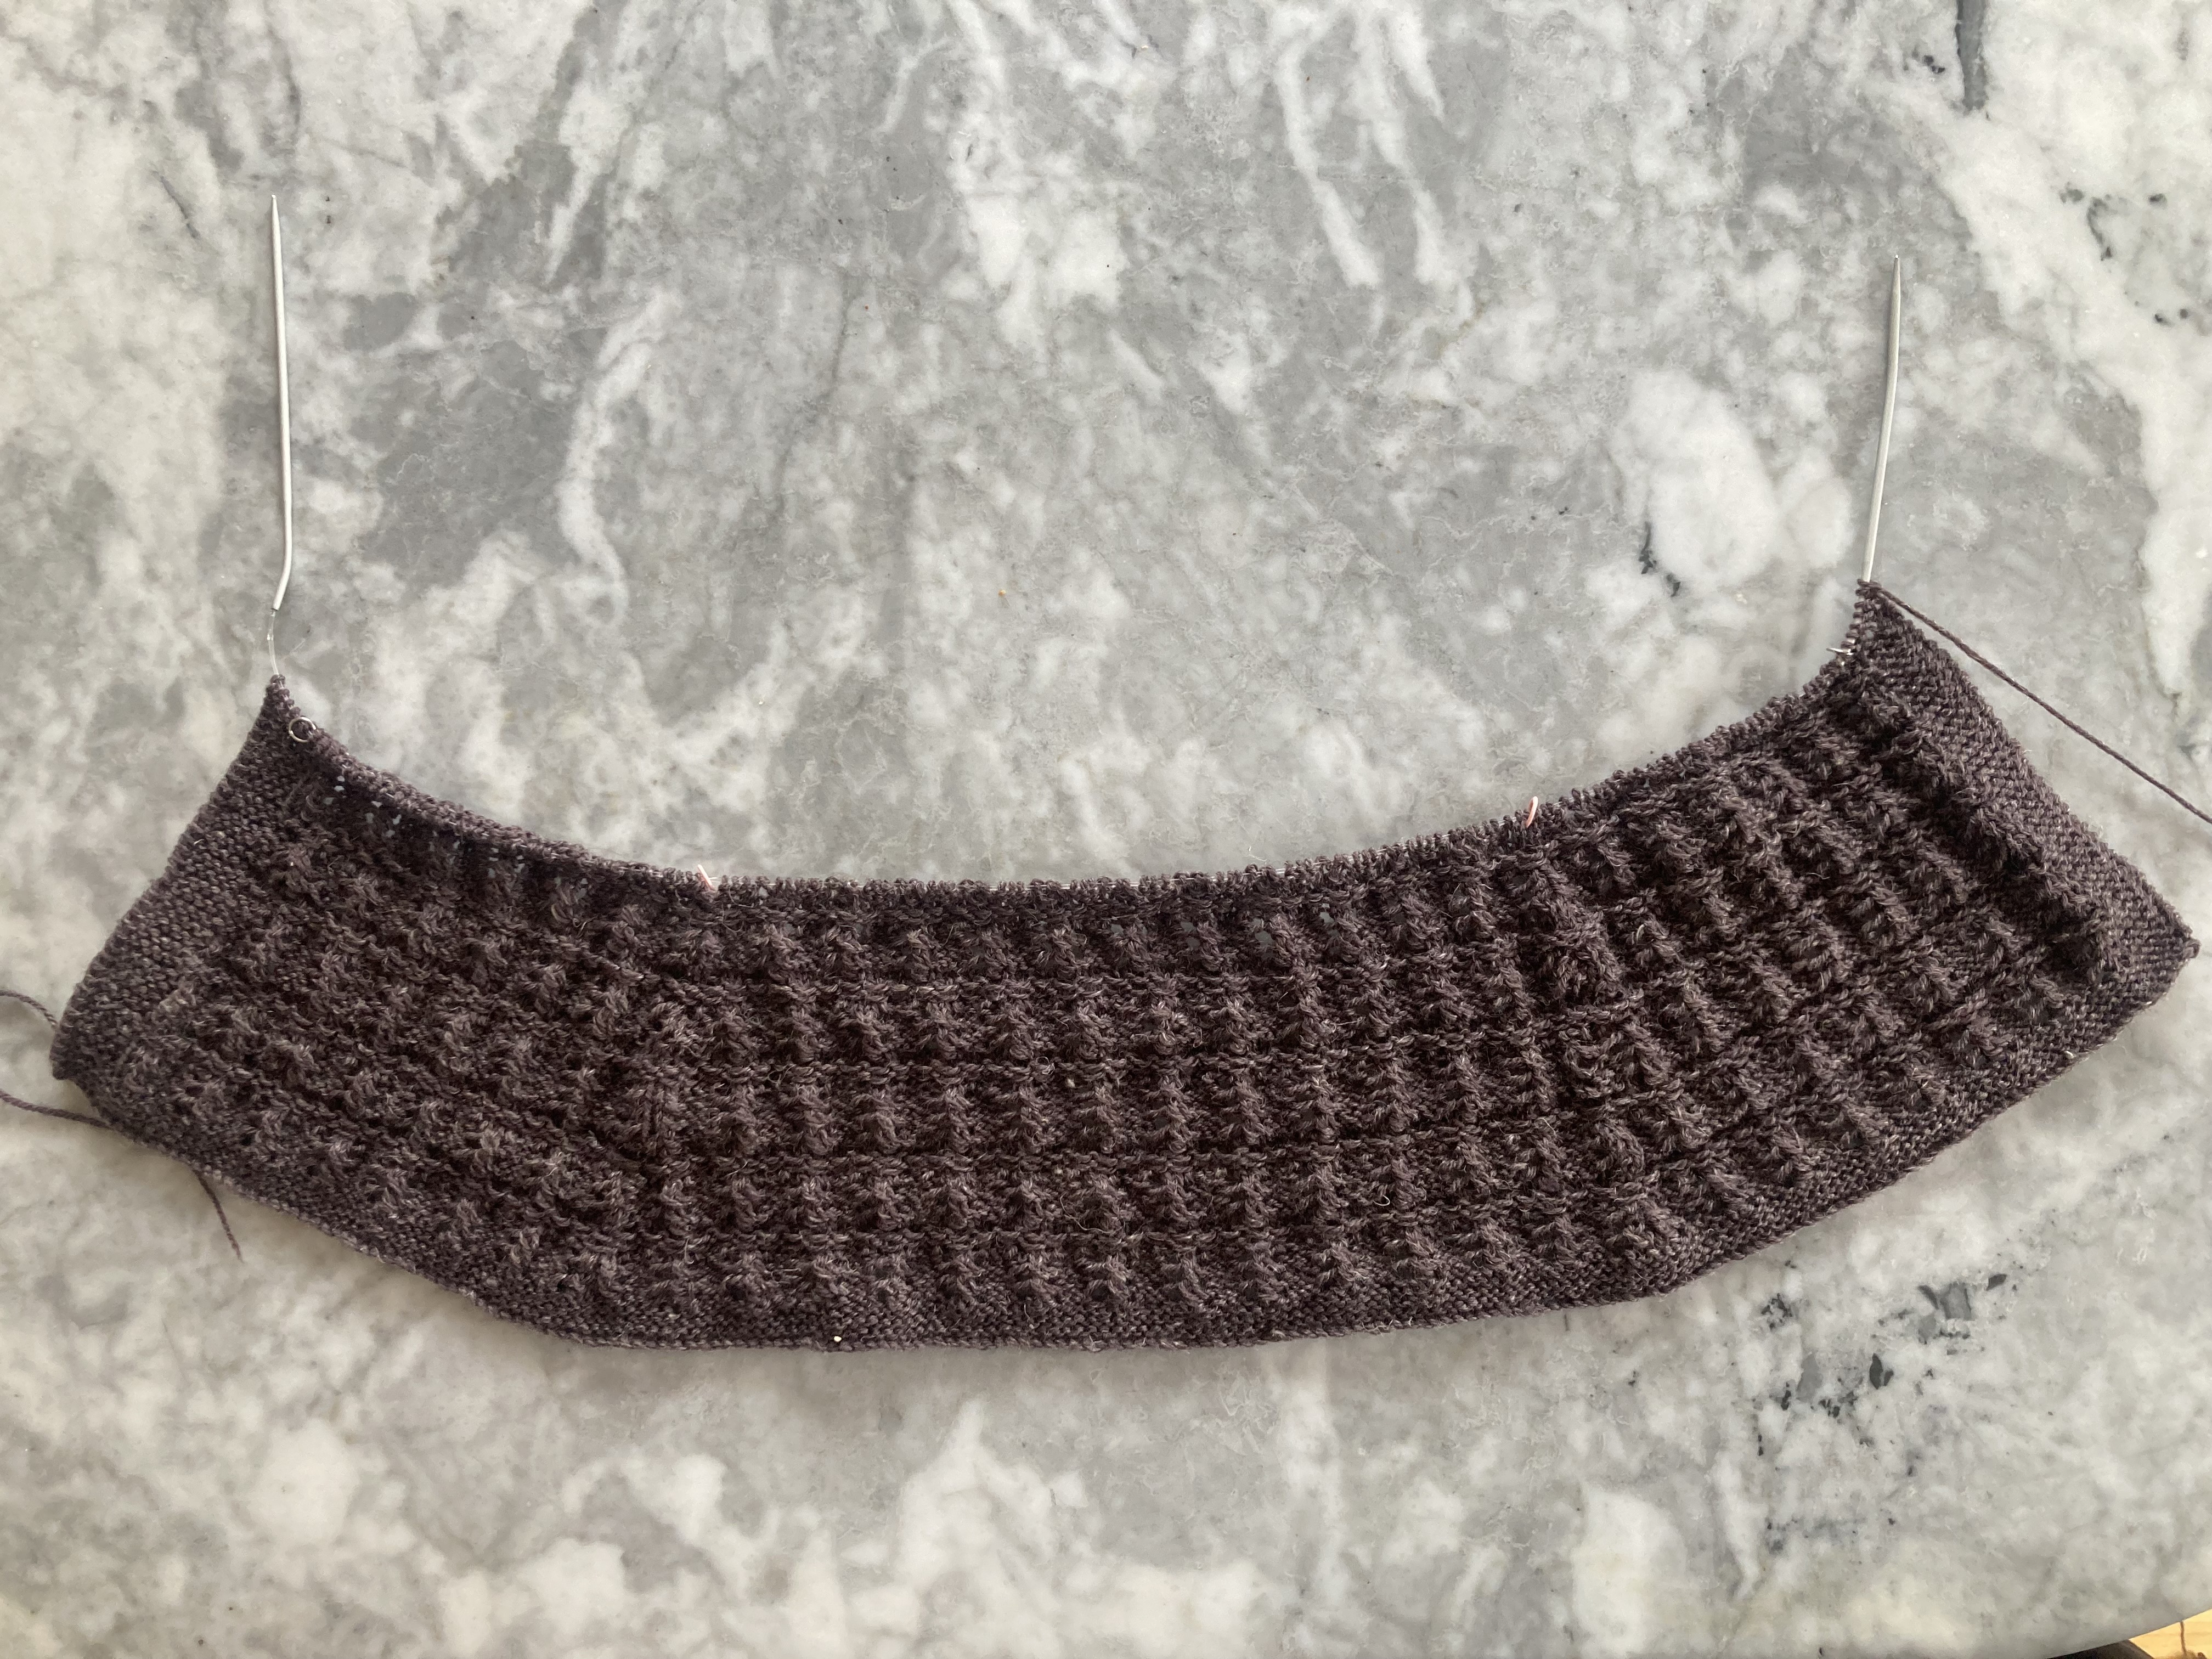
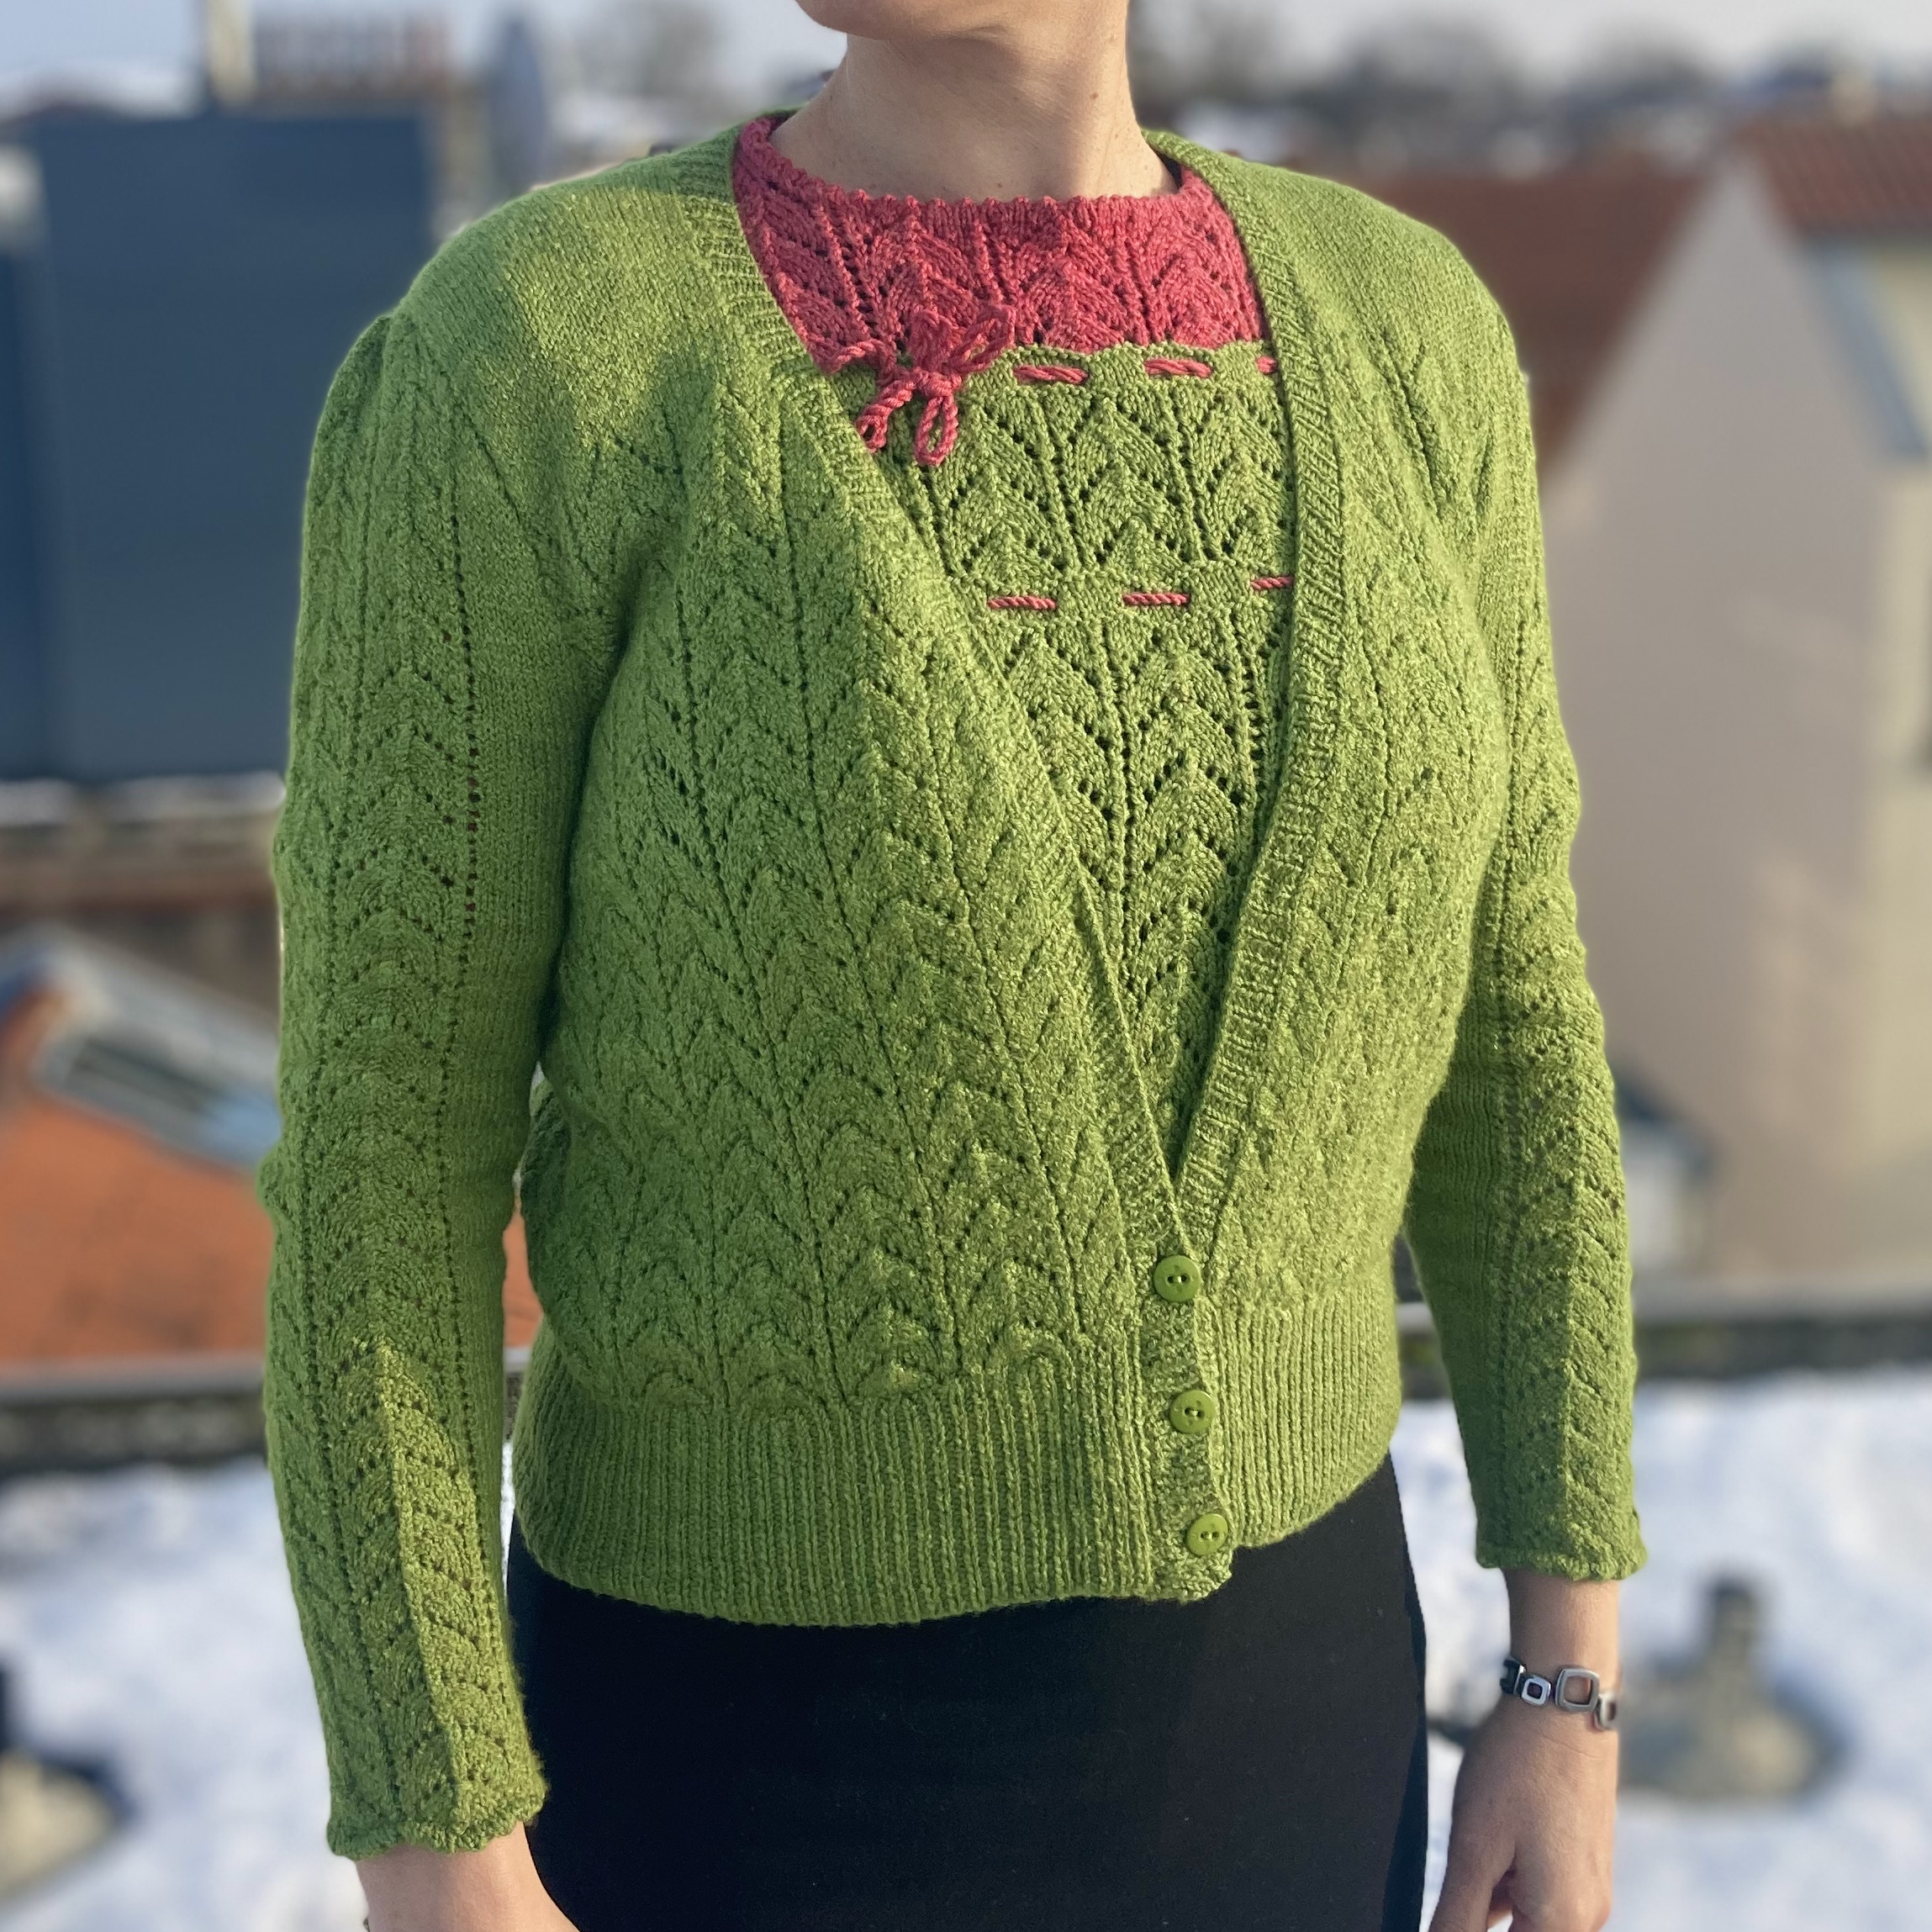
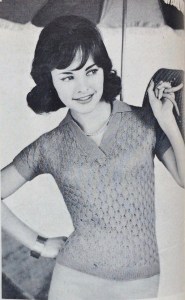
The February 1968 issue of Stitchcraft didn’t have any projects in it that immediately called to me, but a good friend had requested a pink headband for keeping her ears warm without wearing an entire hat, so decided to make an adaptation.
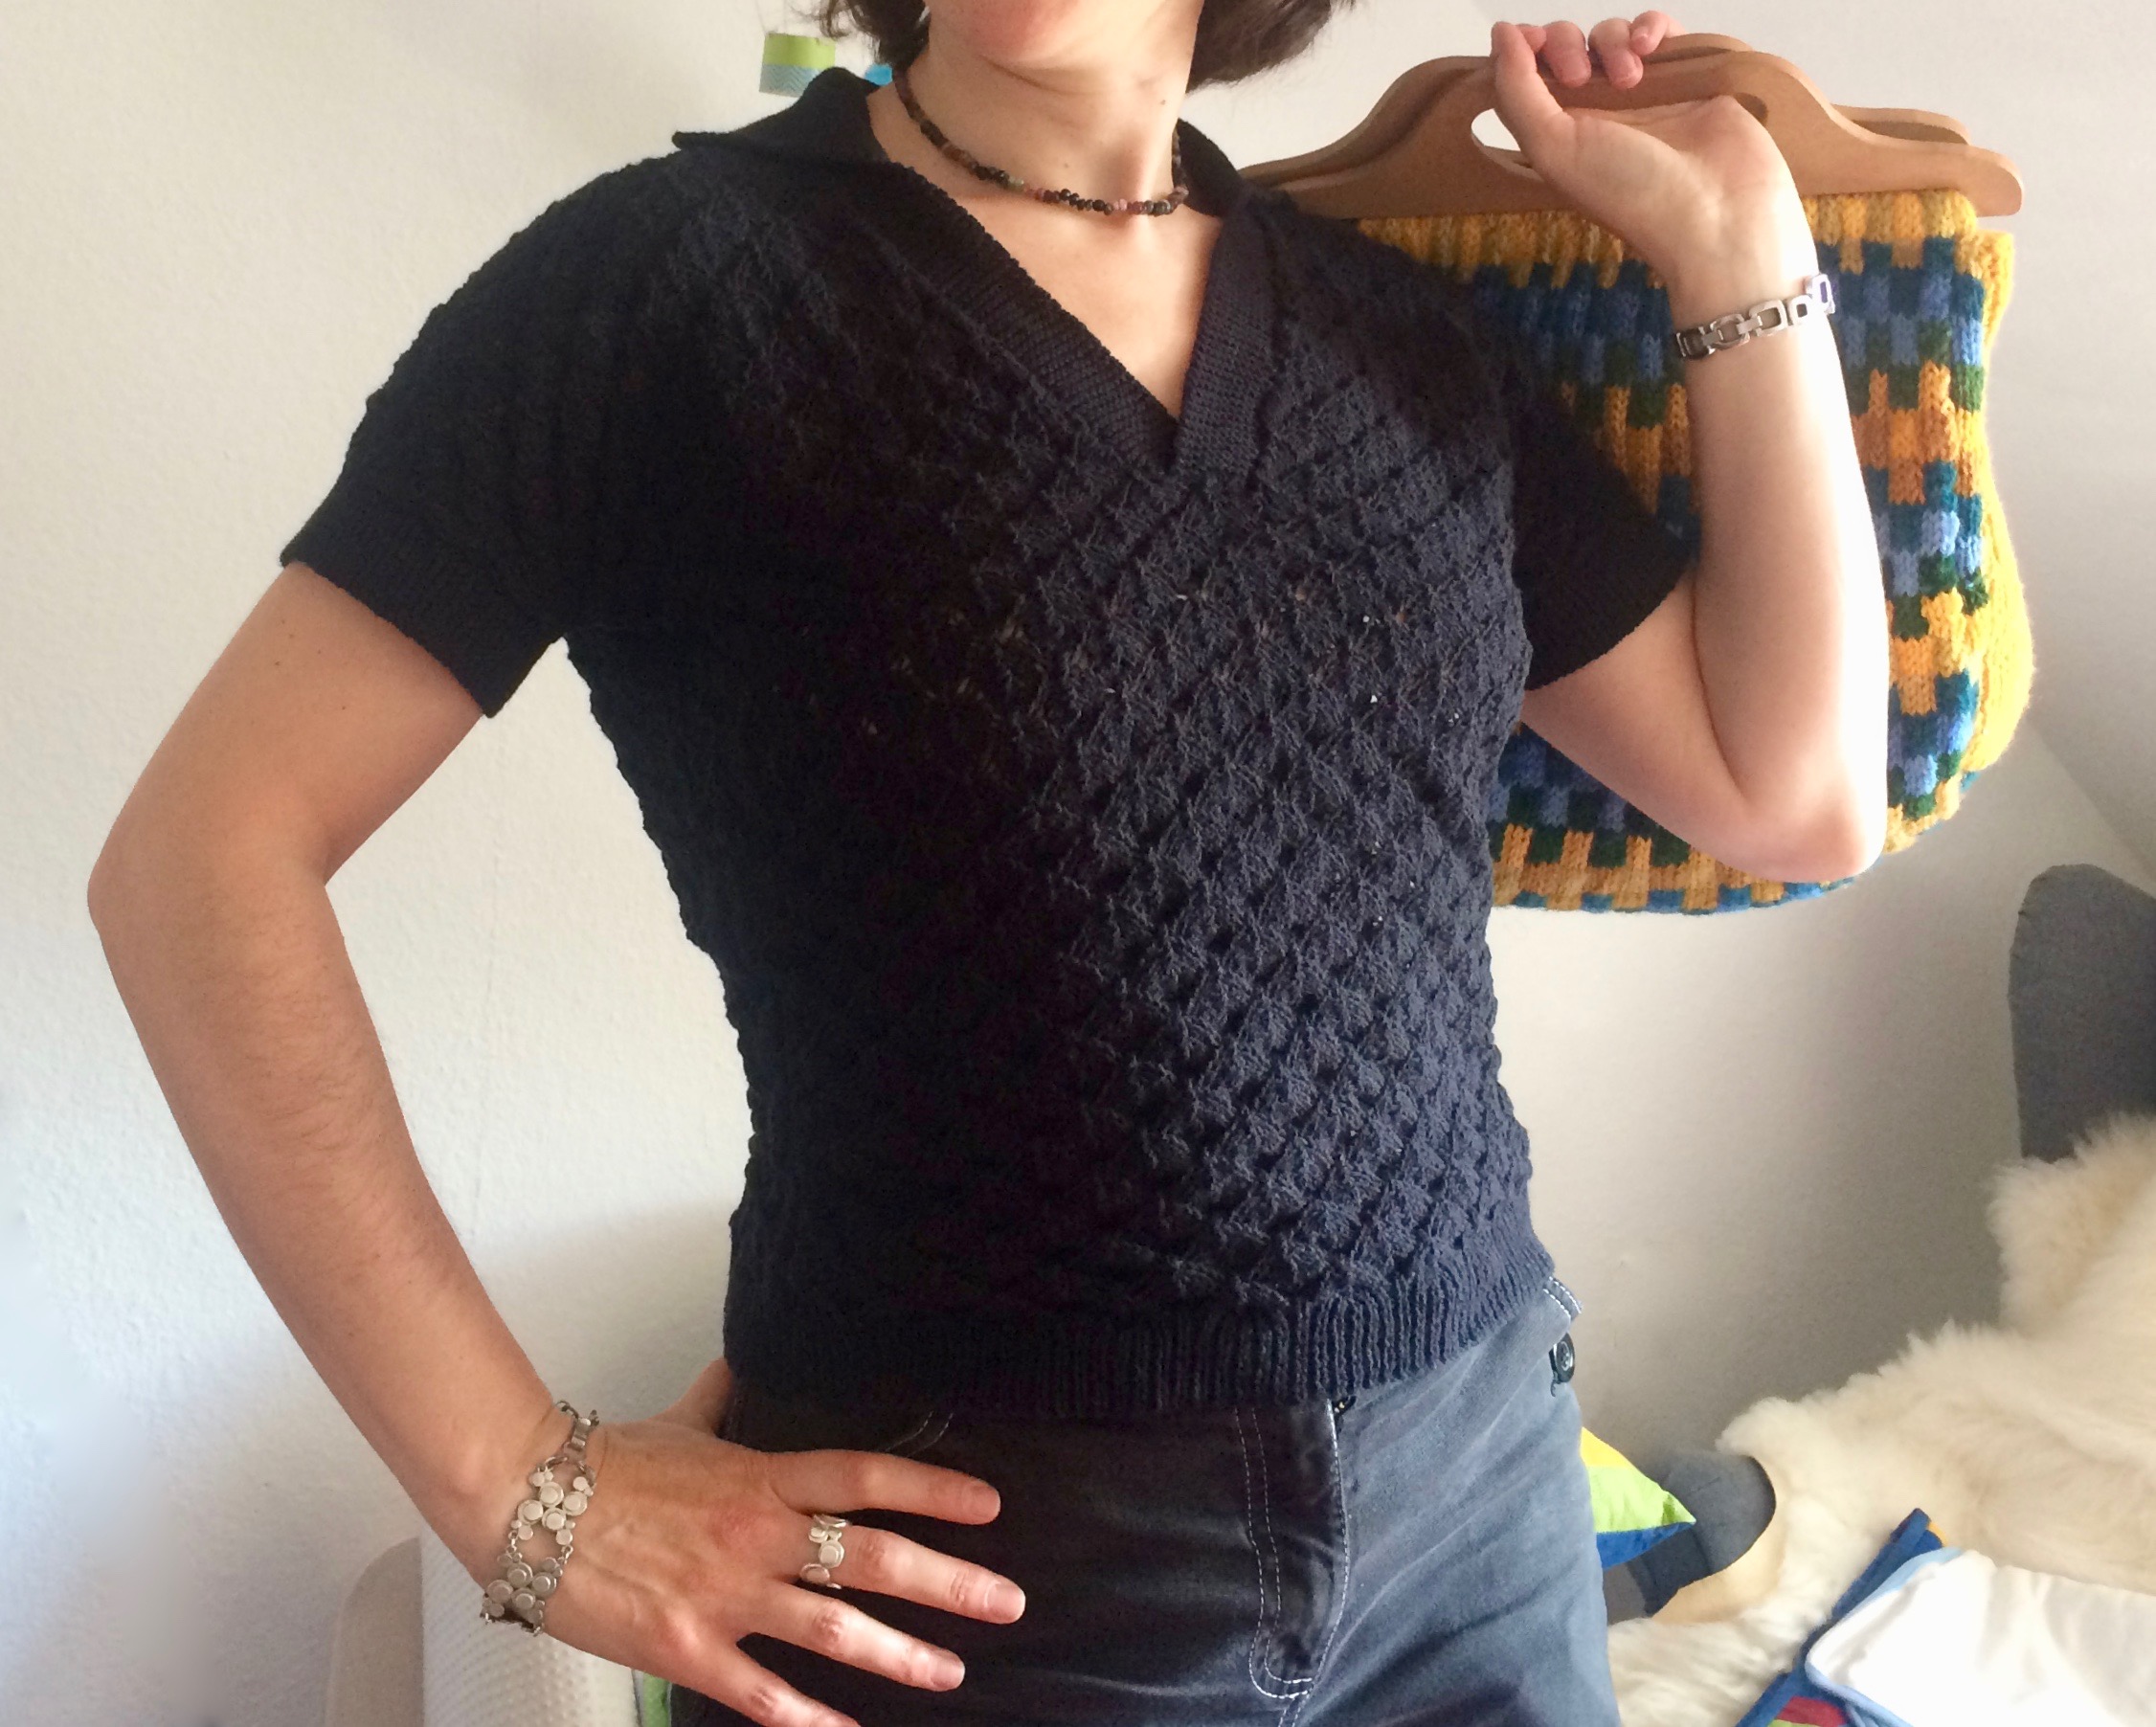
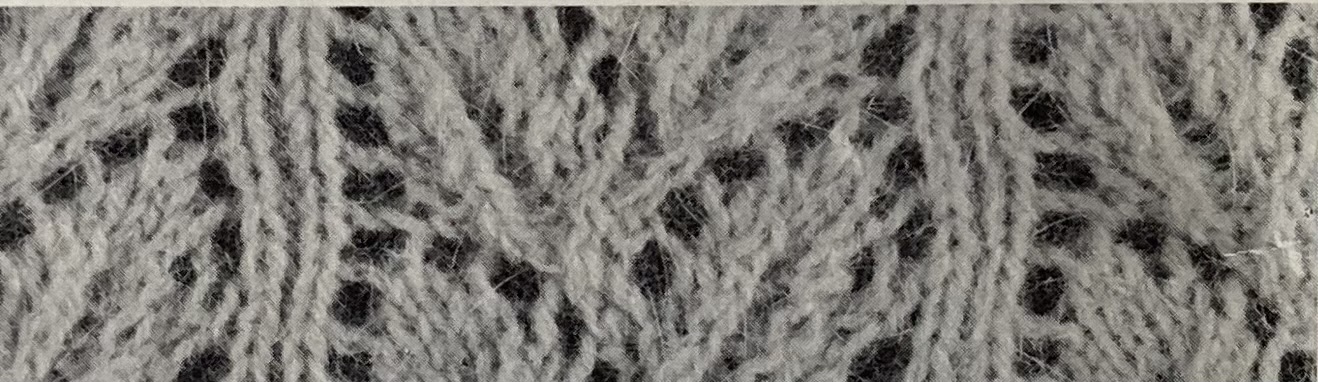
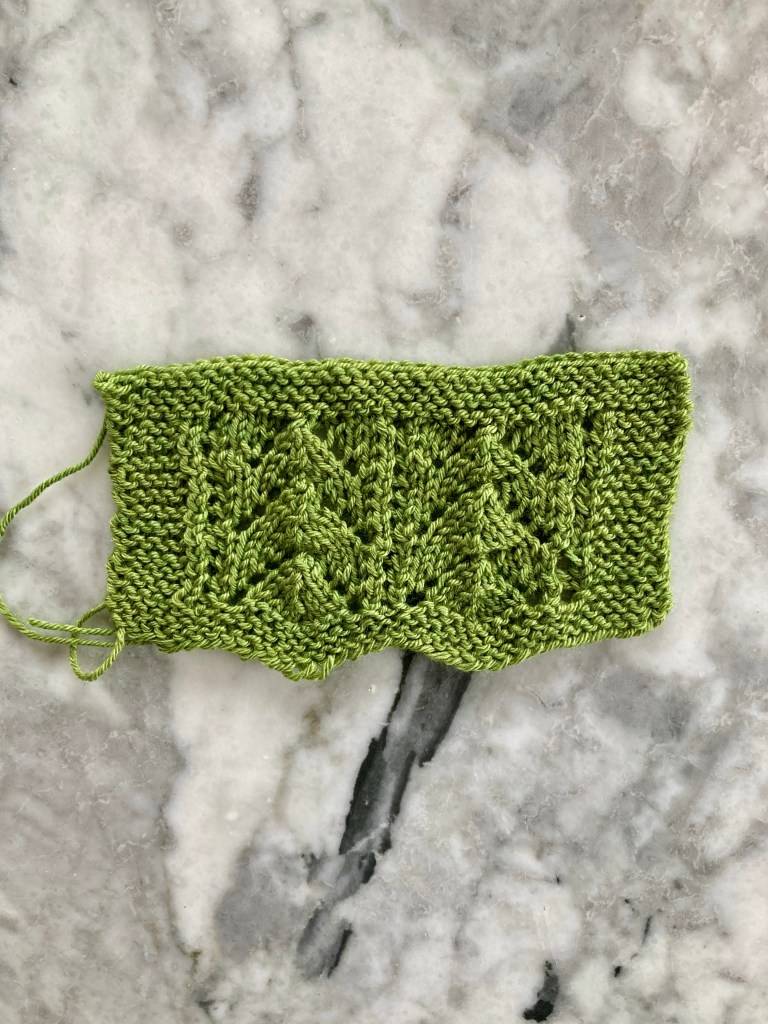
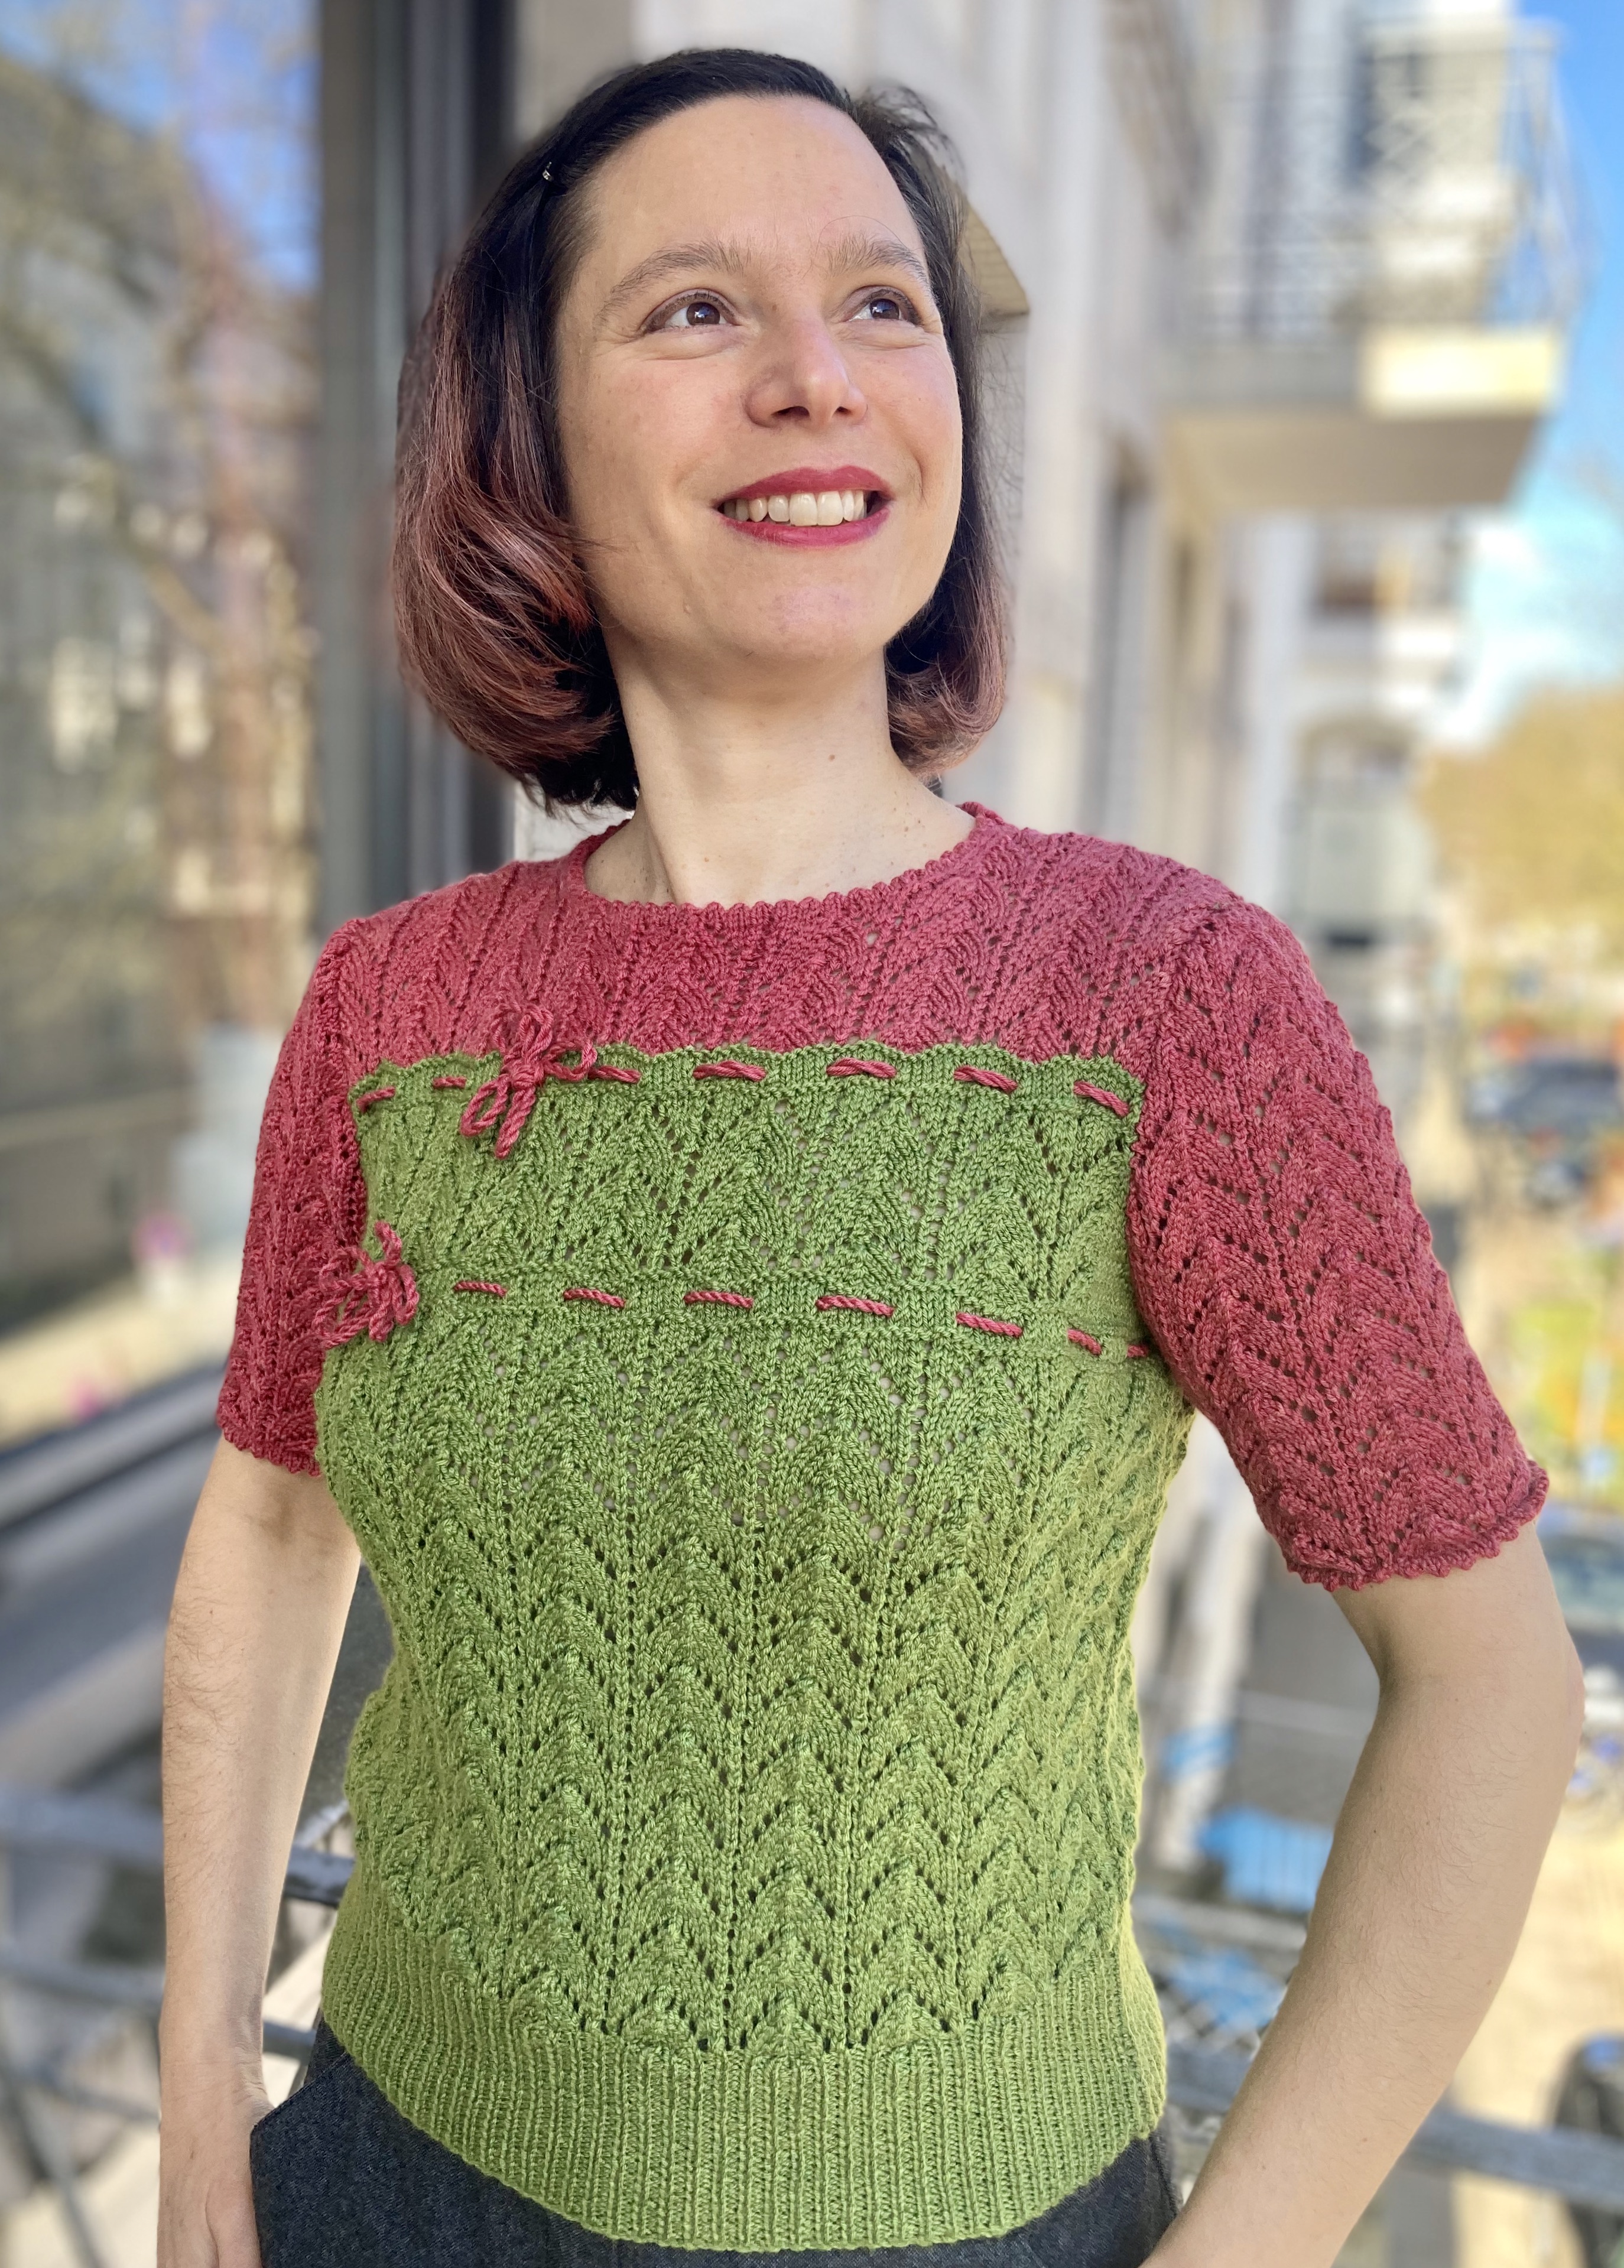
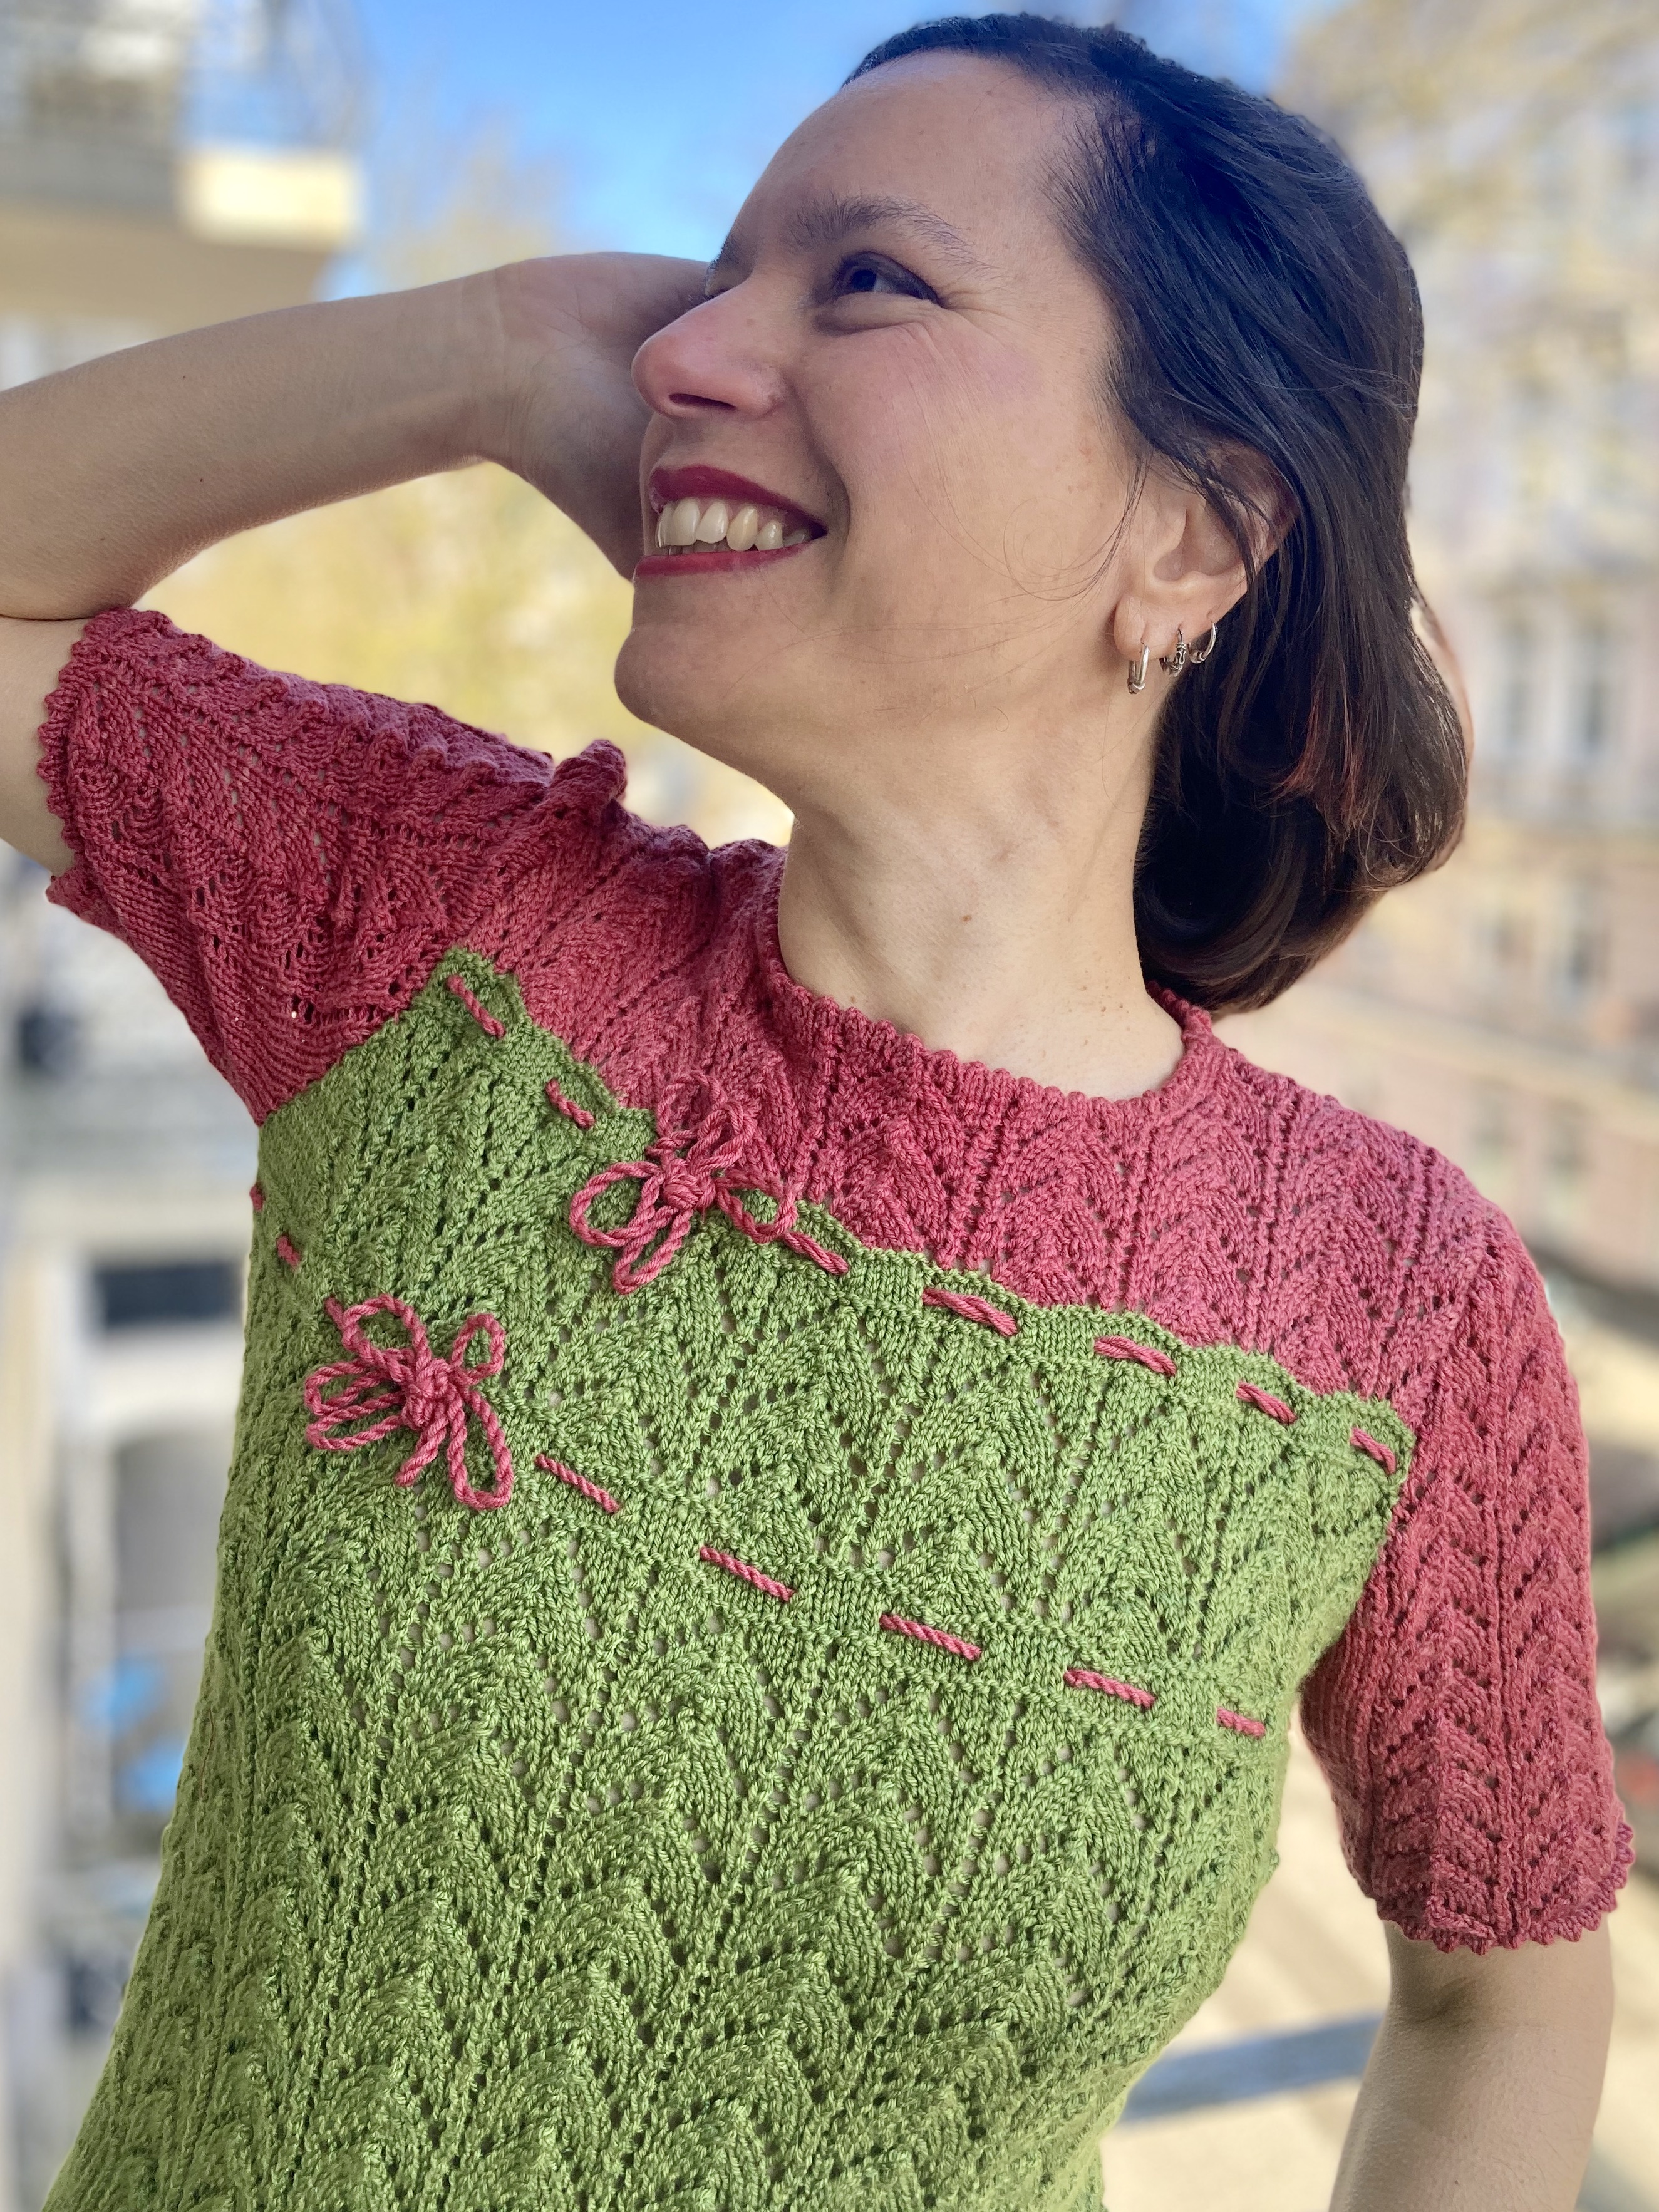
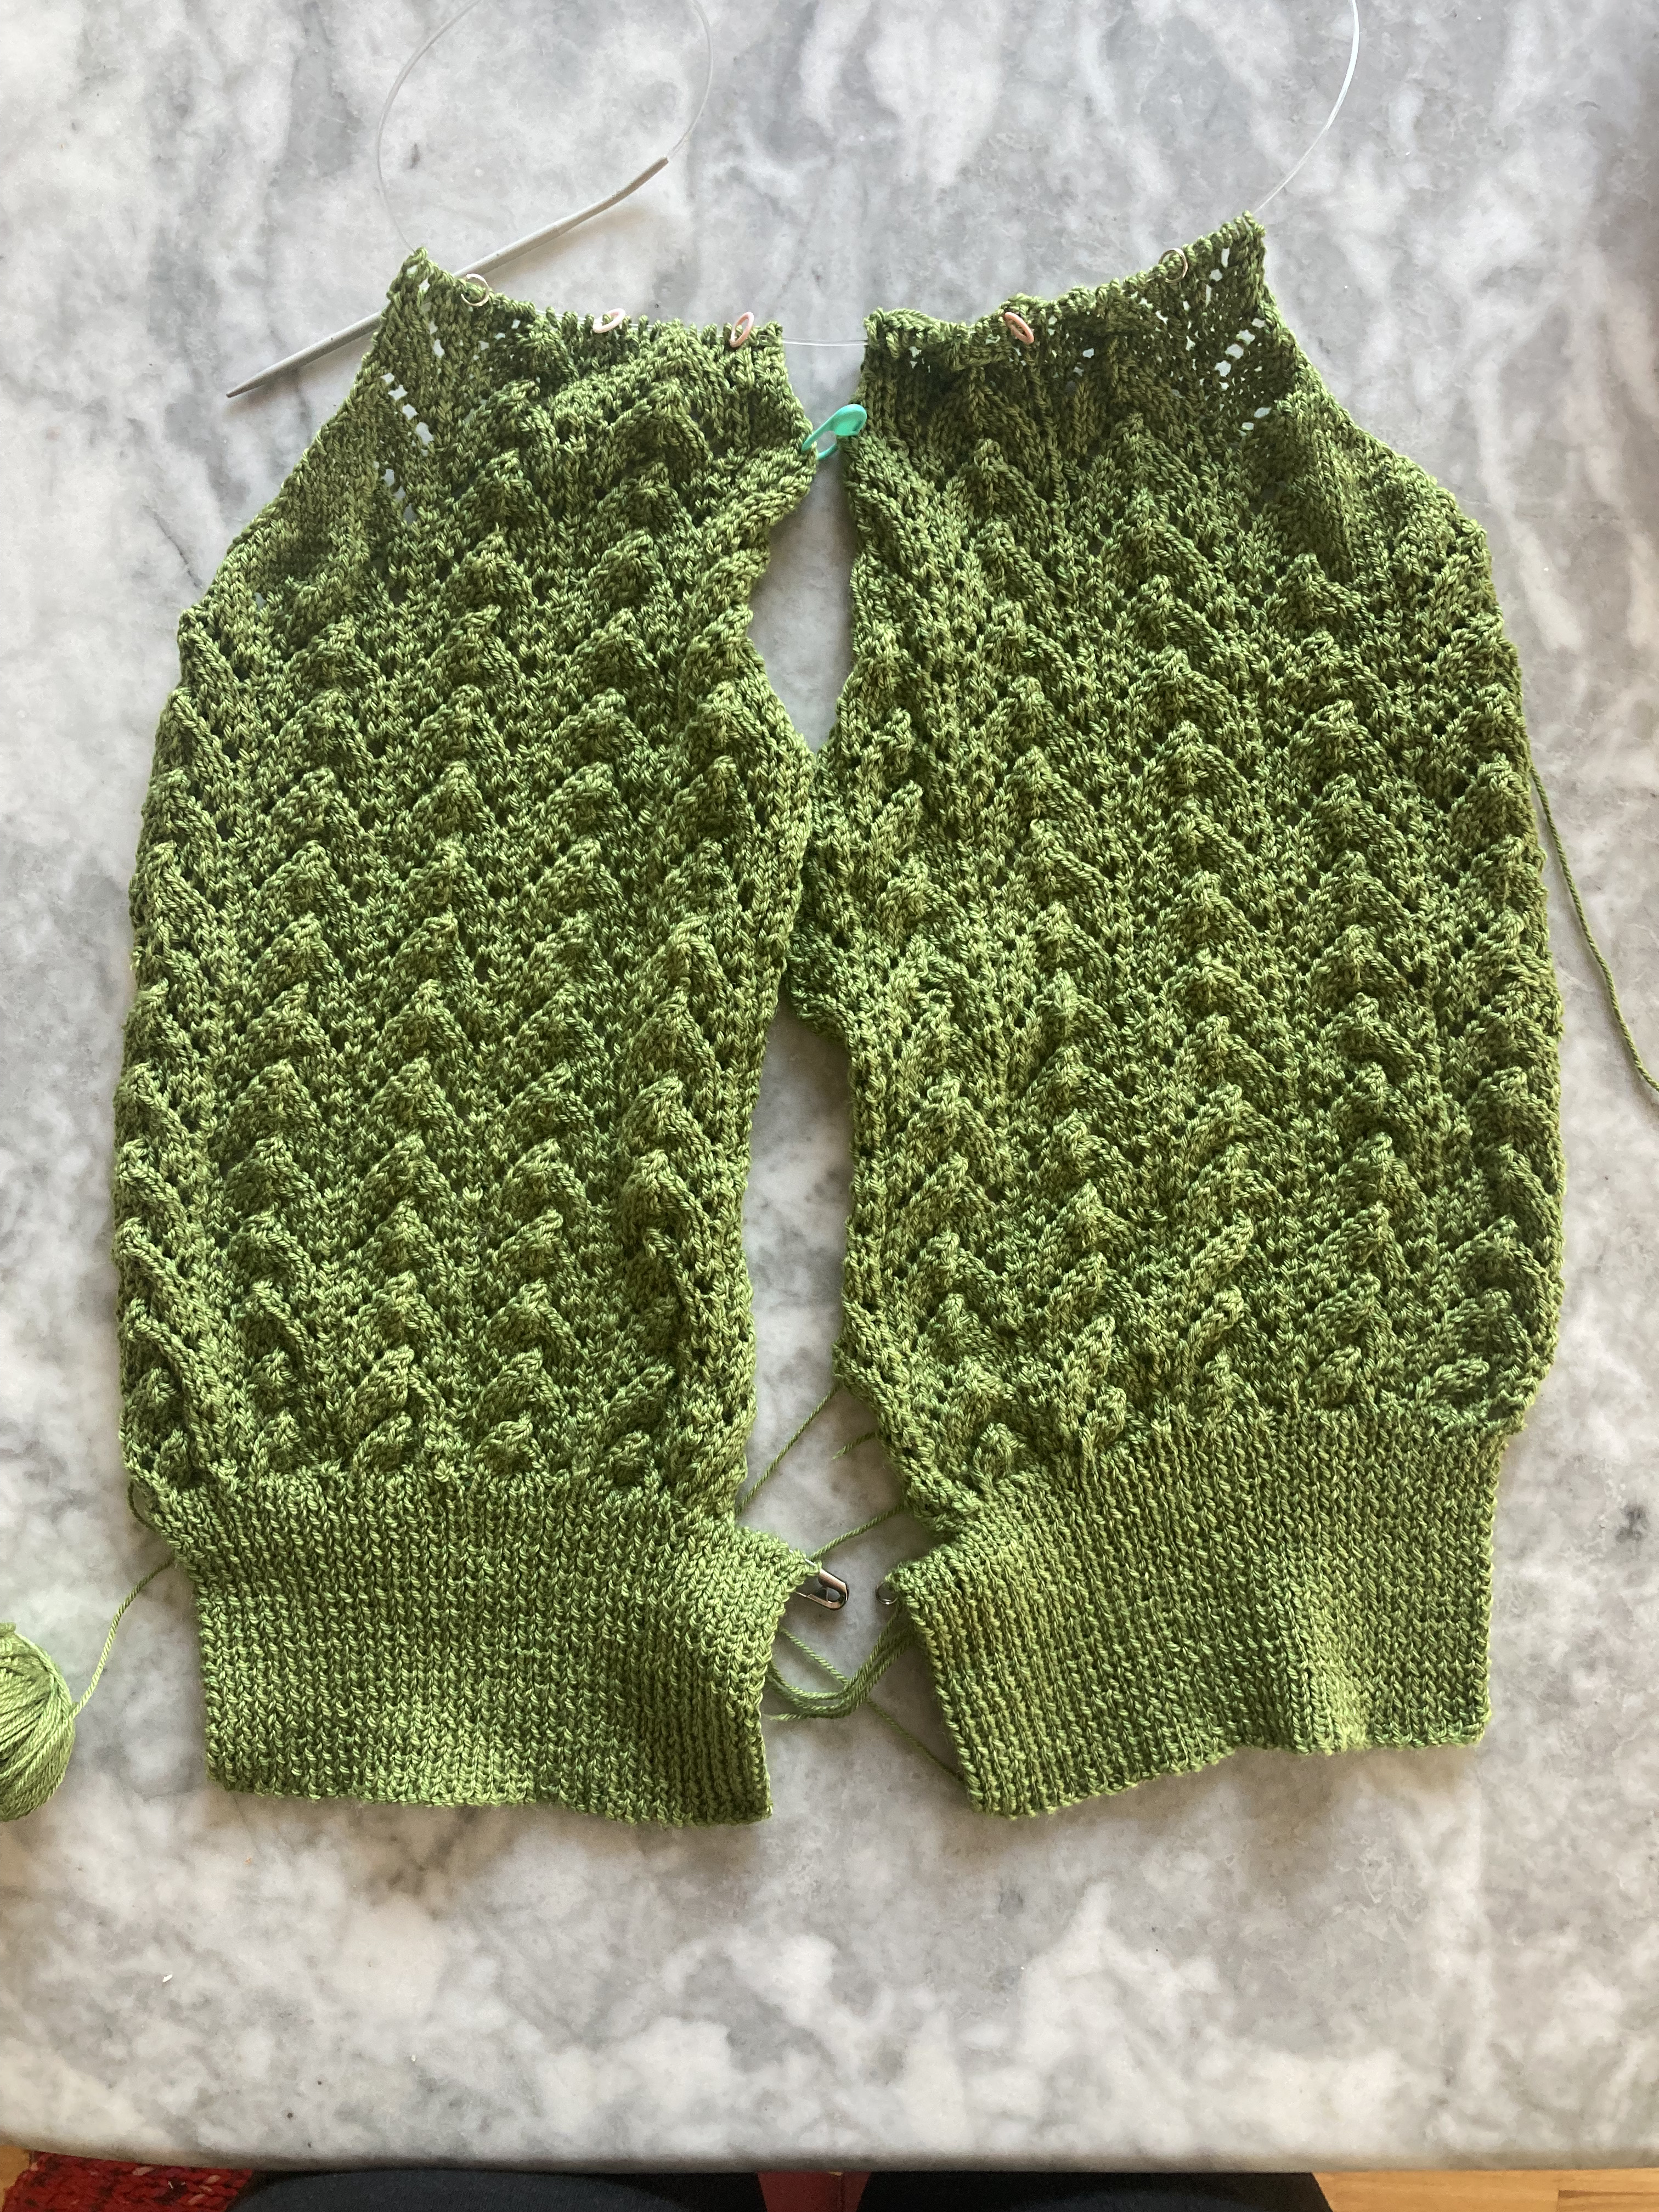
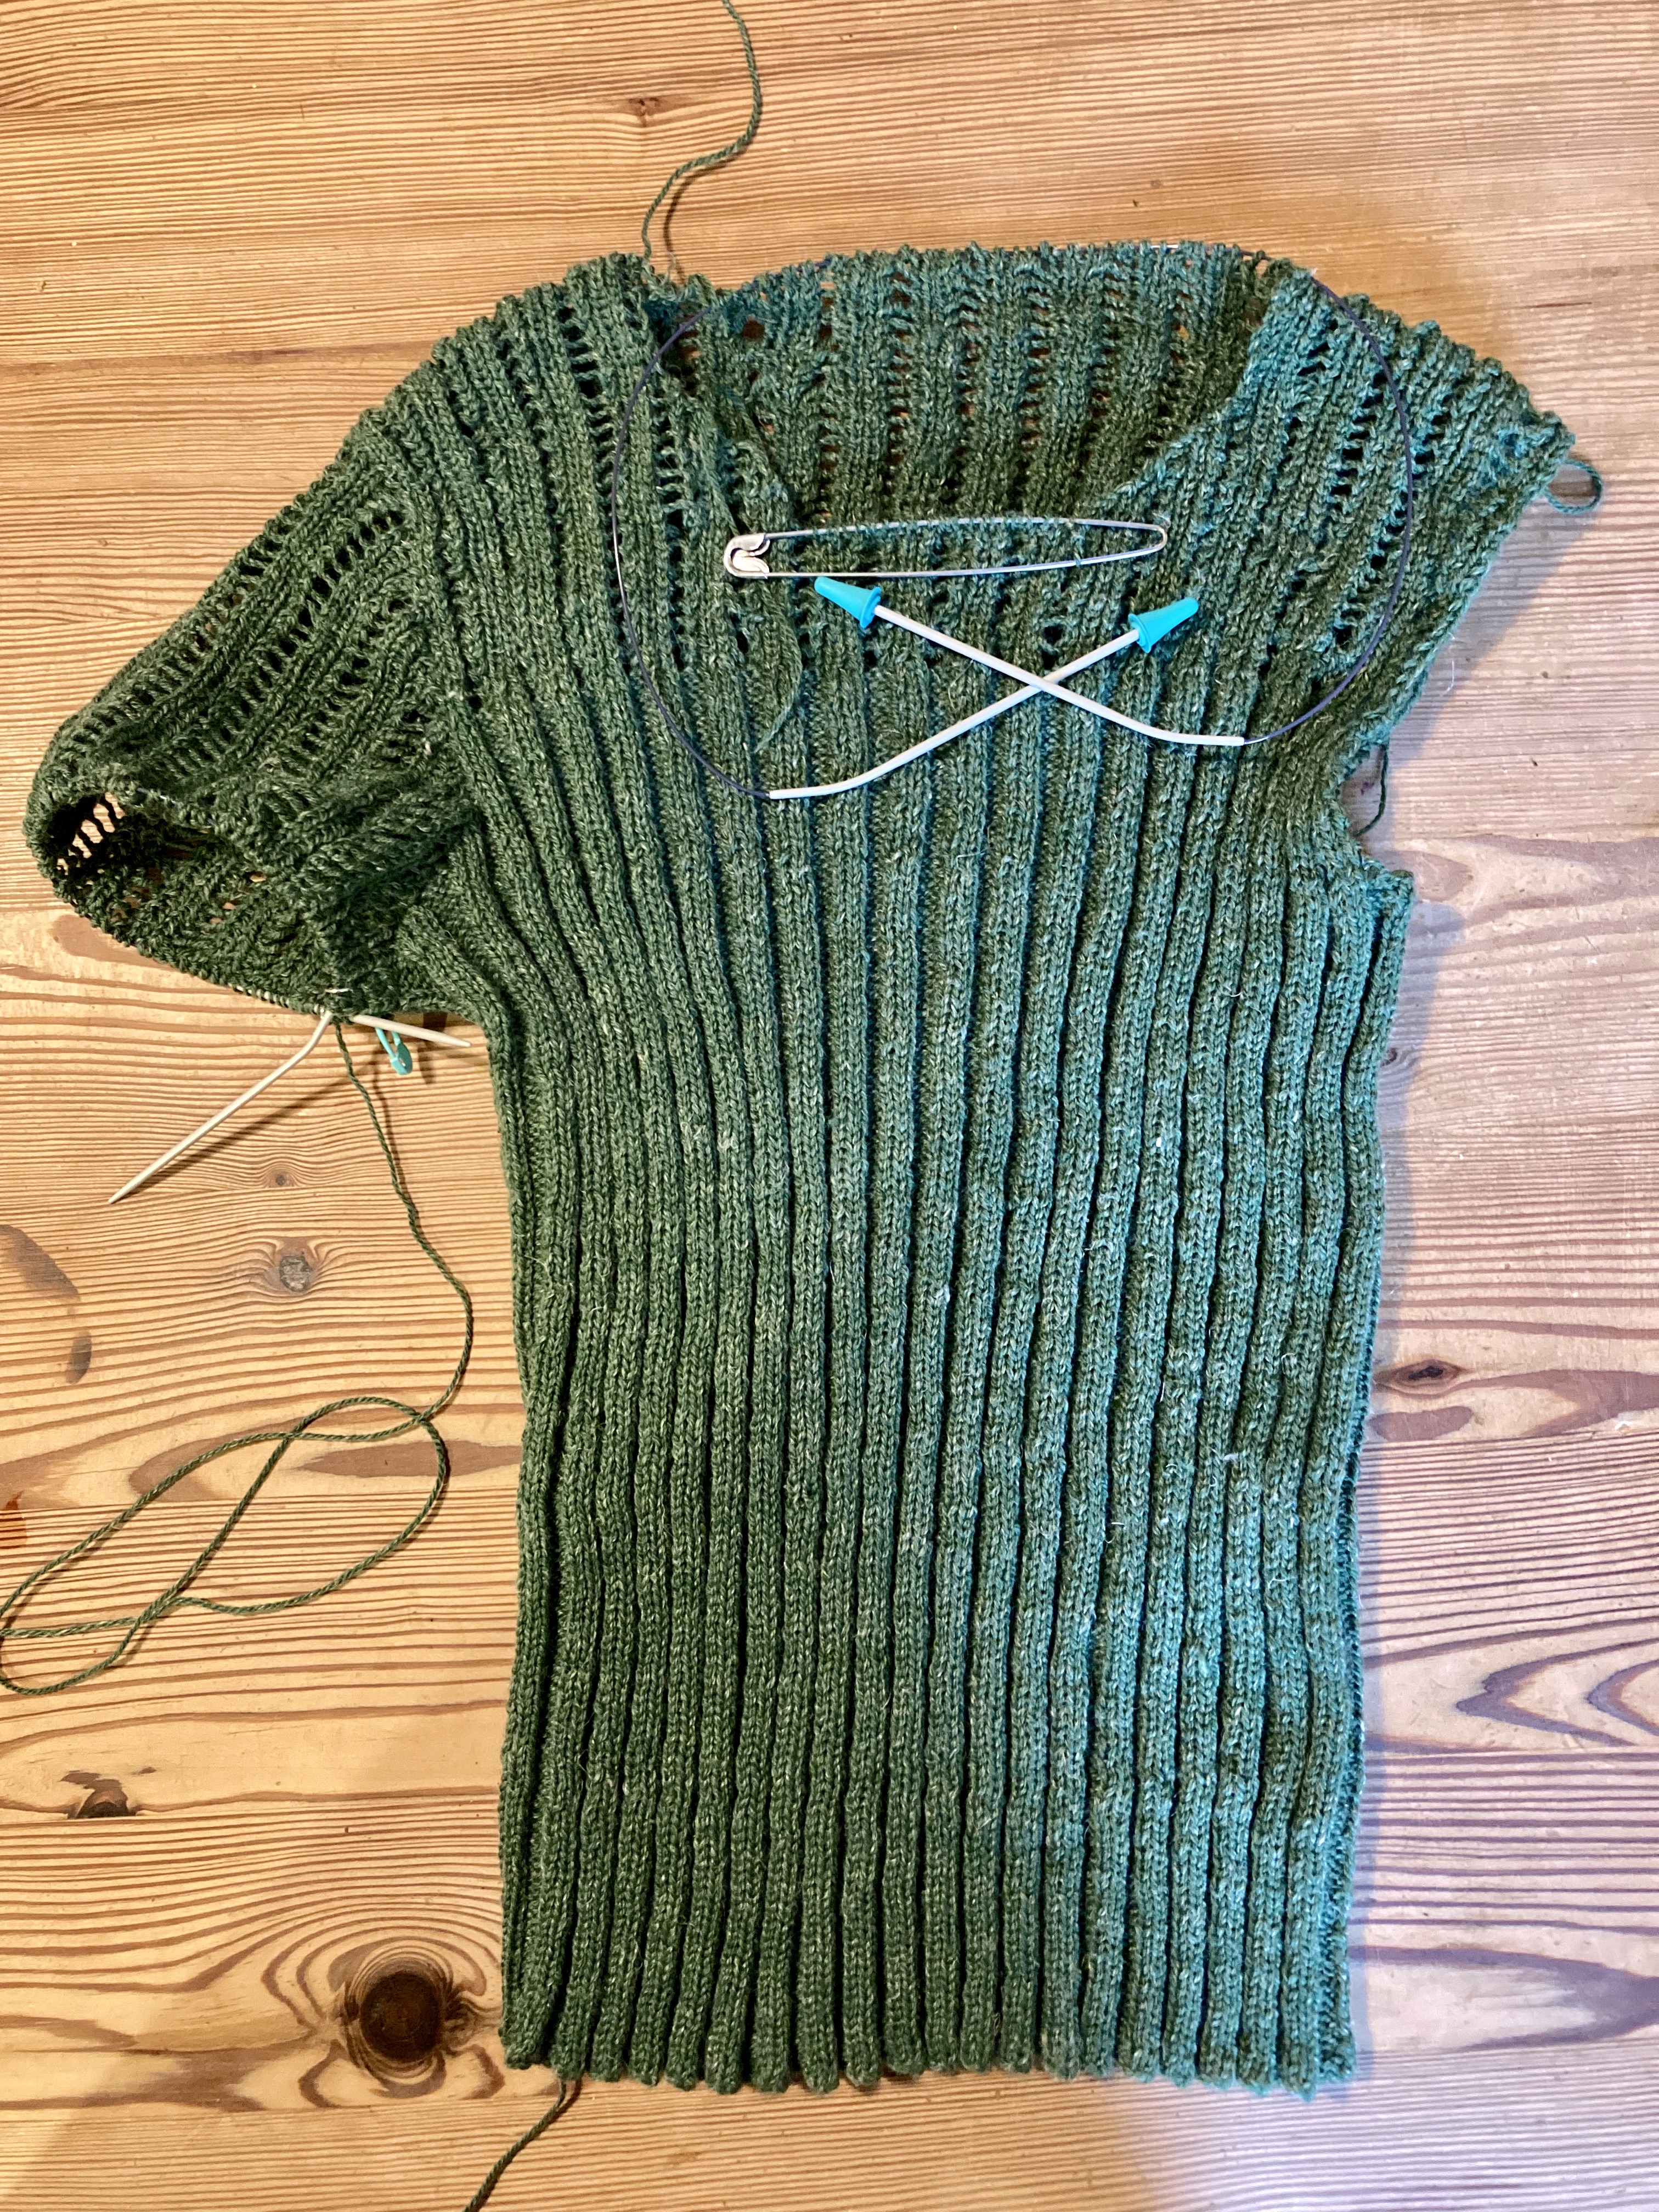
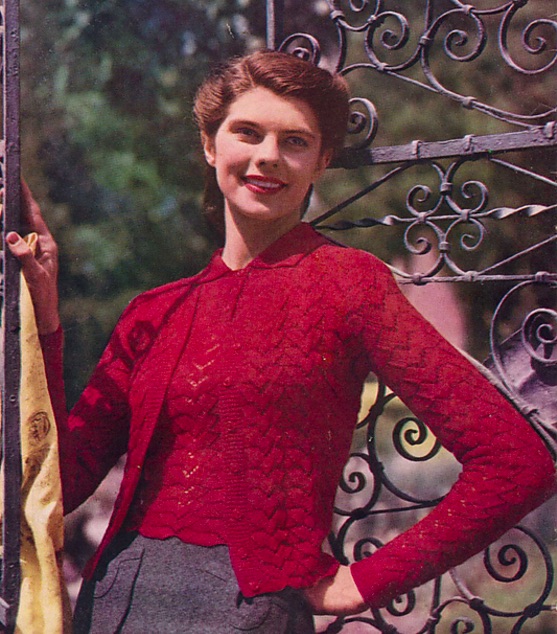
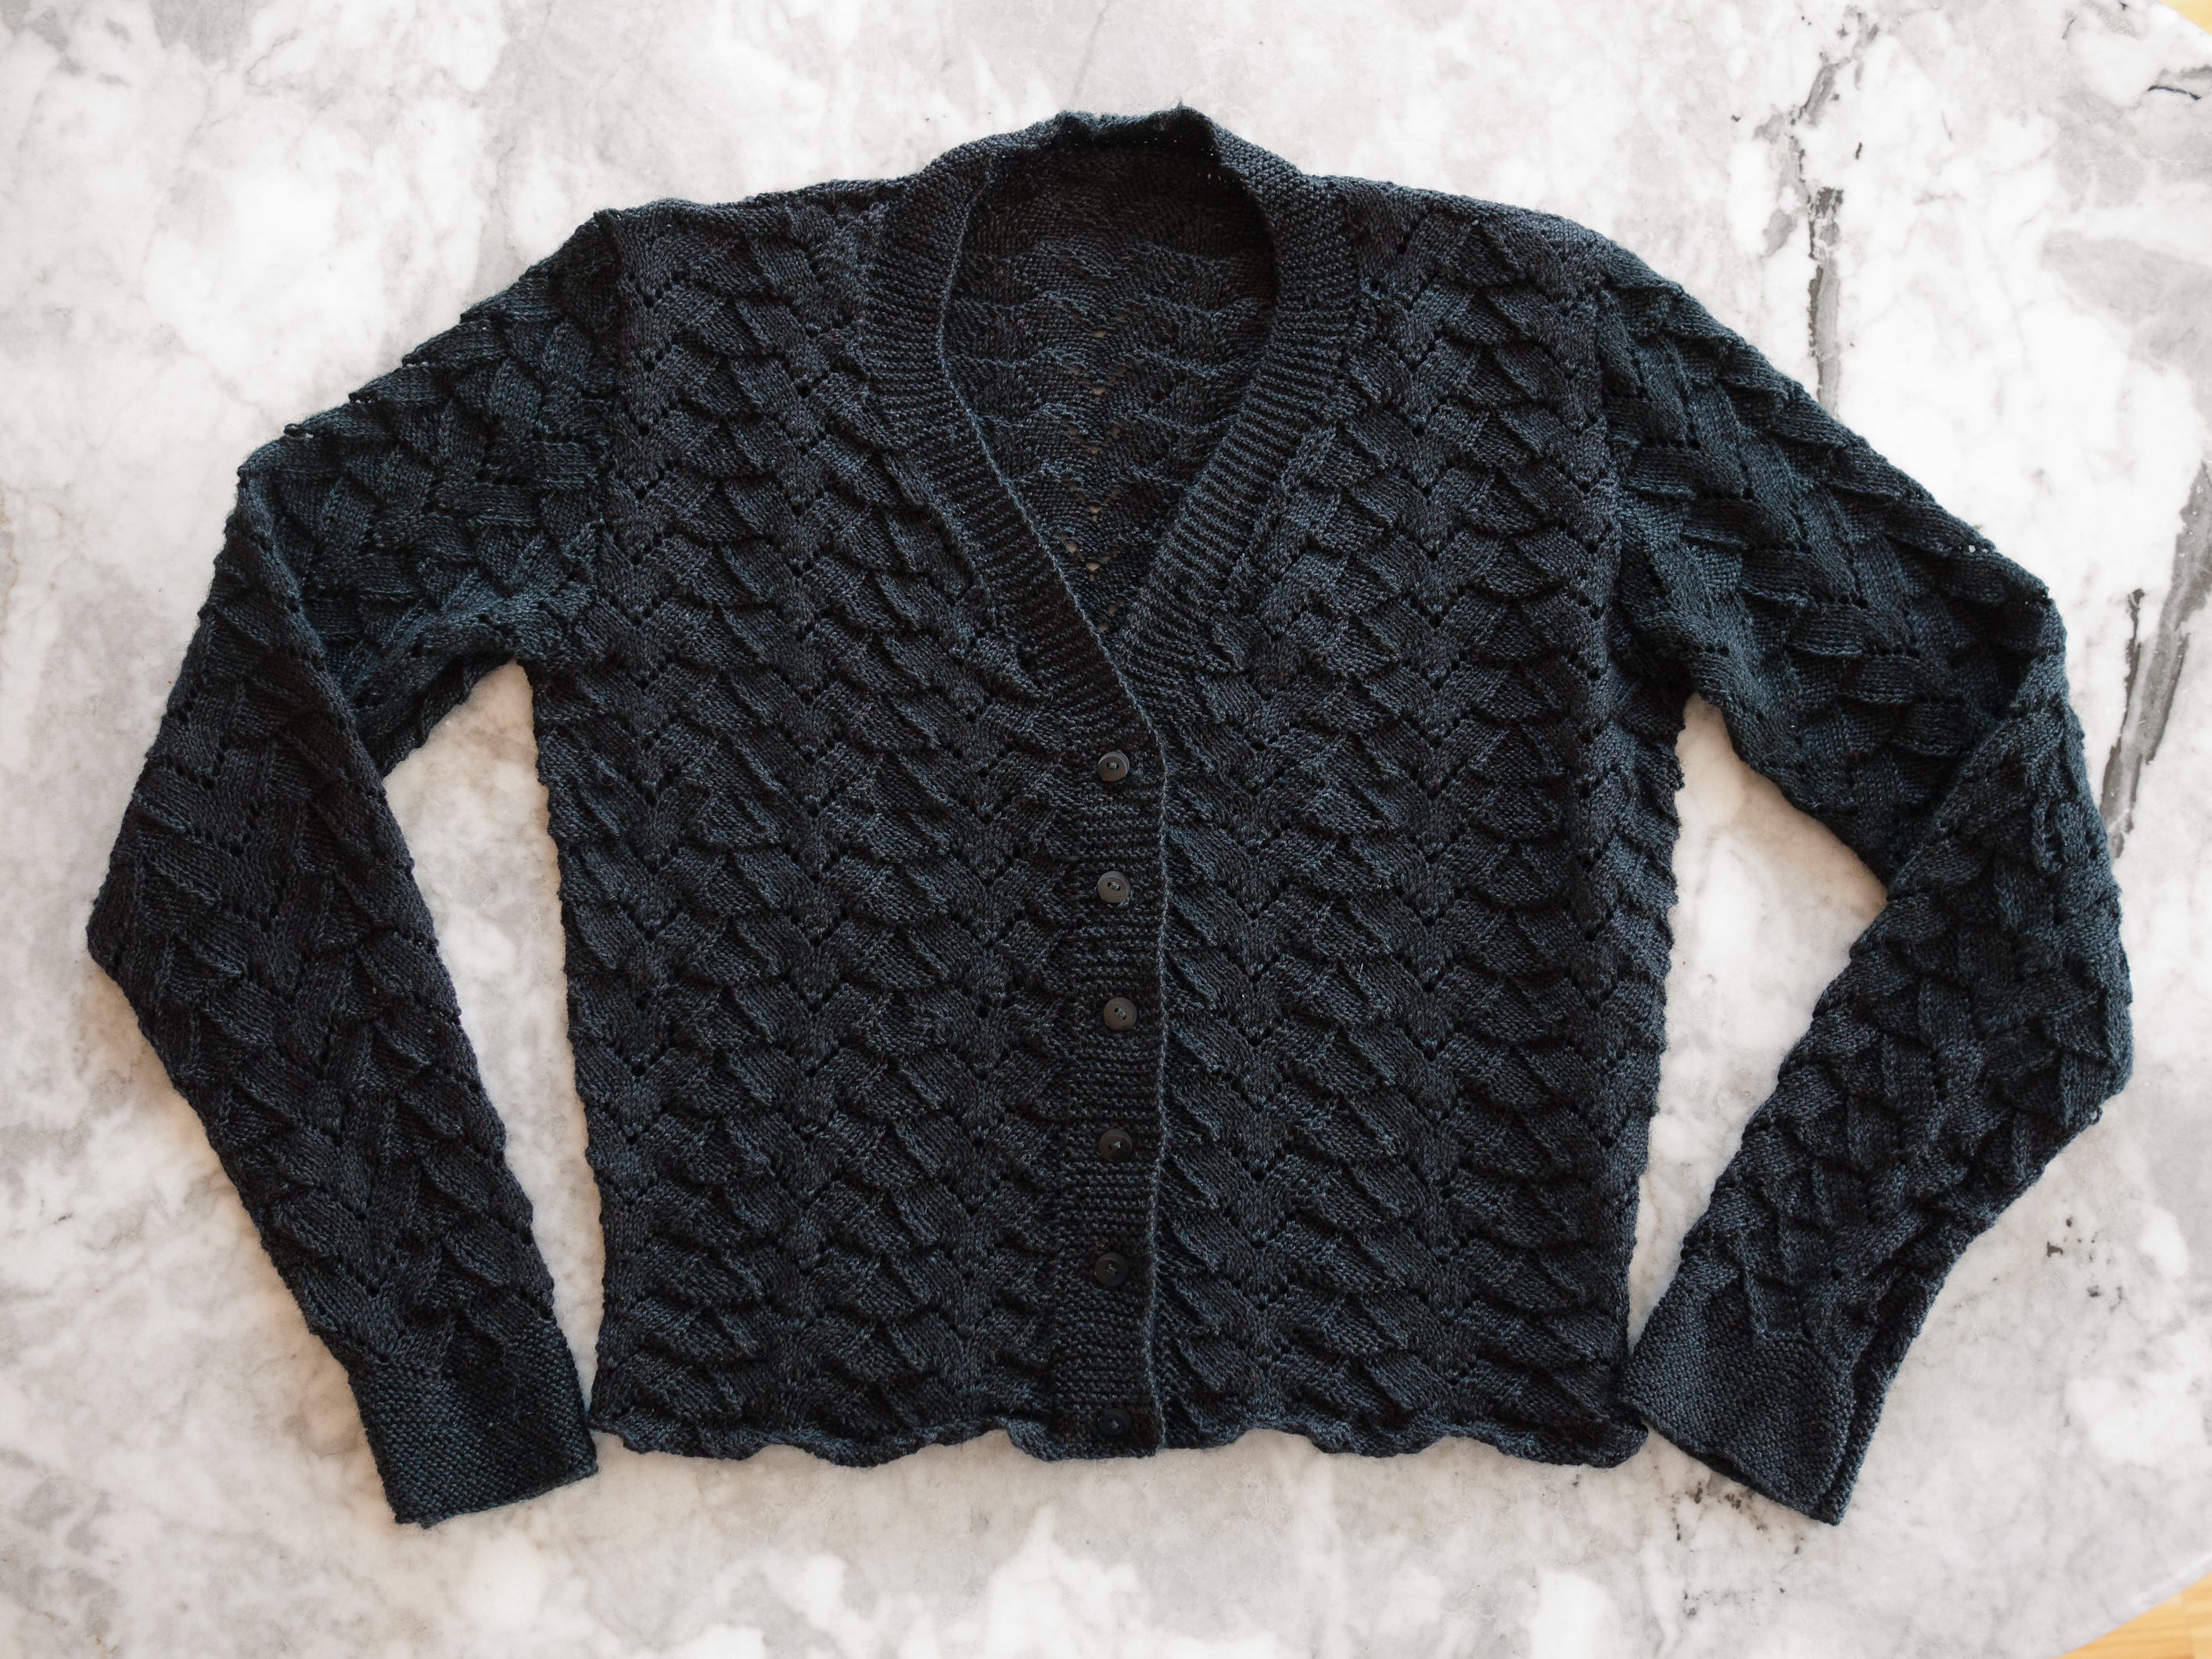
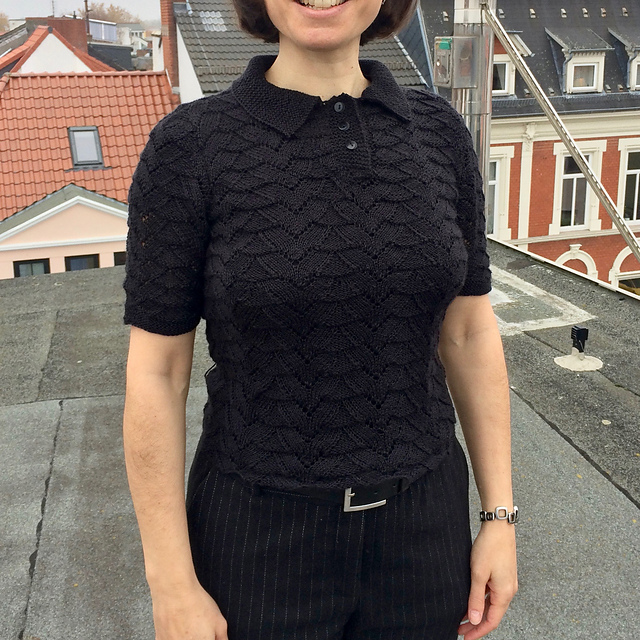
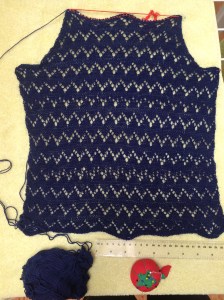
I first tried the two-colour pattern from the amazing cardigan set on the inside back cover. It’s made using a combination of stranded two-colour knitting and twisted stitches and makes a great trellis-like effect. It needs to be made in two colours to actually have an effect, though, so I switched to the fern-y lace pattern on the panel of the jumper on the front cover.
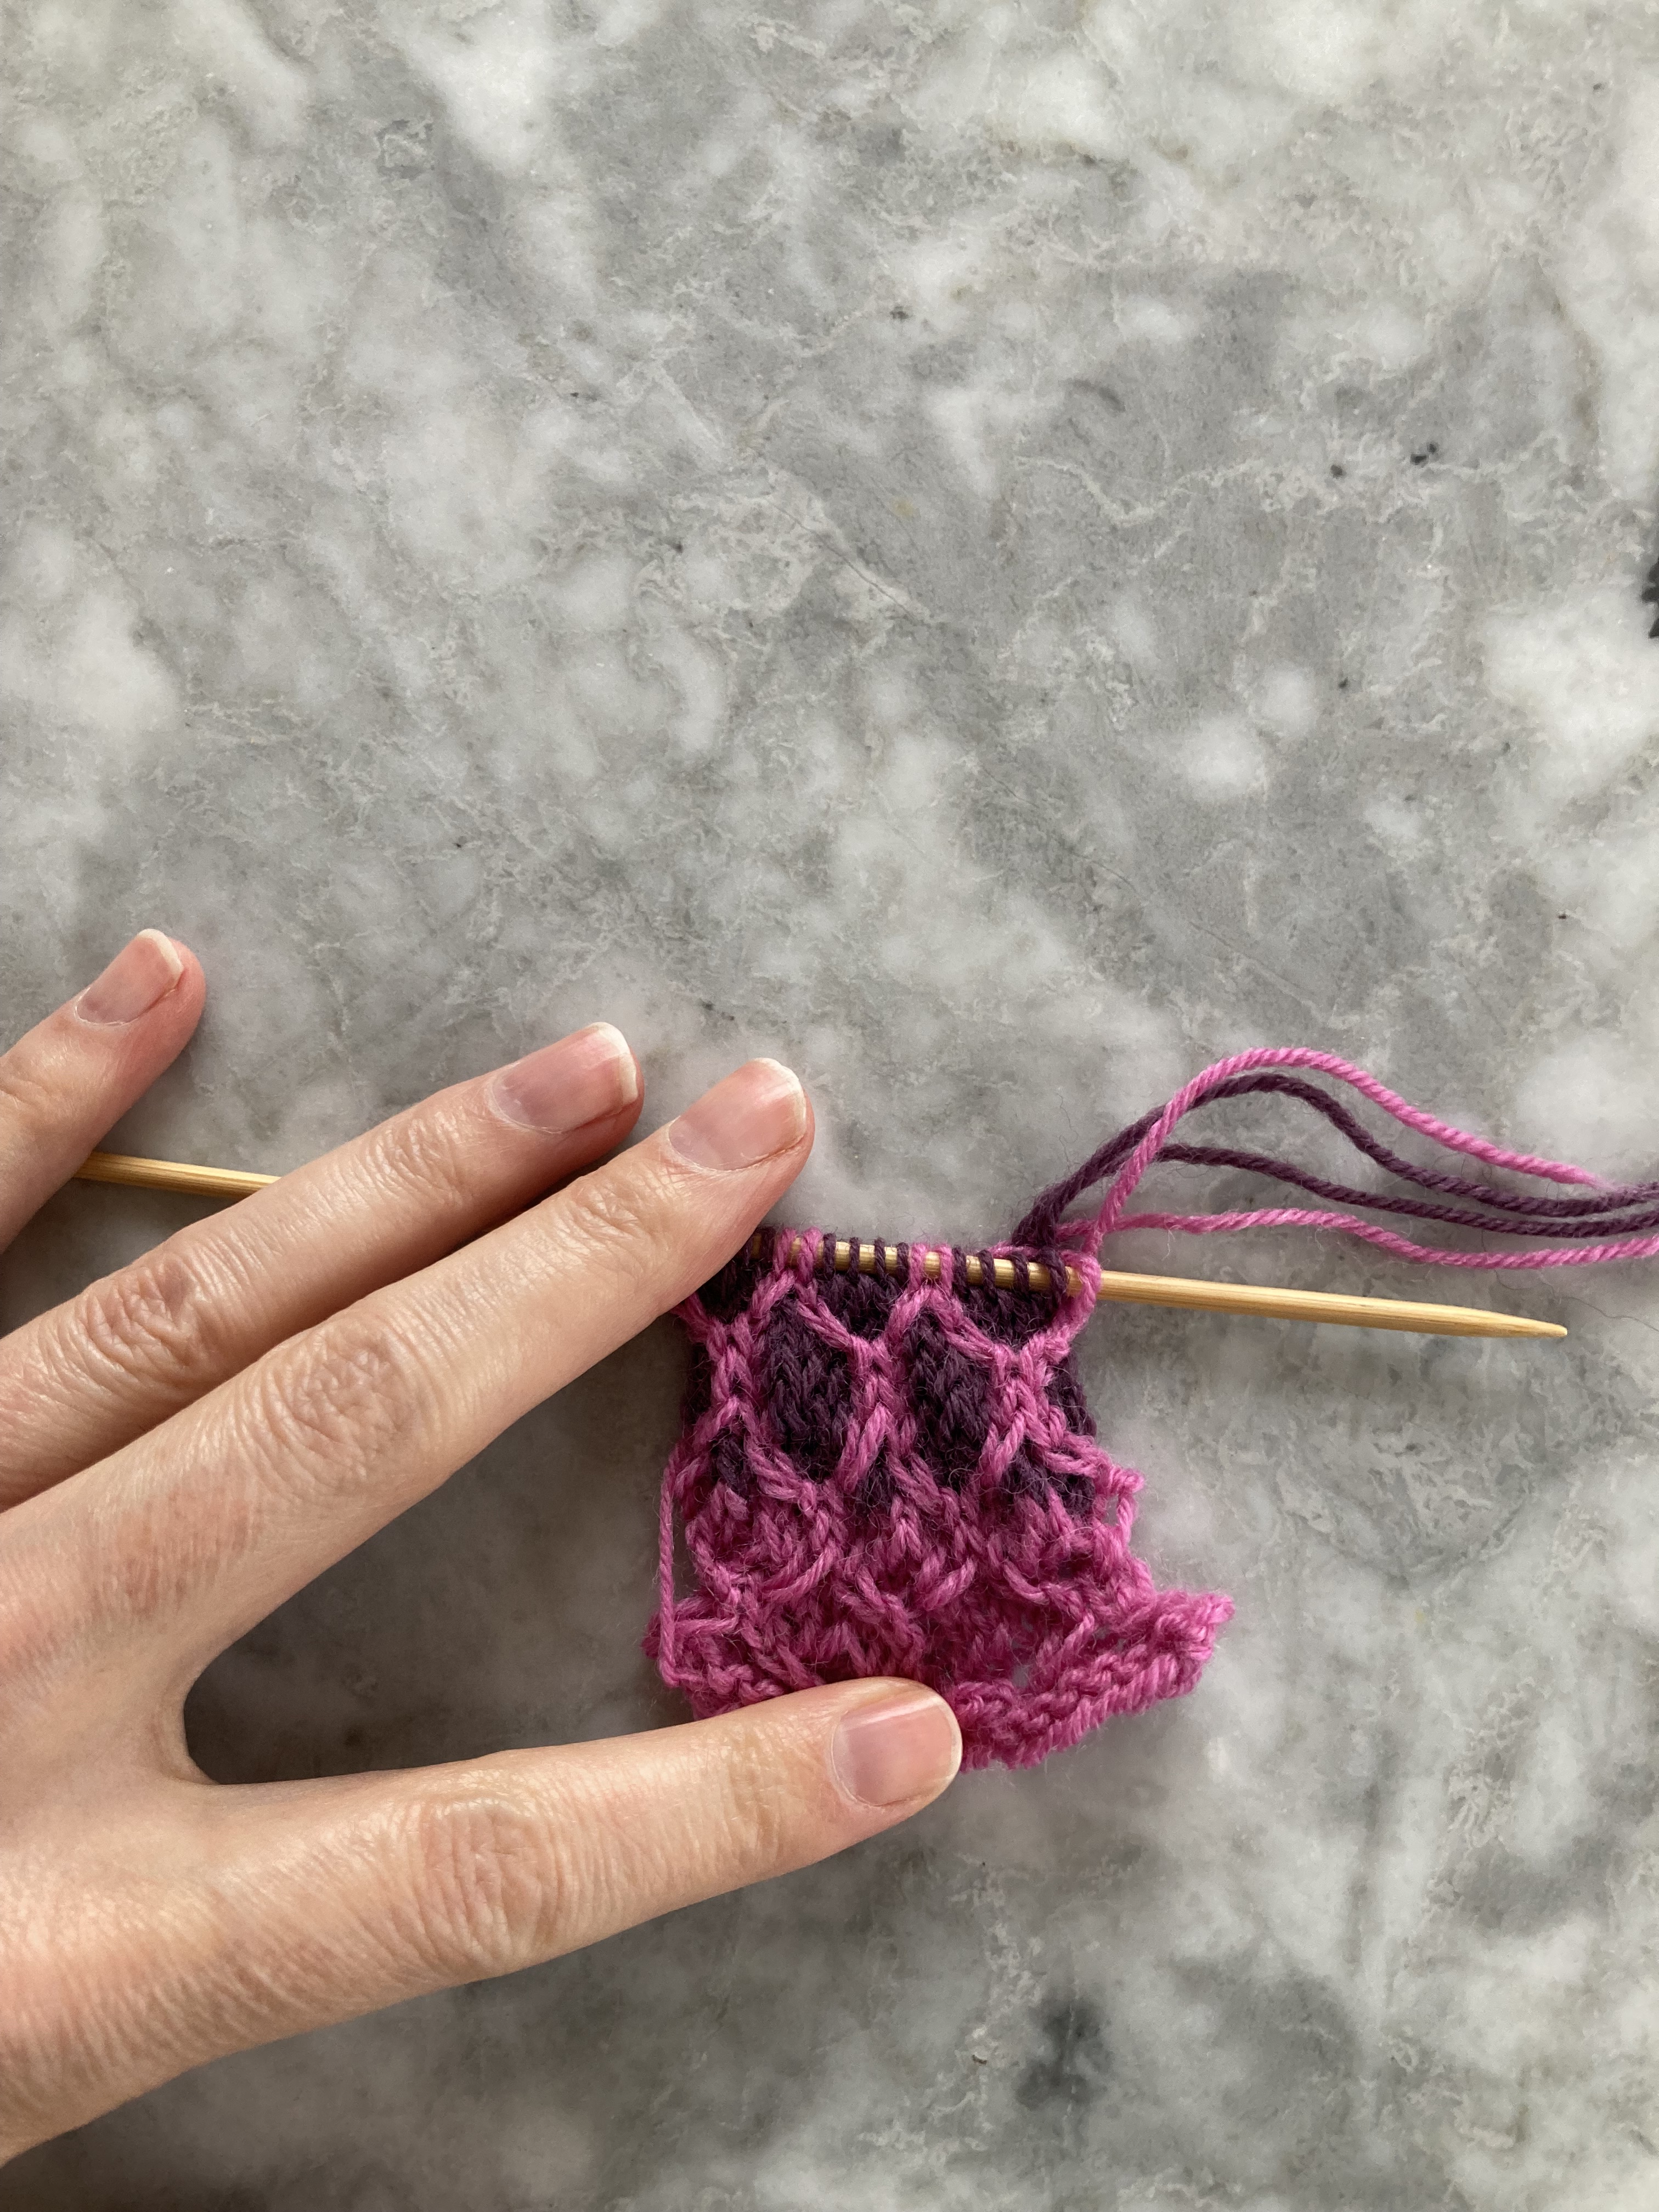
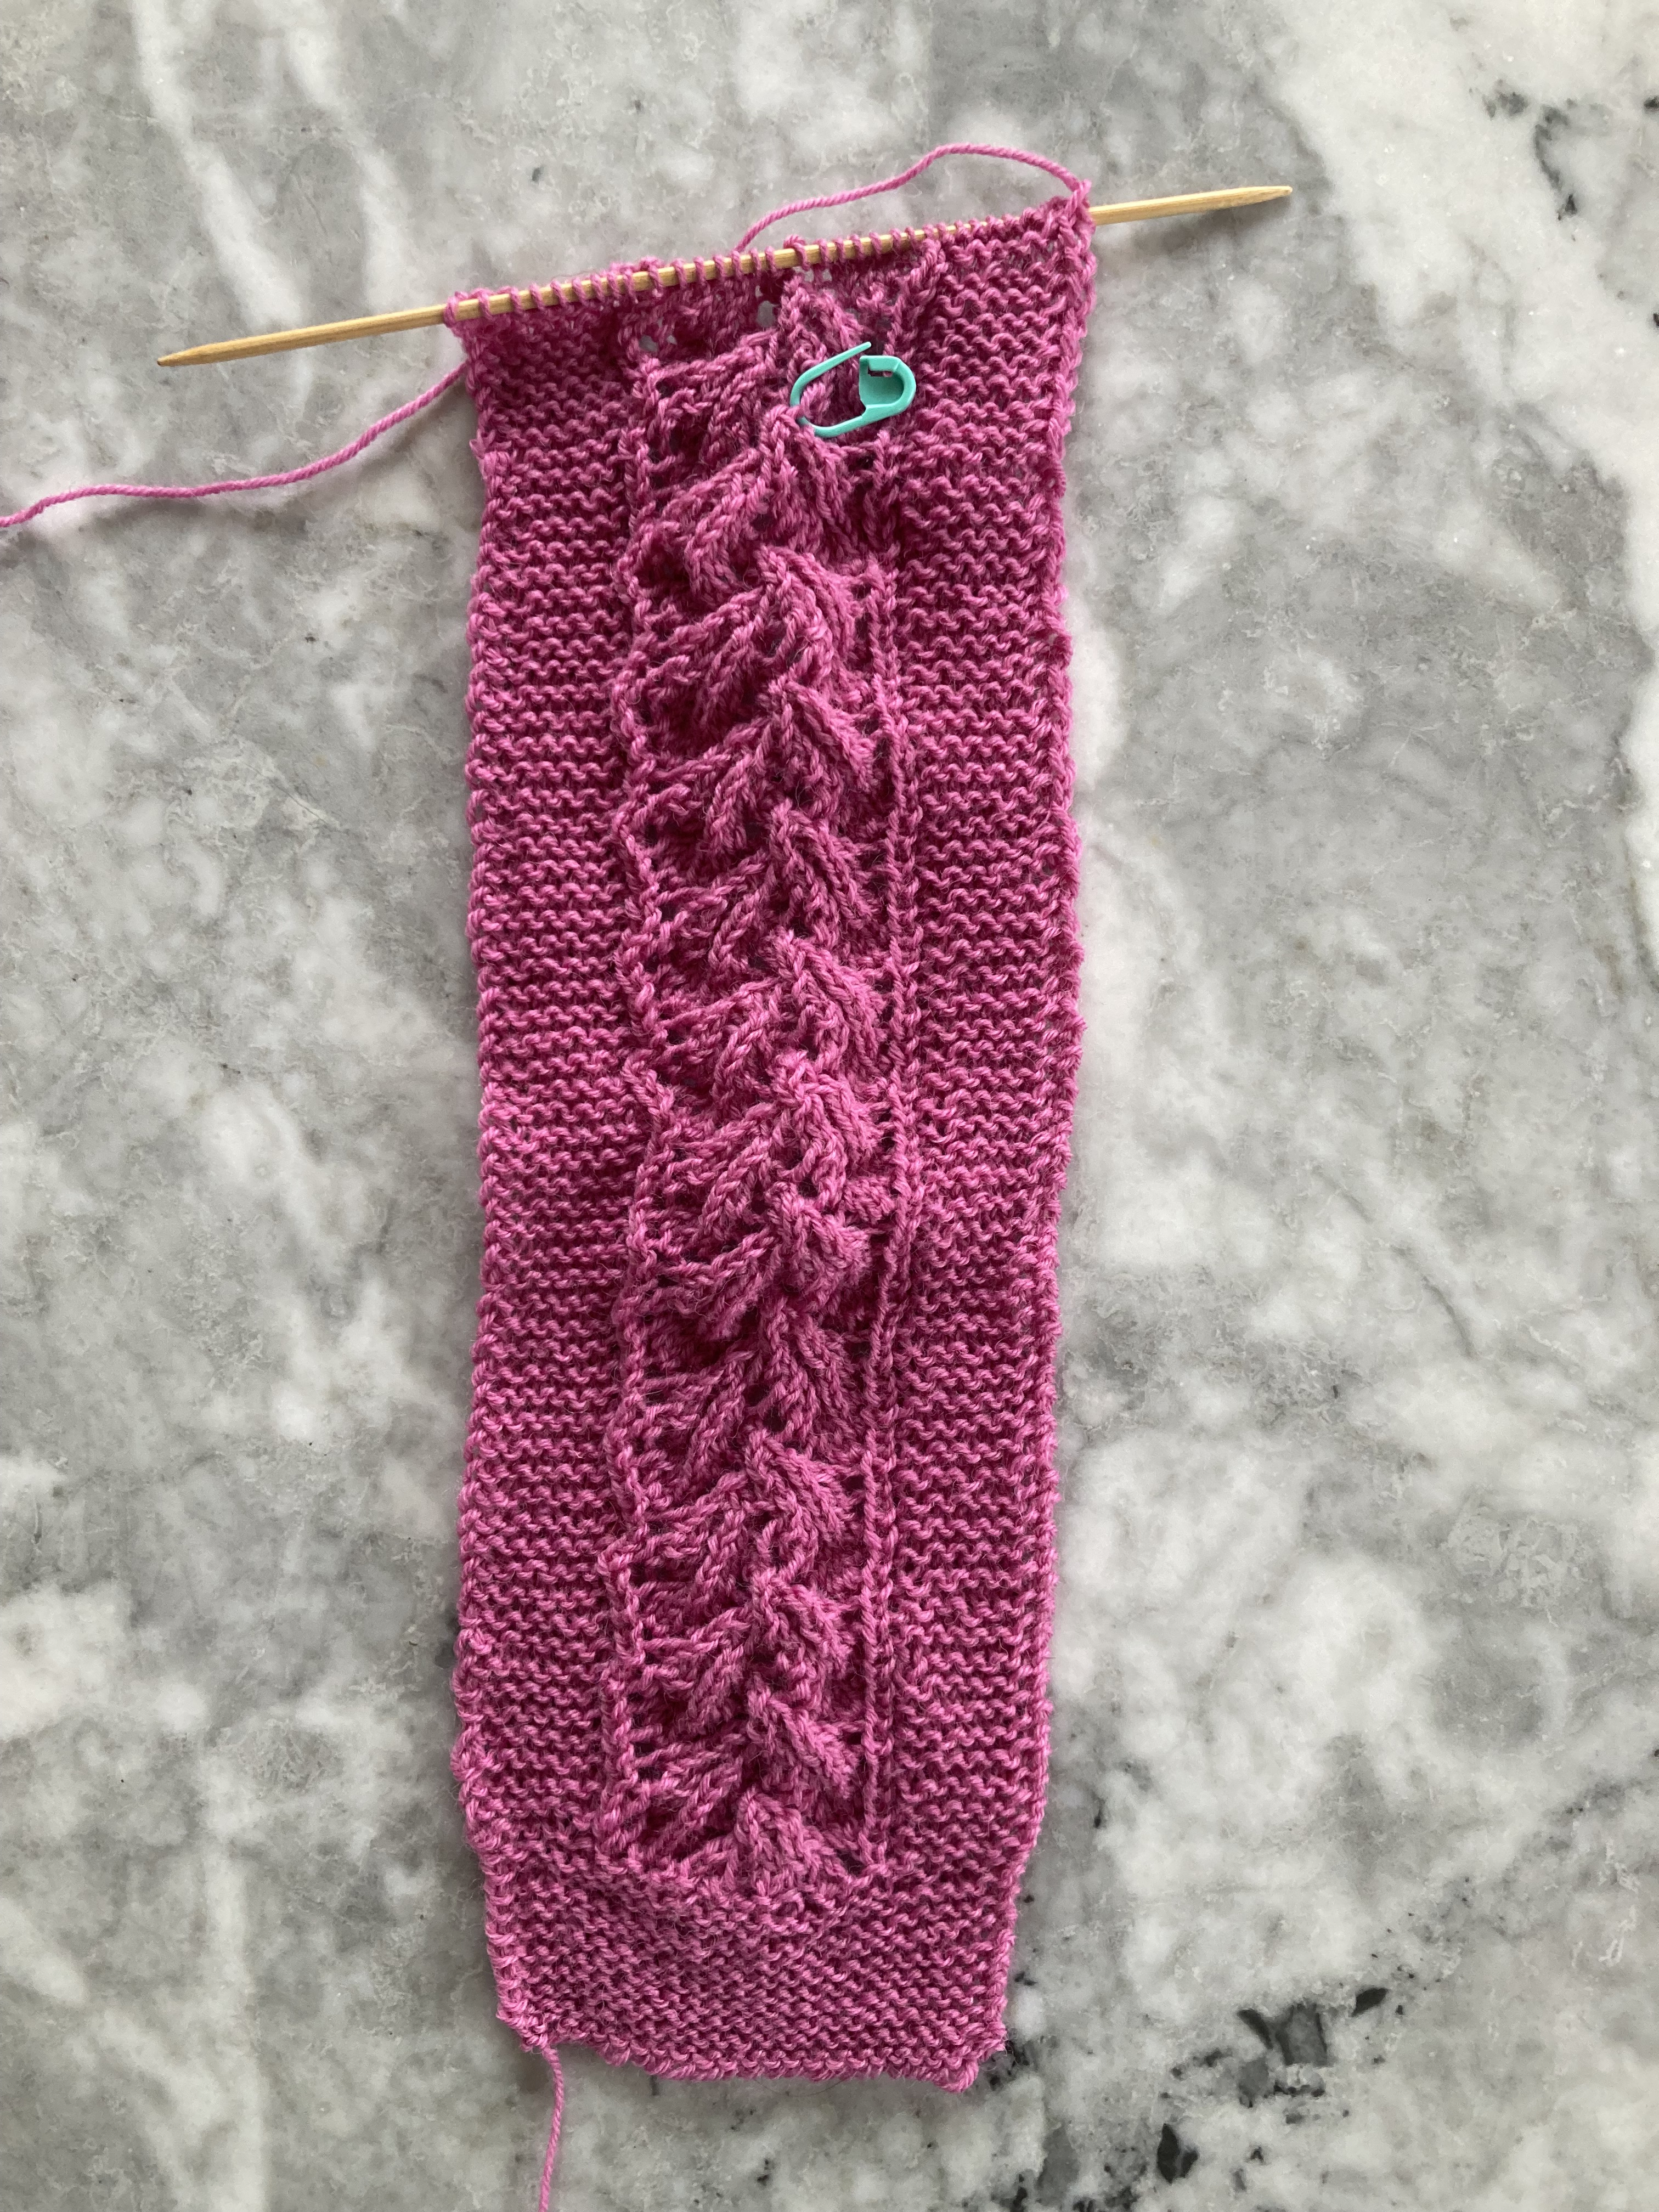
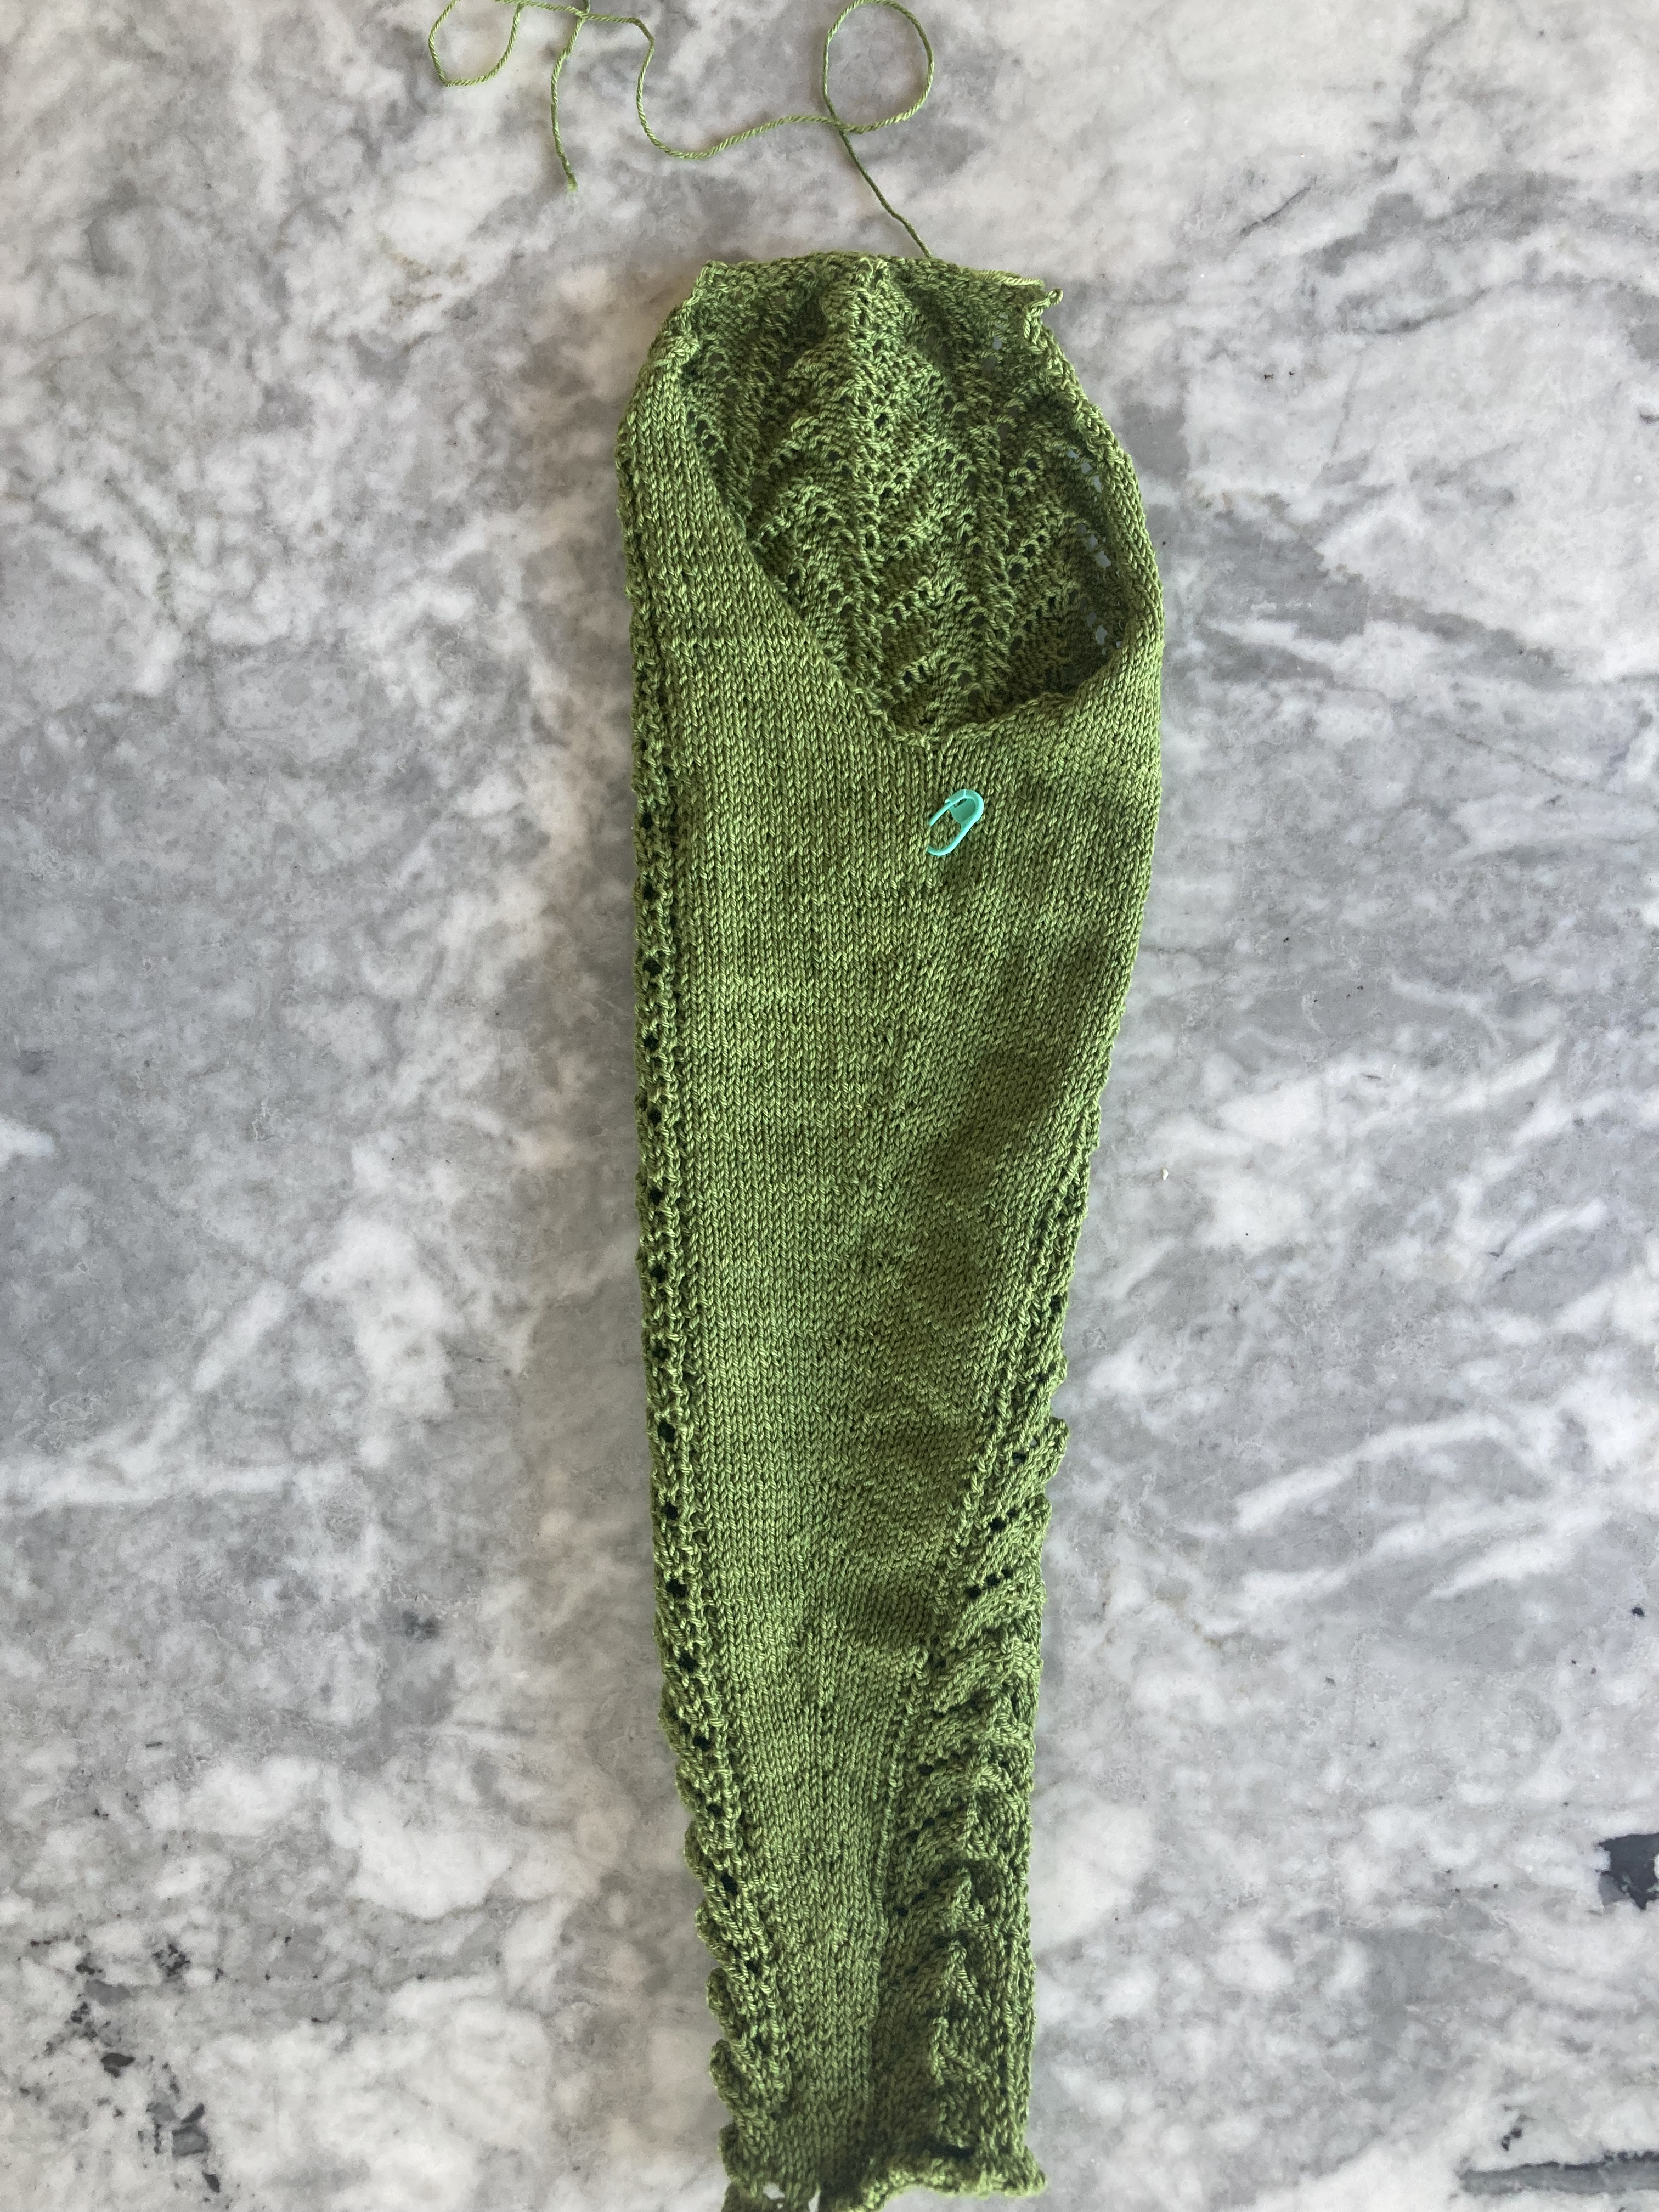
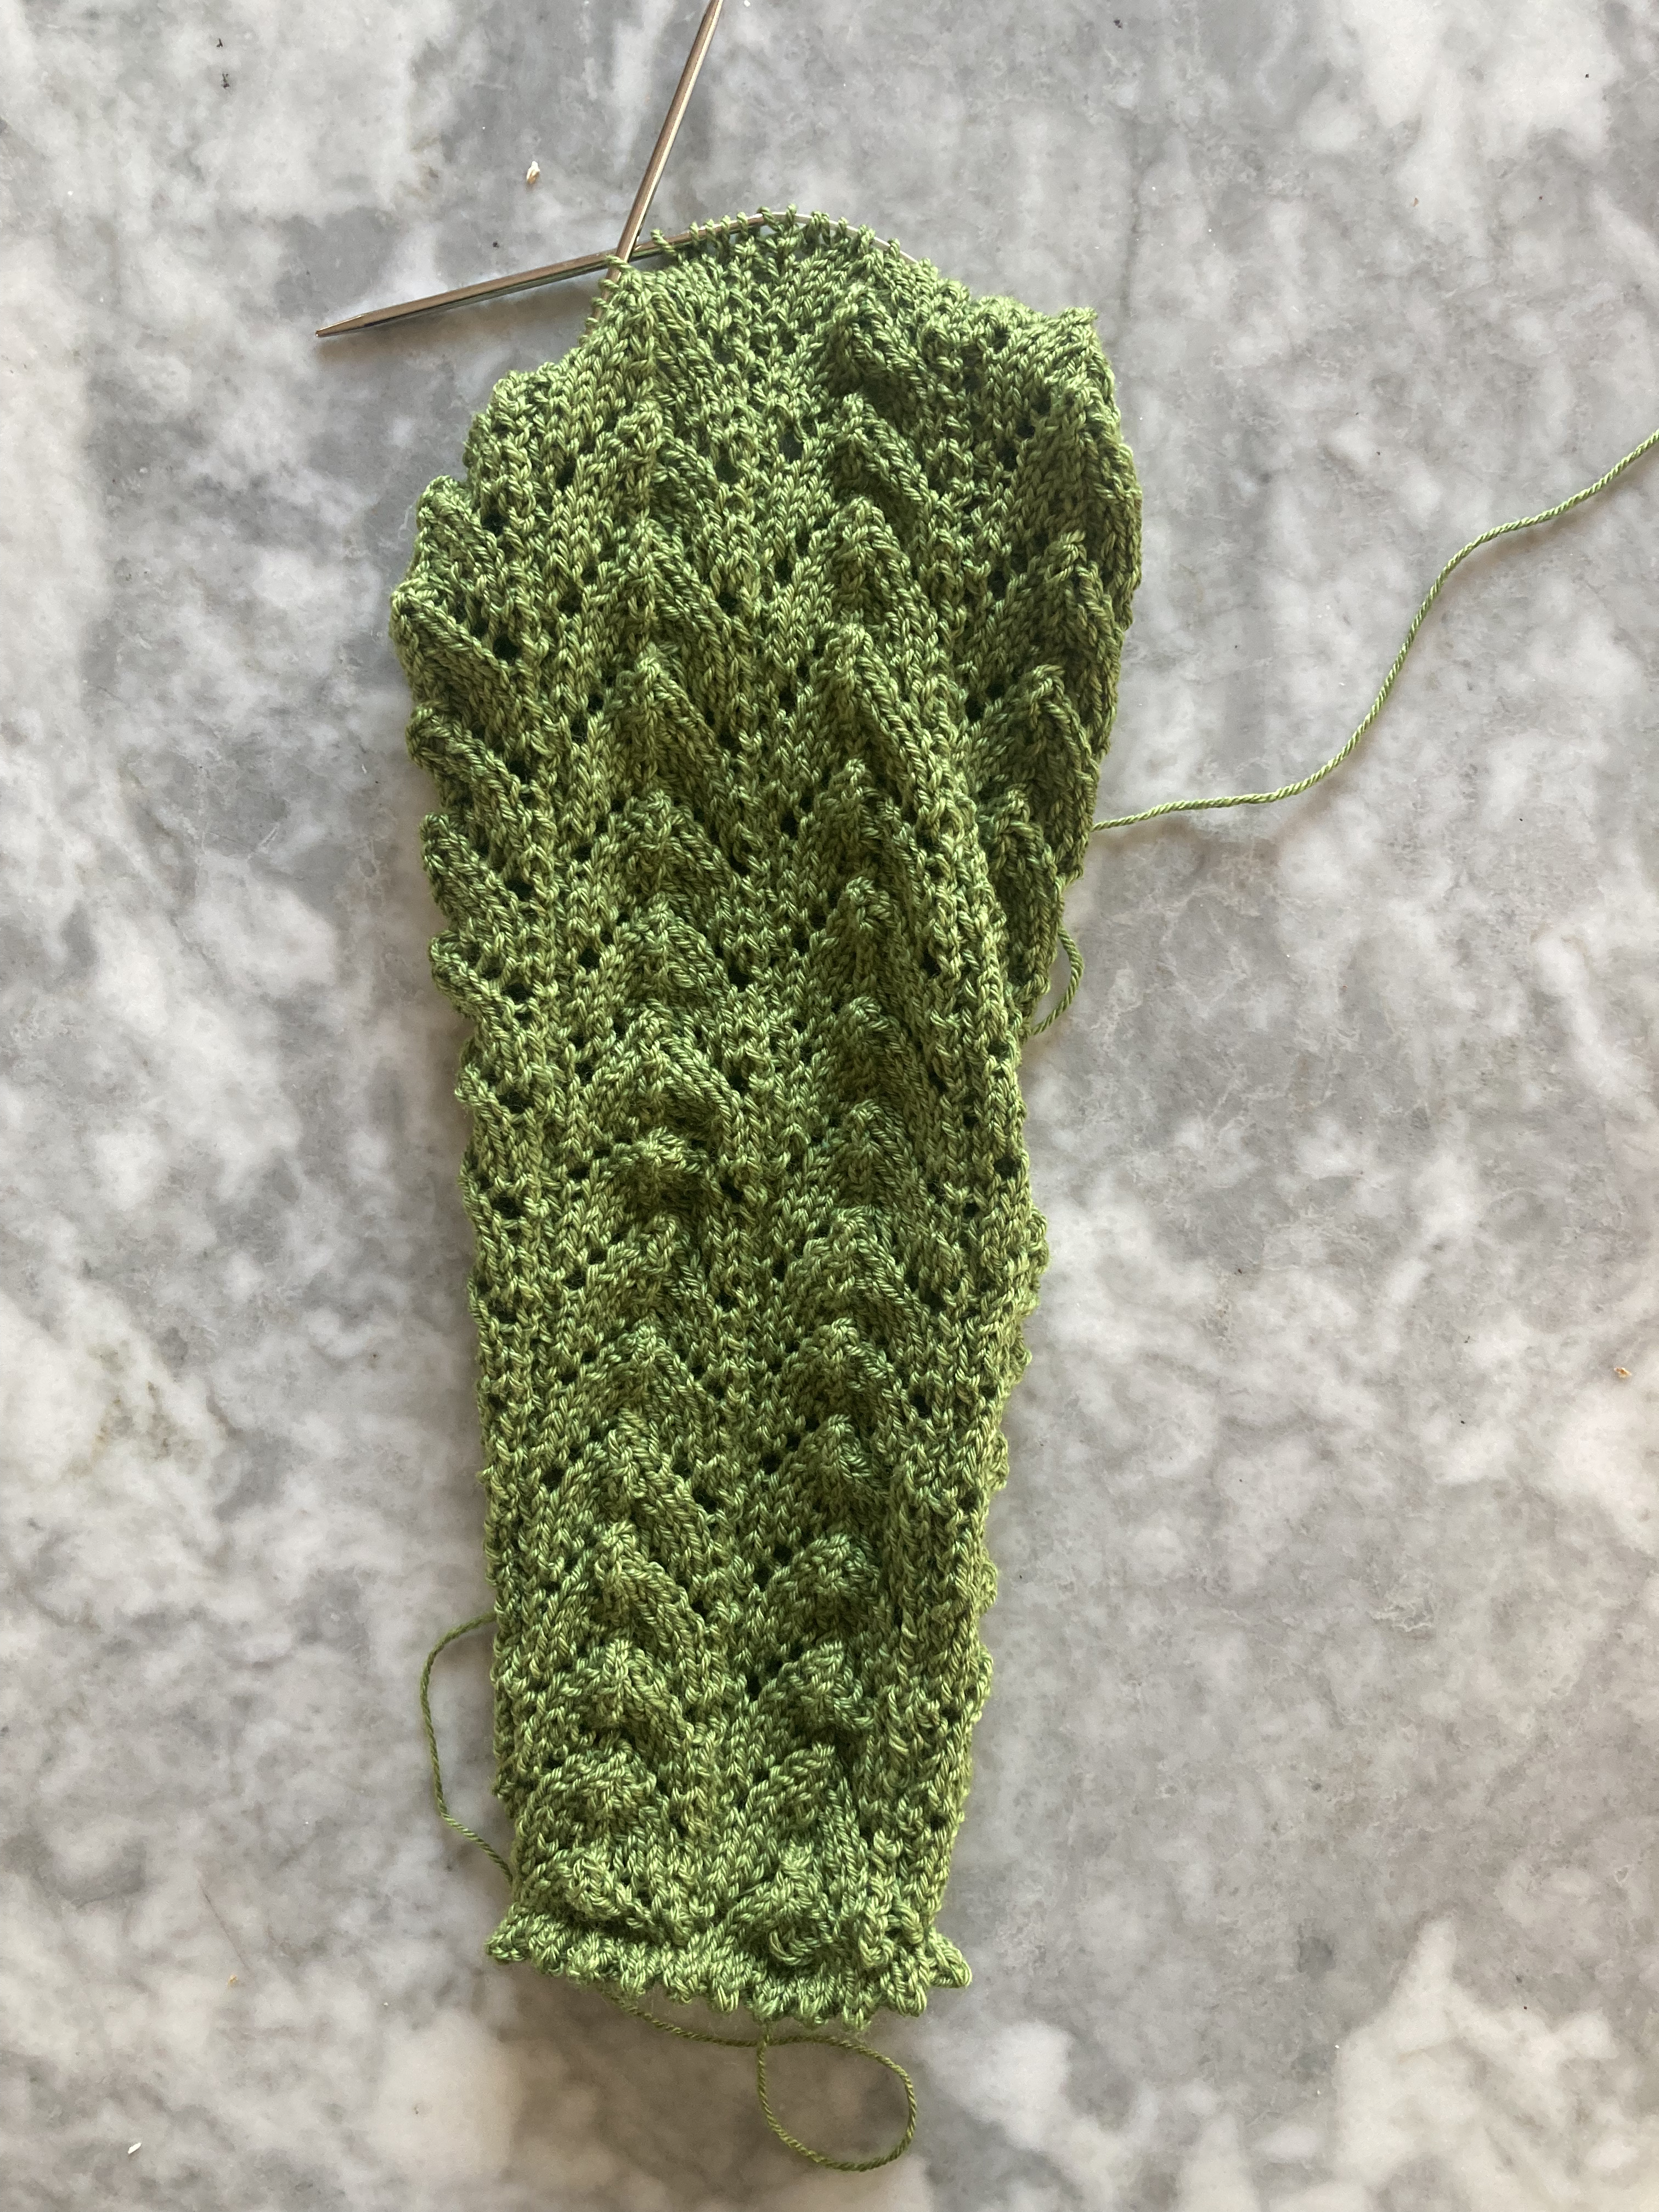
I had a decent amount of pink Drops Fabel sock wool left over from the April 1967 chevron-pattern dress, which was coincidentally almost the same shade as the Stitchcraft jumper. The pattern is made using standard knit and purl, k2tog / k3 tog, and yarn overs. The pattern repeat is 16 stitches + 1, worked on a stocking-stitch background i.e. the even-numbered rows are mostly purl. I added 6 stitches of garter stitch and a selvedge stitch on each side of the panel to get a good width and avoid curl. The pattern was surprisingly boring to knit! I didn’t even bother to make a chart, just used the written instructions straight out of the magazine.
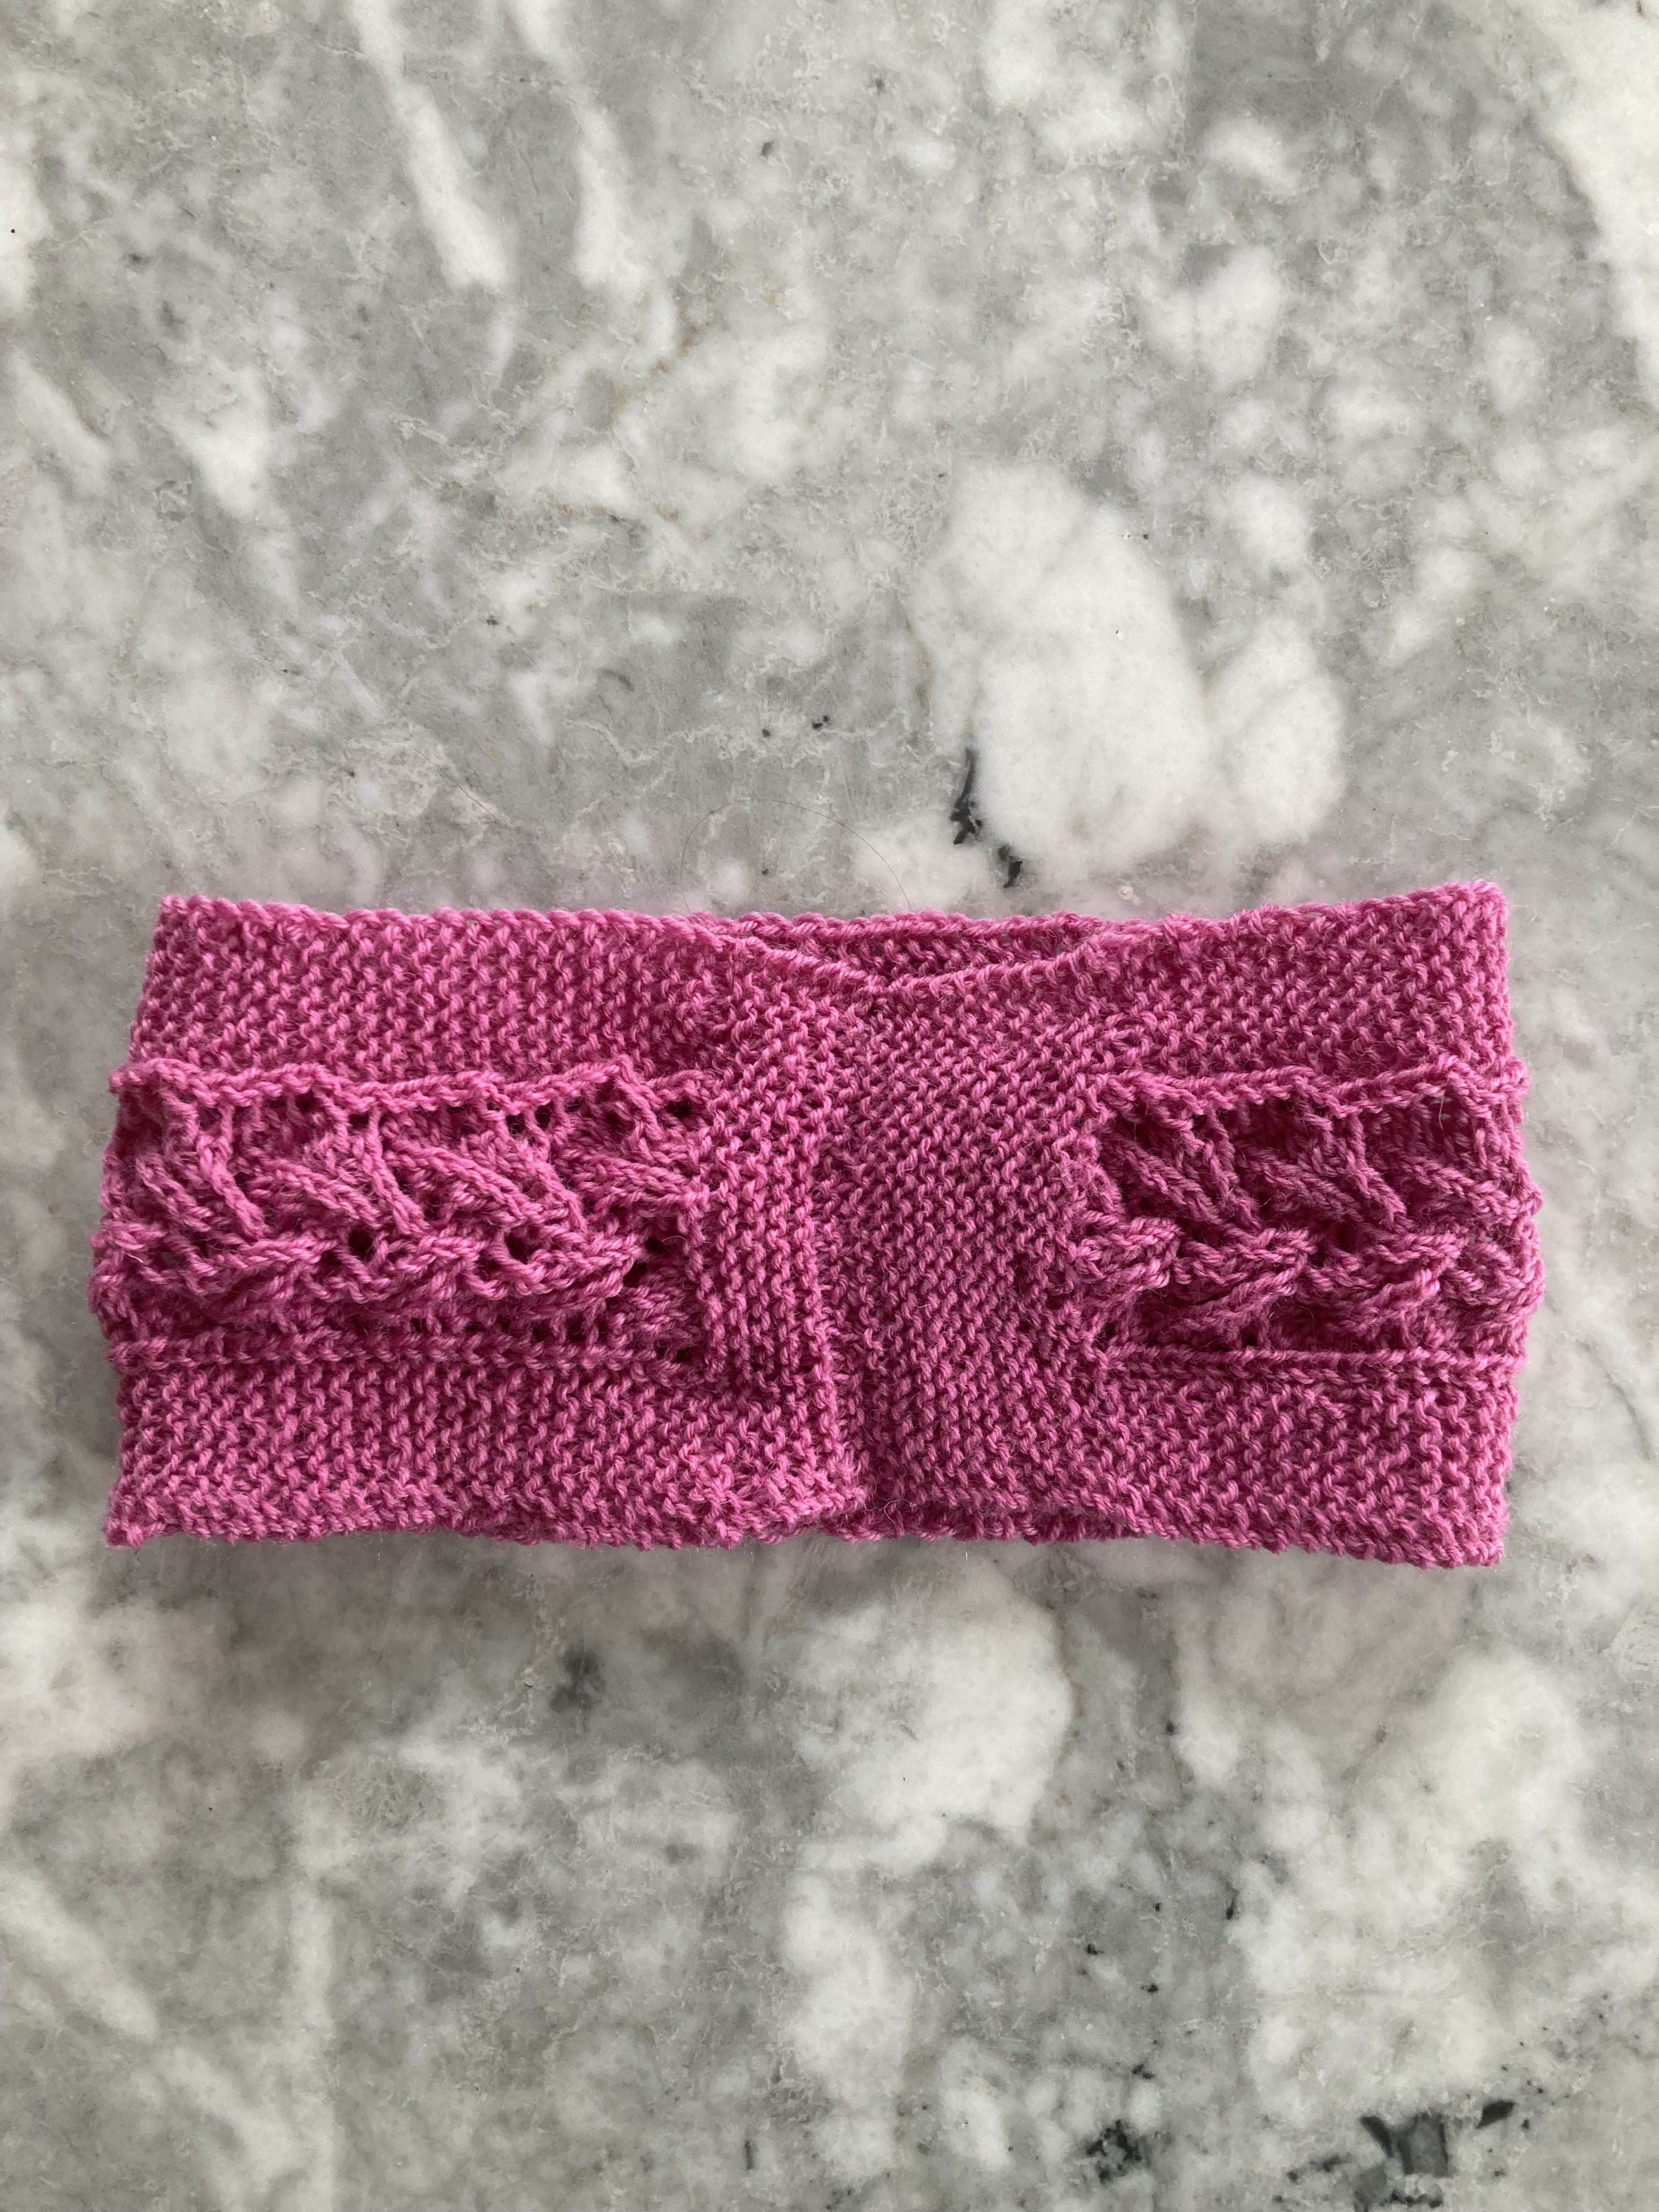
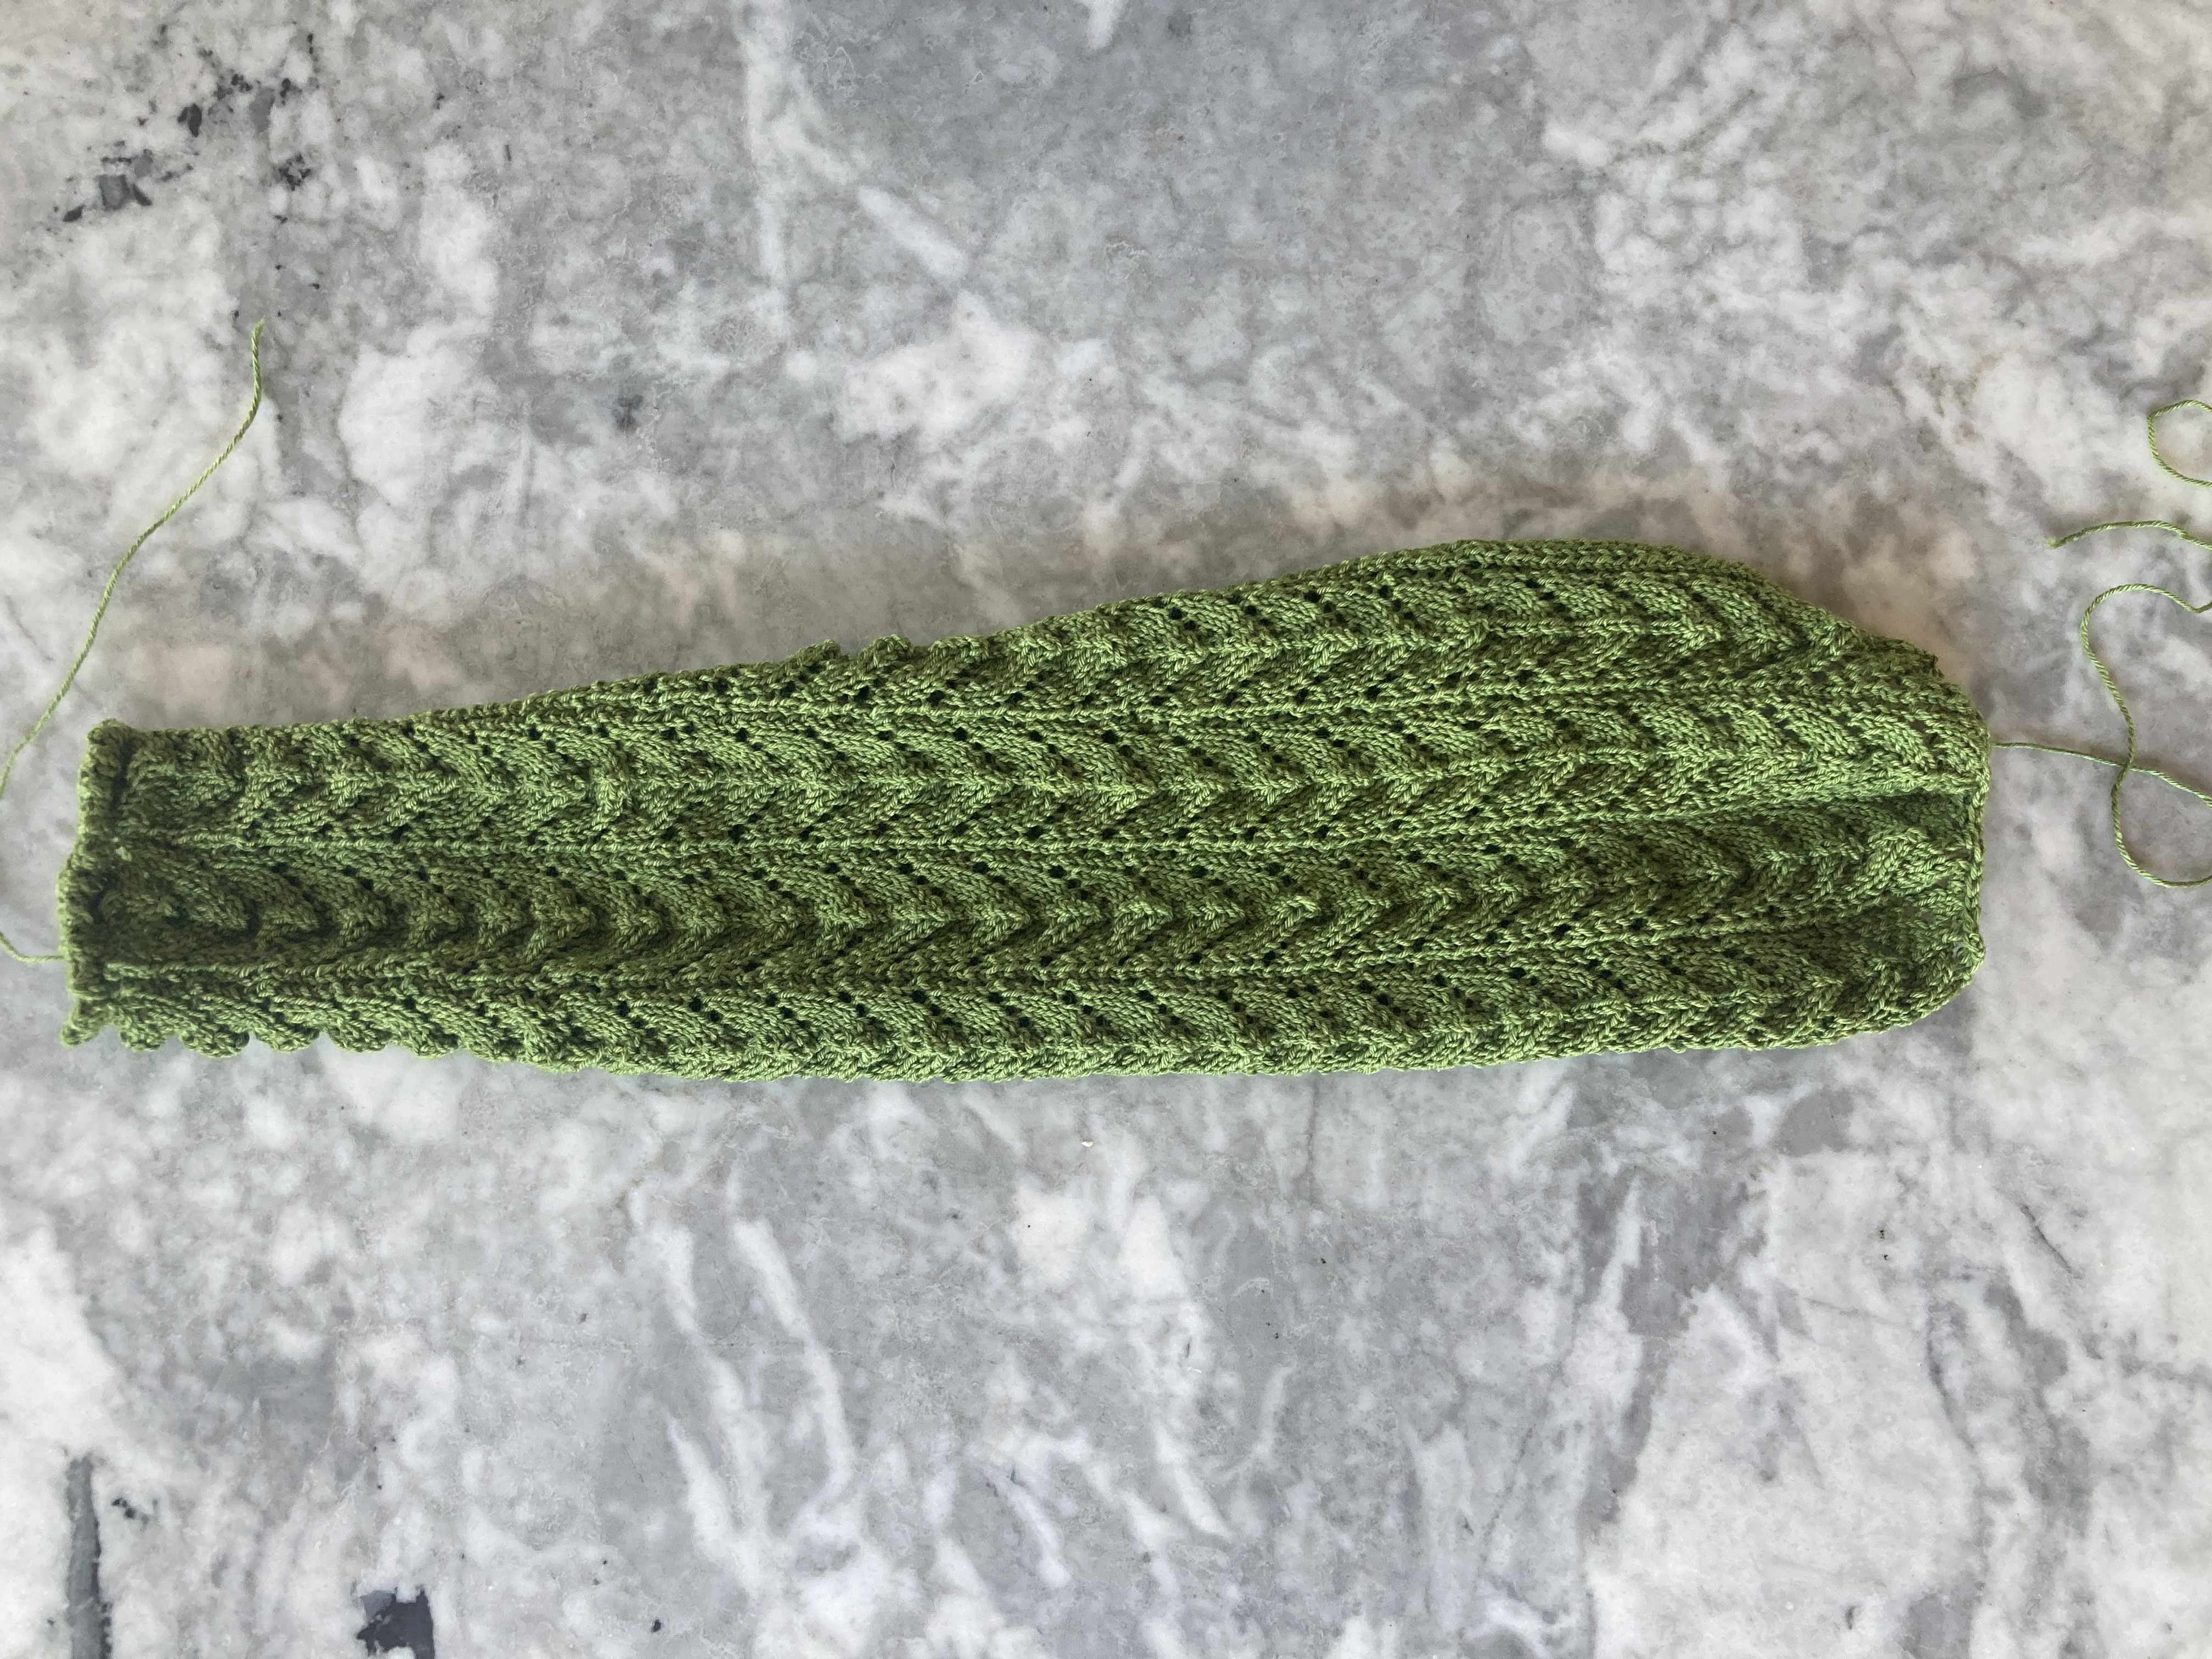
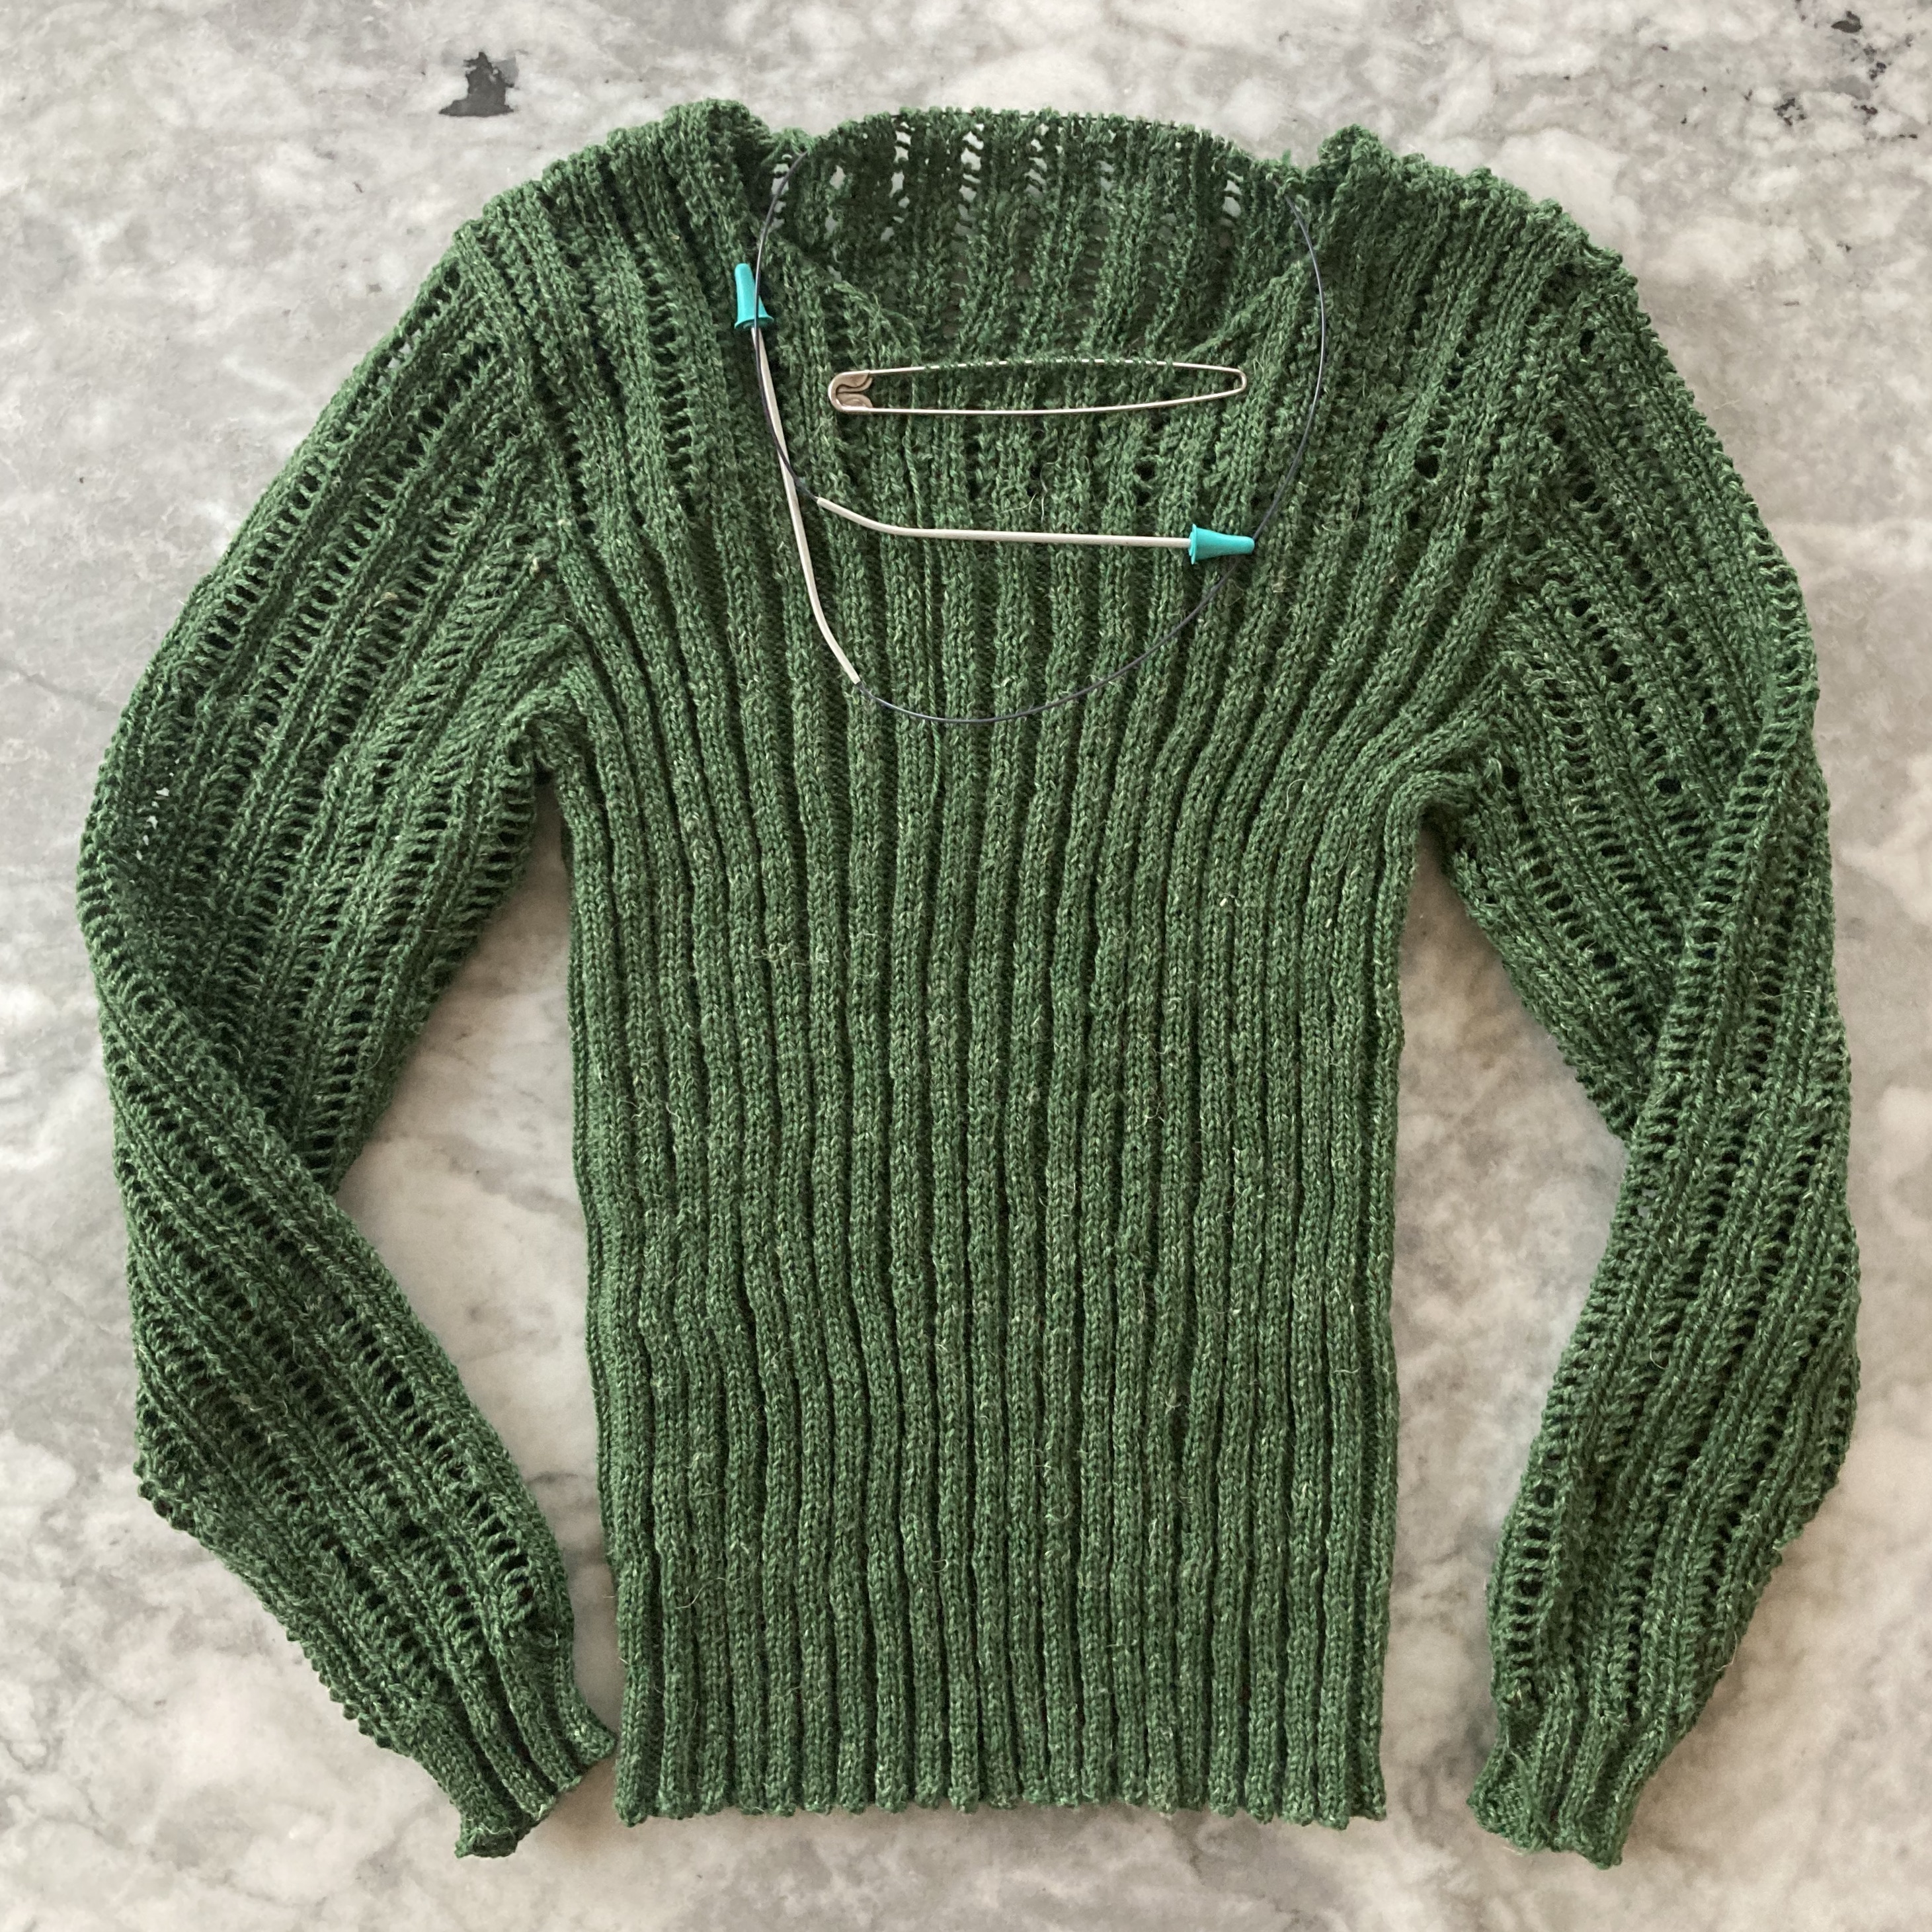
I started and ended with a bit of plain garter stitch, increasing up to the total number of stitches to make the headband a bit narrower at the nape-of neck and create an elastic band effect to keep it snug. I wasn’t sure how big to make it — I have a big head and very flat hair, my friend has a presumably average-site head and very fluffy curly hair. After blocking, it ended up a little loose on me. If it’s too loose, I can always undo some of the garter stitch connecting bit on the underside.
It looks pretty and I like the pattern a lot, but I’m not sure if fingering-weight sock yarn was the best choice for a headband that should keep the ears warm. I’m afraid it won’t be warm enough. in which case, I could line it with fleece?
Not 100% happy with this project, but hopefully my friend will be.
After the “cold snap” predicted in the January 1968 issue of Stitchcraft (and which actually happened throughout the icy, snowy month of January 2026), the February 1968 issue looks toward Spring. There are still plenty of warm things to knit, but the focus is on layering and knitwear as outerwear.
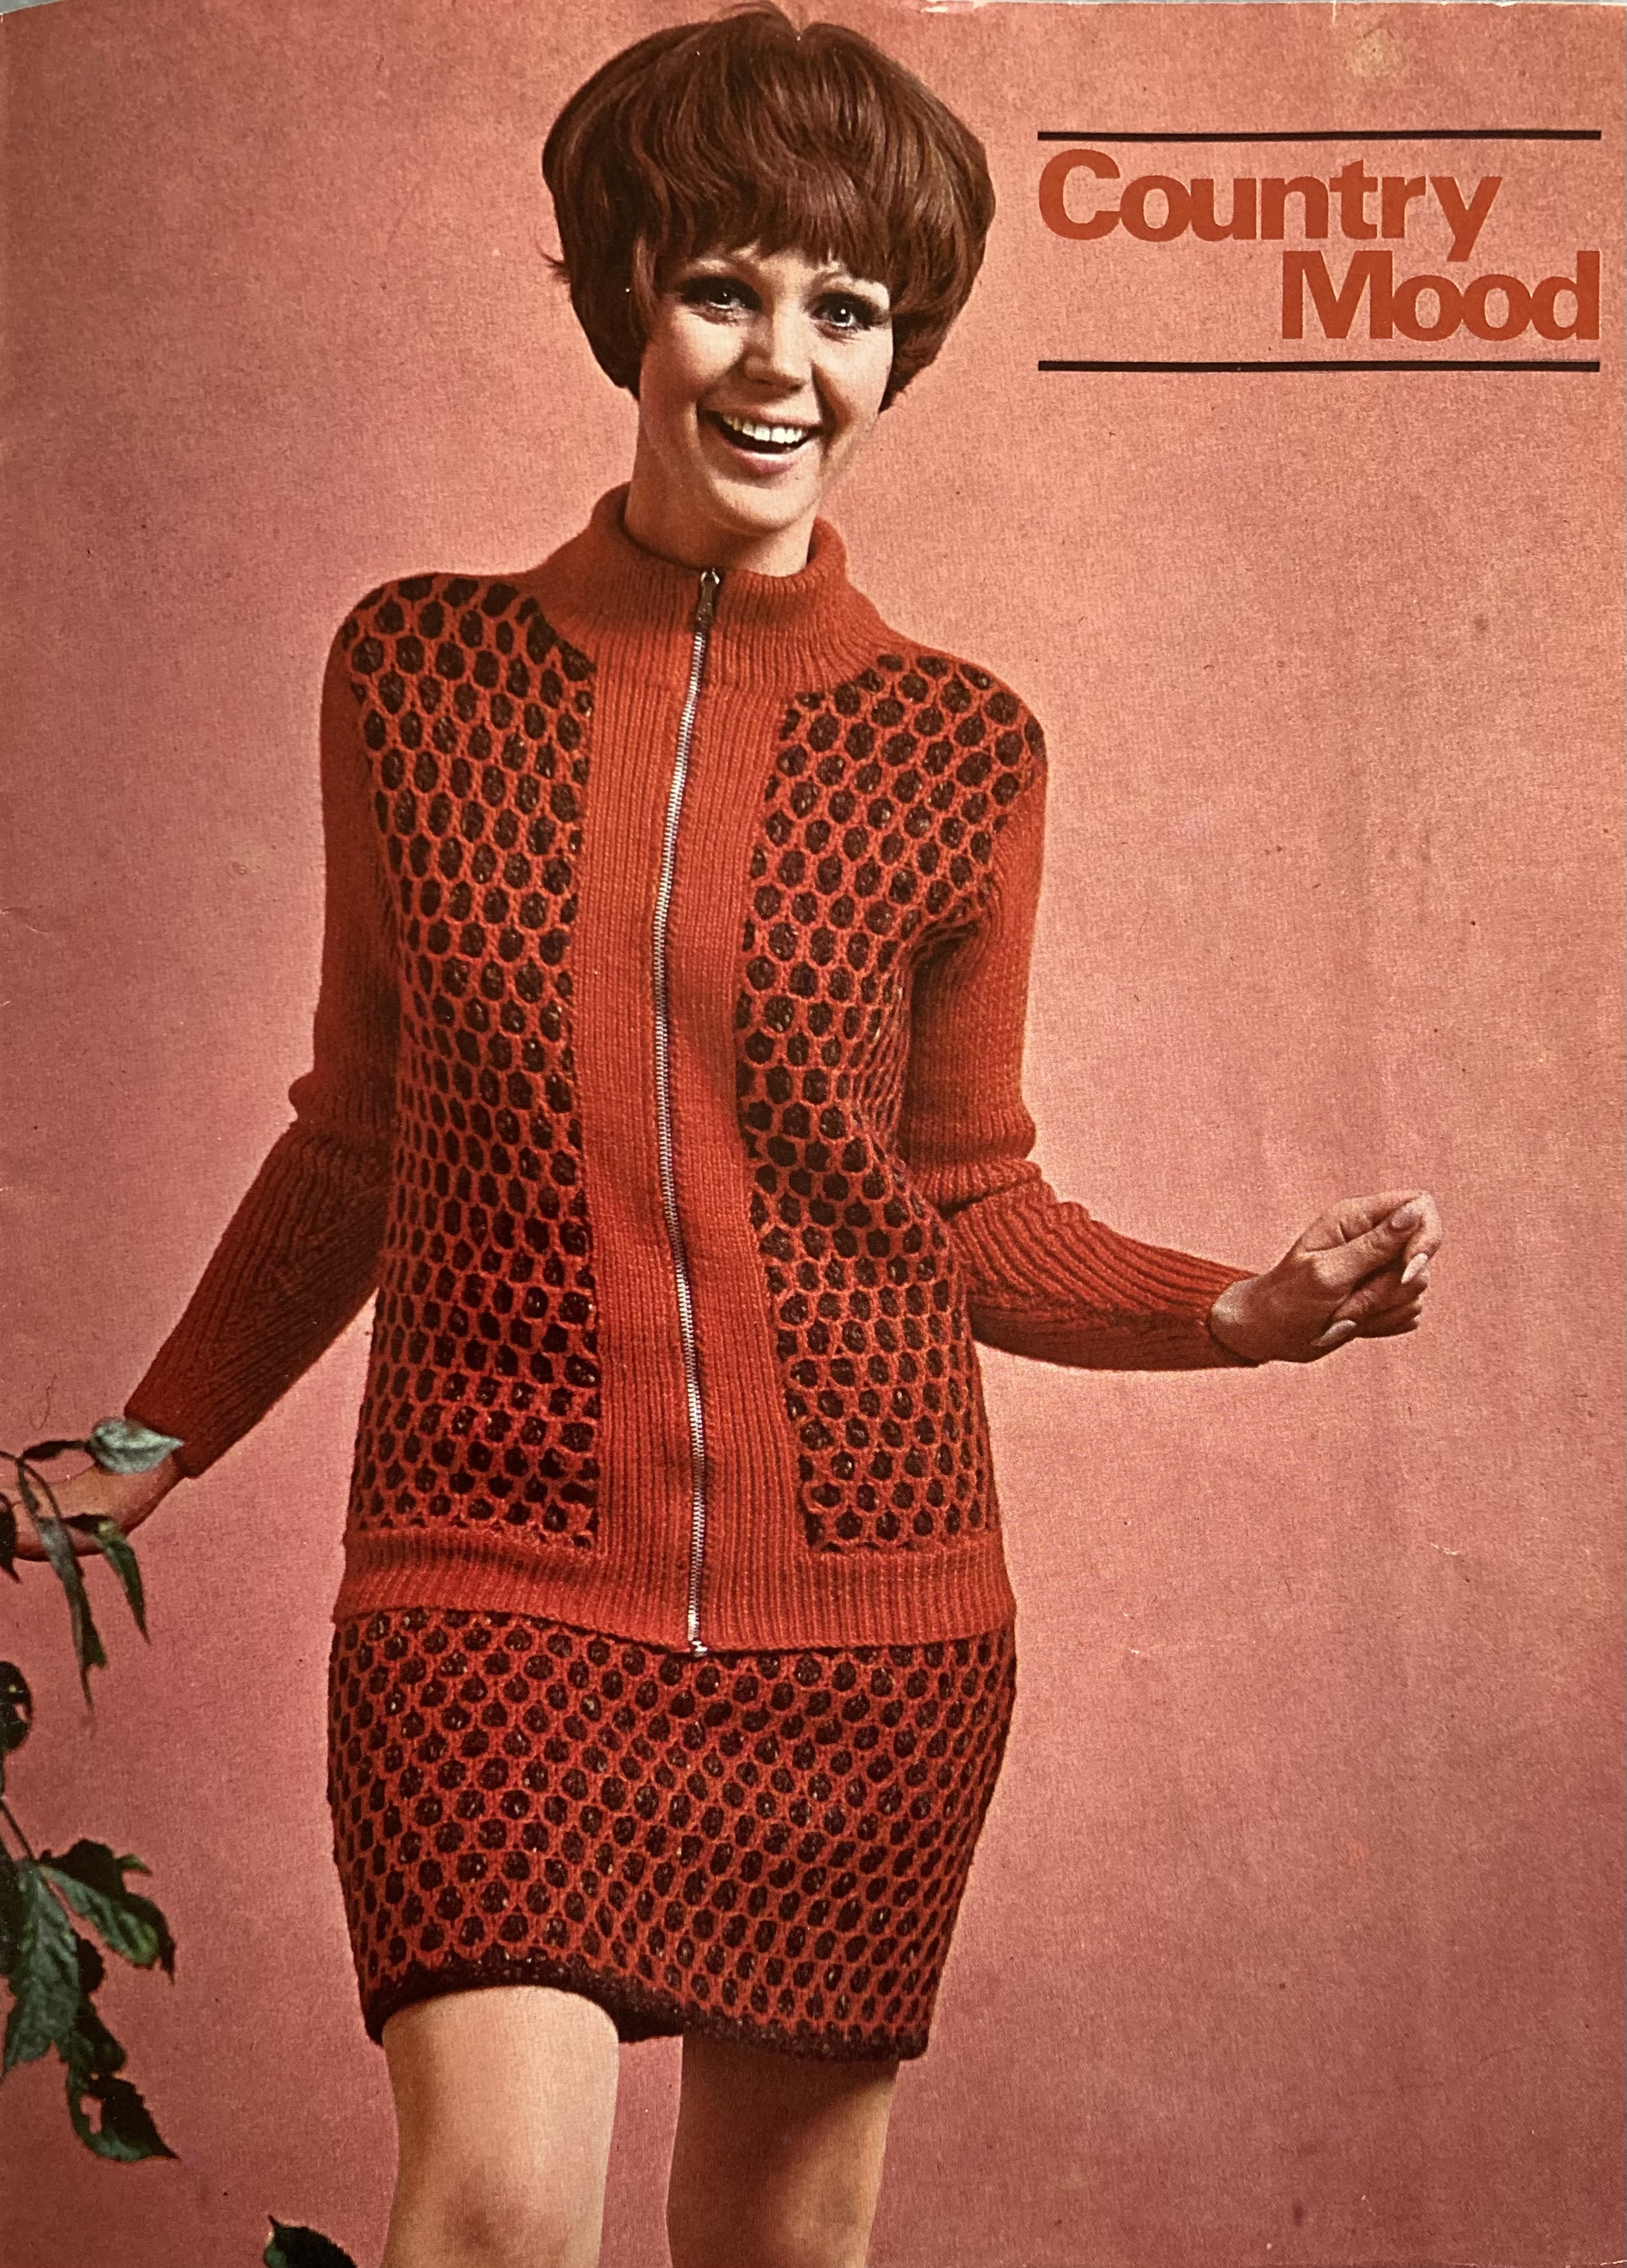
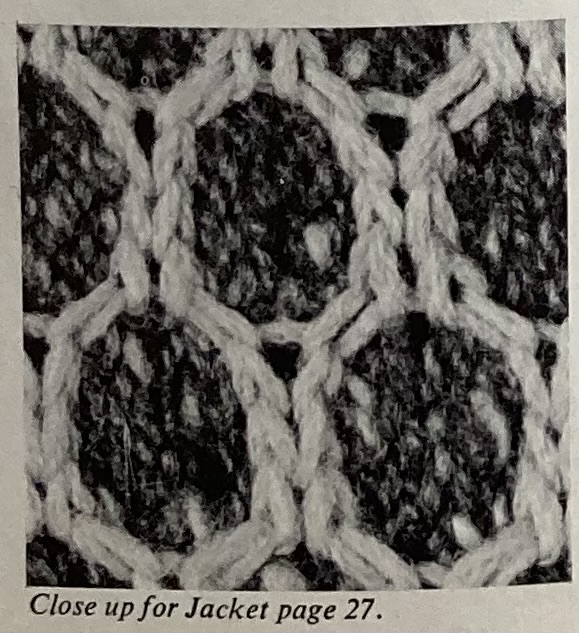
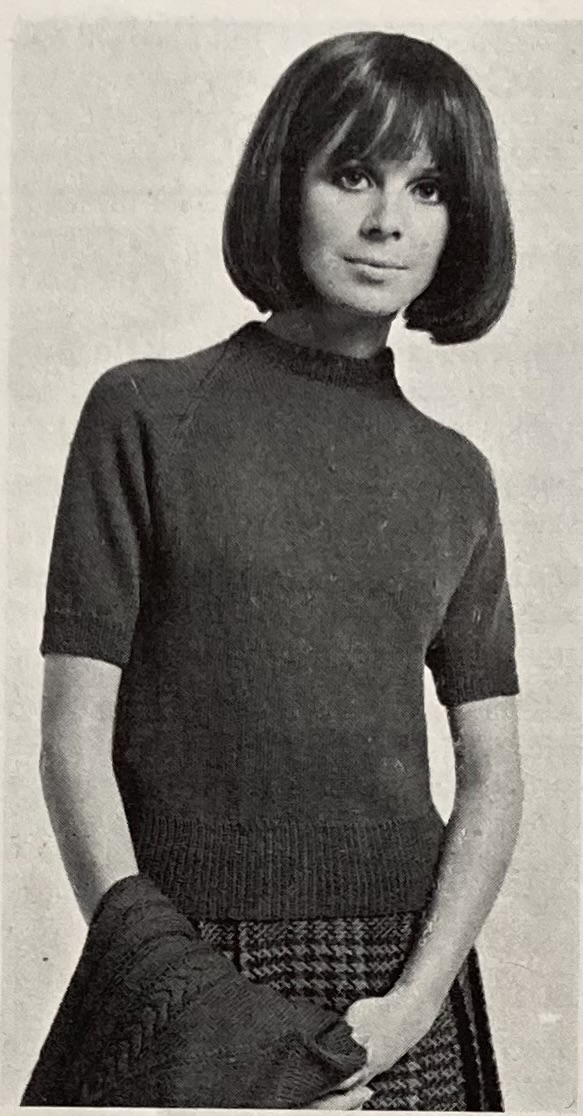
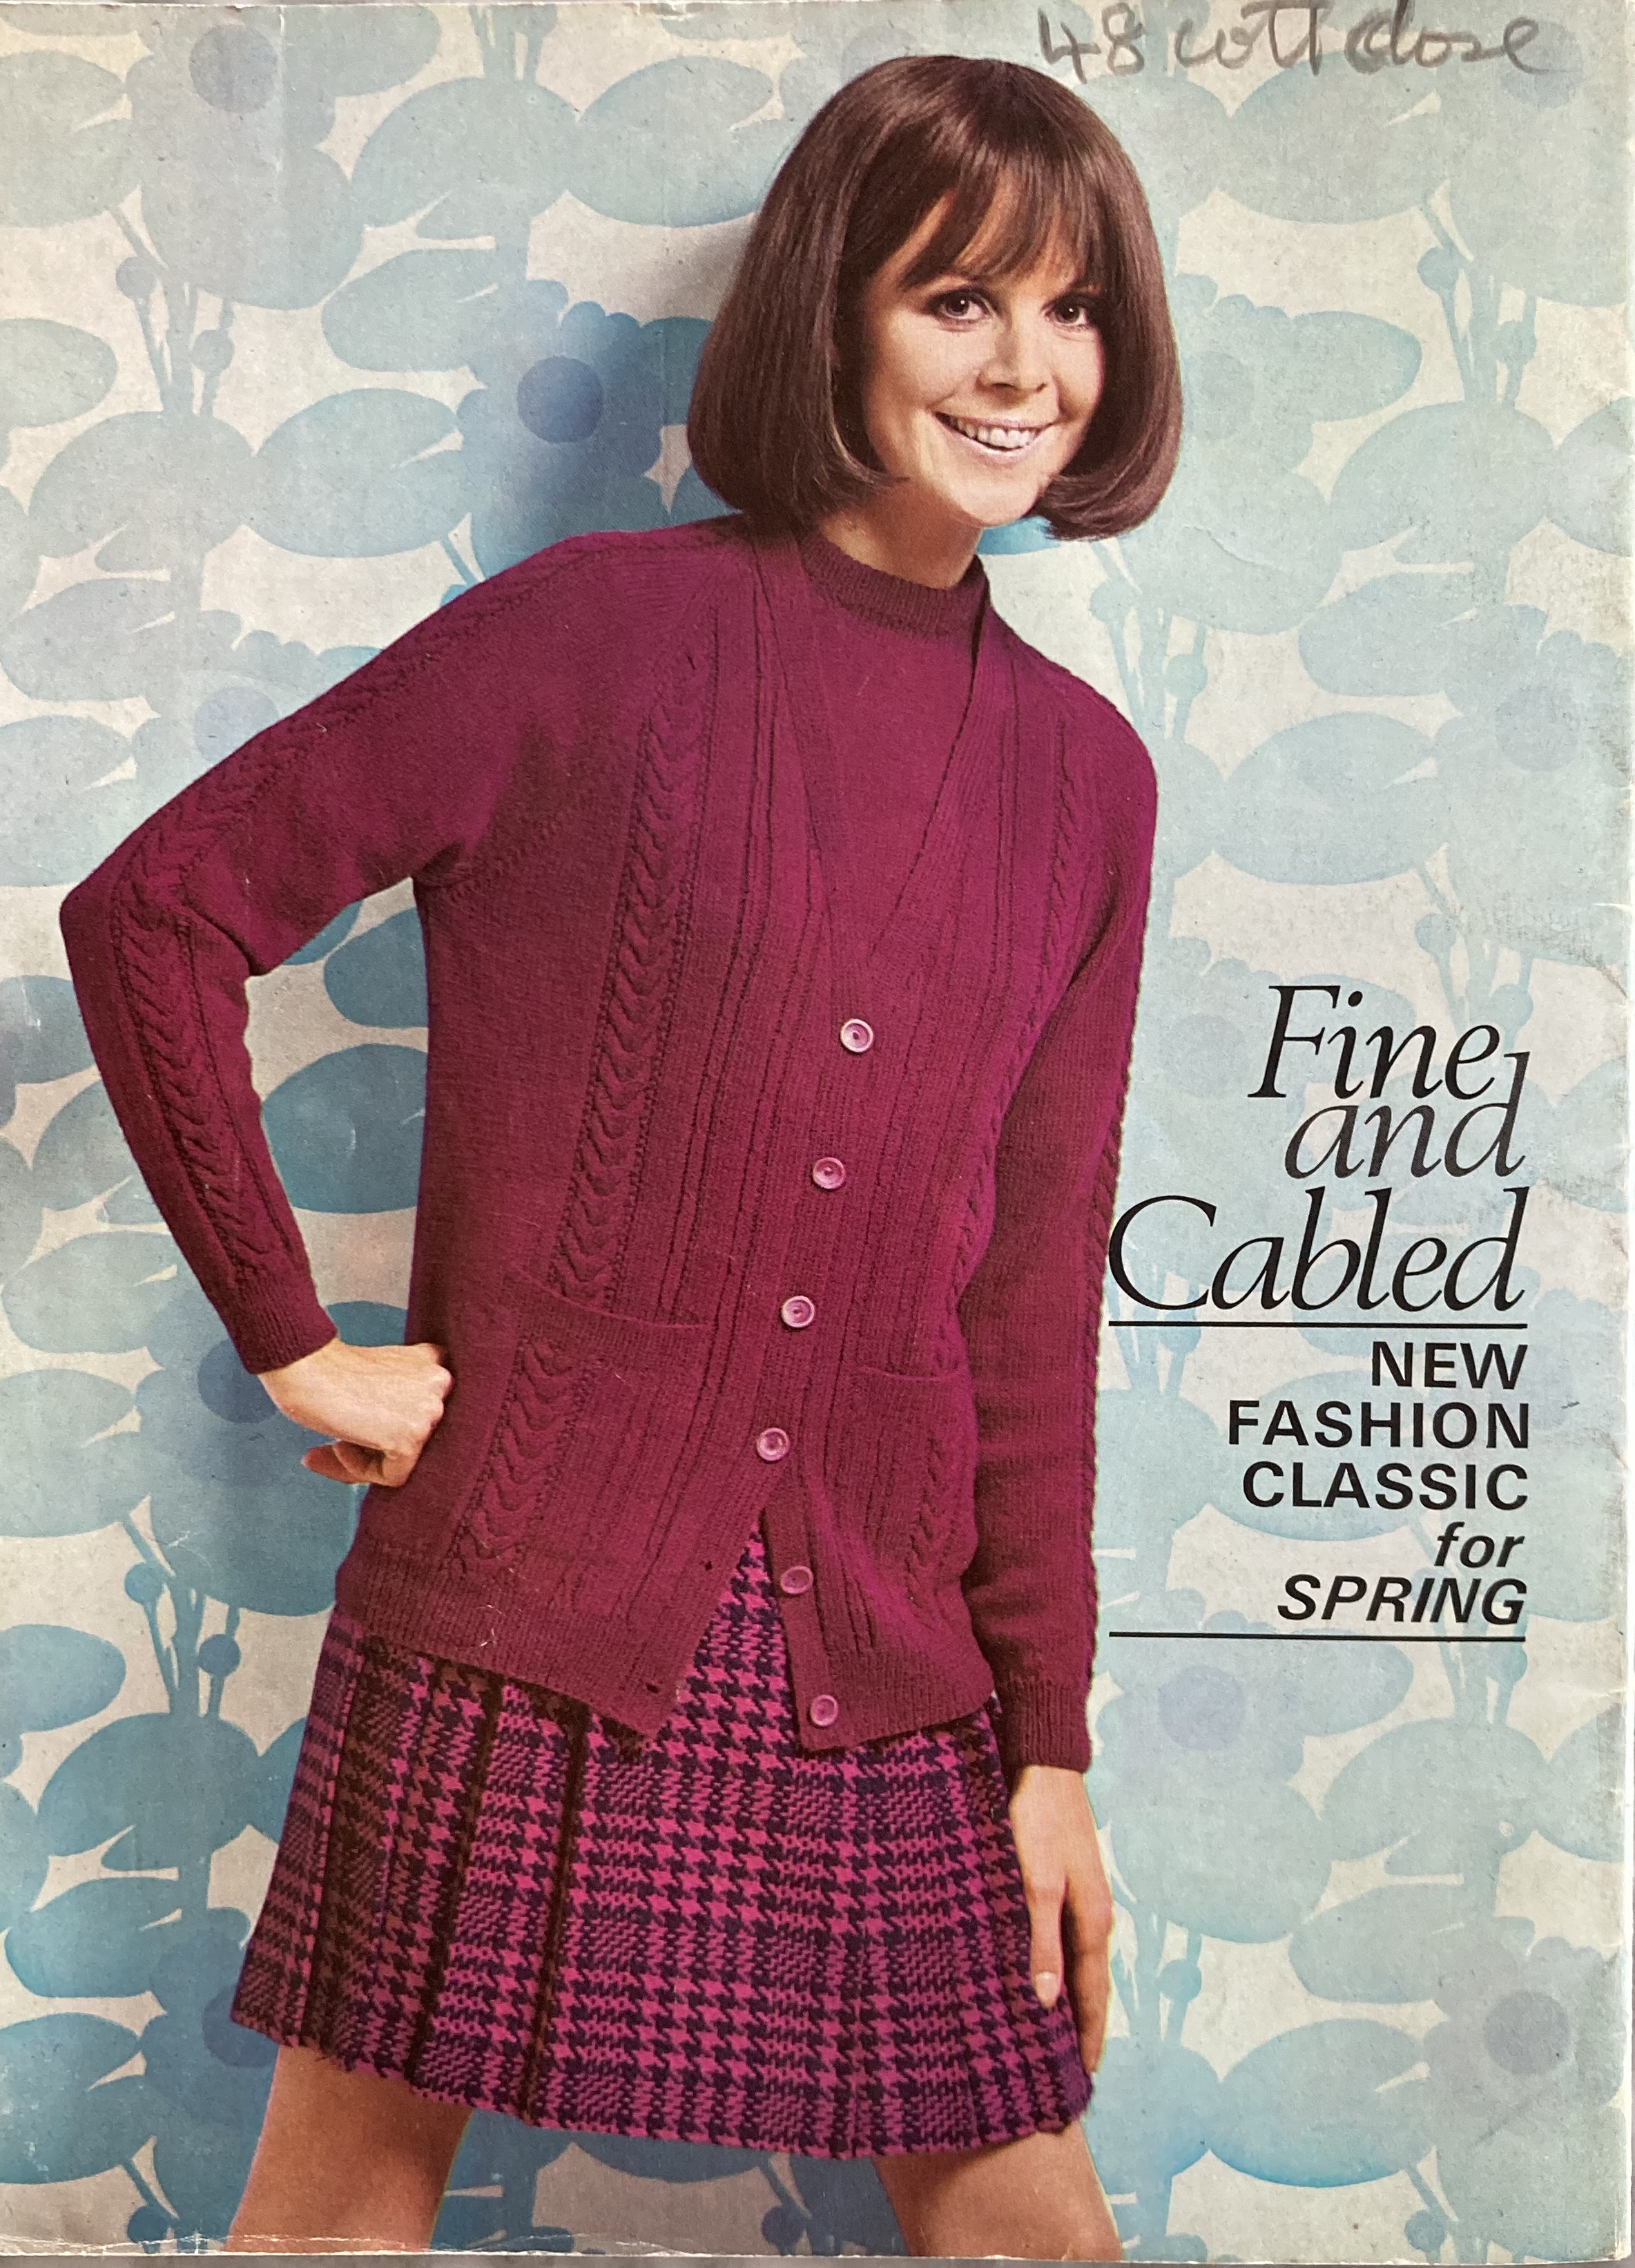
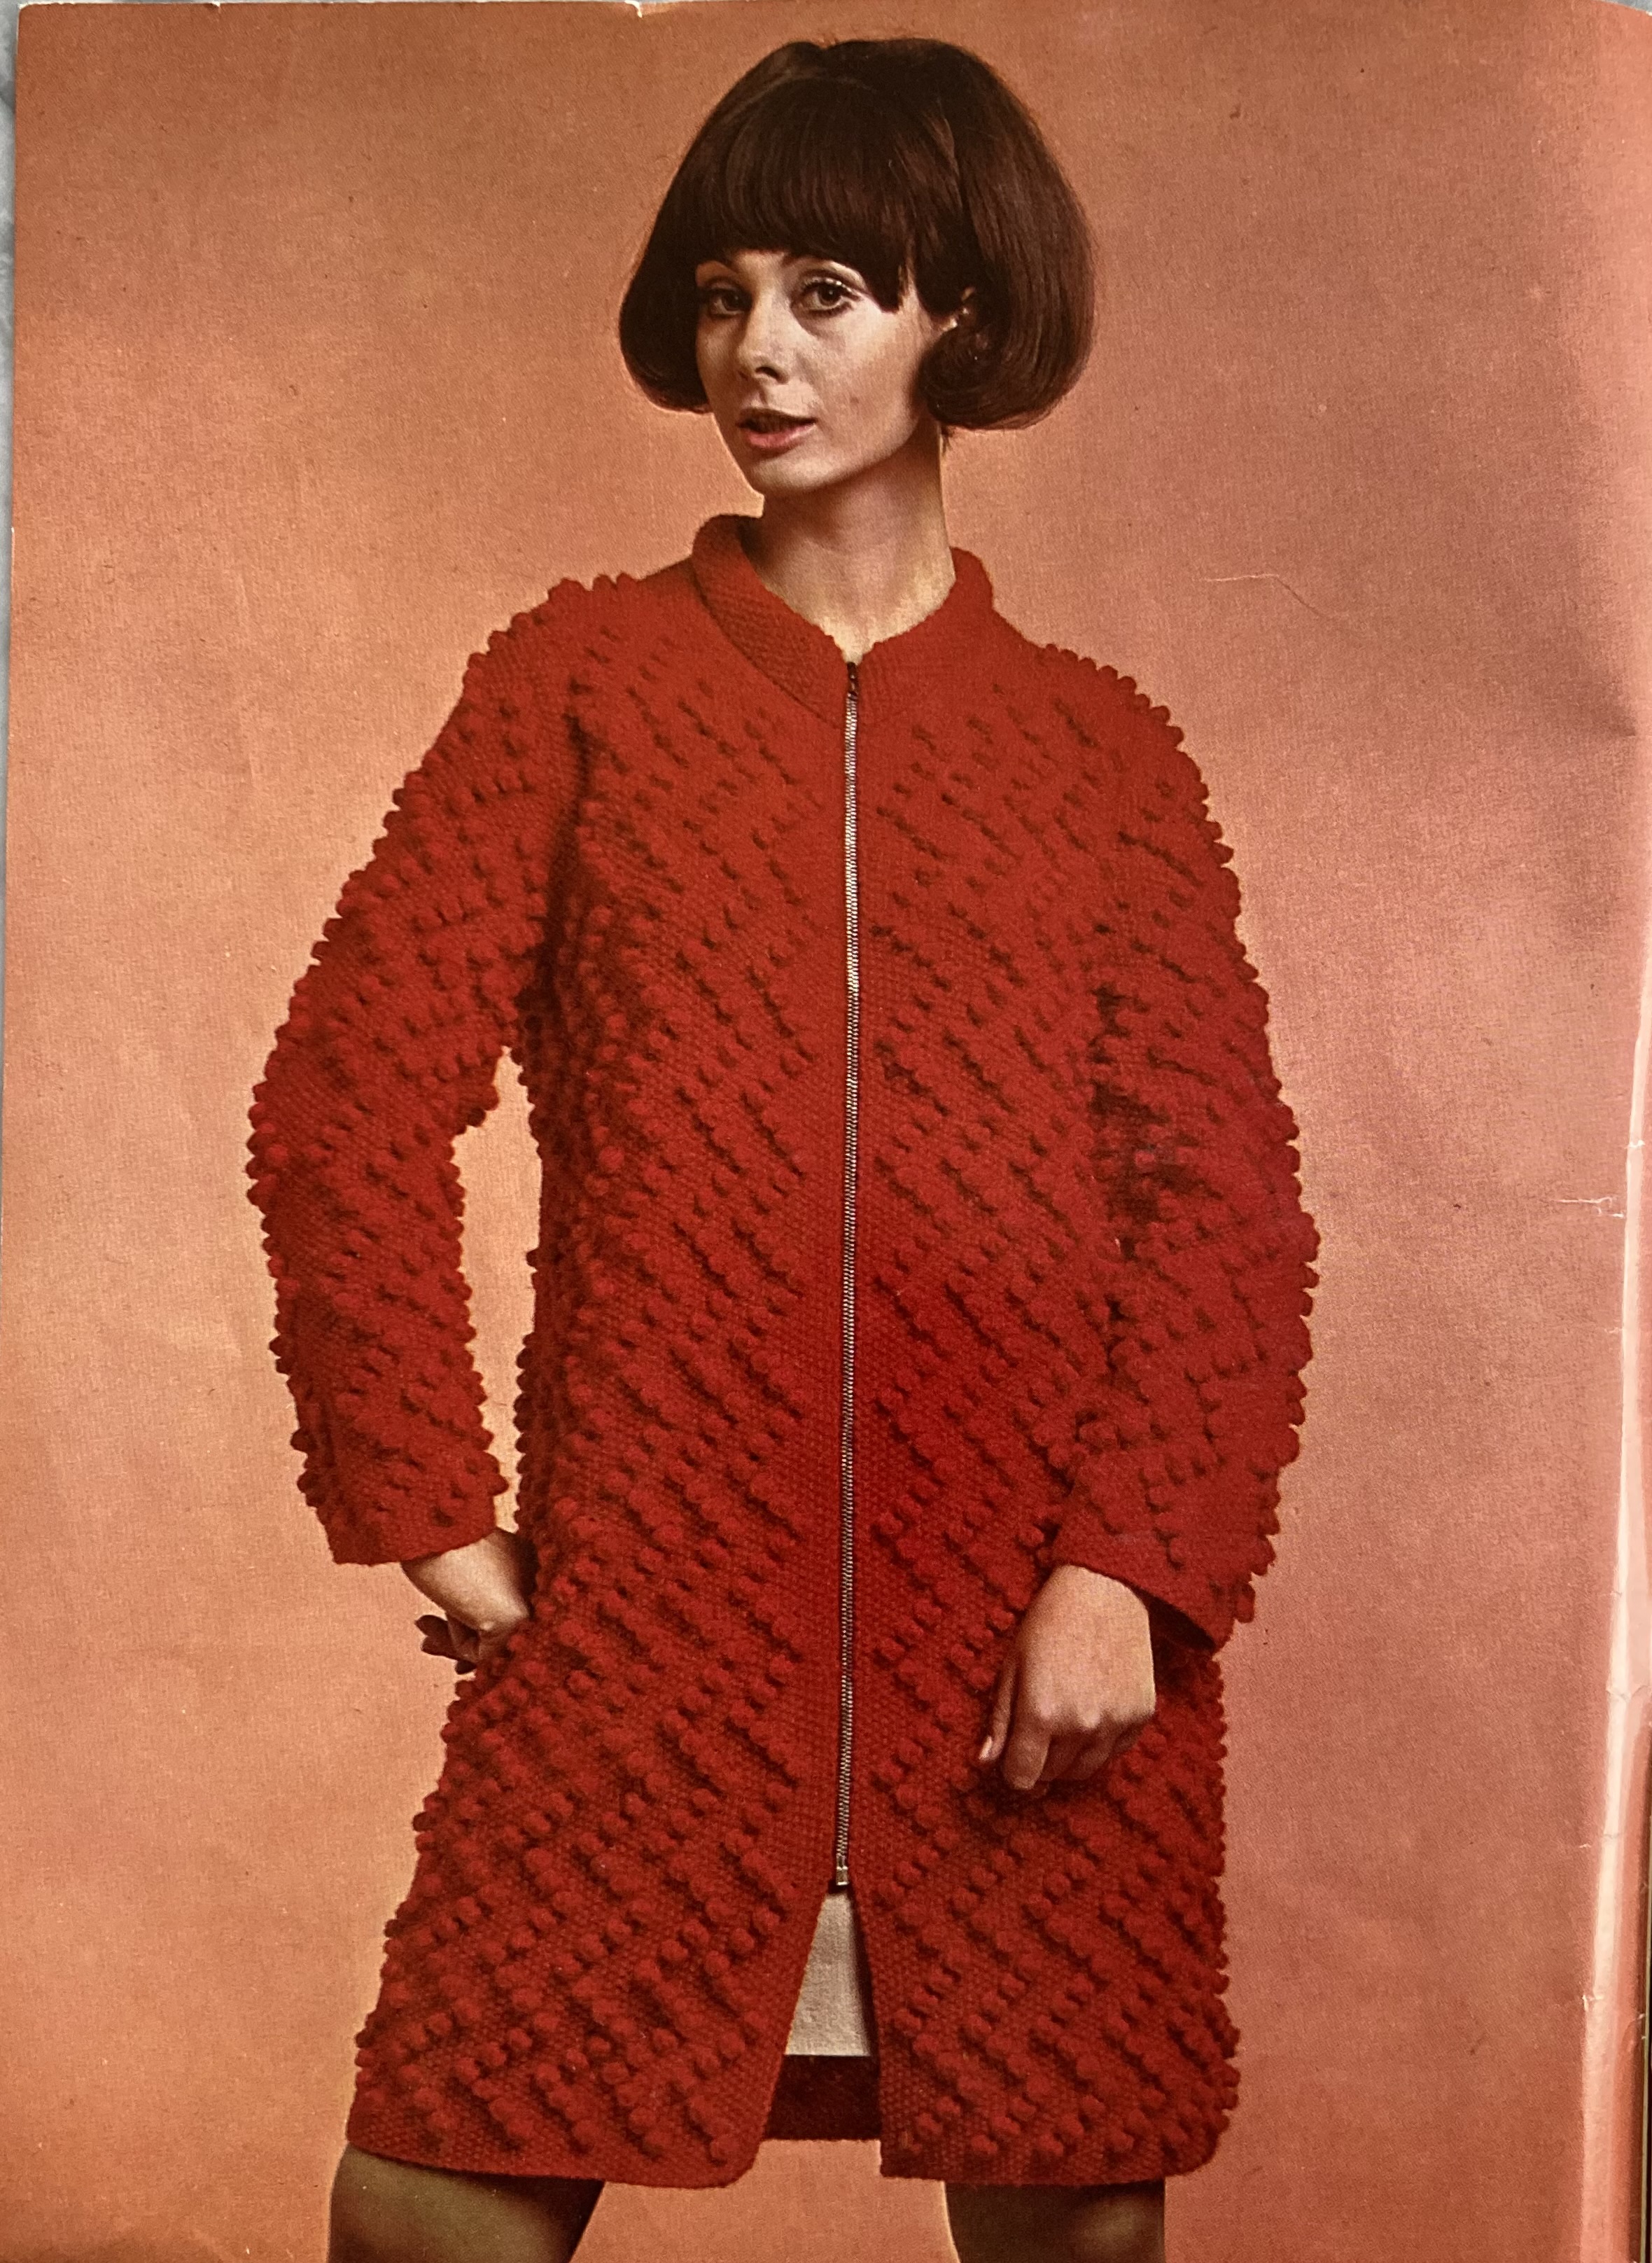
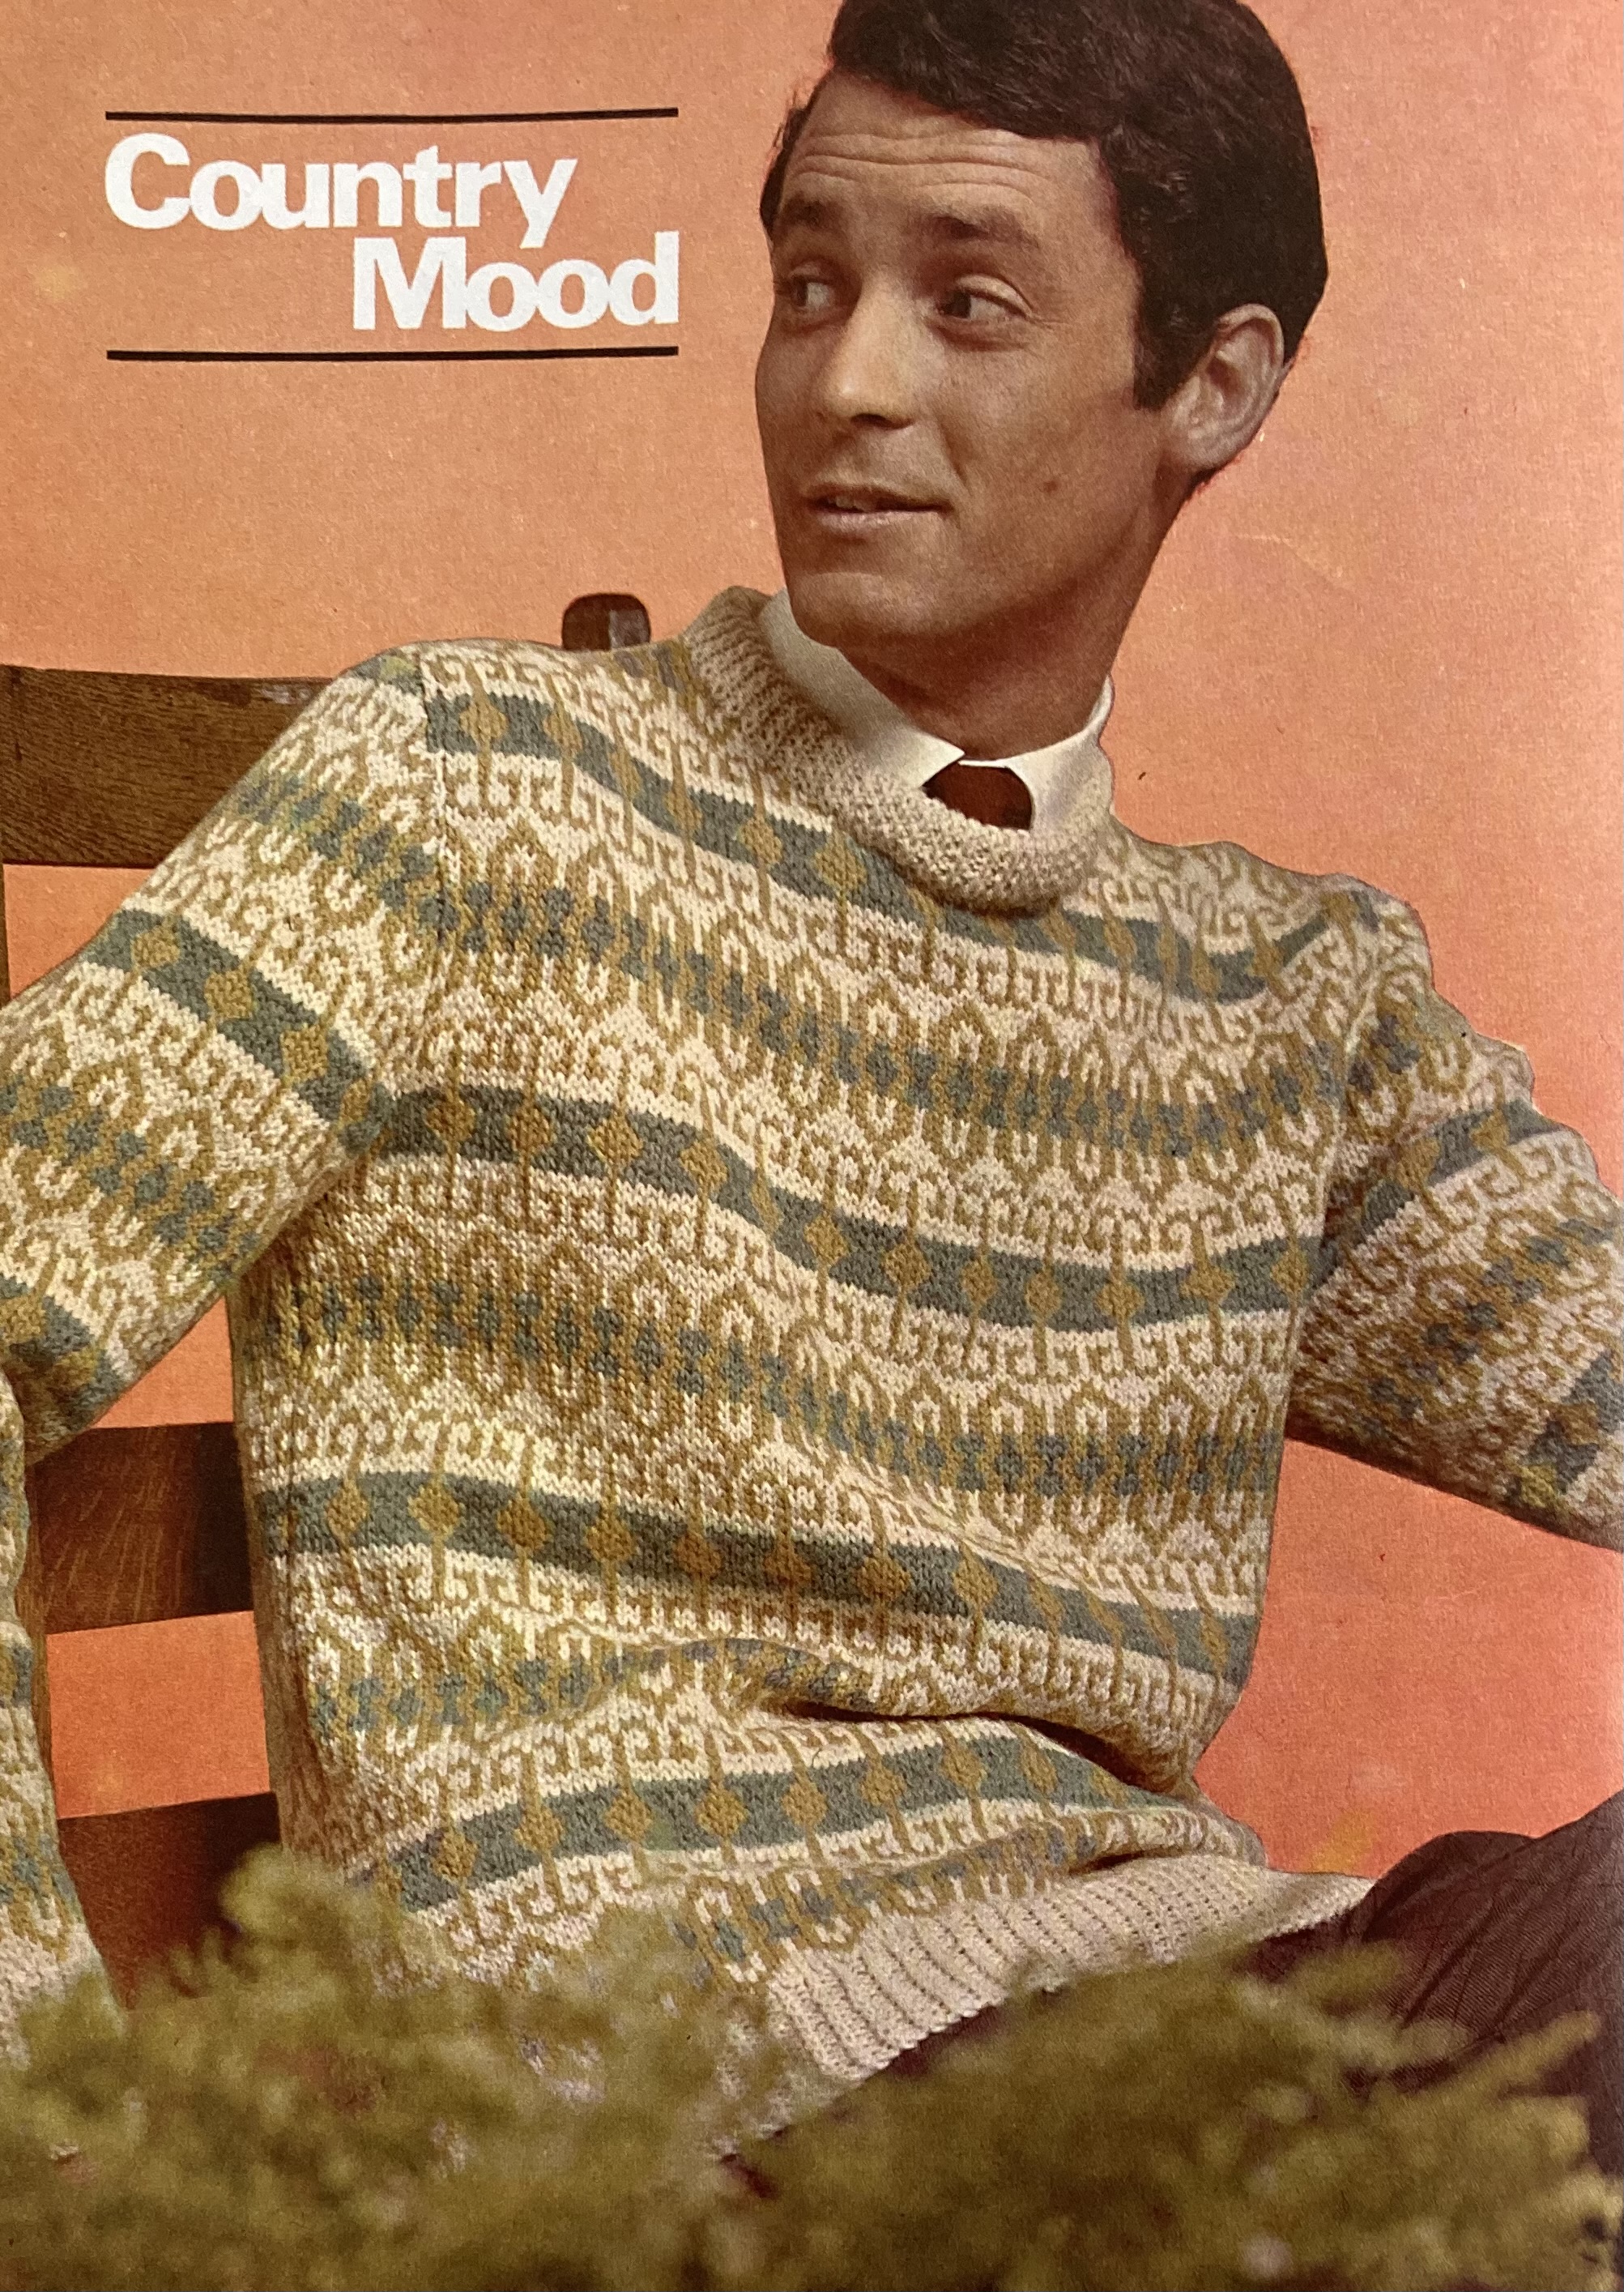
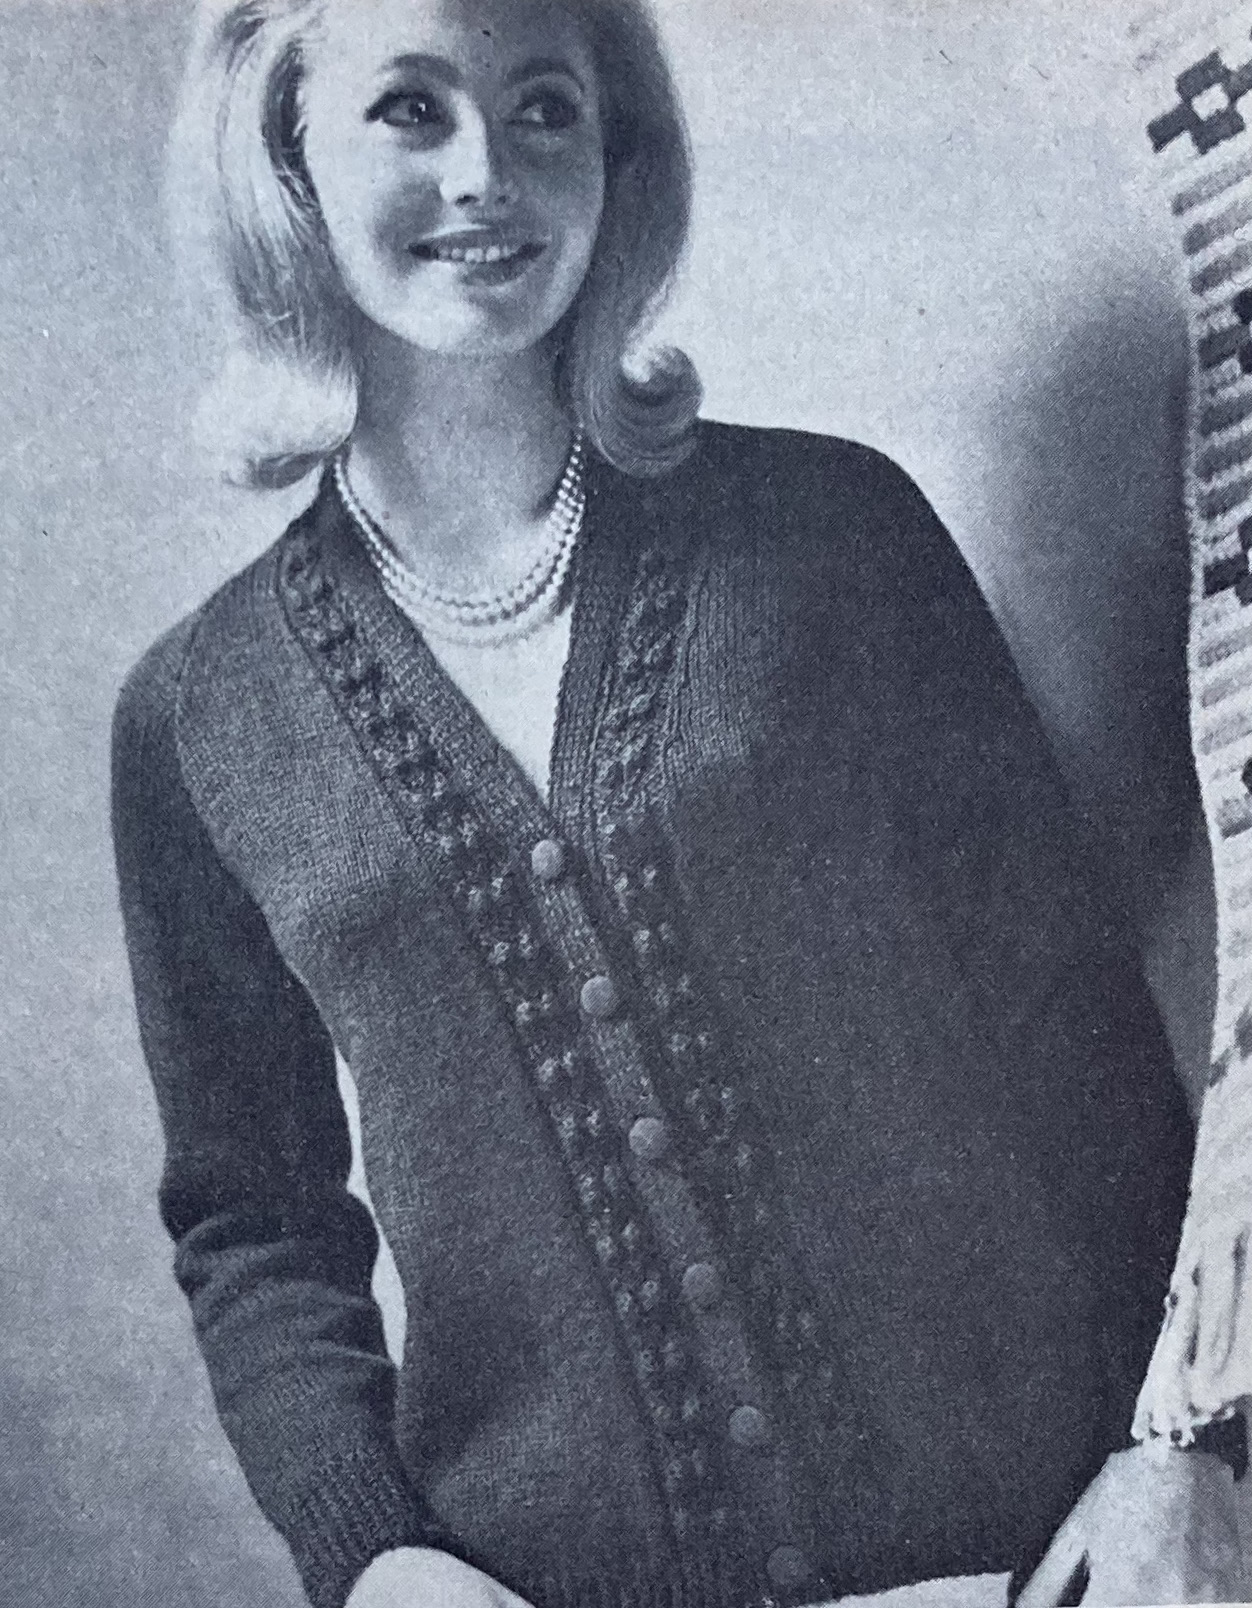
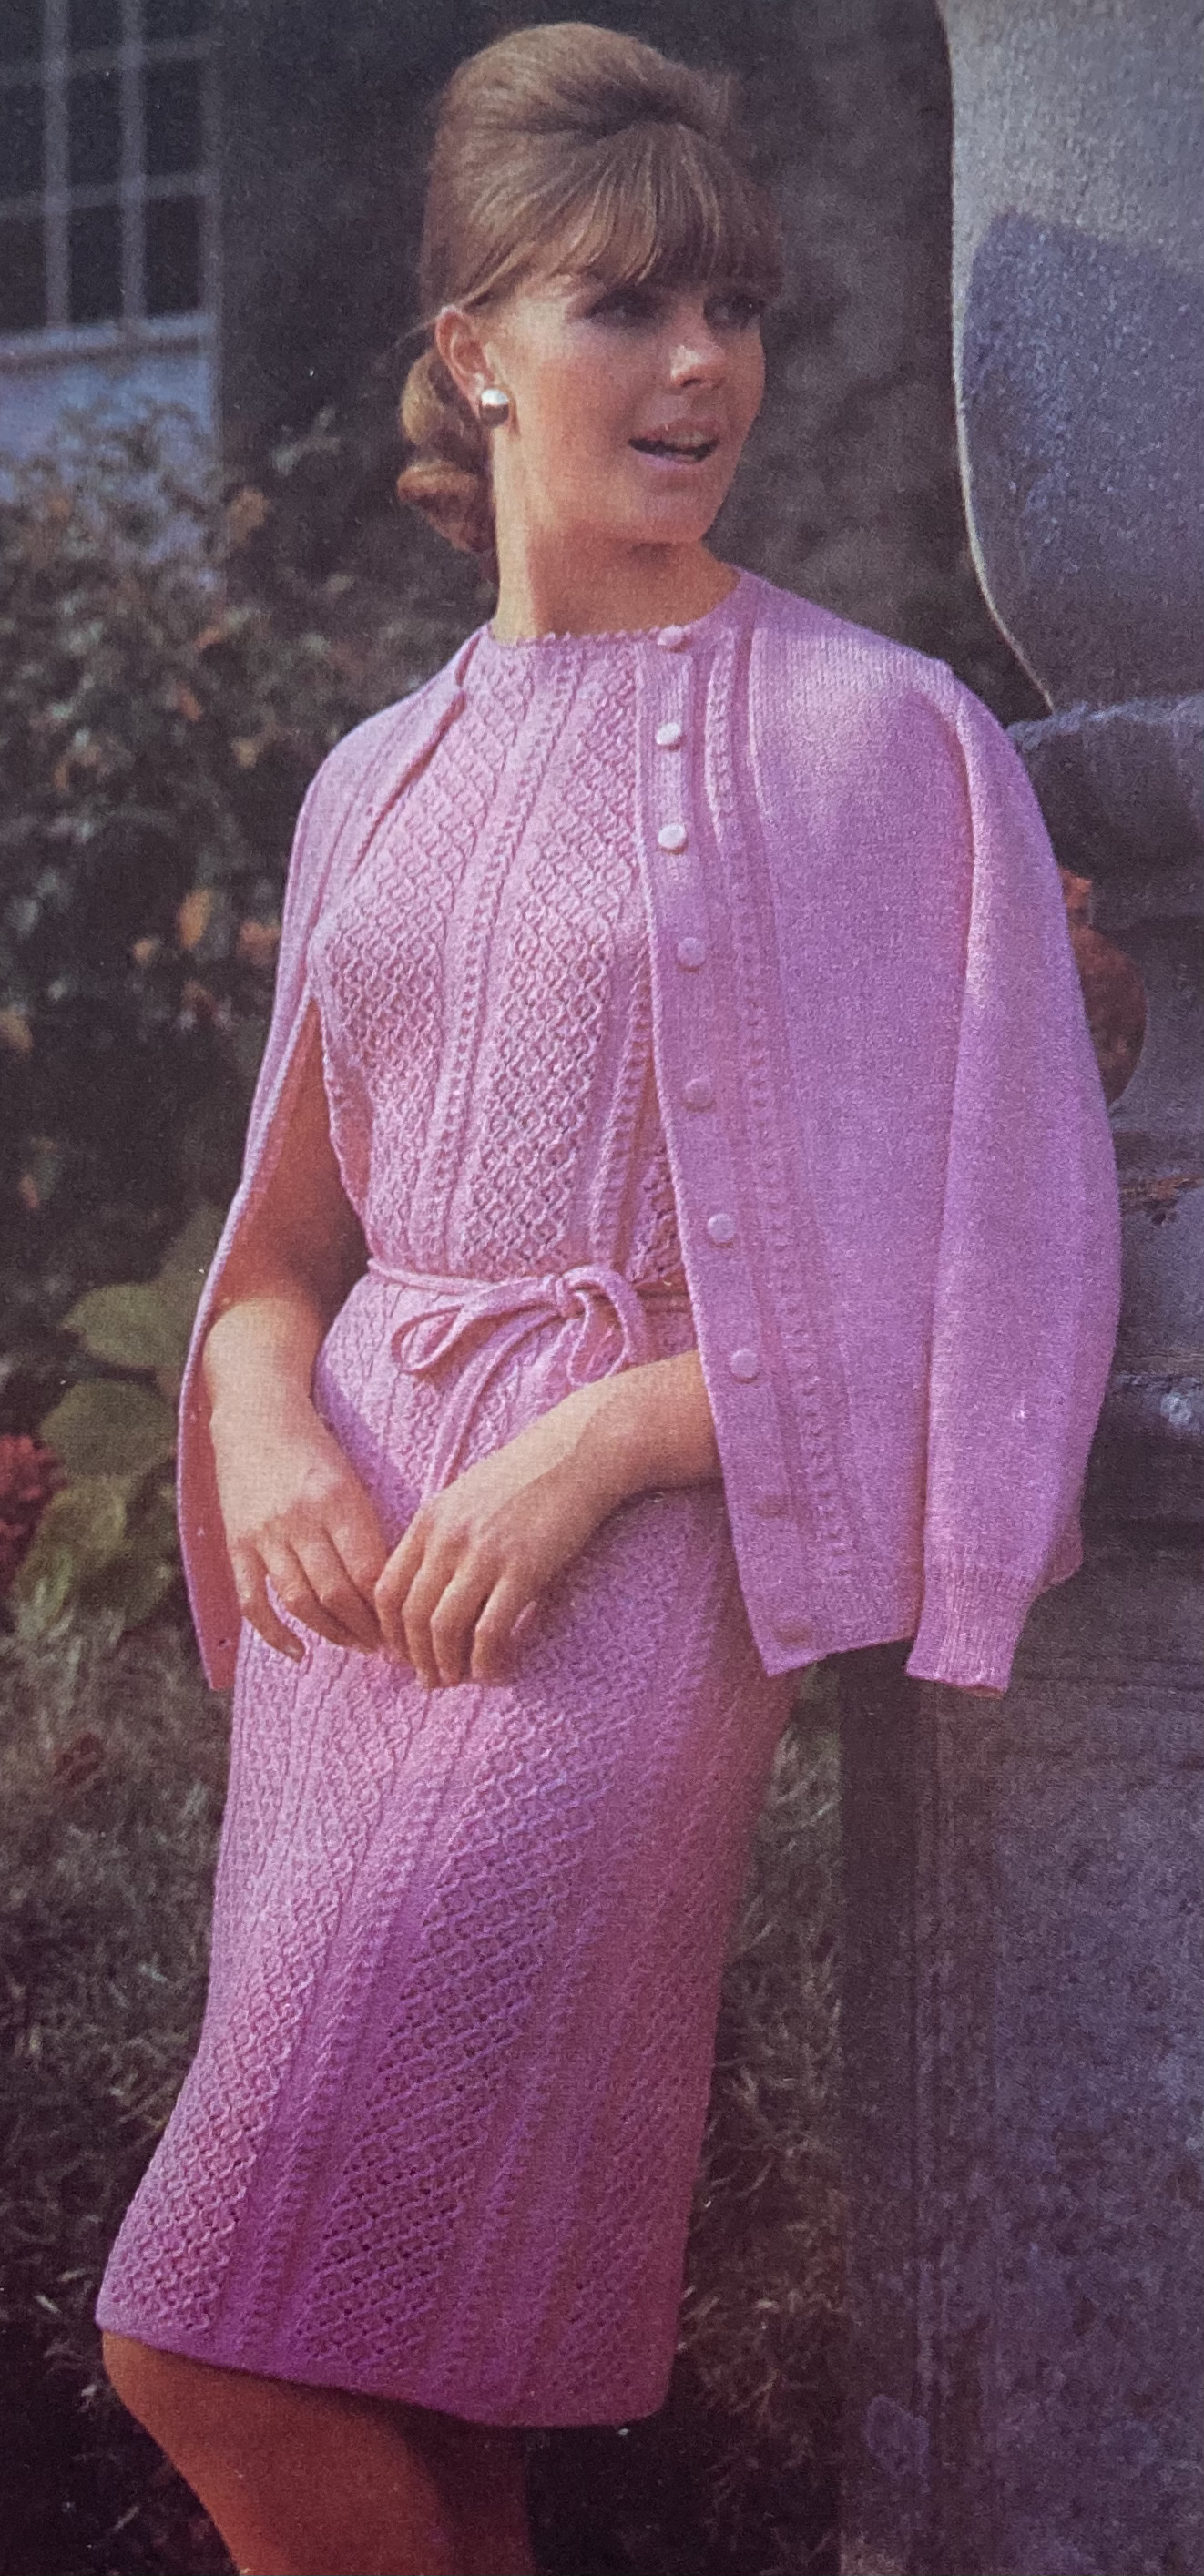
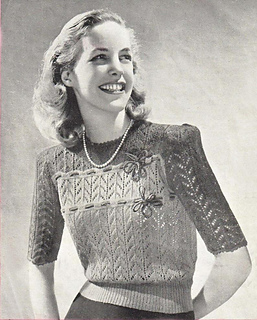
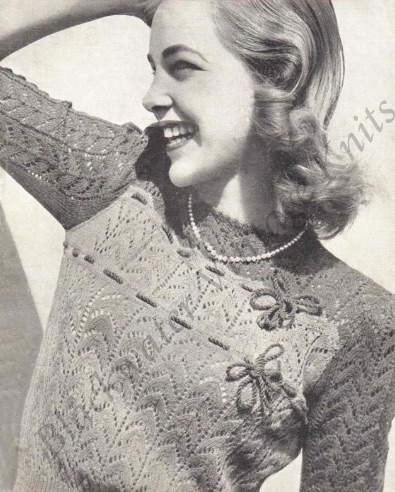
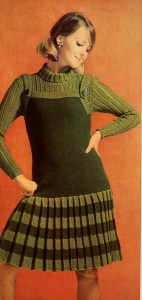
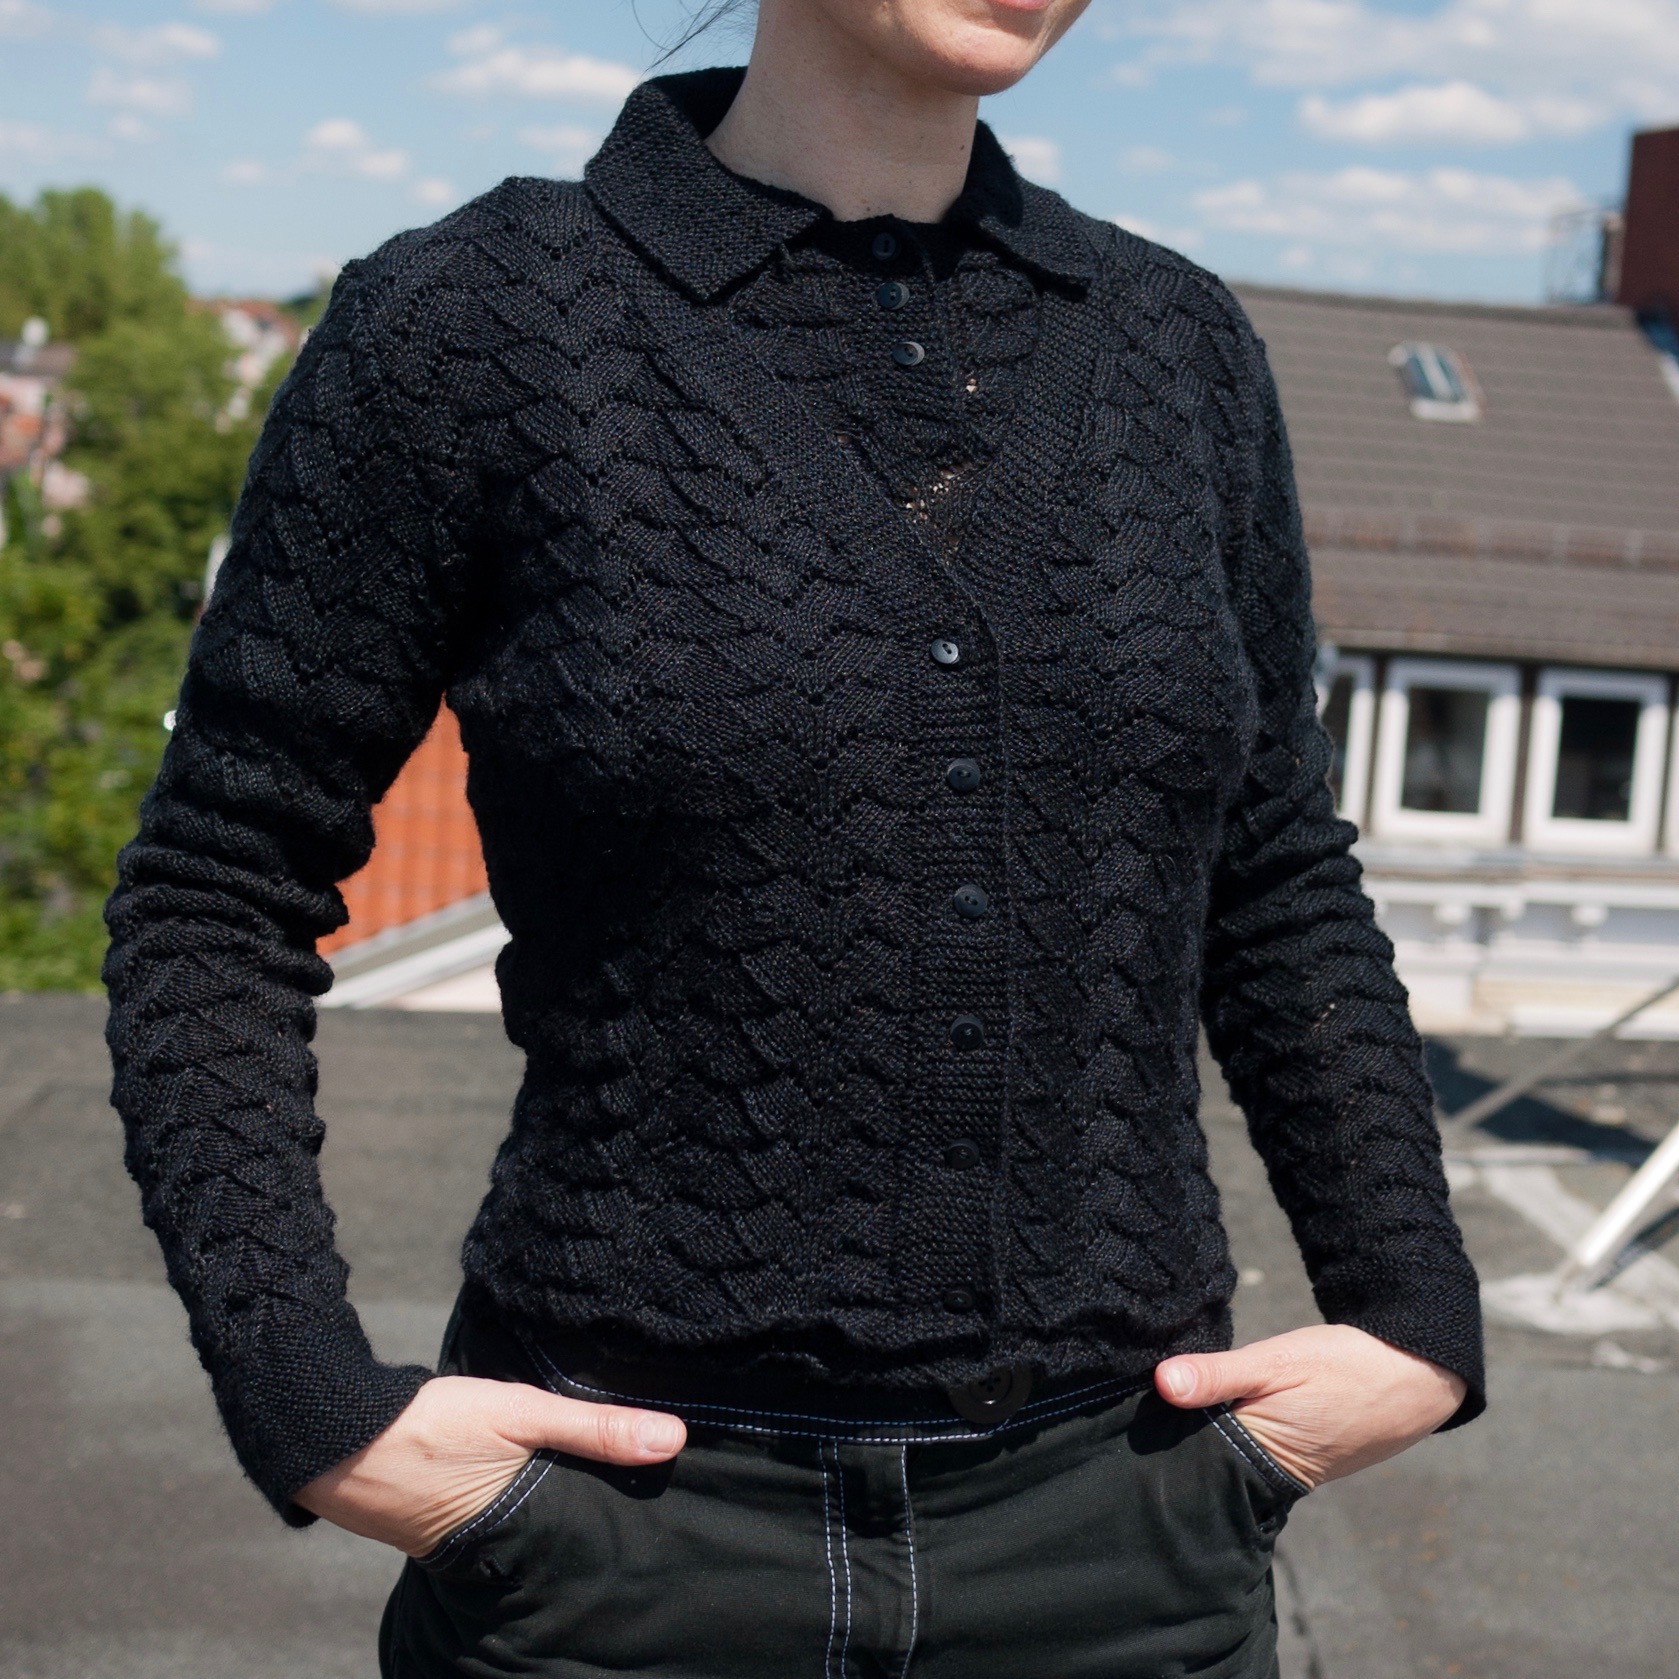
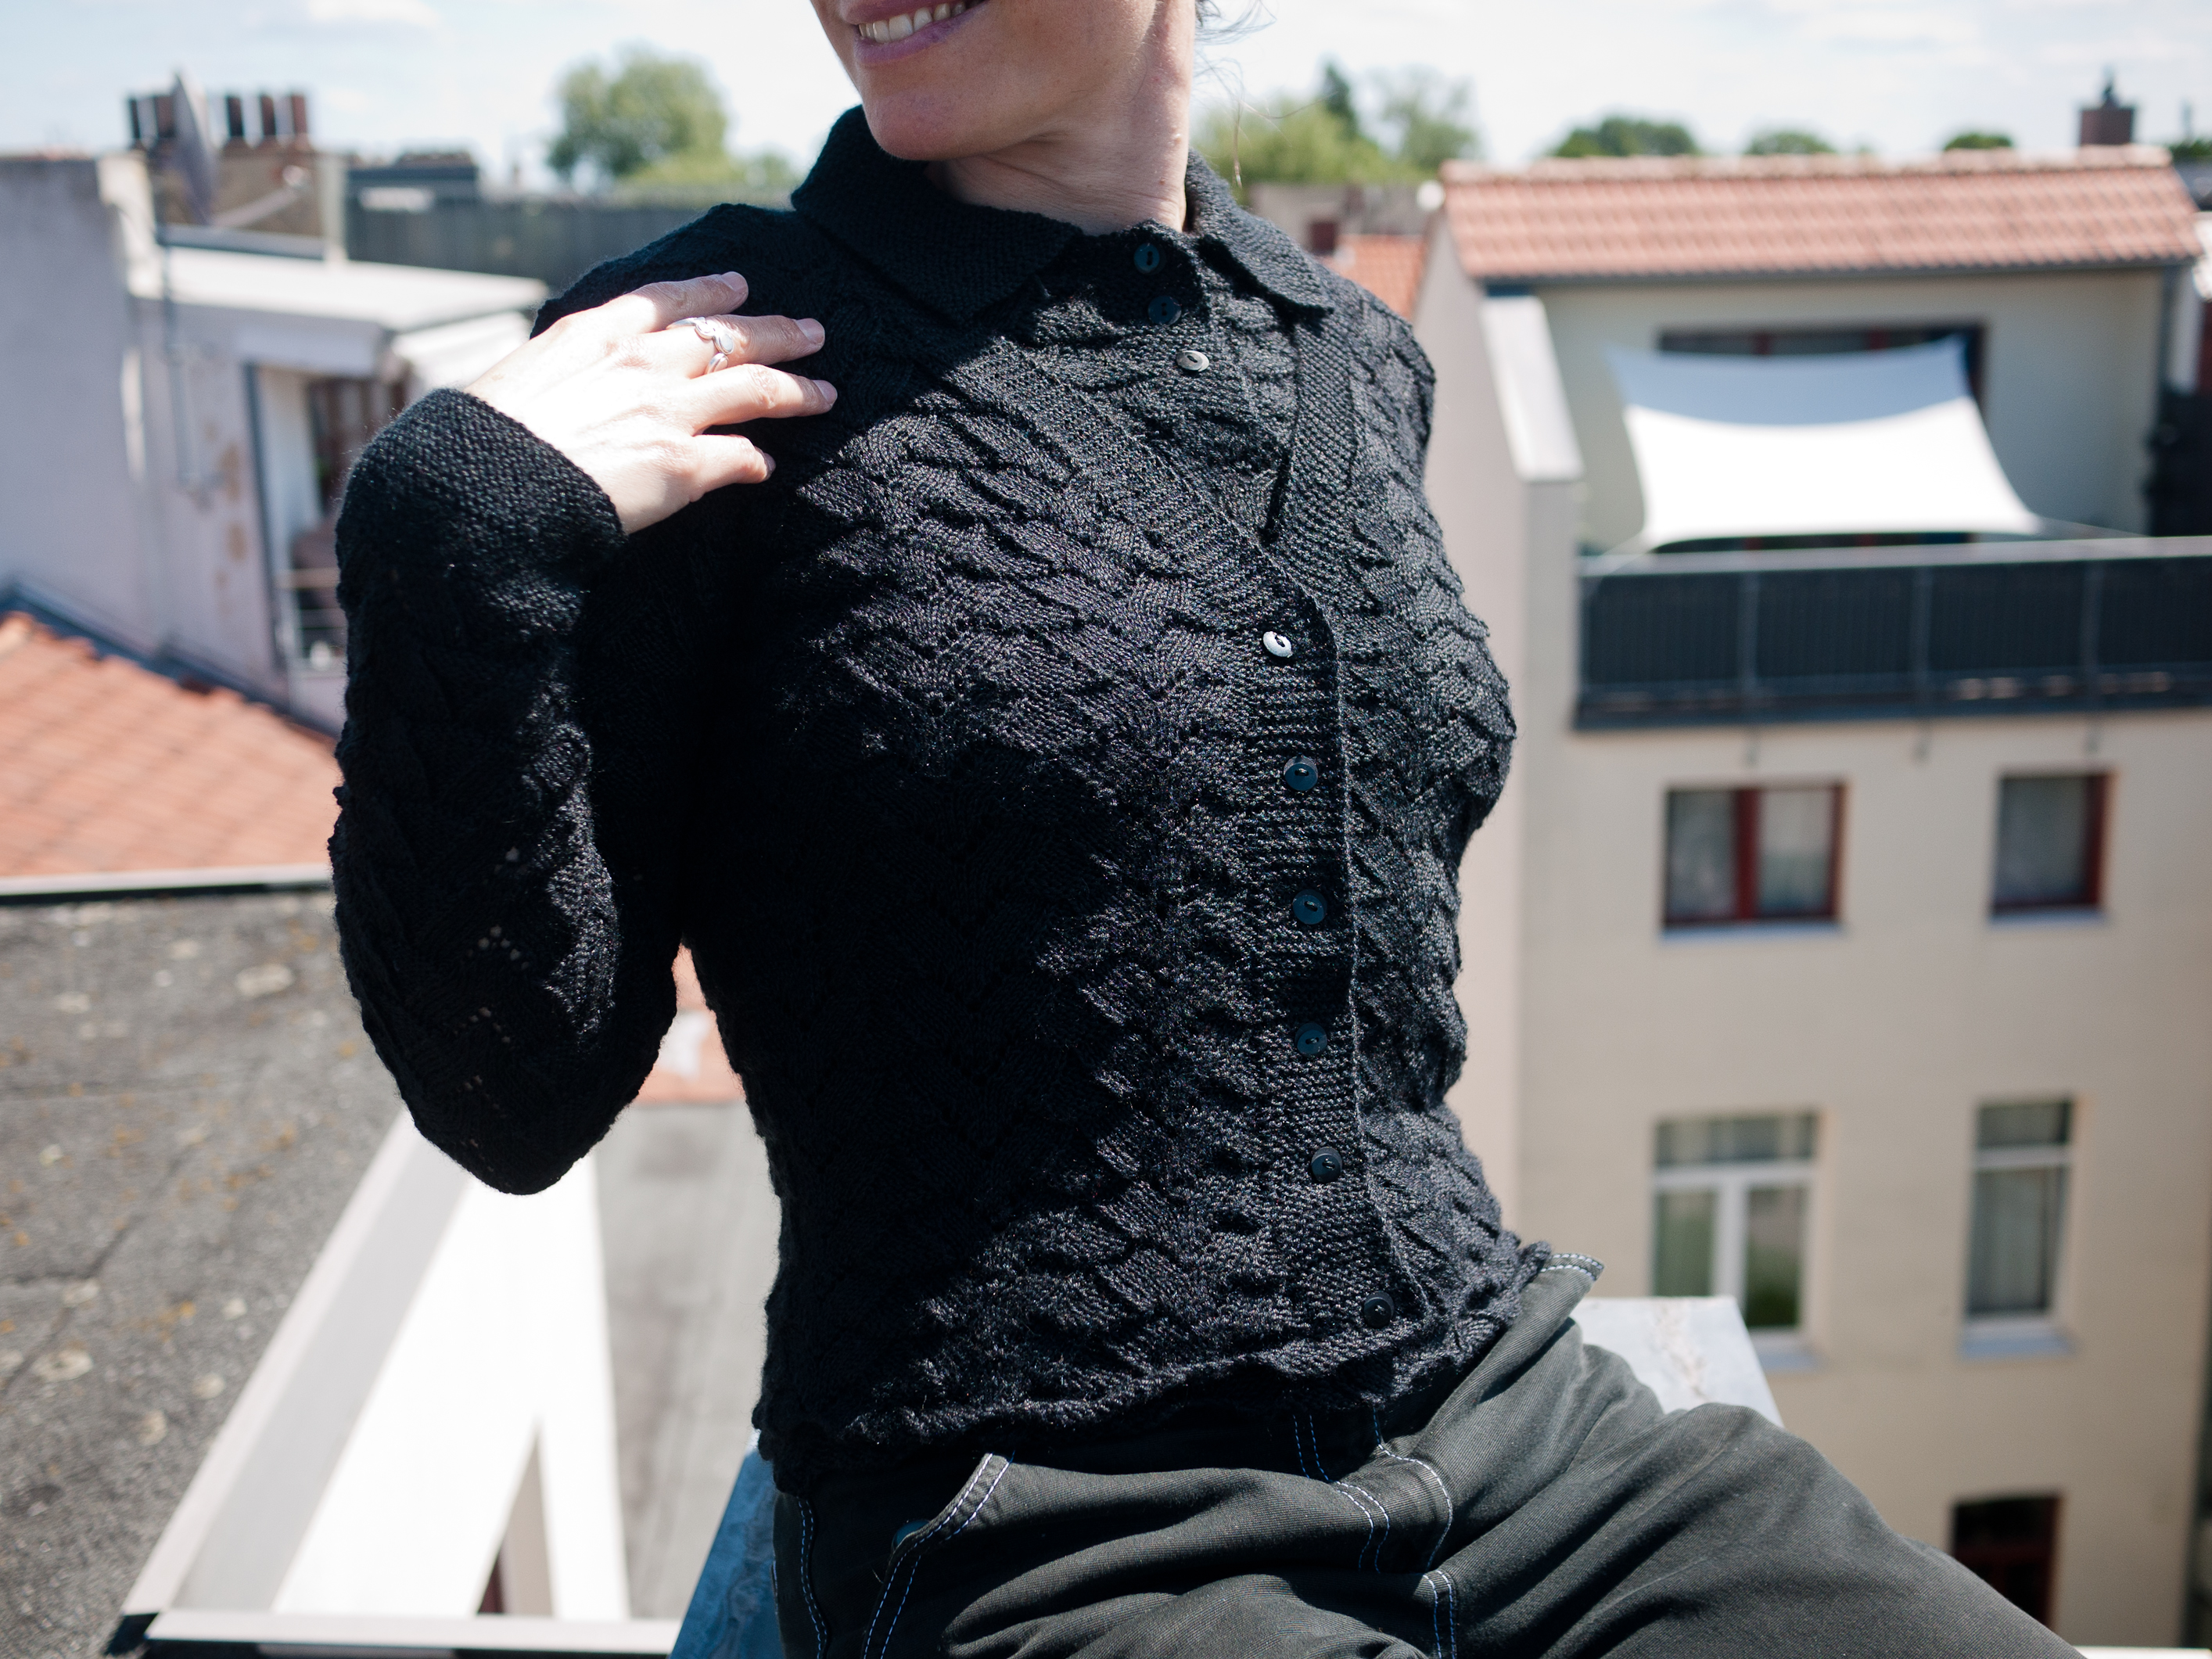
The cover design is a lightweight, but presumably warm pullover in a leafy lace-panel pattern and Patons “Princess” yarn (85% wool, 15% angora.) It’s slimmer, longer, high-necked, and belted — trends that will continue throughout the year. The back-cover design is a twin set in late 60s style, loose-fitting and worn with a kilt-like plaid skirt. It, too, is touted as a “long-liner” and the caption says it can be “belted if you like.” There’s a similar long-and-slim feeling to the “Country Mood” set on the inside back cover, which features a zipped cardigan over a mini-skirt, both in really interesting two-colour trellis pattern. The pattern looks like it would be made with slip-stitches, but is in fact stranded, with twisted stitches to give the trellis effect. Longest of all is the amazing bobble-stitch coat on the inside front cover, weighing in at a whopping 50-54 ounces and similarly zipped up the front.
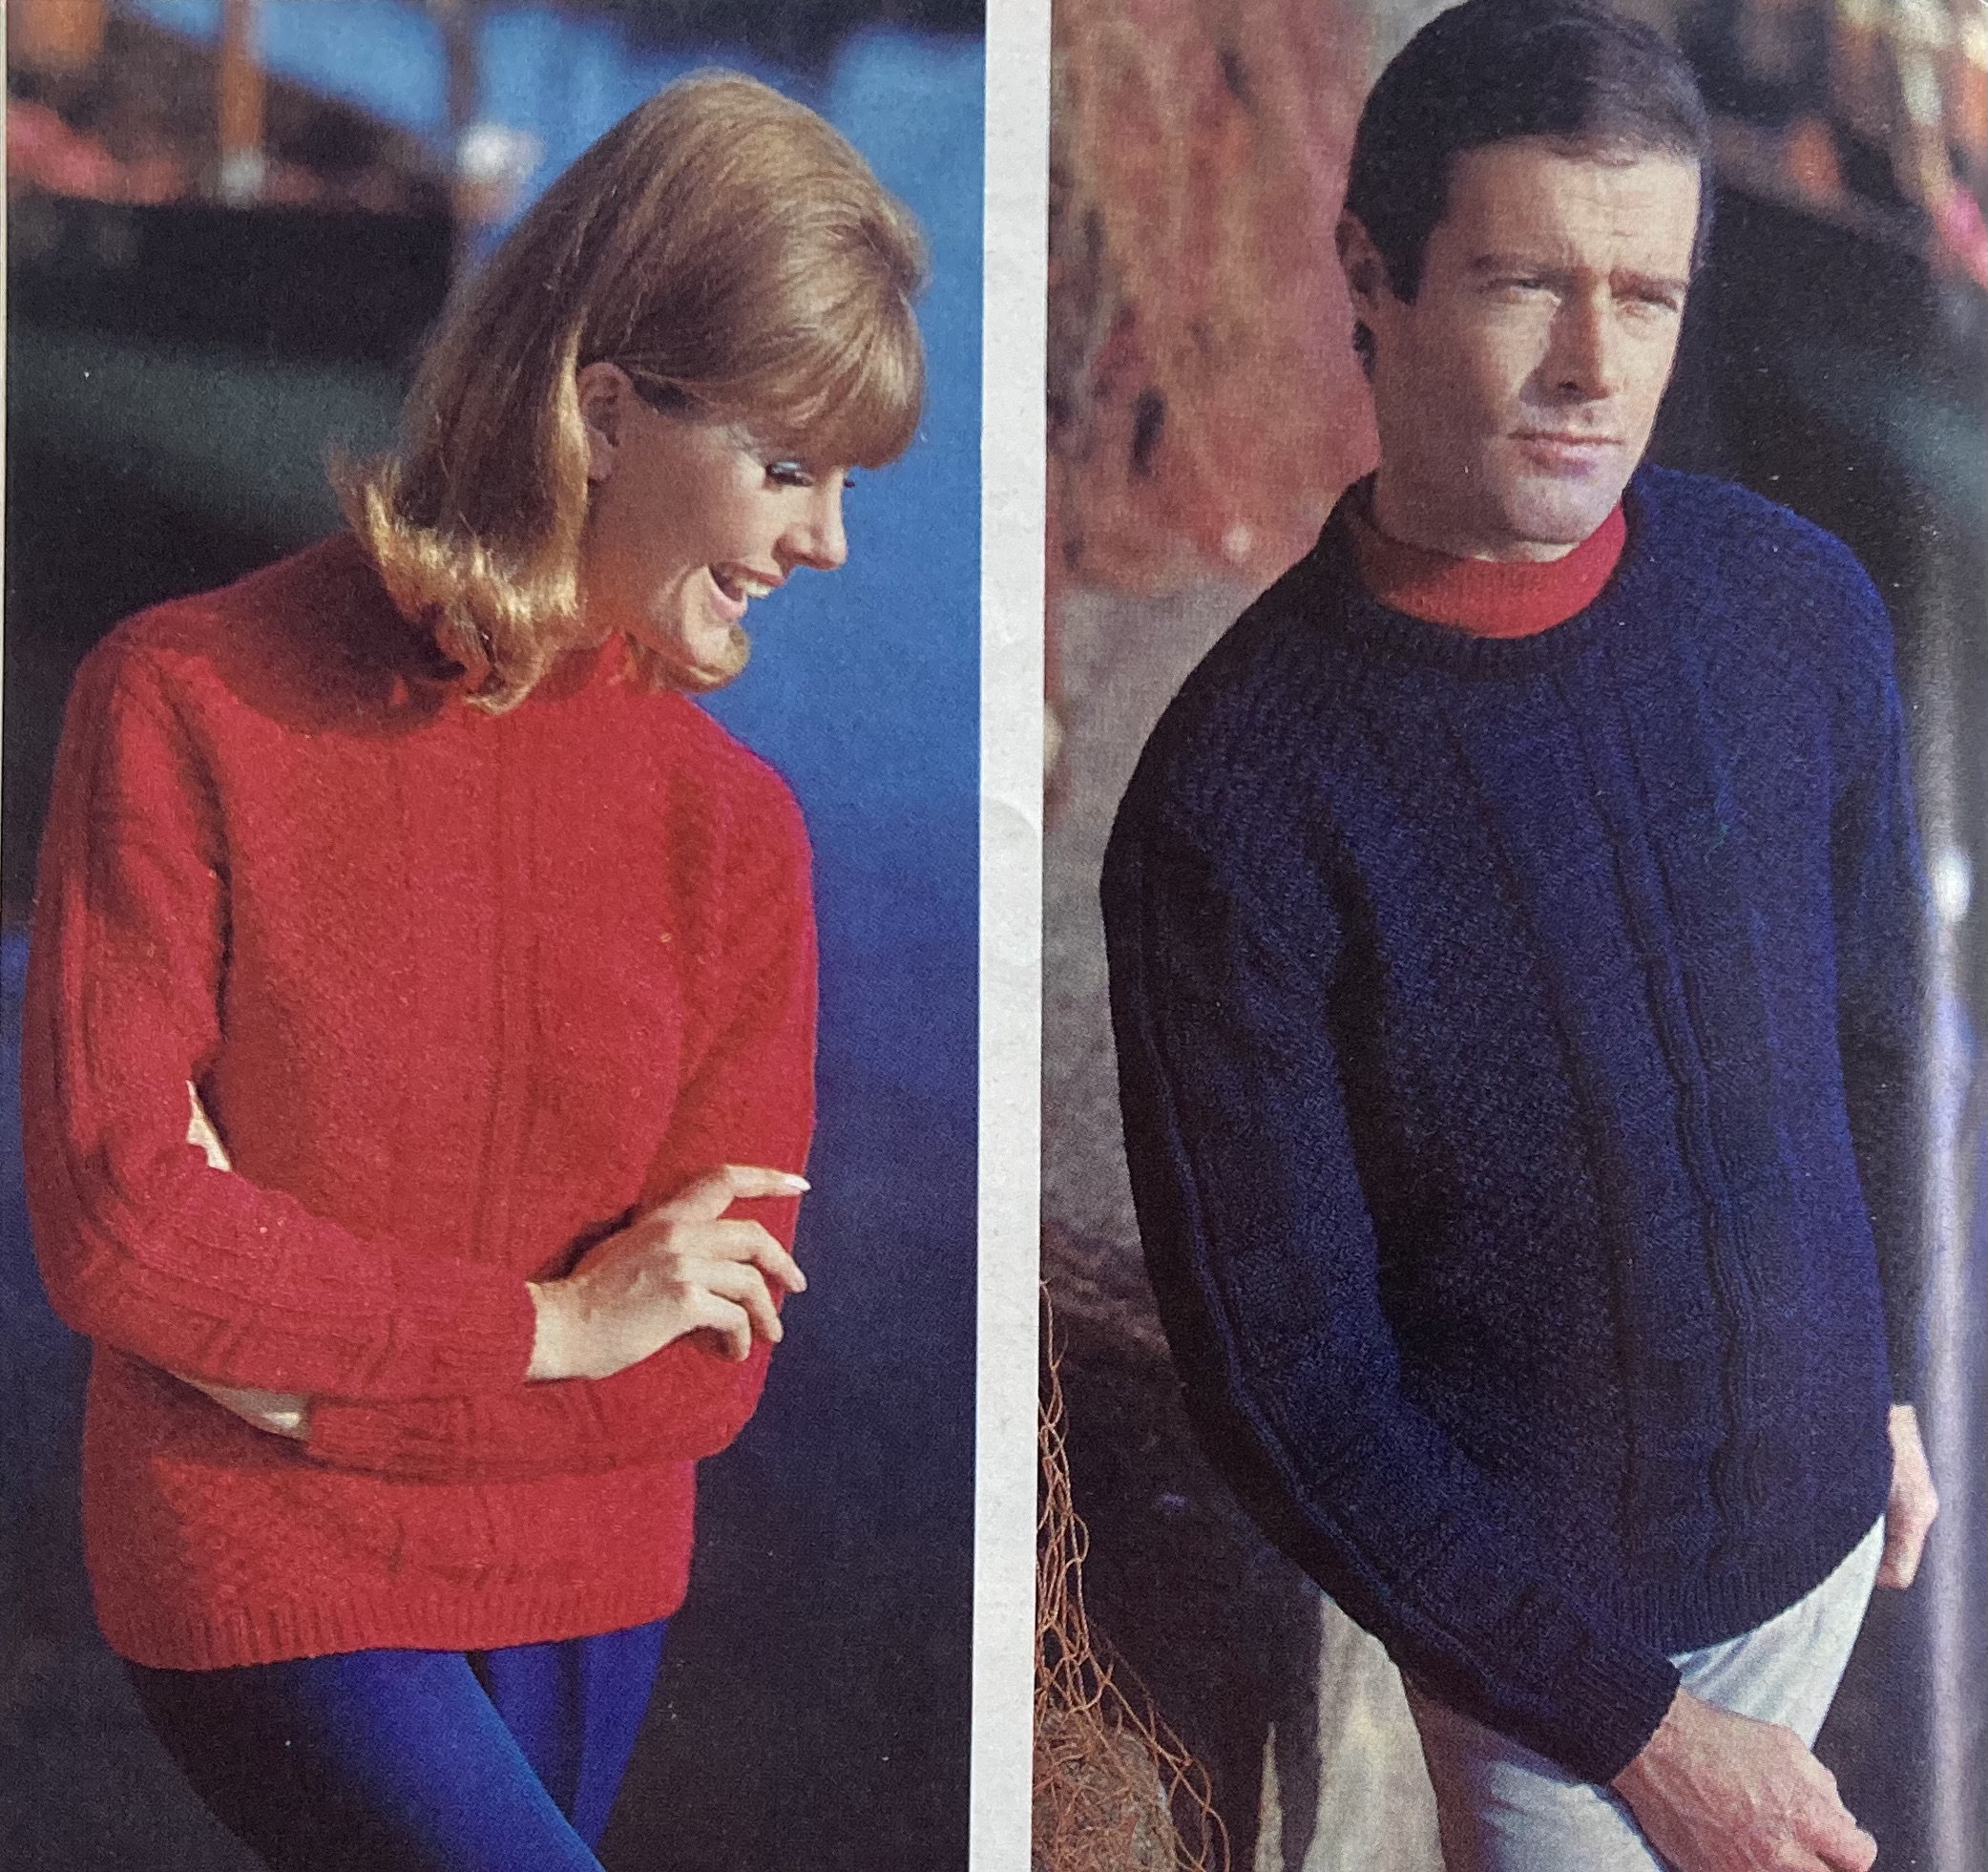
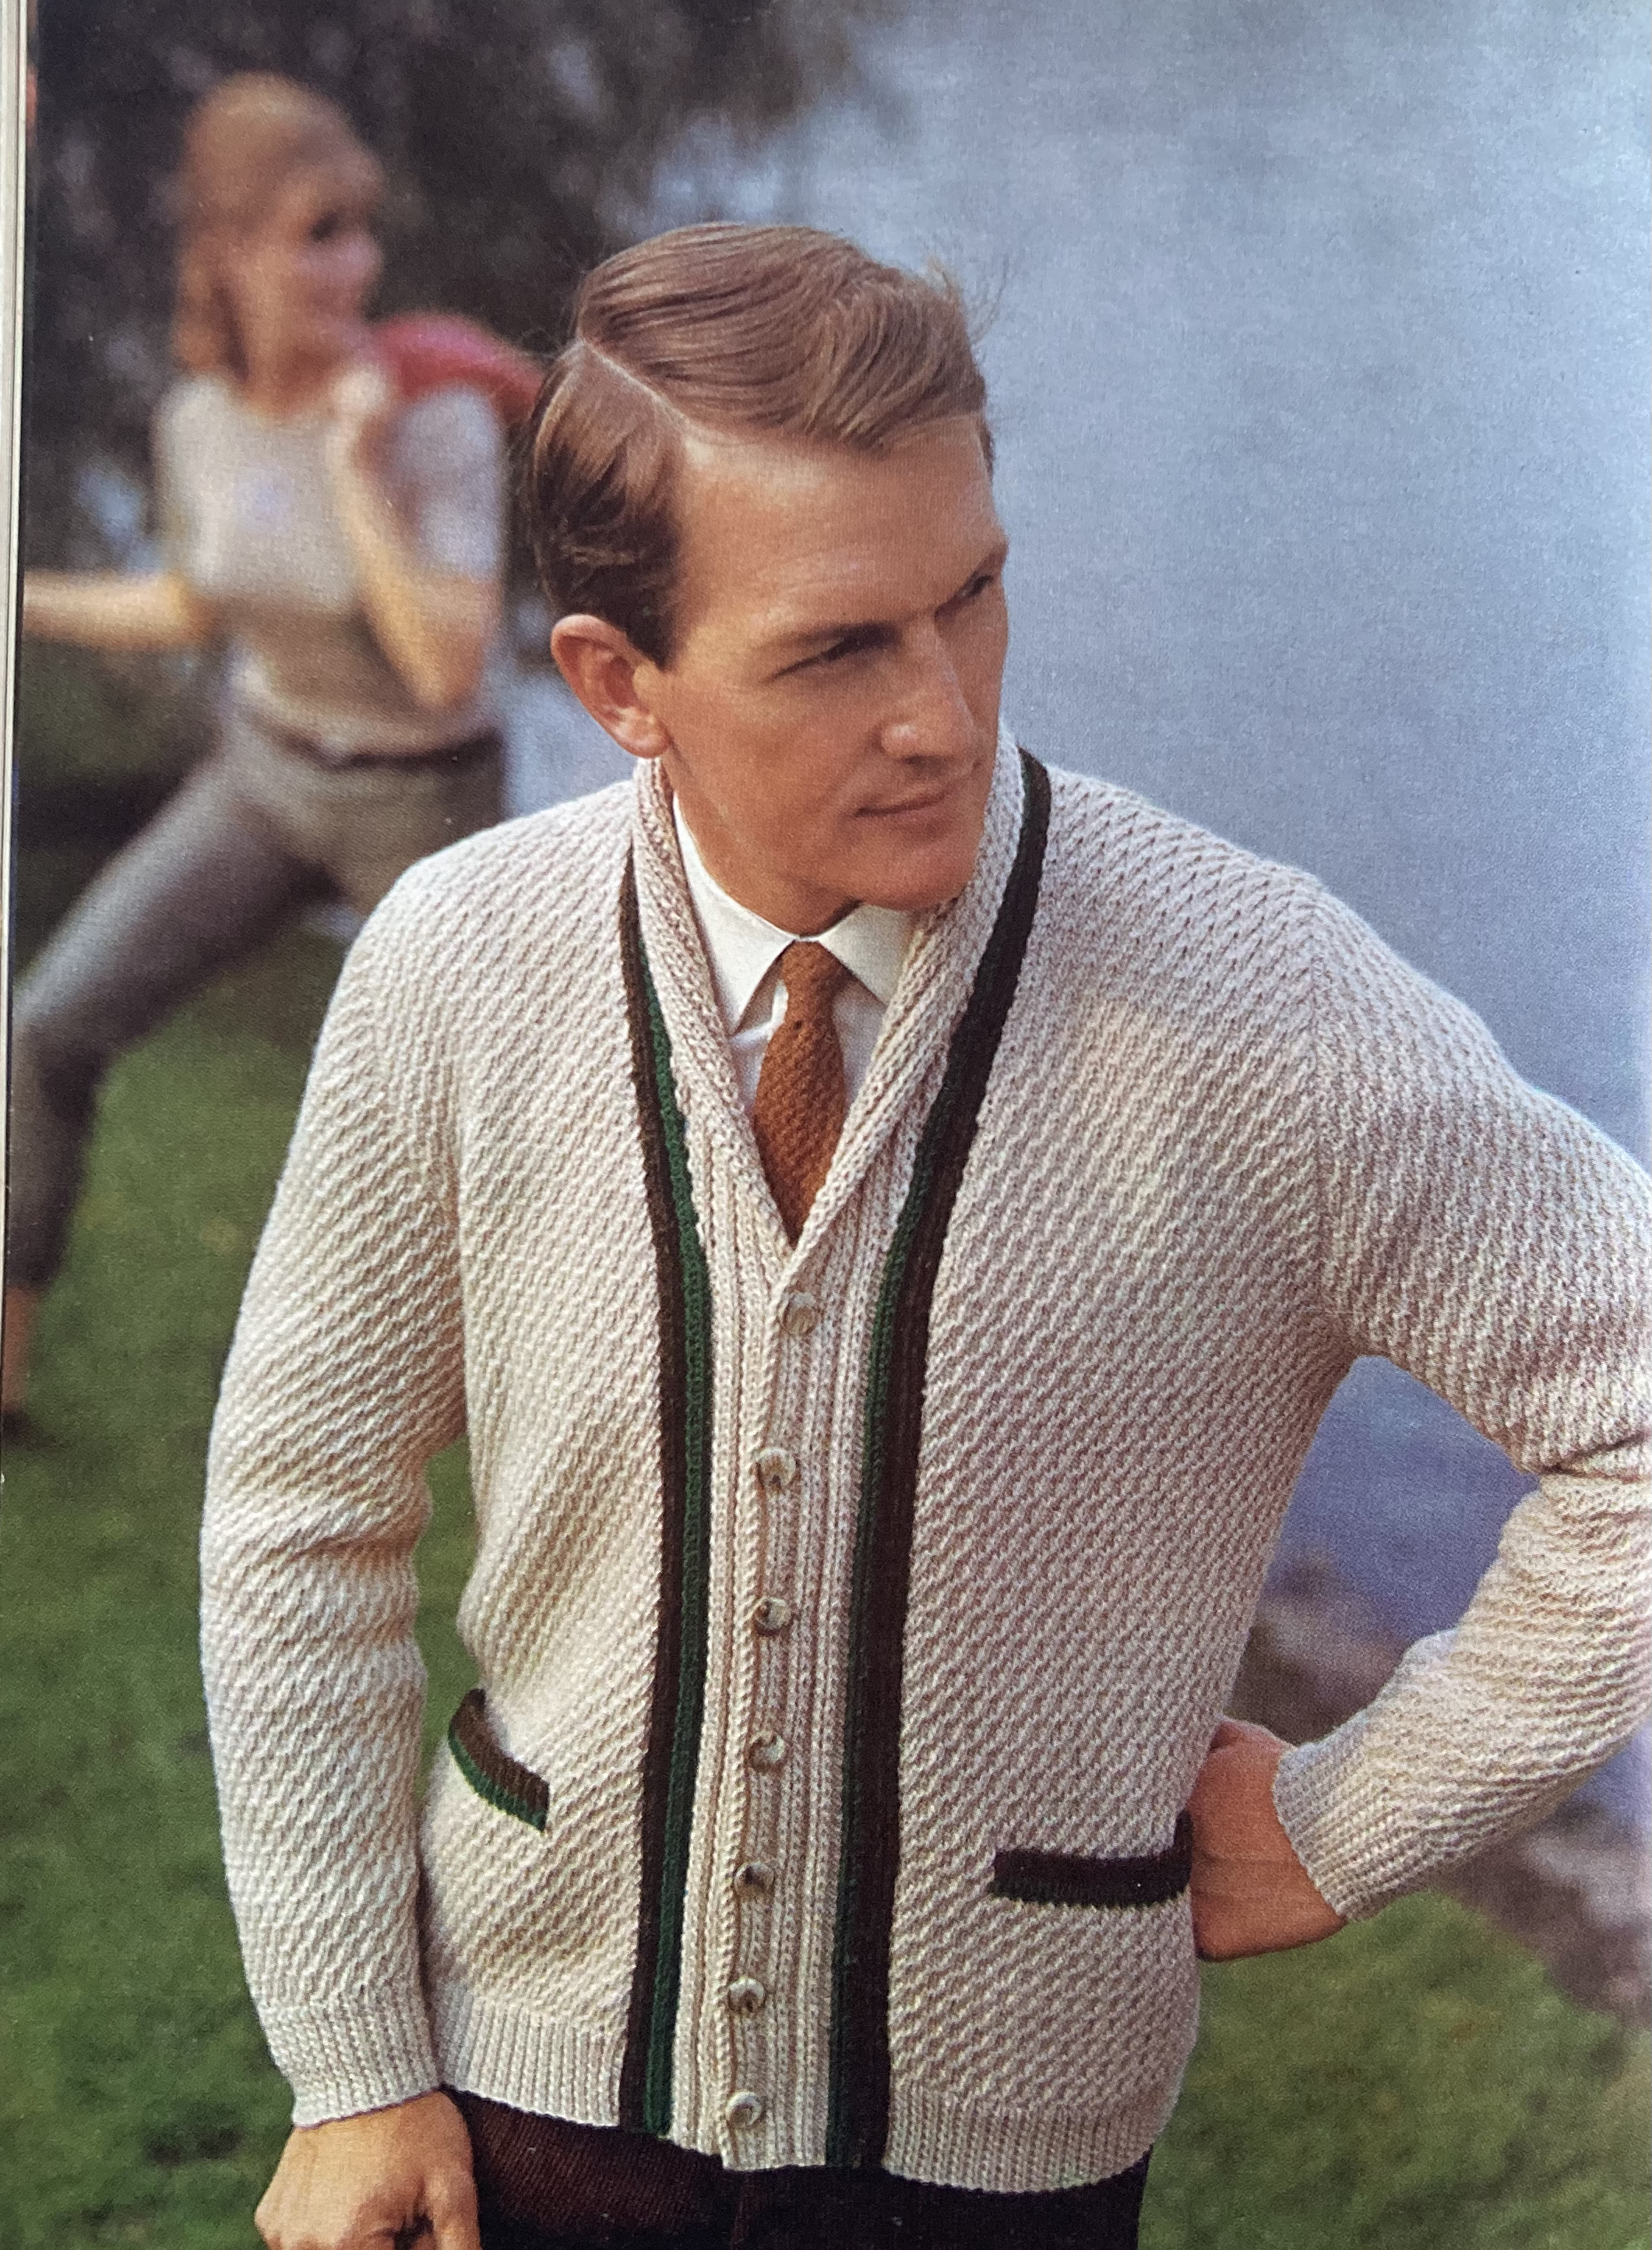
For men, there’s a his-and-hers “Two for the Country” bramble-stitch sweater to be worn indoors or out, and a softly-coloured stranded jumper in an interesting “key”-type pattern. It only uses three colours (“Banana Cream”, “French Mustard” and “Light Steel Grey”), but the pattern gives additional depth and richness.
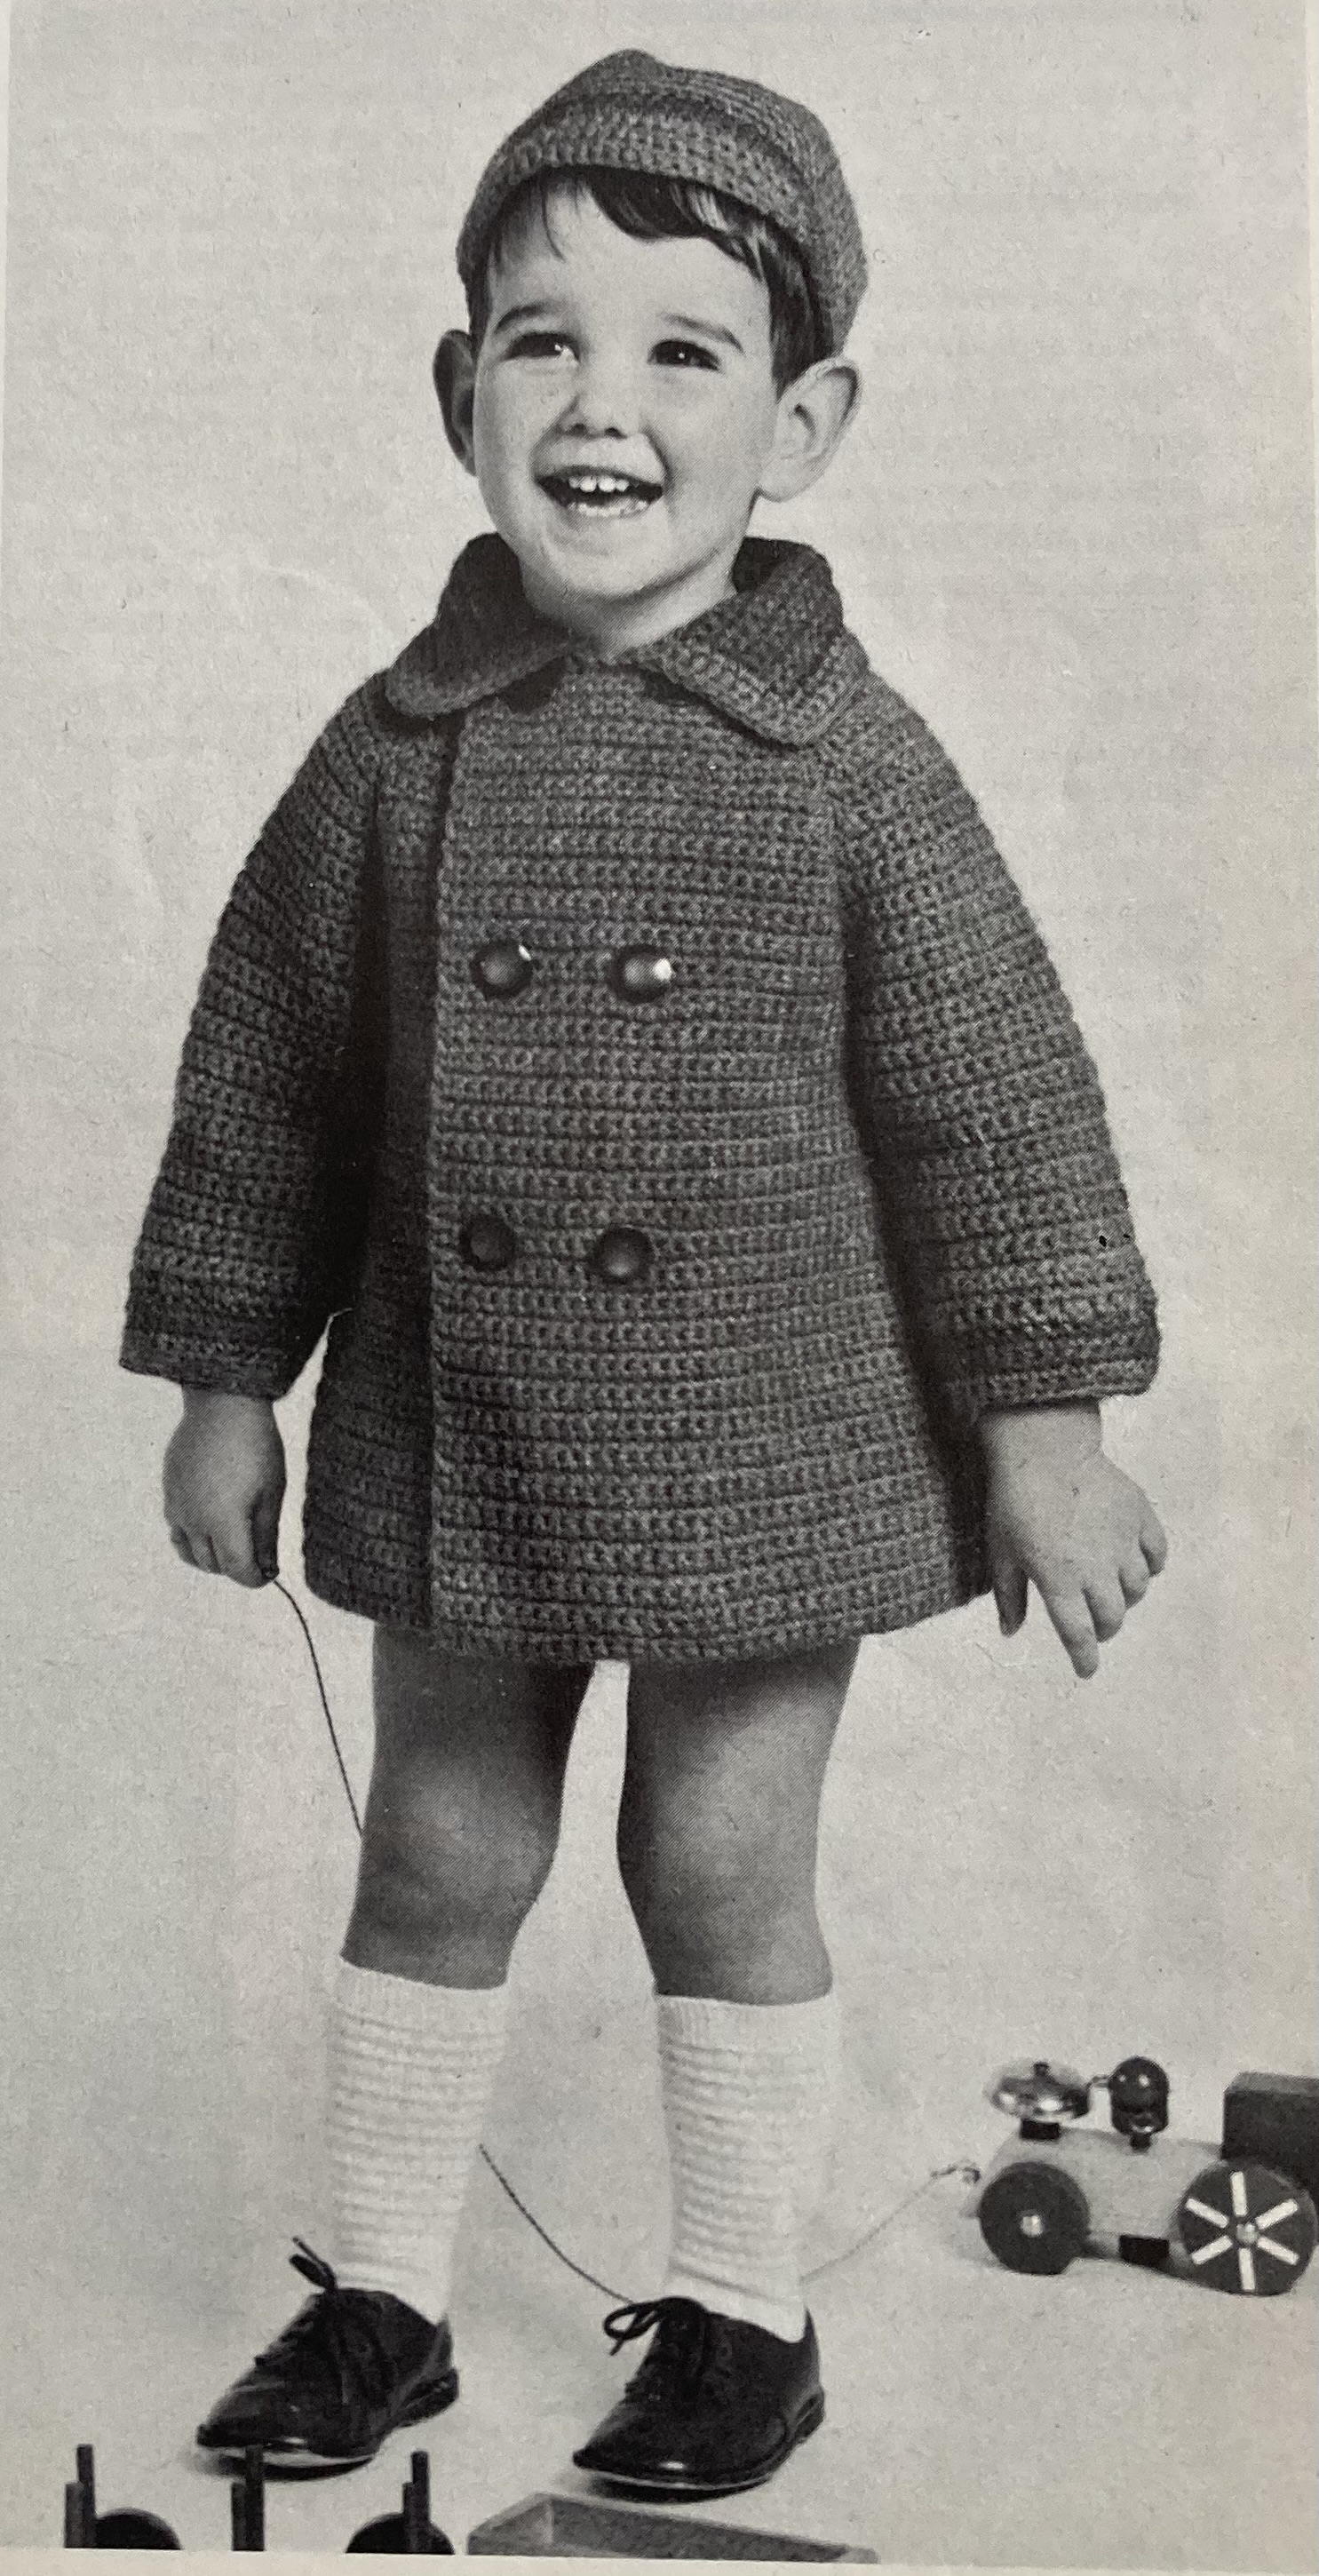
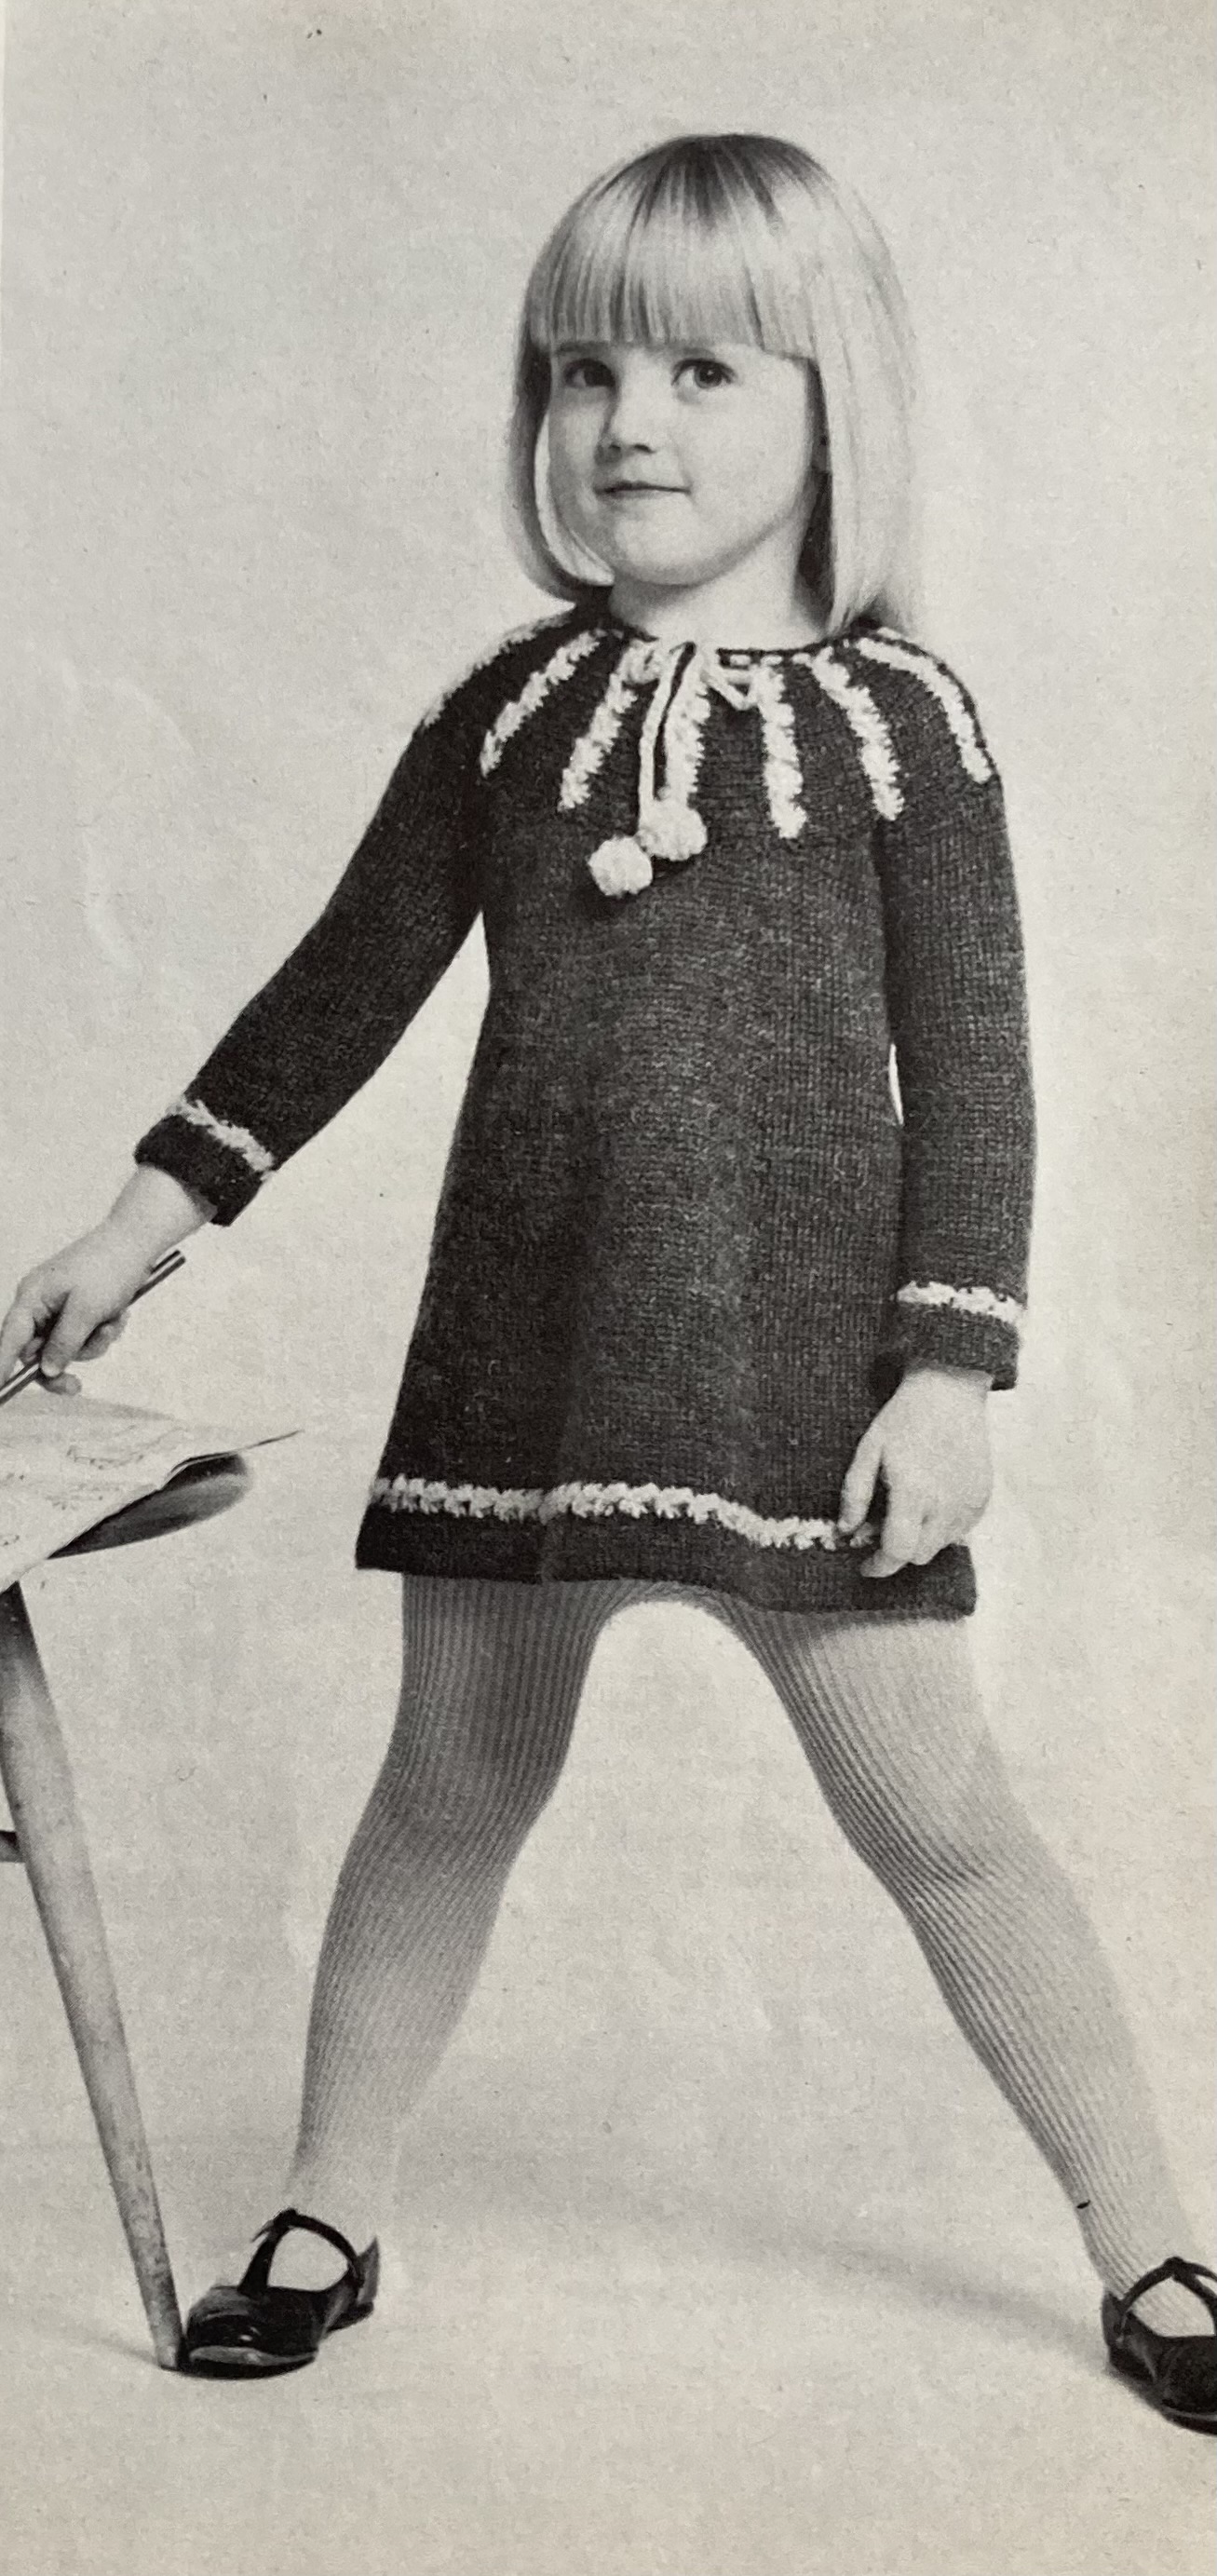
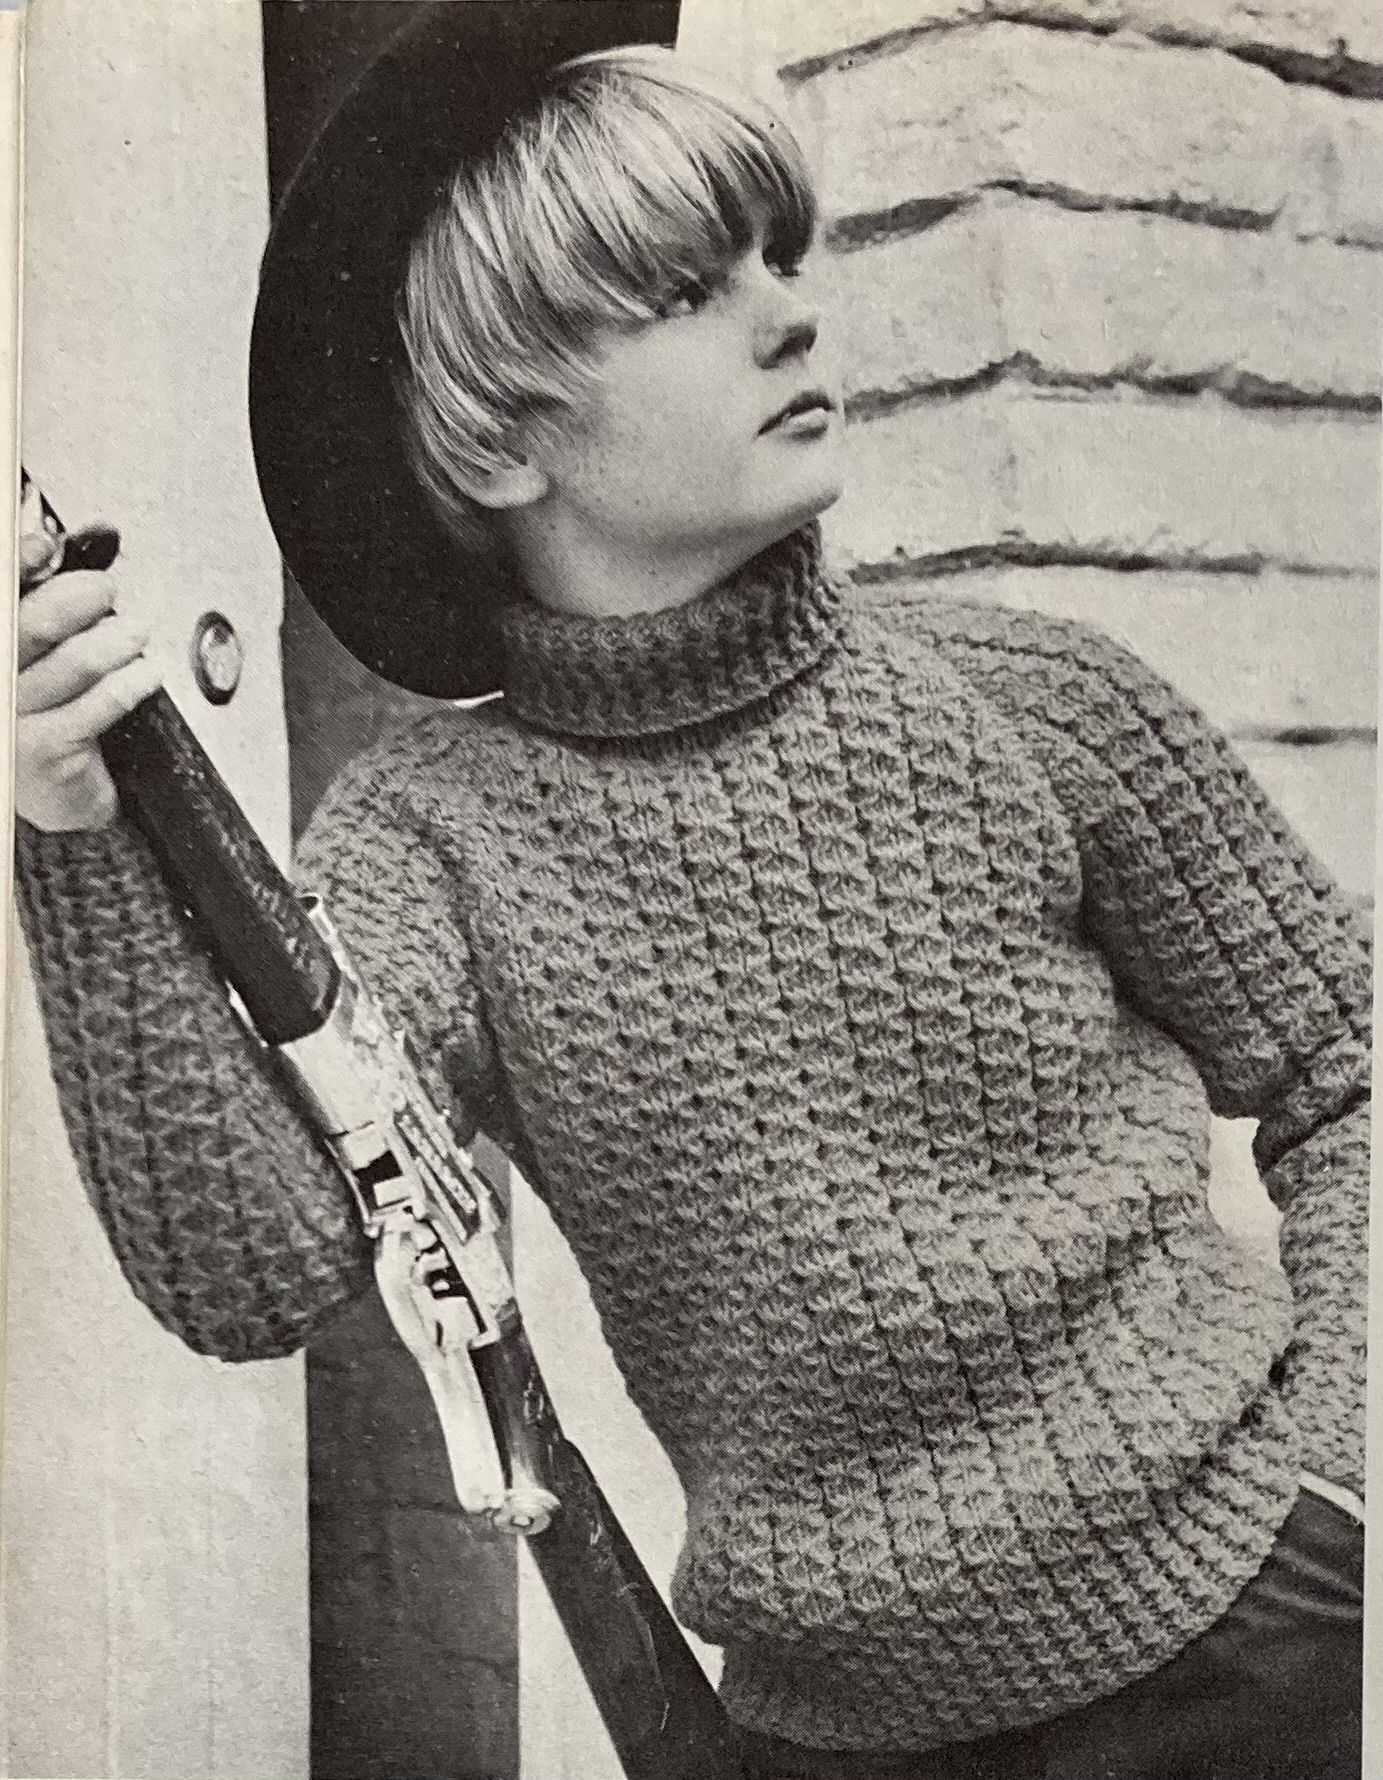
There are three patterns for children of different ages in this issue, starting with a coat-and-cap set for a little boy. I suspect he’s only looking so happy because he’s in a warm photo studio; if he ever actually went outside in that outfit, both his legs and his ears would freeze right off. I know if was customary to dress little boys in shorts at the time, but this poor kid doesn’t even seem to have those! How on earth is he supposed to play in the snow with a practically bare bum? At least the little girl gets to wear tights with her mini-dress/tunic this time, and since it is “for visiting”, I assume she will be wearing it inside. The circular yoke of the tunic is knitted horizontally and sewn on, and the white stripes are made by dropping stitches and picking them up later. The third design is a great indoor-outdoor sweater for a slightly older child, in thick “Capstan” wool and a twisted-stitch pattern that presumably acts as s sort of thermal blanket to keep warm.
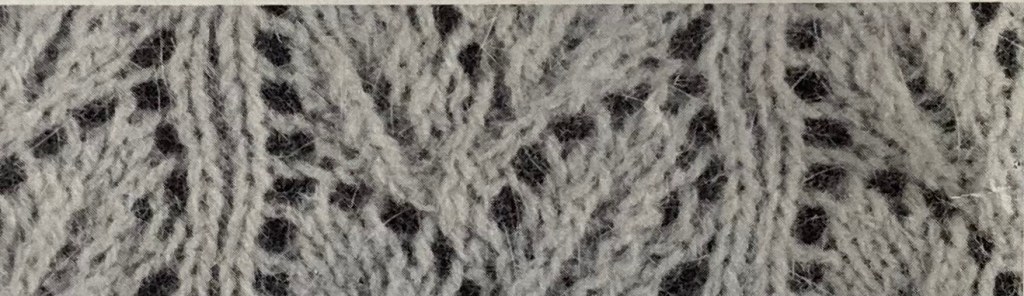
One nice thing about this issue is that there are extra close-up photos of the more interesting stitch patterns:
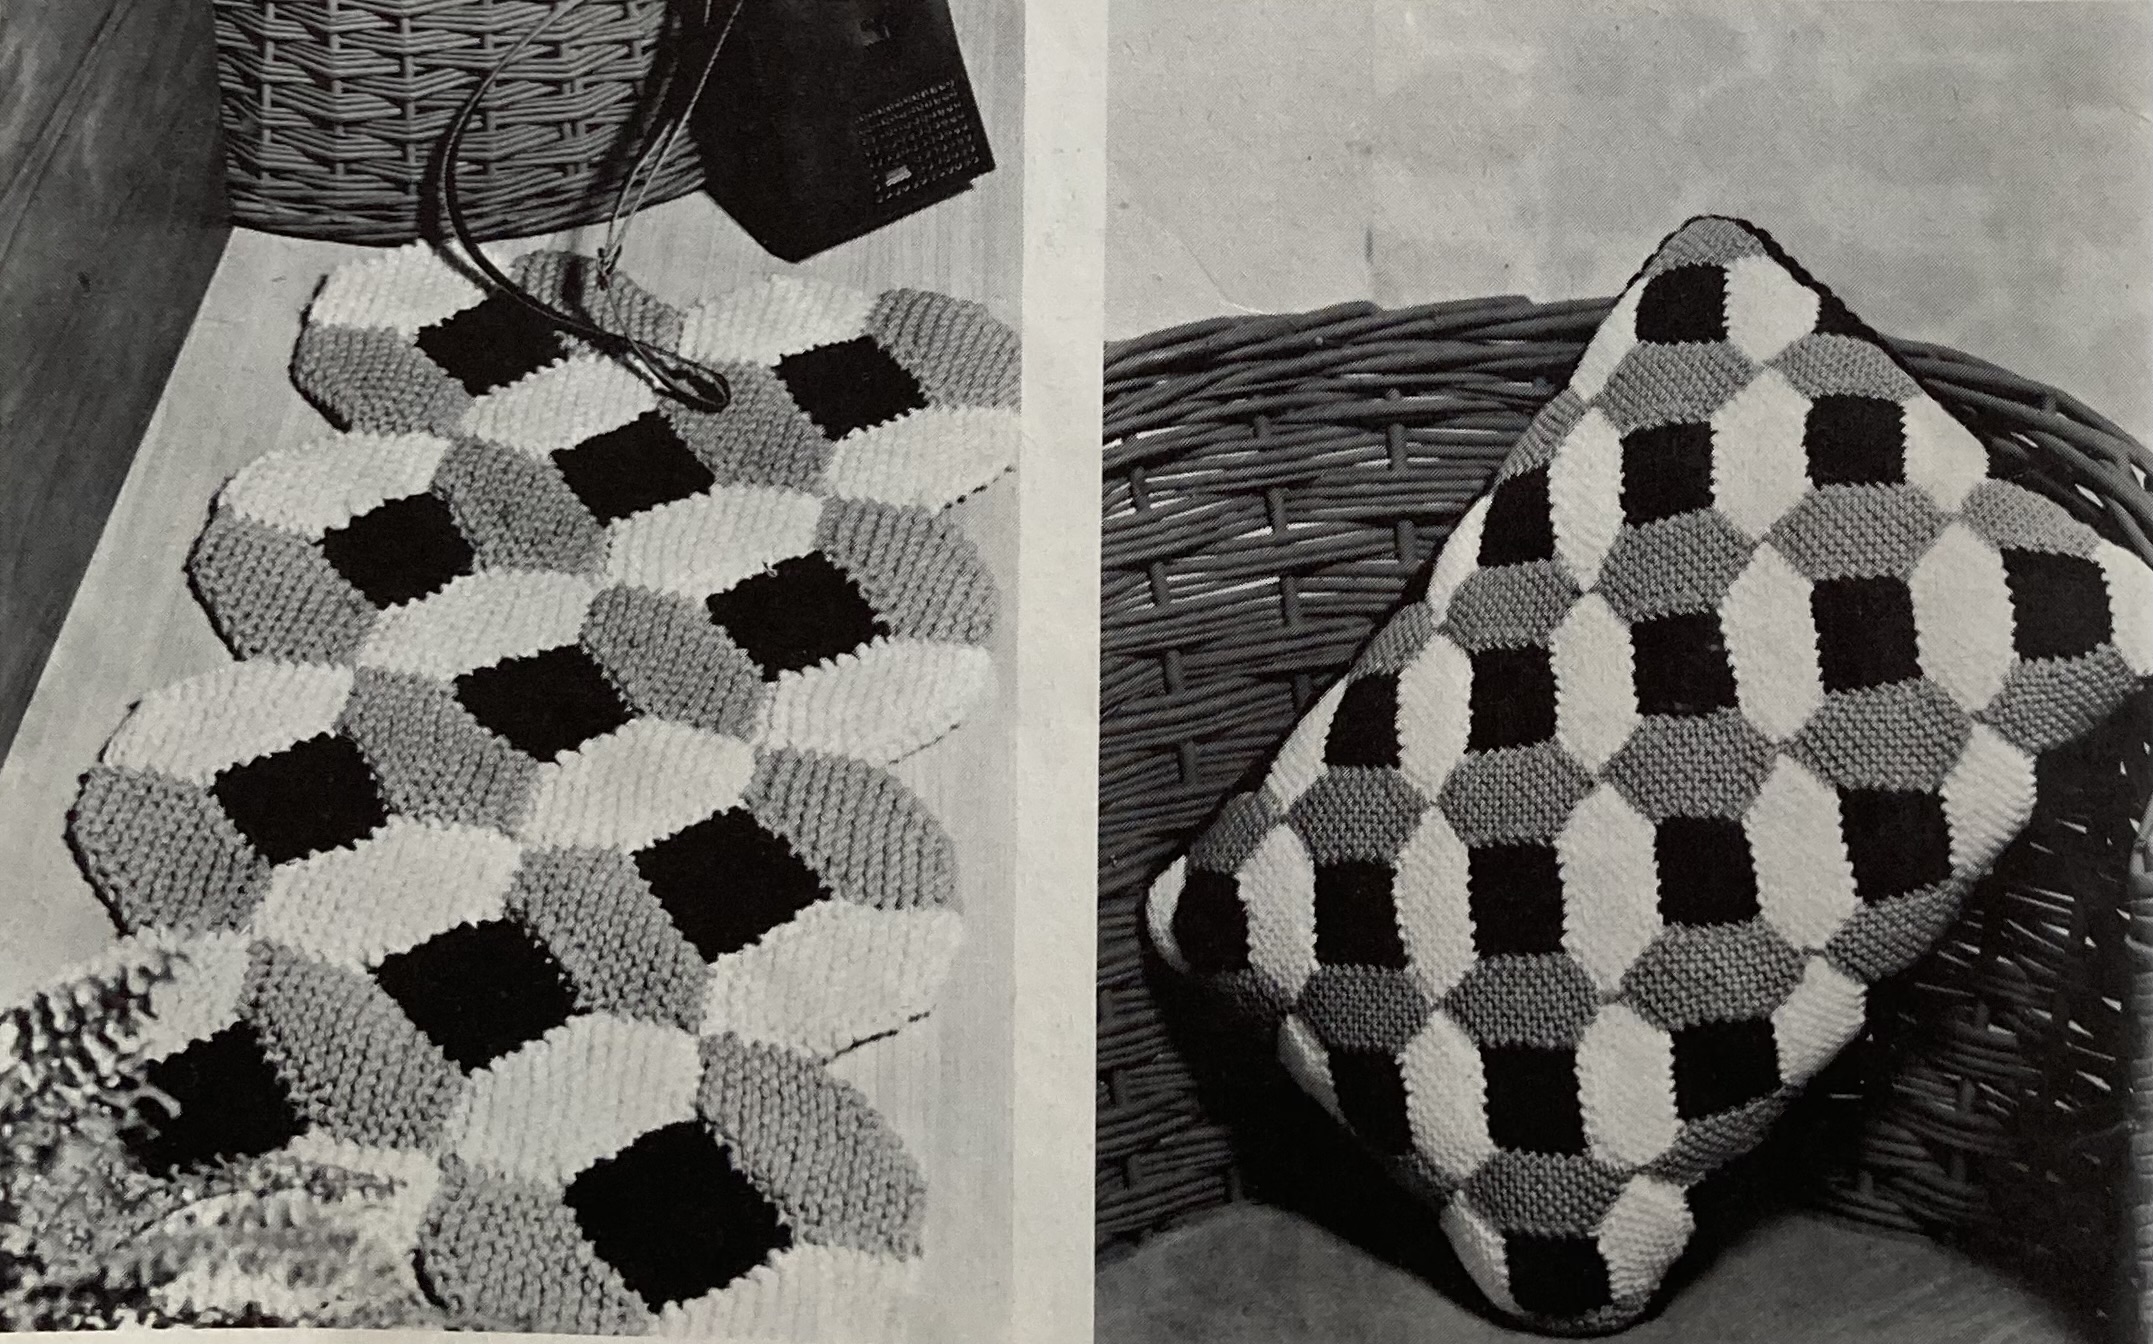
Most of the housewares in this issue are advertised as “Easter Gifts”, though I see no connection to the the patchwork rug and cushion, or the embroidered cushion and chairback.
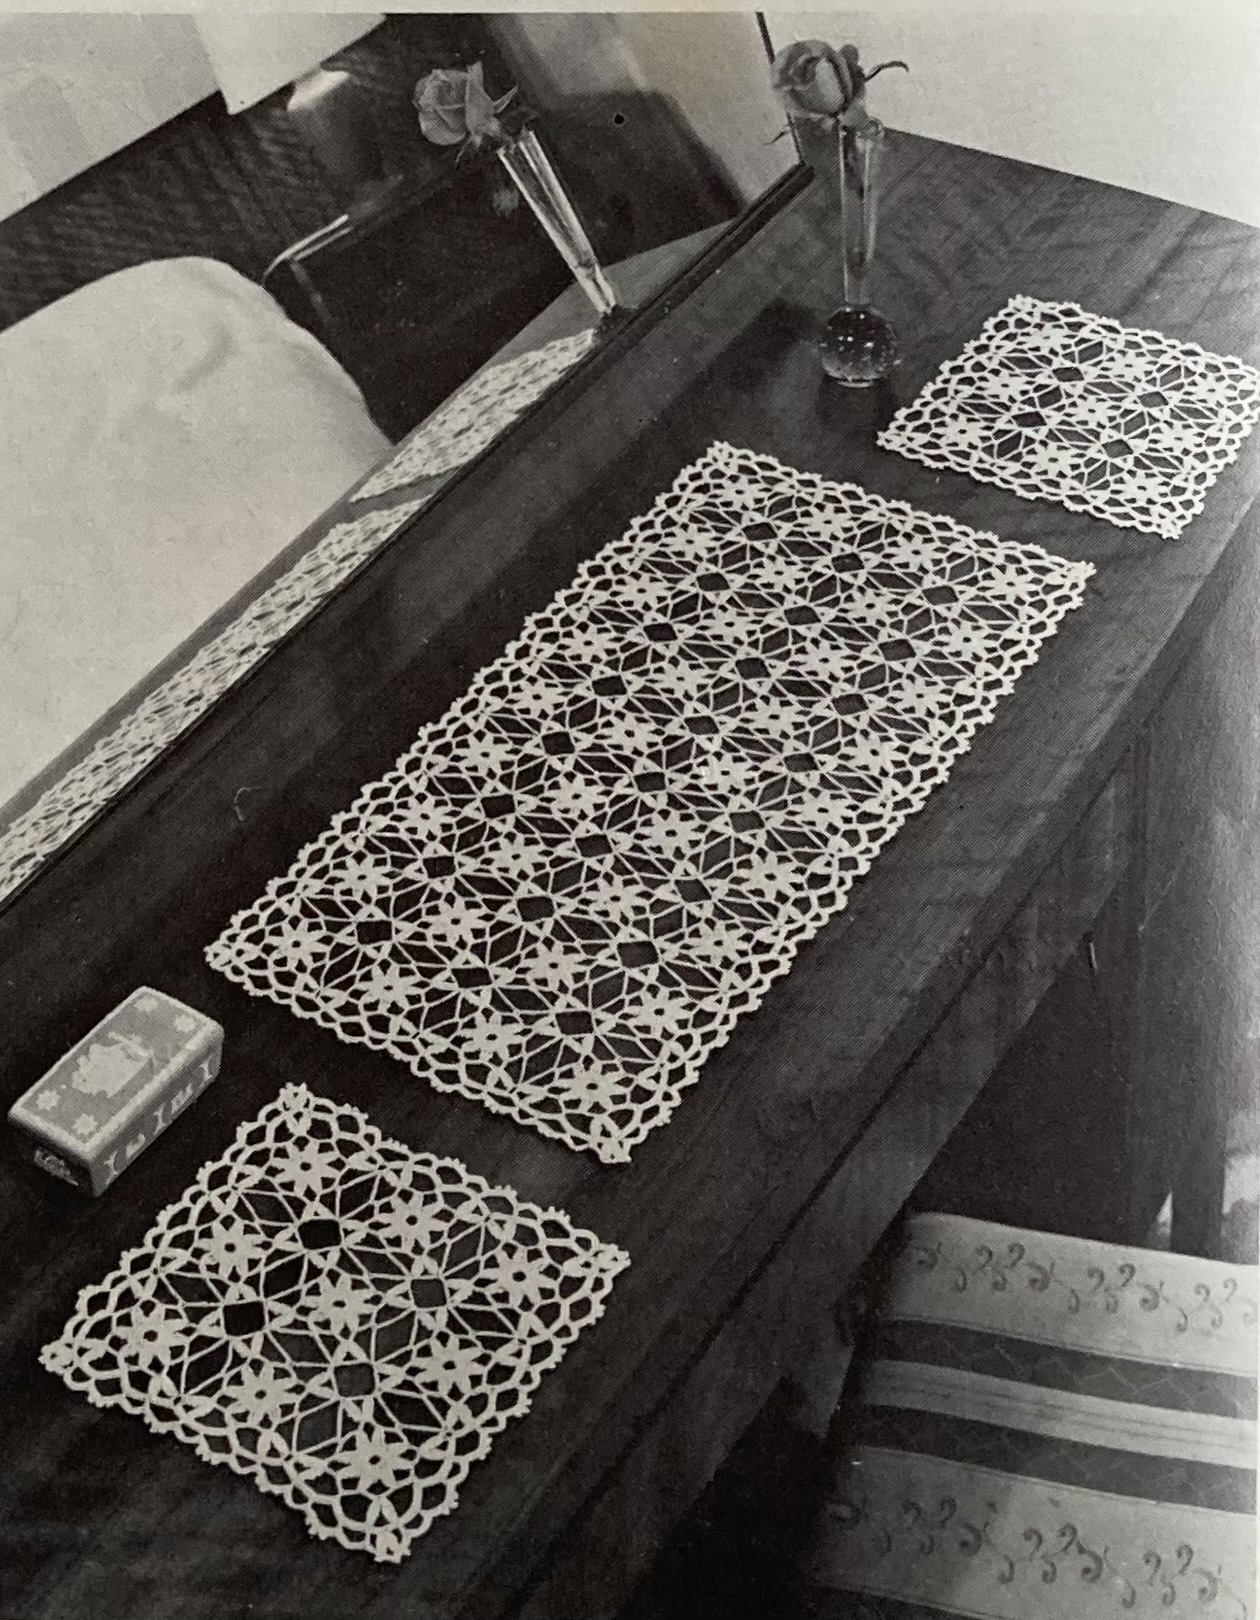
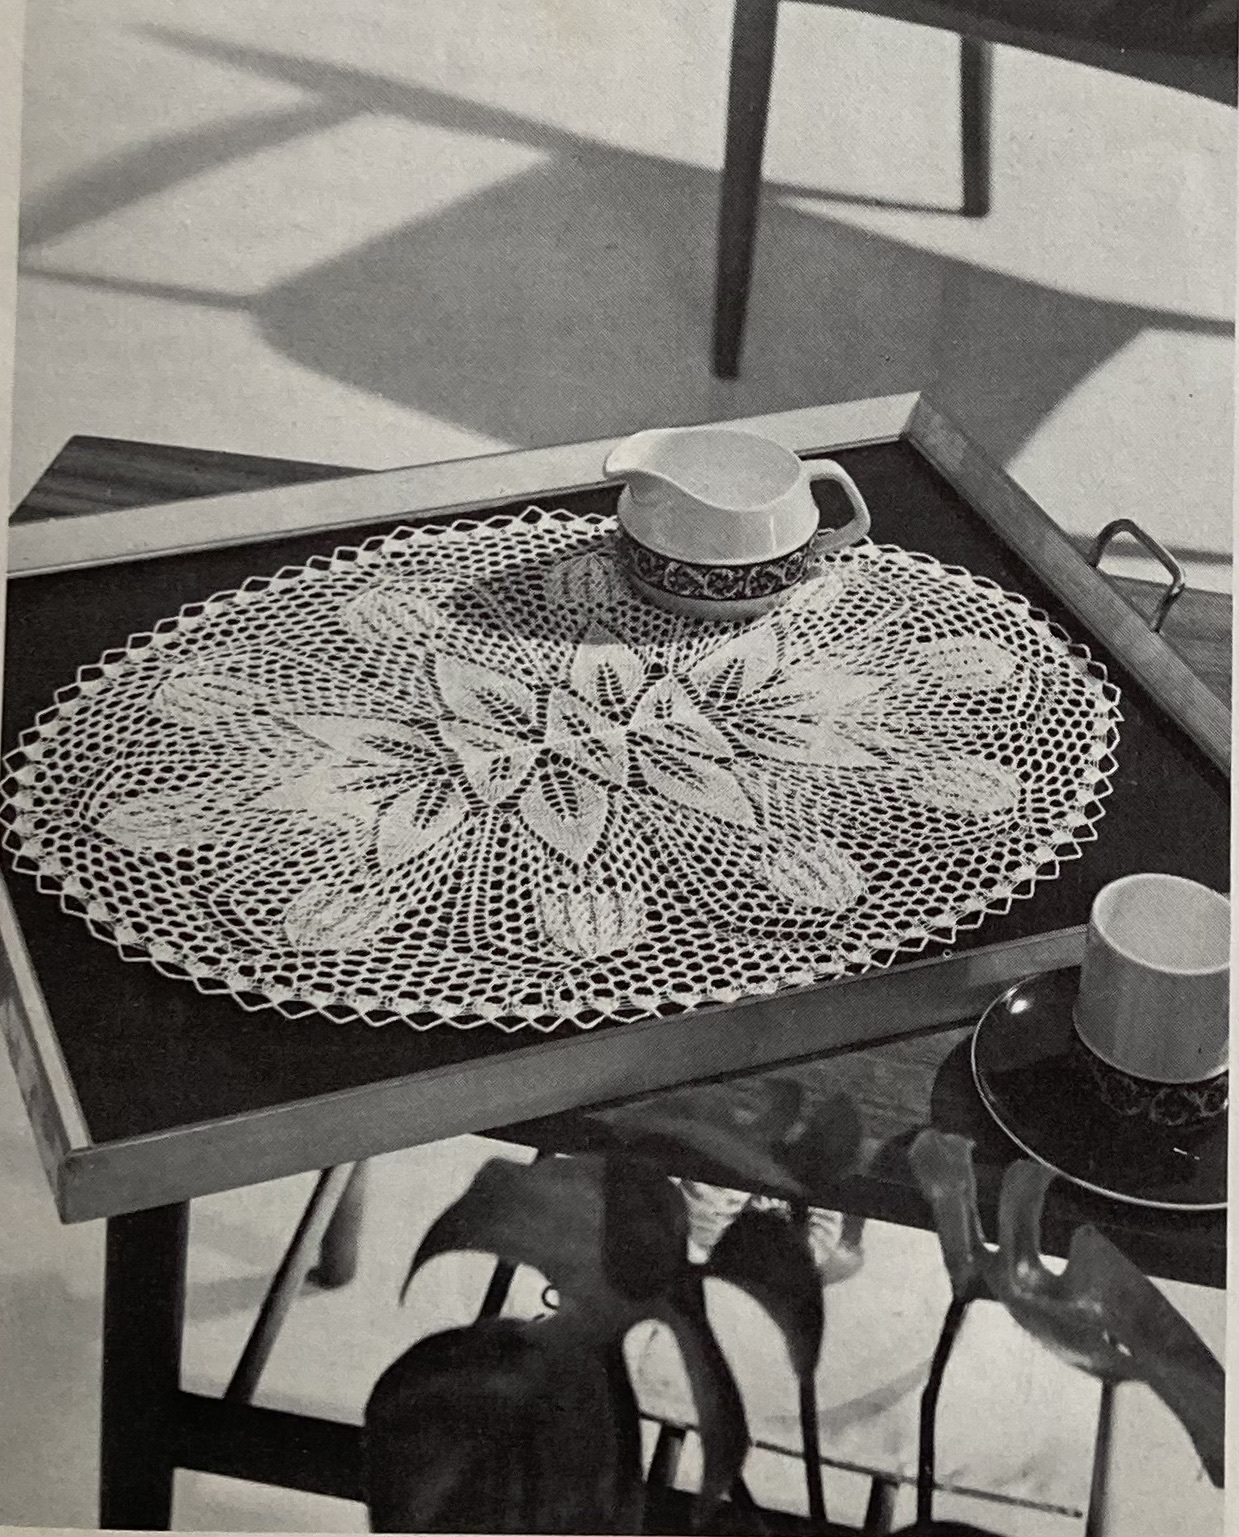
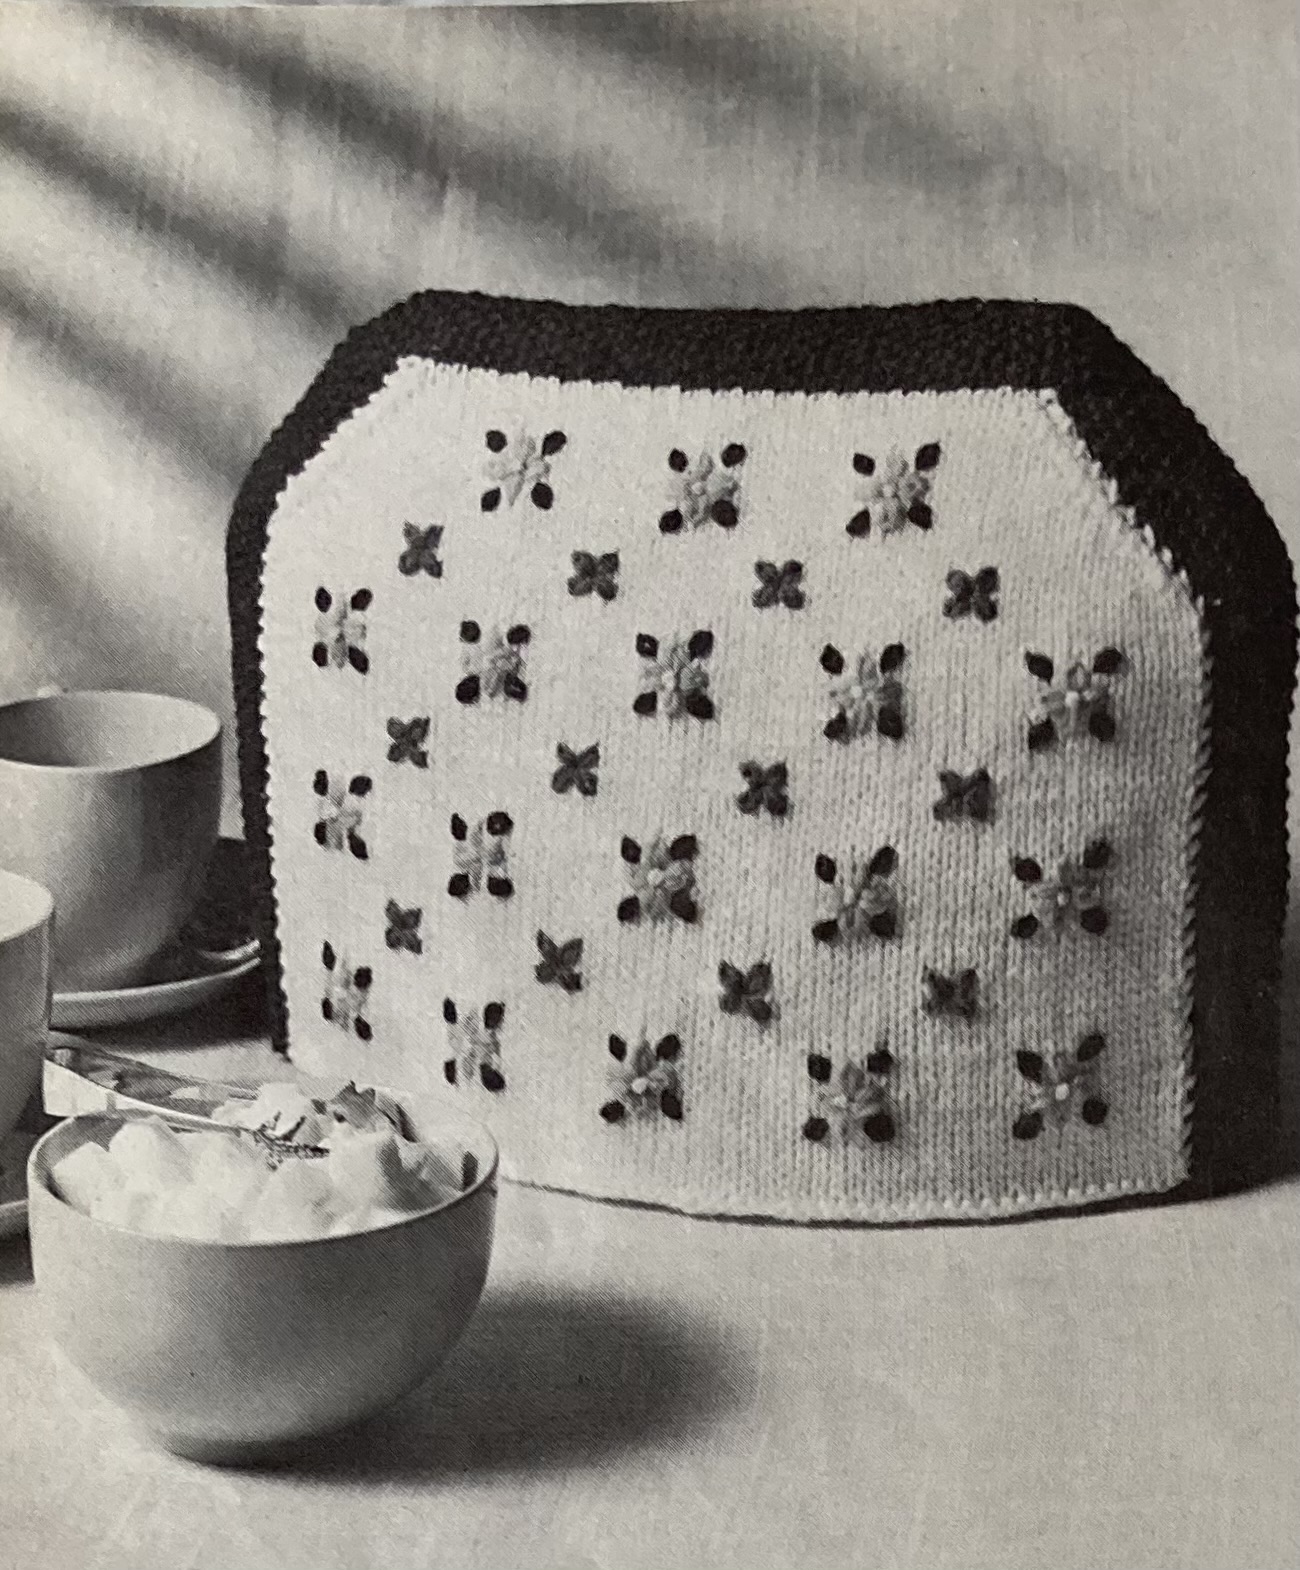
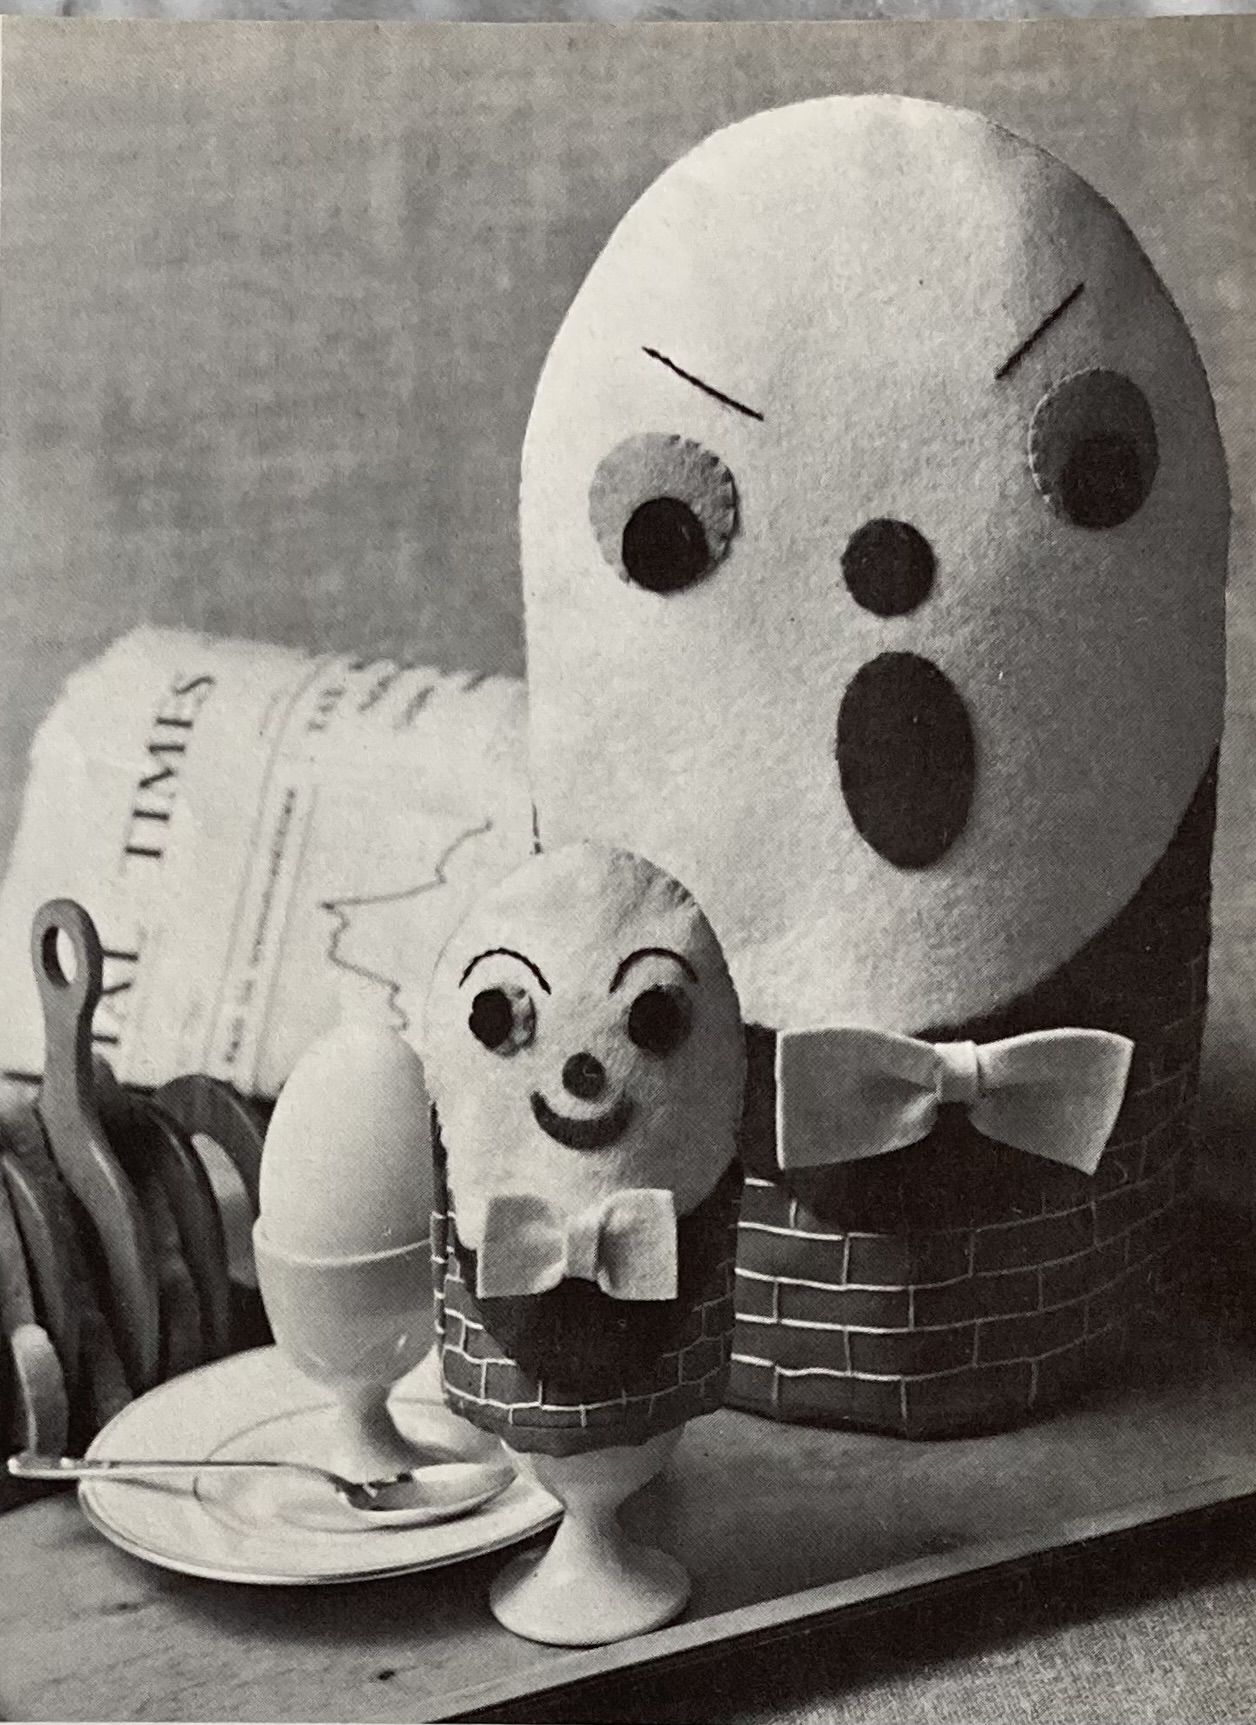
The elaborate crocheted or knitted doilies as well as the knitted tea cosy have floral patterns, but still no real connection to the holiday. I guess the “Humpty Dumpty” coffee-pot and egg cosies could accompany your Easter breakfast, if they don’t put you off it entirely! Stitchcraft is obsessed with Humpty Dumpty. Over the years, there have been egg cosies, stuffed toys, Christmas tree ornaments… I admire the creativity and the artistic commitment to a theme, but I do wonder. If you know why the egg cosy is happy and the coffee pot is angry, please tell me in the comments!
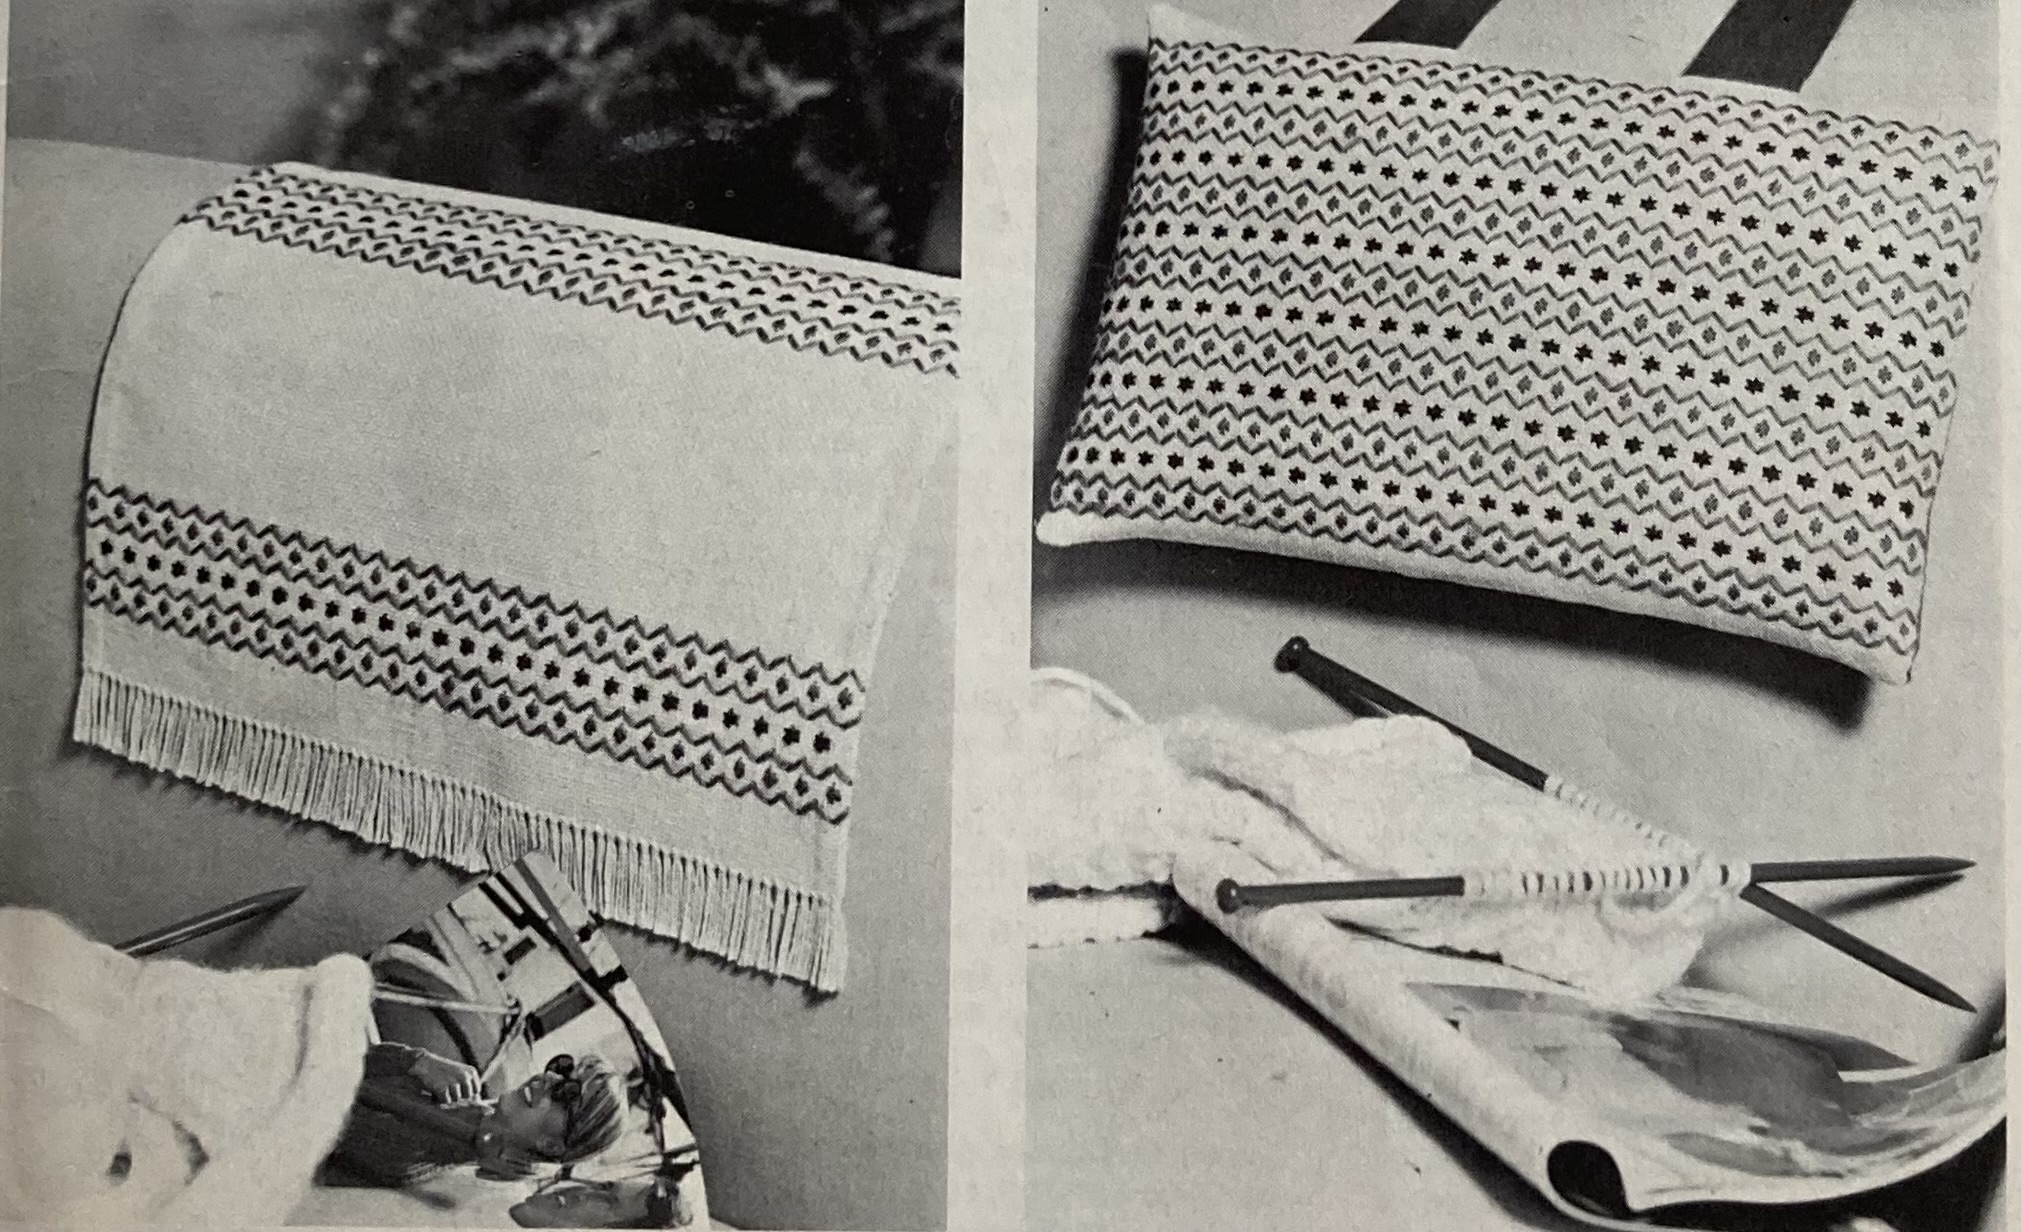
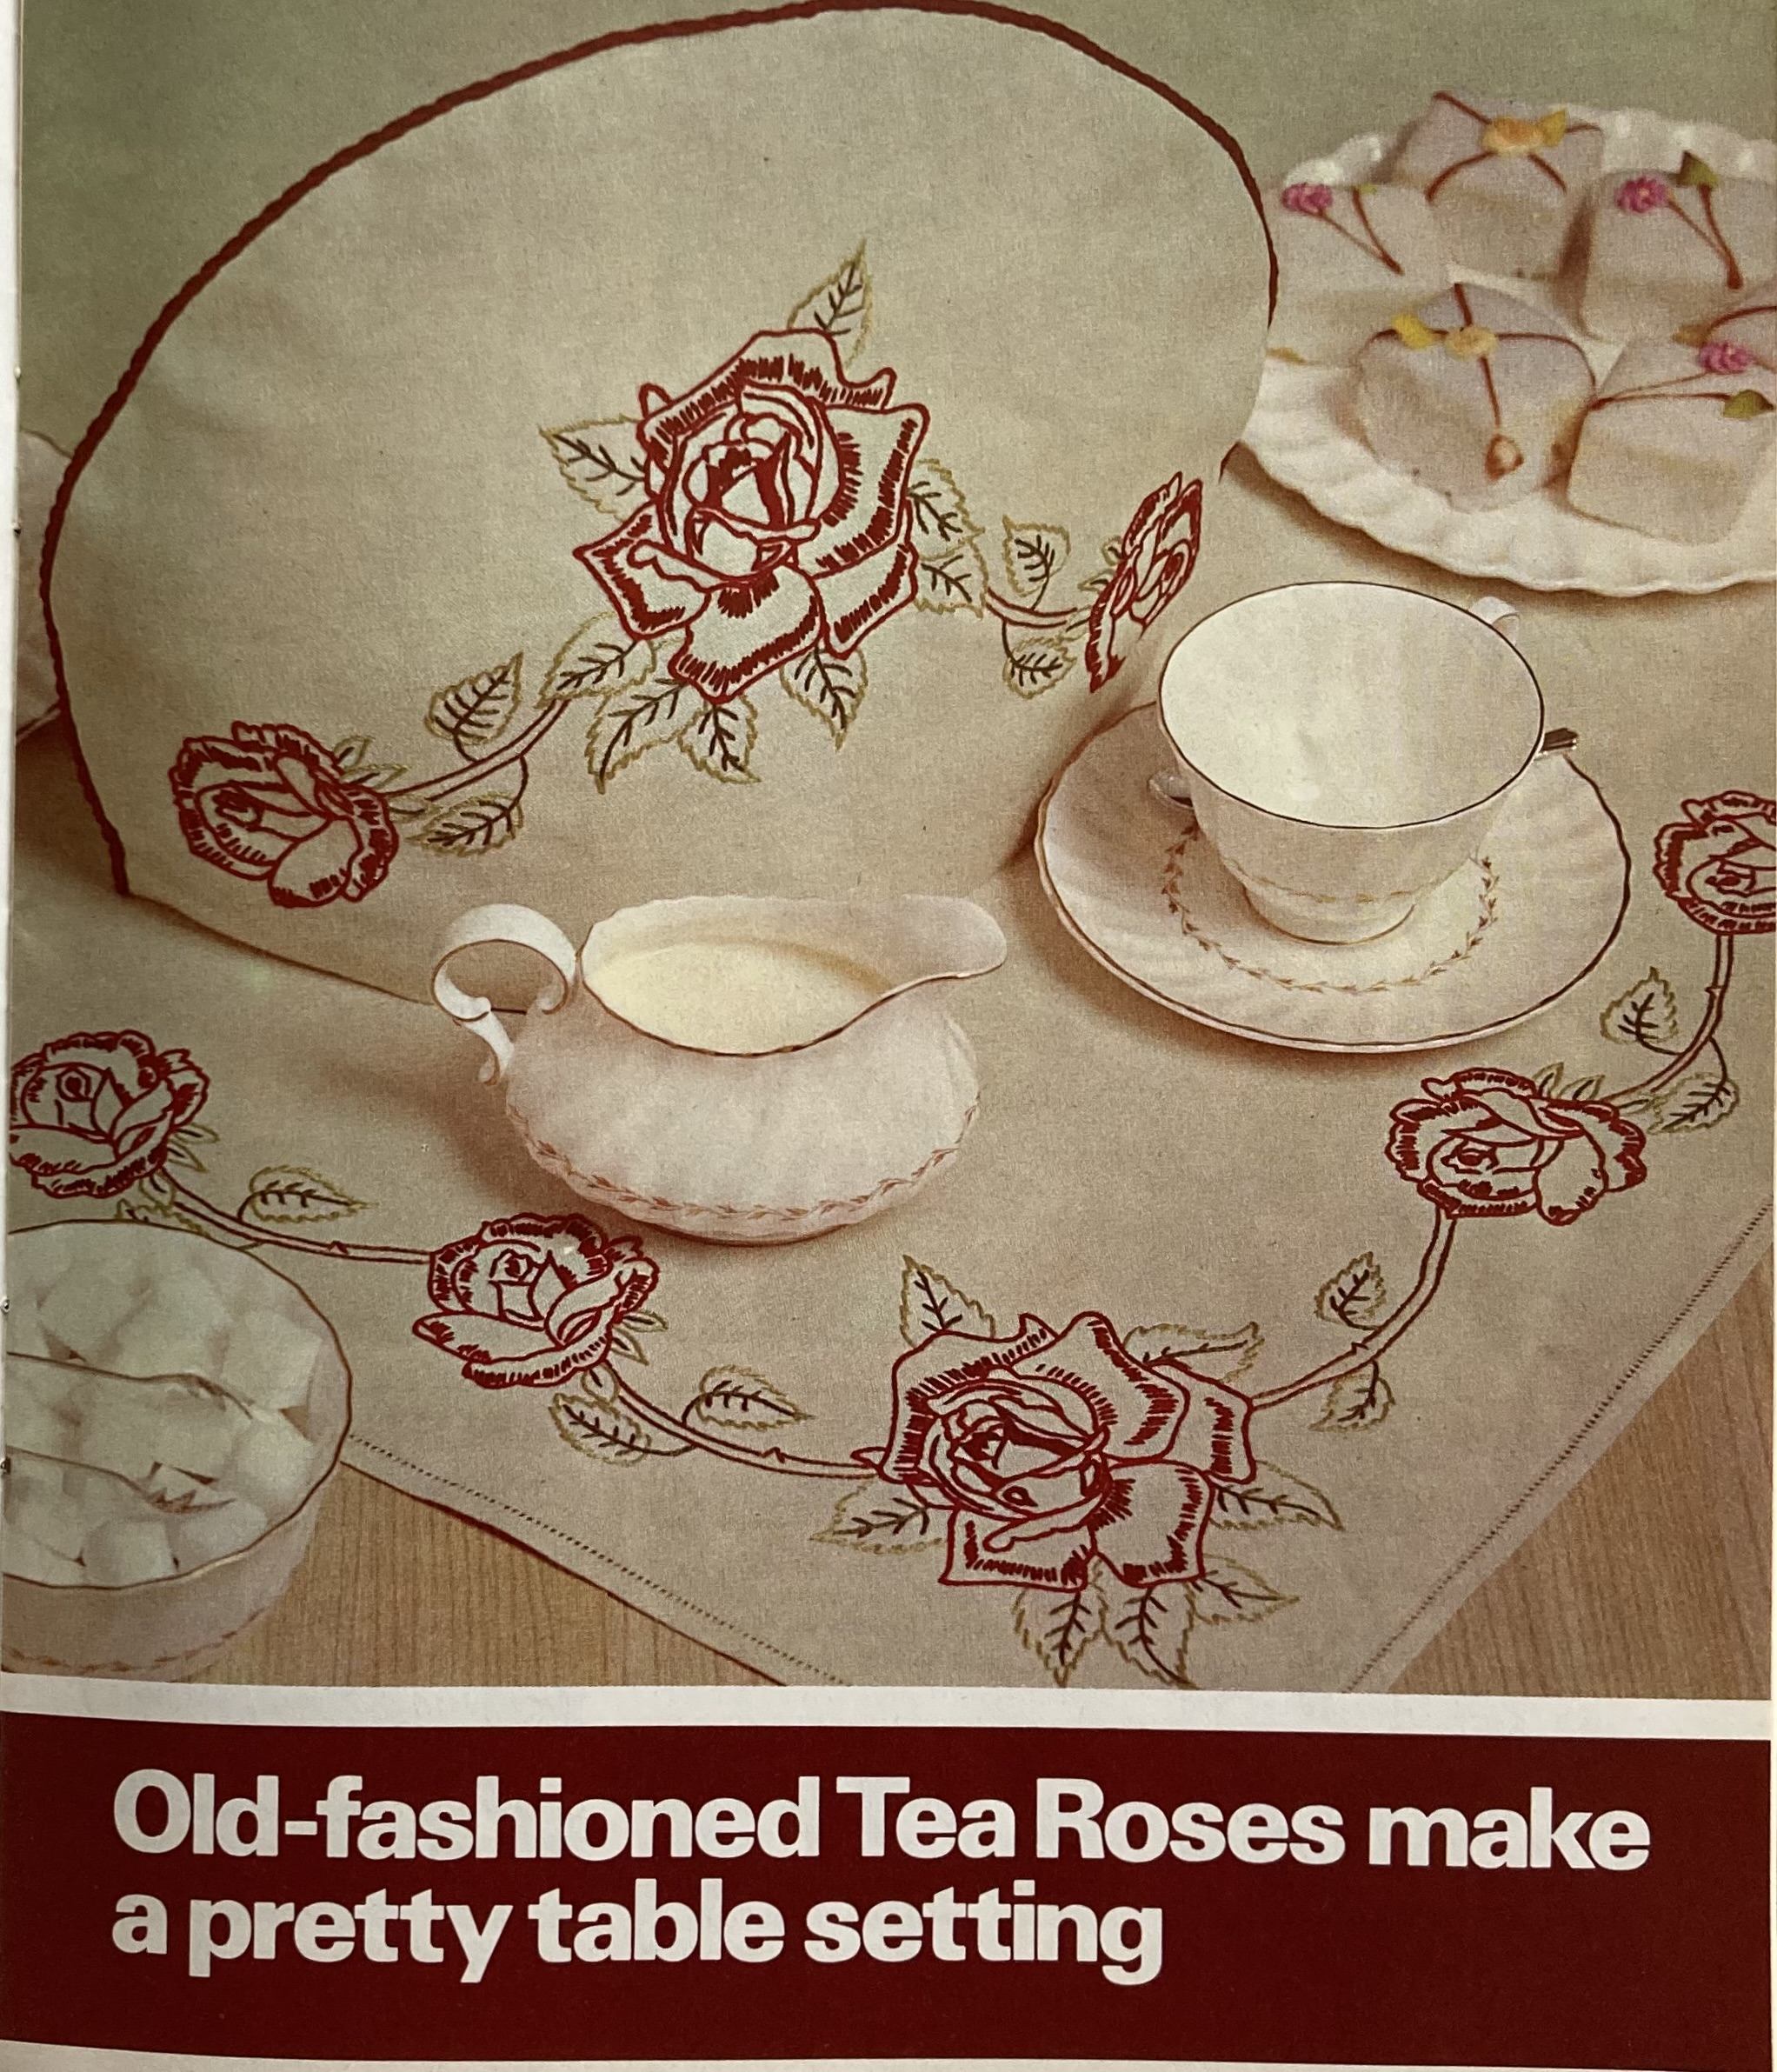
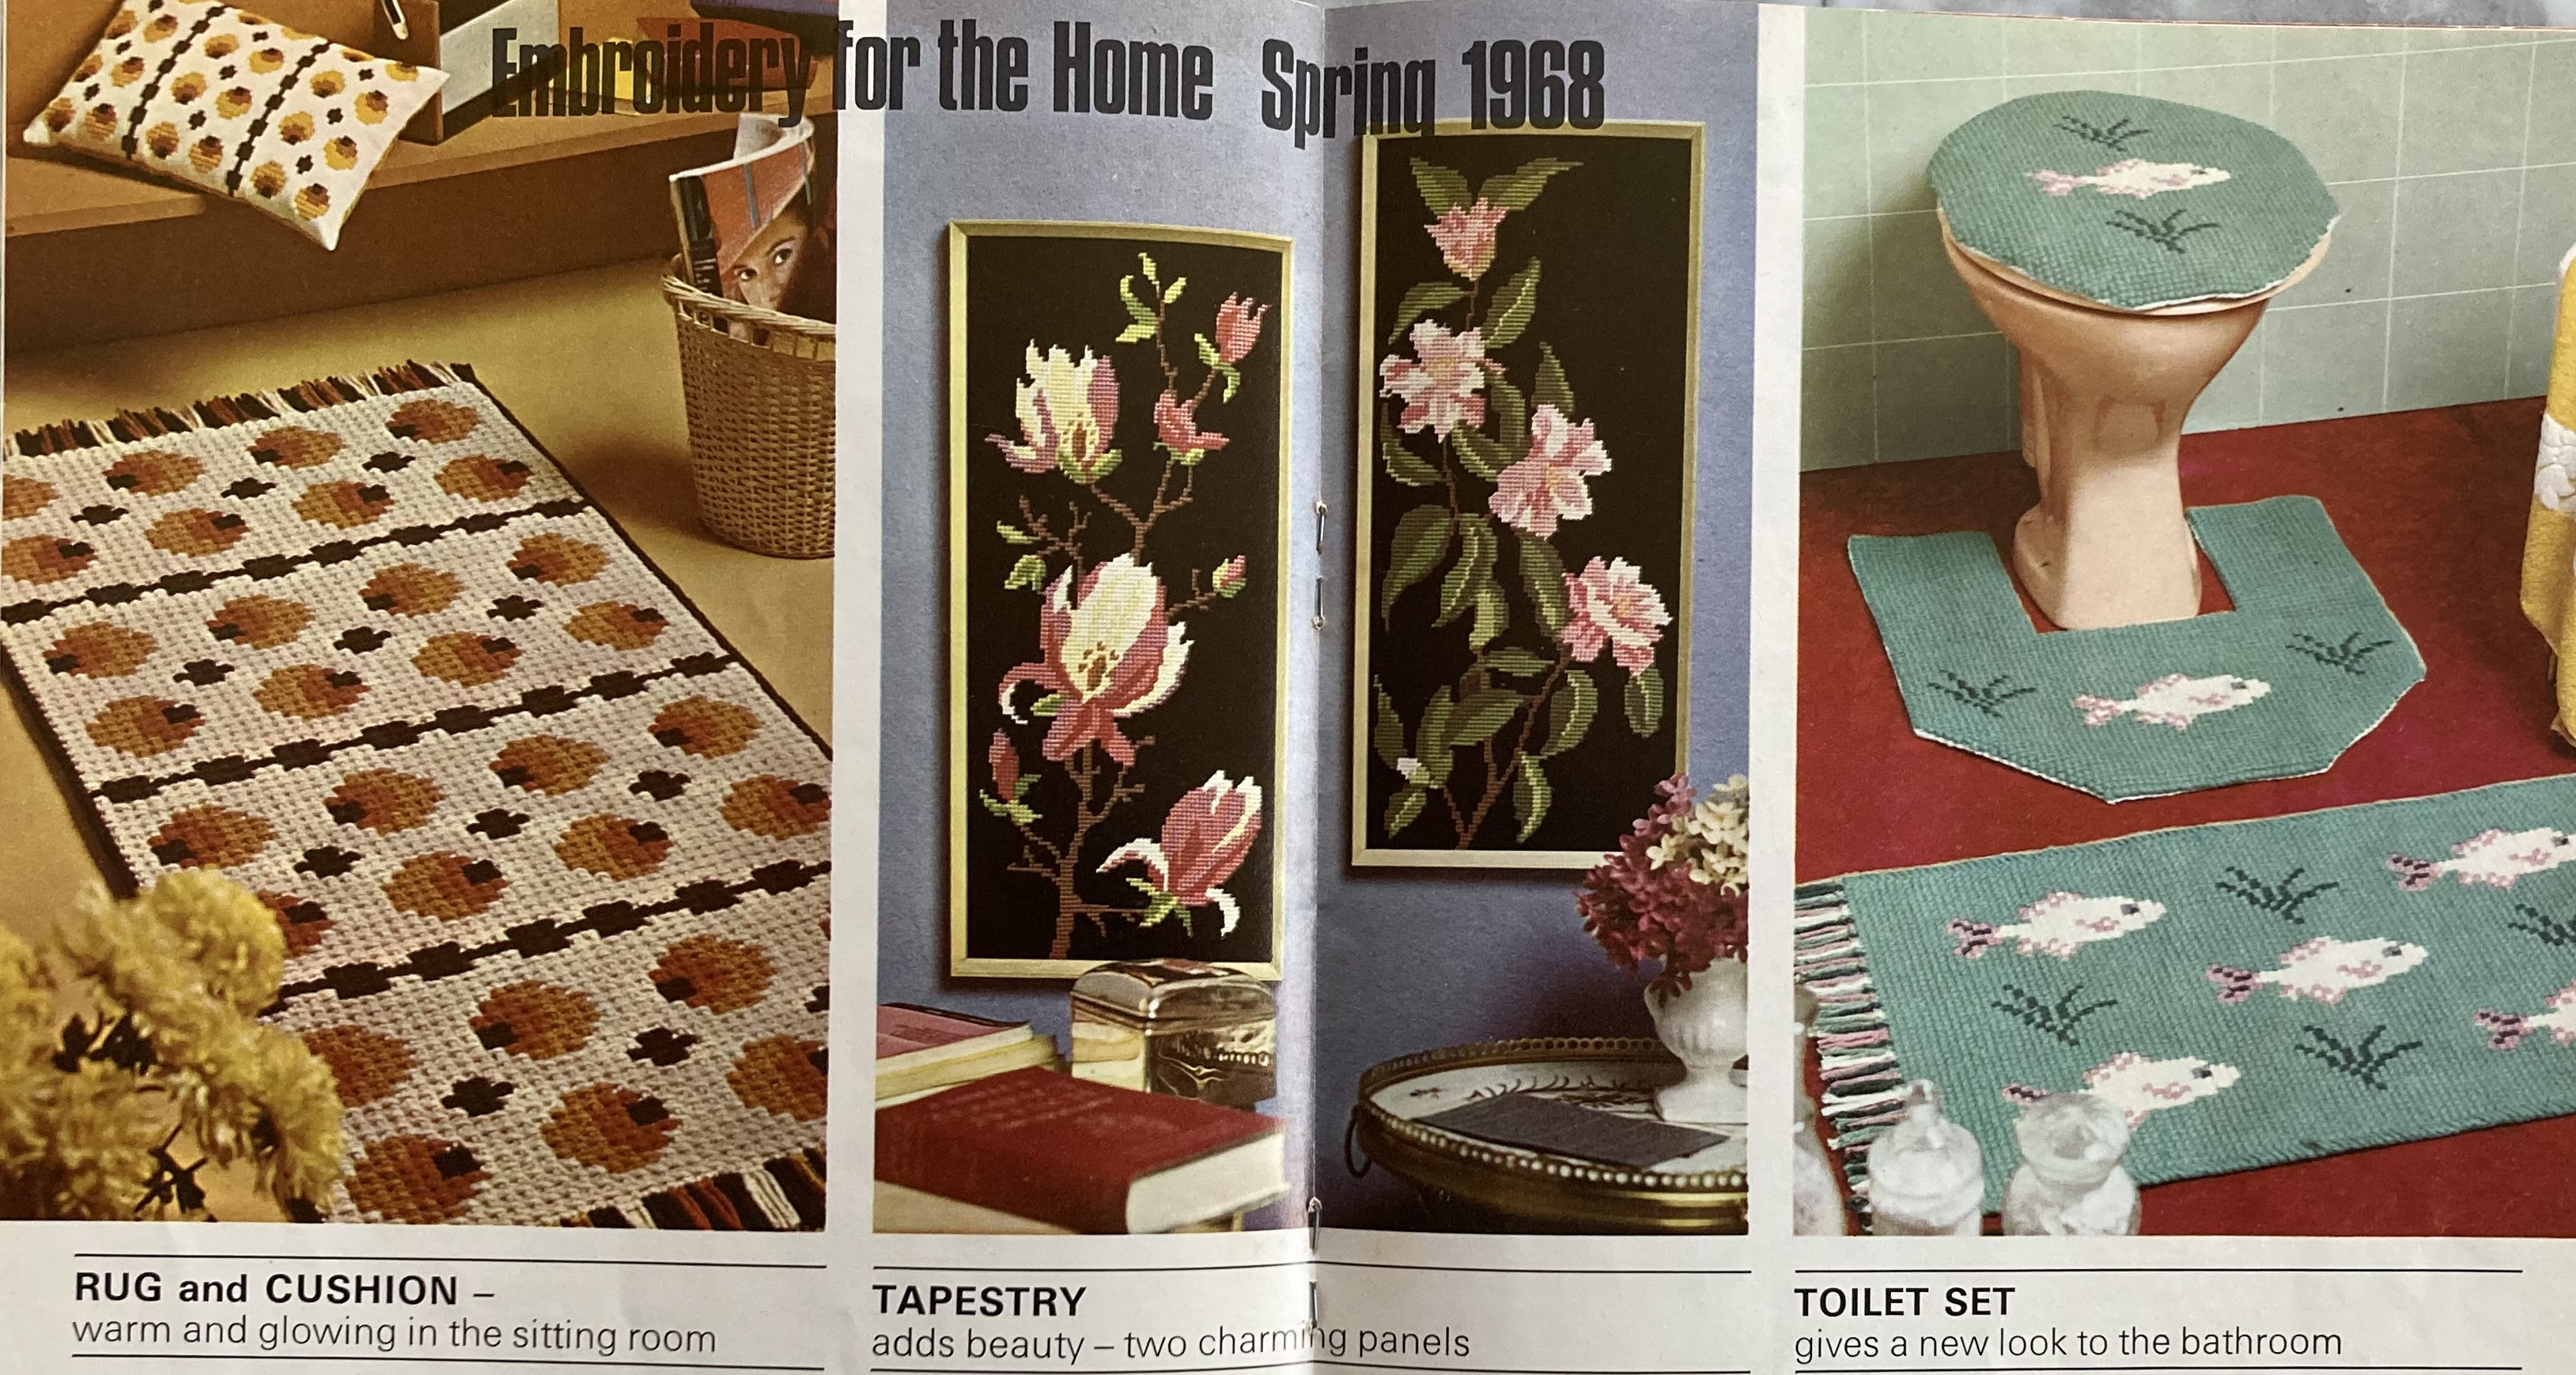
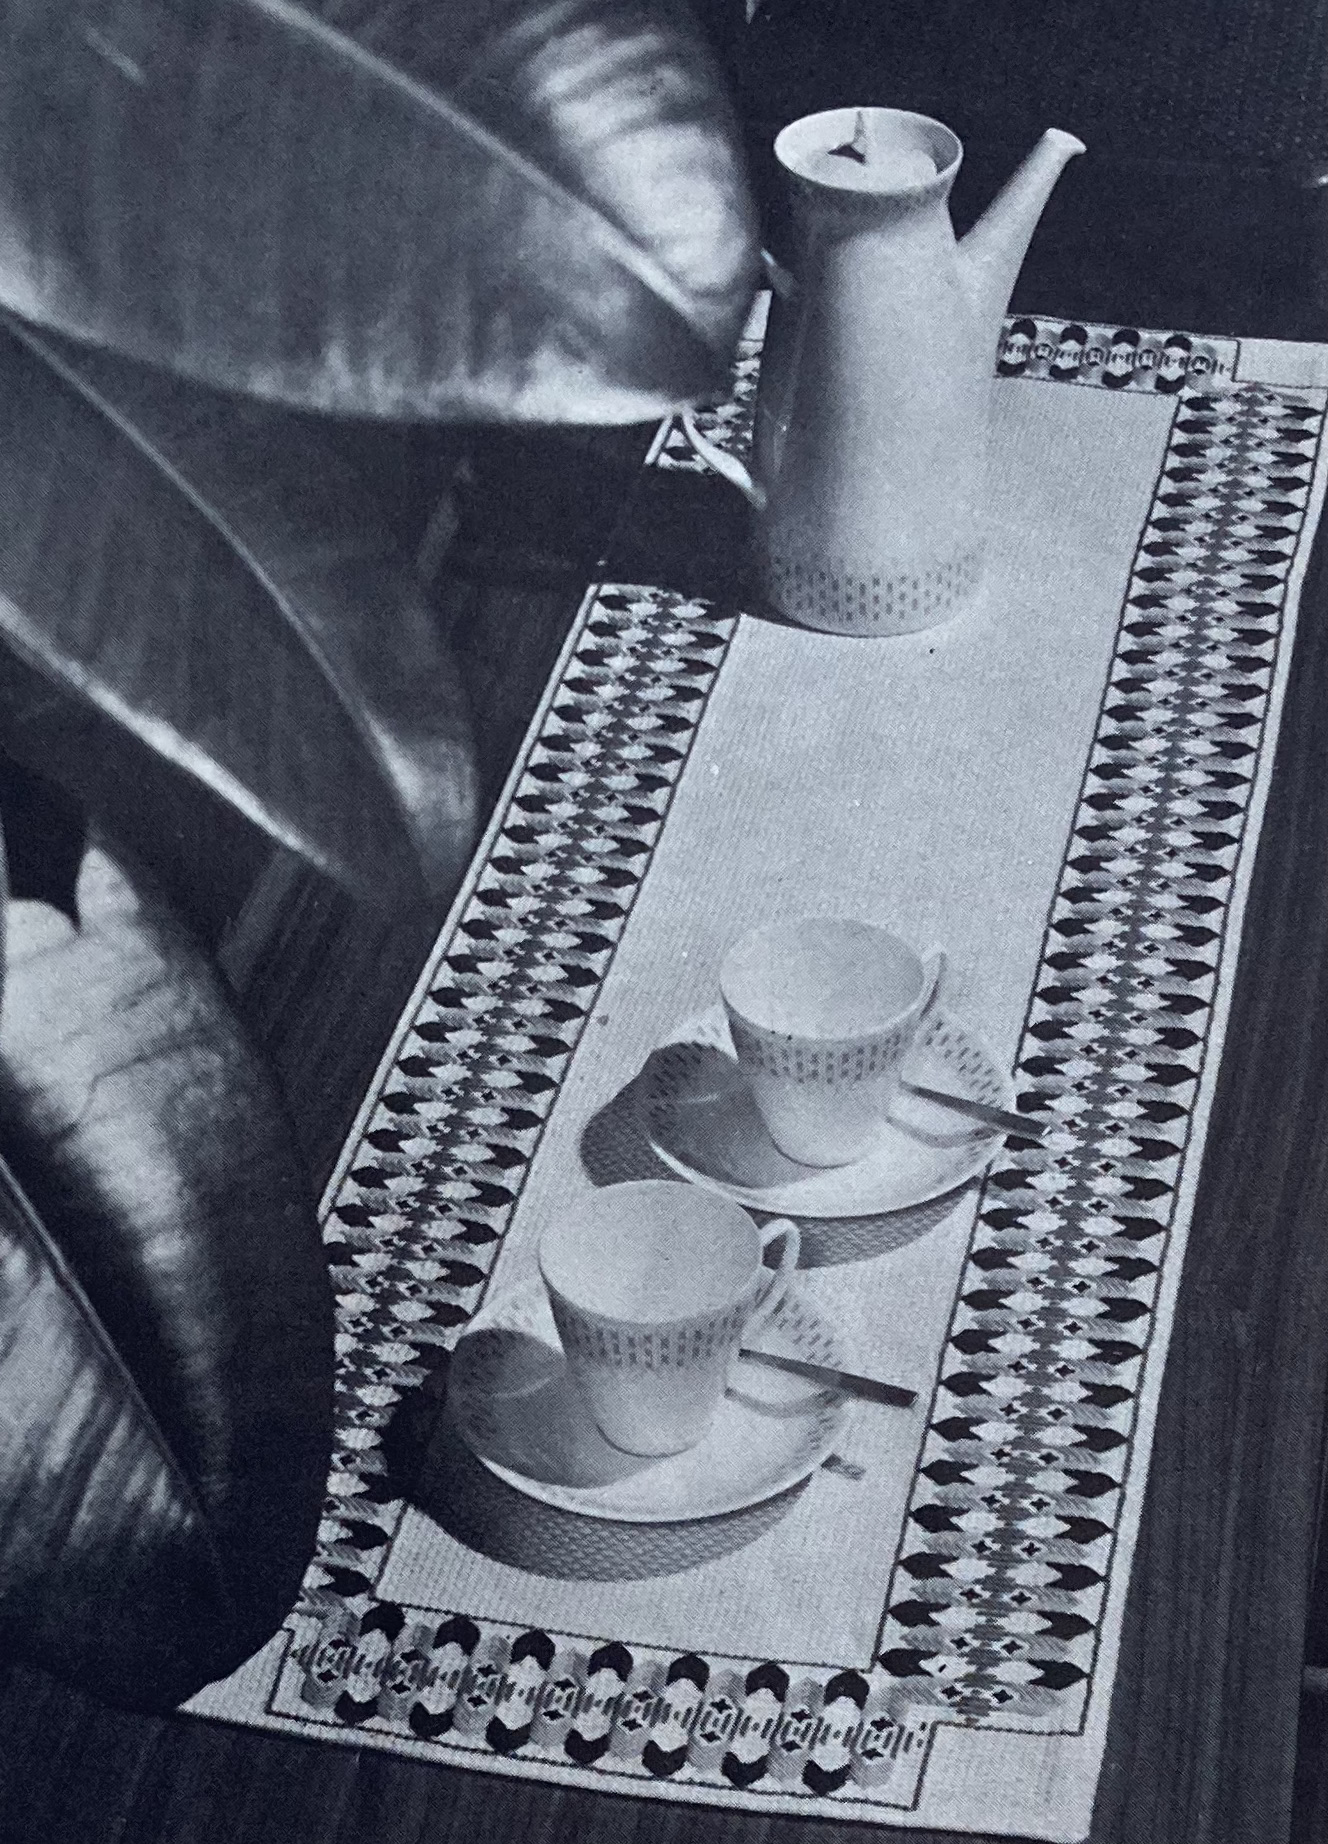
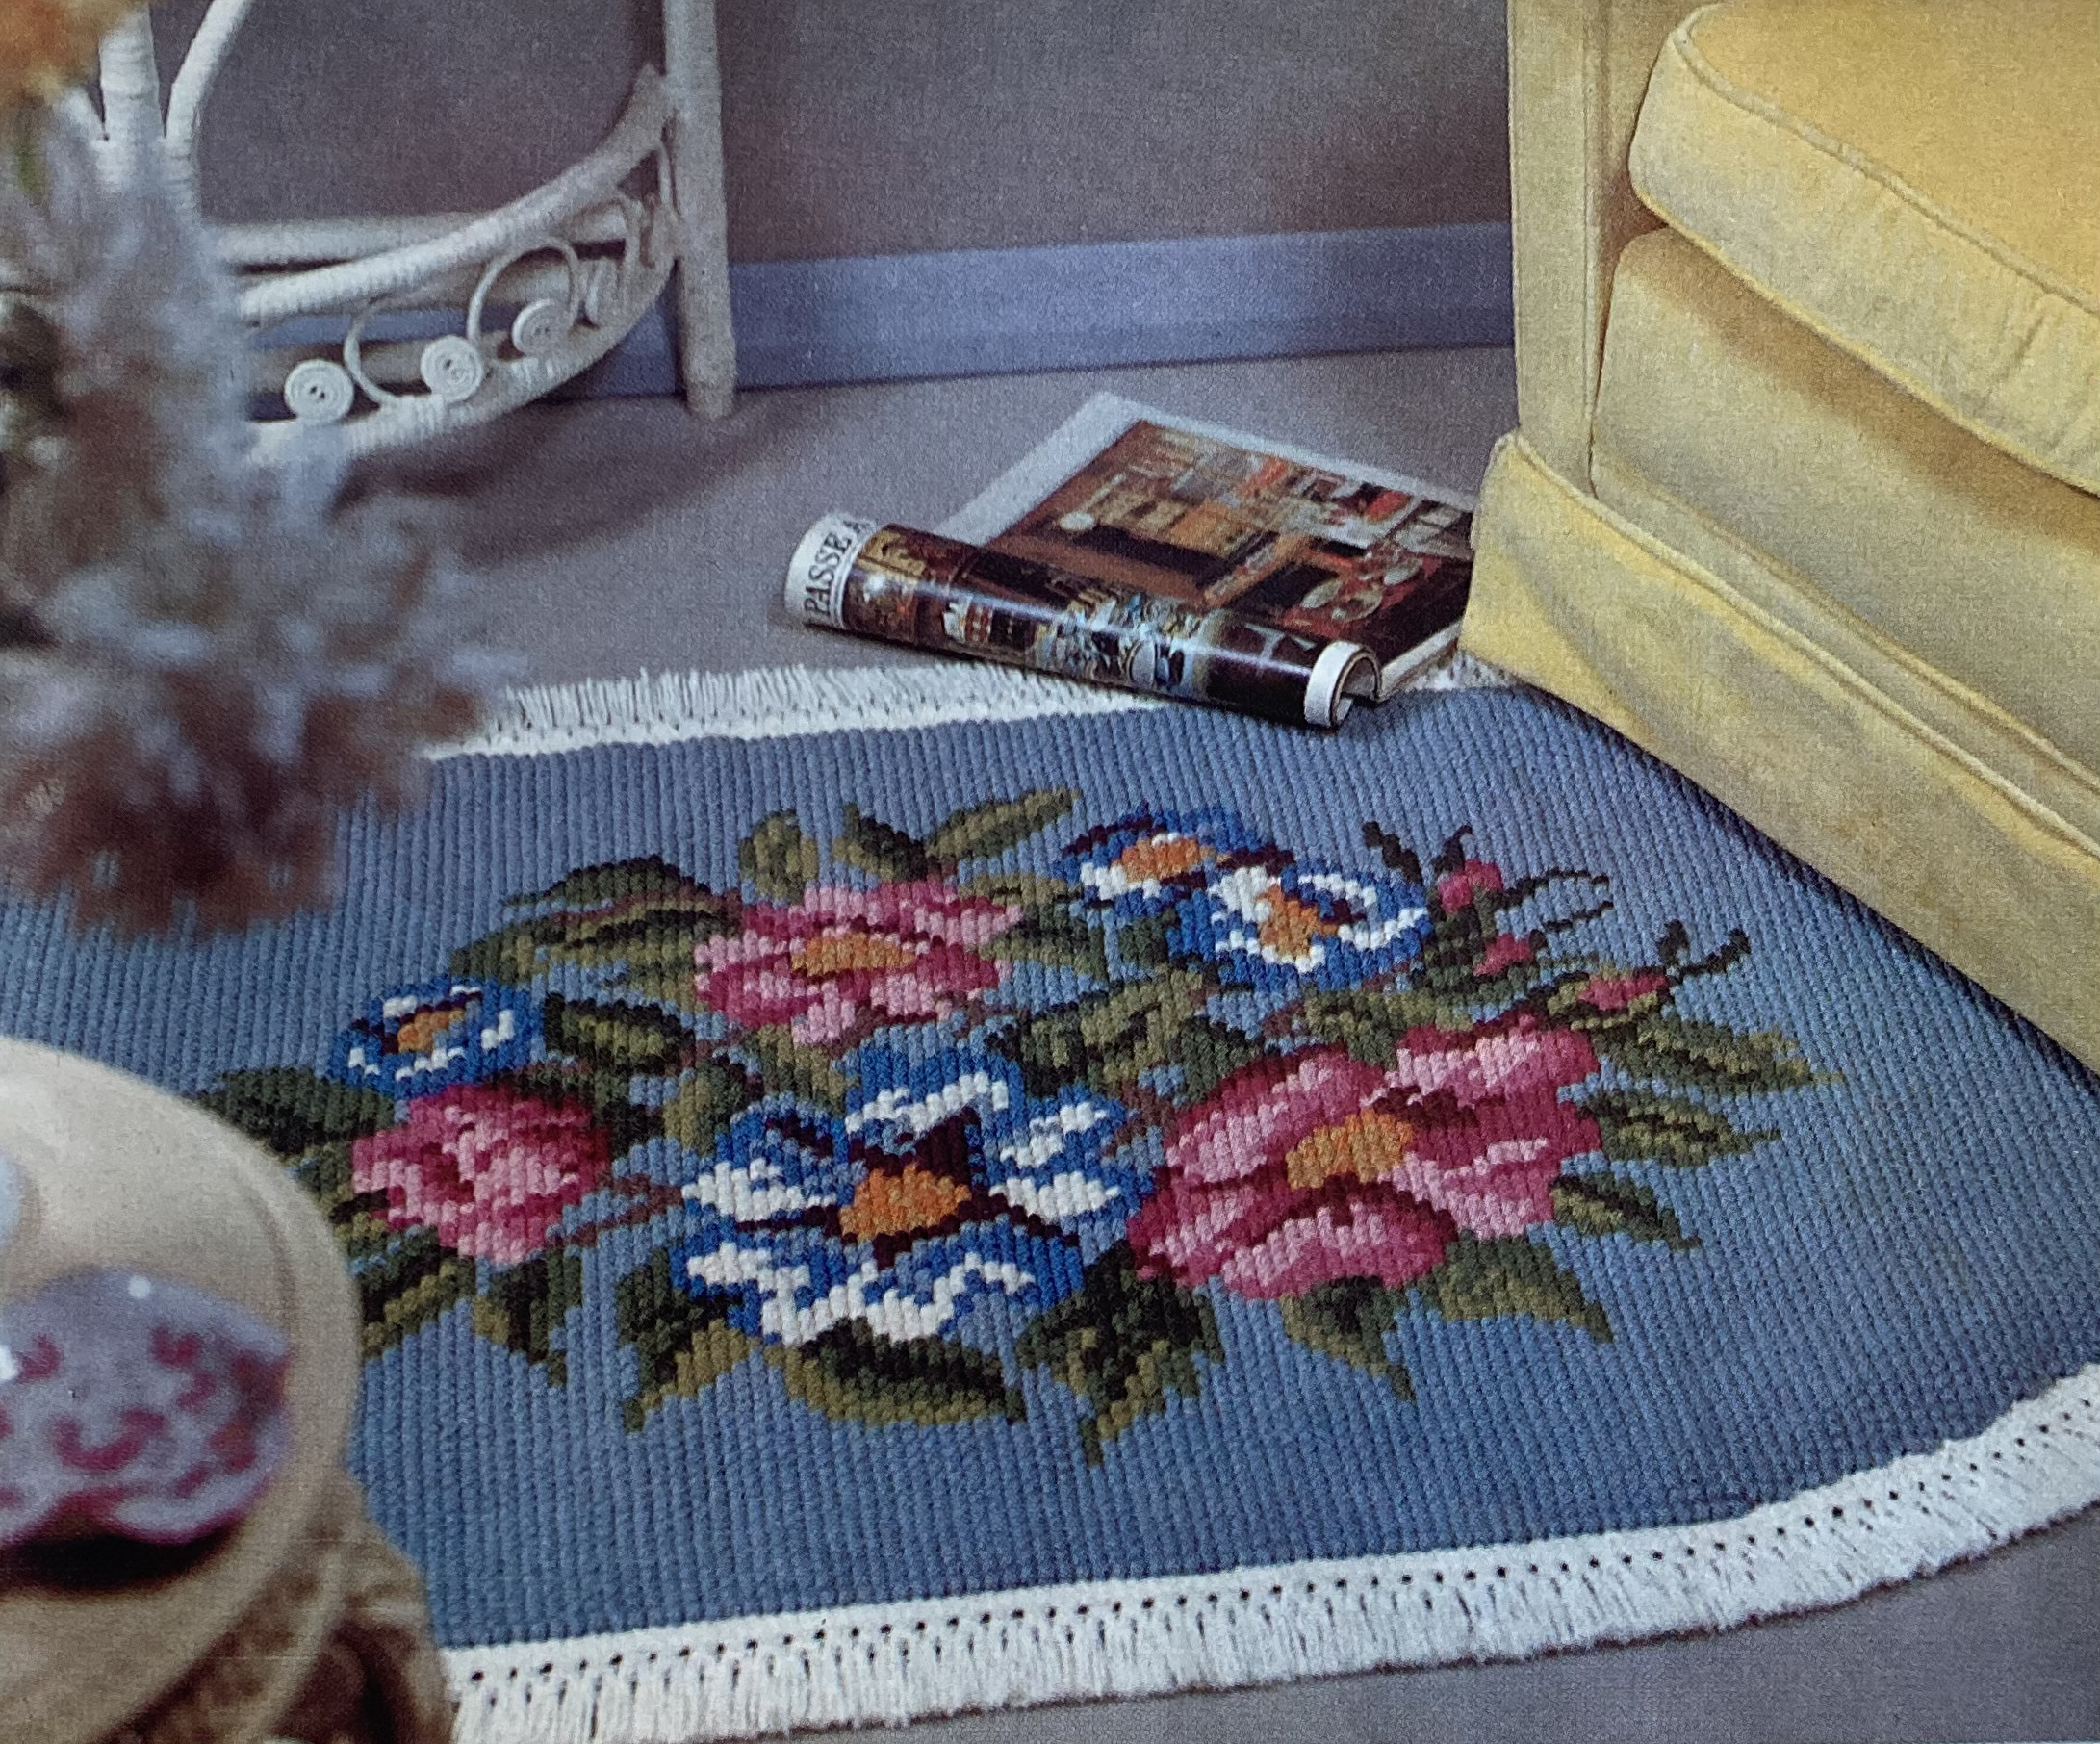
They apparently gave up on the Easter theme by the middle of the issue and just promise “4 pages of Rug-making, Tapestry and Embroidery for the Home”, which appear exactly as promised. There’s an elegant tea-table set of cosy and cloth in rose-pattern embroidery, a rug and cushion in best 1960s shades of brown, orange and gold, two floral tapestry wall panels, and a “Toilet Set” of toilet cosy and two mats. In previous issues, such items were called a “Pedestal Set”. I guess by 1968, there’s less need to be euphemistic. (But still a need to put a cosy on the toilet cover.)
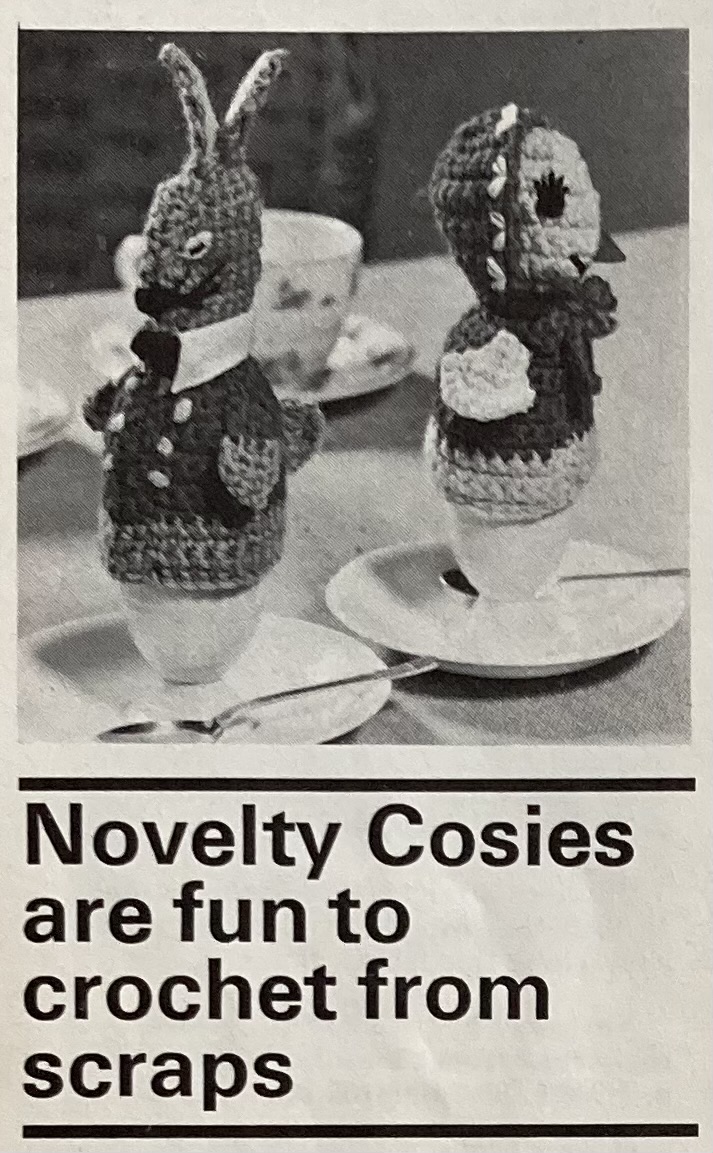
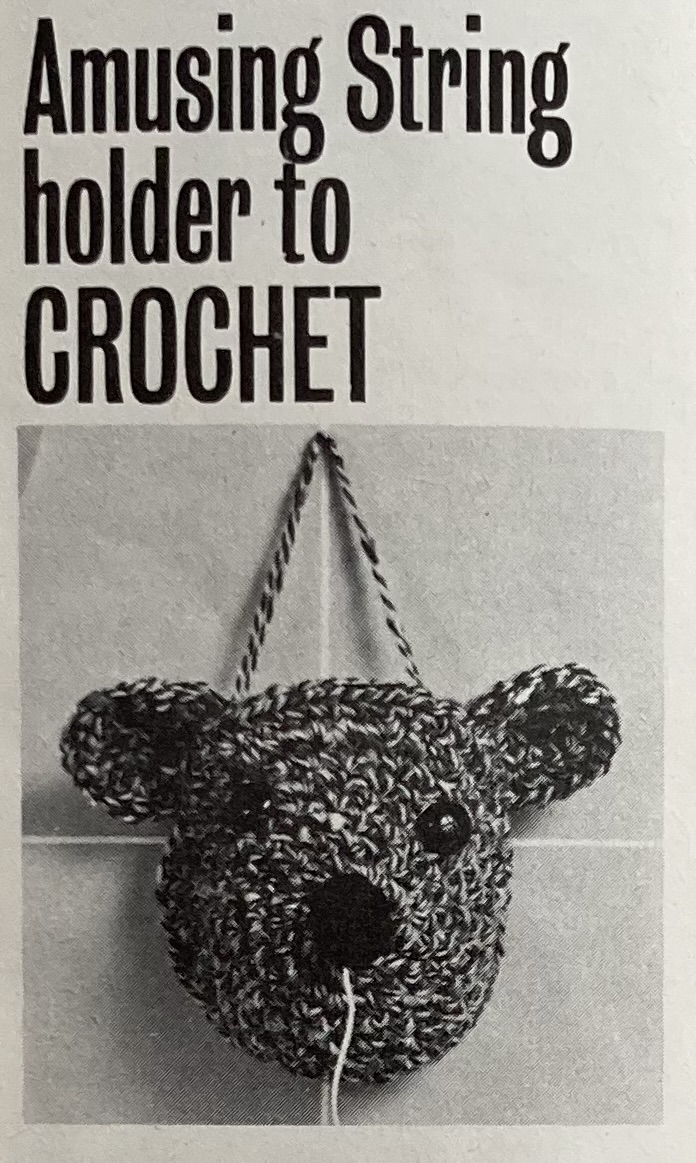
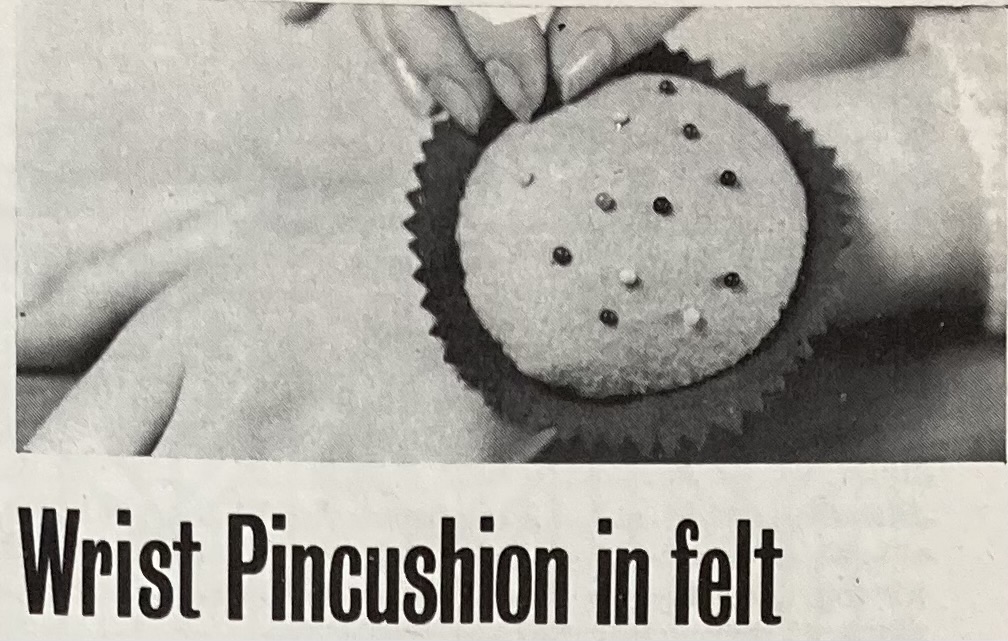
There are some great “novelty” and “bazaar” (…”bizarre” if you ask me) items in the Readers Pages: crocheted rabbit and chicken egg cosies and an “amusing” string holder. Like the Humpty Dumpty obsession, I don’t get the point of string holders. They always seem to involve pulling the end opf a ball of string through the mouth of some creature, in this case a koala. It’s better than the last one, which was a terrifying clown, but again, if you know why this was ever a thing, please enlighten me! The felt pincusion to wear on your wrist, on the other hand (heh), is practical and useful.
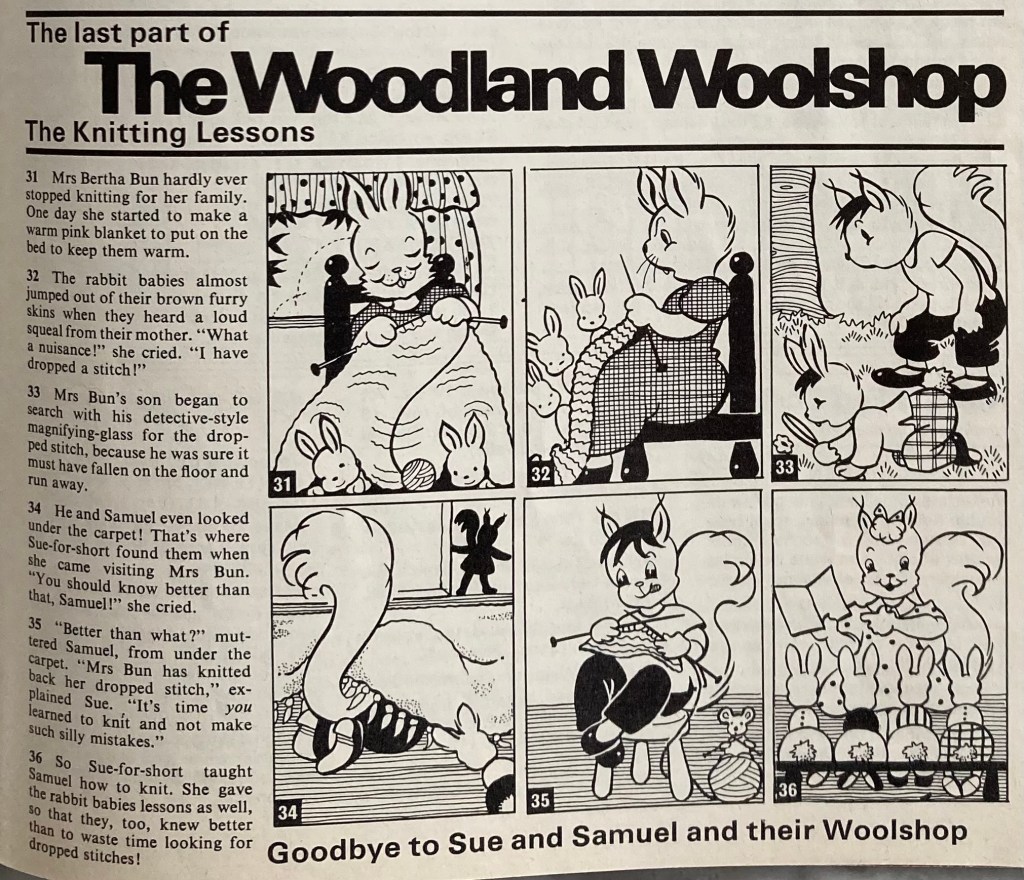
We have come to the end of our latest comic, “The Woodland Workshop”, in which various woodland animals learn that you cannot find a dropped stitch by looking for it on the floor! Words of wisdom, truly. I liked this comic.
I don’t know what to make from this issue. I love the little girl’s tunic-dress and the boy’s sweater, but don’t know any children of that age who might want one. I love the trellis stitch pattern from the “Country Mood” set, but don’t want to make a whole skirt or cardigan from it. Maybe I could adapt the pattern for mitts or something? Or I could work on the fabulous dress from the cover of the September 1967 issue, for which I bought the yarn and everything, but haven’t had time to start. We’ll see! I did finally finish the jaquard pullover from the November 1967 issue and will update that post on Tuesday, so stay tuned.
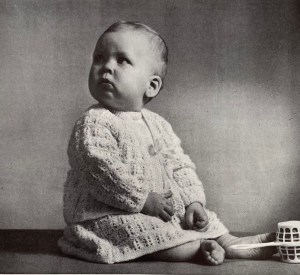
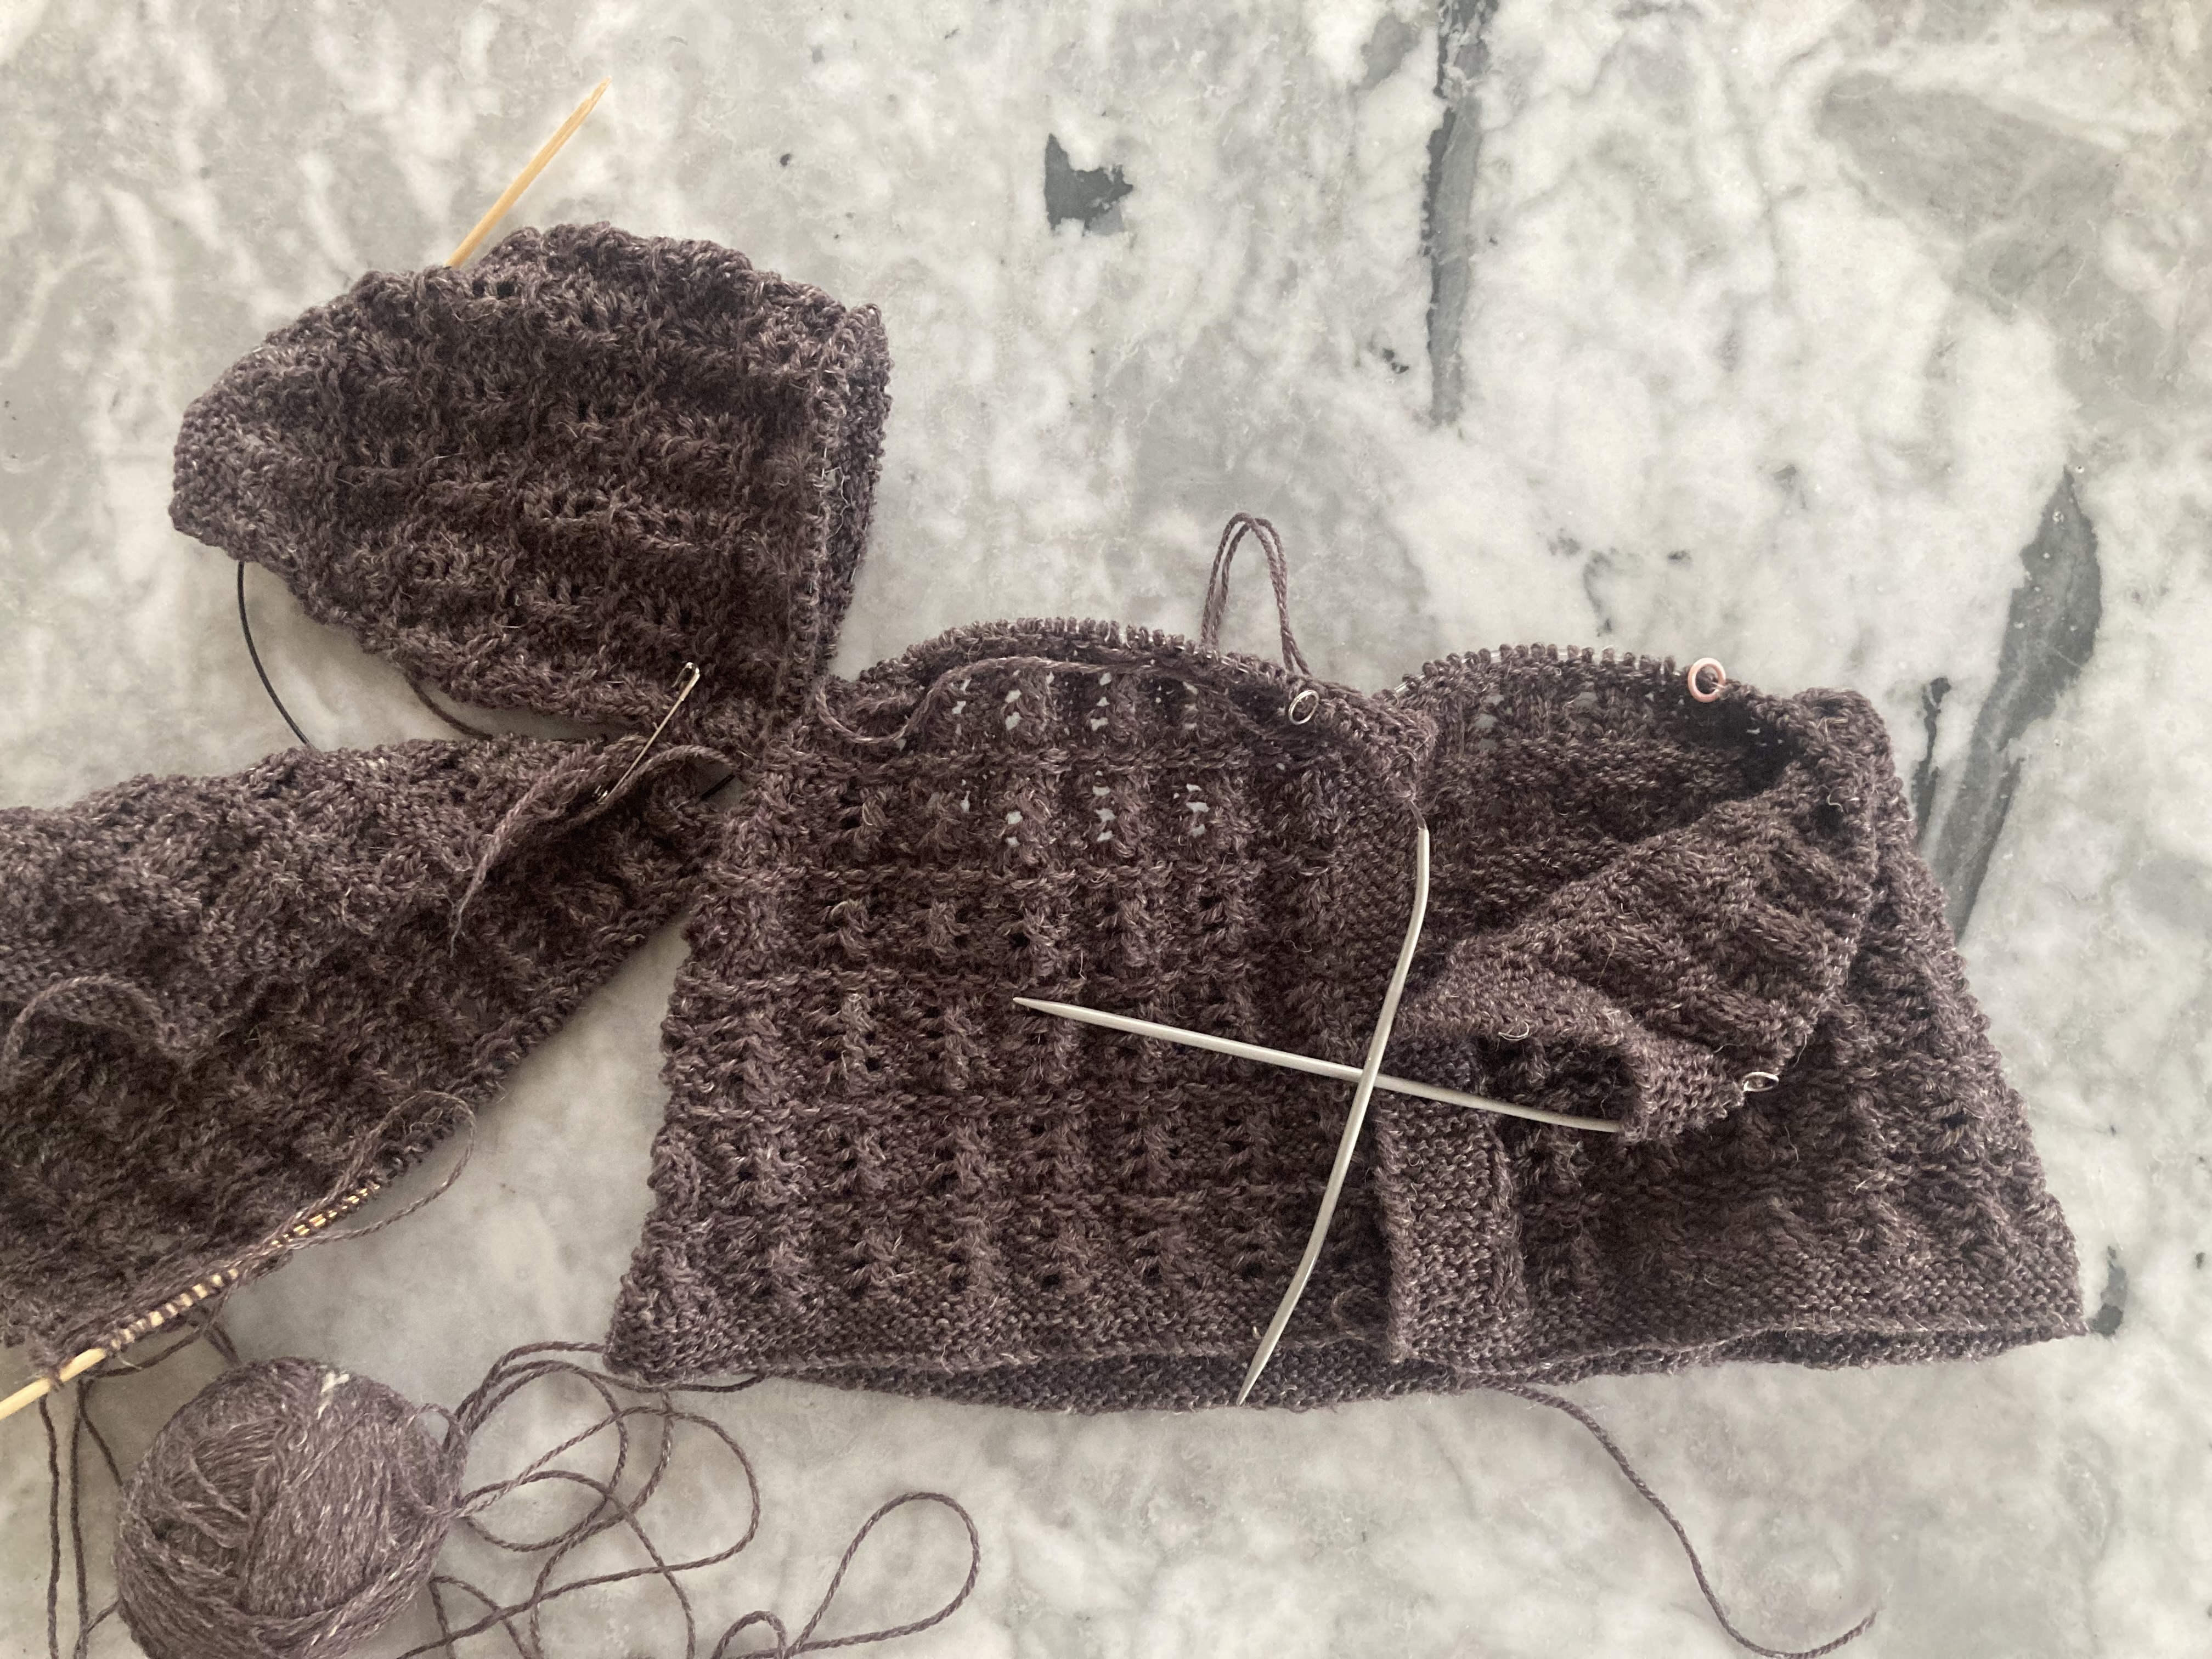
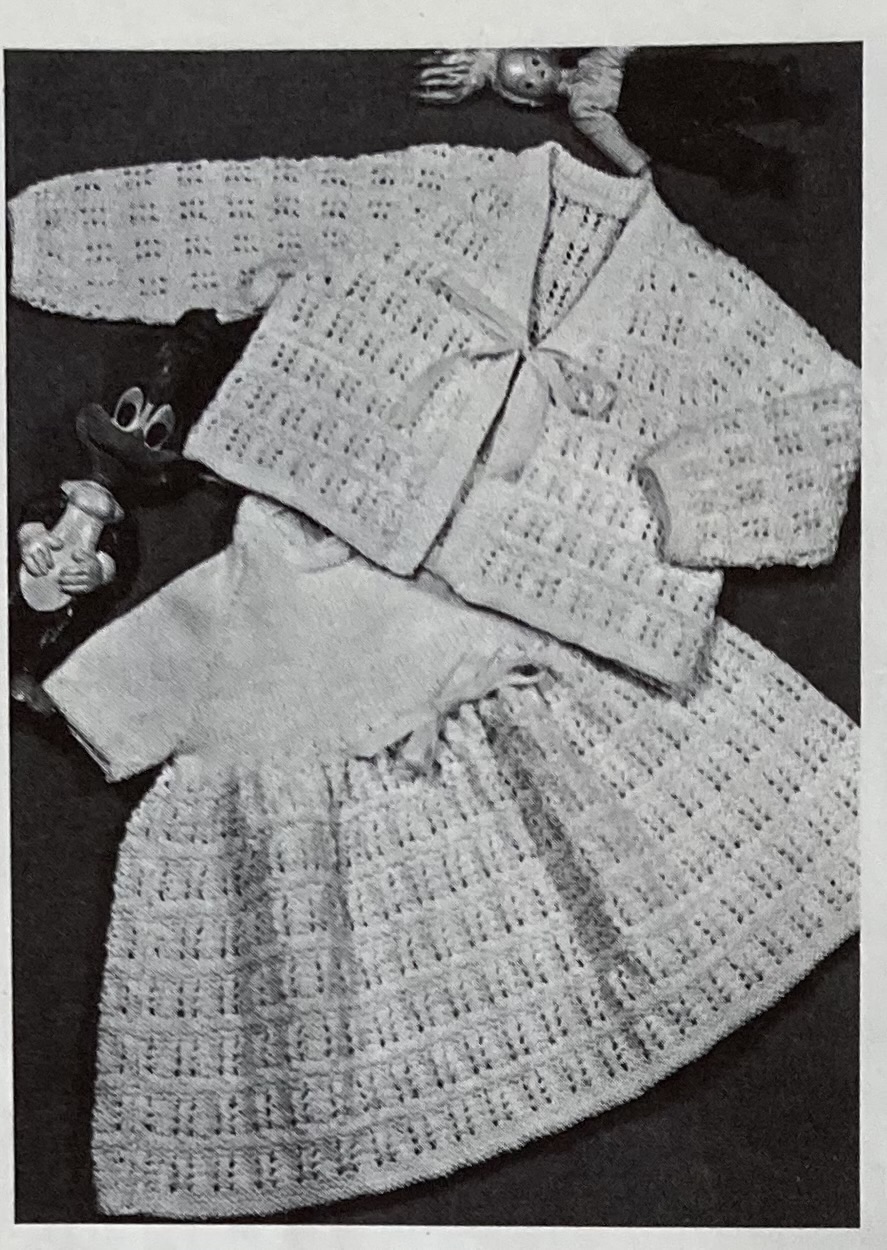
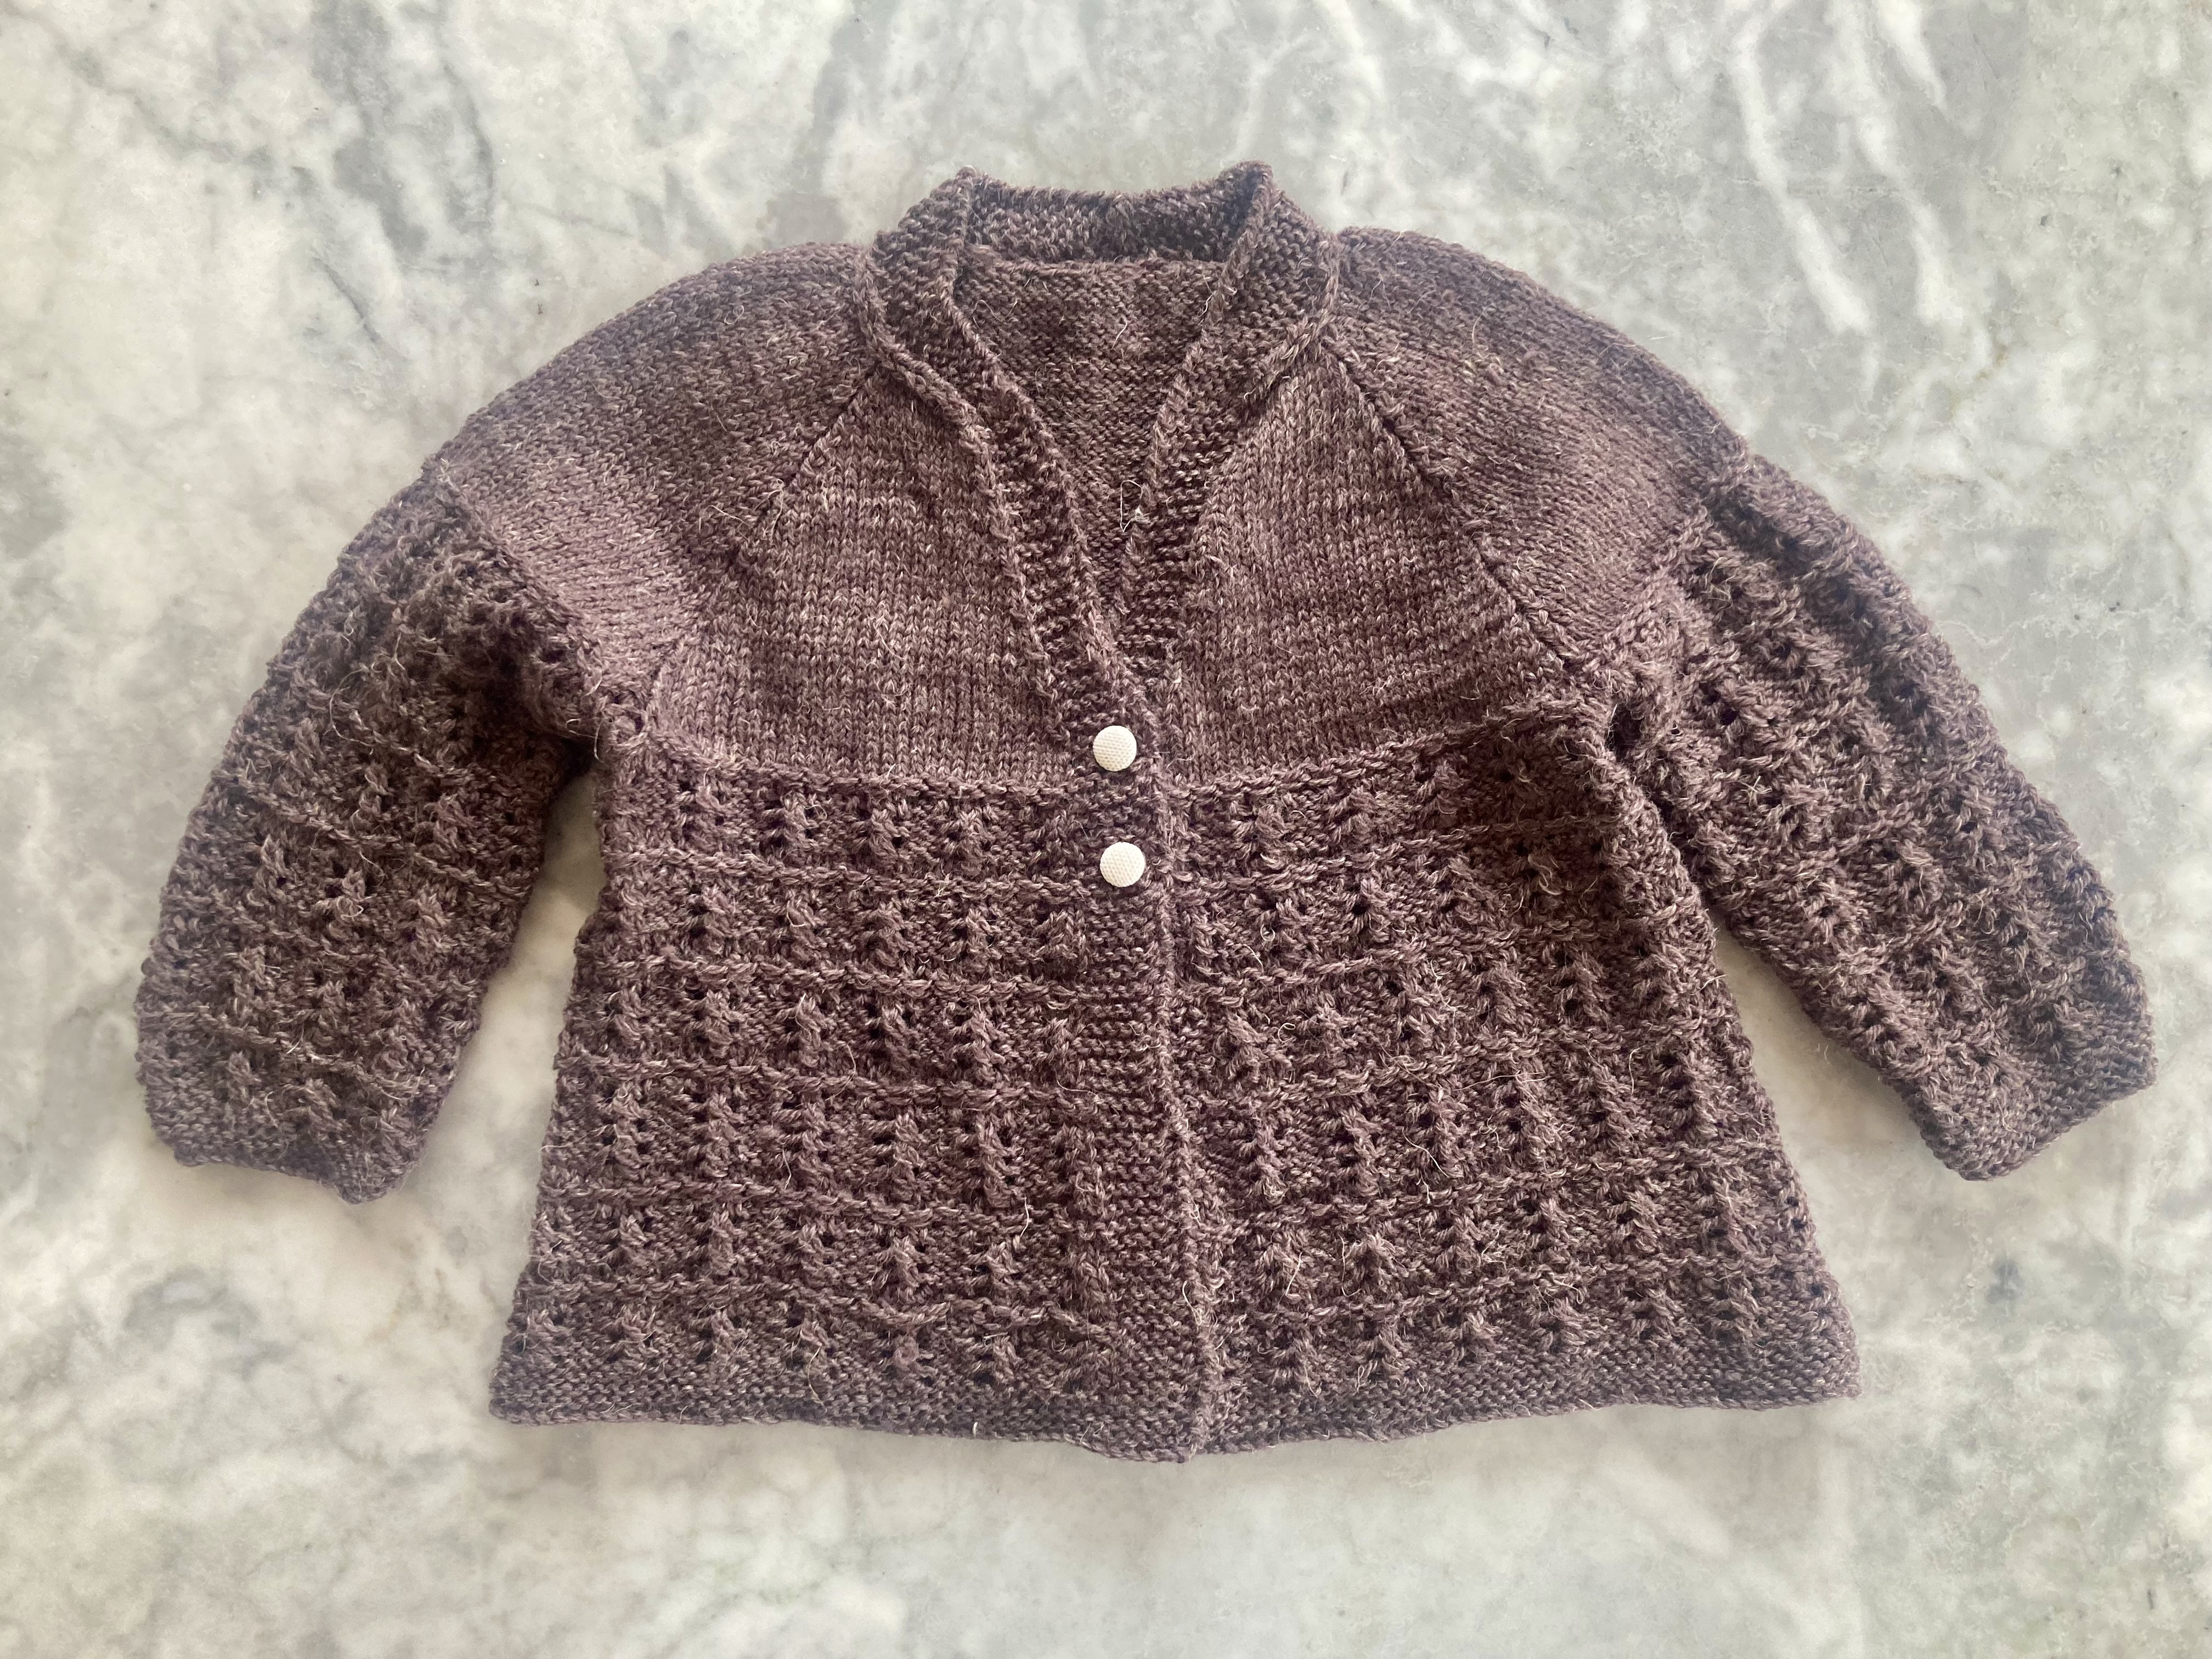
My project from the July 1967 issue of Stitchcraft was the “matinee jacket” from this jacket-and-dress set for a baby.
I had some nice Slow Wool Lino (sadly discontinued but alive and well in my stash drawer) that worked well for it — fine and soft, all-natural and machine-washable. I was a bit ambivalent about making baby clothes in such a drab shade of greyish-brown, but I hear that parents these days prefer neutral colours for babies? It will certainly match with everything.
The tension is supposedly 9 3/4 stitches to an inch over pattern (!) which is supposed to correspond to 7 sts/inch in plain stocking-stitch. I can get 7 sts/inch in stocking-stitch with Slow Wool Lino but the stitch pattern stretches. It is not difficult in itself — basically an eyelet rib on a reversed stocking-stitch background — but was unusually tricky to work increases and decreases in, even though it keeps the same number of stitches in each row, and it was clear that the tension would be completely off even before blocking, so I reduced the number of stitches.
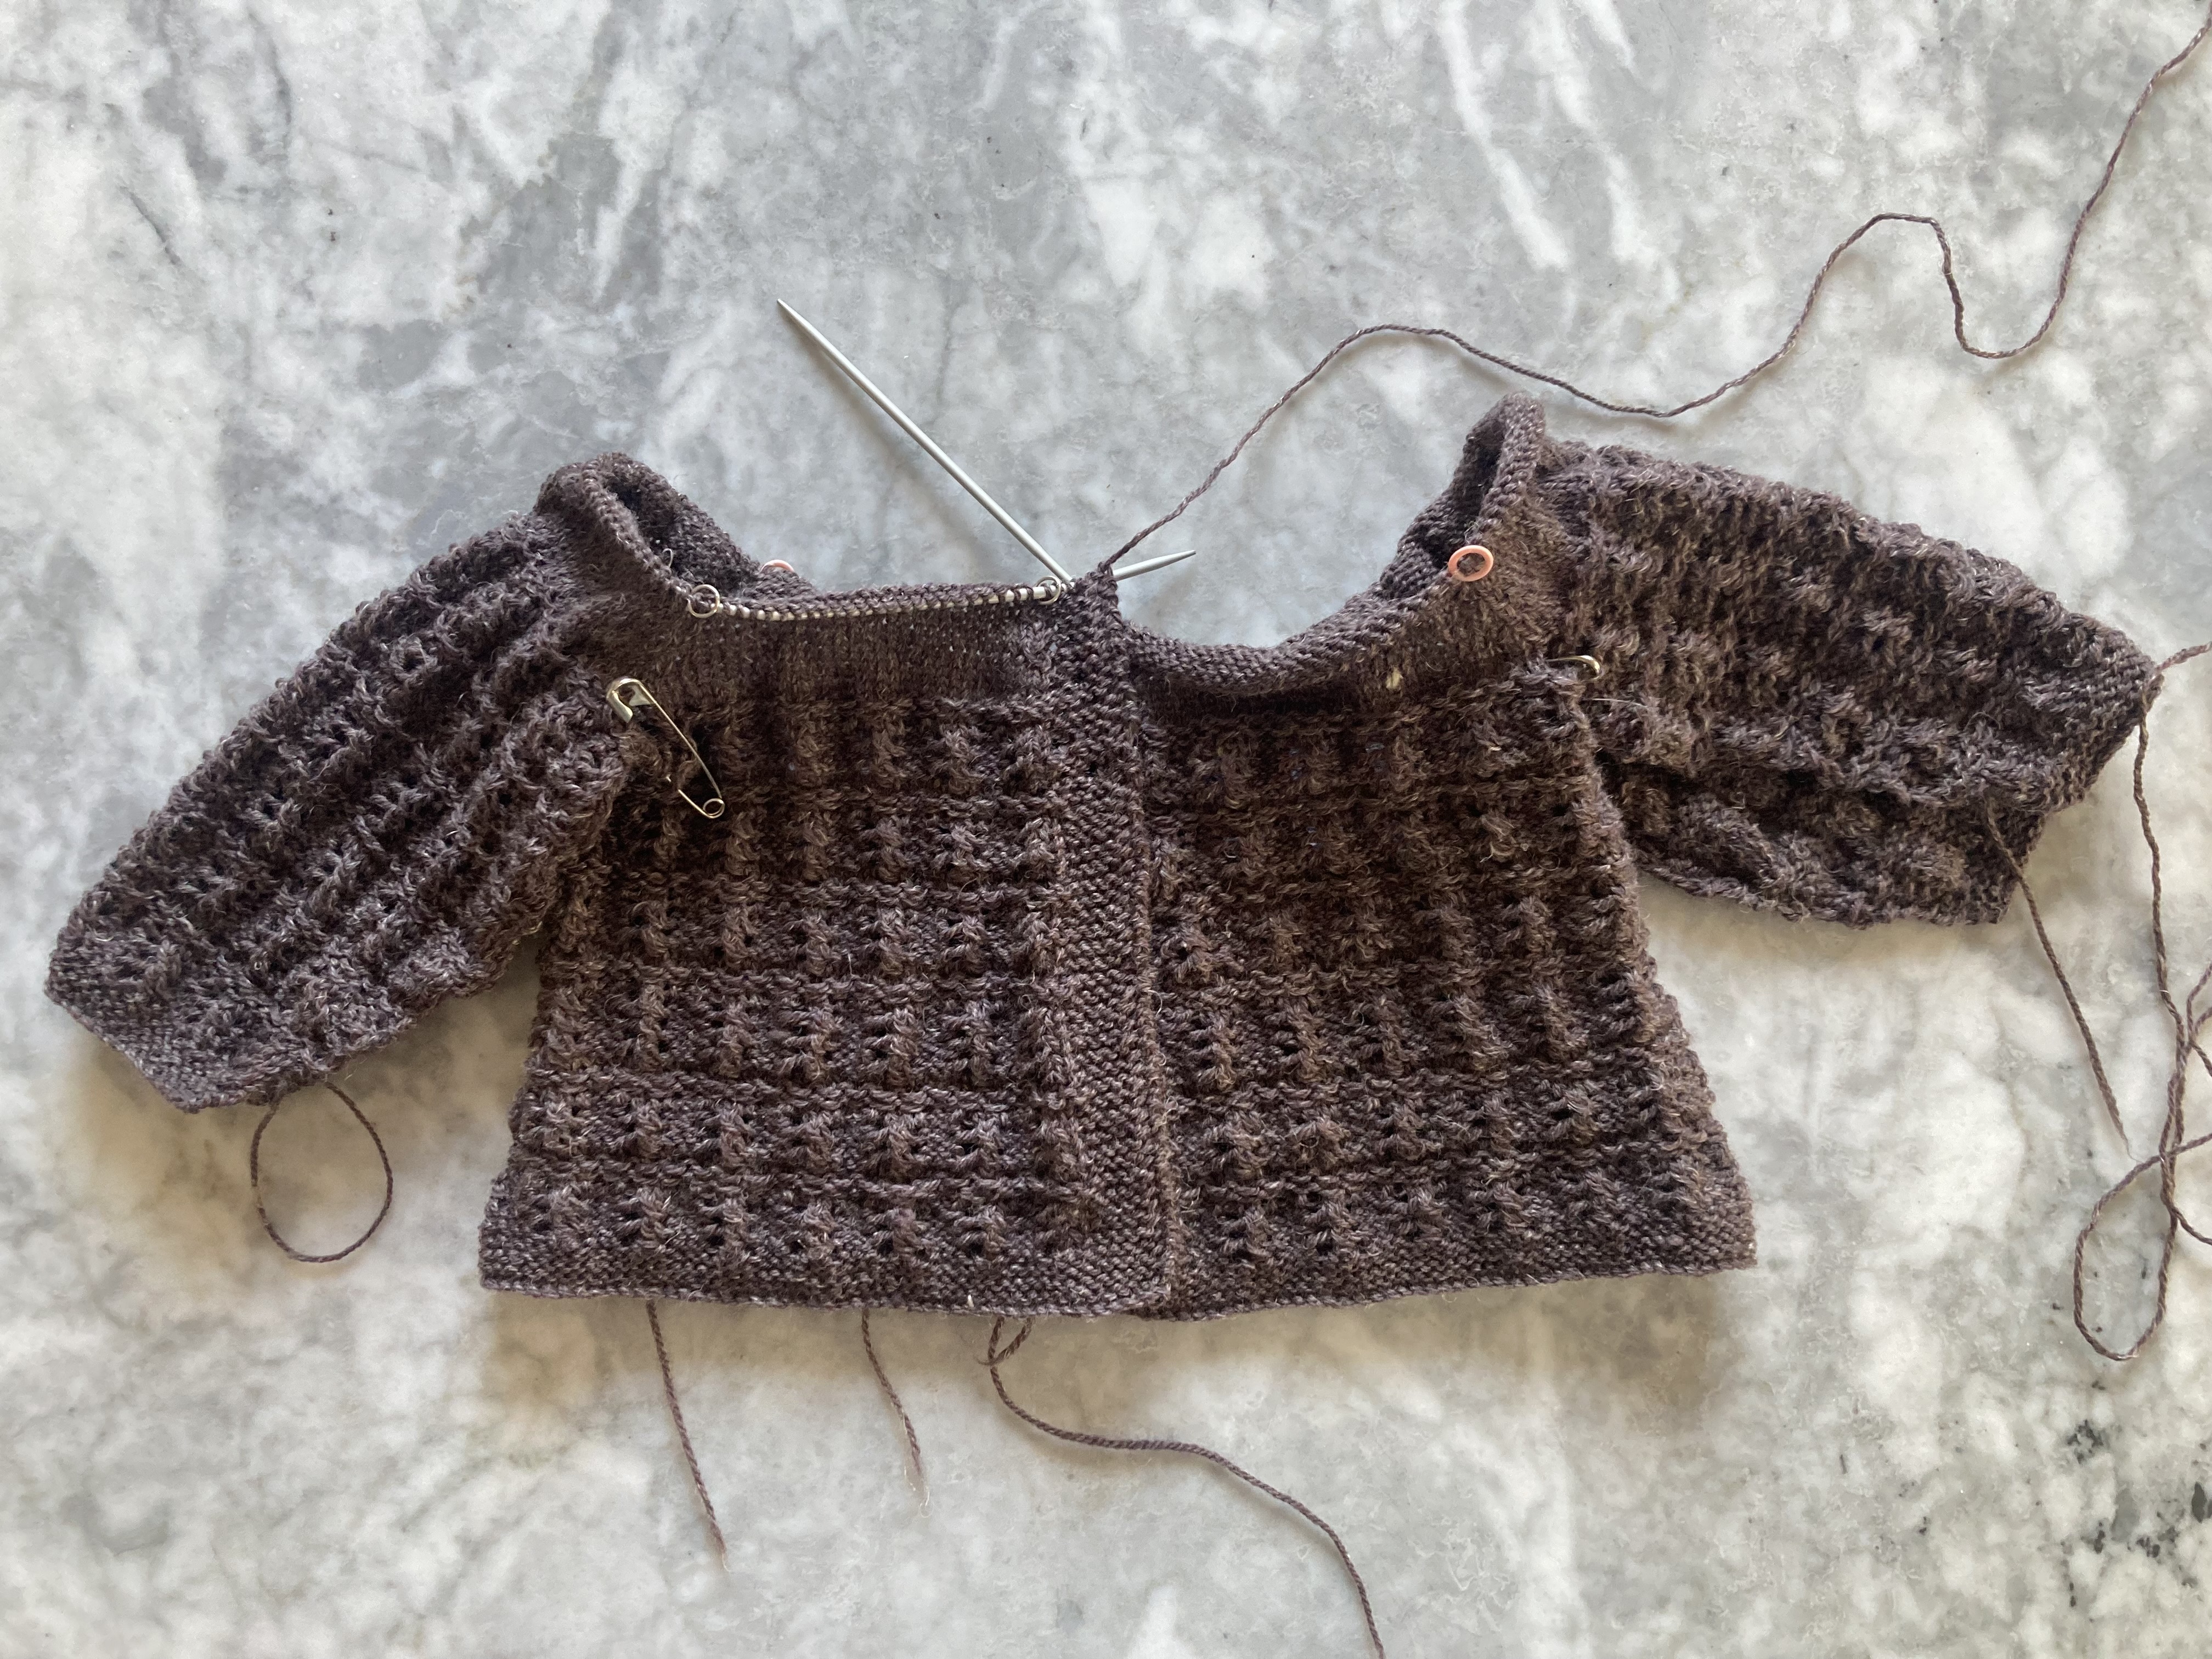
I was so frustrated with the comparatively easy decreases on the “skirt” part and increases on the sleeves (which also ballooned out in an annoying way) that I decided to make the yoke in plain stocking-stitch, similar to the dress from the same pattern. I considered making a round neck like on the dress, or possibly embroidering the yoke afterwards with some little flowers in a contrasting colour to offset the drabness of the brown.
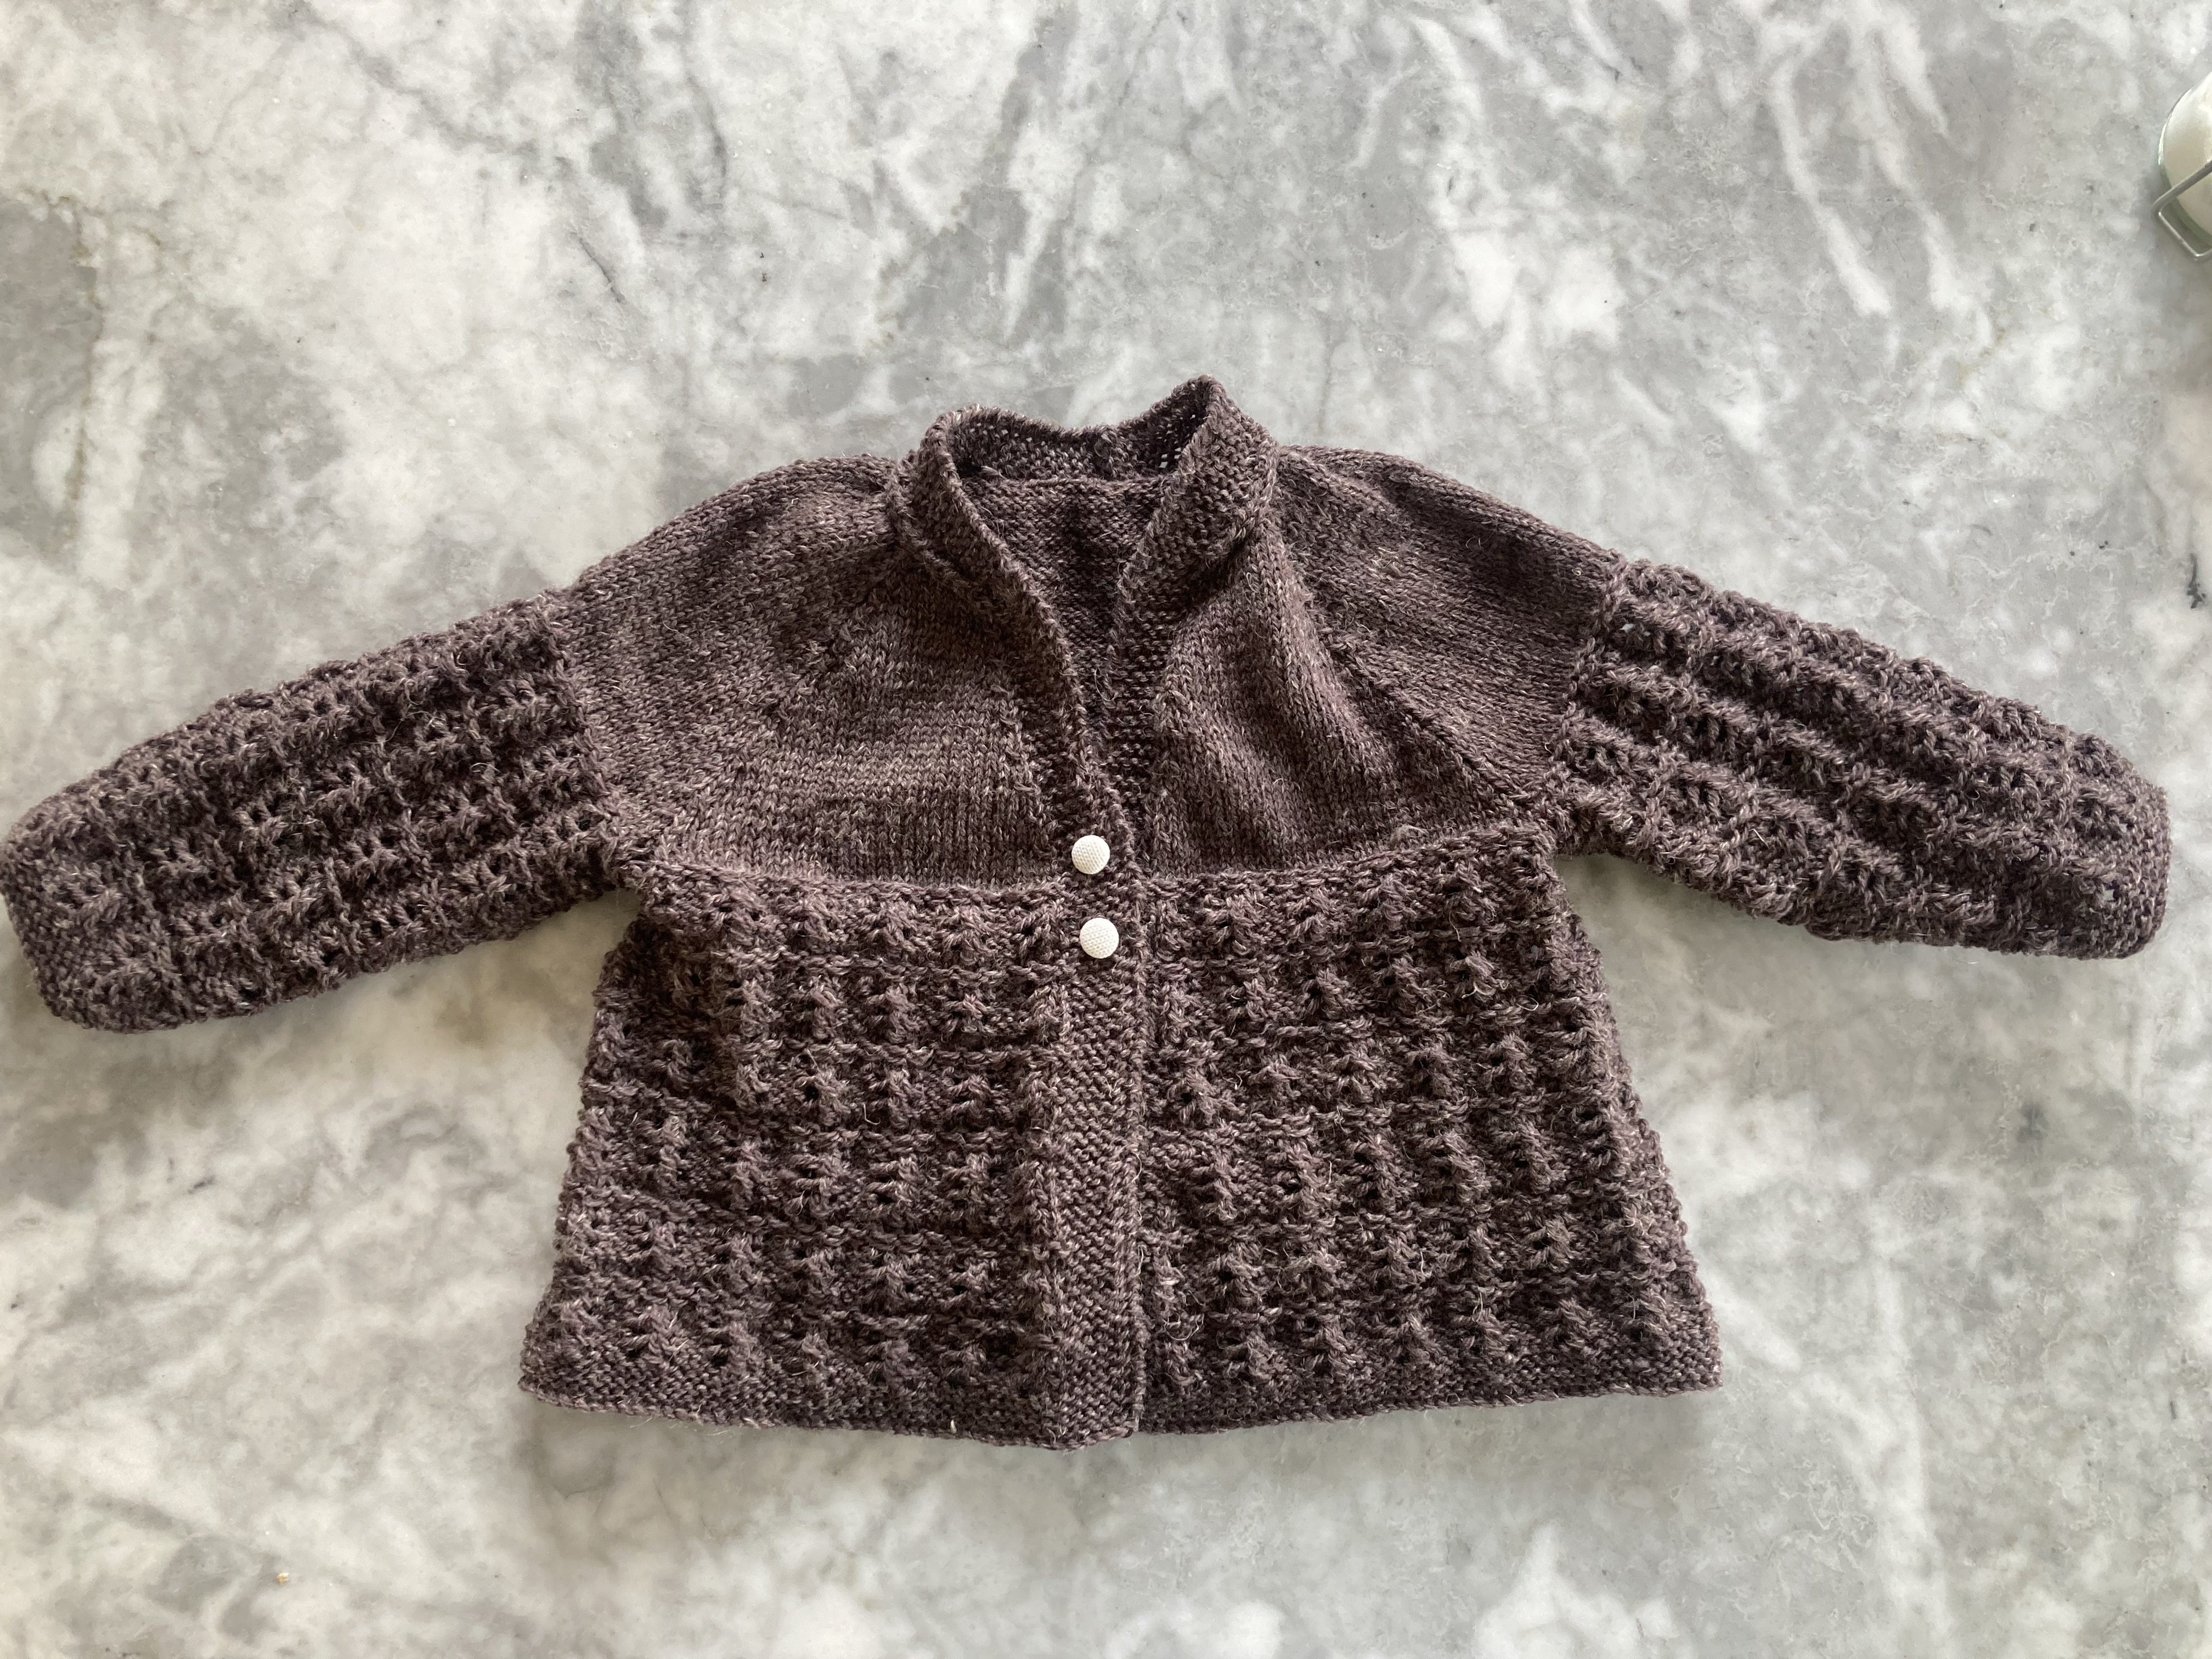
After consulting with the good people on the All Things Vintage forum on Ravelry, I kept the v neck, and when it was done, I didn’t think embroidery was necessary. I had already decided to add a couple of buttonholes at waist/armhole level instead of the unpractical ribbon tie from the pattern, and I found some little white fabric-covered buttons (possibly vintage? maybe just look like it?) in the button box, which perked up the colour with a bit of contrast and looked very sweet and old-fashioned. Here are some photos from before and during blocking:
I was not so impressed by this pattern and ended up making a lot of changes. But the finished product is soft, warm, practical, will match with everything, can be worn in all seasons and will “grow along with” a baby, so I think everyone, including the baby, will be quite pleased with this gift. The recipient is a colleague whose baby should arrive in November, so it was finished well on time for that, as well as on time for the blog. So all in all, a satisfactory project.
In other July 1967 news, I still want to make this dress from the same issue and even bought wool for it! If I ever make it through the “naughty pile” of WIPs, I might be able to start it sometime…
We had a terribly cold April where I live, with rain and gloom and the sense that spring would never come. I had switched out my winter and summer clothing as part of spring cleaning last week and it all felt wrong. Then, all at once, two days ago, winter ended, the sun came out, and temperatures doubled. Perfect timing for the “Summer Plans” in the May 1966 issue of Stitchcraft!
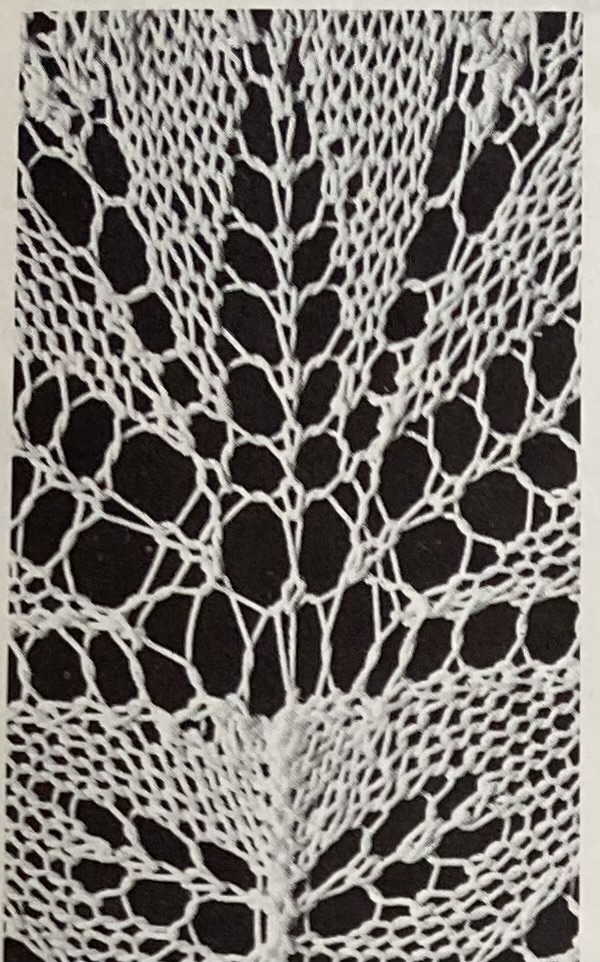
The May to August issues always have lots of projects for travel and holidays: little summer tops, quick bulky jackets and sweaters for cooler weather or sailing holidays (aka normal summer in a temperate/maritime climate) and easy homewares to make in a deck chair while lounging about. The pullover on the cover is made in DK wool, so relatively warm, but with a lacy front to keep it airy. The photo is also almost an exact copy of the March 1966 cover photo! Apparently yellow is still trending.
Other women’s garments include a ribbed and a plain polo-neck jumper designed on “skinny lines” — the ribbed number is a special design for extra-slim Twiggy figures with a 30, 32 or 34 inch bust. For “figure-plus” sizes, there’s a summer blouse in bouclet wool with a wide, rolled collar and chequerboard lace pattern. There’s a plain DK cardigan in a range of average sizes to round out the tops, and an easy crochet dress with “practically no shapings”. High necks and clean lines are in, and stitch patterning is kept to a minimum in favour of little details of colour and finishing — see the smock-like embroidery on the “skinny” jumper, or the twists of colour on the collar and cuffs of the polo-neck. Colours are light but bold — light blue, white, green, yellow and pink.
The other members of the family are well served in this issue too. There’s a men’s “country pullover” in a zig-zag stitch pattern, as well as a bouclet “tennis shirt”, both in neutral colours of “Alabaster” and “Brandy” — even the names of the colours fit the image of 1960s masculinity. The “young fashion” set can have fun in a striped and belted mini-dress. Stitchcraft informs us that the “Young Colour Choice is mid grey and white”, which is interesting, considering that the adult women’s fashions are all quite a bit more colourful. Younger tots can make “Seaside Plans” in a t-shirt-and-trunks set for a boy or a little knitted dress and head scarf for a girl. (Why no trunks for the girl, whose dress is going to fly up over her as soon as she starts digging in the sand with that bucket?)
There are some nice child-appropriate homeware designs as well, starting with a thick, warm pram blanket in blue and yellow (to match the mother’s jumper!) The pattern is a herringbone tweed alternated with cable panels and the finished blanket is edged with satin ribbon. Then there are some wonderful decorations “for the nursery” featuring friendly animals and flowers. You can work them in felt appliqué on a wall panel, or in wool embroidery on a cushion. The animals are so cute! I love how the cat is both guarding its mouse and disdainfully looking away from the dog on the cushion. Whoever designed this obviously had a cat.
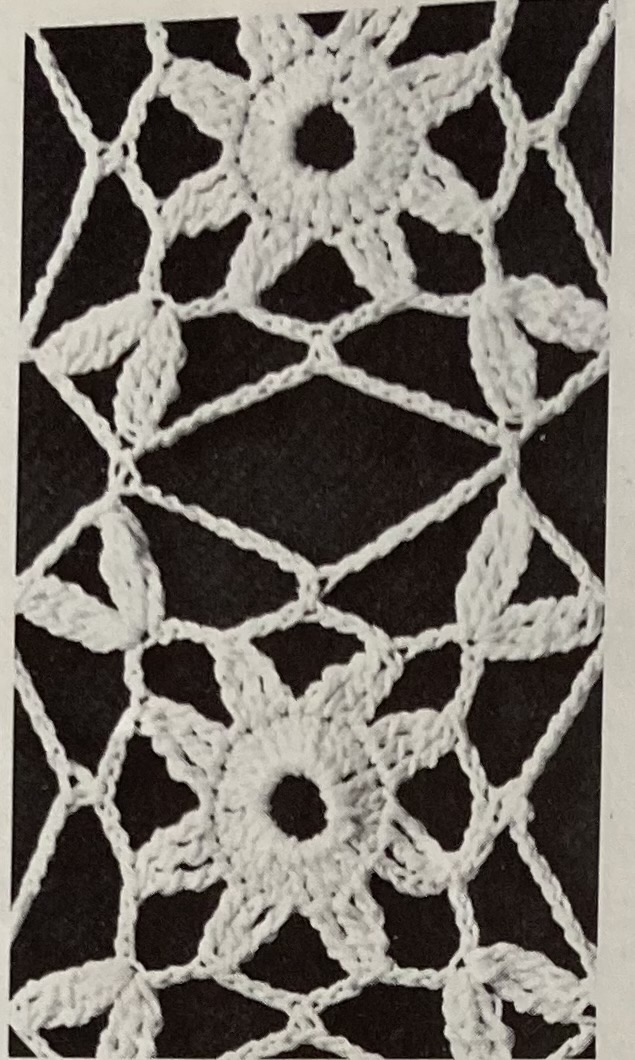
The normal homeware items are, well, normal: two different flower tapestries for a wall panel, the smaller of which can be used for a spectacles case; a tapestry chair seat, a stitched rug and waste-paper bin cover in an easy geometric pattern, a beach bag with beachy motifs (anchor, shell, beach grass) to embroider, or, for people who don’t like to relax on their holiday, a pair of intricately crocheted trolley cloths in a star design.
Saving the best for last, there are designs for two oversized, tall hats. The knitting itself is very easy, but the making-up is complicated, with lots of stiffening in the lining to make the hats stand up off of the head. It feels like Stitchcraft is finally getting into the “fashion fun” era of the 60s, albeit a little late and still pretty conservative.
In the back pages, there’s a teddy-bear motif to knit or embroider and instructions on how to make a pom-pom (two cardboard circles). Eustace the elephant from the children’s comic has eaten delicious buns for tea and helps a mother duck encourage her son to learn how to swim. Finally, “Slip Into Orbit” with these “deliciously private-eye-catching” undergarments from the Scotch Wool Shop! The space age has arrived and we are going to celebrate by wearing pretty underwear.
My project this month will probably be some variant on the animal/flower appliqué or embroidery. Enjoy the Spring!
“Knitting GLOWS with COLOUR and Needlework has Distinction for Spring 1966.” is the headline of the March 1966 issue of Stitchcraft, featuring a new yarn, Patons 101 Double Knitting Courtelle.
“Courtelle” was a synthetic fibre developed in the late 1950s by Courtaulds Ltd, a textile manufacturing company that expanded to include artificial silk (rayon/viscose) at the beginning of the 20th century and went on to produce many different types of artificial and synthetic fabrics, either cellulose-based (acetate, lyocell) or acrylic. Courtelle was an acrylic fibre, 100% synthetic, and featured in many different brands of hand-knitting wool around this time, such as Chadwick’s, Bairnswear (the company was bought by Courtaulds in 1953), Emu or Sirdar in the UK, Sofil, Laines du Pingouin or Georges Picauld in France, Austermann in Germany, Elle, Fiesta or Saprotex in South Africa, Phentex in Canada, and so on. As Patience Horne writes in this month’s issue of Stitchcraft, it was “easy and smooth to knit” (didn’t tangle), “very economical”, and “washes and wears wonderfully” (didn’t shrink or fade). She also claims it was “lovely warm” (pretty sure one sweated in it quite awfully) and “light as a feather” (it was not).
These days, of course we know that synthetic fibres pollute the environment quite terribly in the course of manufacturing, are non-biodegradable and generally not recyclable, and that washing them releases microplastics into wastewater, the long-term effects of which are not wholly known at this point, but certainly not good for human or animal life. Here, for example, is just one very recent and unsettling article about a study published in the journal Toxicological Sciences. To be fair, most of the microplastics found in the study were polyethelene or PVC, which are more commonly used in plastic bags and objects than in textiles, but nylon, used heavily in textiles as well as in other things, was also high on the list.
What to do? I try to avoid buying new synthetic yarn whenever possible. It is not always possible, since many brands and types of wool combine natural fibres with nylon or polyamide. The vintage garments in my closet get worn and used and repaired, washing only as necessary, since the worst thing one can do with plastic is throw it away (doesn’t decompose, can release toxins into air or water if buried or incinerated). One good thing about 1960s and 70s synthetic fabric is that it is virtually indestructible. The dresses and blouses that I inherited from my grandmother or bought in secondhand shops look as new now as they did fifty or sixty years ago, and will presumably keep their bright colour and shape long after whatever environmental/nuclear/zombie or other apocalypse has destroyed humanity. (Maybe the giant radioactive cockroaches will enjoy wearing them.)
Anyway, enough soapboxing and doom. I’m sure you would all rather read about what readers in 1966 could make from this wonderful, evil new yarn! This issue uses it for a “fashion set of 3 garments”: the twisted-rib-and-eyelet pullover on the cover, a “casual dress” in a different type of twisted-stitch, and a sideways-knit pullover for men. All three feature bold and brilliant colours, a hallmark of early acrylic fabrics and in keeping with the bright, fun vibe of a mid-60s spring.
Twisted, textured and lacy pattern stitches show up in the other garments as well, like this update on the “granny” jumper featuring narrow just-above-the-elbow sleeves and a longline body with no extra ribbing or hem treatment, or the tunic-dress with lacy front panel and hem decoration for a little girl.
“Colour for Spring” shows up in a deep gold sweater suit with a chevron pattern made entirely of knit and purl stitches, a short-sleeved jumper in harlequin diamond pattern or a cute stranded hem decoration on a toddler’s “buster suit”. The ever-expanding use of colour photography really makes a difference here — in black and white, the designs don’t stand out, but artfully photographed with matching or contrasting background drops, they really pop.
For those not wishing to follow the pattern and colour trends, there’s a three-piece pullover, slipover and cardigan set for men in smooth beige crepe or brown bouclet, and a “country classic” high-buttoned, stocking-stitch cardigan in DK weight Fiona.
What about that “Needlework with Distinction”? Old-fashioned themes and designs make a comeback this month. There’s an impressive tapestry firescreen and rug with a pattern of early musical instruments guaranteed to “give an air of dignity to your sitting room on those occasions when you have more formal entertaining to do.” Impress your formal guests even more by hanging a homemade tapestry picture of Windsor Castle on your wall! Churchgoers can make a kneeler and prayer-book cover in tapestry, with a floral theme suitable for an Easter service. Spring flowers feature in the Victorian-inspired ribbon garland embroidery for a tablecloth as well, or the simple catkin sprays to be worked on a cushion, tray cloth or placemat.
Last but not least, we have a new children’s serial comic, in which Mark the mouse and Eustace the elephant set out in search of buns. Yum yum.
I love this issue, but strangely, none of the projects speak to me. I will use this month to finish a WIP that has been lying around for ever, namely the cardigan to this “softly fitting” jumper from the January 1962 issue, four years ago. I just need to finish the sleeves and sew some seams, so it should be finished soon.
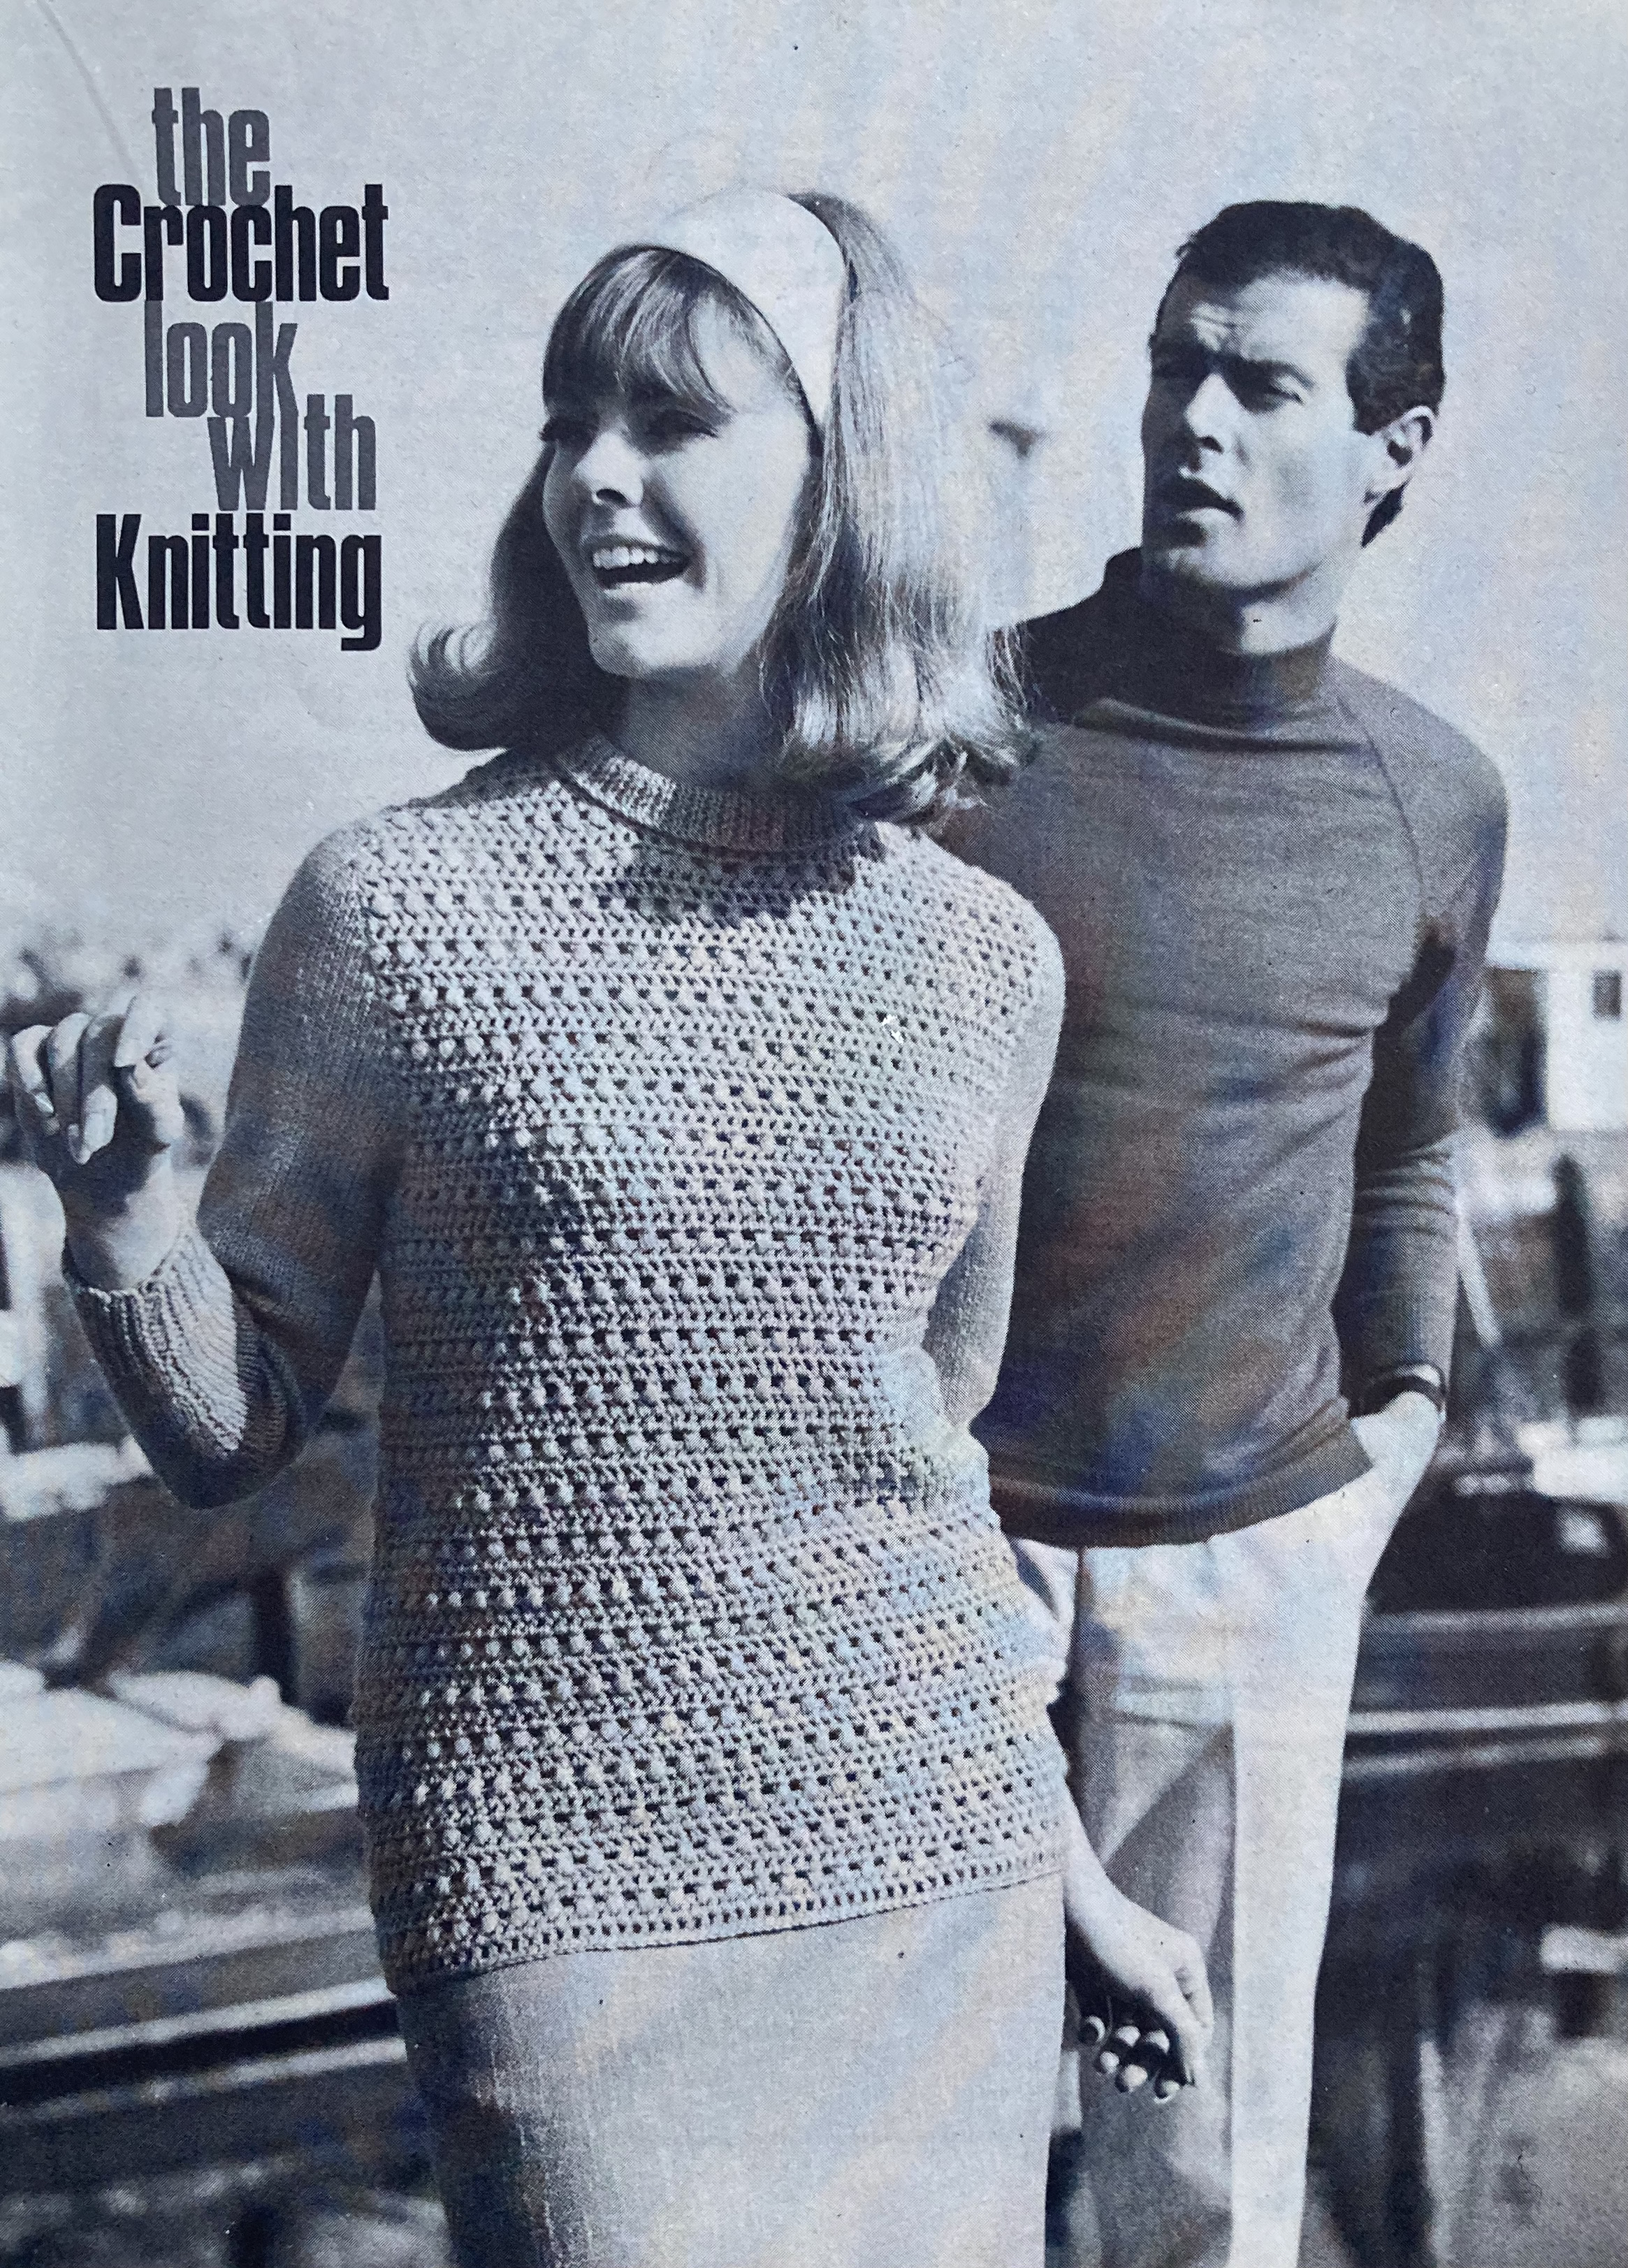
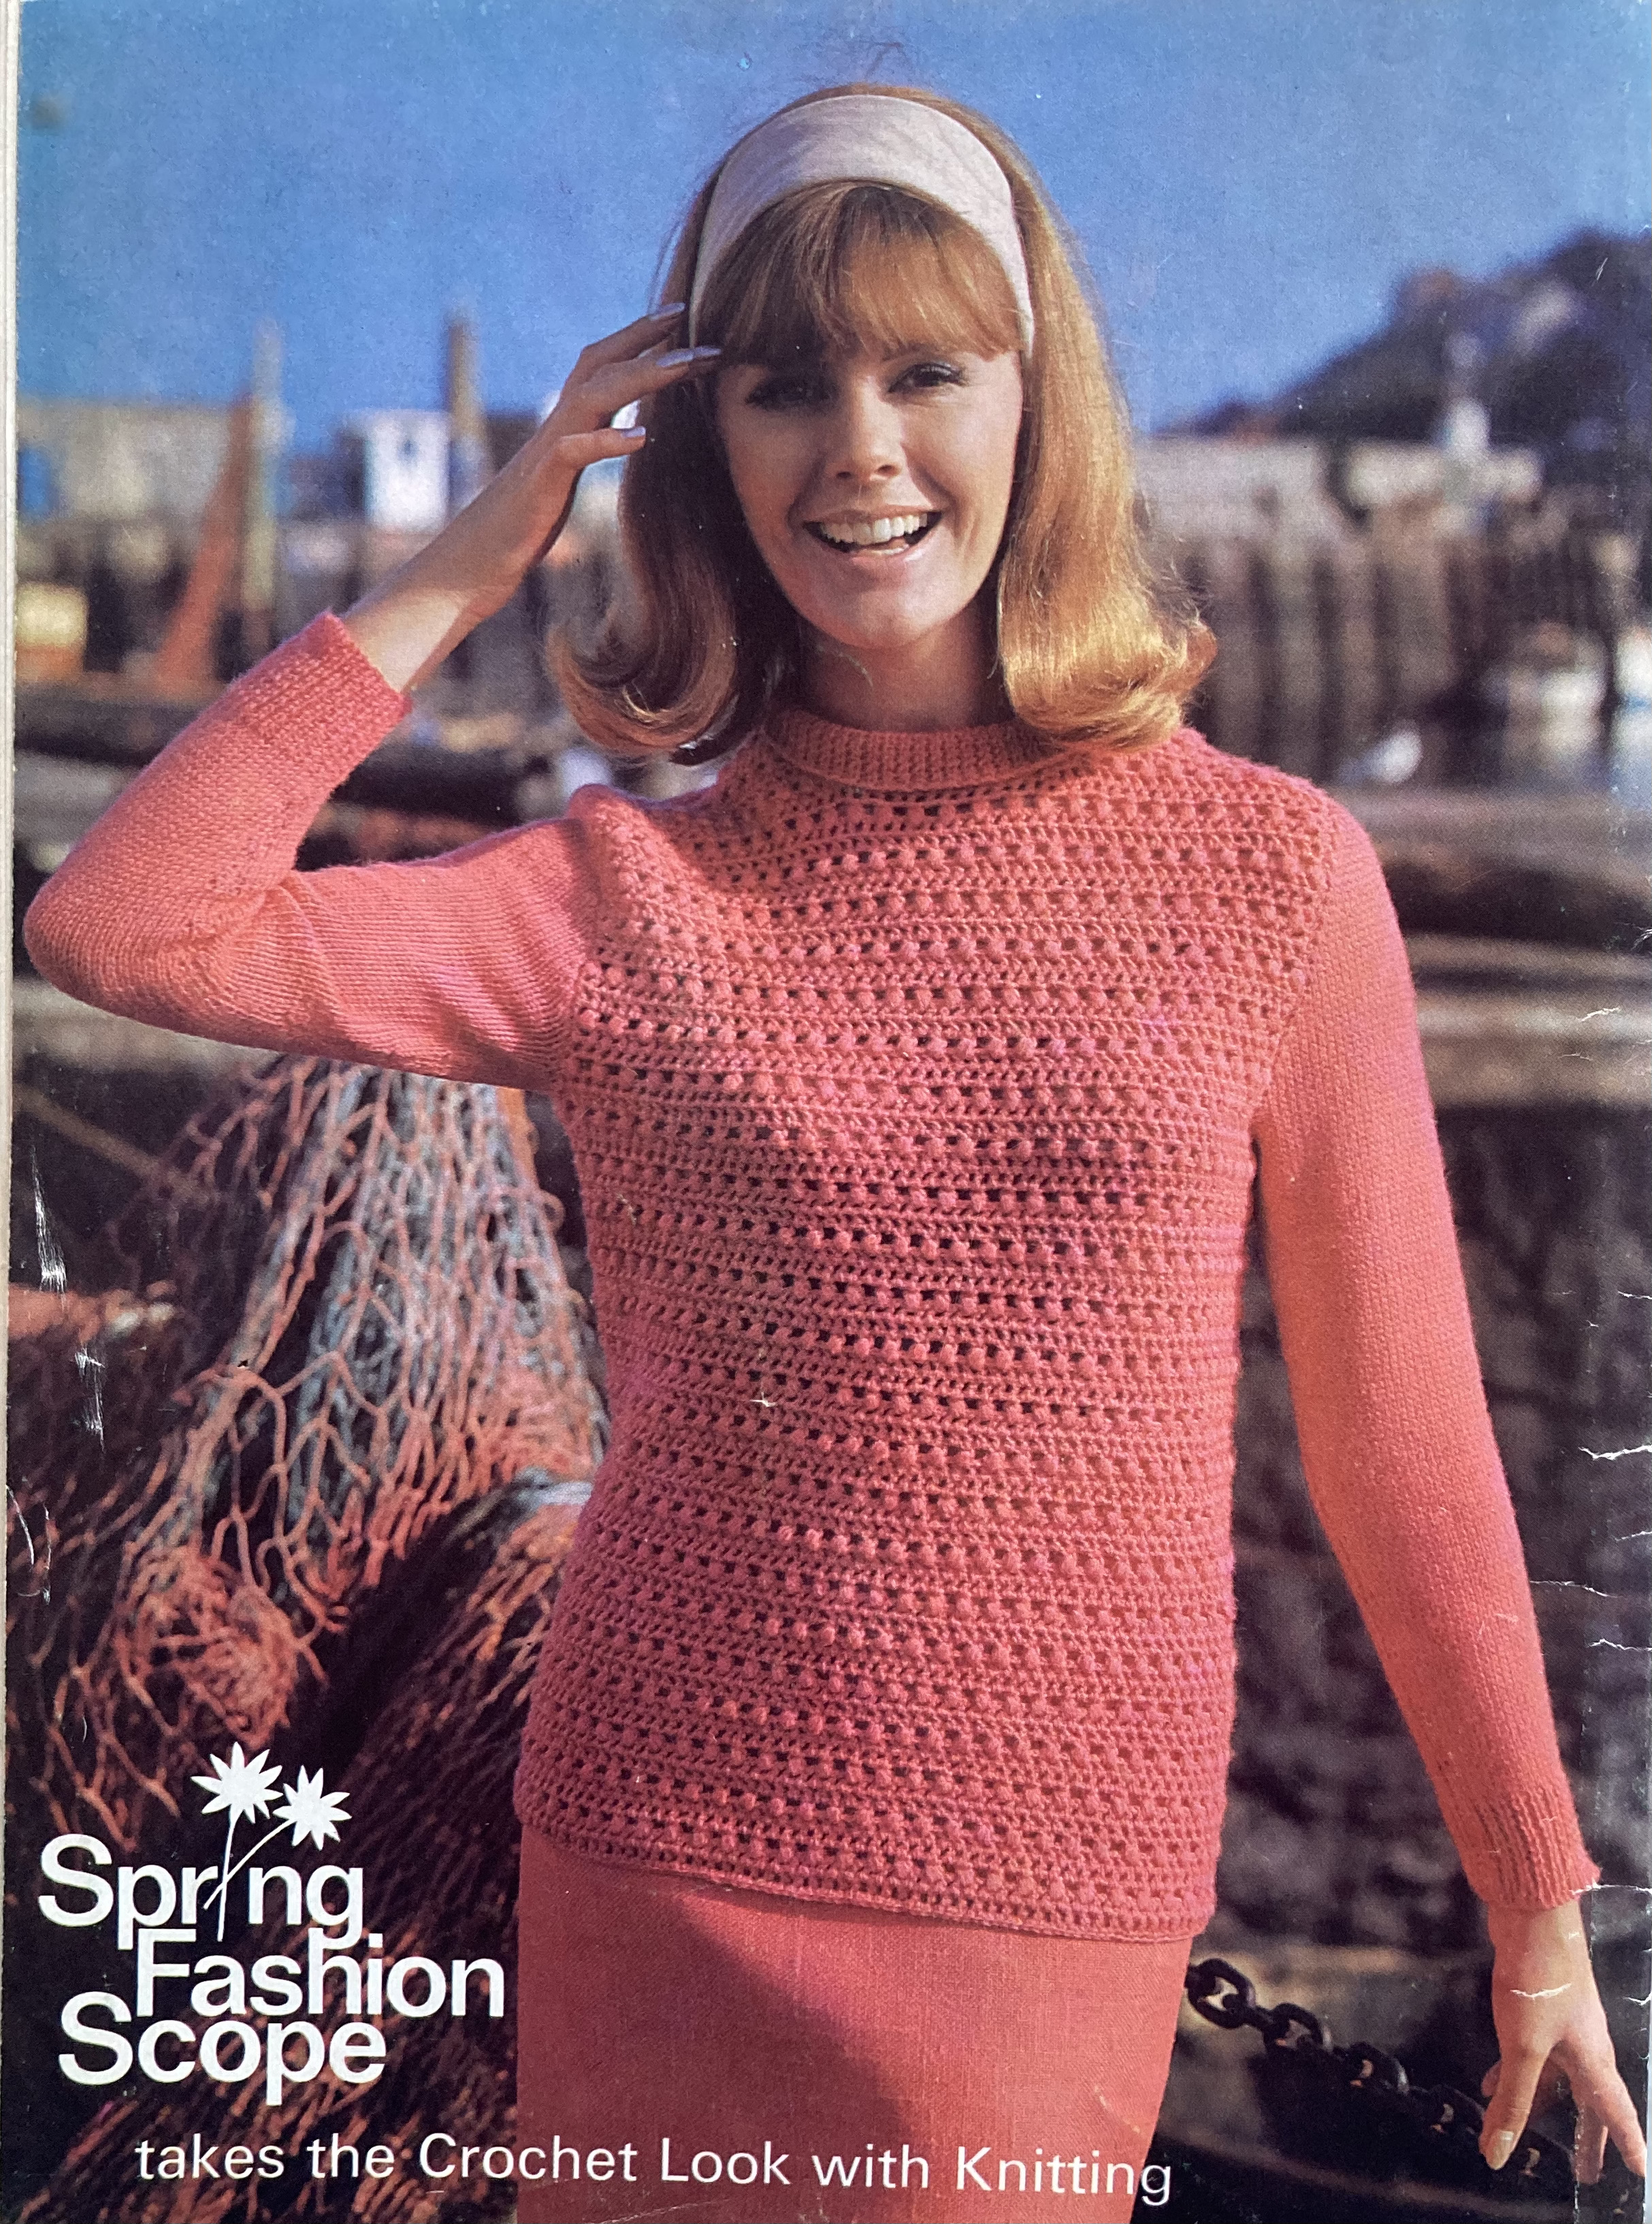
“This is the time to look ahead and start knitting for the first Spring days,” writes “editress” Patience Horne in the header notes to the February 1966 issue of Stitchcraft. I get that feeling in February too. Of course, it is still the middle of winter and one may be drowning in snow or battling freezing rain or waiting out the long grey darkness, but every once in a while (like today), the sun will come out and I can imagine that Spring will arrive at some point. The fashions in this month’s issue are appropriately cheerful and fun, with a special emphasis on “Junior Fashion” for small or school-age children.
The cover ensemble brings back houndstooth, which never really goes out of fashion in the 60s, but was last seen in this form in the earlier years of the decade. It’s a clever choice for a skirt, as the fabric is fairly firm, preventing all too much sagging in the back. The set can be complemented by a wonderful pair of matching-pattern knee socks. Or you can achieve the lastest stitch-pattern trend, namely “the Crochet look with Knitting”, with a sweater that is… well, crocheted, for the most part. Only the sleeves are knitted, in plain stocking-stitch; back and front are crocheted in a bobble-treble pattern. The silhouette for both outfits is long and unshaped, but not baggy: the sweaters have set-in sleeves and high necklines and the skirt sits just above the knee.
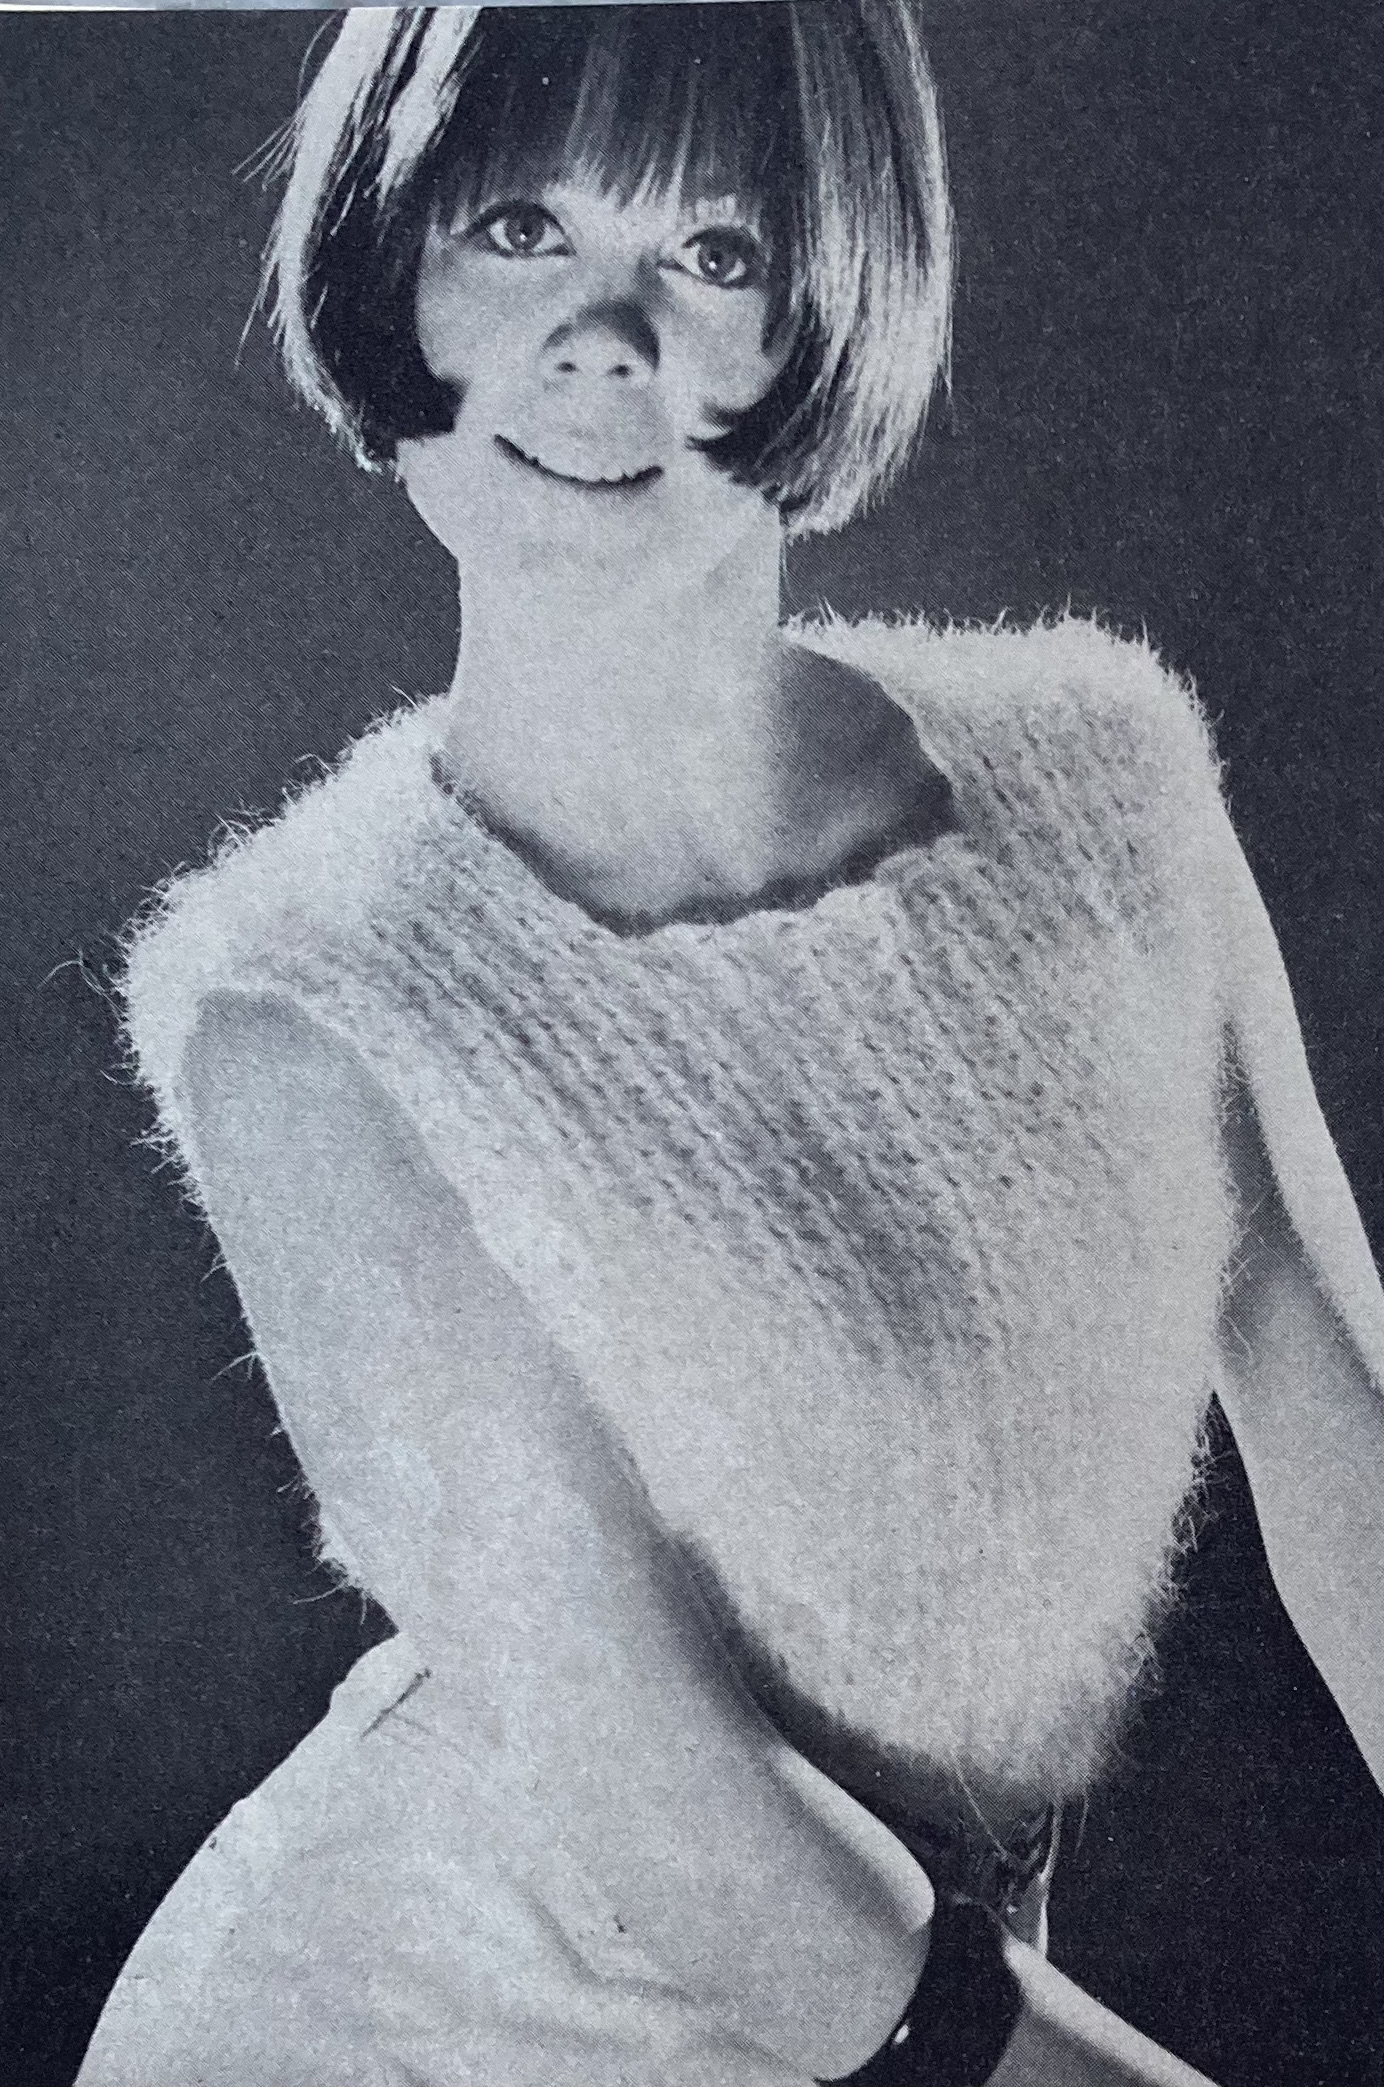
Fans of the knitted look with knitting can make a fluffy lace shell (what a terrible camera angle for the model’s nose), or a classic V-neck cardigan with bobble panels in larger sizes. With the exception of the angora-mohair shell, all are made in DK or slightly heavier wool — it is still winter, after all. Knitters looking ahead to the spring can make a fabulous lace-panel dress with matching cardigan in “Paris Pink” crepe 4-ply. The cardigan has a similar design to the large-size cardigan, just with a narrower bobble band on the fronts and a high-buttoning neck.
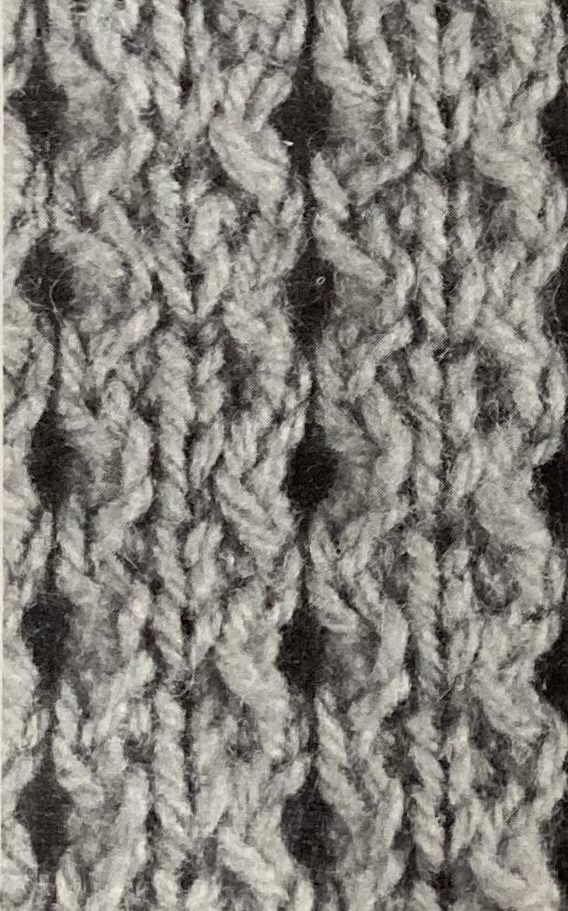
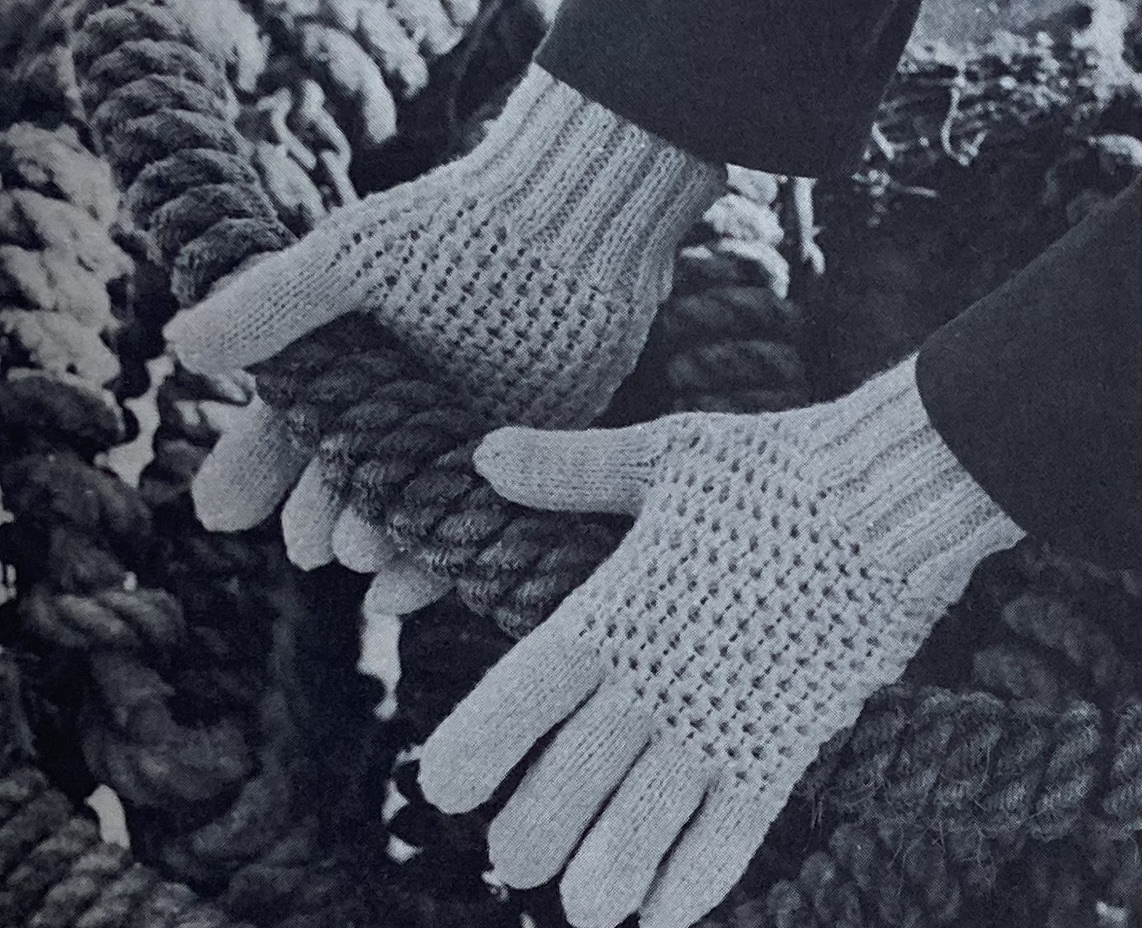
For men, there’s a “sailer with the traditional look” in guernsey style. Instructions are given for “a girl’s a size and a man’s size” (34-36 or 39-41 inch chest) for the partner-look. (Of course, when they say “girl”, they mean a grown woman who doesn’t mind being linguistically infantilised.) The guernsey is nice! There’s a jacket in thick “Capstan” wool for men, as well, which also gives a sort of sailor-y vibe. The interesting stitch pattern is made with twisted stitches set diagonally. Twisted stitches also feature in the men’s “Country Gloves” pattern, where I imagine the stitch pattern makes the gloves particularly warm and hard-wearing.
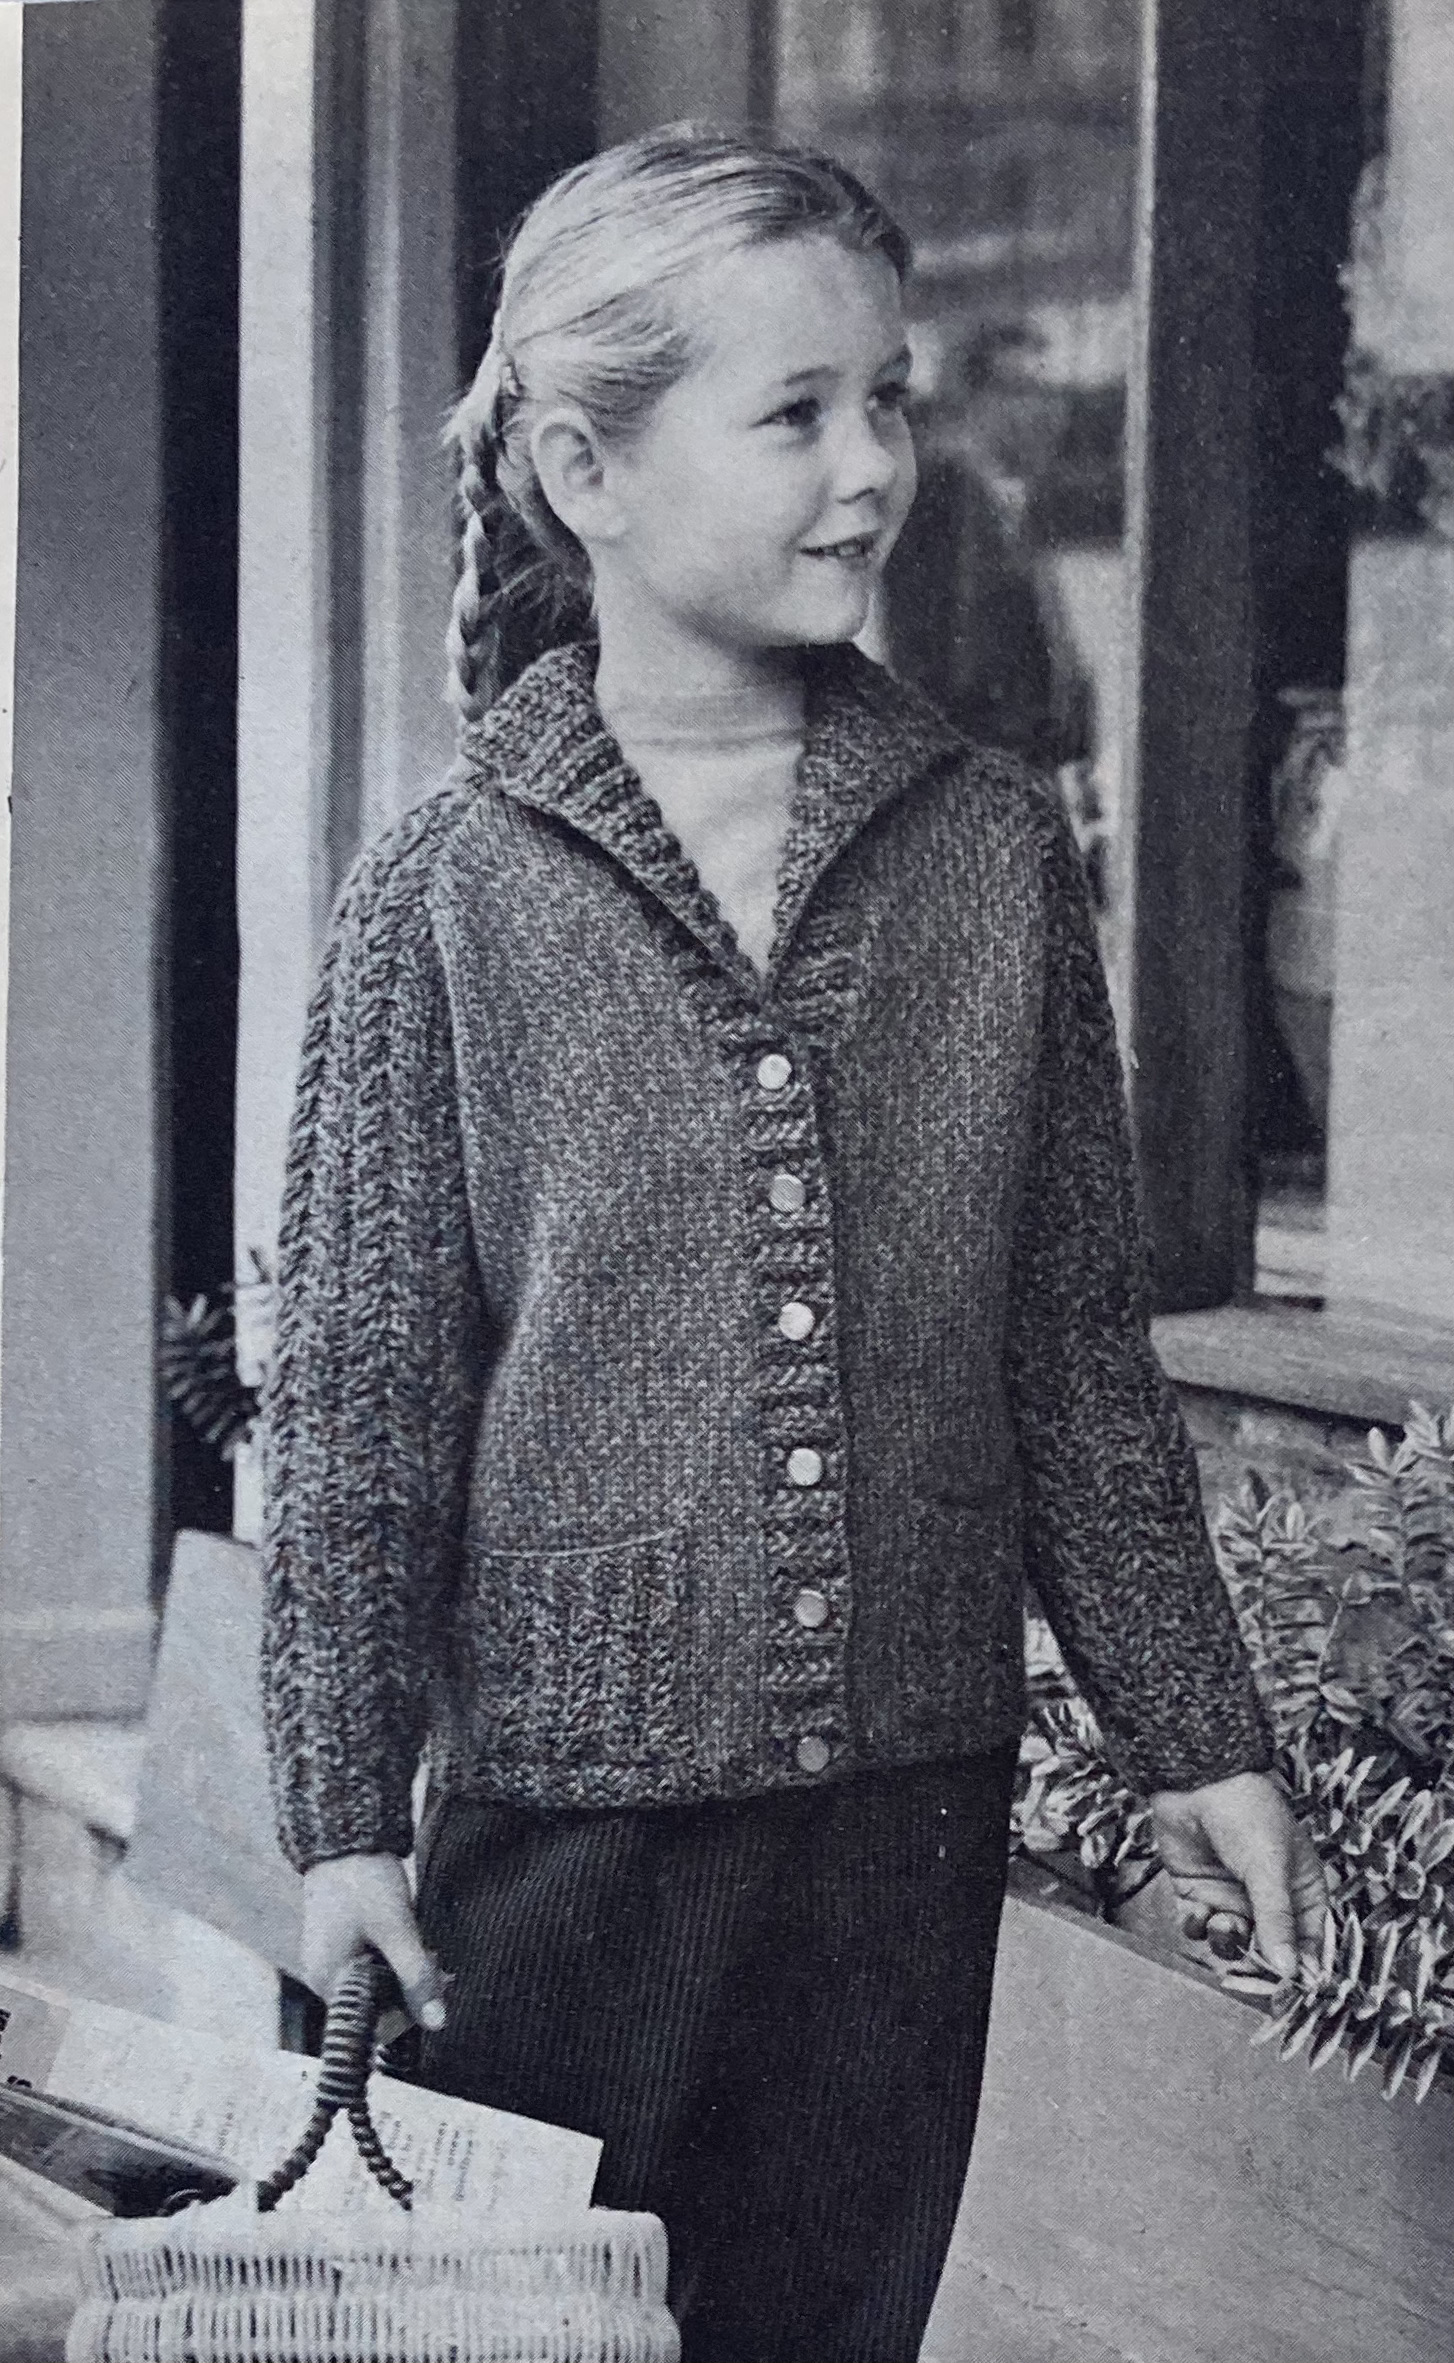
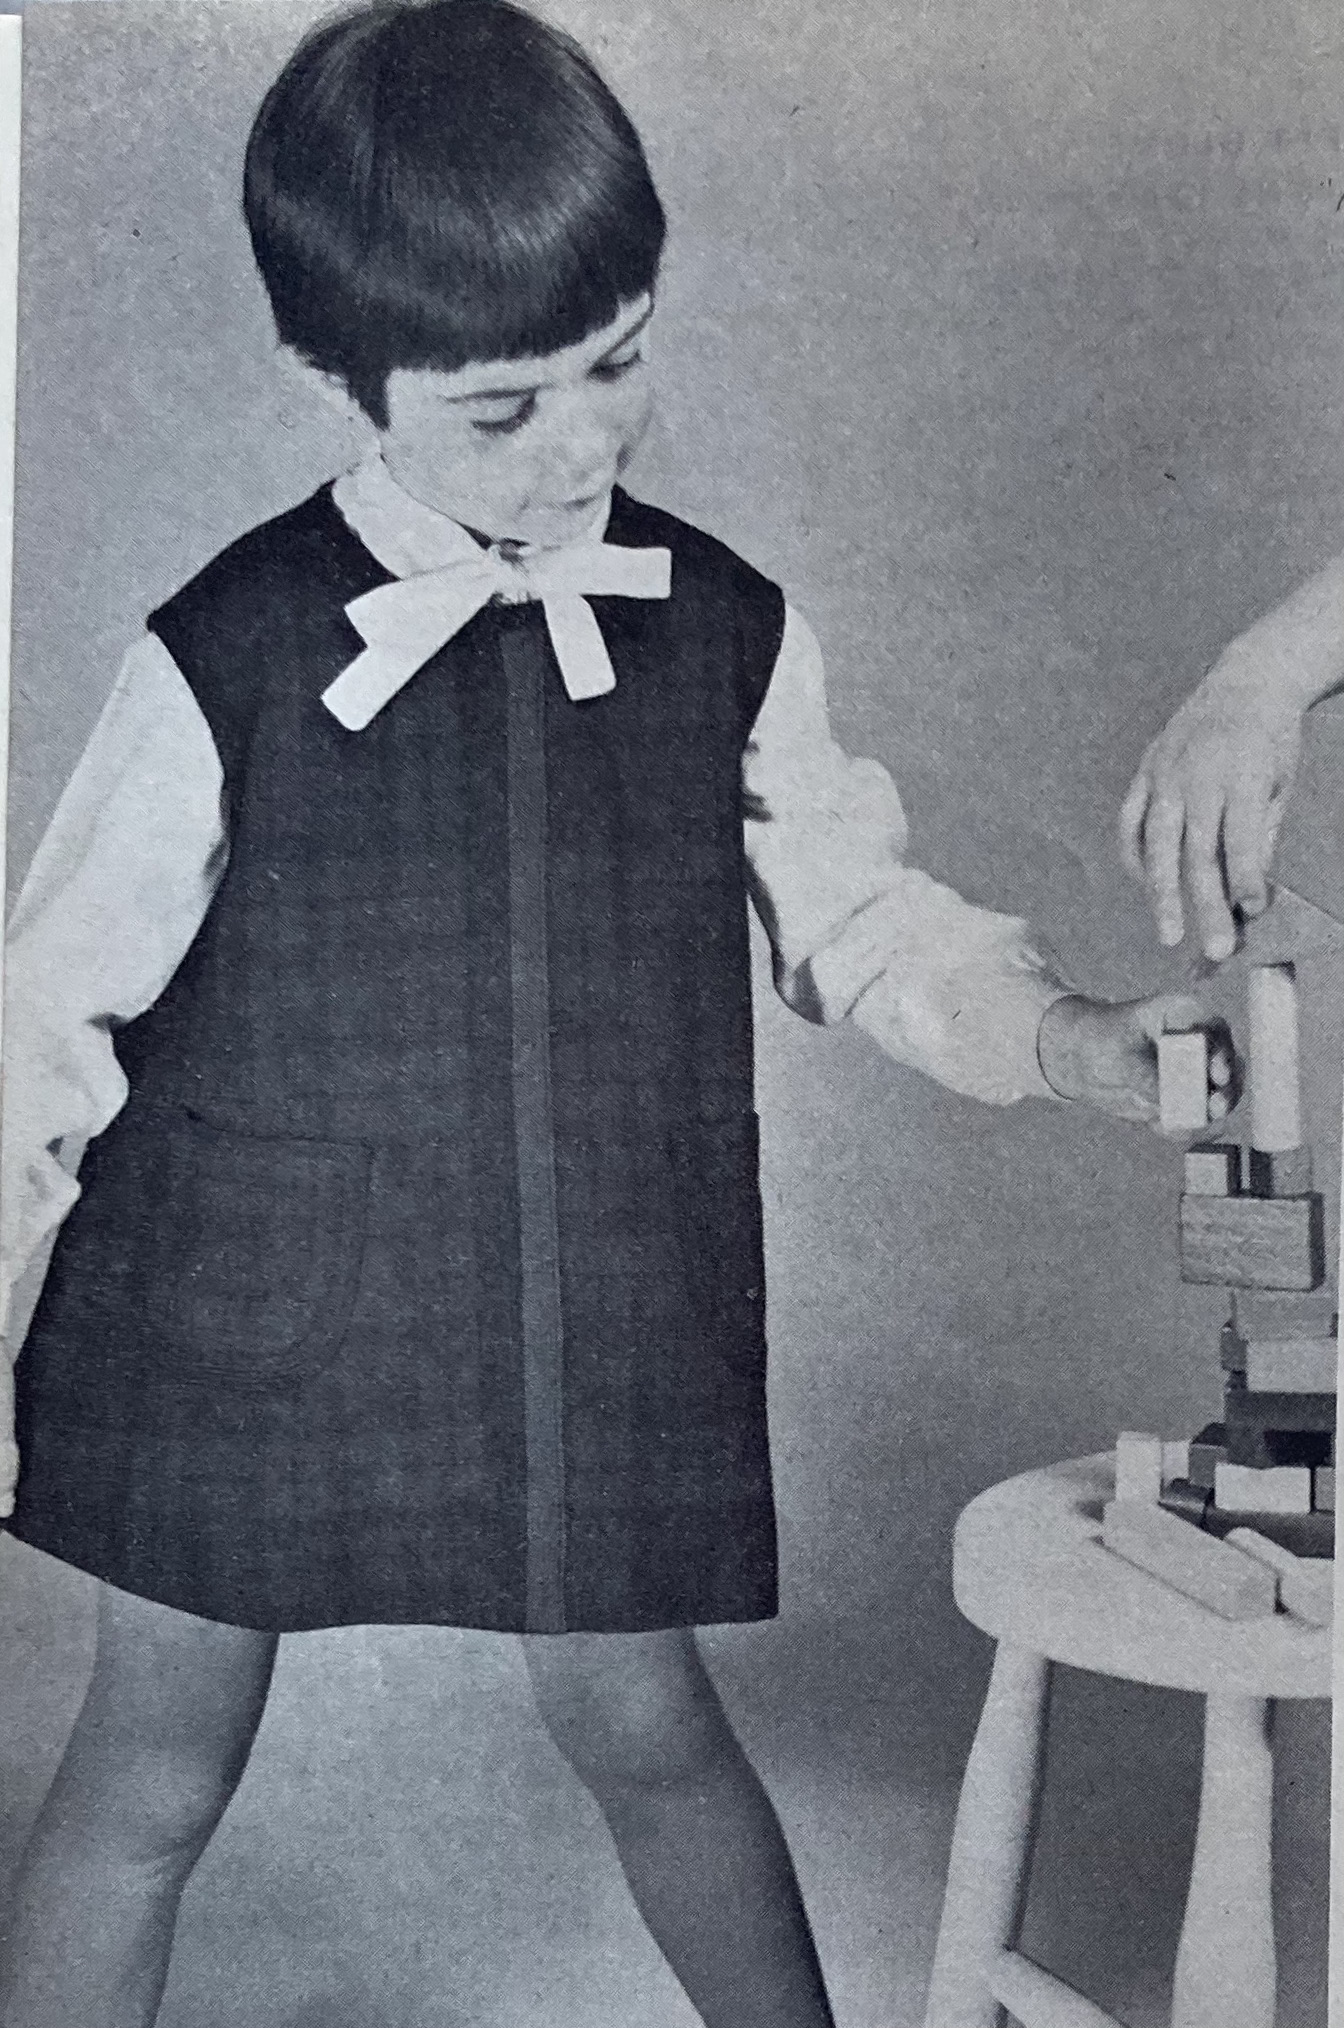
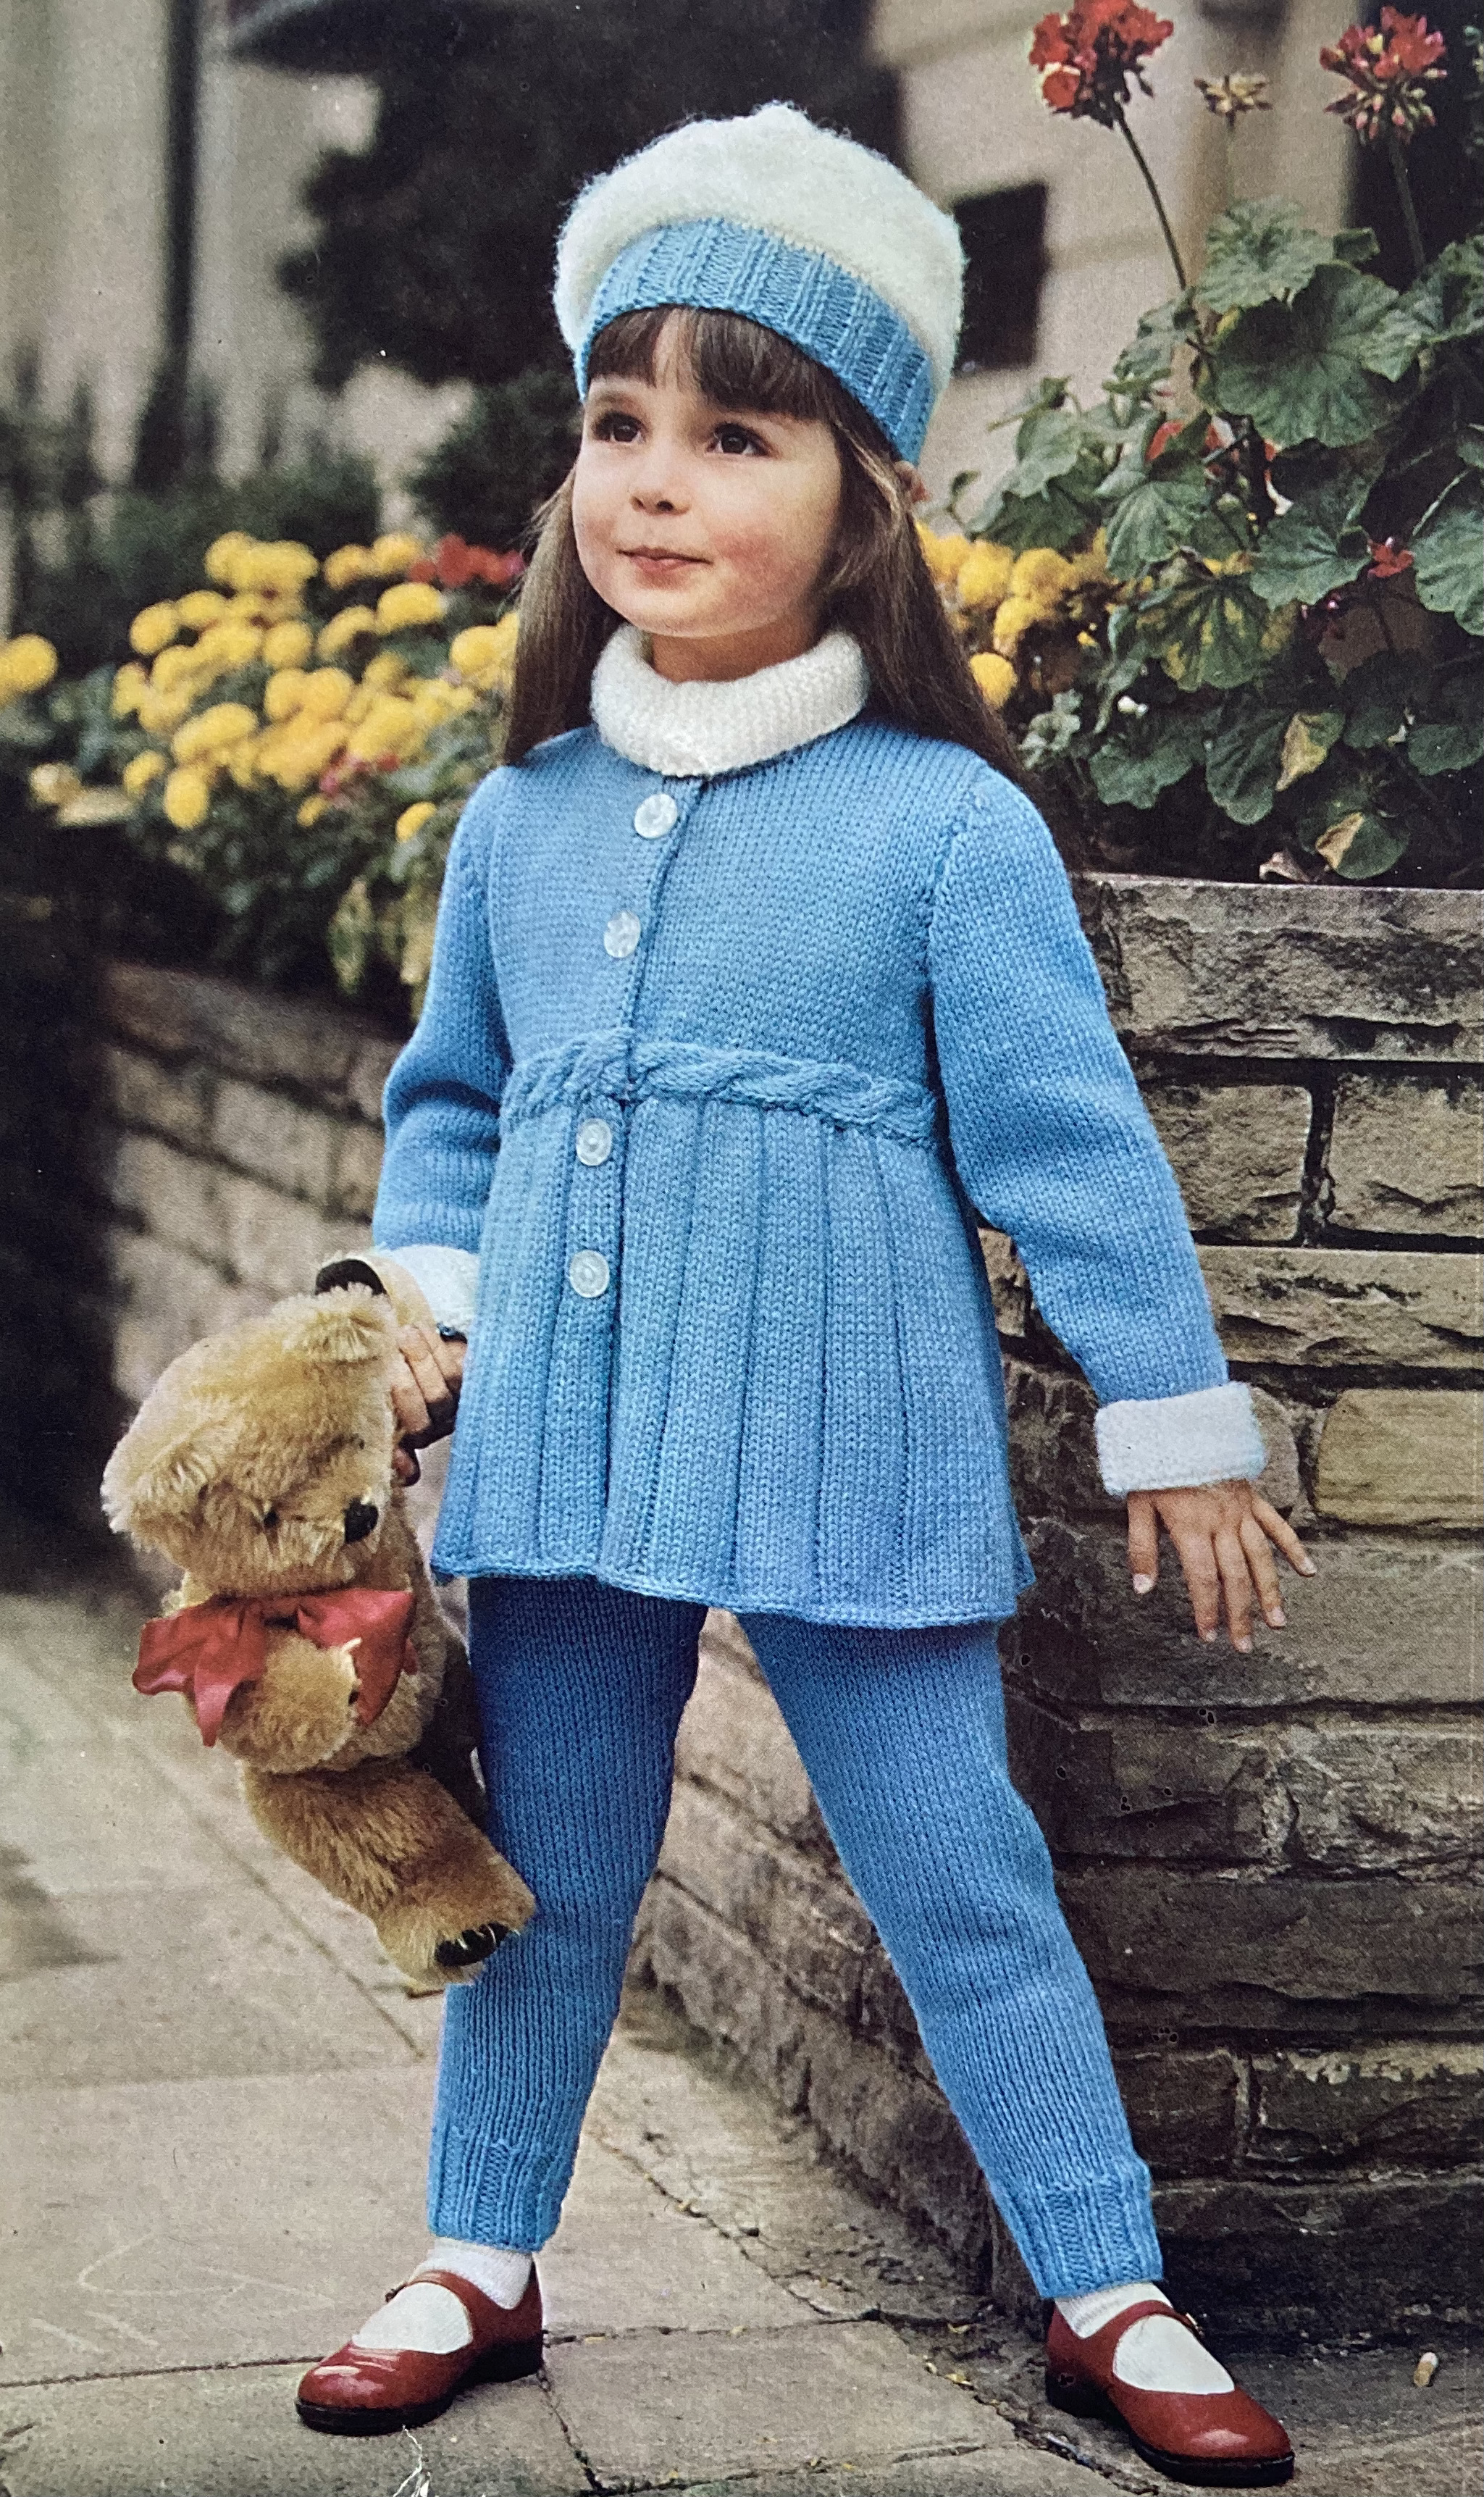
In addition to all that, this issue has some wonderful “Junior Fashion” children’s patterns. There’s a nice thick blazer for an 8-10 year old girl and a knitted shirt with knitted tie to “make a small boy feel very fashion conscious.” If you say so, Patience Horne! There’s a rare sewing pattern, too, for a simple pinafore dress. Best of all is the coat, leggings and hat set for a 3- or 4-year old. The white collar, cuffs and hat are knitted in the same wool as the rest — Shetland-mix “Fiona” — and then brushed with a teasle brush. Teasle or teasel brushes are used to felt and fluff knitted fabric and were often employed in home knitting at the time to give knitted blankets that furry “blanket” texture. Some earlier patterns in Stitchcraft say you should take the finished item in to the haberdashery store or send it away by post to get it professionally brushed; this one assumes that you can do the brushing yourself.
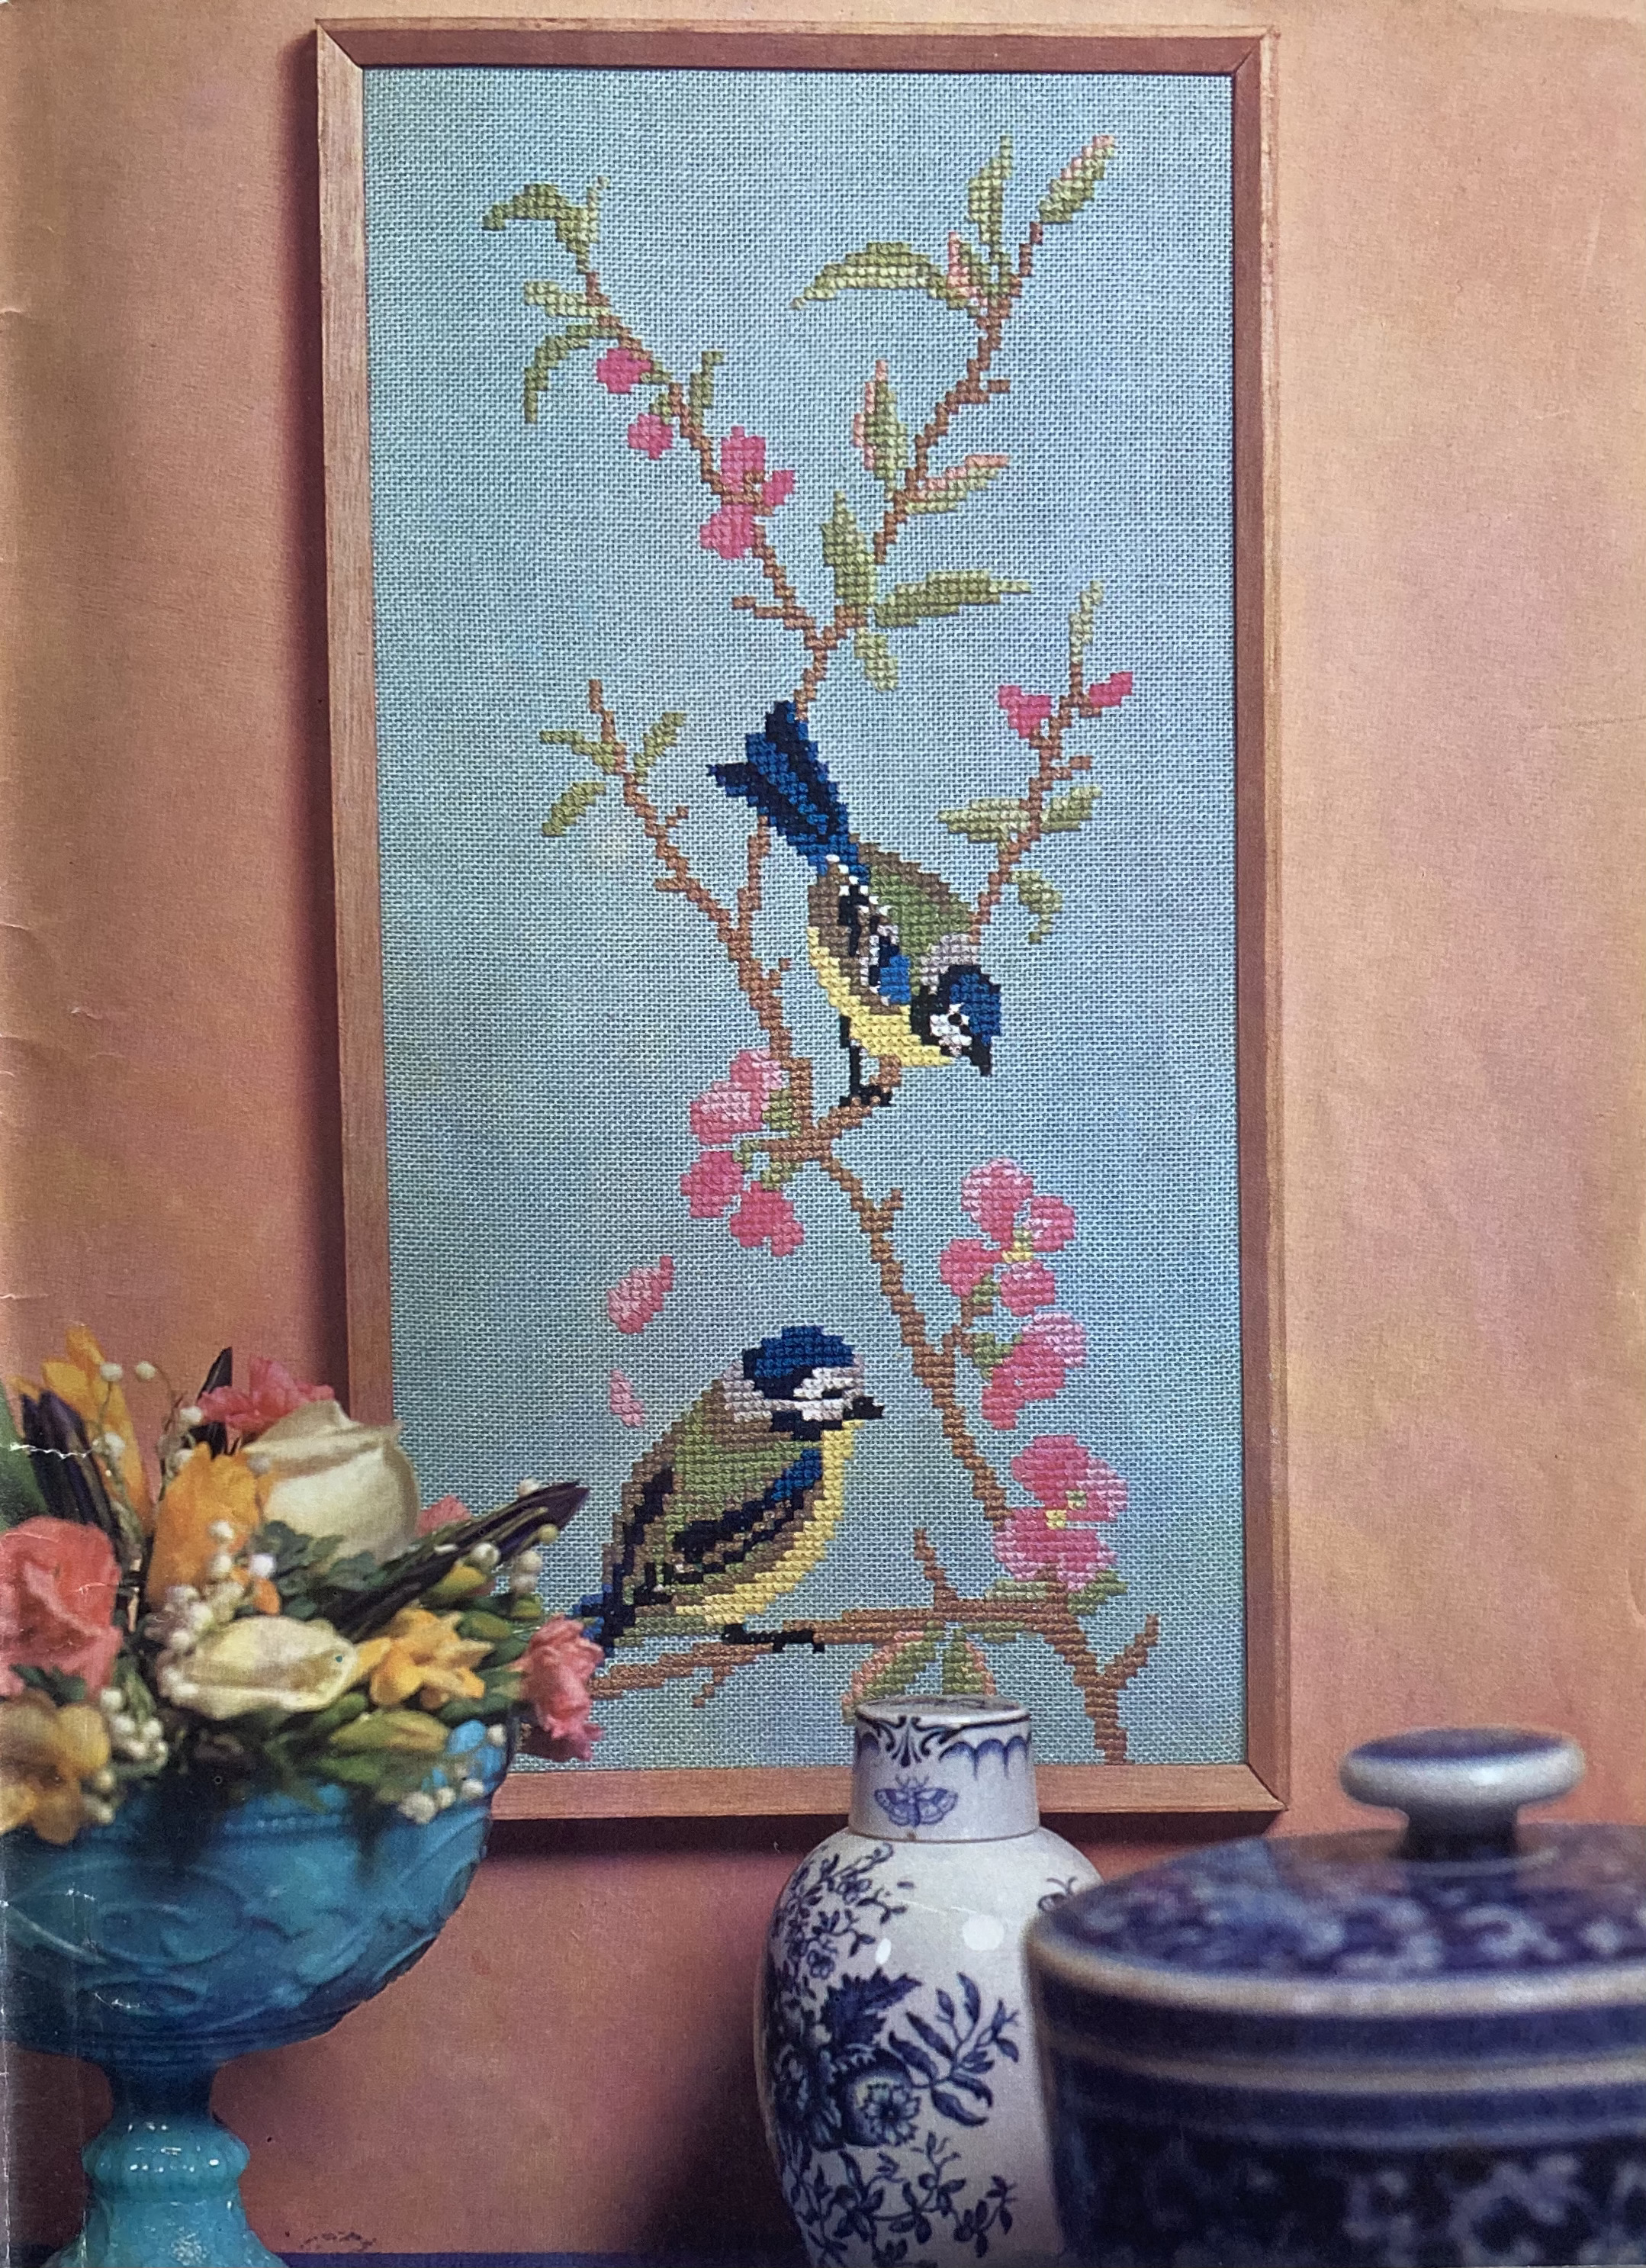
With all these great fashions, it’s no surprise that the homewares in this issue are a bit standard: embroidery for a tablecloth, tea-tray or cosy, embroidered dressing-table mats, or a runner for a Scandinavian-style long coffee table (in very 1960s colours of Tangerine, Coffee and Green), for example. Spring style shows itself best in the stitched rug in traditional floral design, or the birds-and-blossoms wall panel in cross-stitch.
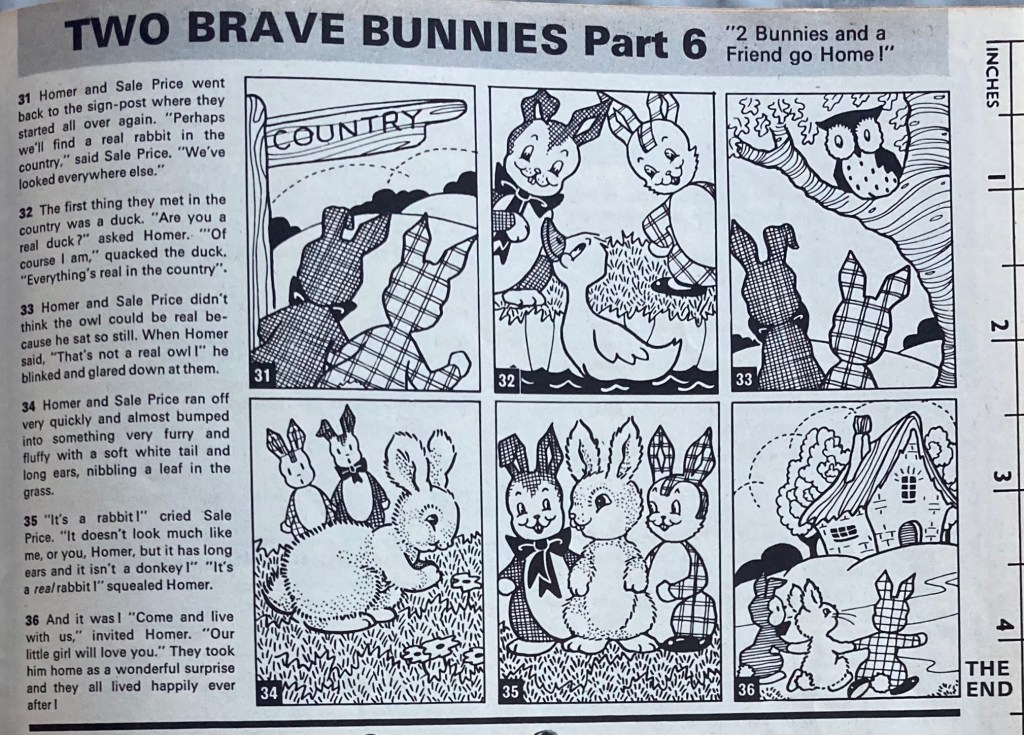
In the Readers’ Pages, we have reached the conclusion of our delightfully silly story of “Two Brave Bunnies” searching the world for a real live rabbit. (For those who haven’t been keeping up: the brave bunnies are sentient sewn toys.) Not having found a real live rabbit anywhere in town, they make the sensible decision to search the countryside instead. Et voilà! They find a real live rabbit and invite him home to come live with them and their human family. A happy ending for everyone involved.
There are so many fabulous patterns in this issue that it’s hard to not spend the next few months making all of them. I love the houndstooth set on the cover and the lace dress with cardigan, the child’s coat, the knee-high socks, the twisted-stitch gloves… Thinking both aesthetically and pragmatically, my choice was the child’s coat and hat set. I have too many clothes for myself right now and don’t want to start a huge new project, and while there are always great fashions for adults in Stitchcraft, there aren’t always nice projects for children. And I happen to know someone with a daughter of the right age and size, who would like it. And since it is not huge, there is a good chance that it might get finished on time. Perfect!
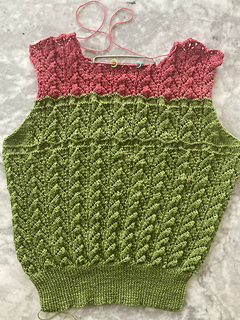
Since there wasn’t anything I really wanted to make from the August 1965 issue, this month’s project is taking us back to 1946. It’s technically not a Stitchcraft pattern (though Stitchcraft magazine was around then), but it is a pattern from Stitchcraft‘s patron wool company, Patons, so close enough for this blog, and conveniently fit into a lace-themed KAL on the All Things Vintage Ravelry forum. The pattern is for a short-sleeved jumper and I’m working to make it into a twin set.
I bought the pattern from the wonderful BlackwaterVintageNtz shop on Etsy and the wool (Yundi & Grete Felice Fingering Puro) from last year’s wool festival in Sulingen (Germany). The wool is a mix of 75% merino and 25% silk, which gives it a lovely softness and shine. I bought 500 grams of green and 200 grams of pink with no set plans for what to do with it, and as often happens, it lay around for a while before it found the right project.
The pattern is from 1946 and, as with many patterns from that decade, information about sizing, ease, tension etc. are minimal. It’s written in one size, for 32 inch bust, with (calculating from the tension given in the pattern) 2 inches of positive ease in the bust — odd for a 1940s pattern, actually, which usually have a quite a bit of negative ease, as do lace patterns, since they stretch so easily. The vintage knitting expert and owner of the BlackwaterVintageNtz Etsy shop Gunwaru on Ravelry had conveniently knitted the jumper herself and wrote in the notes that — made to gauge as specified — her version easily fit a 38 inch-bust dress form. I wasn’t sure if my wool would stretch as much and wanted to reproduce the easy looseness of the pattern photo, so I made a swatch on 3.5 mm needles (pattern calls for 3.75) and added one pattern repeat to each of back and front. This should have given me a 37 inch finished bust, which is a bit of negative ease, but shouldn’t look too tight. I made it one pattern repeat longer as well, as I do for all pre-1960s patterns (I am taller than an “average”-sized woman of the 1940s or 50s and long-waisted).
Well, that all goes to show that swatching and calculating work most of the time. Though my lace swatch hardly stretched in blocking, the finished jumper was generous after knitting and then blocked huge — I could have just made the normal size. Or even smaller! My swatch had no relation to the knitting on the finished garment. Even the sleeves, which were fine before blocking, stretched in both length and width. I had made them shorter since I don’t like just-above-elbow length… if I had made them according to pattern, they would have practically been long.
I couldn’t block it down small enough and in the end, I put it in the dryer to shrink (delicate cycle and not hot, I am not a complete monster.) Strangely, it worked and didn’t ruin the fabric! It is now a reasonable size and fits me. I don’t recommend drying non-superwash merino and silk in a clothes dryer as it is generally really risky (don’t try this at home! I am not responsible for damages!), but in this case, it worked. The yarn did lose a little bit of its sheen and silkiness, but I am willing to sacrifice that if I can get a wearable garment.
As always, we had fun re-creating the pattern photos.
On to the cardigan. There is no pattern for it, so I adapted ideas from the jumper. Sizing was a dilemma, since the jumper was so huge before the dryer manoeuvre, but of course you can’t make the cardigan smaller than the jumper. I decided to make it exactly the same size (plus front bands) and hoped for the best. As for the colour scheme, I wasn’t sure if I would have enough pink yarn left to make both sleeves and yoke, but also not sure if I would have enough green yarn to just make the whole thing in green. This led to a piecemeal approach, since (for example) it would look fine to have just the upper yoke in pink, but not one shoulder of one sleeve. I made at least the start of the front bands together with the fronts for this reason as well. I didn’t want to deal with too many increases in the lace pattern on the sleeves, so I made 4 pattern repeats on a base of stocking-stitch (similar to the way the increases and armhole decreases were made on the jumper.)
It went well in pieces, though I was nervous about the sizing and whether I would have to shrink the cardigan in the dryer as well, or if I could get it down to a size just slightly larger than the jumper. I made the back and fronts (with bands) and finished to the yoke where the colour change would come in the pattern, then finished one sleeve which was quite snug. I blocked the sleeve and it was a fine size after blocking, so made the other one to match.
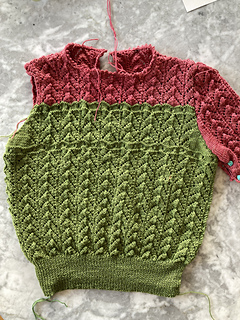
Crossing fingers that it would all work out, I finished the front and back yokes in stocking-stitch in all green (leaving about 10-15 grams of green yarn over, so that was fine) and sewed it together. It was hard to tell whether it was a good size or not, since the lace pattern scrunches up a lot while knitting and I knew that blocking would stretch it out a lot. I didn’t want to complete the button bands on the scrunchy lace, so I blocked the almost-finished cardigan first.
Unfortunately, though the width was OK, and the sleeves were OK if a little narrow at the wrists, the length was unacceptably long. I had made it one pattern repeat longer than the jumper (ca. 3/4 inch) to allow for wearing it over the jumper. But whereas the finished jumper was about 20 inches long (i.e. a little short for me, but appropriate for 1940s style), the cardigan was now 25 inches. The yarn was that unpredictable.
What to do? It ballooned out terribly, of course. It also still didn’t have button bands. I had originally planned vertically-knit bands, started them along with the waist ribbing and left the band stitches on safety pins to continue knitting after the rest was finished. Now I changed tactics, cast off the truncated bands and folded them inward, and picked up stitches for horizontal bands. I calculated the number of stitches to pick up based on the length the cardigan should have been, with the idea that the bands would pull the length together and I could then re-block the cardigan and try to get it smaller.
That actually helped quite a lot — now it was a matter of the back part ballooning still, and of course nothing lying flat in the front. I probably picked up too few stitches along the back neck and upper part of the “V” neck. But I tried blocking it again… Still too long, and not behaving. Well, a short run in the dryer worked for the jumper and didn’t hurt it, right?
Alas, a short run in the dryer (here too, gentle cycle, cool air) was not a good idea this time. After only 10-15 minutes, the cardigan had shrunk massively and already begun to felt. I tried to save it by re-wetting and wearing (while wet, ugh), then pinning it out flat. That got it to a barely acceptable length, but the damage had been done. The sleeves were too tight and too narrow and the fabric had lost its beauty and “bounce”.
I finished it up with buttons and tried to make the best of it, but it’s not good. The cardigan is actually smaller than the jumper and doesn’t stretch any more. The shoulders and upper sleeves are particularly problematic where the jumper fabric bunches up under the cardigan and brings the shoulders out of line. Combined with the puffy 1940s sleeve tops and the too-short sleeves, it makes me look hugely bulky in the upper body. I feel like a gorilla wearing it.
I’m very sad and disappointed, in myself of course for risking the dryer a second time which was obviously a bad decision, but also with this yarn, which I so loved in the skein, but which turned out to be impossible to work with. Swatches, a jumper and a cardigan all knitted from the same pattern on the same needles turned out so wildly different both from each other and before and after blocking. How is anyone supposed to make a wearable garment without being able to calculate how big the finished fabric will be?
Not sure what to do with the cardigan. Maybe I will give it to someone smaller than me who is less picky about fabric perfection. I’ll keep the jumper, of course.
That’s all for this project… May it be a lesson to me!
Since the February 1965 issue of Stitchcraft didn’t have any projects that interested me enough to want to make them, I spent this month working on some eternal WIPs. One of them was this “slim style sweater” in a lace-and-rib pattern from Stitchcraft’s January 1967 issue.
If “Fast Forward, January 1967” seems familiar to you, you are not wrong! I had already made this wonderful “Fashion for Tots” children’s jacket a couple of years ago, and tried my hand at a pleated skirt “pinafore” intended to go over this slim-style sweater (see picture below). The pinafore dress was, unfortunately, a failure, as the wool was too heavy and the finished garment just sagged and sagged. I ended up frogging the whole thing and using the wool for my very first blog project, the Green check jumper from January 1960. Notwithstanding the pinafore, the January 1967 issue is incredible and has so many projects in it that I want to make that it’s a go-to when I can’t find anything I like in a current issue.
The lace-and-ribs jumper was a perfect fit for my stash of green Slow Wool Lino yarn that I picked up a couple of years ago while working on a project in a different city. Sadly, the yarn has been discontinued, so the 300 grams I bought was all there was to be had in this colour (I managed to get 400 grams of salmon pink and made this lovely non-Stitchcraft Clarel last year, as well as 400 grams of bright purple and 300 grams of grey-brown for future projects unknown, at least). Would it be enough?
The body is made in 4×3 ribbing and the “lacy” pattern on the yoke and sleeves is made by doing two yarn-overs ater one another and knitting and purling them on the next row or round, making more of an open rib pattern rather than a true lace. Ribbing eats up yarn, but openwork uses less, so it was hard to call. In anticipation that it might not be enough, I made the sweater from the bottom up in the round and the sleeves knitted-on from the top down. That way, I could use a different wool for the sleeve cuffs and/or neck ribbing if necessary, or make short sleeves, or cap sleeves, or no sleeves.
As it turned out, I was able to exactly use up the 300 grams of yarn to make the sleeves in the normal length. Only the neck ribbing remained. Nobody on Ebay or Ravelry had any Slow Wool Lino on offer in this shade, so I visited my lovely local yarn shop and bought a skein of Rowan Moordale in a slightly lighter shade of green. It’s also slightly thicker and fluffier than the Slow Wool Lino and quite soft, so it worked fine for the neck ribbing.
The finished jumper fits fine, feels soft and comfortable, and looks great. I wore it to my Monday night knit group and we had fun recreating one of the original photos.
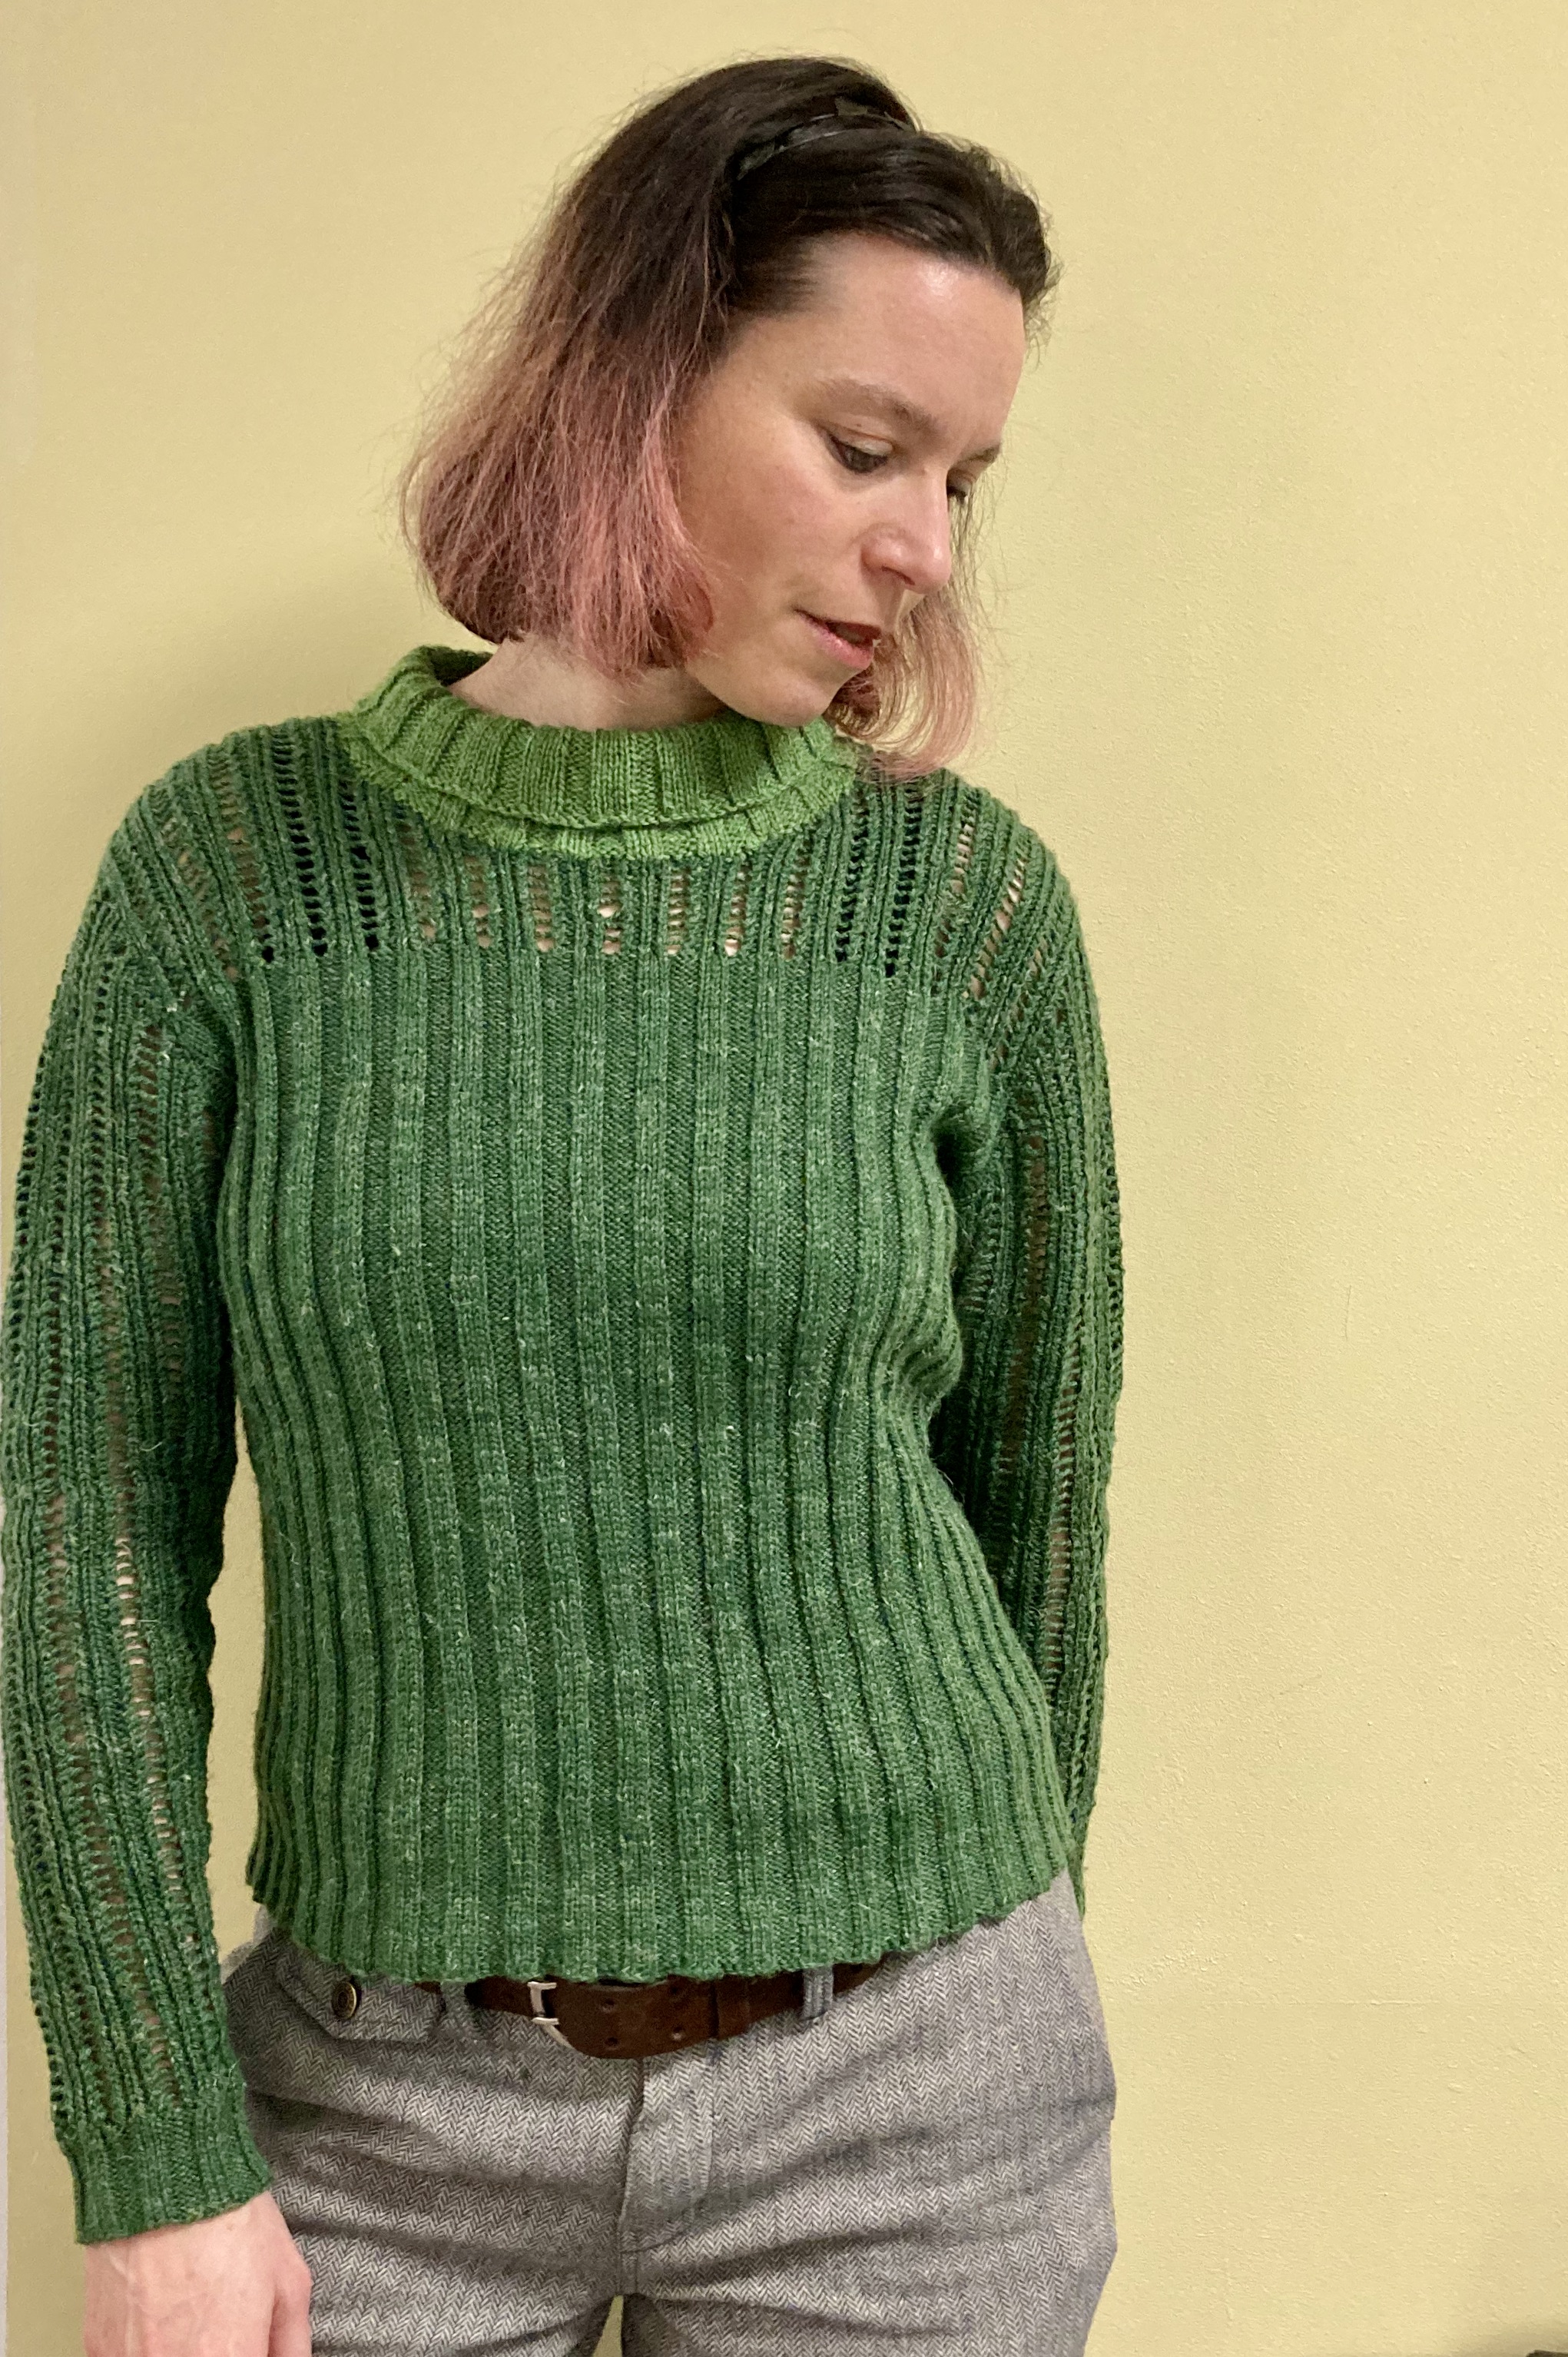
My July project was (emphasis on the past tense) a simple, pretty sleeveless blouse with a decorative square-cut neckline.
It’s written to be knit in (you guessed it) 4-ply wool, specifically, Patons Nylox. According to the Ravelry database, Patons made two different types of Nylox over the years: the first version was 80% wool and 20% nylon, the later version 60% wool and 40% nylon. The photos of the ball bands that I see on Ravelry make me assume that the Nylox used in 1964 was the later, 60/40 version.
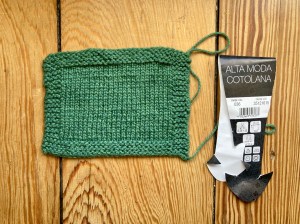
It would not have been very much trouble to find a 60% wool, 40% synthetic modern yarn to substitute, but I much preferred to use a wool-cotton blend, being more natural, nicer on the skin and temperature-controlled than 40% synthetic. I decided to try Lana Grossa’s Alta Moda Cotolana, a 45% merino wool, 45% pima cotton, 10% polyamide blend which was available in my local yarn shop and in colours other than white, neutral or pastel. (Thank you, Lana Grossa, for understanding that some people do not wear light colours even in summer!)
The wool is chained, not plied, and of a sort of indeterminate thickness — it seems to be used more often for shawls and lacy items than solid garments. I got 6.5 stitches to the inch in stocking-stitch on 3 mm needles, which made a nice fabric texture on the swatch and would allow me to make the top with a modified gauge. Or so I thought!
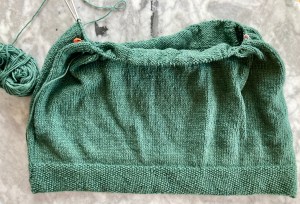
Sadly, this is not the right yarn to make a garment in stocking-stitch. The yarn itself has absolutely no stretch to it due to the high non-wool content and the chain plying. The longer the stocking-stitch tube for the body got (knit in the round with fake “seams”), the more it stretched width-wise. Any attempts to measure, try on, or check the gauge of the garment were futile — it was too slippery and drapy. I frantically tried to save it by decreasing, but it was all to no use, and once the body was pretty much finished (!!), it was clear that it would not work. It was a saggy tent.
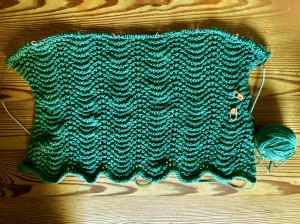
I frogged the entire thing (forgot to take a photo beforehand too, sorry) and thought about how to solve the problem. The easiest way was to choose a stretchy pattern stitch to make up for the lack of stretch in the yarn. A sleeveless top in feather-and-fan (a.k.a. Old Shale, Old Shell) lace would be pretty, stretchy, easy to knit and have a somewhat earlier vintage feel, so that was my choice. I made it flat in pieces with plenty of negative ease and adding some waist shaping to avoid any sagging or floppiness.
As I knitted, I remembered seeing an older Stitchcraft pattern with a pattern for a similar blouse in it. I didn’t know which issue it was, but a little digging turned it up: December 1949. Of course, the Stitchcraft pattern is for a different weight of wool as well a a different size of person — and even a different stitch count in the pattern repeats — so there was no point in trying to re-create it step for step, but I used the photo and general shape as a guide.
I made the waist shaping by increasing and decreasing, which was not as difficult in the lace pattern as one might think. The neckline is square and edged with just a couple of rounds of garter stitch. I did the sleeve cap shaping by guesswork and it turned out fine.
My only complaint is, again, the yarn. The top — made with at least four inches of negative ease everywhere — fit OK after knitting, but stretched during blocking. When I put it on this morning, it still fit fine, if a bit loosely, but by evening, it had sagged and stretched widthwise. As nice as this yarn seems, it is utterly useless for knitting garments, as it refuses to hold any shape and its elasticity only goes in one direction. What a pity, as it has excellent temperature-control properties (it was 32 degrees C today) and feels lovely to the touch! I’m happy with the finished result, though, and will probably wear it a lot.
The June 1962 issue didn’t have any projects that appealed to me enough to make them, so I used the time to finish up a project that I’ve been working on off and on for the last few years: a “4-coupon” twin set from Stitchcraft‘s February 1947 issue.
The “4-coupon” title refers to the clothing coupons used when purchasing rationed items during and after World War II. Rationing began for many food products in January of 1940 and extended to clothing in 1941, whereby clothing coupons could also be used for household textiles or wool. The Wikipedia article on rationing in the United Kingdom during World War II gives a sense of the coupons’ comparative value:
There were 66 points for clothing per year; in 1942 it was cut to 48, in 1943 to 36, and in 1945 to 24. This system operated through a “points” system… [ ] …Clothing rationing points could also be used for wool, cotton and household textiles… [ ] … The number of points that each piece of clothing would be valued at was determined by not only how much labor went into making it, but also how much material was used. A dress could run someone 11 coupons, whereas a pair of stockings only cost 2. Similarly, Men’s shoes cost 7 tickets, whiles women’s cost only 5. In 1945, an overcoat (wool and fully lined) was 18 coupons; a man’s suit, 26–29 (according to lining); Children aged 14–16 got 20 more coupons.
The twin-set uses 8 ounces of wool, so apparently one coupon could get you two ounces of (2-ply) knitting wool. (Just to be clear, one also had to pay for the items; the coupons only limited the amount people were allowed to buy, regardless of how much money they had at their disposal.)
The influence of rationing can be seen in almost every aspect of 1940s issues of Stitchcraft: occasionally titles of designs, such as this one, but more often in recipes and advertisements. These two, from the pages of the 4-coupon pattern, promise that the company in question is “sharing out their dress and lingerie fabrics as fairly as possible” and reassure that “it won’t be long until we can have really new lingerie” (lace and frills were banned, and nylon was needed for parachutes et. al., hence the plain, home-sewn cotton nightgowns).
Many products remained rationed after the war, including clothes rationing, which lasted until March 1949. It was only in 1954 that the last rationing measures were lifted. Since then, the only product that has been subject to rationing in the UK was petrol, briefly, during the Suez crisis of 1956-57. And yet, as the global Covid-19 pandemic continues to rage around us, there have been discussions in many countries — including wealthy countries with excellent medical infrastructures — regarding the rationing of personal protective equipment, ventilators and medical supplies. The past is not as far away as we might think.
Booklet photo, February 1947
I had plenty of time to ruminate on that while finishing this project, which I started as a “home away from home” project in 2016 (a year in which I effectively lived in two different places) and finished in home isolation in 2020. The wool — Onion Nettle Sock — is a mixture of 70% sheep wool and 30% nettle fibre. I would never have thought to knit with nettle fibre, but it works very well! It is smooth and somewhat shiny and the textured lace pattern shows up very well with it. Also, it reminds me of various fairy tales involving our heroine knitting shirts for her brothers out of nettle plants (or aster flowers, depending on the version and translation), like Die Sechs Schwäne (The Six Swans) by the brothers Grimm, or De vilde svaner (The Wild Swans) by Hans Christian Andersen.
As always, I am larger than the 34-inch-bust size for which the pattern is written, but also get a looser gauge, so it worked out for me to make the pattern almost exactly as written. I made the sleeves and the body of the jumper in the round, adjusted for length and changed the sleeve cap slightly for less puffiness, but otherwise I didn’t need to change anything. Of course, the lace pattern is stretchy and can be blocked tighter or looser.
Said pattern was the first one I had worked with that increased and decreased in the course of the pattern repetition, and I was at a loss to deal with the side-seam and sleeve increases and decreases at first. The pattern, like all vintage patterns from this period, assumes you know what you are doing, and there are no charts in any case. I learned a lot and I can see that the side increases on the cardigan are much nicer than on the jumper! (Carefully photographed as to be unnoticeable, but believe me.)
My buttonhole spacing on the cardigan was off, so I ended up sewing most of the holes closed ad carefully cutting new ones after backing the bands with ribbon (a common practice at the time, especially on tight-fitting cardigans, to keep the bands from stretching out and gapping across the chest.)
All in all, this is a wonderful design and very flattering to the figure. Nota bene, my upper body is broad and flat and I am not exactly model-thin, but this ensemble somehow manages to make me look both svelte and curvy. The wool/nettle fingering weight is perfect for fall and spring. I love the buttoned placket and collar of the jumper. Knitting this was definitely worth all the time and hard work and it will be getting a lot of wear for years to come.
May 2020 went quickly and is already over, but (spoiler…) my May 1962 project didn’t get finished until June. It was a lightweight pullover in 3-ply wool with three-quarter sleeves and a lacy yoke, simple, elegant and “in a cooler trend for summer.”
I bought the wool — Regia 3-ply, which has long been discontinued — from a wonderful little wool shop in my town that used to sell and maintenance hand knitting machines as well. It was a tiny, one-woman operation with unpredictable business hours, whose elderly owner lived in the apartment above the shop. She often had vintage second-hand knitting machines for sale and I always meant to buy one, but the times when she had one available and the times when I was able to actually find the store open never seemed to coincide, and sadly, she passed away last year. There were no knitting machines left in the close-out inventory sale, but still plenty of fine-ply wool, which is almost impossible to find in normal wool shops these days. RIP lovely little store and lovely lady who ran it! I will think of you whenever I wear this jumper.
In spite of the fine wool and small needles (2.5 mm), I was unable to get the required tension of 8 stitches and 10 rows to an inch, so I adapted and made the smallest size, which should come out to fit me. I say “should” because the lace pattern used on the sleeves and yoke bunches together quite a lot before blocking. I blocked both sleeves on the needles to try and measure it out (see photos…) but I still wasn’t sure if they would fit properly onto the yoke. They did, with no further alterations.
The only real alteration that I made (besides making the body in the round to save time and seaming) was to alter the decreases on the front and back after the armhole bind-offs and before the beginning of the yoke. The pattern is written with identical back and front pieces, but I wanted the yoke to hang down further on the neck on the front than on the back, so I make the back pre-yoke part longer and the front pre-yoke part shorter by decreasing more or less frequently than in the pattern.
The lace stitch refused to block out flat, no matter what I did. I wash-blocked, stretched and pinned both sleeves before making the yoke (see photo above) and they had bunched up again by the time I was done knitting. I wash-blocked, stretched and pinned the whole garment after completion and the sleeves bunched up again five minutes after I unpinned it (dry). I pinned the sleeves and steamed them, then ironed them with the same result. Did I mention that this yarn is 75% wool and 25% acrylic, which normally blocks for good when any kind of heat is applied? Well, no matter what I did, it didn’t take. The yoke stretches out naturally while worn, but the sleeves bunch up. Since they are supposed to be below-elbow-length anyway, I decided to call it a design feature and live with it.
On the whole, I’m quite happy with it, and it’s the perfect weight for cooler summer days.
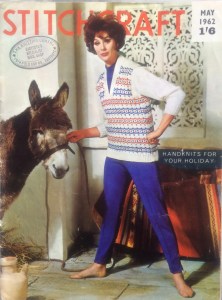
Handknits For Your Holiday! If you are planning on taking a holiday in 1962, that is. In that case, I would recommend going to the Algarve in southern Portugal, which, based on the pattern of the window shutters and blanket in the background, is where I am guessing this magnificent cover photo was taken. Sadly, my time machine is out of order and May 2020’s motto is (Lots Of ) Handknits For No Holidays This Year Or Probably Anytime Soon.
I bought my copy of this issue on Ebay, but apparently it originally came from “The Knitting Centre” on Field End Road in Eastcote near London. I actually checked to see if it still existed but sadly, it seems to not be there anymore, nor is there any other knitting or craft shop in the area as far as Ravelry and the digital map can tell me. It would have been fun to be able to trace a 50+-year-old knitting magazine issue back to its origin!
Like most of the late-spring or summer issues, this one has a mix of quick, warm, bulky sweaters for holidays in northern climes and some finer, dressier items for that special going-out evening. “The boy friend” can get wild in a colourful, oversized mid-weight sweater, while “you” enjoy your evening in a bobbled jumper. For casual outings, there’s a raglan polo-neck and the “latest look in twin sets” — a short-sleeved jumper in lighter-weight wool with a heavier V-neck top worn over it. (The donkey seems to like it.)
The “cooler trend for summer” includes a pretty short-sleeved blouse and a fine-knit jumper with a lacy yoke as well as a cute dress and cardigan for a small child, made in terry-cloth Rimple yarn with fluffy appliquéd chicks.
Older children get their own holiday hand knits and nothing says “1962” like this little girl sporting a spectacular up-do, thick warm cardigan, knee socks and basically nothing else on her body. How is she supposed to play badminton in a skirt that doesn’t even cover her bottom when she’s standing still? Her tomboy sister gets a much better deal in her knitted shirt and shorts. White and pale colours are always on point for summer and lemon yellow is the new colour trend.
The homewares department is quite boring this time, but there is a reason for that, as “editress” Patience Horne explains on the facing page:
After our end-of-the-year check through our embroidery and tapestry features, it is clear that designs of the more traditional type head the list — others in a modern style are way down and definitely have more limited appeal. I think this is because more traditional designs never date and seem to fit in well with most homes, whereas a completely contemporary design requires almost its own special setting.
Well, there you have it. Readers usually had to send away for the embroidery transfers, so it must have been easy enough to determine which designs were most popular, and the most popular embroidery designs of 1961 and the most popular embroidery design of 1960 were “peasant motifs” and two Jacobean cushions, so we can expect more of the same. The May 1962 Jacobean cushion is certainly very pretty and there’s also a cutwork tablecloth, other table linens and a “Chippendale” tapestry stool.
There’s also a “cushion for the car” with the cryptic motif “II3LMF” on it. I assume it must be a reference to some sort of gearstick / gearknob / automobile part code, but I can’t interpret it and Internet searches for vintage gearsticks led me nowhere. Are there any vintage car aficionados out there who can tell me what it means? EDIT: Gretchen aka Stashdragon solved the mystery for me in her comment below. The centre panel is a customisable area for the car’s registration/license plate number and the chart gives you all the letters and numbers you might need to personalise it. Guess I should have read the pattern text! Thanks, Gretchen!
That’s all for now. My May project will be the 3-ply jumper with the lacy yoke. Get well and stay well!
June’s project was this lovely sleeveless top in a leafy lace pattern, touted as a “very wearable and useful jumper to make for your holiday.” It looked pretty and elegant and suitable for my summer climate, which is generally not too hot — a lightweight wool garment in lace with no sleeves should be perfect most days.
It’s written for “smaller sizes” — 32-33 or 34-35 inch bust — which would be too small for me, but my ever-loose gauge and inability to find 3-ply wool came in handy here, as it has in the past. It worked out fine for me to make the second size according to the directions, adding a few rows to the length below the armholes.
The wool I used was an absolute winner — Concept Silky Lace by katja, made of 80% merino wool and 20% silk. It’s lightweight, soft, and warm enough yet cool enough at the same time. My local wool shop had it in colours that I don’t wear, plus dark blue or a sort of salmon orange. Dark blue is always fine but I was so intrigued by the orange that I had to give it a try. I normally wear black with black with possibly dark tweedy blues or greens, so orange was a big change, but I love it! The colour looks good on me, looks good with black (important…) and it seems to even be in fashion at the moment, since as soon as I bought it I started noticing all the other people around me wearing some shade of orange non-vintage clothing.
The body knitted up pretty quickly in spite of the somewhat complicated lace pattern. I charted the pattern out before knitting anything — as was usual for the time, the magazine has written instructions only, and the pattern is 36 rows long. That was not only good for learning the pattern and being able to follow it more clearly, but it allowed me to notice a couple of errors in the pattern instructions that would have been very frustrating had I discovered them while knitting.
Then I ran into trouble with the weather, which was suddenly 34-36 degrees Centigrade with no chance of a cooler room either at work, home or on the move. My hands were too sweaty to hold wool and I had to take a break for a few days until we returned to our regularly scheduled 18-20 degrees. Then I finished the body and moved on the the neck and armhole edgings, which took forever! It’s actually an interesting design, which I haven’t seen before: You knit a strip of stockinette stitch with 3-stitch garter stitch border on one side, then fold the strip in half lengthwise like a sort of hem under the garter-stitch bit and sew it onto the neck or sleeve edge with the garter stitch facing out. It’s a like a separate hem sewn on, and the front neck strip has some cleverly thought-out short rows to make it fit the curve of the neck. But oh does it take a long time to make the strips.
Which is all a very long apology for the fact that it was not done by the end of the month, but now it is! As usual, we tried to re-create the original photo. It’s always hard to get the exact pose angle, but I did have a matching scarf and sunglasses.
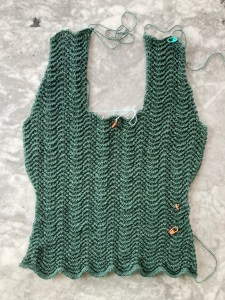
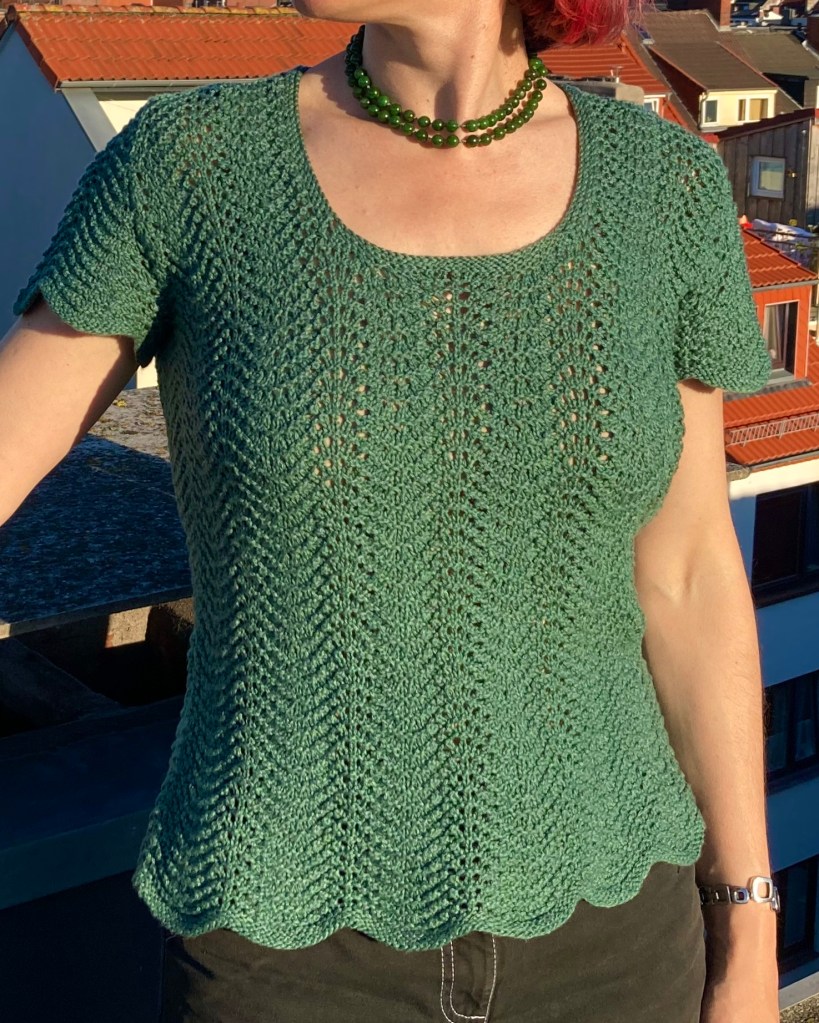
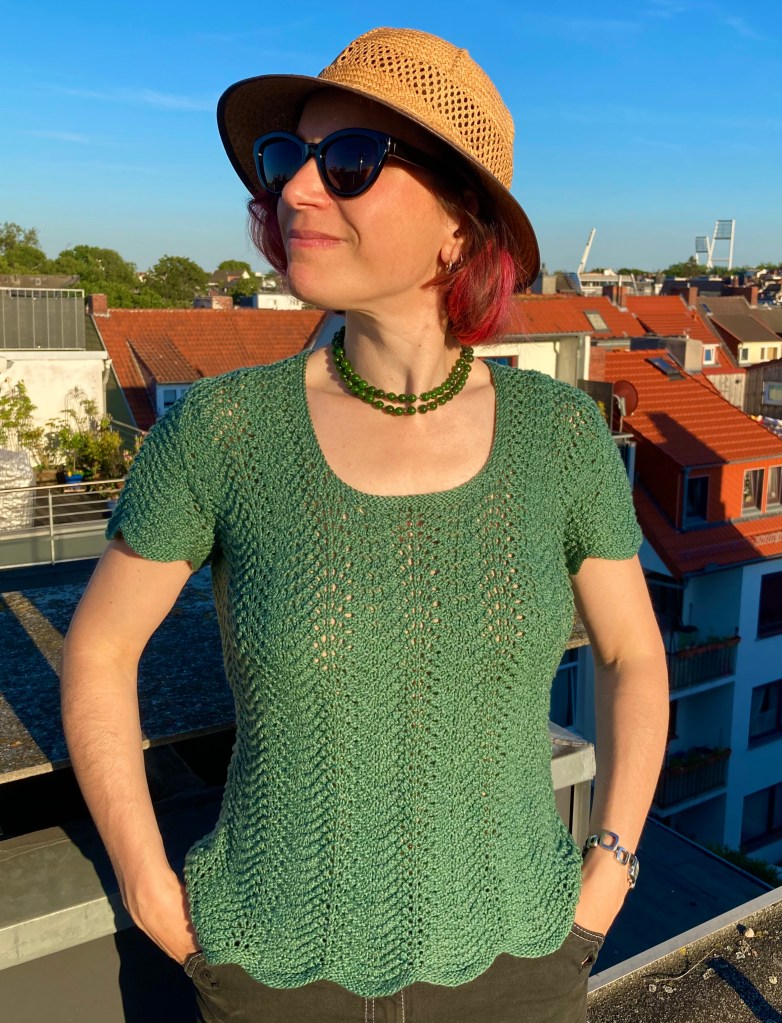
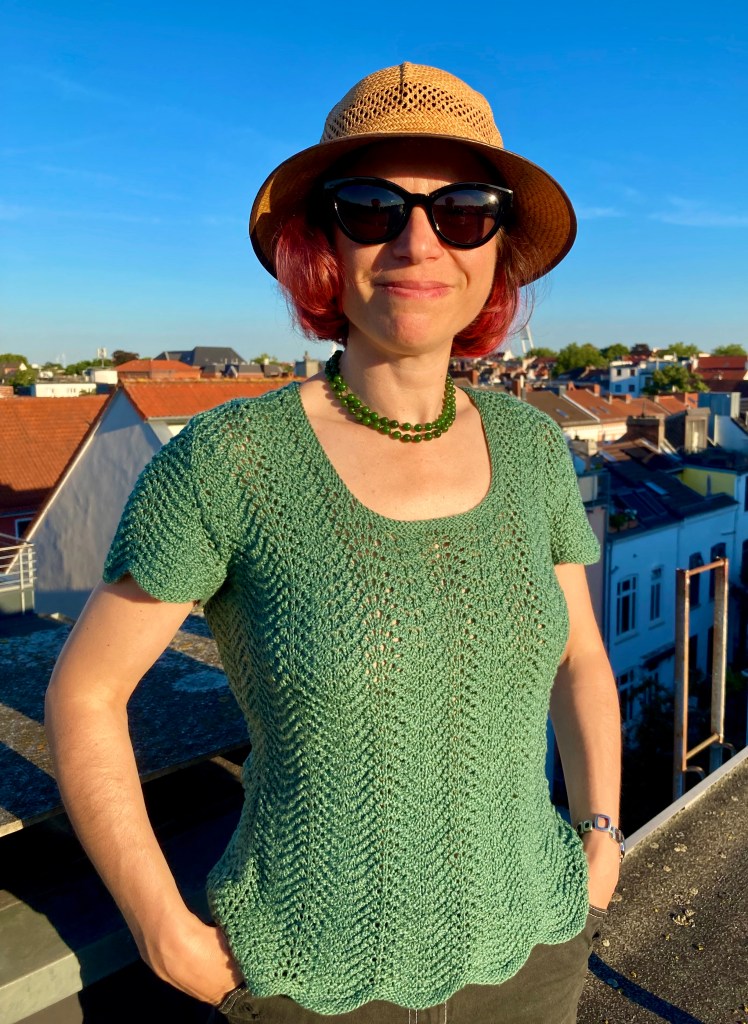
My second project for April (obviously not finished before the end of the month, seeing that I started it two days before) was this cute lace blouse with a “Popular neckline.” I do love the neckline, and the leaf pattern.
The pattern is written for wool, of course, but I made it in cotton for summer. It is very, very difficult for me to find any kind of yarn, especially cotton, that is fine enough to get the pattern gauge of 8 stitches to the inch in stockinette stitch. I can hardly even get 8 stitches to the inch on lace-weight wool on 2 mm needles! But crochet cotton thread would be too thin, and I don’t think I’ve ever seen it in black. So I found a cotton that gets me 7 stitches to the inch on 2 – 2 1/2 mm needles and fiddled with making the middle size and having it come out as the large size.
The biggest problem was making the side-seam increases. The lace pattern has a repeat of 12 stitches, but a sort of varying number of edge stitches. I honestly had no idea where to fit in the extra stitches, or how to keep them in pattern when the increases and decreases within the pattern are broadly spaced. Time to hit the Ravelry forums! I did try charting it out (the pattern has written instructions only) and at first it made it easier to “read” the knitting, but didn’t give me any fundamental technical answers. I realised I had to chart out not just the pattern itself but all of the increases and decreases, with the changes that had to be made row by row. That worked, but by then I had already made the back piece, so those increases on the sides weren’t perfect. But everything else was!
The fit is incredible. I was wary of the horizontal cap sleeves, which are really just made by casting on extra stitches instead of decreasing under the arms. I thought it would make a lot of baggy fabric under the arms, like those 1950s (or 1980s) dolman-sleeve fashions that must be extremely inconvenient to wear. But no! The armholes are snug without being too tight, and I appreciated the extra width and give in the upper chest and back, where I am quite wide.
All in all, it is wonderful and I am very happy. Here I am having fun “recreating” the original picture. The bag is from a Stitchcraft pattern, too!


 Handknits For Your Holiday! If you are planning on taking a holiday in 1962, that is. In that case, I would recommend going to the Algarve in southern Portugal, which, based on the pattern of the window shutters and blanket in the background, is where I am guessing this magnificent cover photo was taken. Sadly, my time machine is out of order and May 2020’s motto is (Lots Of ) Handknits For No Holidays This Year Or Probably Anytime Soon.


 June’s project was this lovely sleeveless top in a leafy lace pattern, touted as a “very wearable and useful jumper to make for your holiday.” It looked pretty and elegant and suitable for my summer climate, which is generally not too hot — a lightweight wool garment in lace with no sleeves should be perfect most days.
 orange non-vintage clothing.
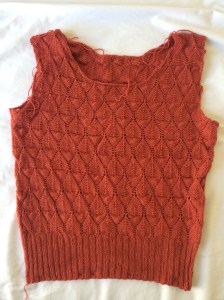 Then I ran into trouble with the weather, which was suddenly 34-36 degrees Centigrade with no chance of a cooler room either at work, home or on the move. My hands were too sweaty to hold wool and I had to take a break for a few days until we returned to our regularly scheduled 18-20 degrees. Then I finished the body and moved on the the neck and armhole edgings, which took forever! It’s actually an interesting design, which I haven’t seen before: You knit a strip of stockinette stitch with 3-stitch garter stitch border on one side, then fold the strip in half lengthwise like a sort of hem under the garter-stitch bit and sew it onto the neck or sleeve edge with the garter stitch facing out. It’s a like a separate hem sewn on, and the front neck strip has some cleverly thought-out short rows to make it fit the curve of the neck. But oh does it take a long time to make the strips.

 My second project for April (obviously not finished before the end of the month, seeing that I started it two days before) was this cute lace blouse with a “Popular neckline.” I do love the neckline, and the leaf pattern.
 The biggest problem was making the side-seam increases. The lace pattern has a repeat of 12 stitches, but a sort of varying number of edge stitches. I honestly had no idea where to fit in the extra stitches, or how to keep them in pattern when the increases and decreases within the pattern are broadly spaced. Time to hit the