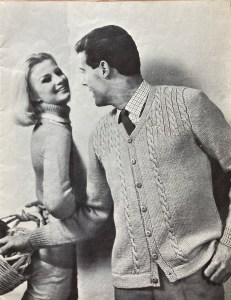
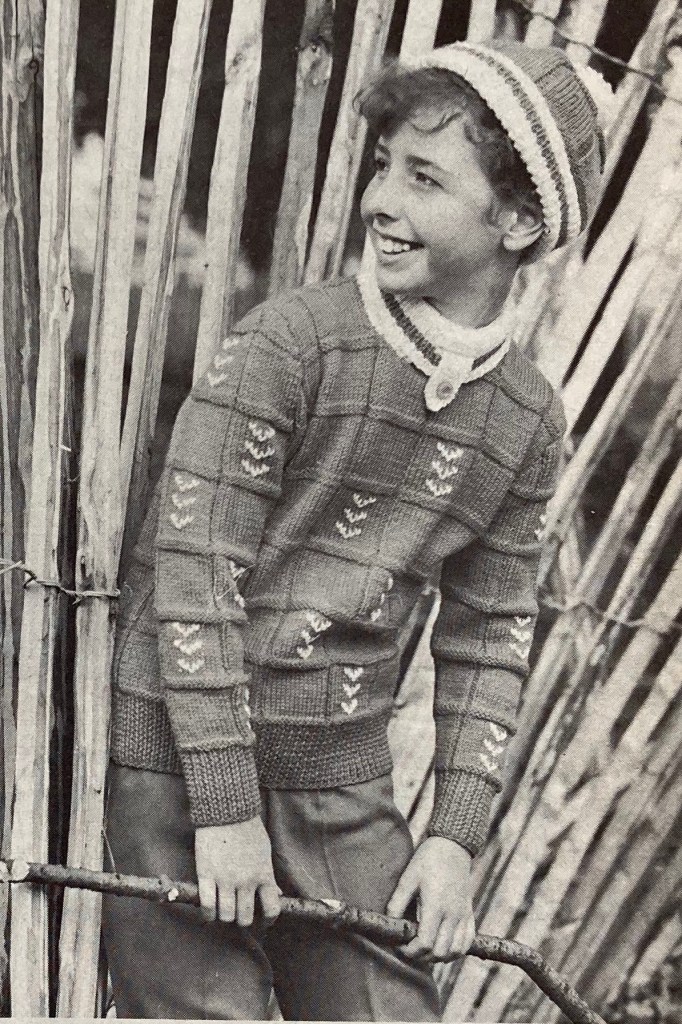
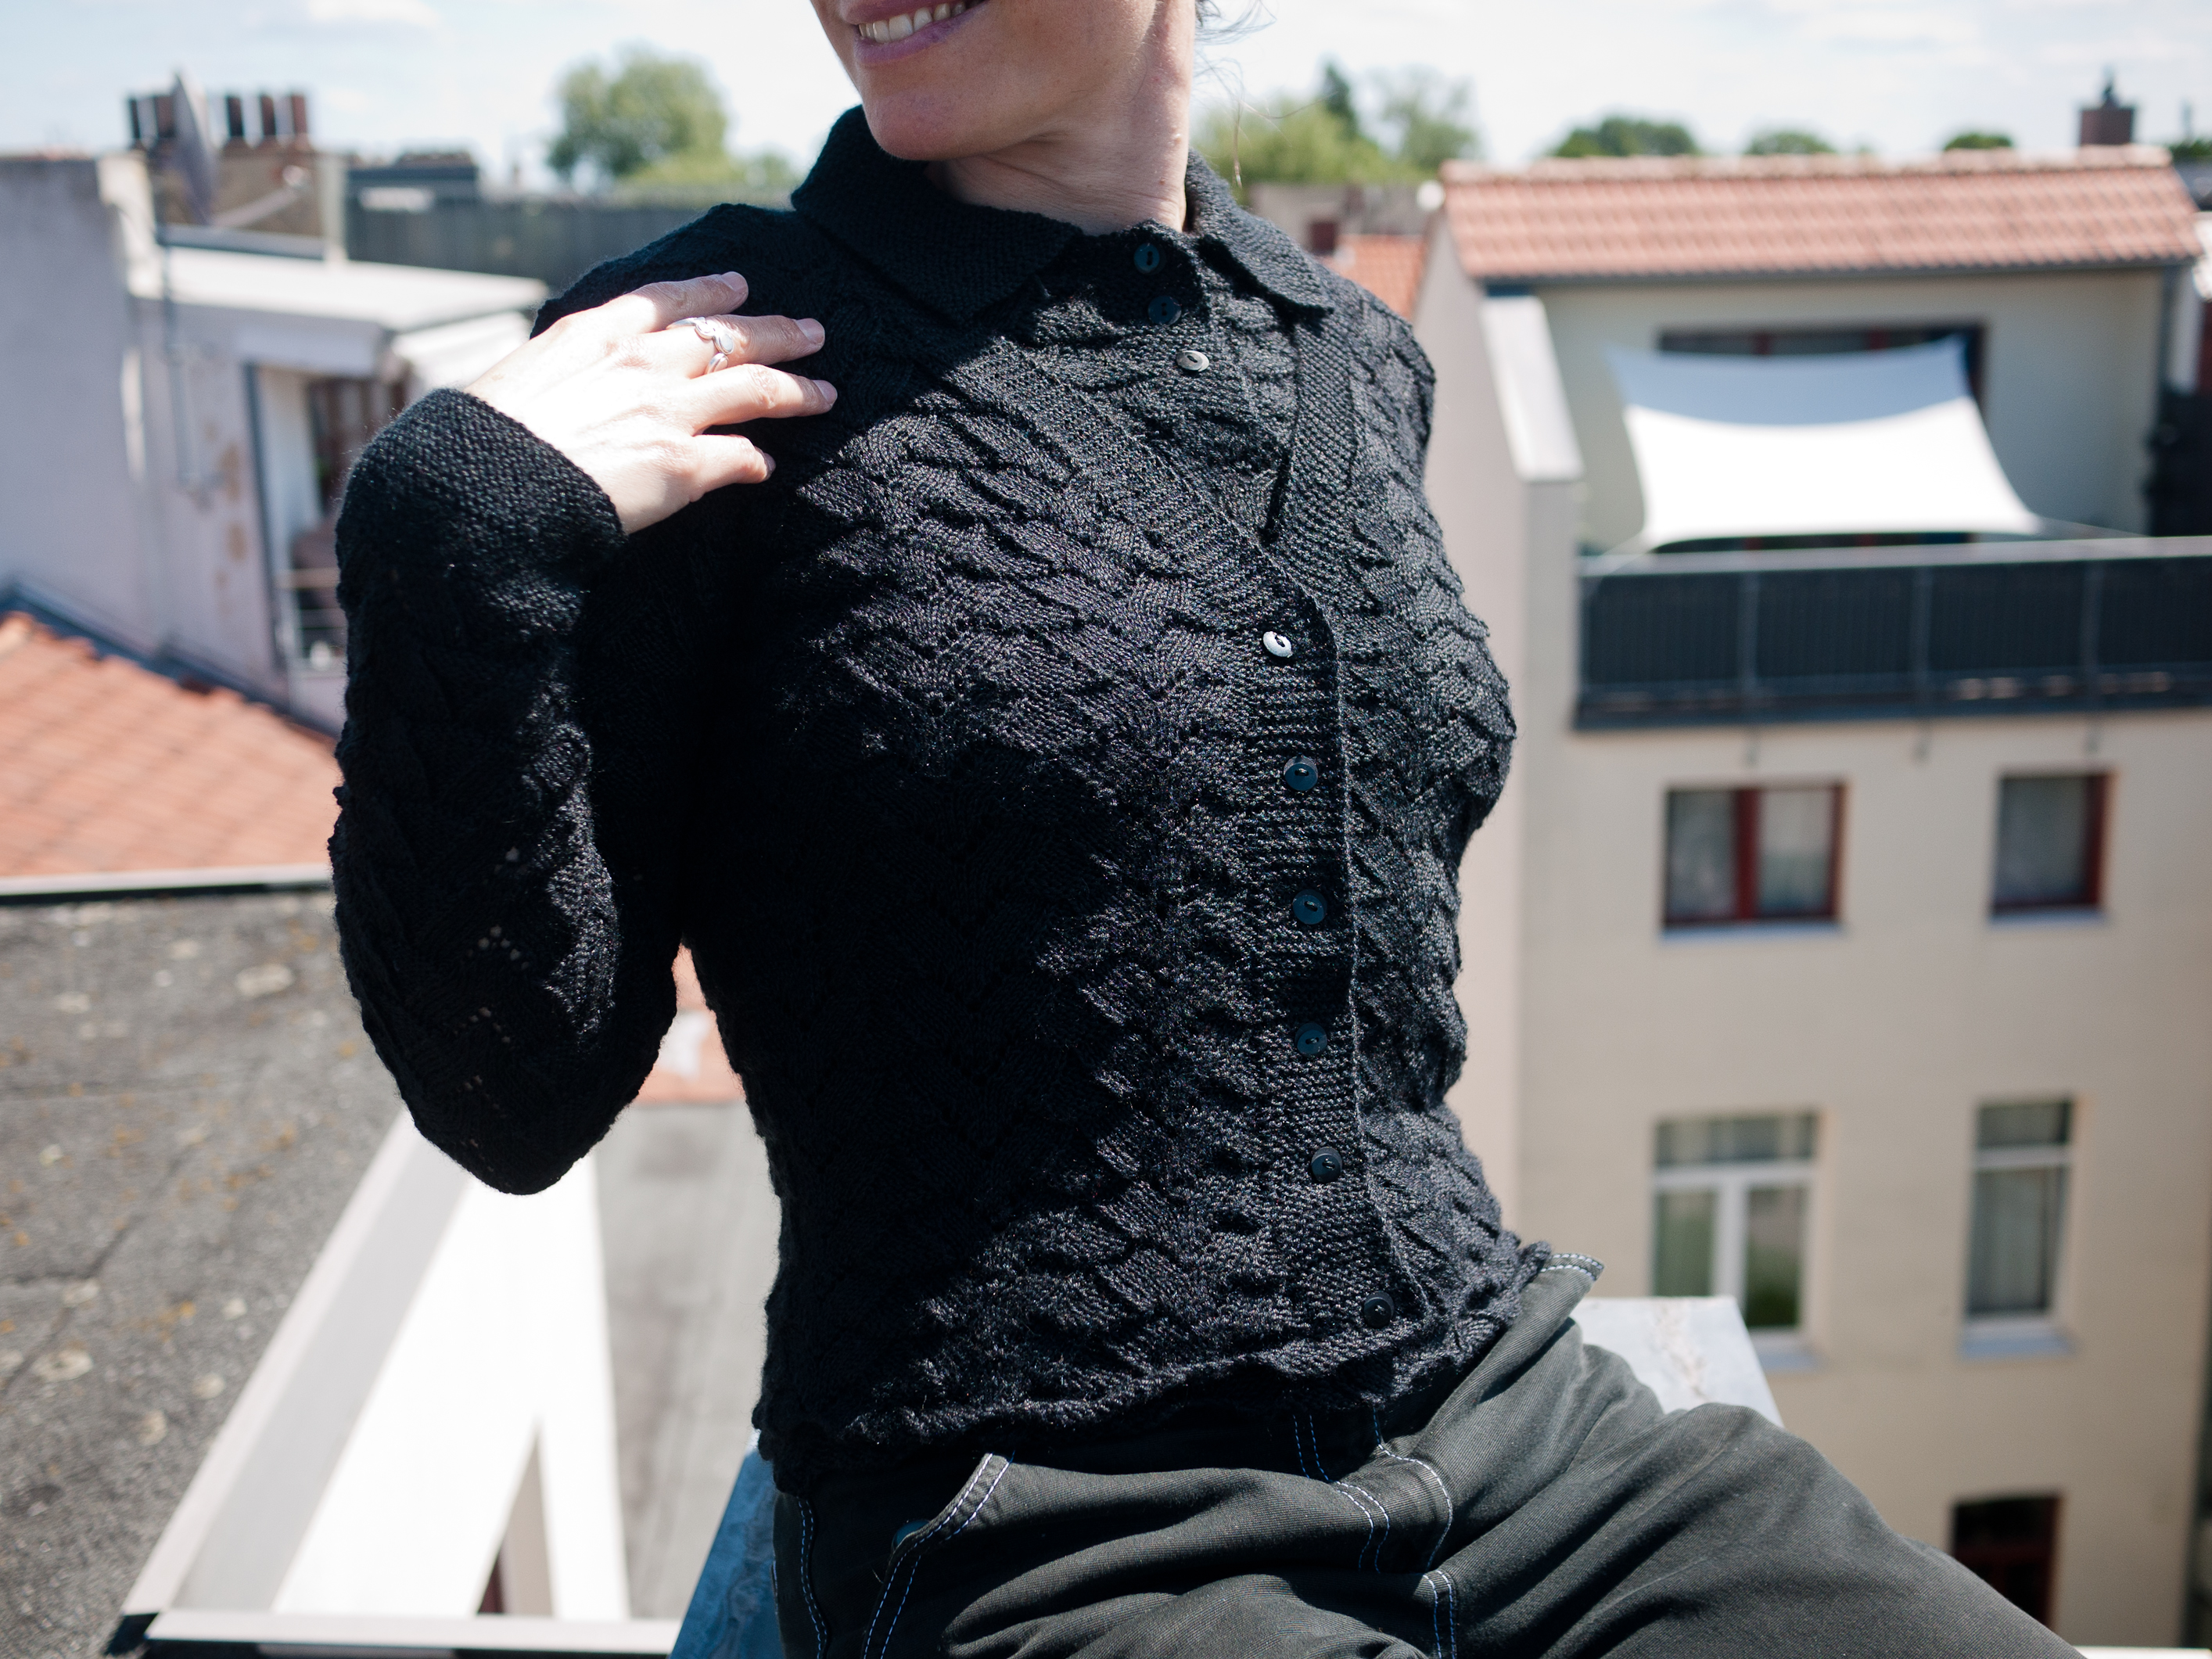
The August 1963 issue had some nice projects in it, most of them pretty labor-intensive. None of the women’s garments spoke to me and while I liked some of the embroidery projects, I still hadn’t finished my blackwork butterfly cushion (From April. April !!) and was not going to start on a huge tablecloth. I loved this cabled men’s cardigan, though! It has a nice classic form and just enough detailing to keep the knitting interesting. And it’s made in DK weight wool, so it should go fast… right?
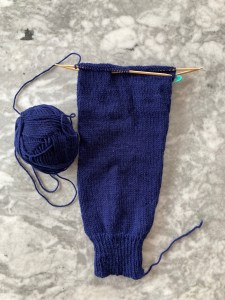
Ha ha. No, of course it did not go that fast. I had been trying to finish up a lot of other wips (not necessarily vintage or Stitchcraft-related) and the pandemic had eased enough in my corner of the world that my work started up again, so the cardigan was not nearly finished at the time of the first draft of this post. As of August, I had knitted one sleeve completely and was quite a ways on the other sleeve and that was all.
I would be happy to wear this design myself and could have juggled the proportions and made it in a smaller size for me. At the same time, I have so many clothes and a close family member who would love to have a nice hand-knitted cardigan has a “big” birthday coming up later this year. At his request, I made making the cardigan in a lovely shade of deep blue in lovely Drops Garnstudio Lima (65% wool, 35% alpaca.) He hasn’t seen the design (that part will be the surprise).
The sleeves are quite straightforward stocking stitch, so not much to report. I really loved the wool.
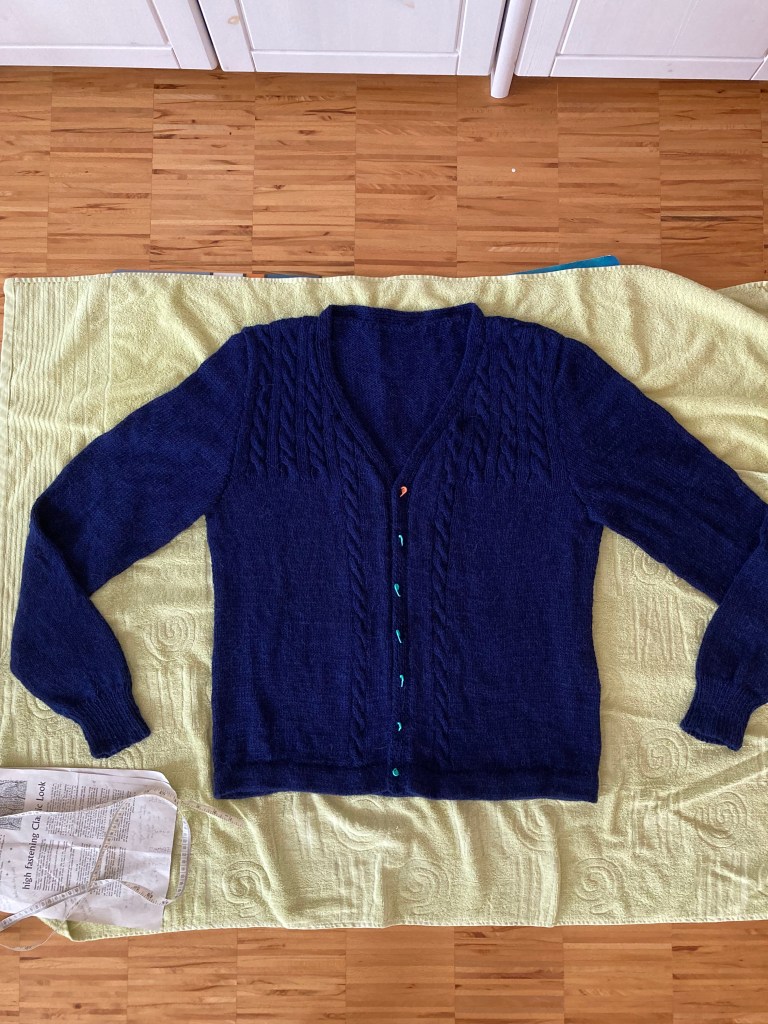
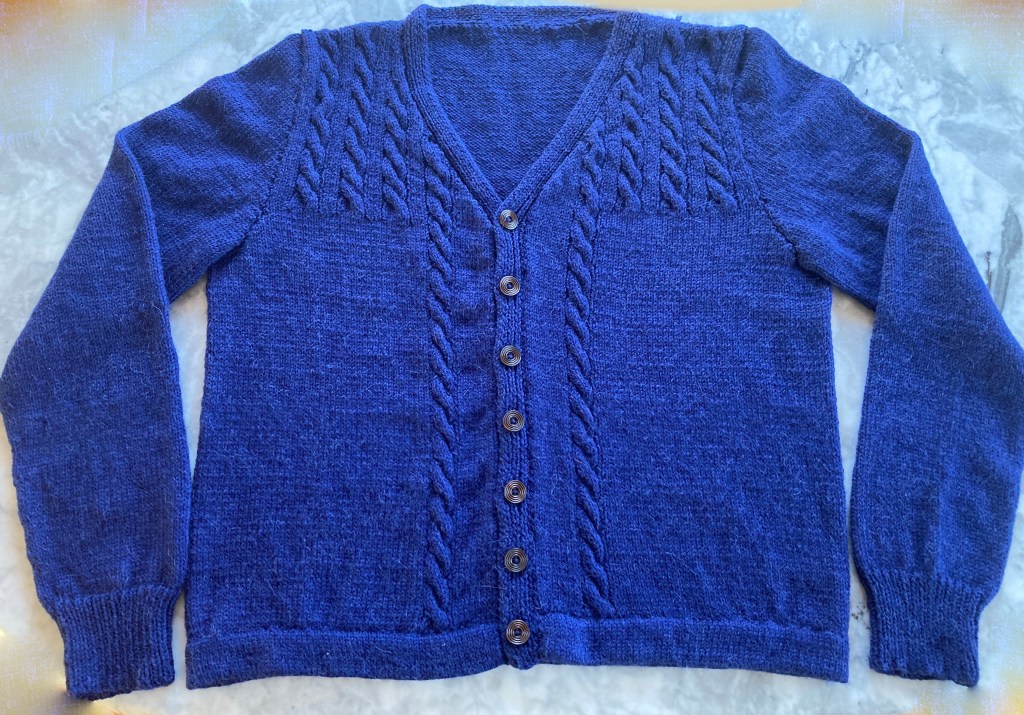
I made the body in one piece to avoid having to seam more than necessary (likewise, I made the sleeves in the round). The cable pattern is quite standard, but used here in an effective and interesting way to narrow the top yoke. The hem at the bottom is neat and tidy and does not flip up.
The intended recipient is slightly bigger than the largest size given in the pattern, so I made the cardigan on 4 mm needles for a bit looser gauge. Recipient is also more square-shaped than the “rectangular” model in the photo, but it will fit him with the same amount of ease.
That’s pretty much all there is to say! It came out perfectly and will be delivered on time for the big birthday. I’ll also definitely keep this pattern around to maybe make another one for myself some time.
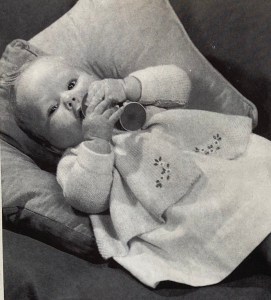
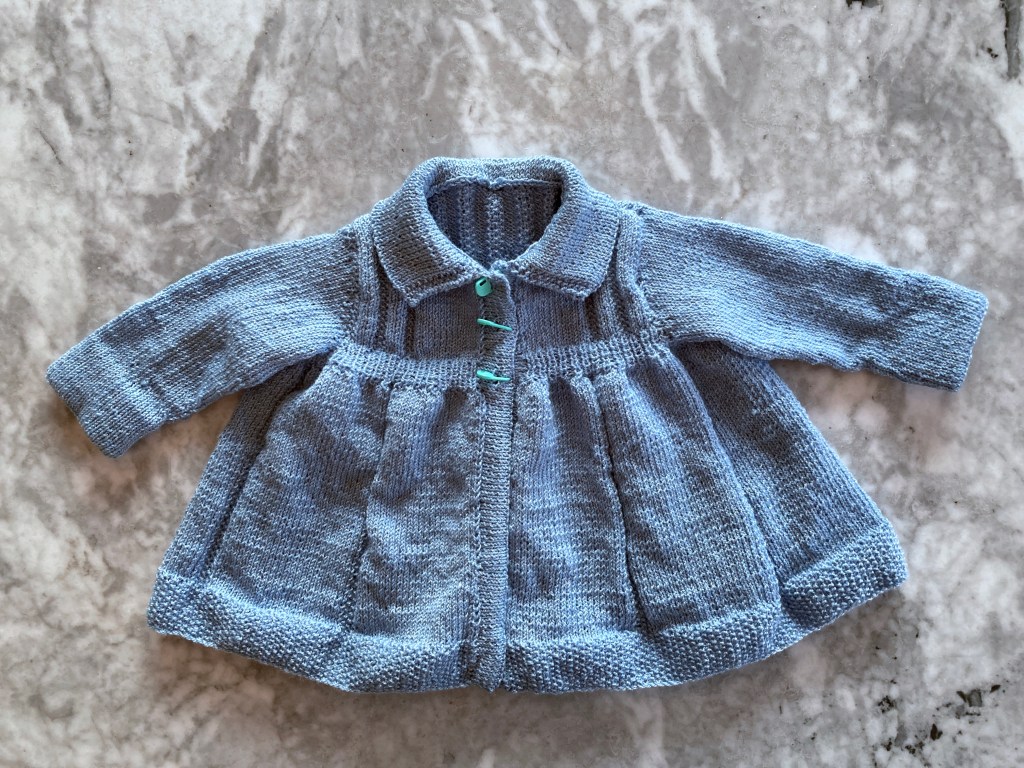
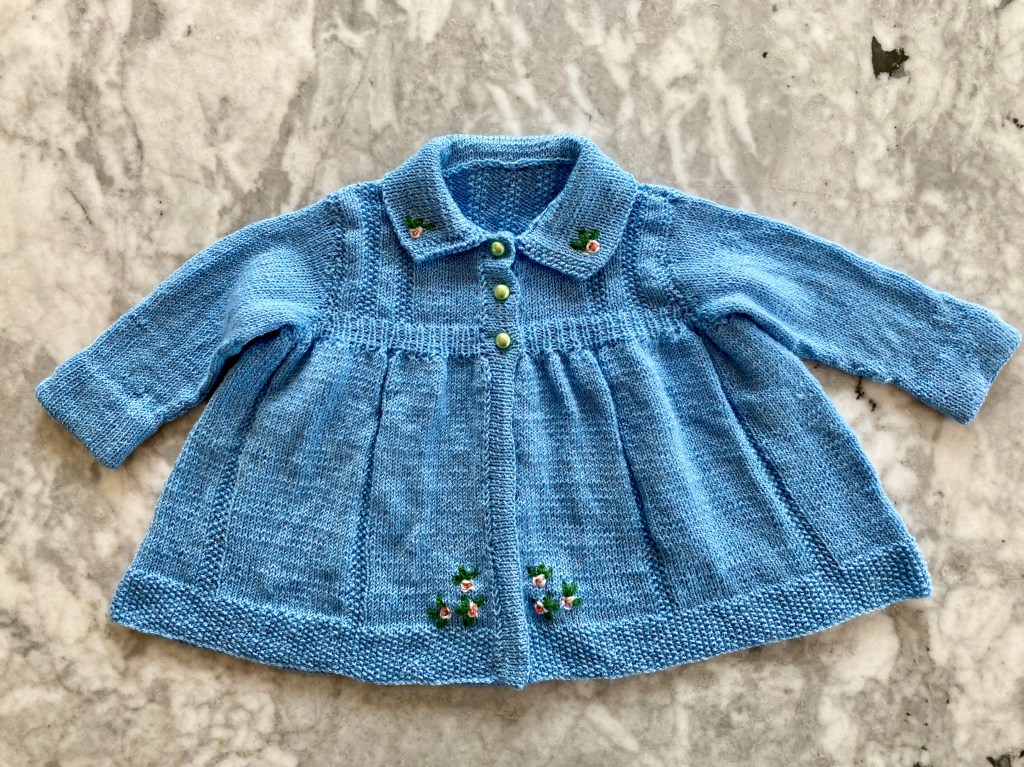
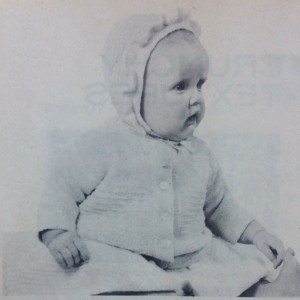
My June 1963 project was a lovely (if not quite as practical as the title suggests) “matinee coat” for a baby. Two styles are given in the pattern, “for a girl” (long coat with ribbing at the waistline, flared skirt and collar) or “for a boy” (straight up and down, basic cardigan styling.) Both styles have dainty flower embroidery as decorative accents. Not wanting to inflict 1960s gender roles on a modern baby and also not having a personal preference, I asked one of the child’s parents which style they liked more, and the answer was “the long coat”, so the long coat it was.
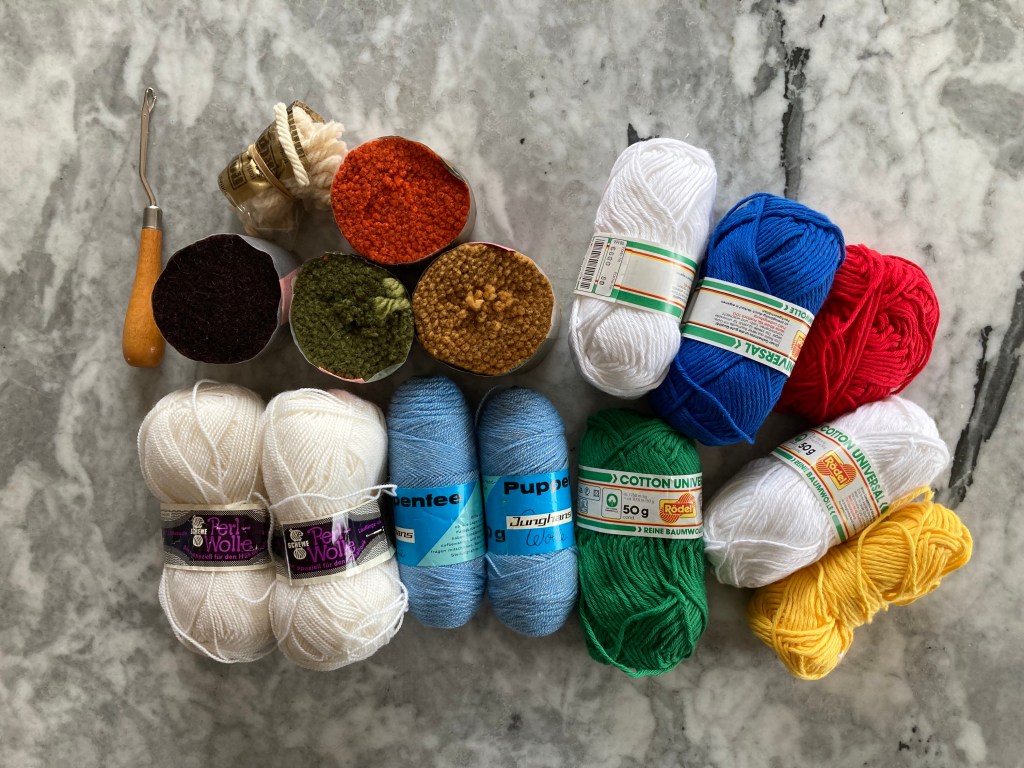
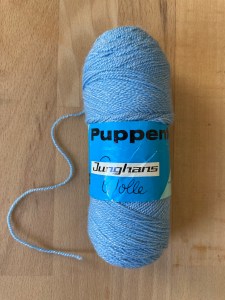
As for the wool, last year another colleague of mine, who knows that I like to knit from vintage patterns, came into a rather large stash of yarn when an elderly relative moved into a care home. Apparently, she (the relative) had liked to crochet and make latch-hook rugs, and when the younger generation of non-crafters cleared out her house, my colleague knew who would give the yarn a good home. There was some great stuff! In addition to a latch hook and some cut rug yarn in very 1960s shades of brown, tan, rust, beige and olive green, there was enough bright cotton to make a crocheted baby blanket, some nice, soft, plain white wool that would be great for baby clothes, and 400 grams of light blue “Puppenfee”, a yarn made by the German Junghans Wolle company in the 1960s? 1970s? which combines light 4-ply wool with a shimmery, presumably nylon or Lurex “Effektfaden”.
Just a selection — there was a lot more of each type of yarn!
The base colour is light blue, and the nylon strand makes the knitting softly sparkly and also very elastic — perfect for a baby cardigan. Happily, light blue was also the parents’ preferred colour, I had plenty of it and the tension and size in the pattern were perfect for this one-year old infant.
The coat is made in one piece from the moss-stitch lower border to the armholes, and the moss-stitch is carried up throughout the stocking-stitch skirt part in narrow vertical bands that make the skirt pleat prettily after the waist is gathered in with decreases and ribbing. Then the fronts and back are continued separately. I made the sleeves in the round from the top down, since that was faster, and made them a little longer than the pattern called for, as the baby is on the tall and thin side and will presumably get longer in the arms before it gets wider in the middle. (Though you never know with babies, but the cardigan is big enough to hopefully fit for a while in any case.)
Both the sleeve edges and interestingly, the collar are hemmed — in the case of the collar, that means stitches are picked up around the neckline as usual, then the collar is knitted in stocking stitch the “wrong way out” i.e. the inner side would be facing once the collar was opened down, then you make a purl ridge for the fold line and knit stocking-stitch for the depth of the collar back again and then sew it together. The result is very neat and crisp. There’s a narrow band of moss stitch (just 3 stitches) at the front corners of the collar to tie it together with the bands in the skirt.
The rosebud embroidery was very easy, no transfers, just a sketch in the pattern and colour choice suggestion. I used bits of leftover Jamieson & Smith Shetland wool in pink, white and green as suggested and finished everything off with three little buttons from stash. Do the buttons look familiar? They are the same ones I used on this “Sunday Best Dress” project from March 1963 / March 2021. And yes, it is even for the same lucky baby! Maybe, with the parents’ permission, we can even re-create the pattern photo. Until then, here it is without the baby — I actually got a project done on time for once!
I am very happy with the finished coat and I hope the baby and parents are as well.
My March project featured sewing, for a change. I can sew, both by hand and with the machine, and I have sewn quite a few things in my time (even worked in the costume department of various community theatres as a teenager/young adult), but I do not enjoy sewing, nor am I particularly good at it, to be honest. (My costume shop work involved mostly either “pulling” outfits from storage, or doing fittings and alterations, or sewing things that someone else, i.e. the head designer had cut out. For that reason, I never learned to cut things to fit properly and am surprisingly bad at working from bought patterns.) Years of knitting have also made me very inexact about perfect measurements and straight lines, which is obviously sub-optimal for sewing. But I gave it another try to make this embroidered “Sunday best dress” for a baby from the March 1963 issue.
For once, you didn’t have to send away for the sewing pattern; since all the pieces were basically rectangles, they just printed a little scaled-down plan for cutting the material on a graph, with each square being equivalent to 2 inches. It was designed for silk or crepe fabric. I had bought a large remnant of beautiful light-grey viscose (rayon) some time ago, of which I used a small amount for the lining of February 1963’s needlepoint bag and had plenty left over. Rayon fabric has been around for more than a hundred years and was (and still is) used as “artificial silk” throughout the 20th century, so my fabric was quite period-accurate even though modern. I didn’t have silk floss to do the embroidery and just took the opportunity to use up some small scraps of normal cotton floss in pastel colours.
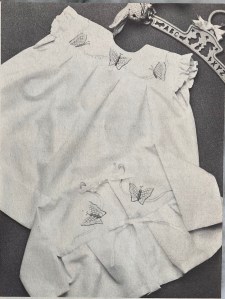
The dress was supposed have three embroidered butterflies on the front and close in the back with a couple of buttons. I didn’t have all that much embroidery thread and I did have quite a lot of lovely vintage buttons in a perfect pearly-green colour (thank you, kind seller on Ebay!), so I changed it around to fasten in the front, using the two-butterfly design from the coat (which I didn’t make).
The butterfly design was easy enough to copy without a transfer and features laid stitches on the wings — something new for me. My embroidery skills are still far from professional, but improving. The sewing work was interesting because I am not always in the same place as my sewing machine due to pandemic chaos — but also didn’t want to wait until I was — so I sewed everything except the buttonholes and waist strengthening zigzag at the end by hand. Including the gathers, buttonhole band, frilled sleevelets etc. Now I know why Marilla from the Anne of Green Gables books had to stop sewing in her later years to preserve her eyesight! Everything was tiny and took forever and my fingers, which are actually quite long and thin and nimble, felt like elephant feet.
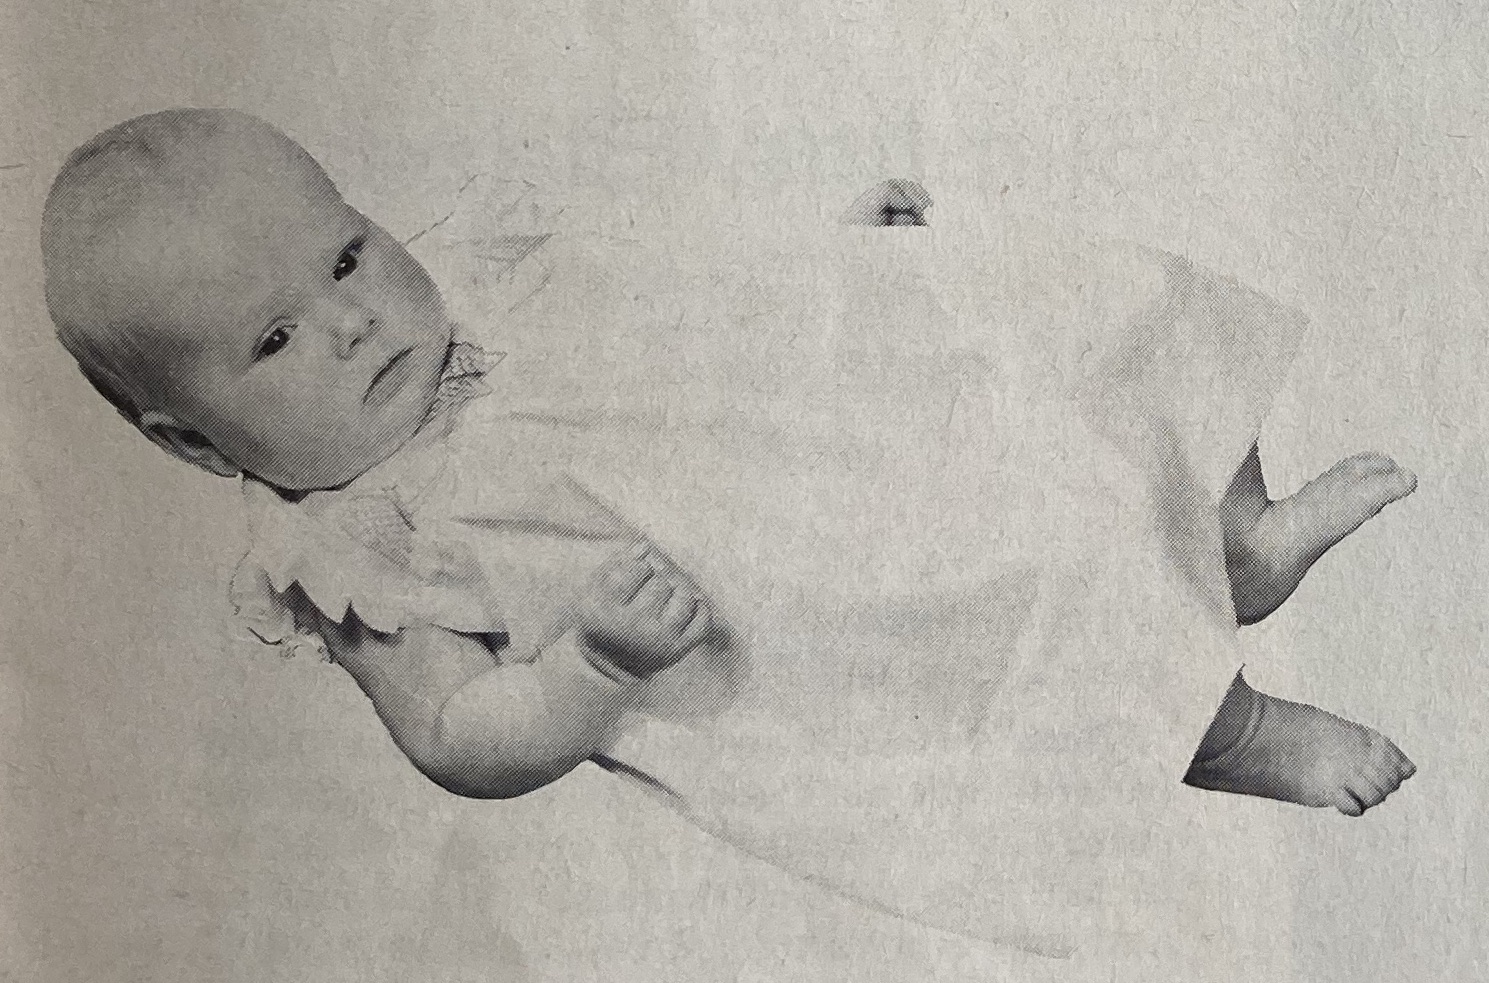
I did the buttonholes on the machine when I could, because I was definitely not going to try to sew buttonhole stitch by hand on thirteen tiny buttonholes. My machine-sewed buttonholes look messy enough that they could pass for hand work, ha ha. I am surprised that it turned out even vaguely even (yes I know, the hem in the front is a mess.) But in spite of its obvious imperfections, I’m quite happy with the result and proud of myself for making it work. I know a one-year-old baby who would fit in it perfectly and the parents will be very happy to have it as an Easter dress for her, so in my mind, it’s a success.
Meanwhile, the “naughty pile” of unfinished projects is slowly diminishing and I’m looking forward to getting back to knitting.
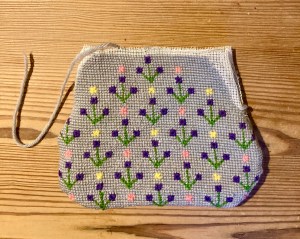
I was a bit uninspired by the February 1963 issue, which had several nice garments that were either too bulky for my taste or would just take too long to finish. I’m also trying to work from stash as much as possible. With that in mind, I adapted this “Prayer book cover and kneeler for a bride” tapestry design for a small, simple needlepoint bag.
My first, and until now, only tapestry/needlepoint project (what is the difference, anyway? Stitchcraft always uses the word “tapestry”and often qualifies it with gros point or petit point, but I see “needlepoint” used just as often in other sources) was this unfinished failure from the May 1961 issue. I still had the wool and enough canvas to make a smaller bag using the flower part of the design from the prayer-book cover.
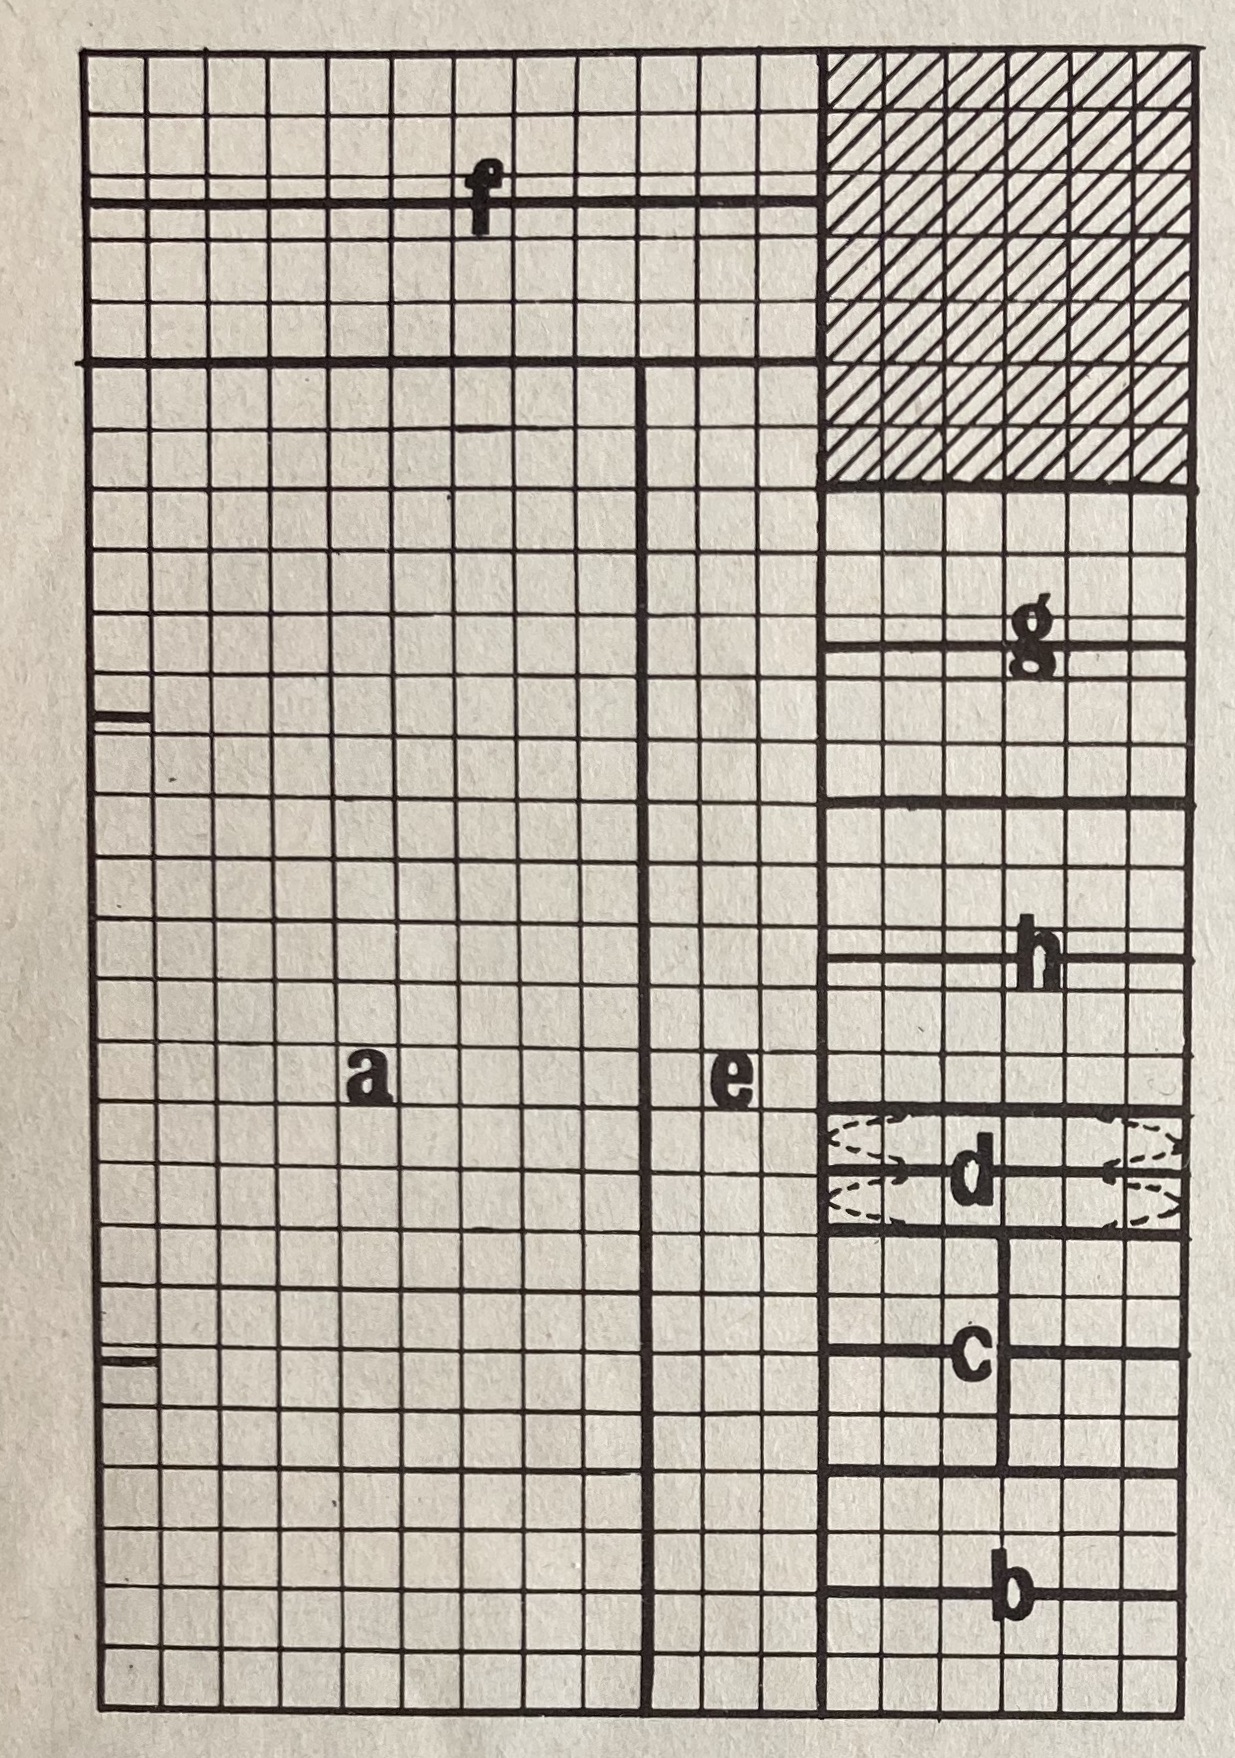
Since the original chart was not printed in the magazine but had to be ordered via post, I had to recreate it myself on graph paper, which wasn’t too difficult. The basic stitch is a half cross stitch, which works much better with this combination of wool thickness and canvas density than the earlier project, which was all in cross-stitch. The flower heads are made with eye stitch — 8 stitches all going into the same center hole. The stems of the flowers and the little hash marks between them in the original are supposed to be embroidered over the tapestry using gold Lurex thread, but I changed that to add some little pink and yellow blossom-like accents and just worked the stems in green wool.
So far, so good. I ordered a little bag clasp, marked out the approximate area of the needlepoint and started on the first half. In the middle of the large piece of canvas. Obviously that was a bad move, because a bag has to be worked symmetrically along the bottom fold line, no? The canvas was just large enough to divide it into two parts, but obviously it would have been better to work the whole thing in one mirrored piece and not have to sew a seam on the fraying bottom edge.
Once that problem was solved, I found the actual work to be relaxing, if somewhat boring (lots and lots of grey background). Also, I just barely squeaked through with enough grey wool to finish both pieces. The hard part came when fitting the finished tapestry into the clasp frame and dealing with the lining. The tapestry was… strangely twisted? The two sides of the bag did not lie flat over each other even though both pieces were perfectly identical and perfectly mirrored. I steamed the life out of it with the steam iron and managed to get it flatter, but… why? How? Things only got worse when I added the lining. I hate sewing and I hate linings. No matter how carefully I cut out a lining to the correct size and pin it and mark it and all the other boring things you are supposed to do, it never, ever comes out to the right size, or lies flat, or looks neat and deliberate. (I did manage to get the lining into the bag with a nice neat edge at the top… then realised it made no difference, as the top edge was going to be sewn to the metal clasp.)
The clasp has holes in it to sew the bag and lining in on the top and sides, and it was clear enough how that should be done, but theory was easier than practice and there was much clenching of teeth and growling. Also, a lot of that nice neat edge needed to be painstakingly ripped out to fit it over the clasp rim, reducing the nice neatness considerably. Did I mention how much I hate sewing? In the end, the edge was quite messy on the inside and not perfectly aligned on the outside. Both the needlepoint and the lining are oddly twisted and uneven and steaming it didn’t help anymore.
My take from this project: Needlepoint is fine, but not as much fun as knitting. Some older issues of Stitchcraft give an address where you can send tapestry projects in to be professionally made up into a bag or cosy or whatever “for a reasonable price” and if that service still existed, I would definitely take advantage of it! I have to make up the project myself, it is not worth it.
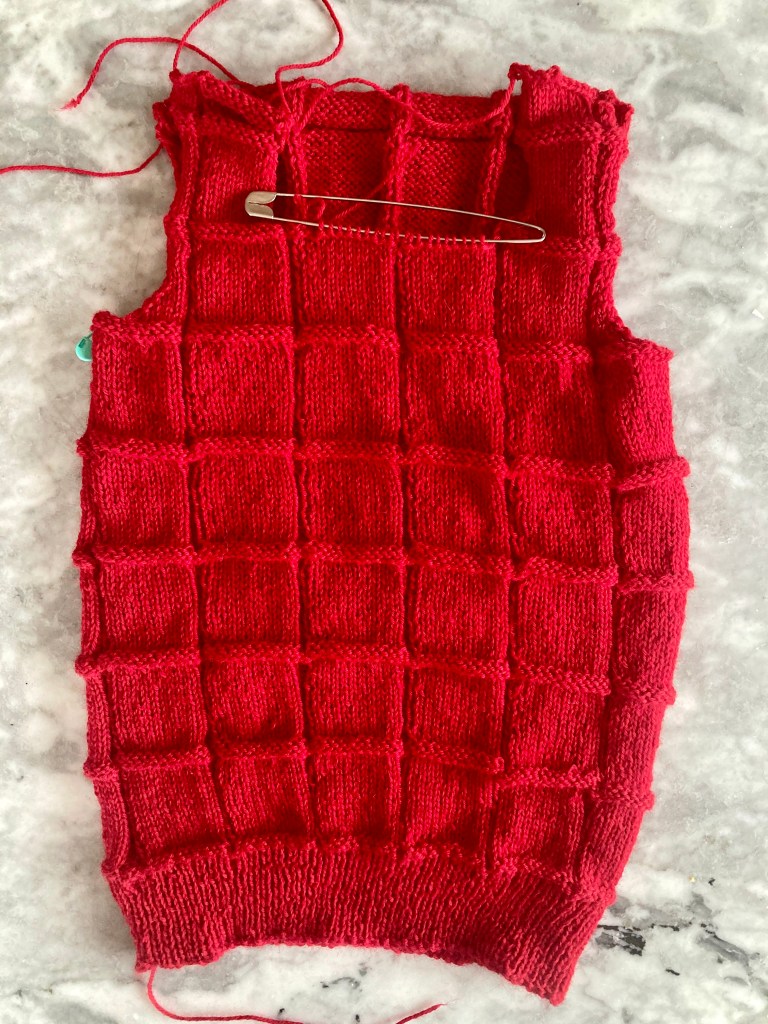
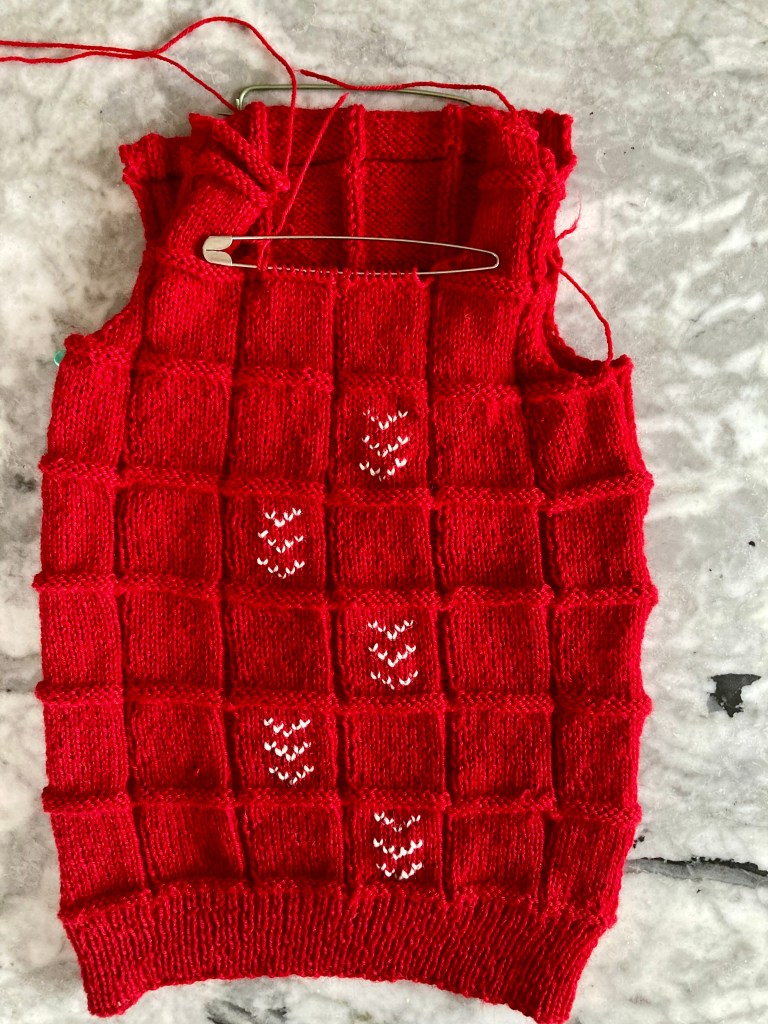
This month’s issue had a wonderful winter pullover for a larger child, featuring white “Swiss darning” (a.k.a. duplicate stitch embroidery) on a brilliant red background. I had also promised a friend to knit something for her toddler, whose favourite colour is red. Perfect!
Well, not quite perfect, since the toddler in question has a 22 inch chest and the pattern is written for children with 28, 30 or 32 inch chests. But it’s also written for DK weight wool and it was easy enough to find a lighter-weight wool to convert the pattern down into a smaller size. DROPS Garnstudio “Nord” (45% alpaca, 30% polyamide, 25% wool) gives 26-27 stitches in 4 inches and is soft and easy to care for. It’s also inexpensive and the red colour is beautiful. The white is just subtly off-white, which I like better than pure white for pairing with a really strong colour like the red.
The pattern uses stocking stitch and reverse stocking stitch to make square-ish pattern “blocks”, which are embroidered with white wool in duplicate stitch after everything is finished. Duplicate stitch or “Swiss darning” as it was often called in vintage magazines, is made by threading a length of contrasting colour yarn around stitches that have already been made. I had seen it on garments and in many vintage patterns (all kinds of embroidery on knitting was quite popular in the 1950s and early 1960s), but I had never tried it myself until now. It is pretty easy in principle, but tricky to get the stitches to look even — in this smooth yarn, any pulling of the thread made the embroidered stitches disappear. But it worked and it really peps up an otherwise simple pattern!
I made the body in the round to save time, but correctly guessed that it would be easier to embroider the sleeves if I made them flat.
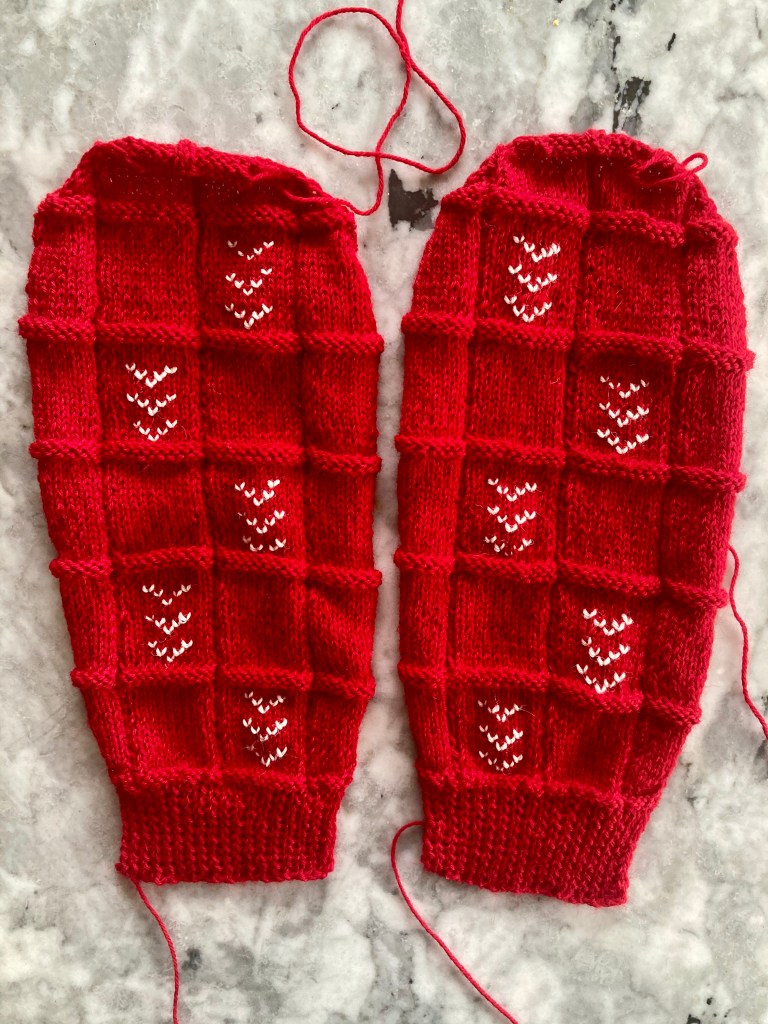
This was fun and easy to make and I actually finished it on time for once! I have plenty of yarn left, so I think I’ll go ahead and make the hat before I give both to my friend. EDIT: I made the hat! Here is an updated photo.
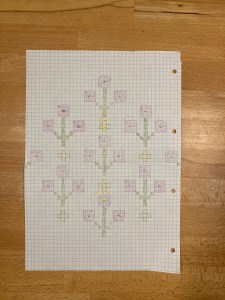
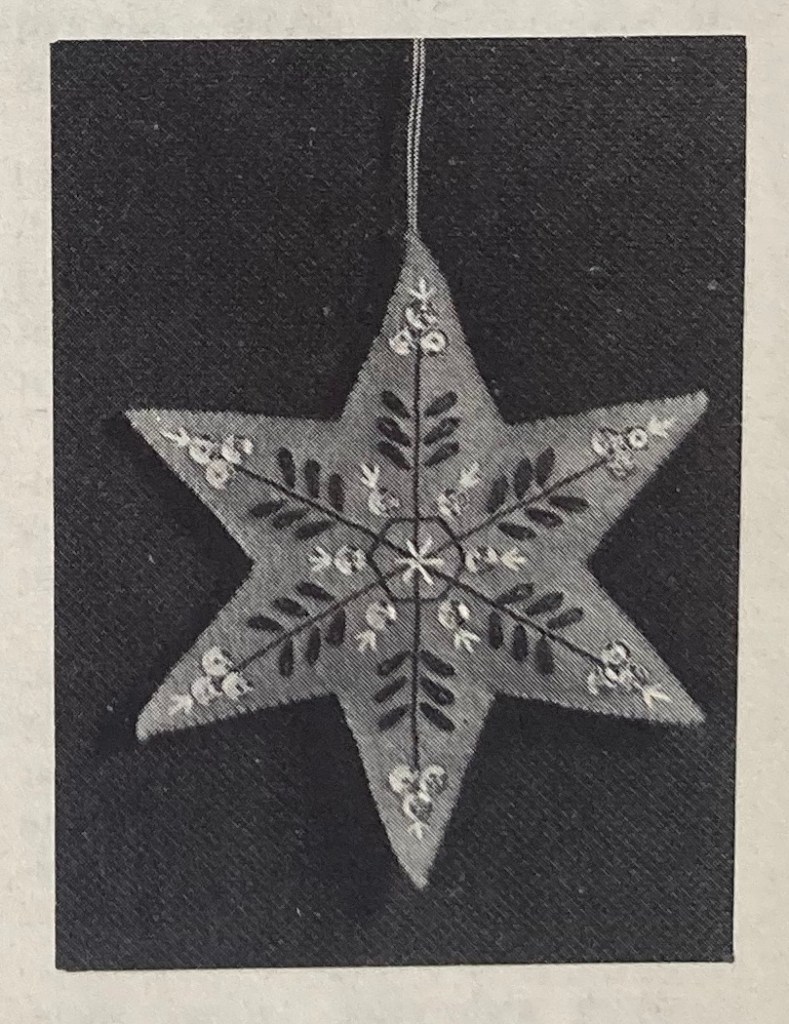
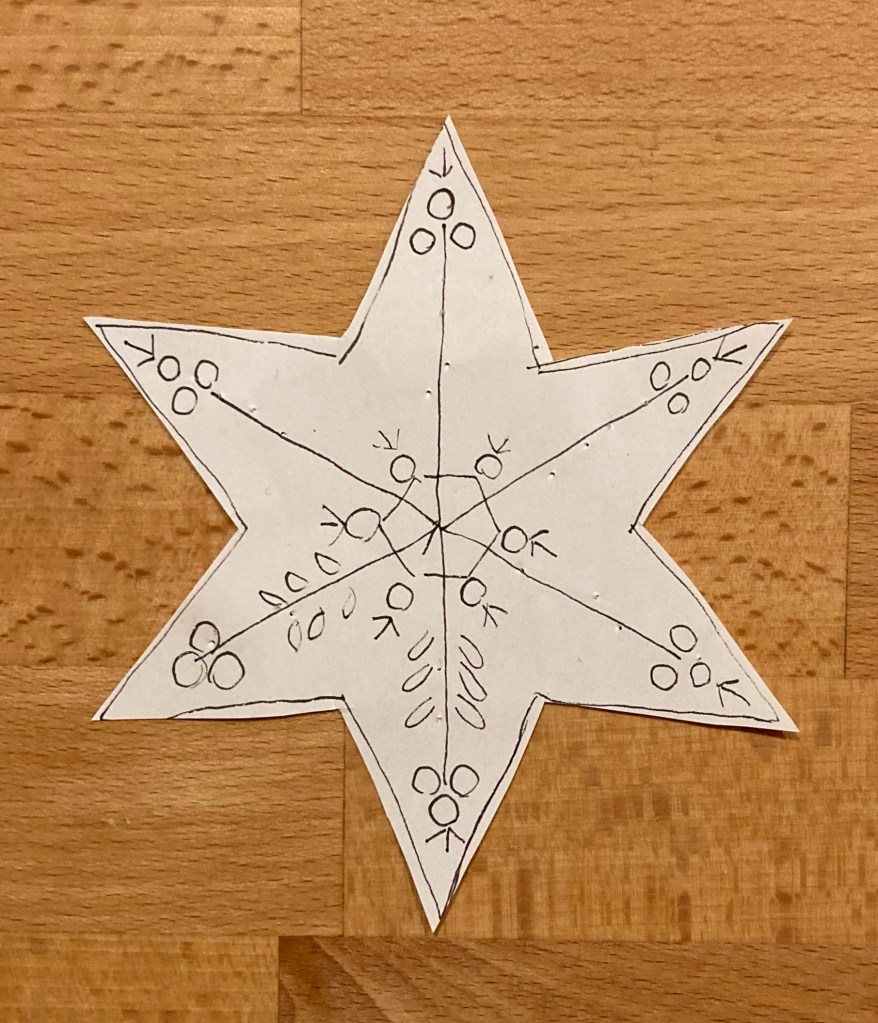
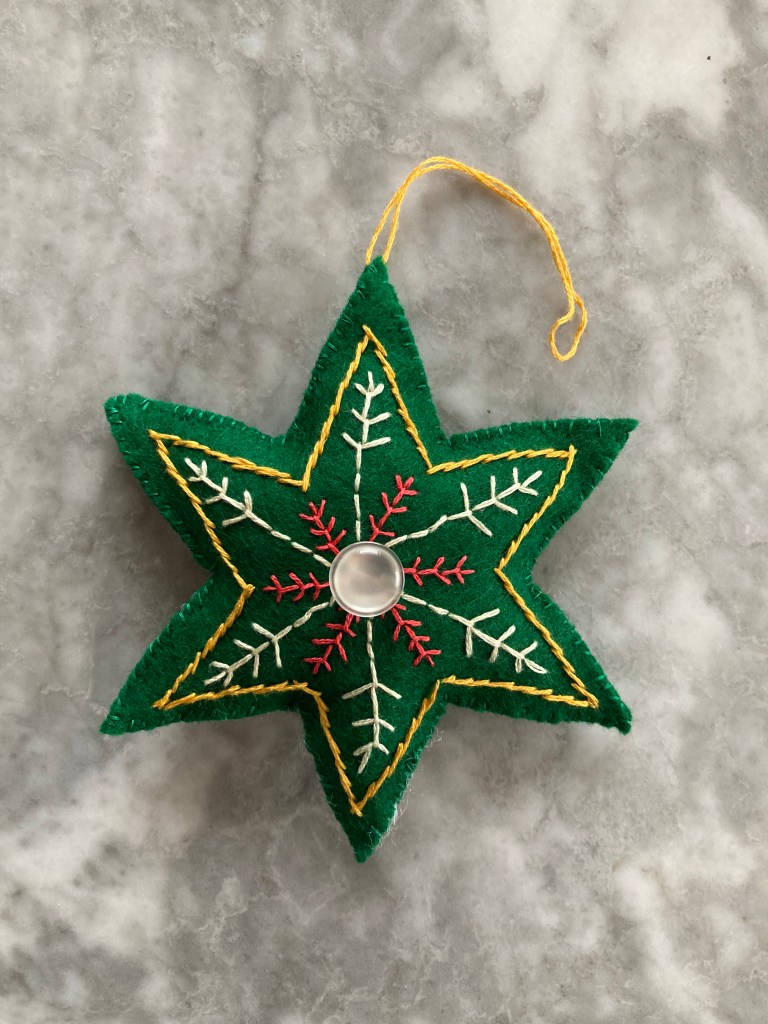
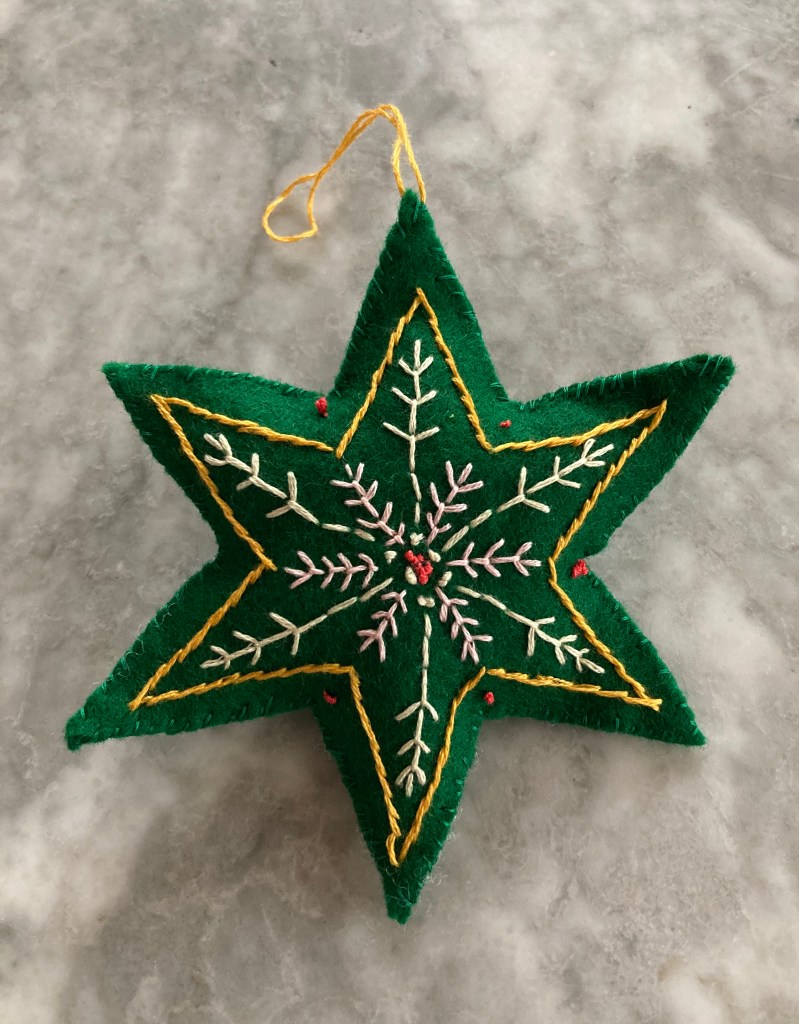
2020 has been a bad year for many things, but a good year for little home-made presents made from stash. I used a lot of cotton fabric for pandemic masks (with an added inner layer of fabric cut from an upcycled duvet cover made of special hypoallergenic tight-weave, dust-mite-proof fabric) and a big piece of green felt went to this iPad cosy, but I still had plenty of large scraps of all kinds of materials and the usual box full of odd buttons and leftover embroidery floss. Meanwhile, the holiday season was upon us, all the stores were closed and I wanted to be frugal with money but still be able to leave some mini-presents in friends’ mailboxes with a card and some cookies. These little felt stars from the December 1963 issue of Stitchcraft were the perfect choice.
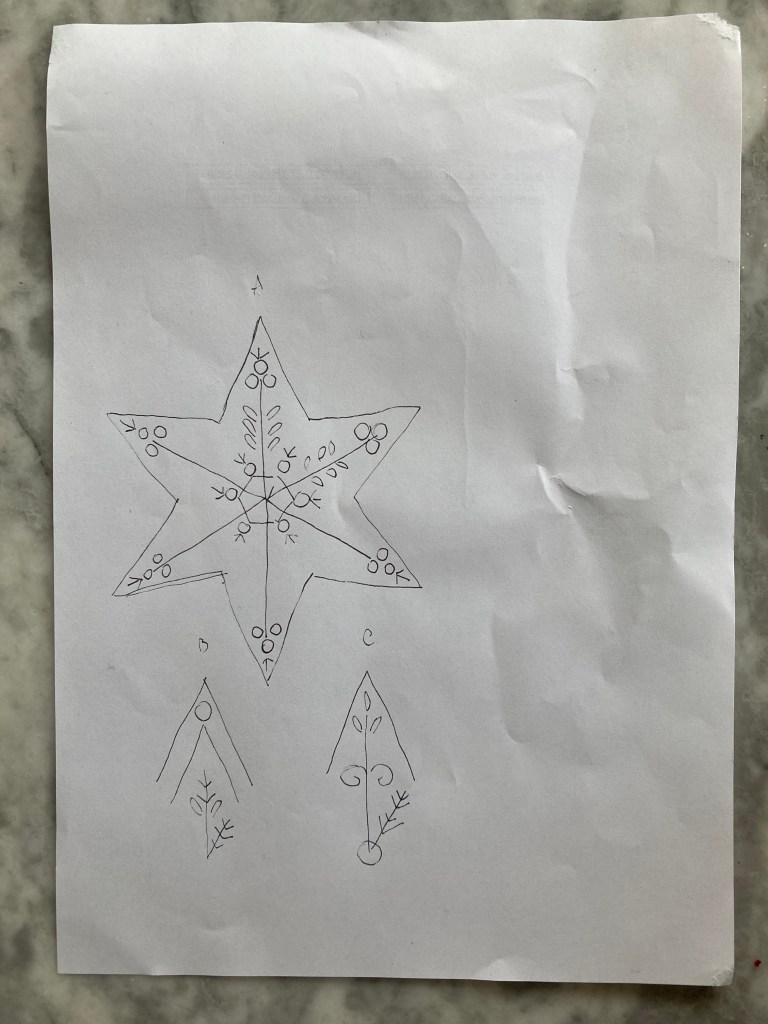
There was a life-size transfer in the magazine to trace (or photocopy and cut out — I’m lucky to have a printer at home that is also a scanner and single-page copier) with samples of the three star designs to copy onto the points of the star. I traced it onto the felt with chalk, cut out two stars, picked my favourite design, and embroidered away. (Technically I should have first traced the design onto the fabric, then embroidered it and then cut out the stars, but it worked anyway.)
I had neither sequins nor pearls, so I just did everything in embroidery and added a button for the center on one side. I overstitched the edges to make a little cushion, added a loop for hanging on a tree and stuffed it with polyester fluff. Wonderful! The first star went to a fellow knitter from my now-online knitting meetup — we did a Zoom version of our usual “secret Santa” wool gifting party — and by then I was so involved in getting people’s knitted gifts finished that I ended up not making any more this year. Now that I know how it works, and that it works, I can make more next time.
Merry Christmas, if that’s your holiday, and happy New Year to all of you.
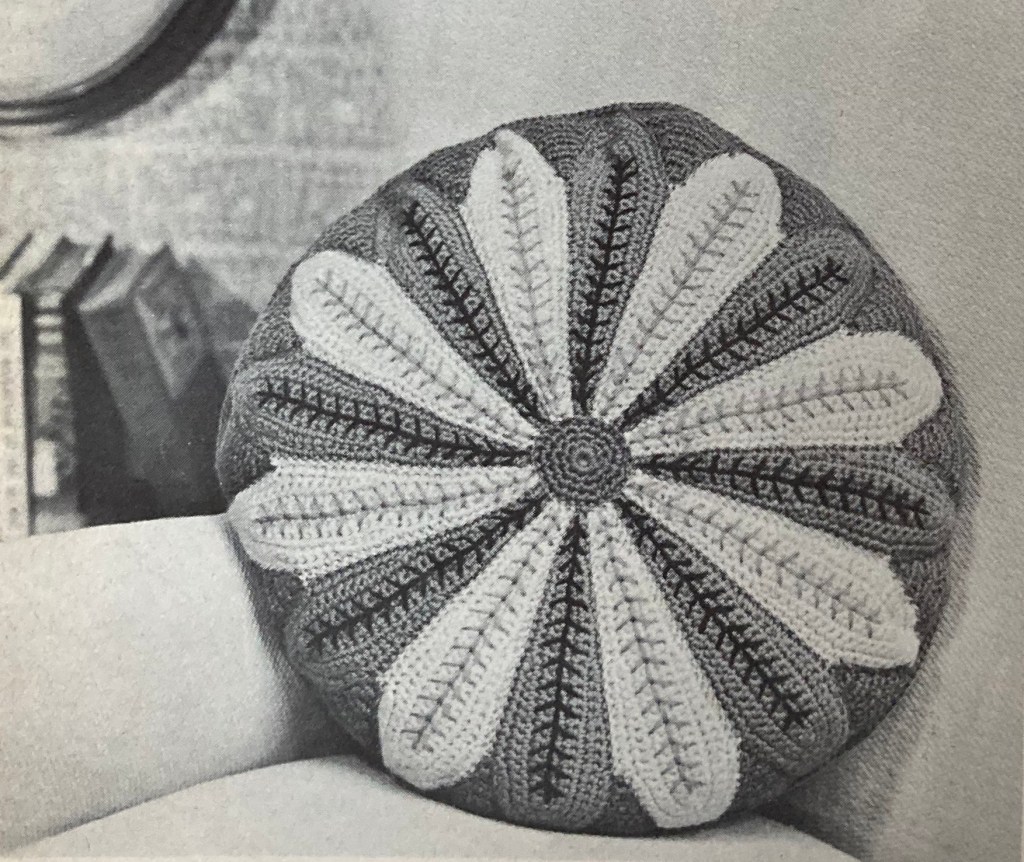
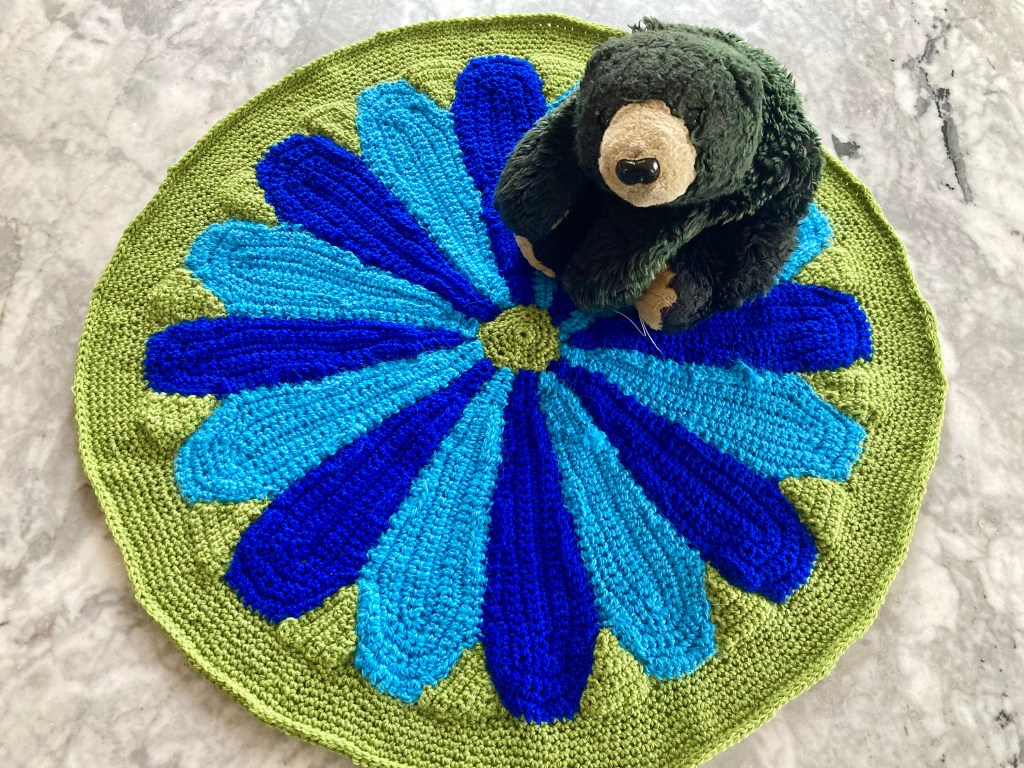
I have a huge backlog of unfinished projects and recently even got a commission to write a pattern for a new knitting and sewing magazine, so I needed the December project to be something quick and easy that I could make from stash. Behold, a very 1960s crocheted flower-petal cushion from this month’s issue! I love cheerful crocheted cushions and afghans — they have that fun, old-fashioned charm.
This one is made in double knitting, and I had two colours of blue and one of green to make a big, blue flower. I guess it’s a cornflower? Whatever, it’s cute and the colours looked good together. The dark blue is 100% acrylic (left over from this project and this project, which was patterned after this project — yes, I bought plenty of yarn), the light blue is 90% alpaca / 10% sheep wool (a gift from a very nice friend who brought it over from Chile!) and the green is a wool-acrylic blend last seen in this project from January 1960, so I was concerned that the finished item might behave inconsistently when washed or blocked, but I had no problems with that.
The size and scale, on the other hand… There was no tension given in the instructions, only a finished size of “approximately 17 inches diameter” and instructions to use double knitting wool and a No. 8 (5 mm) hook. The cushion is made in pieces — first the petals, then the triangular inserts at the top of the petals, then the center, then it gets sewn together, then you crochet the border and sew it onto fabric for the back side of the cushion — so it was hard to tell how big it was going to be. Also, the instructions very clearly say to make 12 petals and 12 insertions, but the accompanying photo very clearly shows a cushion with 16 petals and insertions. Patience Horne, you need a tech editor and a proofreader!
The result — once I had finished all 16 petals and 16 insertions, which was in fact the correct number to get the petals to form a circle, and sewn all the fiddly bits and pieces together — was huge. Granted, 17 inches in diameter is a fairly large cushion, but mine was 19 inches in diameter before I had even started crocheting the border, and the triangular insertions were also too big, making them pucker and wave a bit. I made a snap decision to just crochet the border larger and larger until all of the green wool was used up and have it be a baby blanket instead of a cushion, which would also spare me the trouble of figuring out how to make the back of the cushion, whether or not to make an inner cushion pad and have the crocheted part be a removable cover, etc. etc.
The border in the instructions only being a few rounds and me not being the world’s best crocheter, I searched for a formula to crochet something in rounds of double crochet that would have the right amount of increase per round to keep the circle flat. Though I found many amazing doily patterns and not-quite-fitting formulas, I didn’t find what I was looking for, so I just increased one stitch per petal each round and did a plain round in between every so often. There was much ripping back and doing over, but in the end it worked out fine. As for the still-puckery triangle inserts, I declared them a “design feature” and left it at that.
I wash-blocked the blanket, which evened it out some more, and only then realised that I had forgotten to embroider the lines down the center of each petal. In the end, I decided against it. The dark blue and green yarns were all used up, I didn’t have any other colour that looked right and I honestly thought it was fine the way it was. The finished size is 23 1/2 inches or 60 cm in diameter, which will fit a baby’s pram nicely. Not having a baby on hand, here it is with a teddy bear for scale:
It’s not perfect and it definitely has that “home-made charm”, but I think it will make any parents and baby happy.
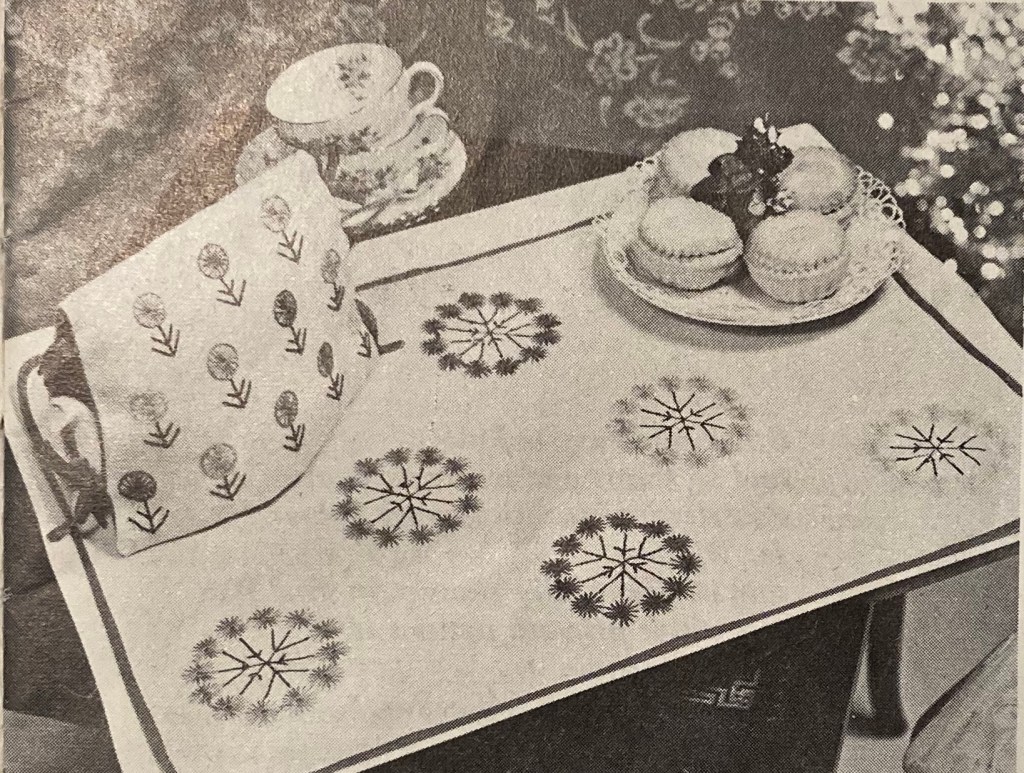
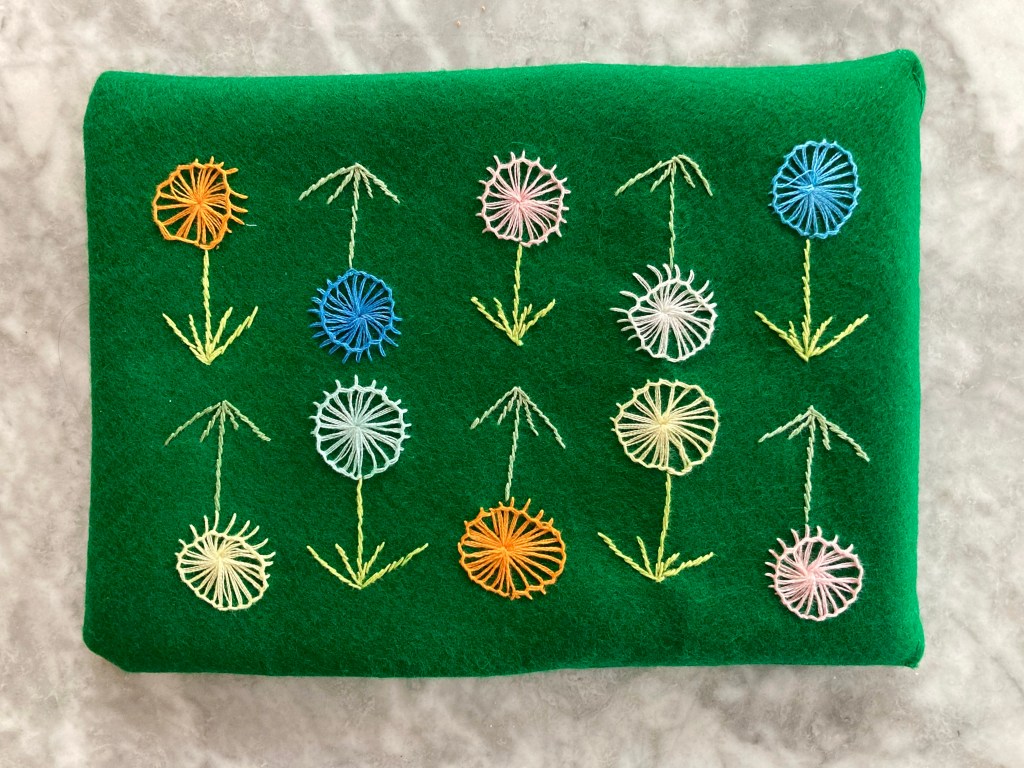
The November 1962 issue had so many exciting projects that I wanted to make, but as I am woefully behind on so many other projects, I settled for a modern version of the cute embroidered tea cosy from this “star motif” cosy-and-tray-cloth set. The star design only really comes out on the tray cloth, where flowers with spiky leaf bases are embroidered in circles. The tea cosy has the flowers arranged individually in lines.
Since I don’t use tea cosies, I adapted the design as an iPad / tablet cosy, like I did with the “Gay Goslings” design from April 1960 and the “Posies for Cosies” from March 1961. I had plenty of green felt left over from the not-so-successful October 1960 “No Fun Fuchsia” project and enough scraps of embroidery floss in fitting colours to make everything from stash.
Obviously I didn’t have a transfer, but luckily this design is so simple that I was able to just draw around a coin with chalk for the flower heads and add in the stems freehand. I say “simple” and “just”, but the felt material was of a nature that chalk does not stick to it for more than a minute and the colour is too dark to draw on with a pencil or embroidery marking pen. My continuing incompetence in drawing, cutting or embroidering straight lines came back to haunt me! Oh well, that’s how you know it’s handmade.
The tea cosy has three rows of flowers: three in the top row, four in the second and five in the third. Not sure exactly how to scale the design for a tablet cosy, I started by embroidering two rows of flowers with three flowers in the top row and two in the bottom row. I didn’t like the asymmetry, so I filled in the gaps with more flowers aligned upside down.
Making it up into a bag was straightforward enough (except for the not being able to cut in straight lines thing, even using a ruler and template) and I finished it off with a vintage fabric-covered button from the button box. I’m quite happy with the result, even if the design is not entirely even and the buttonhole stitch pulls to the center of some of the flowers (not sure how to correct that.) And it went so fast! I did the embroidery last night and made it up into a bag this afternoon.
It looks very 1960s!
Since I still use and love my “gay gosling” iPad cover, I will send this one to a friend as a birthday/Christmas present.
Progress on actual projects has been going slowly this month, but here’s a fun extra: a video about the connections between performing early music and knitting from vintage patterns, written, directed by and starring yours truly.
In “real life” (i.e. what I do for a living when I am not knitting) I’m a professional concert and opera singer, and as you all may imagine, work has been more or less non-existent since the pandemic hit. Among other upheavals, my friends and colleagues Yonit Kosovske and Vlad Smishkewych had to first postpone, then completely overhaul the launch of their new organisation for early music, H.I.P.S.T.E.R. (Historically Informed Performance Series, Teaching, Education and Research). Being the creative people that they are, they re-imagined part of the launch as a new video series exploring connections between music and artisanry, called WAVE~LINKS.
Many of us professional musicians perform or engage with other artistic genres, and the idea behind WAVE~LINKS was to showcase those “other” passions and serve as a platform to discuss and reflect upon the shared spaces between (early) music and other artistic disciplines. And we are a very creative bunch! The online H.I.P.S.T.E.R. launch on November 7th, 2020 featured videos from creative artists around the globe sharing their insights into links between music and poetry, painting, pottery, photography, dance, knitting, weaving, fermentation, wood working, and more.
My video is about knitting, obviously, and the similarities that I find between historical performance practice as it relates to singing early music, and historical “knitting practice” as it relates to working with and from vintage pattern sources. I hope it is interesting to musicians and knitters alike.
Enjoy it, and if you like it, check out the other WAVE~LINKS videos on the H.I.P.S.T.E.R. web site, their Facebook page or their YouTube channel. I can especially recommend the video by Rosemary Heredos, a fellow singer and knitter whose video explores the connections between singing, knitting and spinning wool.
“The most welcome present you can give to a mother-to-be is something warm and hand-knitted for the layette,” wrote Stitchcraft’s “editress”, Patience Horne, in the September 1962 issue, and it’s still true! If I can’t decide on a project, if I don’t feel like making a full-size adult garment, if I have bits of wool that want to be used up in a useful way, I make a baby jacket. Someone, somewhere is having a baby soon, and I always have a couple of finished objects on hand in case I didn’t know that a colleague or acquaintance was “expecting”.
That was the case this month, funnily enough in my own weekly knitting group. We have been “meeting” via Zoom since March due to the pandemic, and I dropped out for a while due to being ill myself, so by the time I came back I had apparently missed some happy news — one of my fellow knitters will be having a baby this winter. What better time to make this cute and easy first size raglan cardigan?
I had 3-ply wool left over from this jumper, so I was even able to achieve the tiny gauge of 8 stitches to the inch. Only… it turned out I did not have enough of this wool, so the raglan yoke part is leftover mystery purple 4-ply. I’m not quite convinced that it’s going to work; the harsh colour line seems weird at the moment.
I don’t know the name of the stitch pattern, but it’s a lovely easy sort of herringbone:
Row 1: knit
Row 2: k1, p3
Row 3: knit
Row 4: p2, *k1, p3*
Except… I decided to make the yoke in one piece, because I didn’t want to sew raglan seams, and the raglan decreases change the pattern at the armholes. I knew that would happen, but was too lazy to work out mathematically exactly what the decreases would do. It turned out that the fronts and back stay in the proper pattern and both sleeves end up in k3, p1 rib. OK, it’s symmetrical and doesn’t looks terrible, so I decided to live with it.
But… then I ran out of the mystery purple wool as well! And had to make the last bit of collar ribbing in another mystery purple-ish wool that was also thicker. Well, at least the colours didn’t clash too much? And I had cute, matching, vintage buttons in the button box!
… except that I somehow utterly failed to sew them on evenly spaced? I could add one more in the gap near the top — there’s a buttonhole there — but somehow the buttonhole in the lower gap got sewn shut while I was weaving in ends or sewing on the front bands. I have enough buttons, but can’t decide whether to cut a new lower buttonhole and add two more buttons or just give up and leave it as it is. At least the gaps are vertically symmetric.
Not my best work, but it will keep a baby warm and clothed. Perhaps I’ll make something else for my knitting friend’s baby — a fellow knitter deserves a more successful project!
August was a pretty blah month this year, what with the never-ending Covid-19 pandemic and associated long-term isolation, illness and unemployment. My knitting motivation is sub-par and the August 1962 issue of Stitchcraft didn’t have any projects in it that really inspired me. Still, I’ve been trying to turn the situation into an “opportunity” to save money and free up space by finishing WIPS and making new projects from stash.
This month’s embroidery flower was the gladiolus, with a special extra design of wild orchids. I chose the gladioli and embroidered them on another one of the recycled moneybags that I bought at an antique market last year. They really do make excellent sturdy little bags for buying small amounts of potatoes, mushrooms or other vegetable items, and with a zipper on the top they would even be good for buying and storing things like beans and lentils in bulk. They also work well as small project bags — I kept this WIP in the bag that I made in December.
The colours that I had in the embroidery-thread scrap box were more or less accurate to the pattern (mauve, mid-mauve, violet, yellow, gold, dark green and light green.) Also, the stitches are technically not very hard to do: the petals are long-and-short buttonhole (blanket) stitch outlined in stem stitch with straight-stitch center lines and satin stitch centres, the buds are satin stitch, the stems are stem stitch and the leaves are fishbone stitch. I like the effect of the dainty flower embroidery on the rough burlap fabric, too.
On the critical side… I am really not that great at embroidery, especially when I don’t have a transfer and I’m working with fabric like this, on which I can’t draw a design outline very well. I drew a few straight lines and dots with a pencil and improvised from there. Also, since the fabric is already made up into a bag, it’s difficult to use a hoop properly or work on the lower edge. The buttonhole/blanket stitch is a strange choice for the flowers, if you ask me — they look very scraggly! (Just like my real plants at home, ha ha.)
I left the top edge unfinished for now, as I couldn’t decide whether to make a simple button closure like on the other embroidered money bag, a fold-over buttoned closure, or a drawstring. (I don’t have a zipper of the right length on hand and I’d like to stay on the “no-buy” wagon for as long as possible, but it would be the most practical solution.)
I still have plenty more of the bags, so I can keep making one every time a little embroidery project presents itself.
July 1962’s issue didn’t have anything in it that particularly interested me, so I took the time to go back to the June 1961 issue, which had so many nice projects in it that it was hard for me to decide which to make. (I ended up making this lacy top and later, this child’s tunic-dress.)
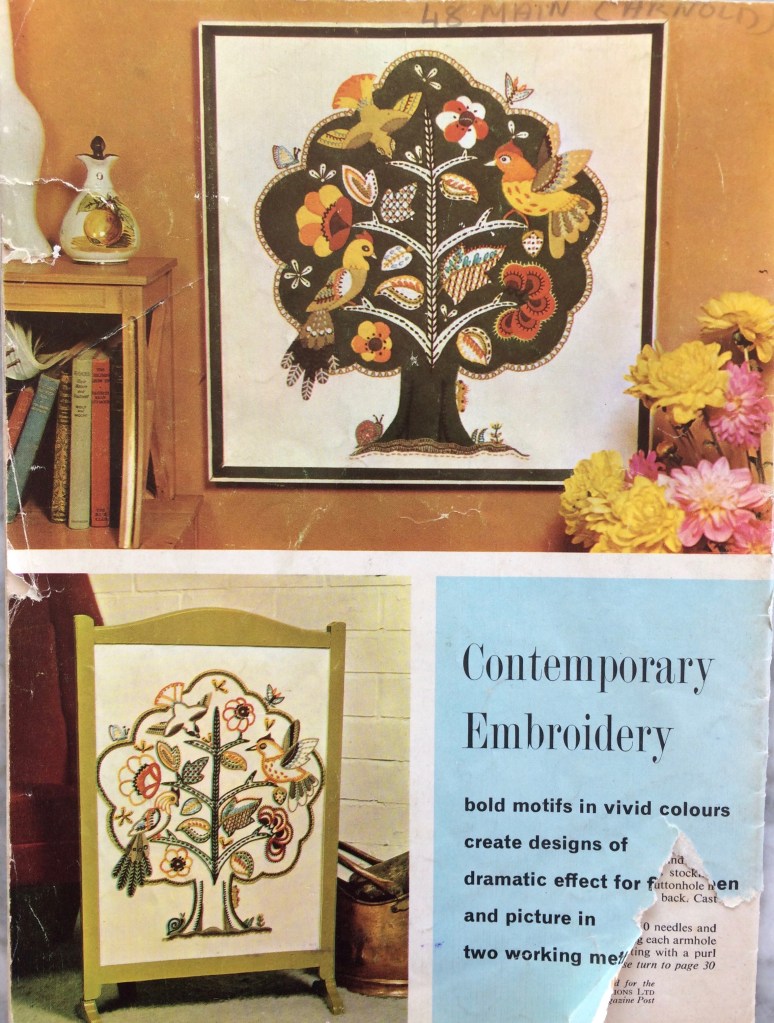
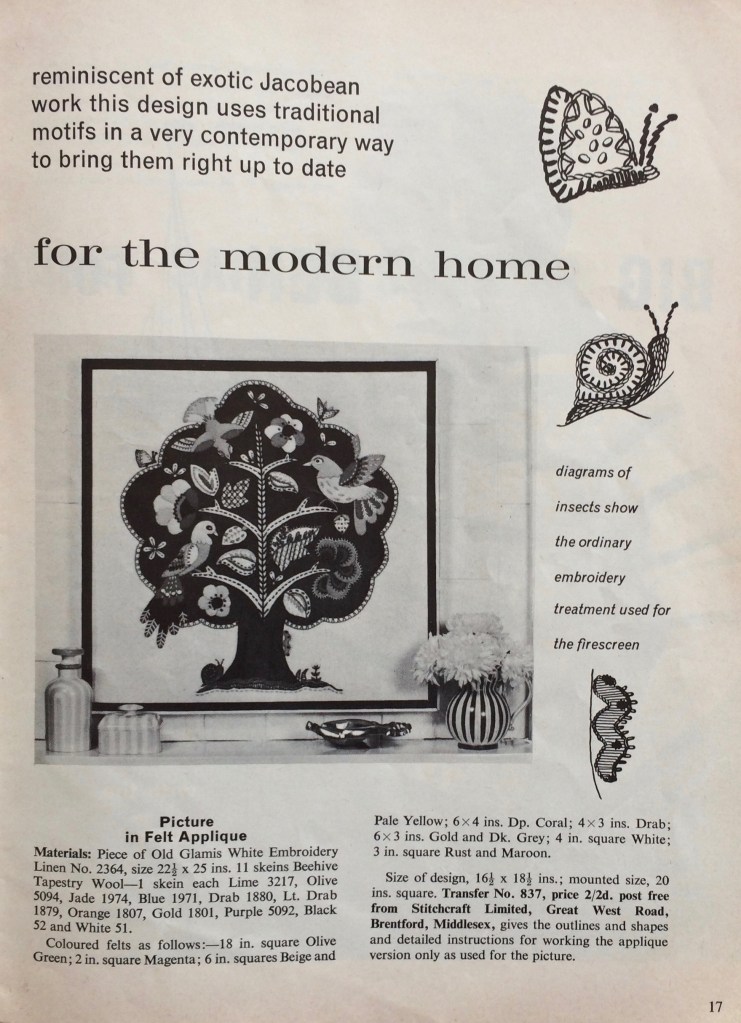
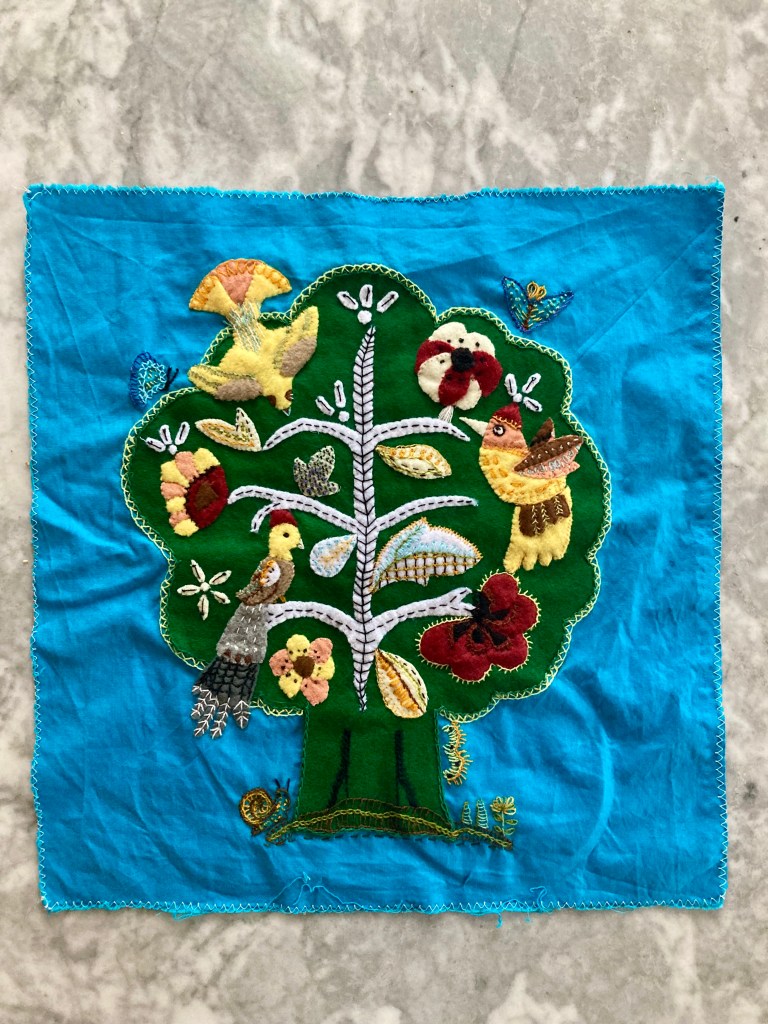
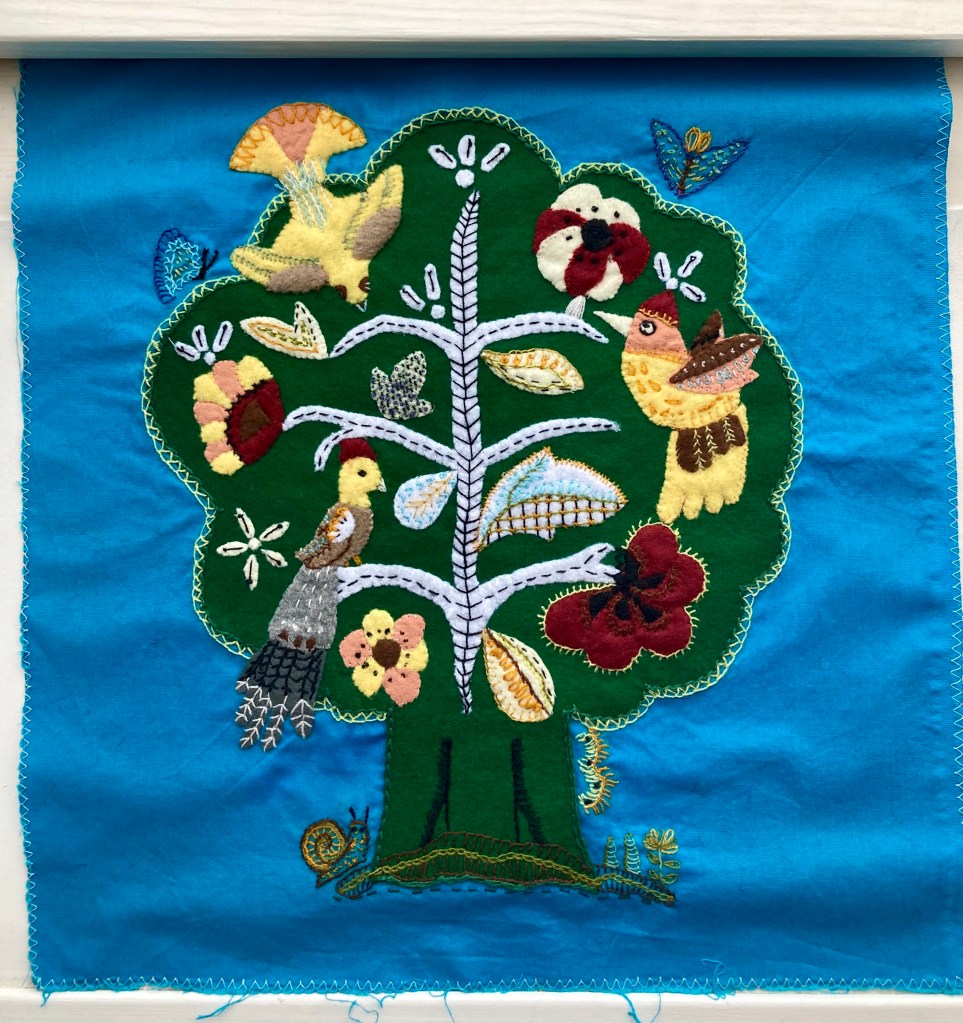
I loved the extremely complicated, heavily embroidered, faux-neo-Jacobean felt appliqué “birds in a tree” extravaganza featured in colour on the back cover, but it was too daunting. For one thing, of course I didn’t have the transfer or pattern for the appliqué pieces, since I would have had to have sent away for them via postal order in 1962. For another, there weren’t even any instructions in the magazine — the design was offered as either an embroidery or an appliqué project (see photo), and the instructions in the magazine only covered the embroidered version in any detail. The appliqué version just gave a list of materials, size of finished design, and the address where one could order the pattern and instructions. And when it comes right down to it, my appliqué and especially, embroidery skills are really not very well developed.
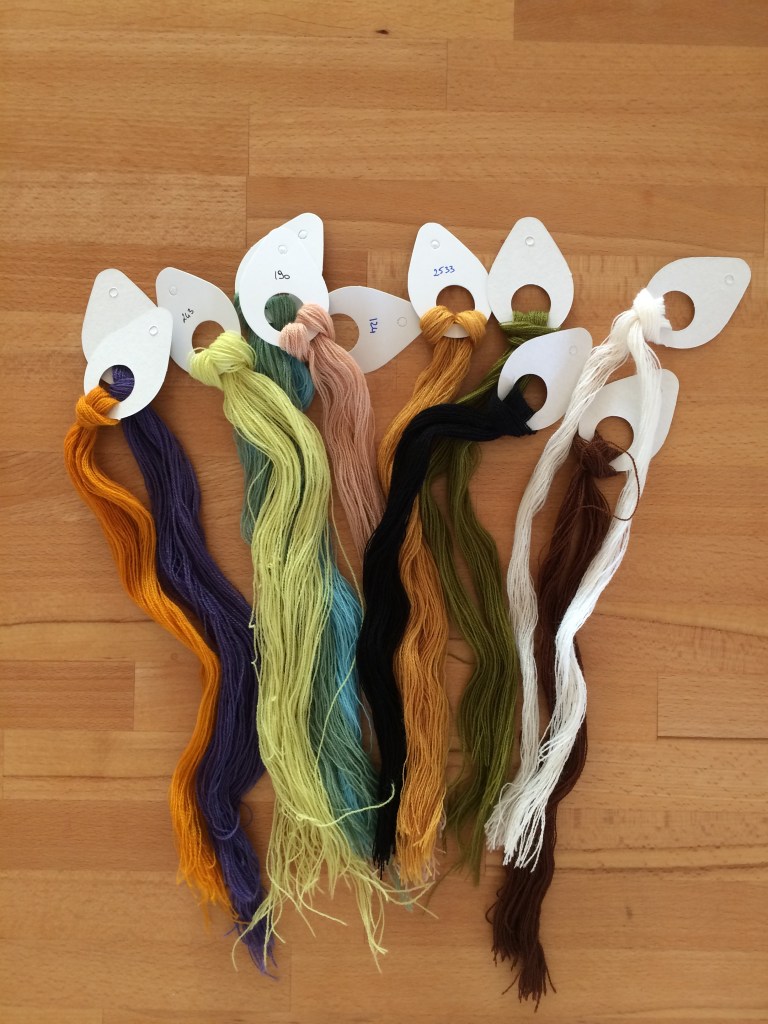
Oh yes, and while felt is easy enough to buy, the materials included tapestry wool for the embroidery, which is impossible to find in stores anywhere near me and even difficult to order online in the right weight (very fine)! Luckily, last year I happened to be in the one city I know that houses the one shop I know that actually specialises in tapestry and sells the right kind of wool, so I was able to get that, at least.
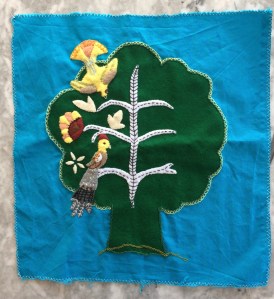
I decided to make it as a cushion, not a wall hanging. The background tree was easy enough. Technically, the white branches and leaves should have been made by cutting holes in the green tree felt and letting the (white/beige) background fabric show through, but since I chose a blue background fabric, I appliquéd them as well. It was predictably difficult to make and cut out my own patterns for the little bits of felt for the birds and leaves, and after making the first two birds, I realised it was easier to just cut the pieces freehand. Since there were no instructions to follow, I went from the photo and the instructions for the embroidered version, which obviously didn’t give much useful information.
Such a detailed project took forever, of course. It needed many tools and materials, so I could only work on it at home at a table, and not during the winter months, as I needed natural light for the fine work.
I made two of the birds on the left first, wasn’t really happy with them, and realised why after making the first flower on the left. I liked the way the flower turned out — it’s much simpler! The birds seemed overdone in comparison. I thought about changing the design and realised at some point that, of course, the who idea of this neo-Jacobean, embroidered and appliquéd extravaganza is that it is supposed to be over the top.
Before ironing…And after ironing
And so, slowly and painstakingly, it got done, one piece at a time. (It also spent a lot of time in the cupboard in between bursts of activity.) The embroidery directions in the magazine were often quite different from the appliqué version, so I did a lot of guesswork and adaptation based on the (rather small) colour photo on the back cover, from which the colours had changed and faded in the 50 years since its printing.
I was determined to get it done before the end of 2021, and I did (on December 31st.) It was a huge milestone for me in my appliqué / embroidery learning process, and I am really, really happy with the way it turned out.
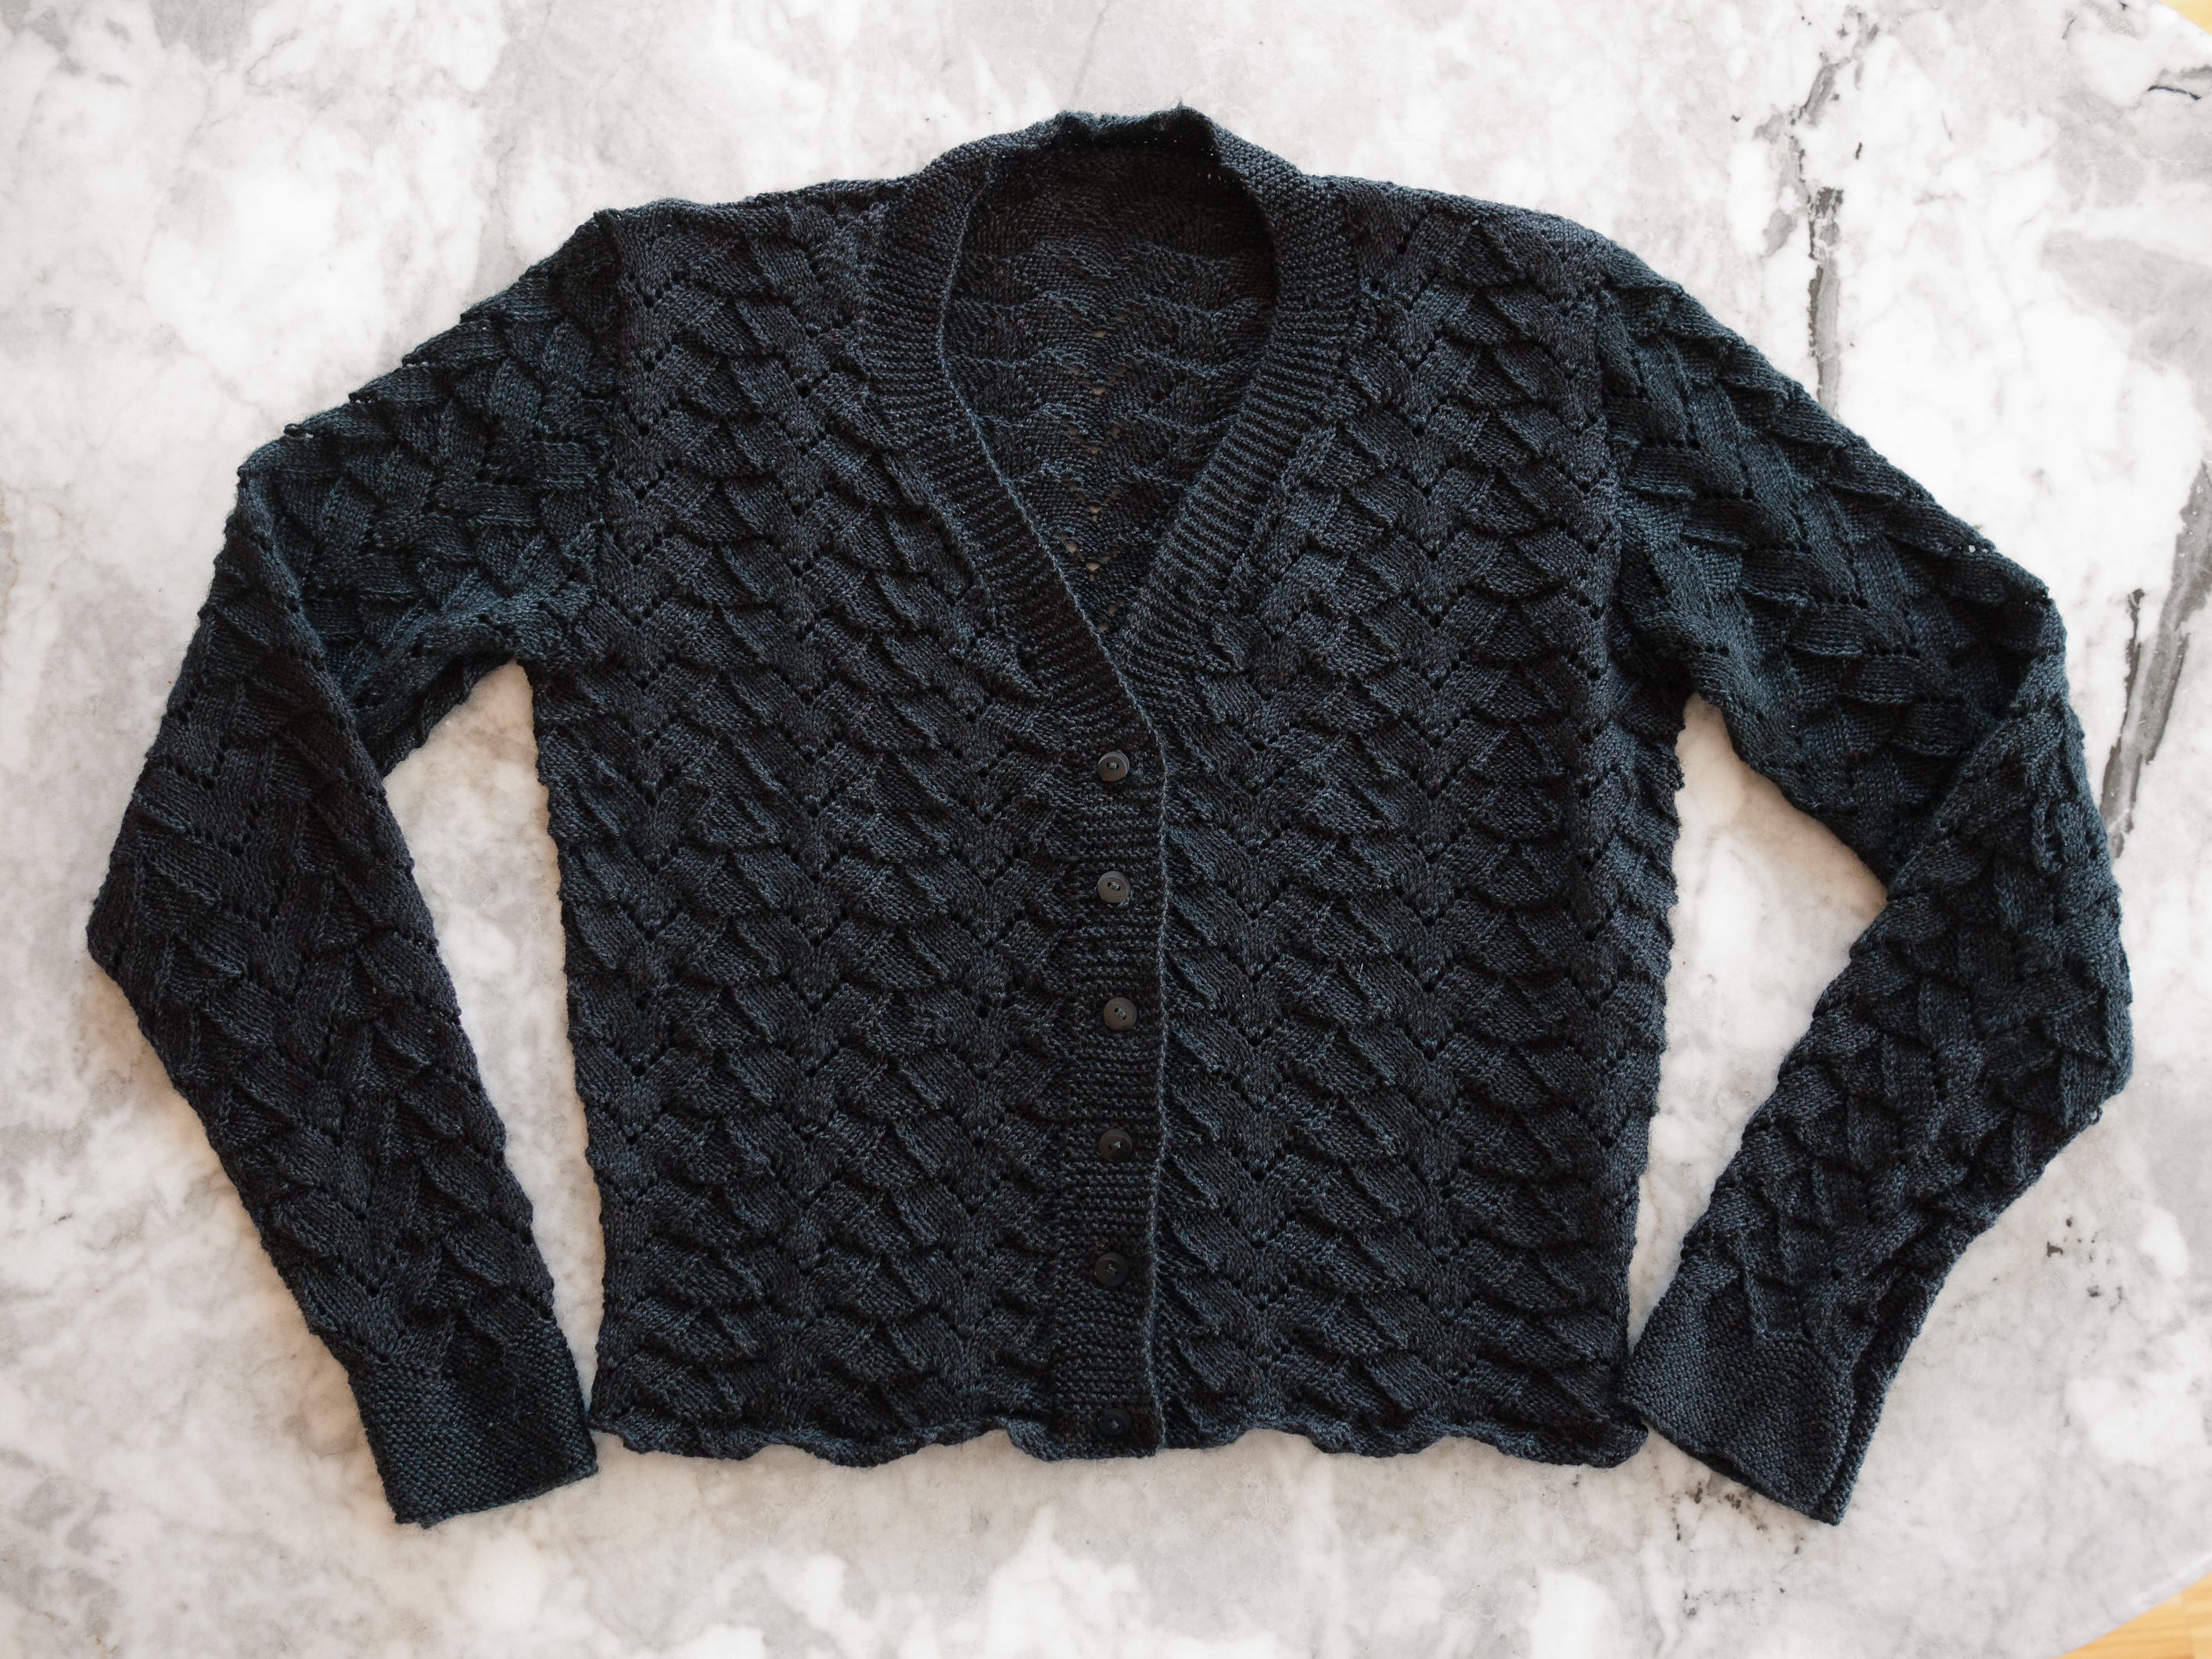
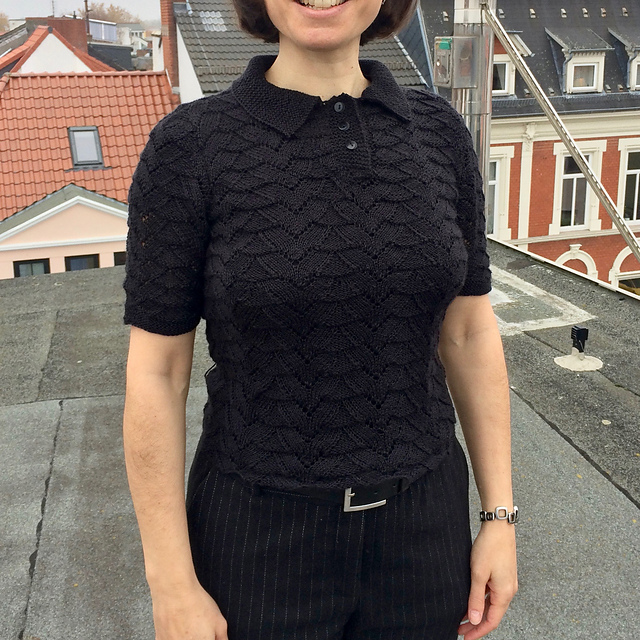
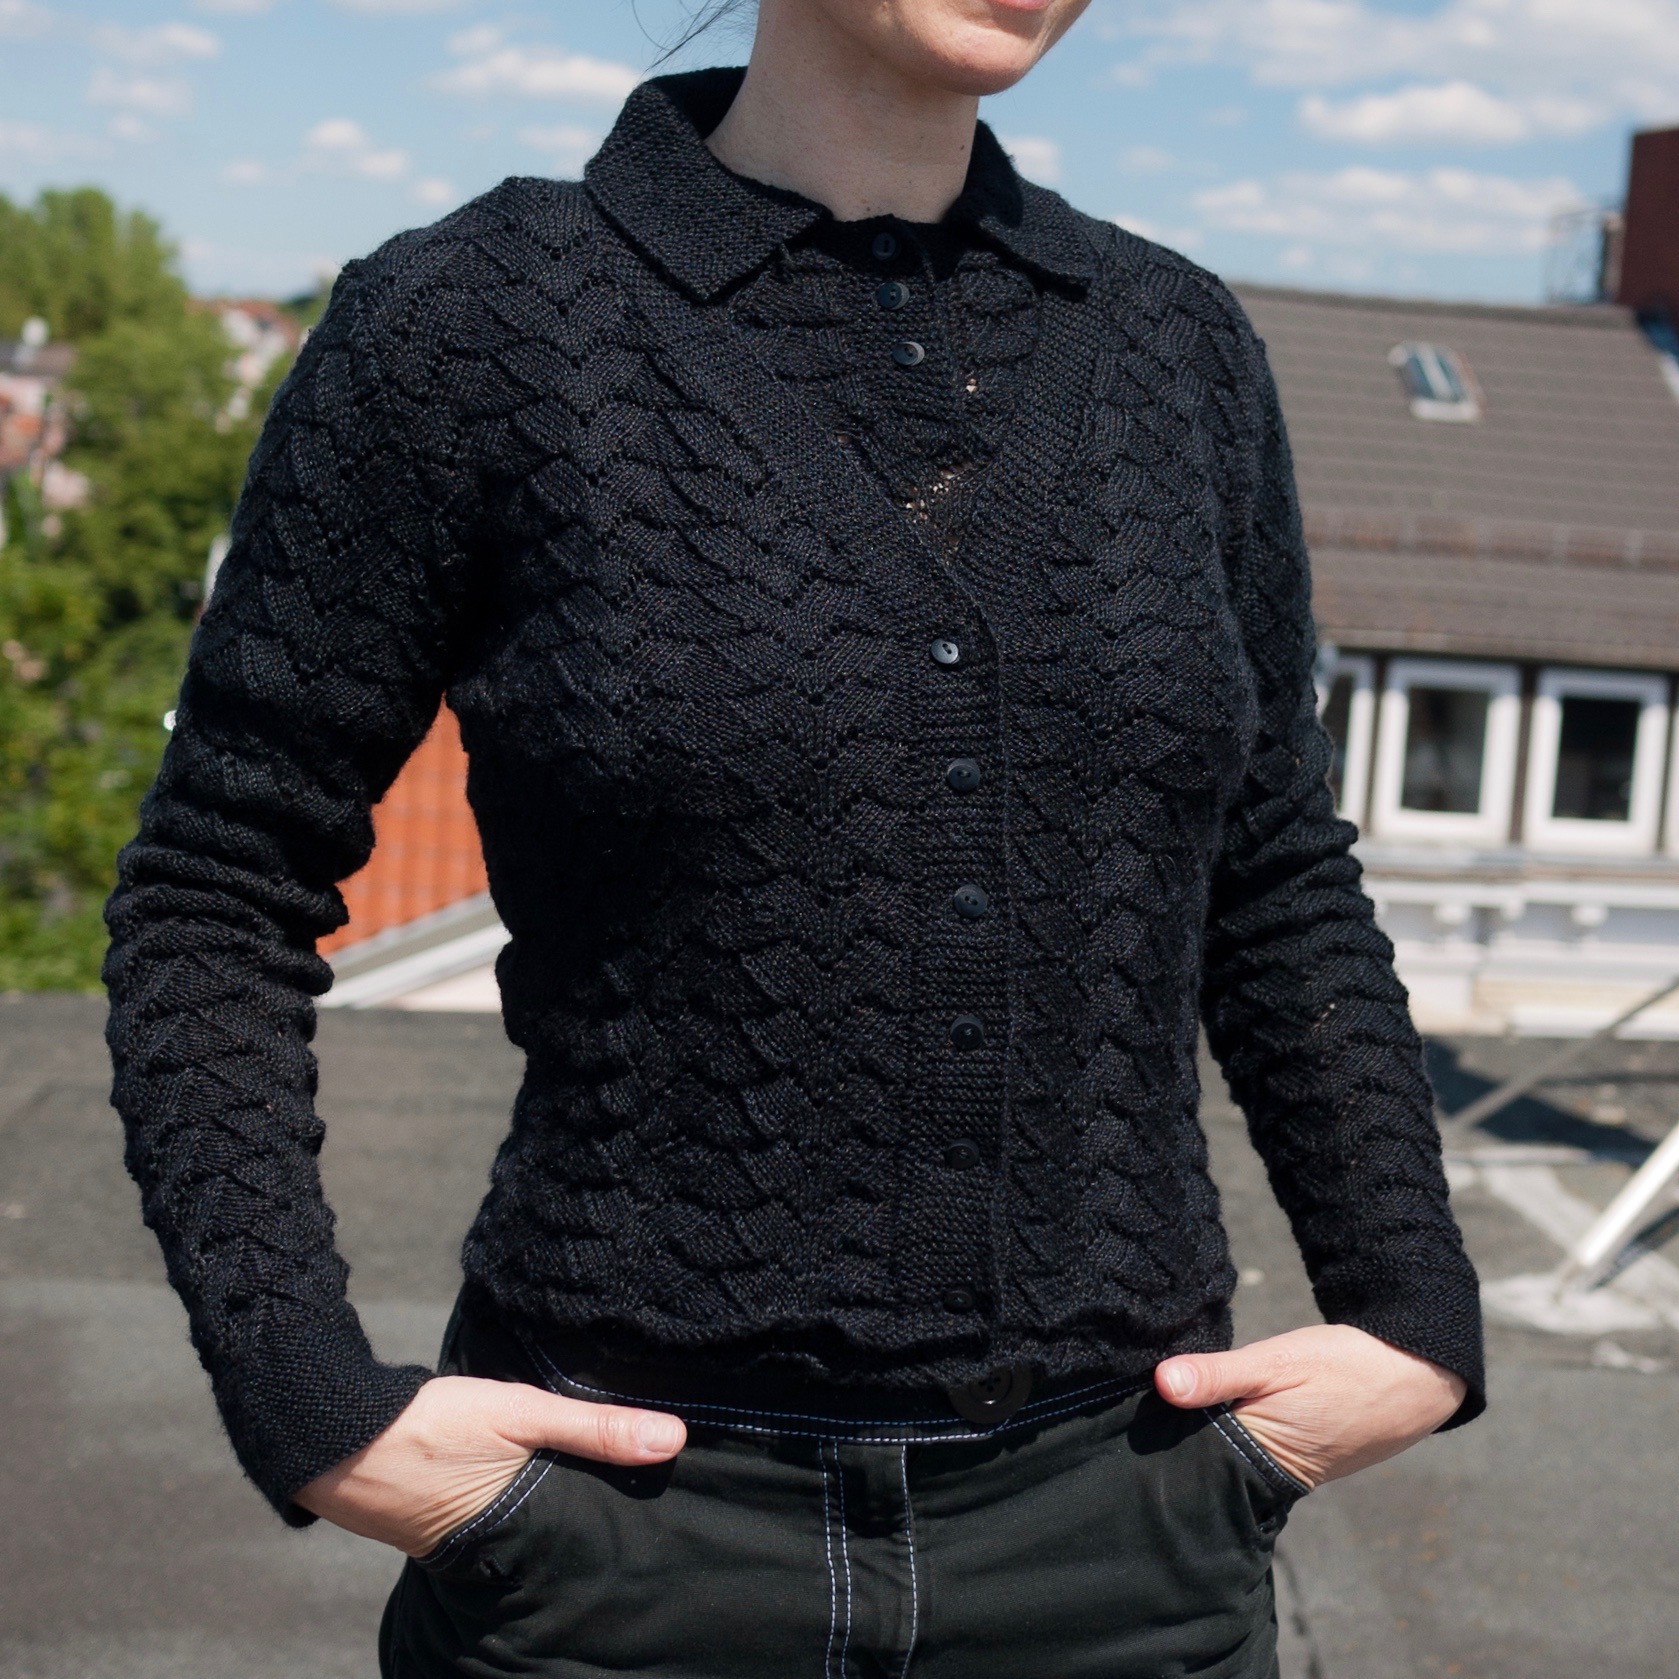
The June 1962 issue didn’t have any projects that appealed to me enough to make them, so I used the time to finish up a project that I’ve been working on off and on for the last few years: a “4-coupon” twin set from Stitchcraft‘s February 1947 issue.
The “4-coupon” title refers to the clothing coupons used when purchasing rationed items during and after World War II. Rationing began for many food products in January of 1940 and extended to clothing in 1941, whereby clothing coupons could also be used for household textiles or wool. The Wikipedia article on rationing in the United Kingdom during World War II gives a sense of the coupons’ comparative value:
There were 66 points for clothing per year; in 1942 it was cut to 48, in 1943 to 36, and in 1945 to 24. This system operated through a “points” system… [ ] …Clothing rationing points could also be used for wool, cotton and household textiles… [ ] … The number of points that each piece of clothing would be valued at was determined by not only how much labor went into making it, but also how much material was used. A dress could run someone 11 coupons, whereas a pair of stockings only cost 2. Similarly, Men’s shoes cost 7 tickets, whiles women’s cost only 5. In 1945, an overcoat (wool and fully lined) was 18 coupons; a man’s suit, 26–29 (according to lining); Children aged 14–16 got 20 more coupons.
The twin-set uses 8 ounces of wool, so apparently one coupon could get you two ounces of (2-ply) knitting wool. (Just to be clear, one also had to pay for the items; the coupons only limited the amount people were allowed to buy, regardless of how much money they had at their disposal.)
The influence of rationing can be seen in almost every aspect of 1940s issues of Stitchcraft: occasionally titles of designs, such as this one, but more often in recipes and advertisements. These two, from the pages of the 4-coupon pattern, promise that the company in question is “sharing out their dress and lingerie fabrics as fairly as possible” and reassure that “it won’t be long until we can have really new lingerie” (lace and frills were banned, and nylon was needed for parachutes et. al., hence the plain, home-sewn cotton nightgowns).
Many products remained rationed after the war, including clothes rationing, which lasted until March 1949. It was only in 1954 that the last rationing measures were lifted. Since then, the only product that has been subject to rationing in the UK was petrol, briefly, during the Suez crisis of 1956-57. And yet, as the global Covid-19 pandemic continues to rage around us, there have been discussions in many countries — including wealthy countries with excellent medical infrastructures — regarding the rationing of personal protective equipment, ventilators and medical supplies. The past is not as far away as we might think.
Booklet photo, February 1947
I had plenty of time to ruminate on that while finishing this project, which I started as a “home away from home” project in 2016 (a year in which I effectively lived in two different places) and finished in home isolation in 2020. The wool — Onion Nettle Sock — is a mixture of 70% sheep wool and 30% nettle fibre. I would never have thought to knit with nettle fibre, but it works very well! It is smooth and somewhat shiny and the textured lace pattern shows up very well with it. Also, it reminds me of various fairy tales involving our heroine knitting shirts for her brothers out of nettle plants (or aster flowers, depending on the version and translation), like Die Sechs Schwäne (The Six Swans) by the brothers Grimm, or De vilde svaner (The Wild Swans) by Hans Christian Andersen.
As always, I am larger than the 34-inch-bust size for which the pattern is written, but also get a looser gauge, so it worked out for me to make the pattern almost exactly as written. I made the sleeves and the body of the jumper in the round, adjusted for length and changed the sleeve cap slightly for less puffiness, but otherwise I didn’t need to change anything. Of course, the lace pattern is stretchy and can be blocked tighter or looser.
Said pattern was the first one I had worked with that increased and decreased in the course of the pattern repetition, and I was at a loss to deal with the side-seam and sleeve increases and decreases at first. The pattern, like all vintage patterns from this period, assumes you know what you are doing, and there are no charts in any case. I learned a lot and I can see that the side increases on the cardigan are much nicer than on the jumper! (Carefully photographed as to be unnoticeable, but believe me.)
My buttonhole spacing on the cardigan was off, so I ended up sewing most of the holes closed ad carefully cutting new ones after backing the bands with ribbon (a common practice at the time, especially on tight-fitting cardigans, to keep the bands from stretching out and gapping across the chest.)
All in all, this is a wonderful design and very flattering to the figure. Nota bene, my upper body is broad and flat and I am not exactly model-thin, but this ensemble somehow manages to make me look both svelte and curvy. The wool/nettle fingering weight is perfect for fall and spring. I love the buttoned placket and collar of the jumper. Knitting this was definitely worth all the time and hard work and it will be getting a lot of wear for years to come.
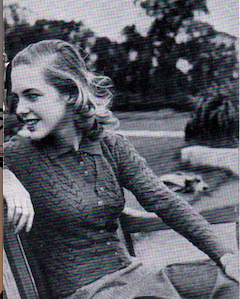
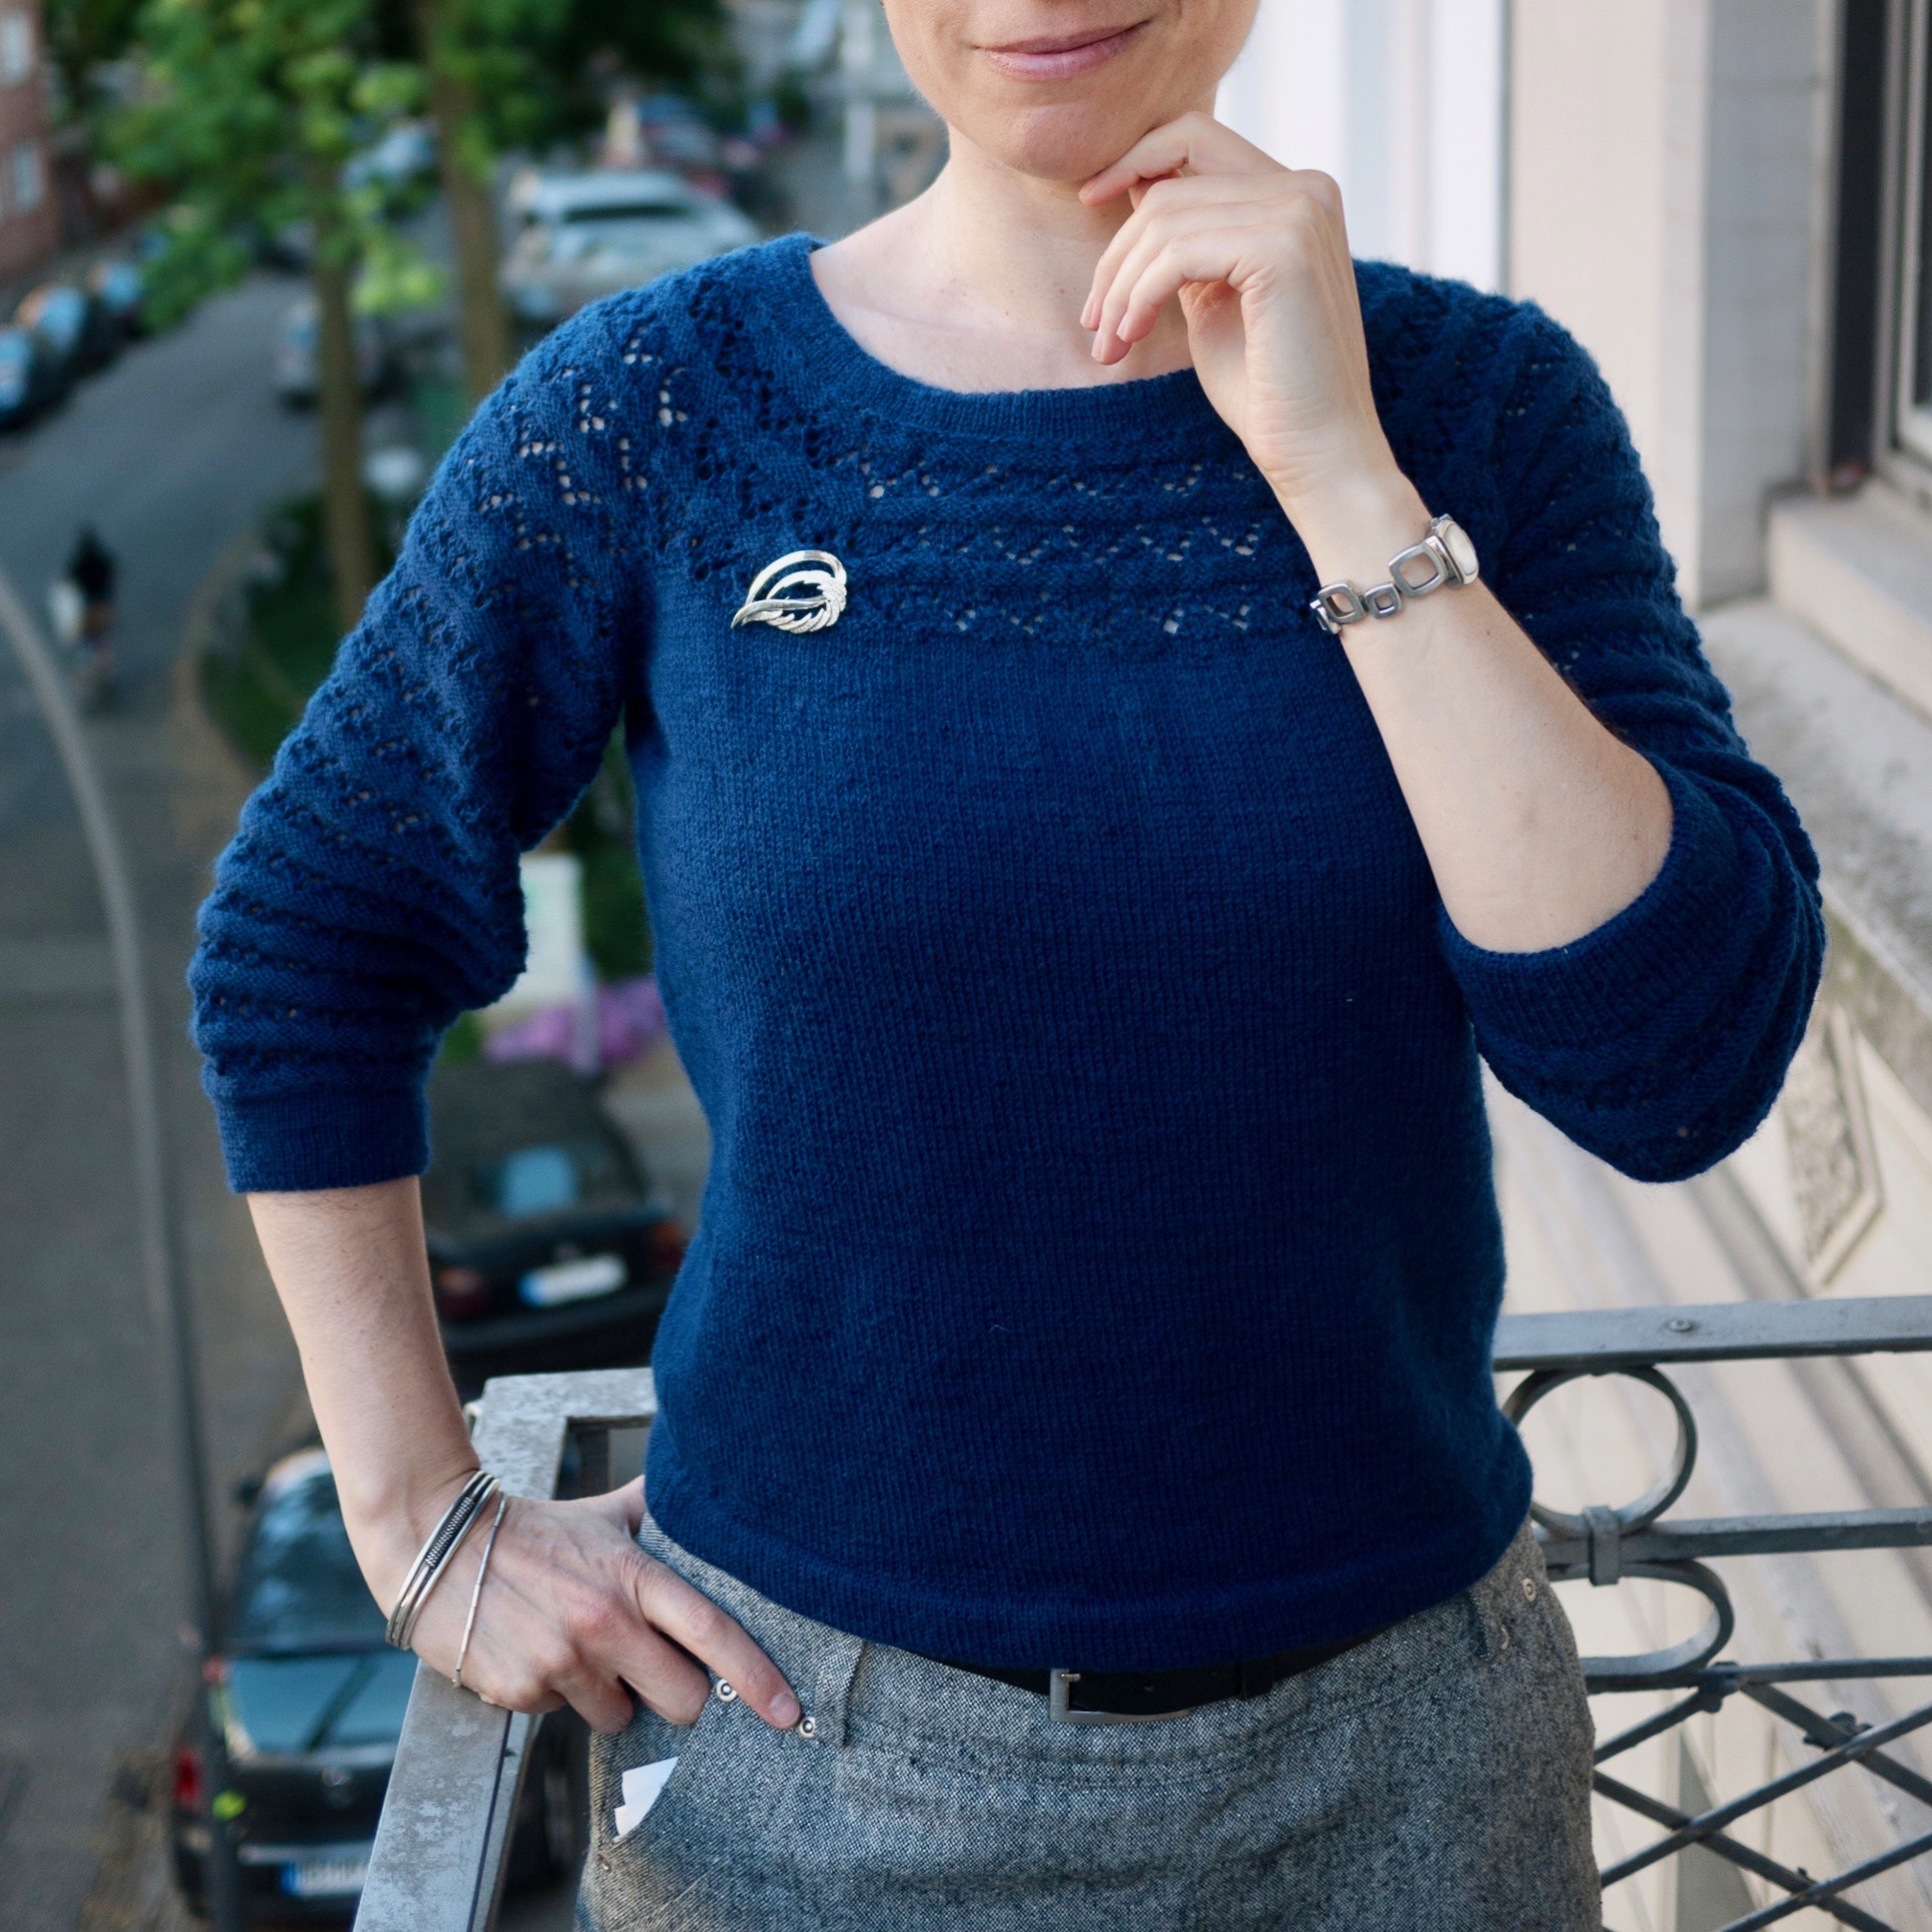
May 2020 went quickly and is already over, but (spoiler…) my May 1962 project didn’t get finished until June. It was a lightweight pullover in 3-ply wool with three-quarter sleeves and a lacy yoke, simple, elegant and “in a cooler trend for summer.”
I bought the wool — Regia 3-ply, which has long been discontinued — from a wonderful little wool shop in my town that used to sell and maintenance hand knitting machines as well. It was a tiny, one-woman operation with unpredictable business hours, whose elderly owner lived in the apartment above the shop. She often had vintage second-hand knitting machines for sale and I always meant to buy one, but the times when she had one available and the times when I was able to actually find the store open never seemed to coincide, and sadly, she passed away last year. There were no knitting machines left in the close-out inventory sale, but still plenty of fine-ply wool, which is almost impossible to find in normal wool shops these days. RIP lovely little store and lovely lady who ran it! I will think of you whenever I wear this jumper.
In spite of the fine wool and small needles (2.5 mm), I was unable to get the required tension of 8 stitches and 10 rows to an inch, so I adapted and made the smallest size, which should come out to fit me. I say “should” because the lace pattern used on the sleeves and yoke bunches together quite a lot before blocking. I blocked both sleeves on the needles to try and measure it out (see photos…) but I still wasn’t sure if they would fit properly onto the yoke. They did, with no further alterations.
The only real alteration that I made (besides making the body in the round to save time and seaming) was to alter the decreases on the front and back after the armhole bind-offs and before the beginning of the yoke. The pattern is written with identical back and front pieces, but I wanted the yoke to hang down further on the neck on the front than on the back, so I make the back pre-yoke part longer and the front pre-yoke part shorter by decreasing more or less frequently than in the pattern.
The lace stitch refused to block out flat, no matter what I did. I wash-blocked, stretched and pinned both sleeves before making the yoke (see photo above) and they had bunched up again by the time I was done knitting. I wash-blocked, stretched and pinned the whole garment after completion and the sleeves bunched up again five minutes after I unpinned it (dry). I pinned the sleeves and steamed them, then ironed them with the same result. Did I mention that this yarn is 75% wool and 25% acrylic, which normally blocks for good when any kind of heat is applied? Well, no matter what I did, it didn’t take. The yoke stretches out naturally while worn, but the sleeves bunch up. Since they are supposed to be below-elbow-length anyway, I decided to call it a design feature and live with it.
On the whole, I’m quite happy with it, and it’s the perfect weight for cooler summer days.
My April project was the cardigan jacket, a.k.a. “matinee coat” from Stitchcraft’s April 1962 layette set “for an Easter baby.” The set included a dress, the jacket, bootees, a bonnet and a blanket to use as a pram cover, plus a sewn “pin-tidy” made out of a tiny baby doll with flannel and satin “skirts” to hold the safety pins for baby’s cloth nappies. The pin-tidy is a bit “uncanny valley” for my taste, but the knitted items are all lovely.
My knitting group has a gift exchange game every December and my prize this last year was 100 grams of Opal “Beautiful World” 4-ply sock yarn, 75% wool, 25% polyamide, multicoloured. I don’t like multicoloured yarns, but hey, a gift is a gift and I knew I would find a use for it! Sock yarn works well for baby things, being washable and non-felting, and 100 grams was the perfect amount for the jacket. The colour is unusually dark for a baby garment, but I don’t this the friend whose baby-to-be I knit it for will mind — they wear a lot of black themselves. (Side note: I did make an all-black baby cardigan for a black-clothed metal fan father-to-be friend once, and he was thrilled, because he knew he would never find one in a store. Take note, baby clothing designers — there is a market out there!)
The construction is a simple dolman, made in pieces from the bottom up with cast-on sleeves. The button band is made with a slip-stitch hem and the stitch pattern in the lower part is an easy broken welt:
Row 1: (RS) knit
Row 2: *k2, p 6* to last 2 sts, k2
Rows 3 and 4: knit
I even found seven buttons — one extra! — in my stash that fit the buttonholes and the style really well (my local stores are still closed).
My only worry is that the neck is too tight. It looks awfully small. Of course, they can just leave the top button open if they have to.
The baby will arrive in June and I will “see” my friend next week (i.e. non-contact delivery of present, perhaps we will literally see each other through a window or something). I hope everything works out for them as well as this project did for me!
Greetings from the Covid-19 lockdown! March 1962’s project sports the headline “Ready for the Easter Parade” in the magazine, but there are definitely not going to be any Easter parades in March 2020. I hope all of you, dear readers, are staying healthy and staying home.
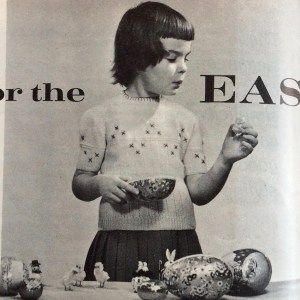
I made the jumper from this lovely “best-dress” twin-set in an easy flattened-rib pattern with added cross-stitch embroidery. It’s written for 4-ply wool, but the child I knit it for can’t wear wool and the warmer months are coming, so I made it in cotton. And I finally found a cotton yarn that is non-mercerised and fine enough for me to get 7 stitches to the inch with it — Cotton 8/4 by the Danish brand Mayflower. It’s even organic! Sadly, there wasn’t enough yarn left in the shop to make the cardigan, said shop has decided not to re-order this yarn and Mayflower doesn’t seem to do direct sales via its website, so if I want to make the cardigan, I’ll have to see where else I can order some more.
The pattern was easy and my only modifications were to close the back neck opening with snaps and a button instead of a zipper and to forego the blanket-stitch embroidery around the neck, which I thought didn’t go well with the cross-stitch embroidery. It was a fun project and I hope the little girl for whom I made it will enjoy her birthday present.
Sorry for the very short post, but there’s really not much more I can say. Stay tuned for the year-long saga of the 1940s twin-set, which might actually be drawing to a close now that I have lots and lots of time at home to knit.


 My April project was the cardigan jacket, a.k.a. “matinee coat” from Stitchcraft’s April 1962 layette set “for an Easter baby.” The set included a dress, the jacket, bootees, a bonnet and a blanket to use as a pram cover, plus a sewn “pin-tidy” made out of a tiny baby doll with flannel and satin “skirts” to hold the safety pins for baby’s cloth nappies. The pin-tidy is a bit “uncanny valley” for my taste, but the knitted items are all lovely.
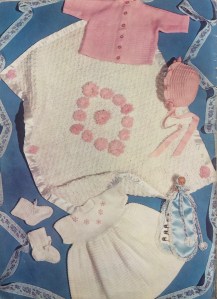 The colour is unusually dark for a baby garment, but I don’t this the friend whose baby-to-be I knit it for will mind — they wear a lot of black themselves. (Side note: I did make an all-black baby cardigan for a black-clothed metal fan father-to-be friend once, and he was thrilled, because he knew he would never find one in a store. Take note, baby clothing designers — there is a market out there!)
 Greetings from the Covid-19 lockdown! March 1962’s project sports the headline “Ready for the Easter Parade” in the magazine, but there are definitely not going to be any Easter parades in March 2020. I hope all of you, dear readers, are staying healthy and staying home.

