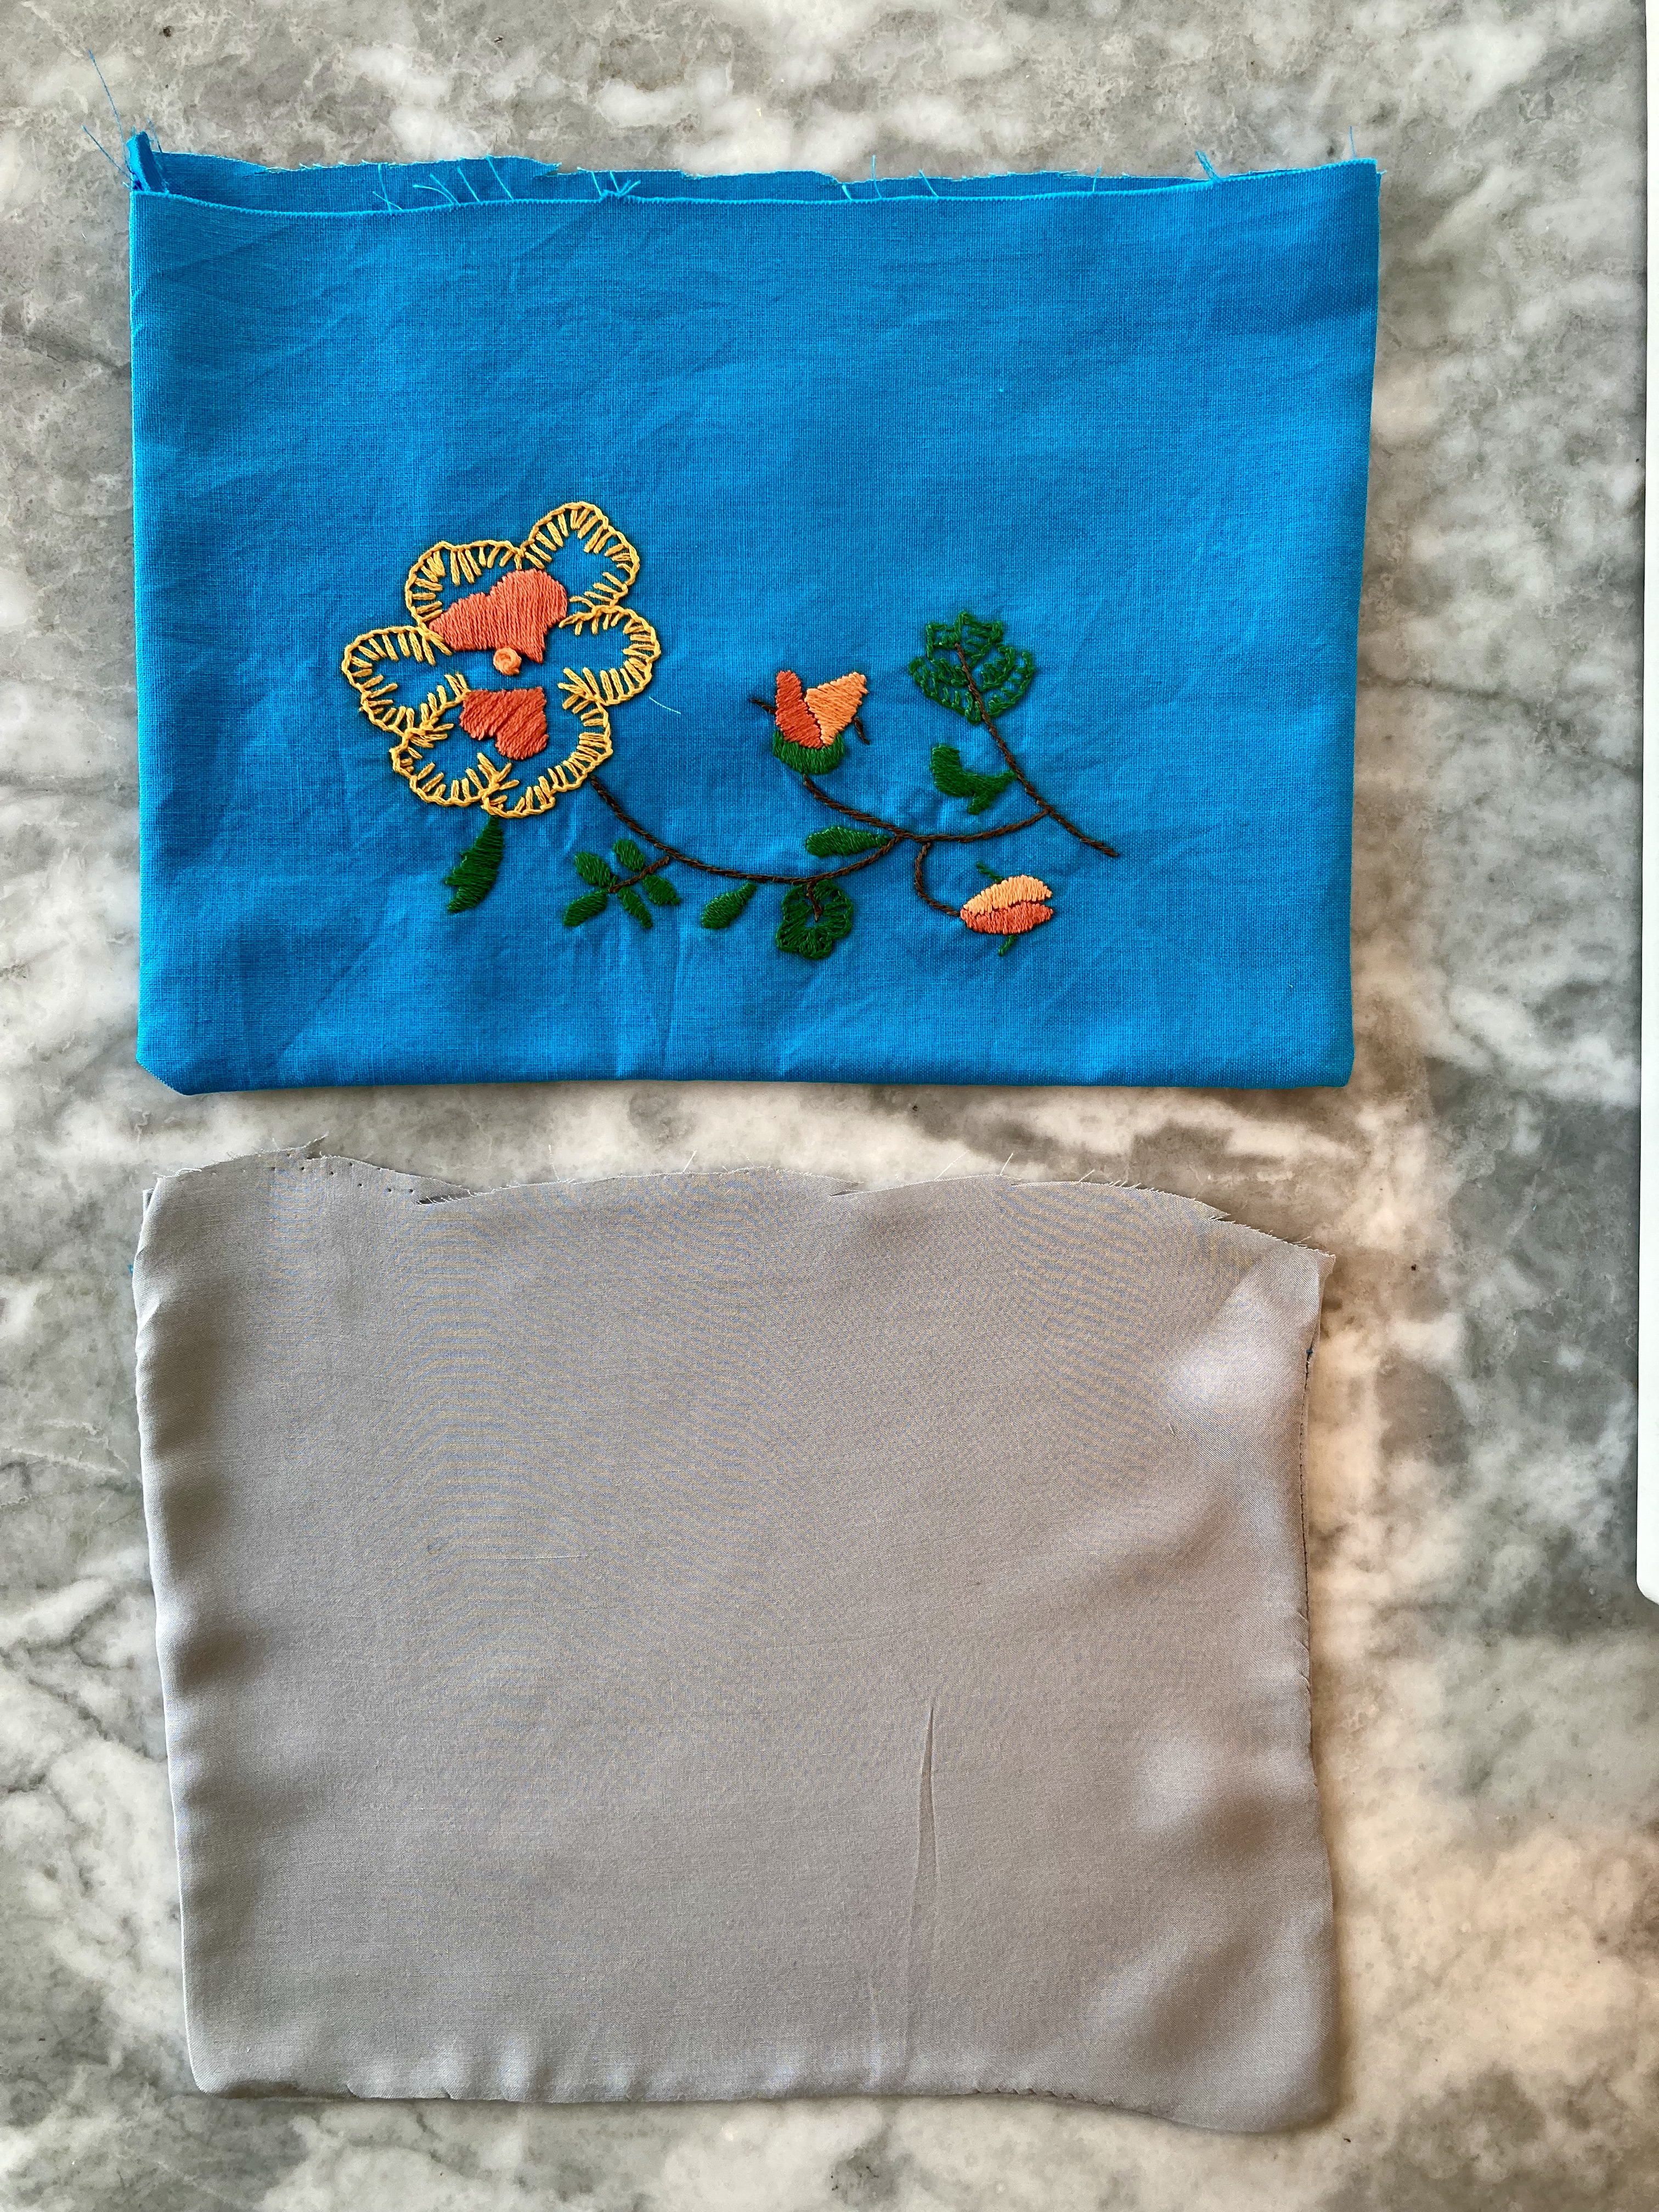
Choosing a project from the March 1965 issue of Stitchcraft was an interesting process. I loved both of the children’s designs (a “continental” cardigan and a textured pullover with a round stranded yoke), but could find no takers among the children / parents of children that size that I knew. I loved the red cardigan in the cover photo, but didn’t feel like going through the work of re-sizing and re-proportioning it for myself and it wasn’t the right style for any knit-worthy men in my life. None of the bulky, large, unshaped garments in the issue would have suited me. Also, I had multiple “endless” WIPs that I wanted to finish and other projects that have been waiting in the queue for a long time. So — I made a little embroidery project.
The project as presented in the magazine is a flower border in simple stitches and a limited colour palette (all blue, all “peacock”, or green and orange), to be worked either on a cushion, as a border on a pillowcase, or on satin fabric for a door panel. Not needing any of those things, I embraced the spirit of versatility and made a little embroidered and zippered bag that can be used for spare knitting needles / accessories or any other kind of easy-to-categorise-but-hard-to-contain “stuff”. I have many of these bags around the house, some made by me and some by friends. They are particularly useful for organising things in drawers or travel luggage. You can never have enough… and yet I kind of do! Luckily, they also make great little presents for friends, and one of mine has a birthday coming up, so I made it for her.
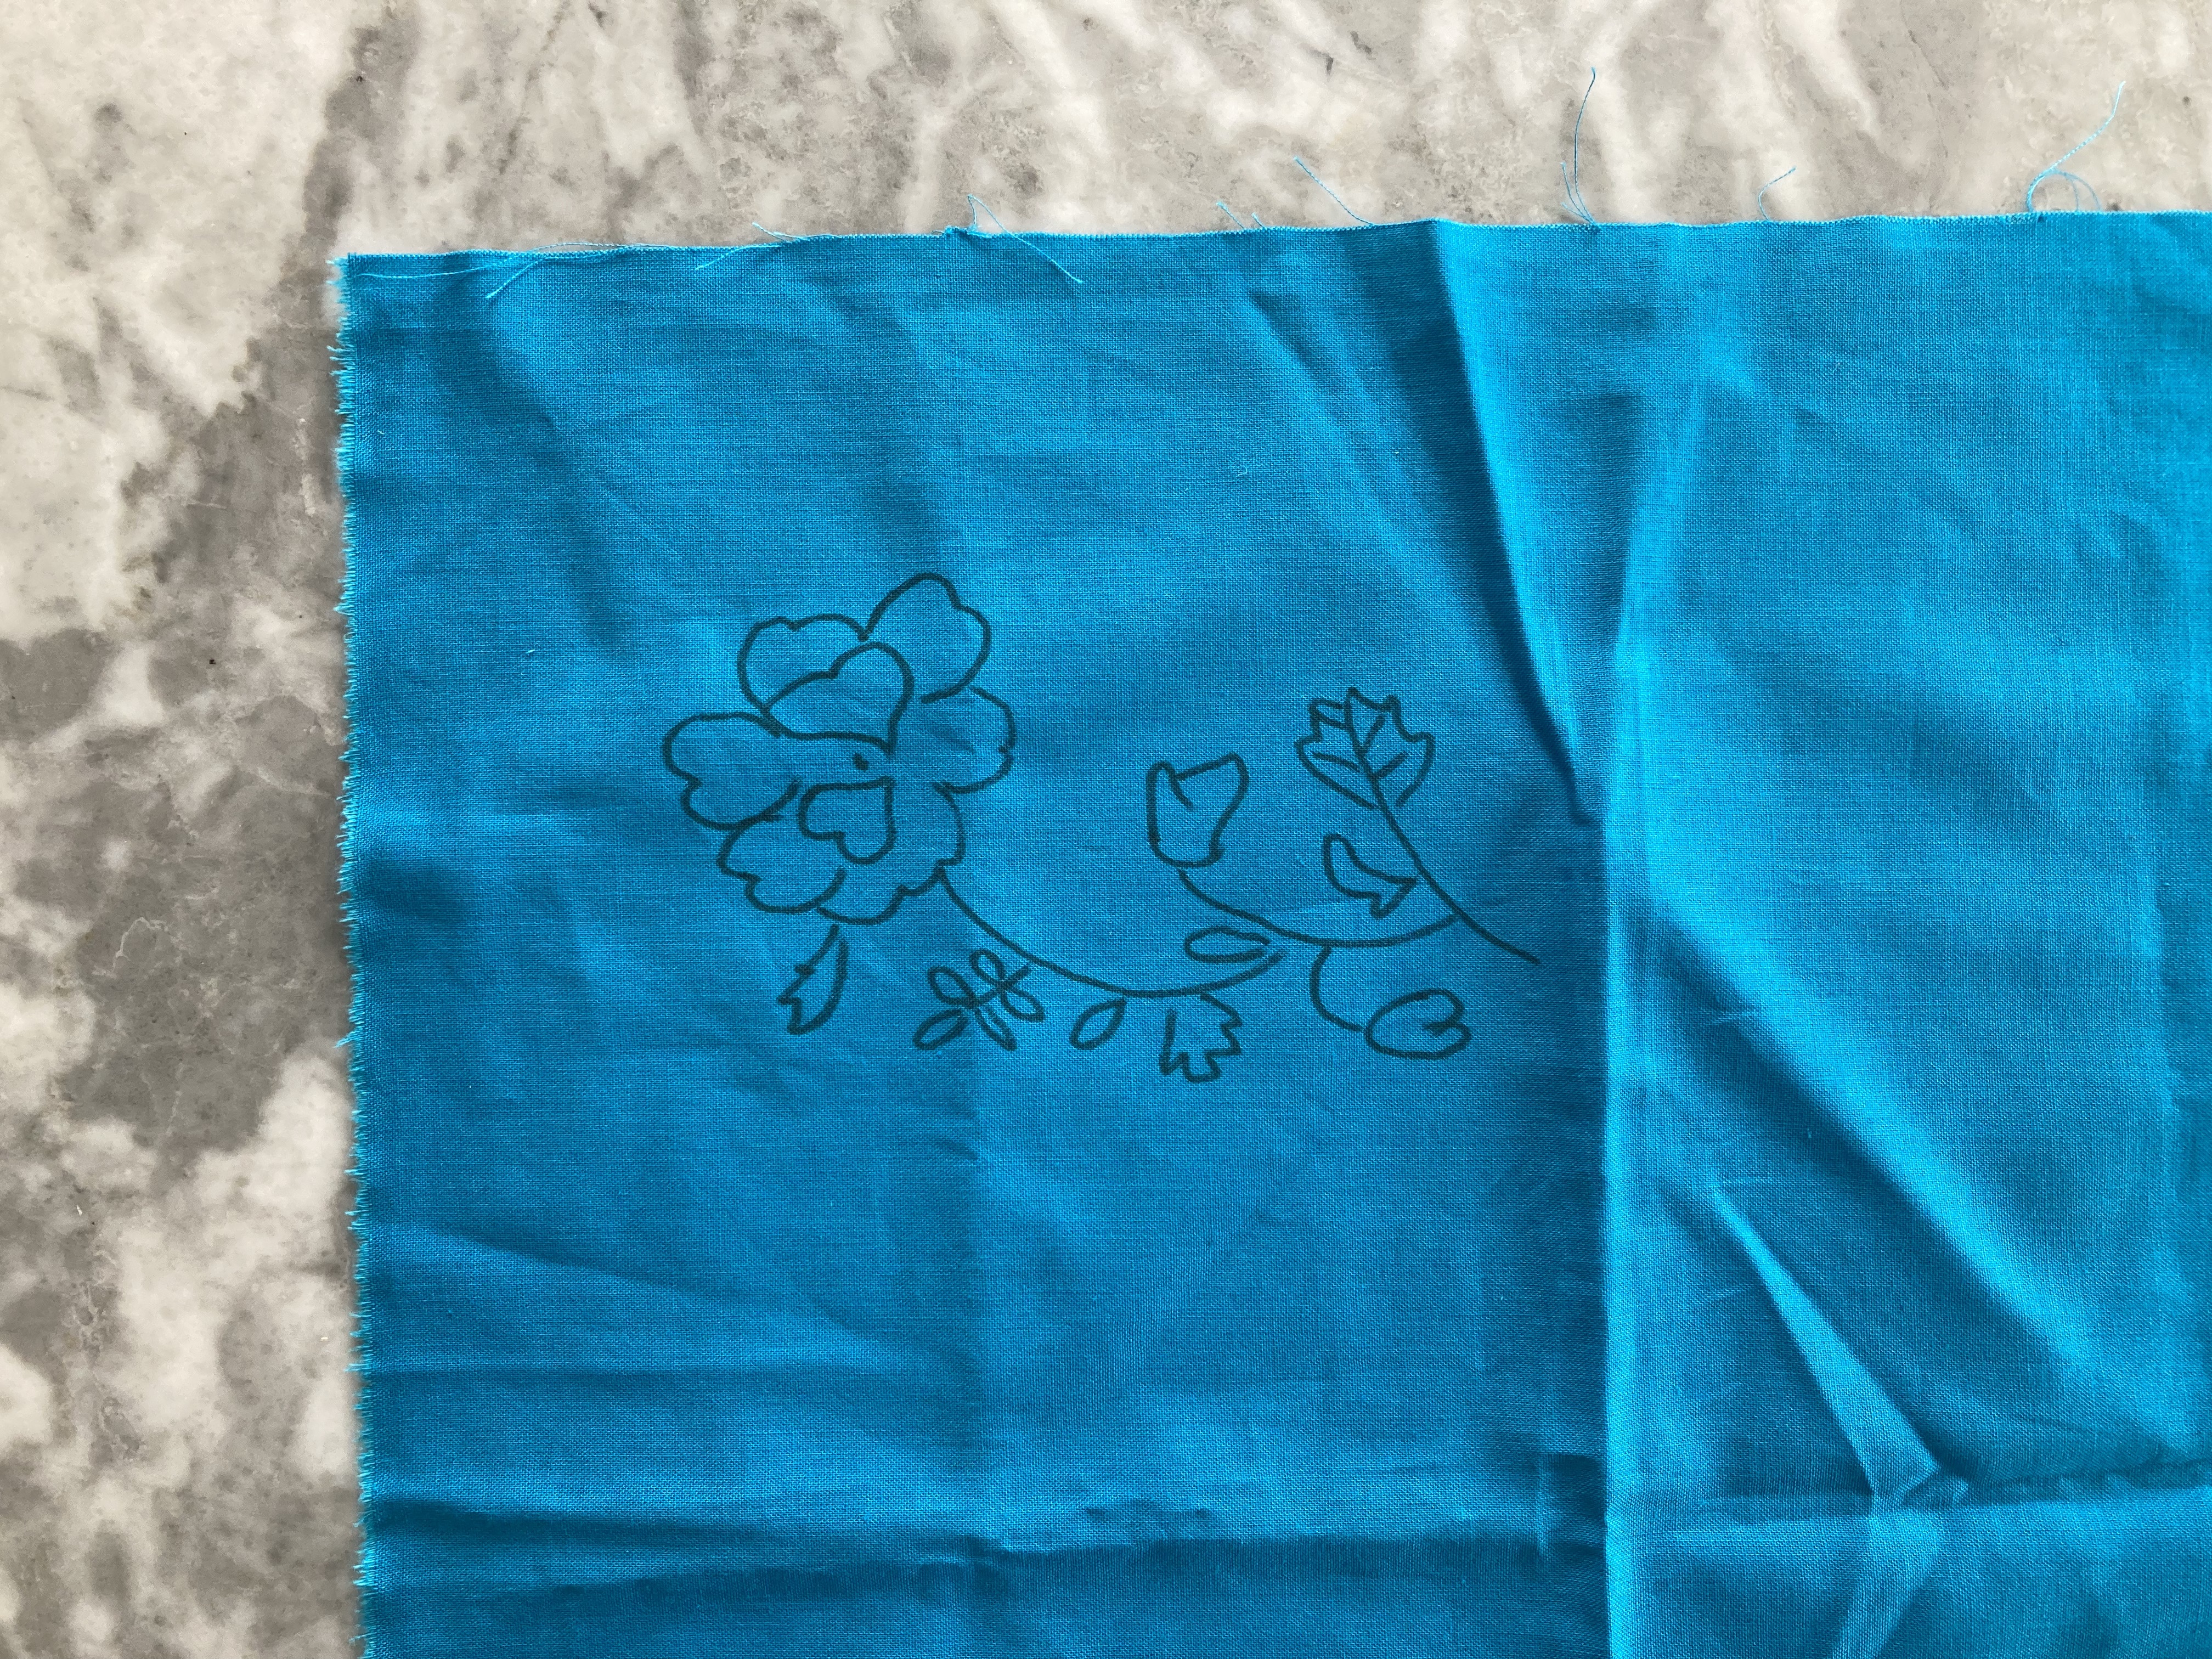
Of course, I don’t have the embroidery transfer from the magazine — readers had to send away for them back in the day. The flower is quite simple, however, and I was able to just copy it onto a piece of paper freehand. I had some nice bright turquoise linen left over from this cushion, some dove-grey viscose for lining left over from whatever, and embroidery floss in several shades of orange left over from this cushion as well as brown, so all I had to buy was a skein of green floss and a zipper. I transferred the pattern to the fabric by taping it up on the window and tracing with a marker pen and was good to go.
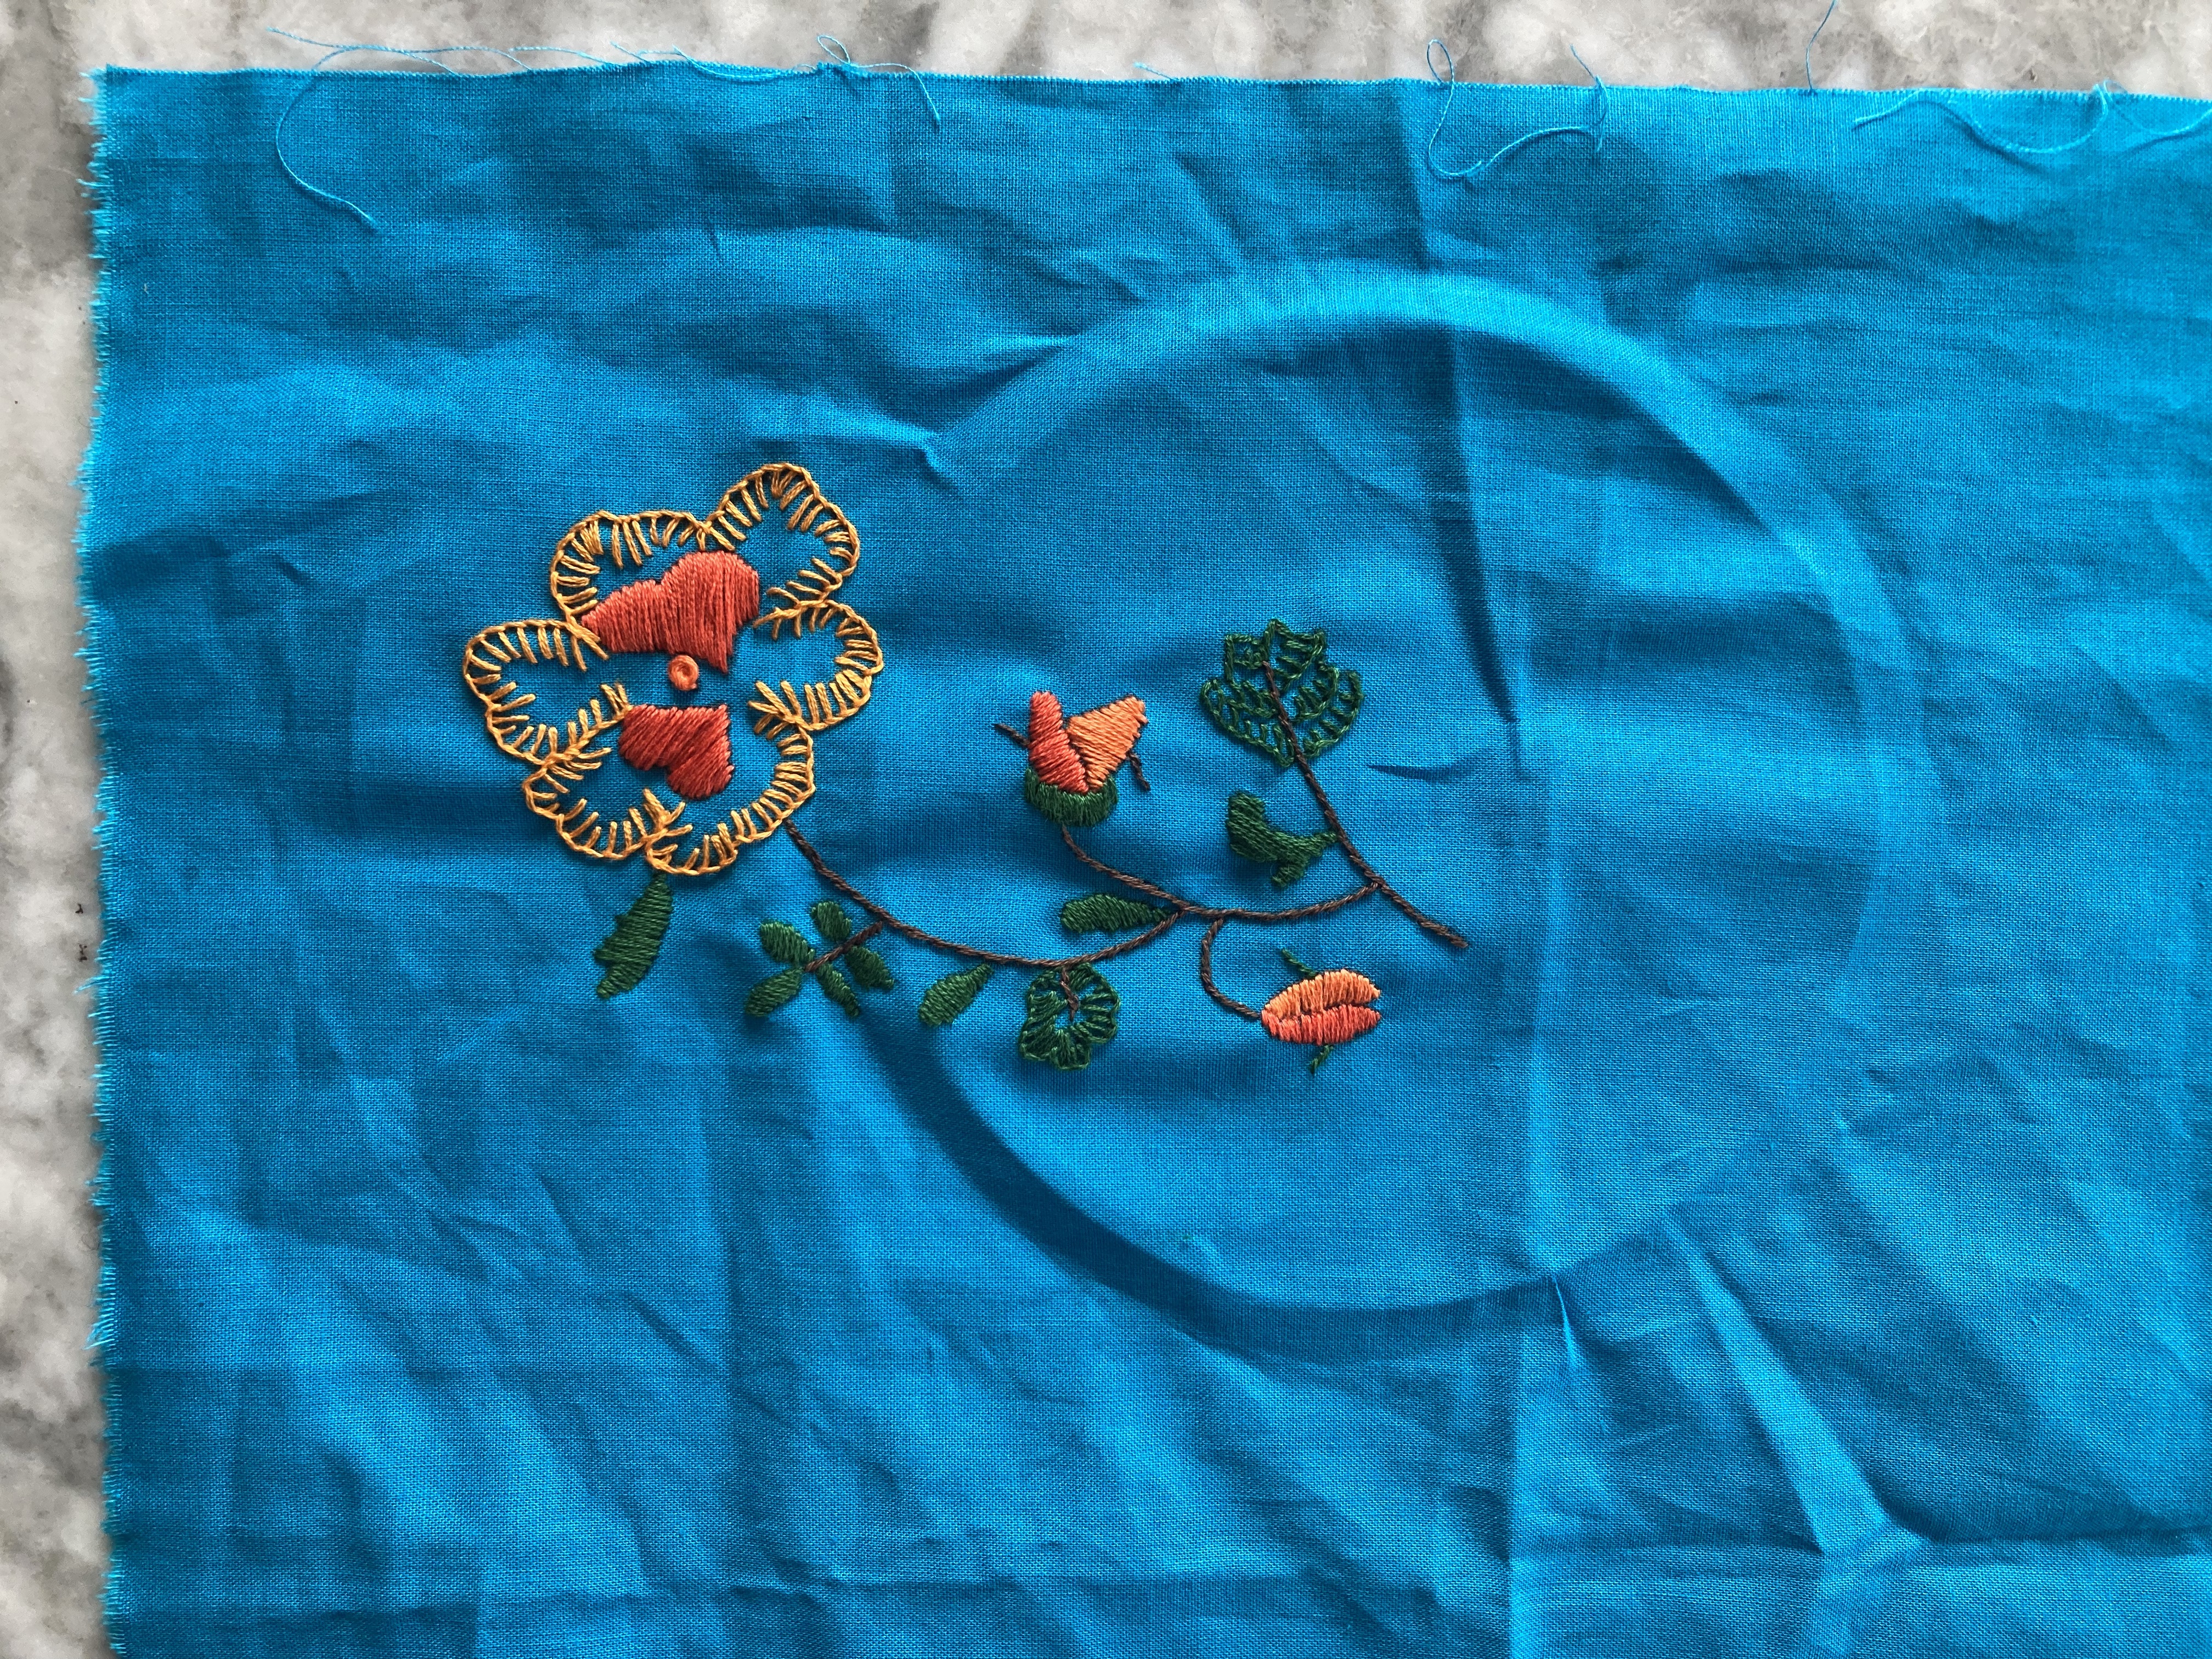
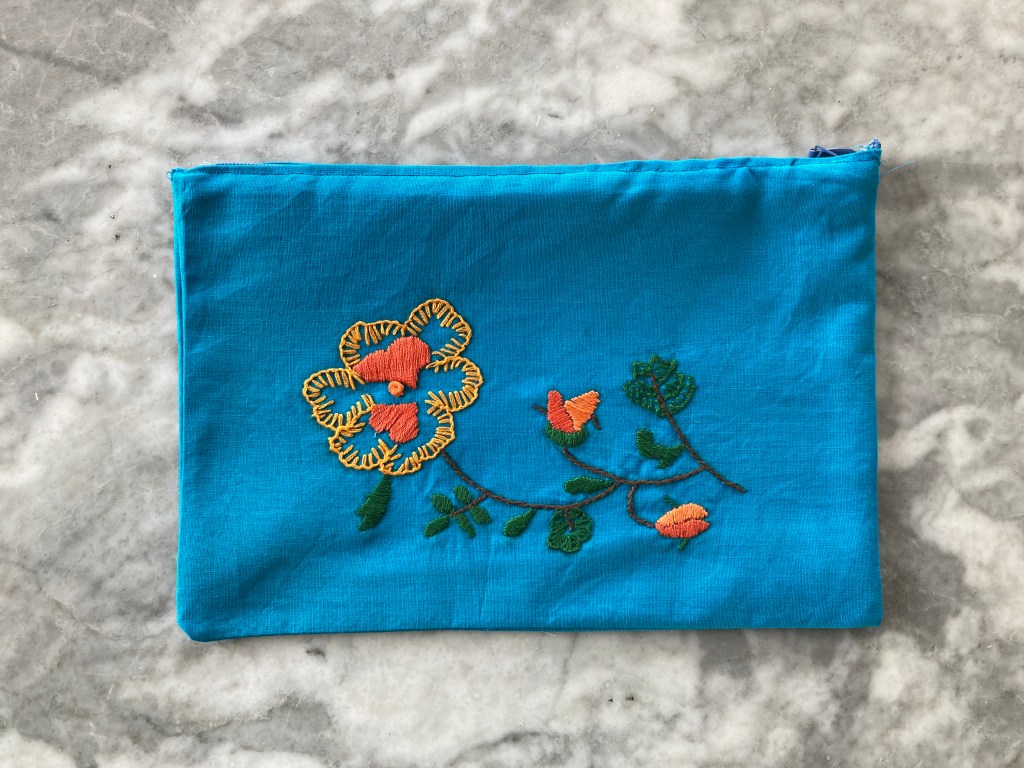
The embroidery is done entirely in satin, stem and blanket stitches — really fast and easy. I finished it in one afternoon, washed it out by hand under the tap to get rid of the marker lines and let it dry overnight. The next day, I made it up into a bag and voilà, finished.
It measures about 24×17 cm or 9.5×6 inches, a practical size, and the design works well. I could have chosen a more vibrant green for the leaves, but the subtlety of the leaves and stems makes the bright orange flower pop even more, and I think the smaller orange buds balance it out nicely. I am also very proud of my zipper-setting skills. All in all, I think this was a great example of how vintage designs can be adapted to fit modern needs and make homeware items that are both useful and attractive.
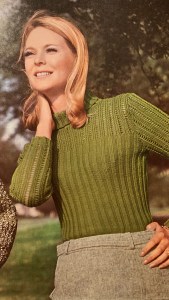
Since the February 1965 issue of Stitchcraft didn’t have any projects that interested me enough to want to make them, I spent this month working on some eternal WIPs. One of them was this “slim style sweater” in a lace-and-rib pattern from Stitchcraft’s January 1967 issue.
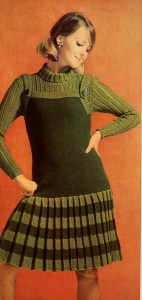
If “Fast Forward, January 1967” seems familiar to you, you are not wrong! I had already made this wonderful “Fashion for Tots” children’s jacket a couple of years ago, and tried my hand at a pleated skirt “pinafore” intended to go over this slim-style sweater (see picture below). The pinafore dress was, unfortunately, a failure, as the wool was too heavy and the finished garment just sagged and sagged. I ended up frogging the whole thing and using the wool for my very first blog project, the Green check jumper from January 1960. Notwithstanding the pinafore, the January 1967 issue is incredible and has so many projects in it that I want to make that it’s a go-to when I can’t find anything I like in a current issue.
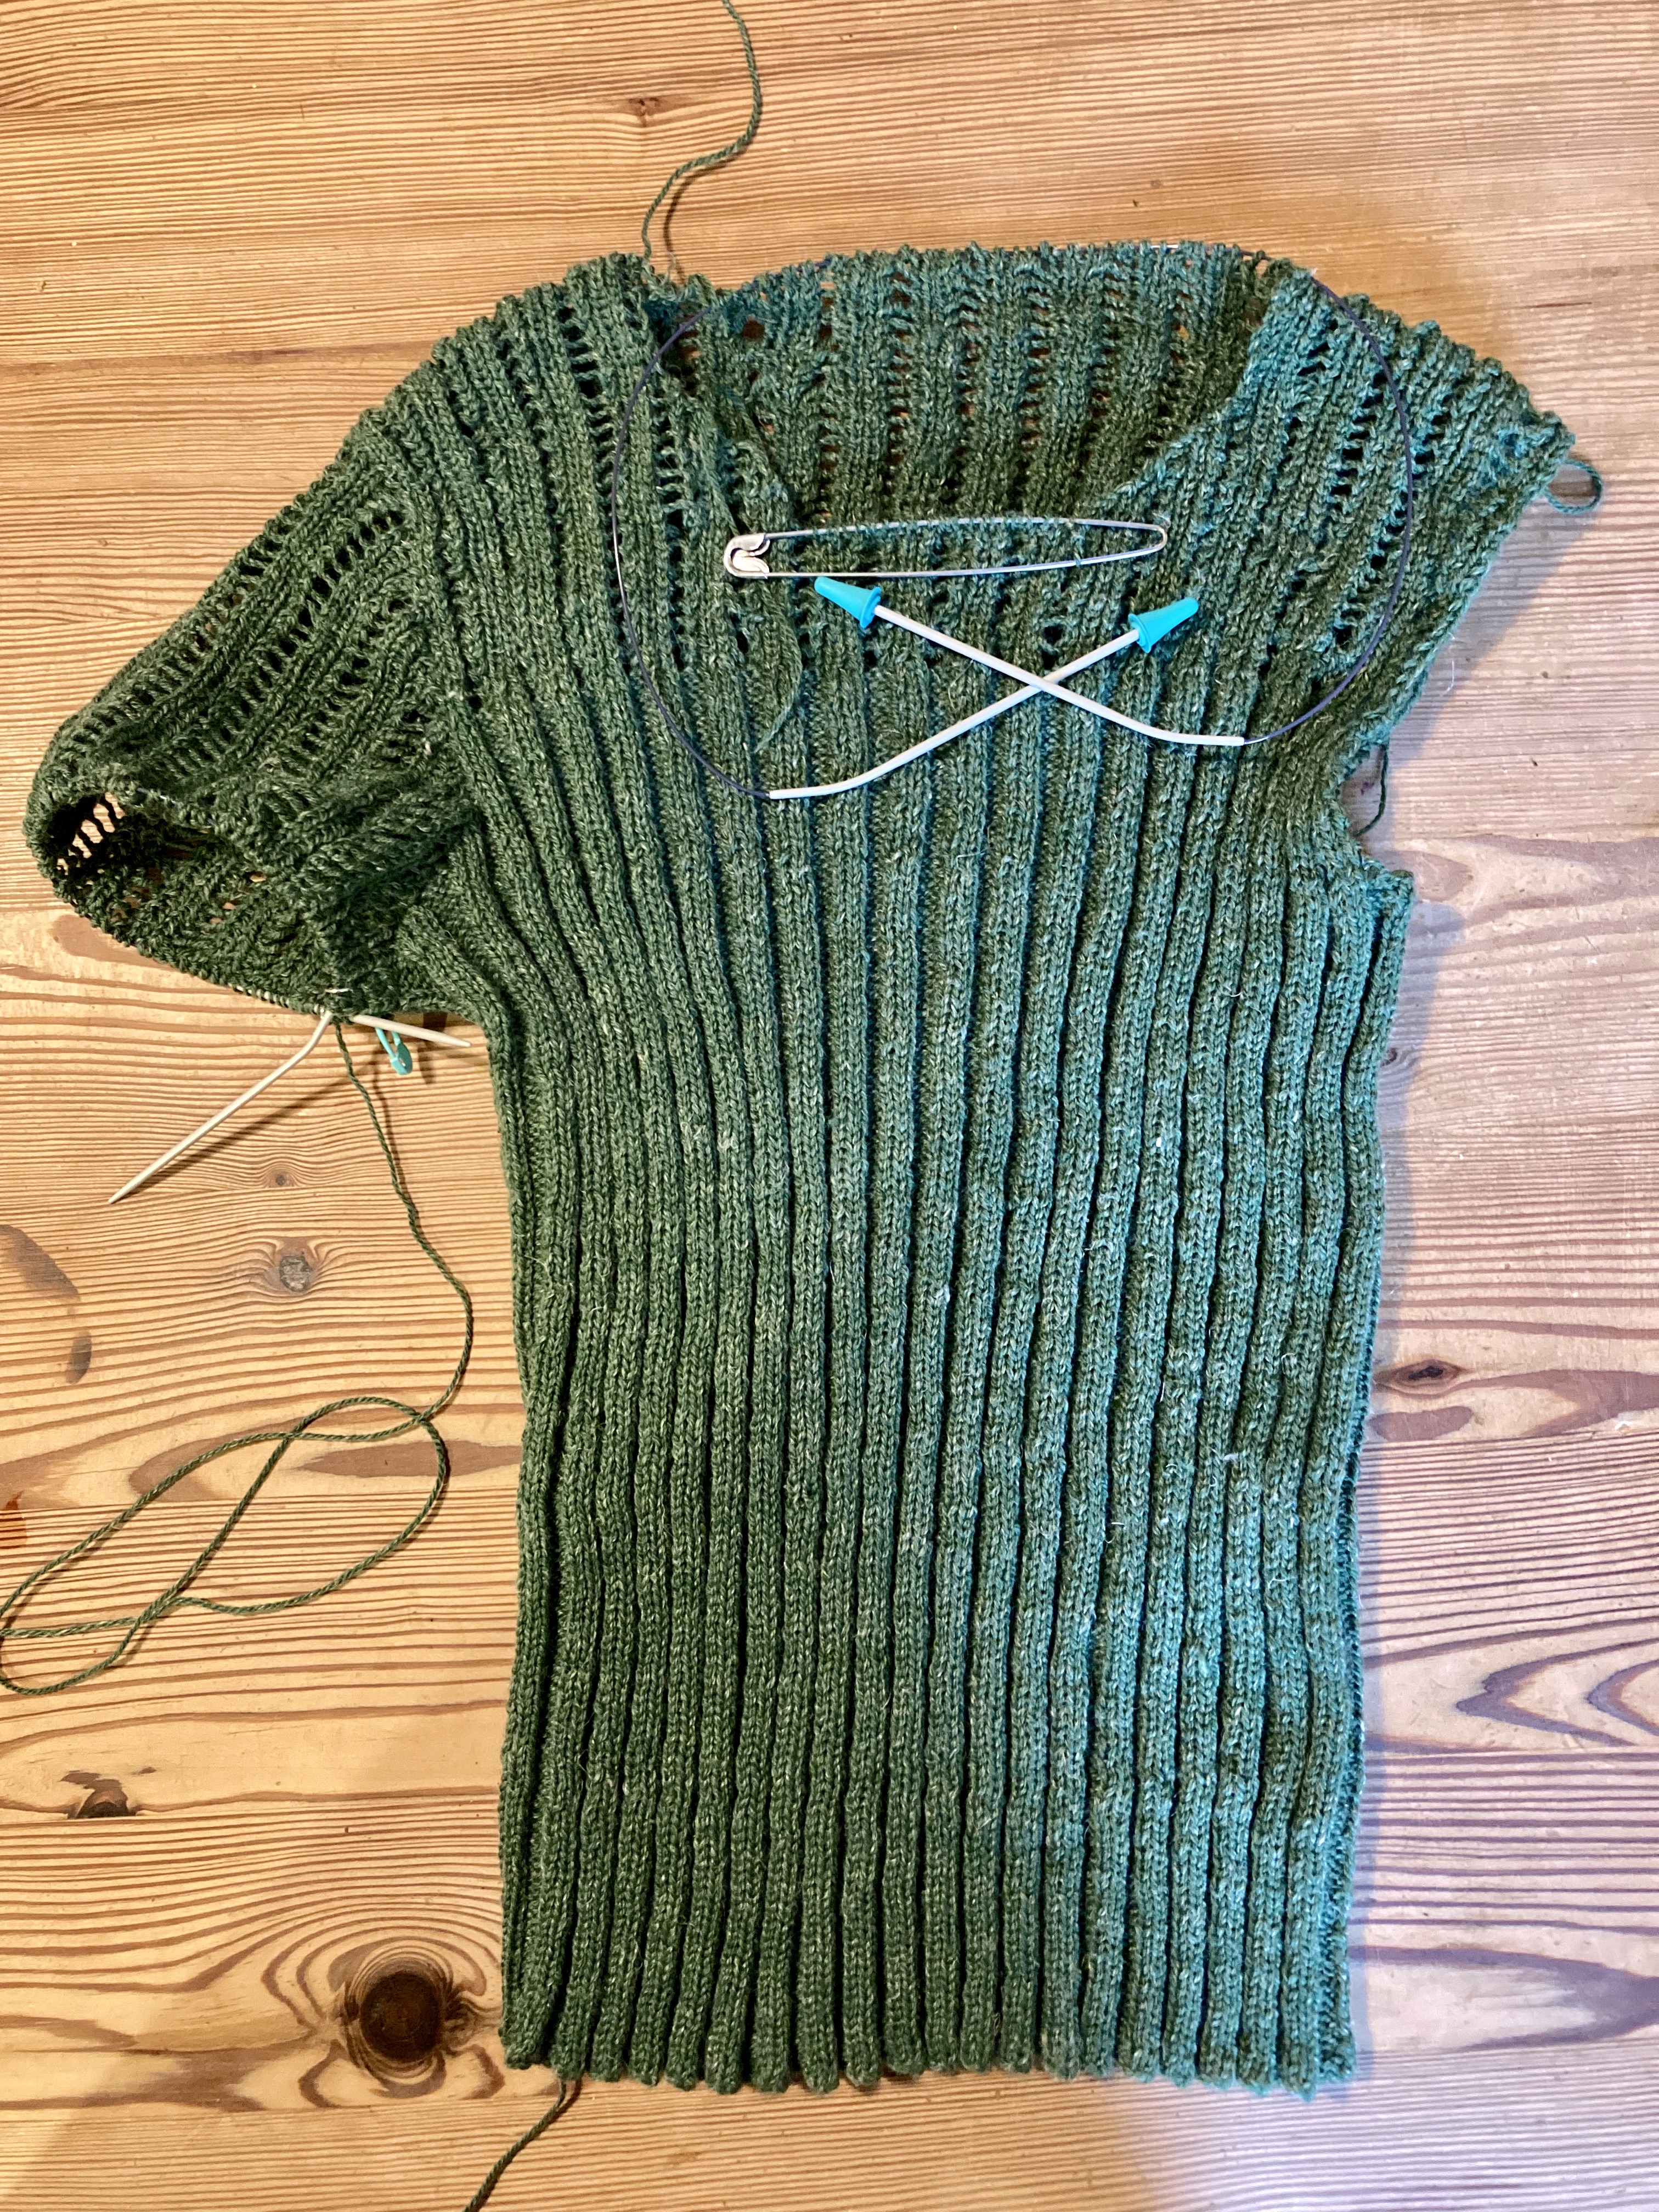
The lace-and-ribs jumper was a perfect fit for my stash of green Slow Wool Lino yarn that I picked up a couple of years ago while working on a project in a different city. Sadly, the yarn has been discontinued, so the 300 grams I bought was all there was to be had in this colour (I managed to get 400 grams of salmon pink and made this lovely non-Stitchcraft Clarel last year, as well as 400 grams of bright purple and 300 grams of grey-brown for future projects unknown, at least). Would it be enough?
The body is made in 4×3 ribbing and the “lacy” pattern on the yoke and sleeves is made by doing two yarn-overs ater one another and knitting and purling them on the next row or round, making more of an open rib pattern rather than a true lace. Ribbing eats up yarn, but openwork uses less, so it was hard to call. In anticipation that it might not be enough, I made the sweater from the bottom up in the round and the sleeves knitted-on from the top down. That way, I could use a different wool for the sleeve cuffs and/or neck ribbing if necessary, or make short sleeves, or cap sleeves, or no sleeves.
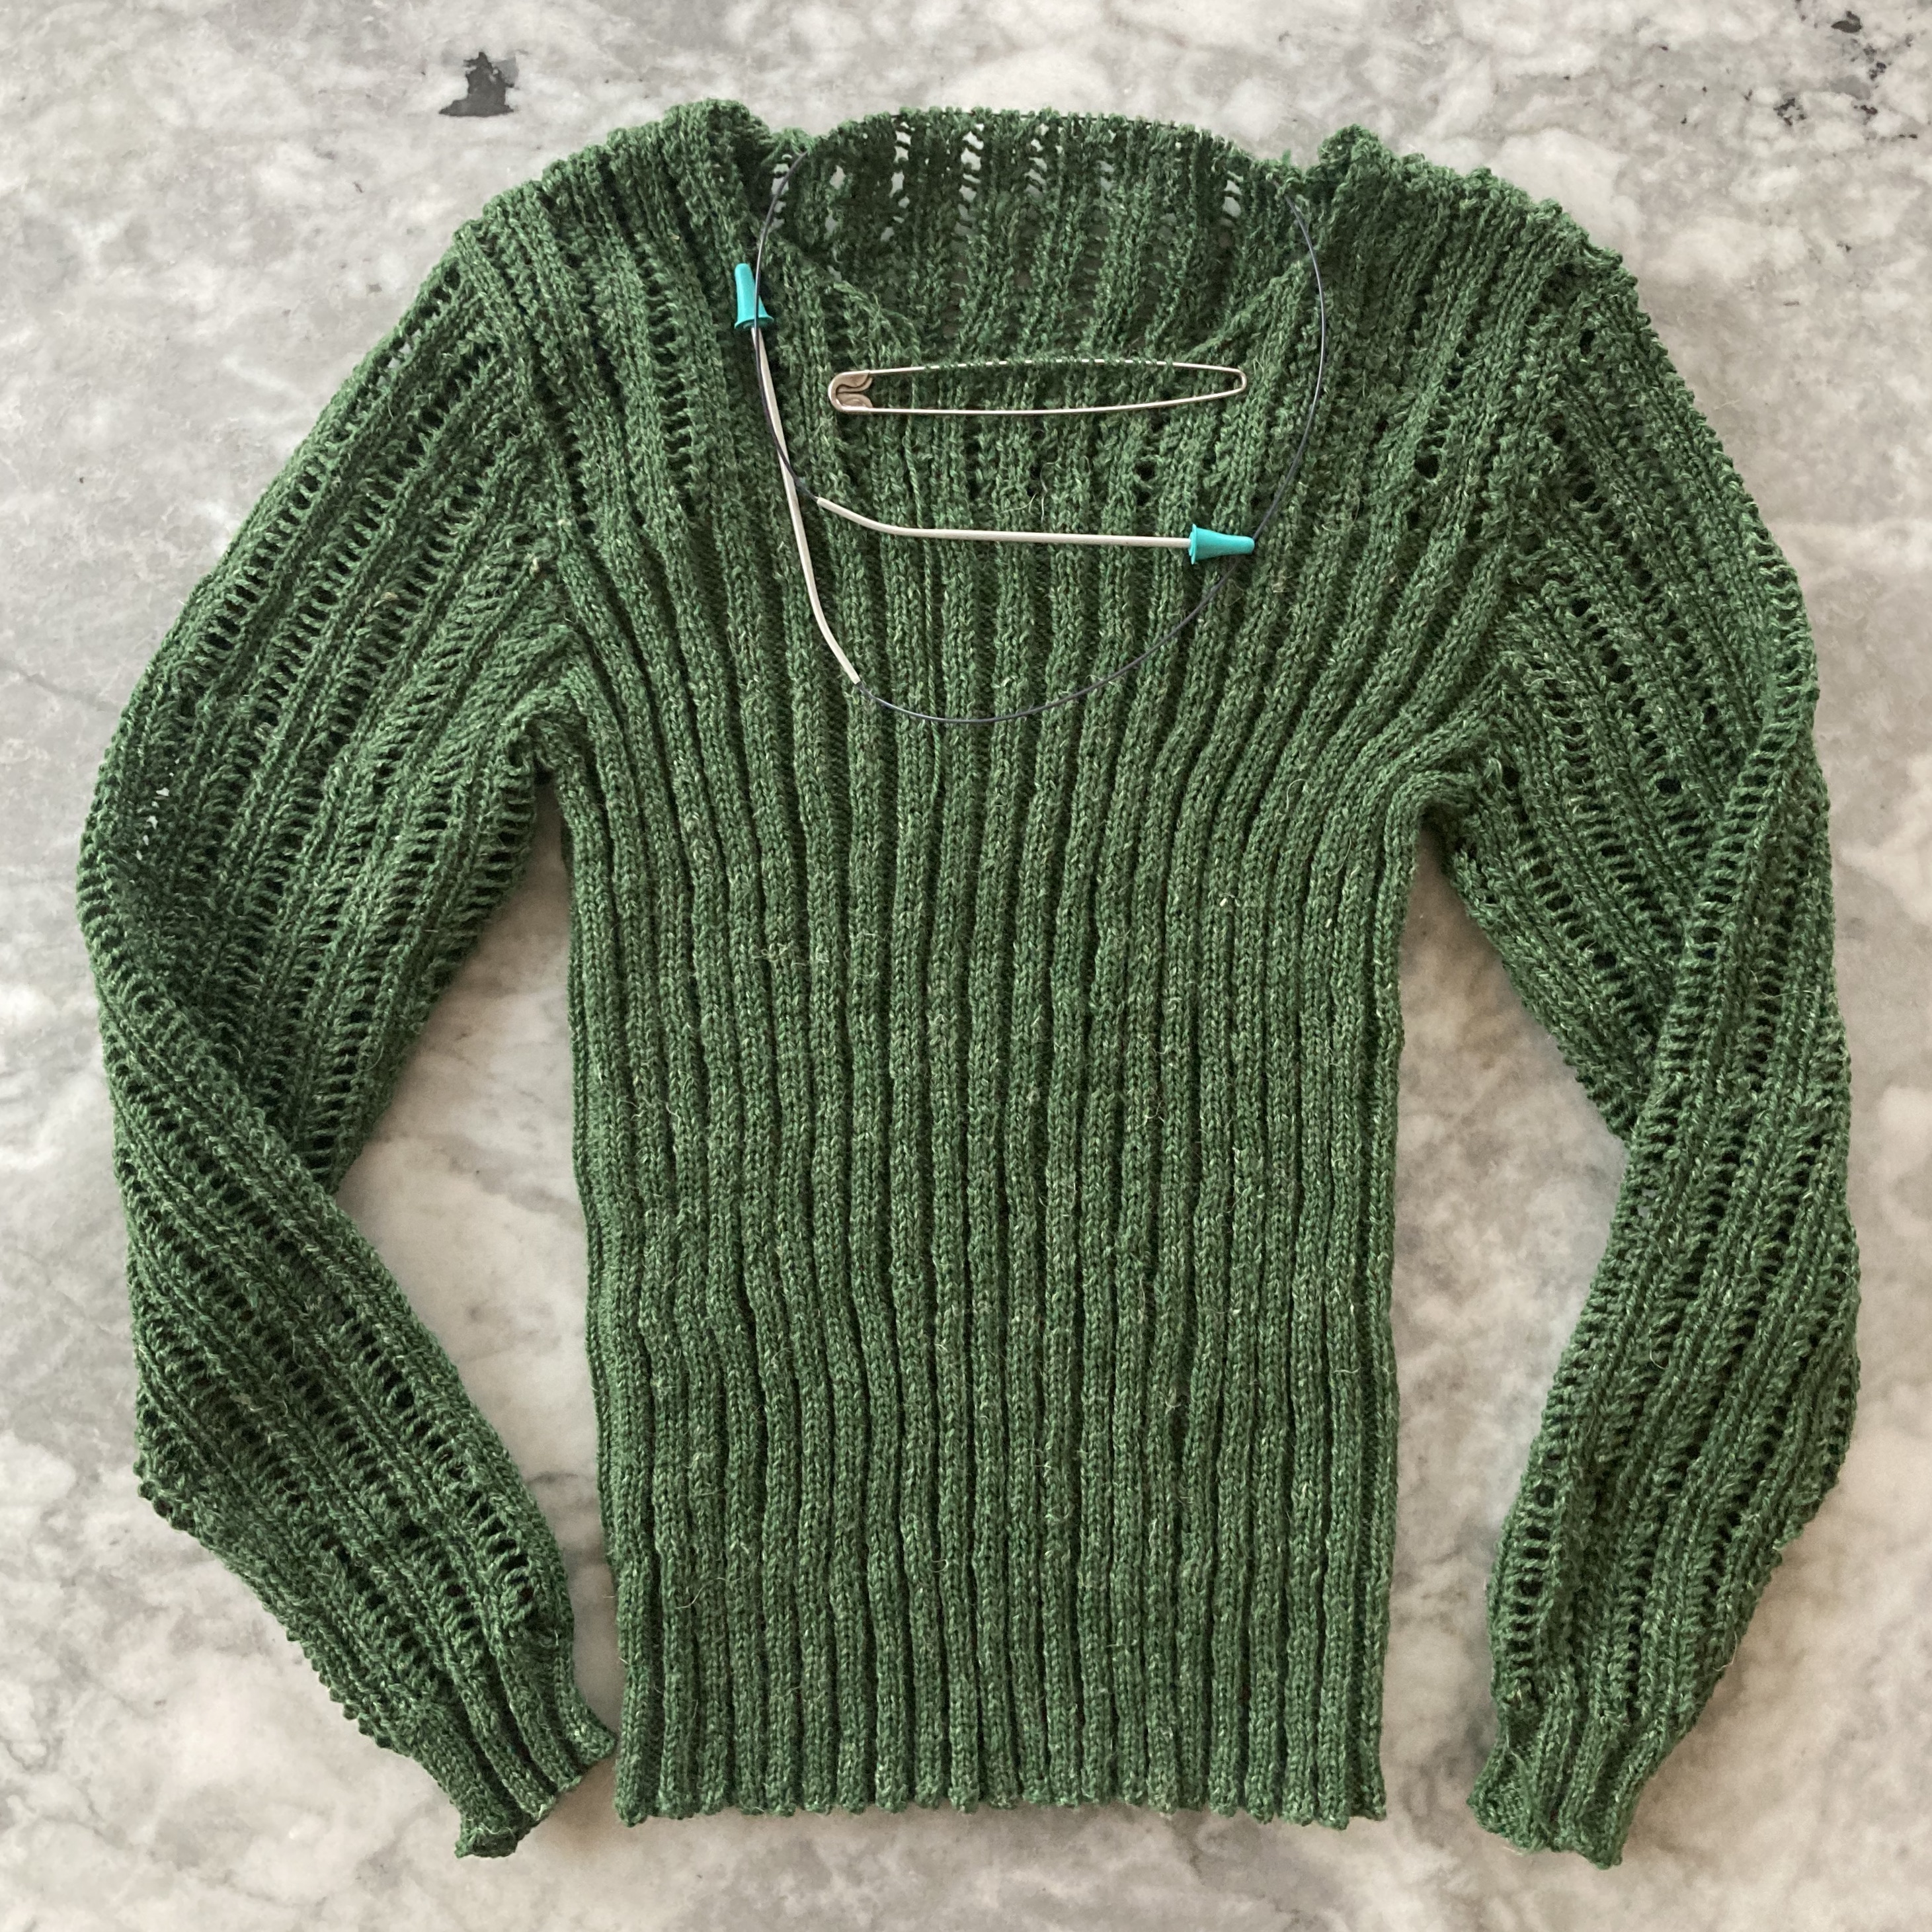
As it turned out, I was able to exactly use up the 300 grams of yarn to make the sleeves in the normal length. Only the neck ribbing remained. Nobody on Ebay or Ravelry had any Slow Wool Lino on offer in this shade, so I visited my lovely local yarn shop and bought a skein of Rowan Moordale in a slightly lighter shade of green. It’s also slightly thicker and fluffier than the Slow Wool Lino and quite soft, so it worked fine for the neck ribbing.
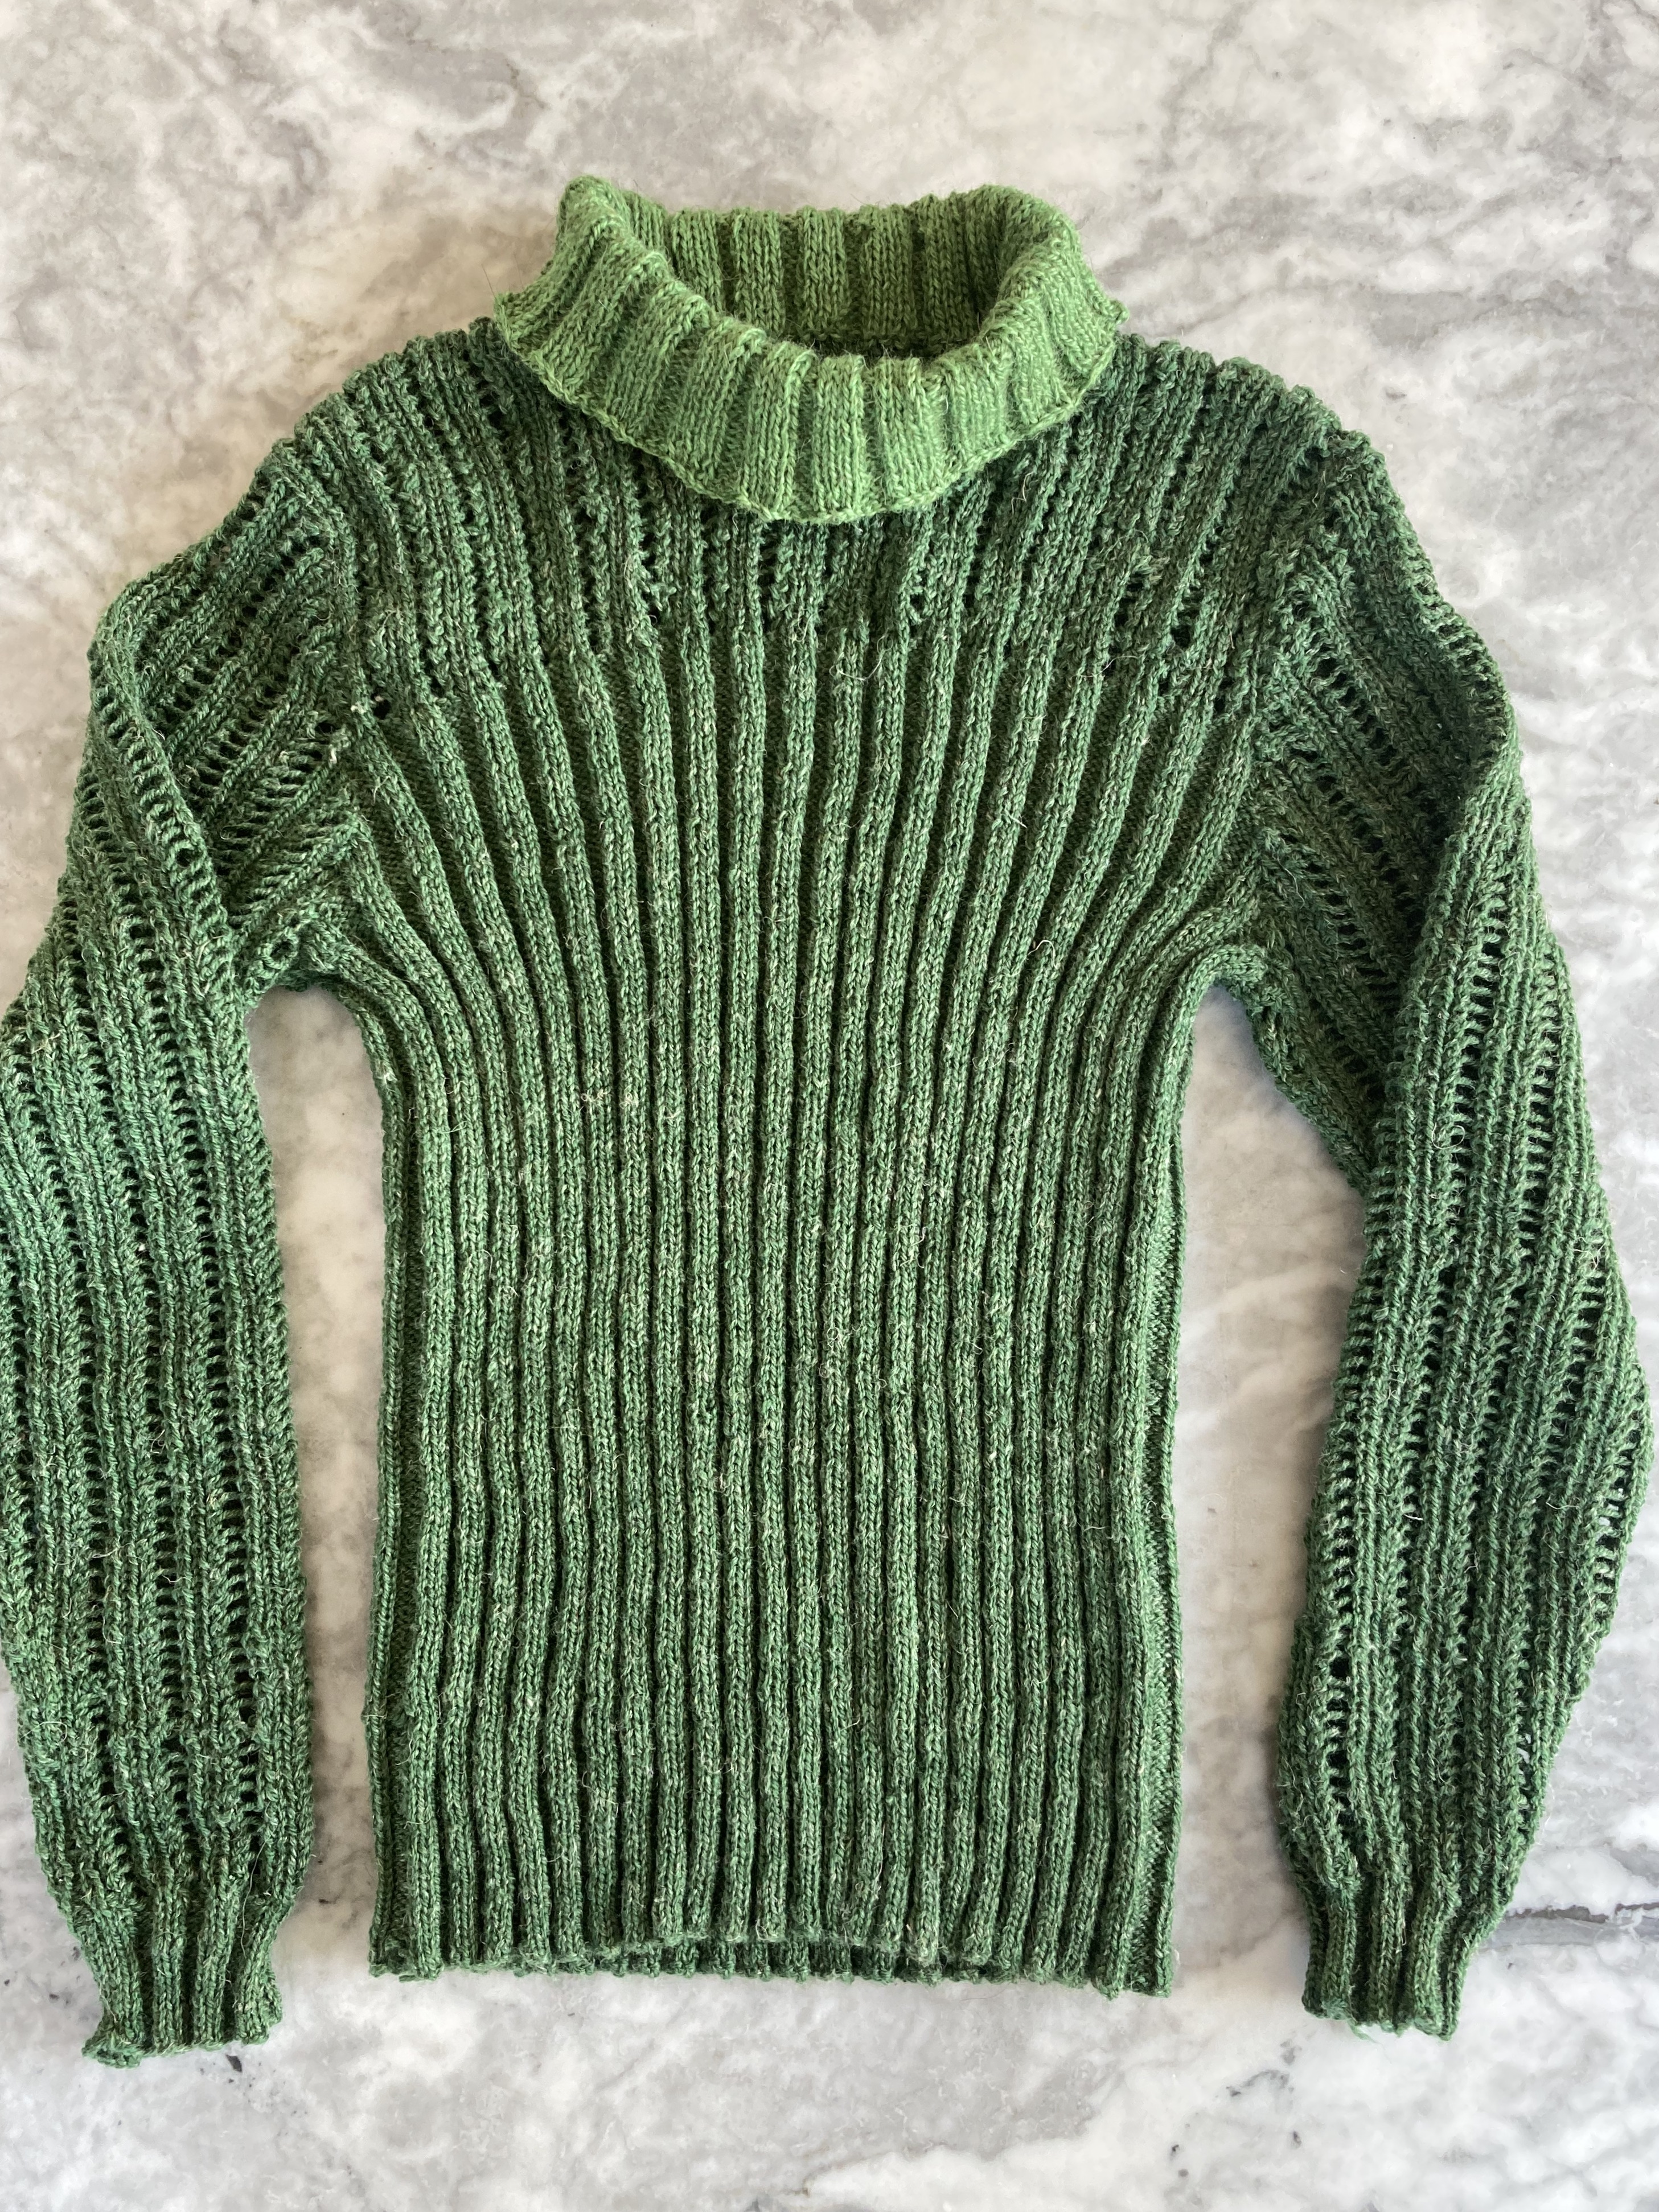
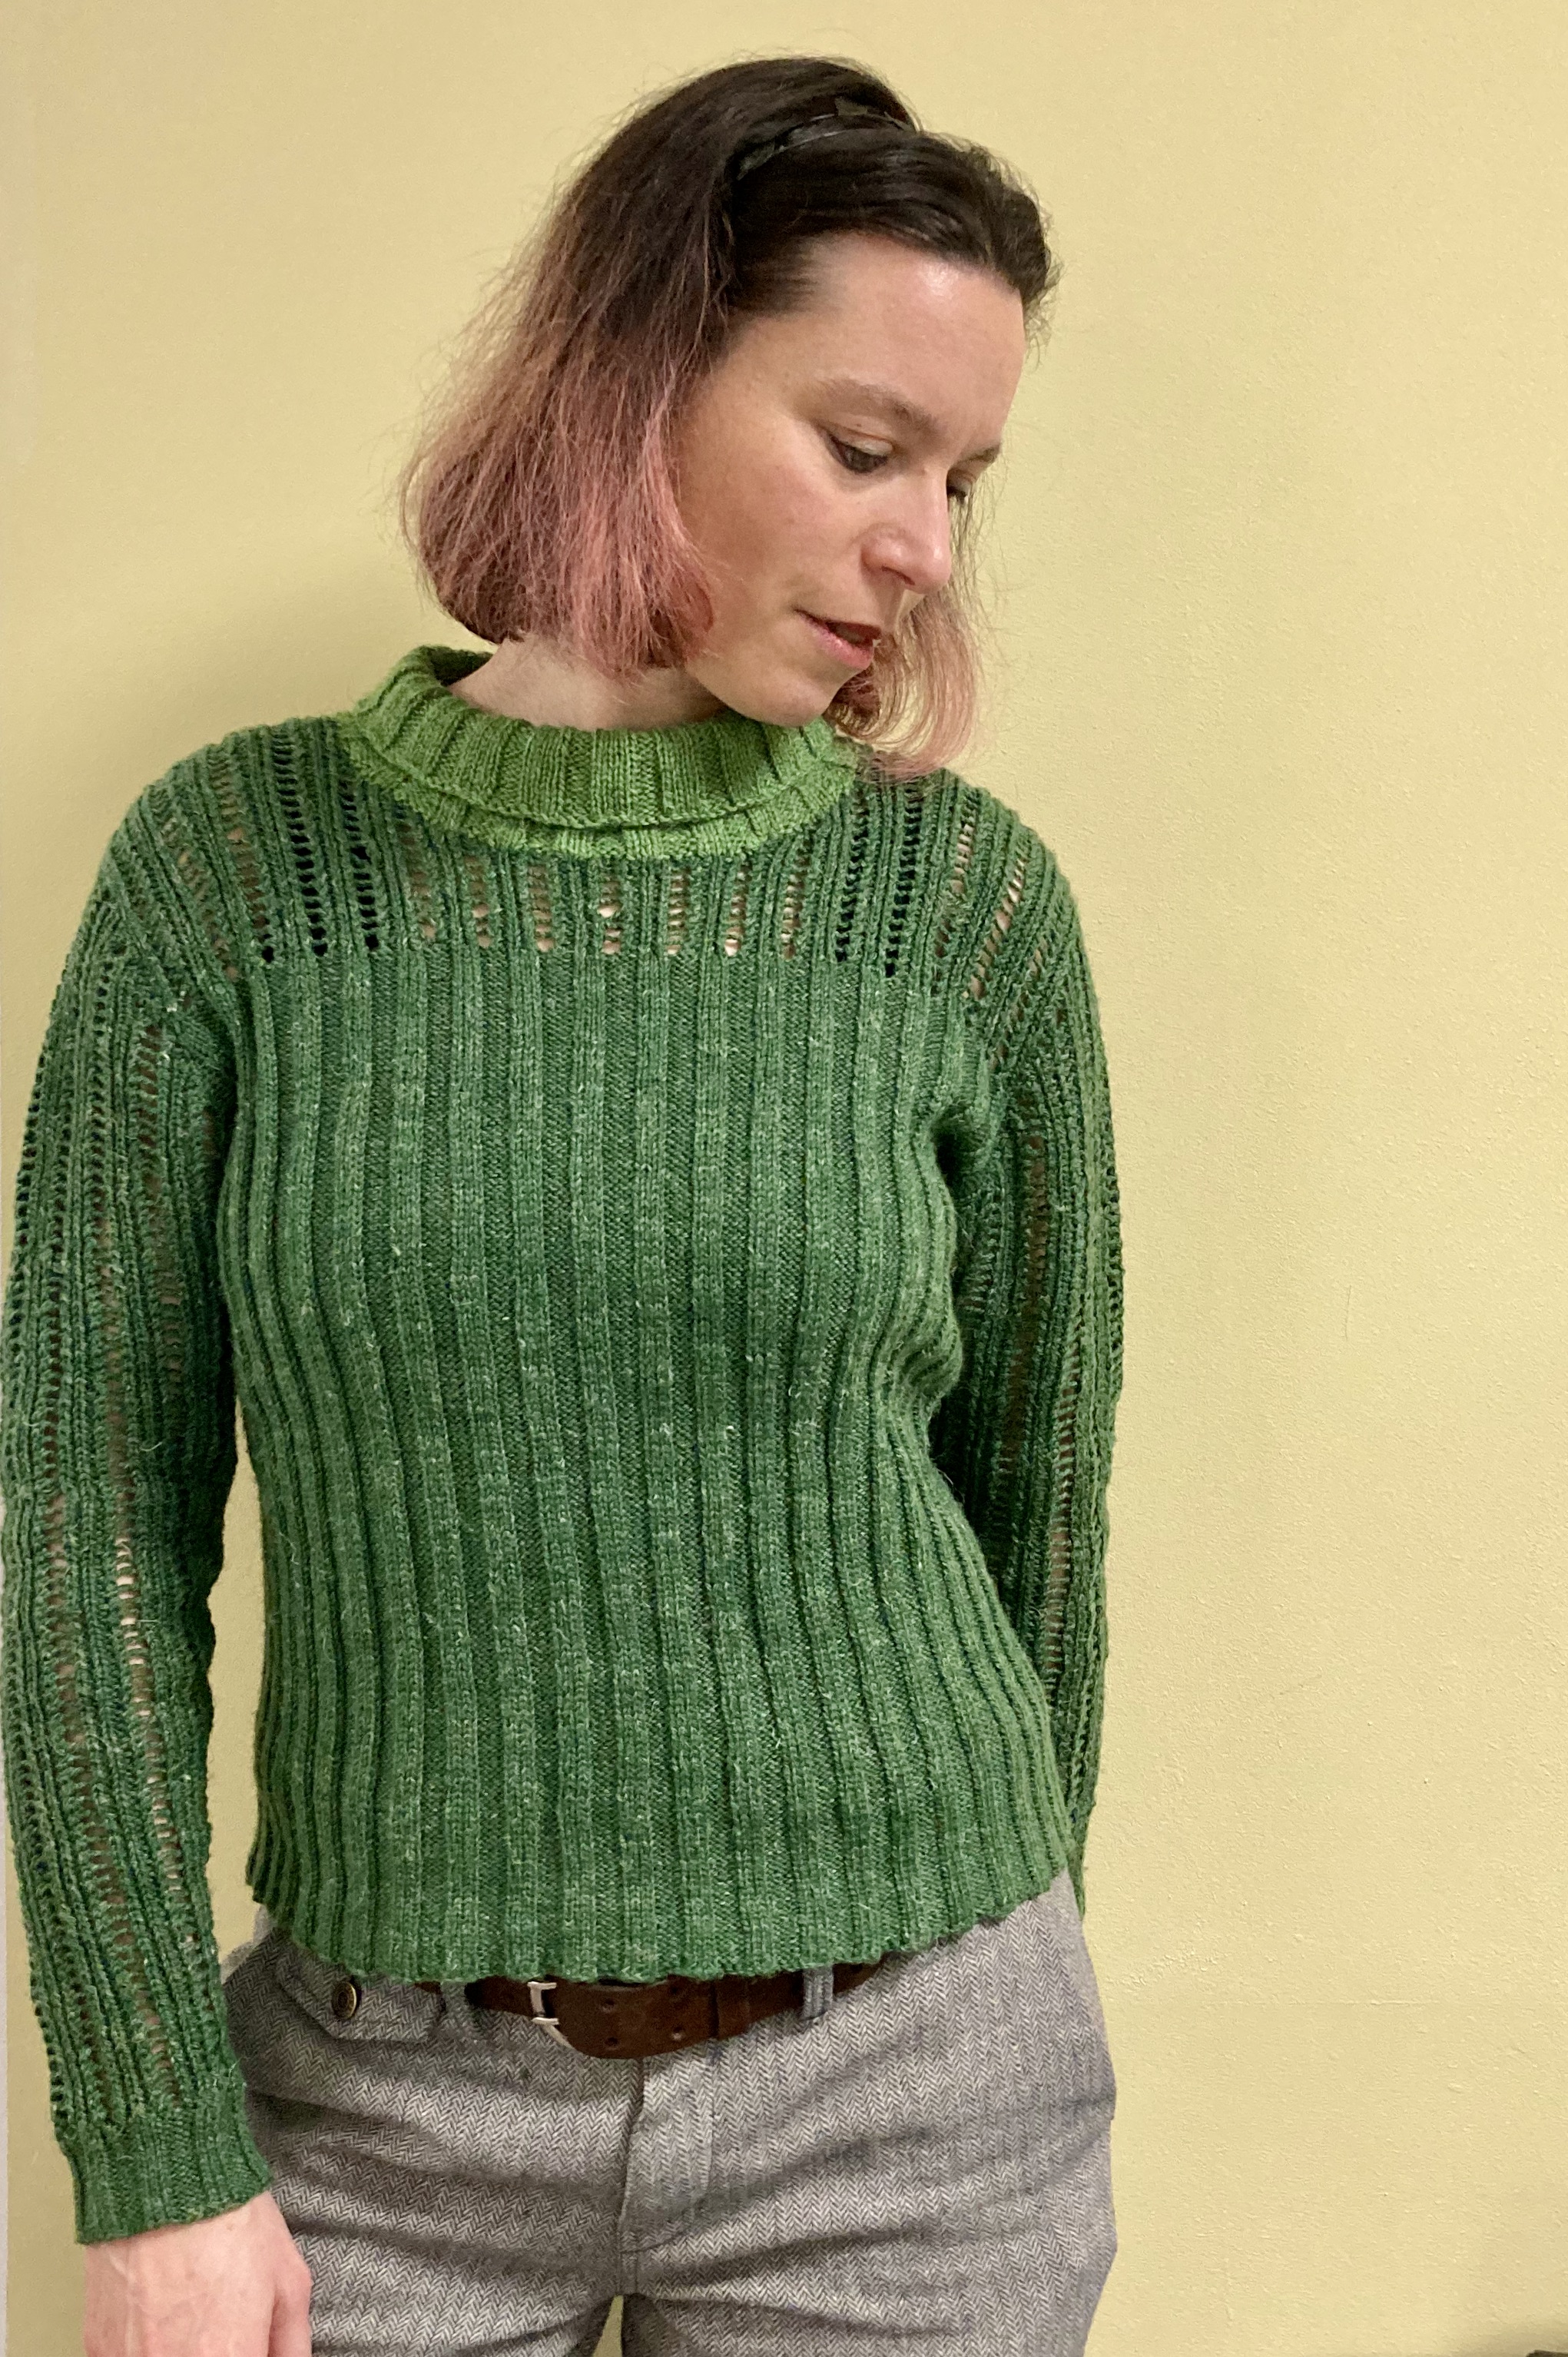
The finished jumper fits fine, feels soft and comfortable, and looks great. I wore it to my Monday night knit group and we had fun recreating one of the original photos.
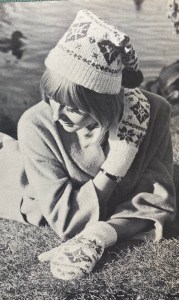
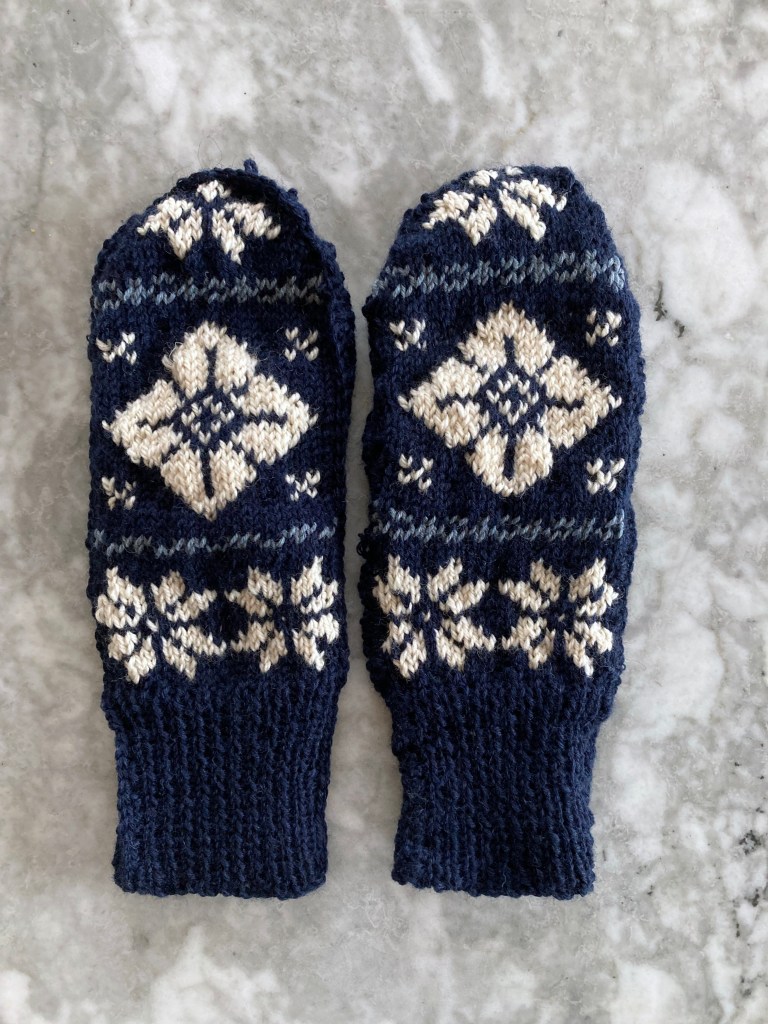
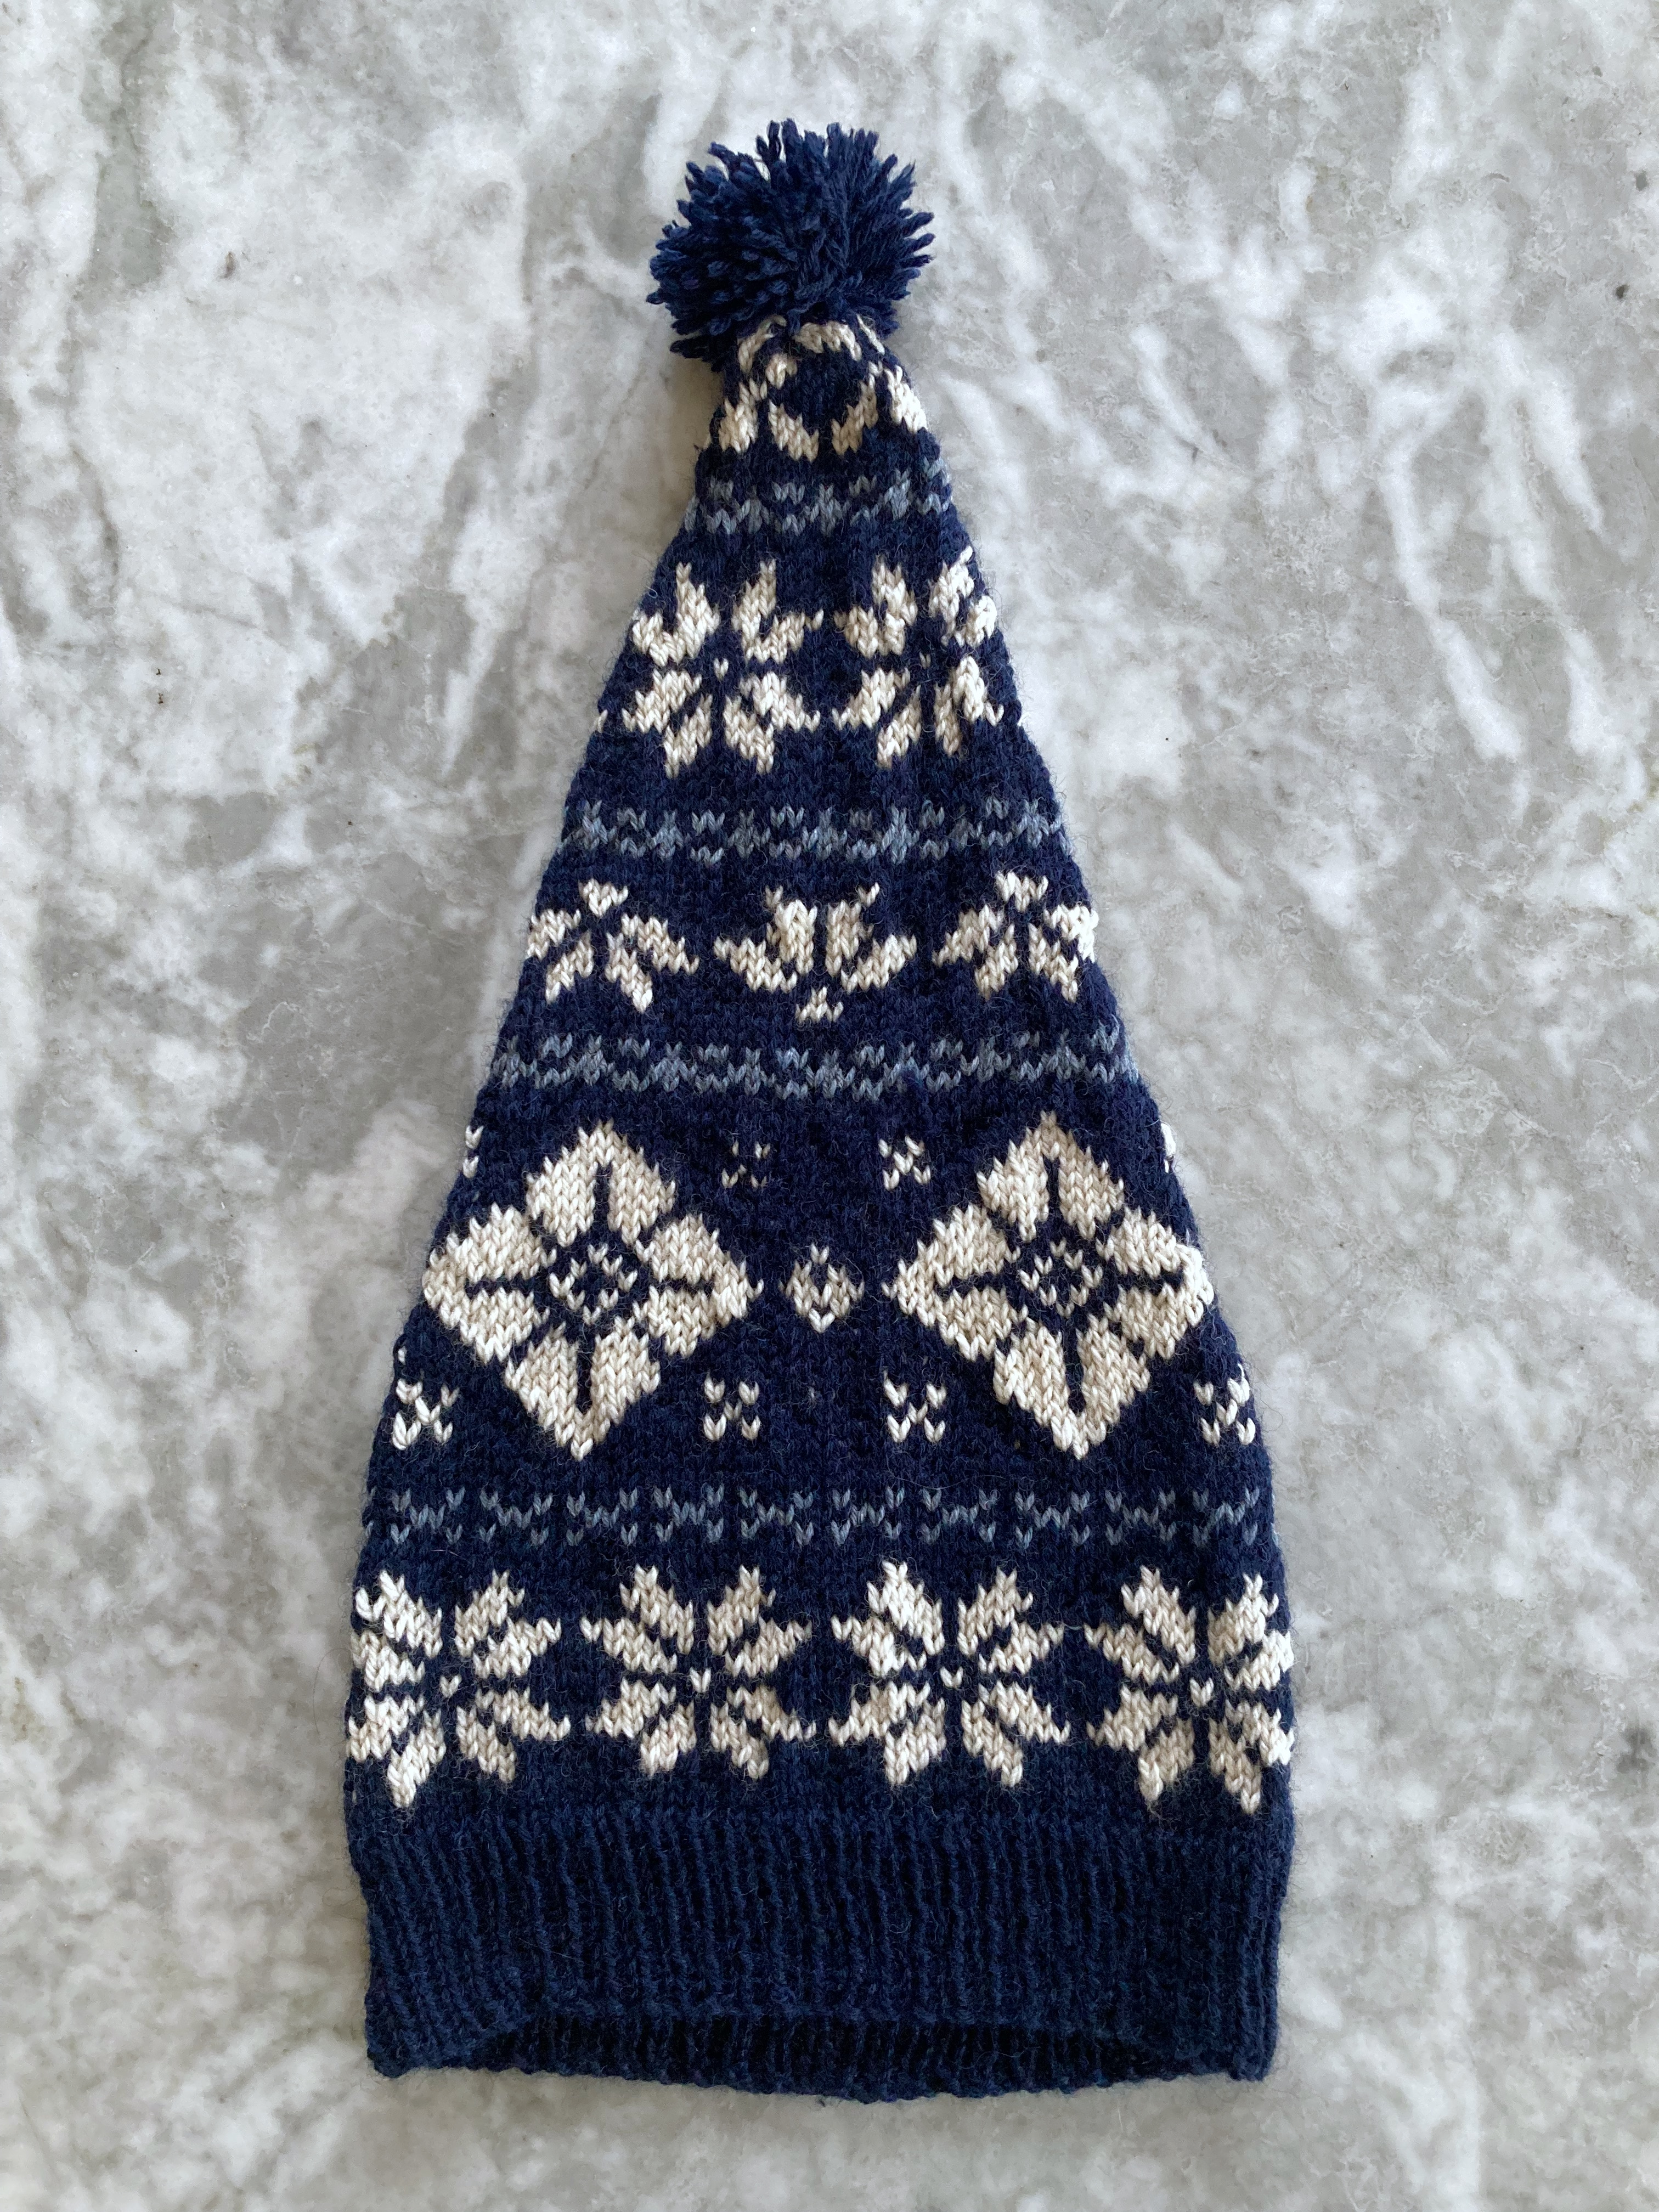
I had long admired this cap and mitten set and was very happy to arrive at this issue in order to knit it.
… That is, until I actually took a better look at the pattern and made it! The snowflake pattern and folded stocking-cap design looks great in the photo, but the pretty setting and pose detract from some of the design flaws, which became glaringly apparent once I started work on it.
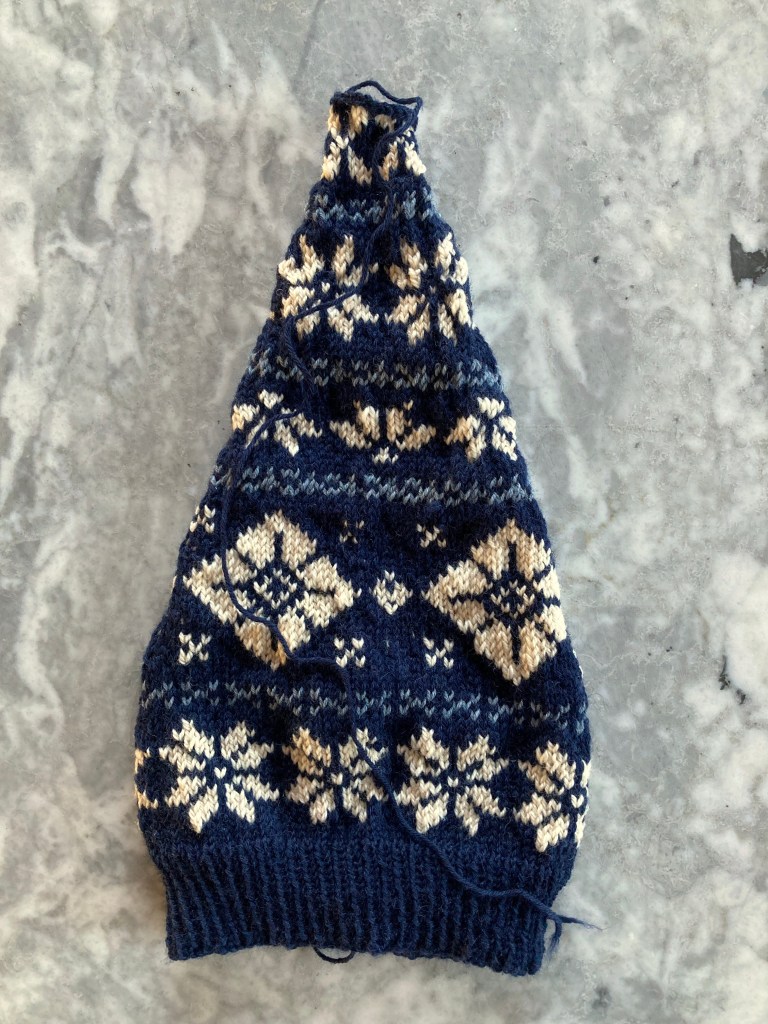
But first things first: It’s written for Patons DK yarn, 100% wool, in white with “Lipstick Red” pattern. I have a good stash of leftover DK wool from other projects and decided on a dark blue background (Schachenmayr Regia 6-ply sock wool) with the pattern in white (Wolle Rödel Soft Merino) and blue-grey (Lana Grossa Cool Wool Big Mélange) to really bring out the snowflakes. The written pattern gives no row gauge and assumes a tension of 6.5 stitches to the inch over the stranded pattern on No. 10 (3.25 mm) needles for the mittens, and 6 stitches to the inch on No. 8 (4 mm) needles for the hat.
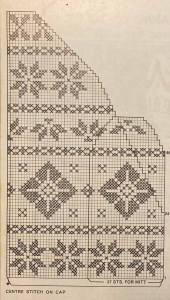
6 and especially 6.5 stitches to the inch is quite tight for DK wool, but I did my best on 3.5 needles (I don’t have 3.25 needles — the pattern is written for old UK sizes) and started with the hat. I noticed it was meant to be knitted flat and seamed up the back, but no worries, I could just make it in the round. There was even a chart (not a given with vintage patterns), so everything seemed fine.
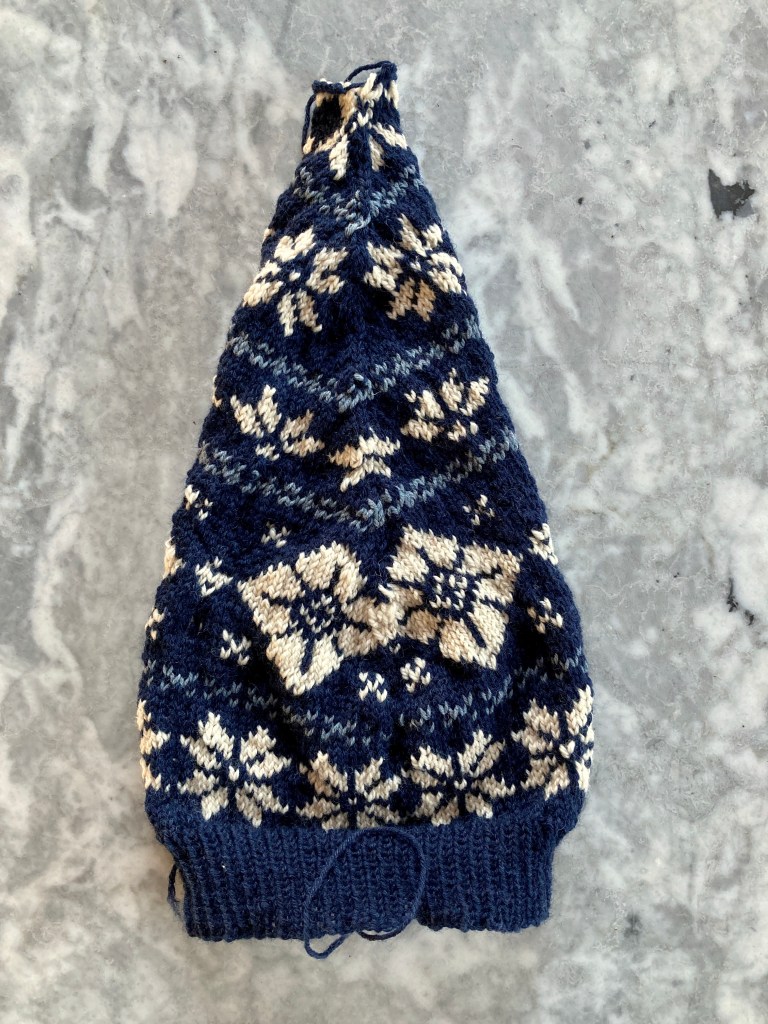
Well — after the first snowflake, it was clear that this hat would not fit any adult head, even that of the friend it was intended for, whose head is quite small. Knitting stranded DK that tightly just made it impossible to stretch, as well. Looking back at the photo, I noticed that the finished hat is just sort of perched on the of the model’s head, not pulled down over her forehead like one would normally wear a hat…! Yeah, 6 stitches to the inch is too tight. So I started over with 4 mm needles for the pattern and 3.5 mm for the ribbing.
That solved the first problem, but as soon as the large diamond pattern started, I noticed how badly designed the colourwork pattern was. There were huge gaps between colour changes, necessitating weaving-in the wool constantly, and even then, the white wool showed in the gaps. I can’t imagine how this would have worked with stranding bright red behind white! Even worse, the pattern doesn’t match up in any way at the “seam” / round change. The large diamonds just get swallowed into each other like in of all those Netflix opening credits that use mirror effects. I was able to finesse it on the smaller snowflake and the repeat of the medium-size snowflake at the top of the hat, and the back “seam” does get covered by the long upper part of the hat when it fold over, but still, it looks messy.
Starting on the mittens, it became obvious why the hat pattern was so badly designed: The mitten pattern is perfectly centered and balanced and looks fine. There’s no problem with patterns bleeding into each other because the decreases only happen at the top of the fingers, and no big problem with weaving in across the back, because the back-of-the-hand and palm pieces are knitted flat and separately and there is no patterning on the palm, so the pattern motifs are made in sort of stranded intarsia. It seems the designer designed a pattern for mittens and, when instructed to make a matching hat, just extended the pattern out to hat size without much though about pattern placement or correct sizing.
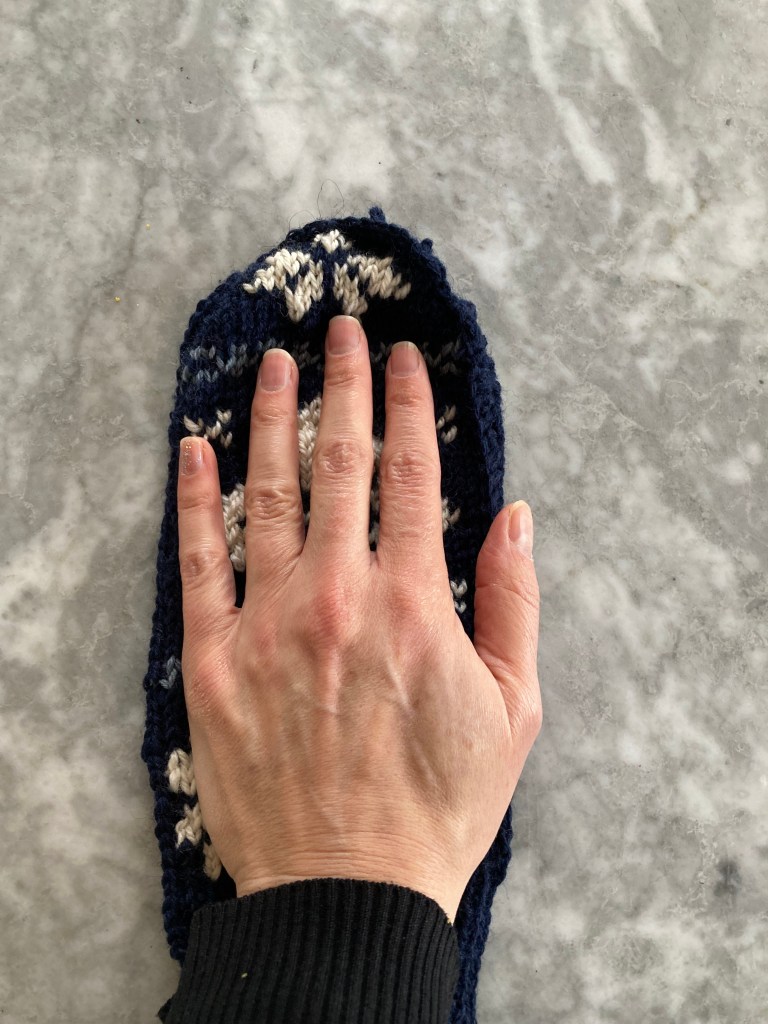
Speaking of sizing, though… The finished mittens were way too long! I have size 8 hands and really long fingers, but even they look stubby on this photo, simply because the mitten length is out of all proportion. Looking at the magazine photo again, I think they are too long for the model’s hands as well. Yes, I should have checked it as I went along, but of course I didn’t, so I only noticed the problem after all the pieces were made and seamed together. (Using a crochet seam as directed in the pattern.) I thought I could block them shorter… Erreur fatal! Blocking not only made no difference in the size, it cemented that crocheted seam so solidly that it was not possible to undo it in order to frog and re-knit the mitten tops in a better size. By the time I was finished “undoing” the first mitten seam, the whole mitten looked like it had been mangled by a dog.
I will give the hat to my friend as intended, as it turned out OK and the weaving-in blotches mostly disappeared after blocking. It does look cute, especially with a pompom on the tip. As for the mittens, I consigned them to the upcycling drawer, as I just didn’t want to deal with them any more.
This project was no fun to knit, but I will call it a learning experience and move on. And I do think my friend will like the hat, at least.
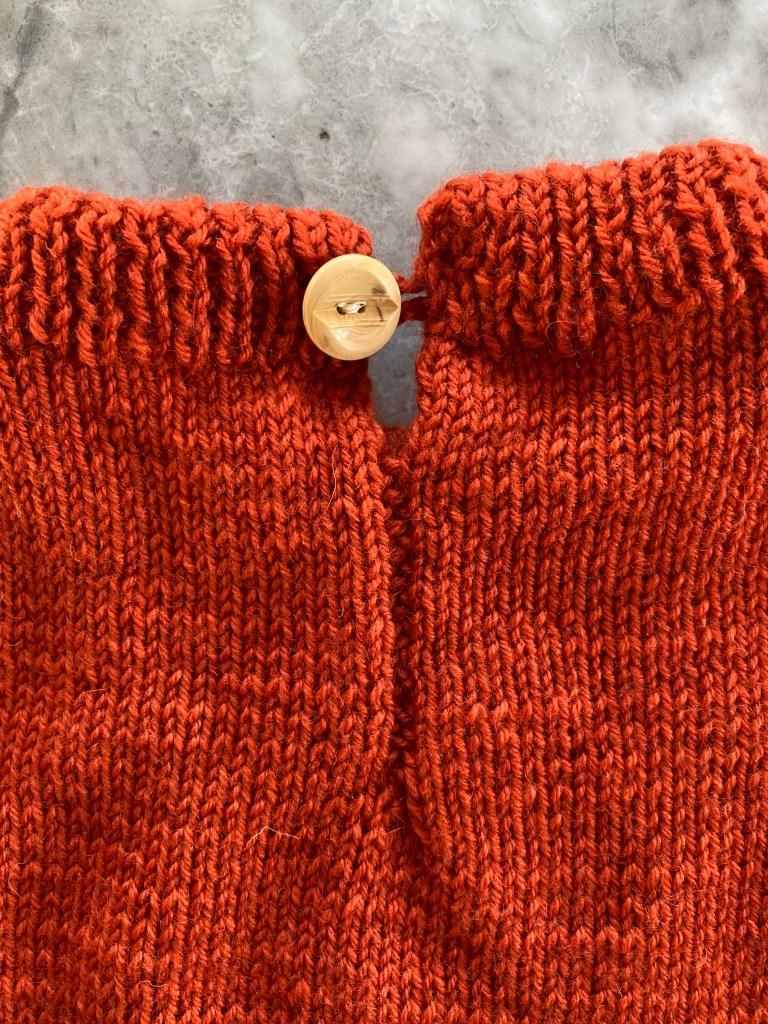
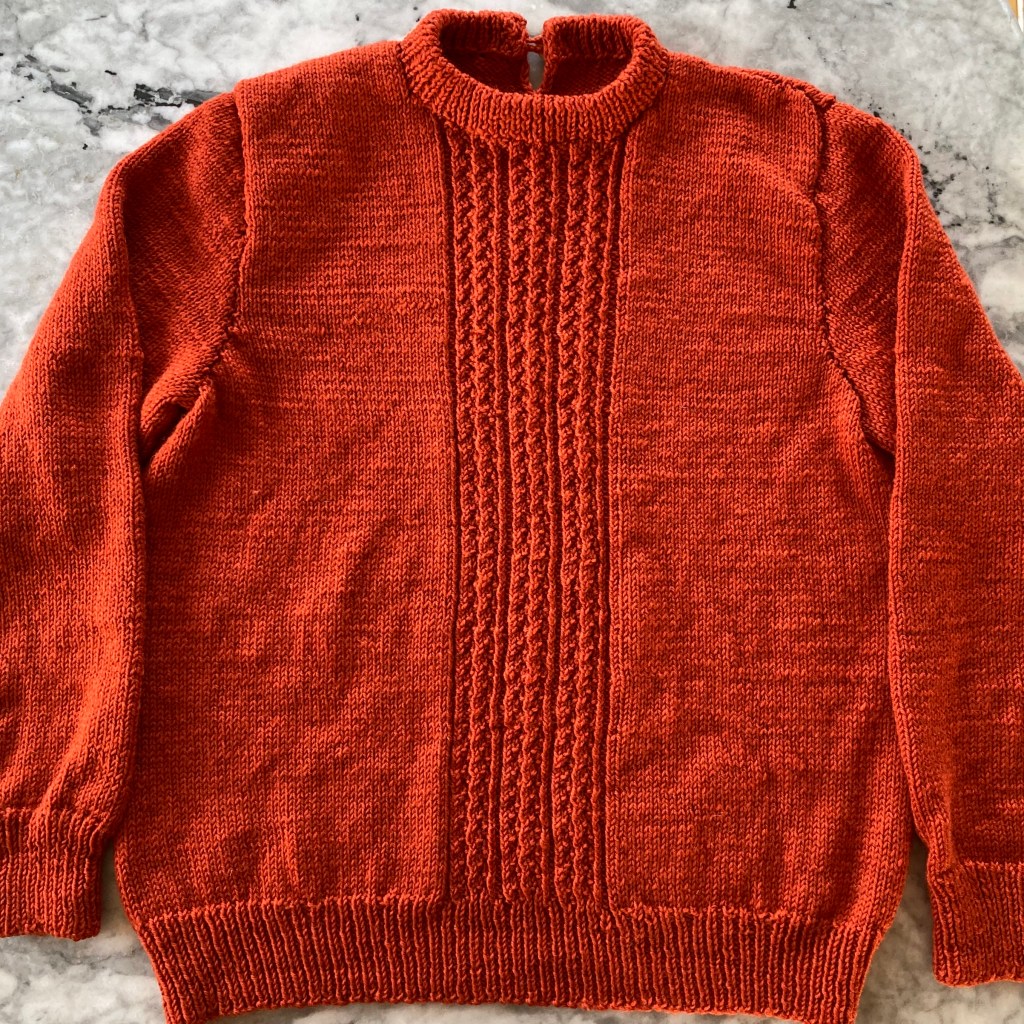
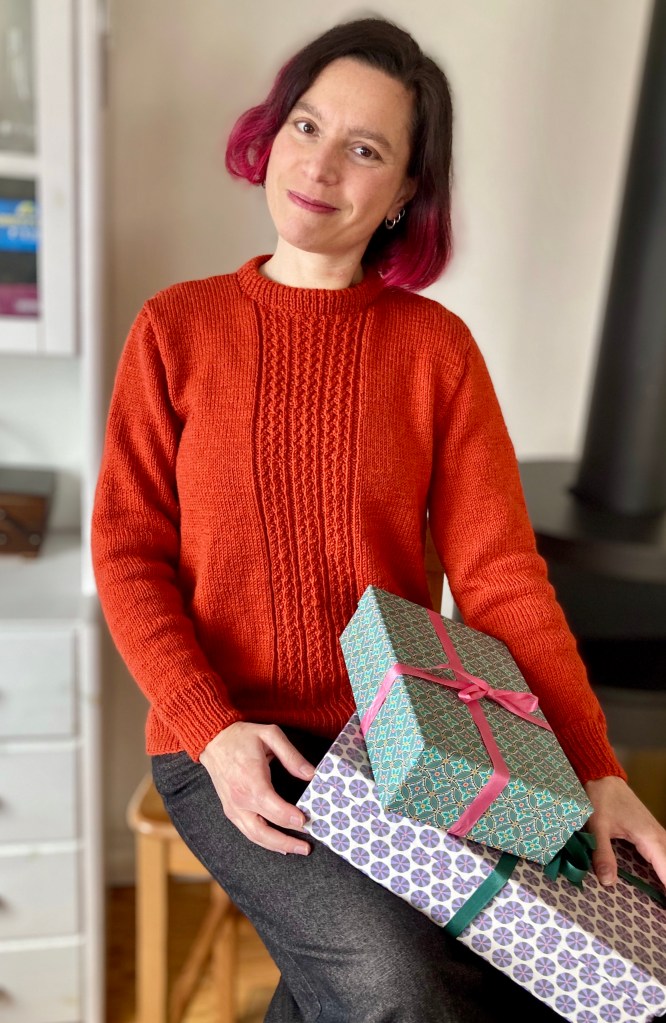
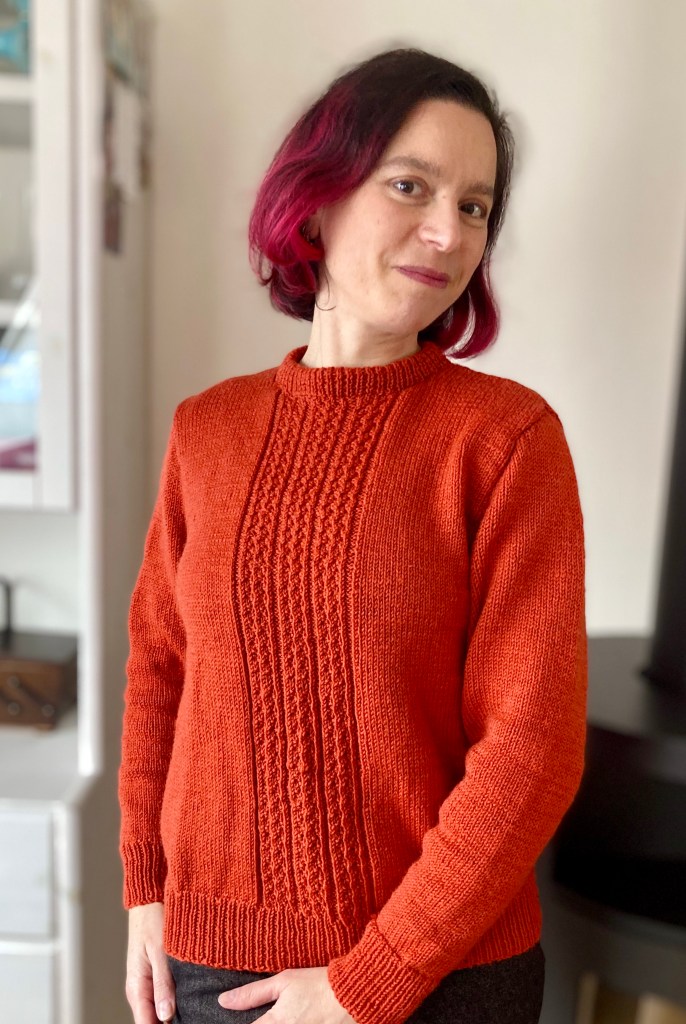
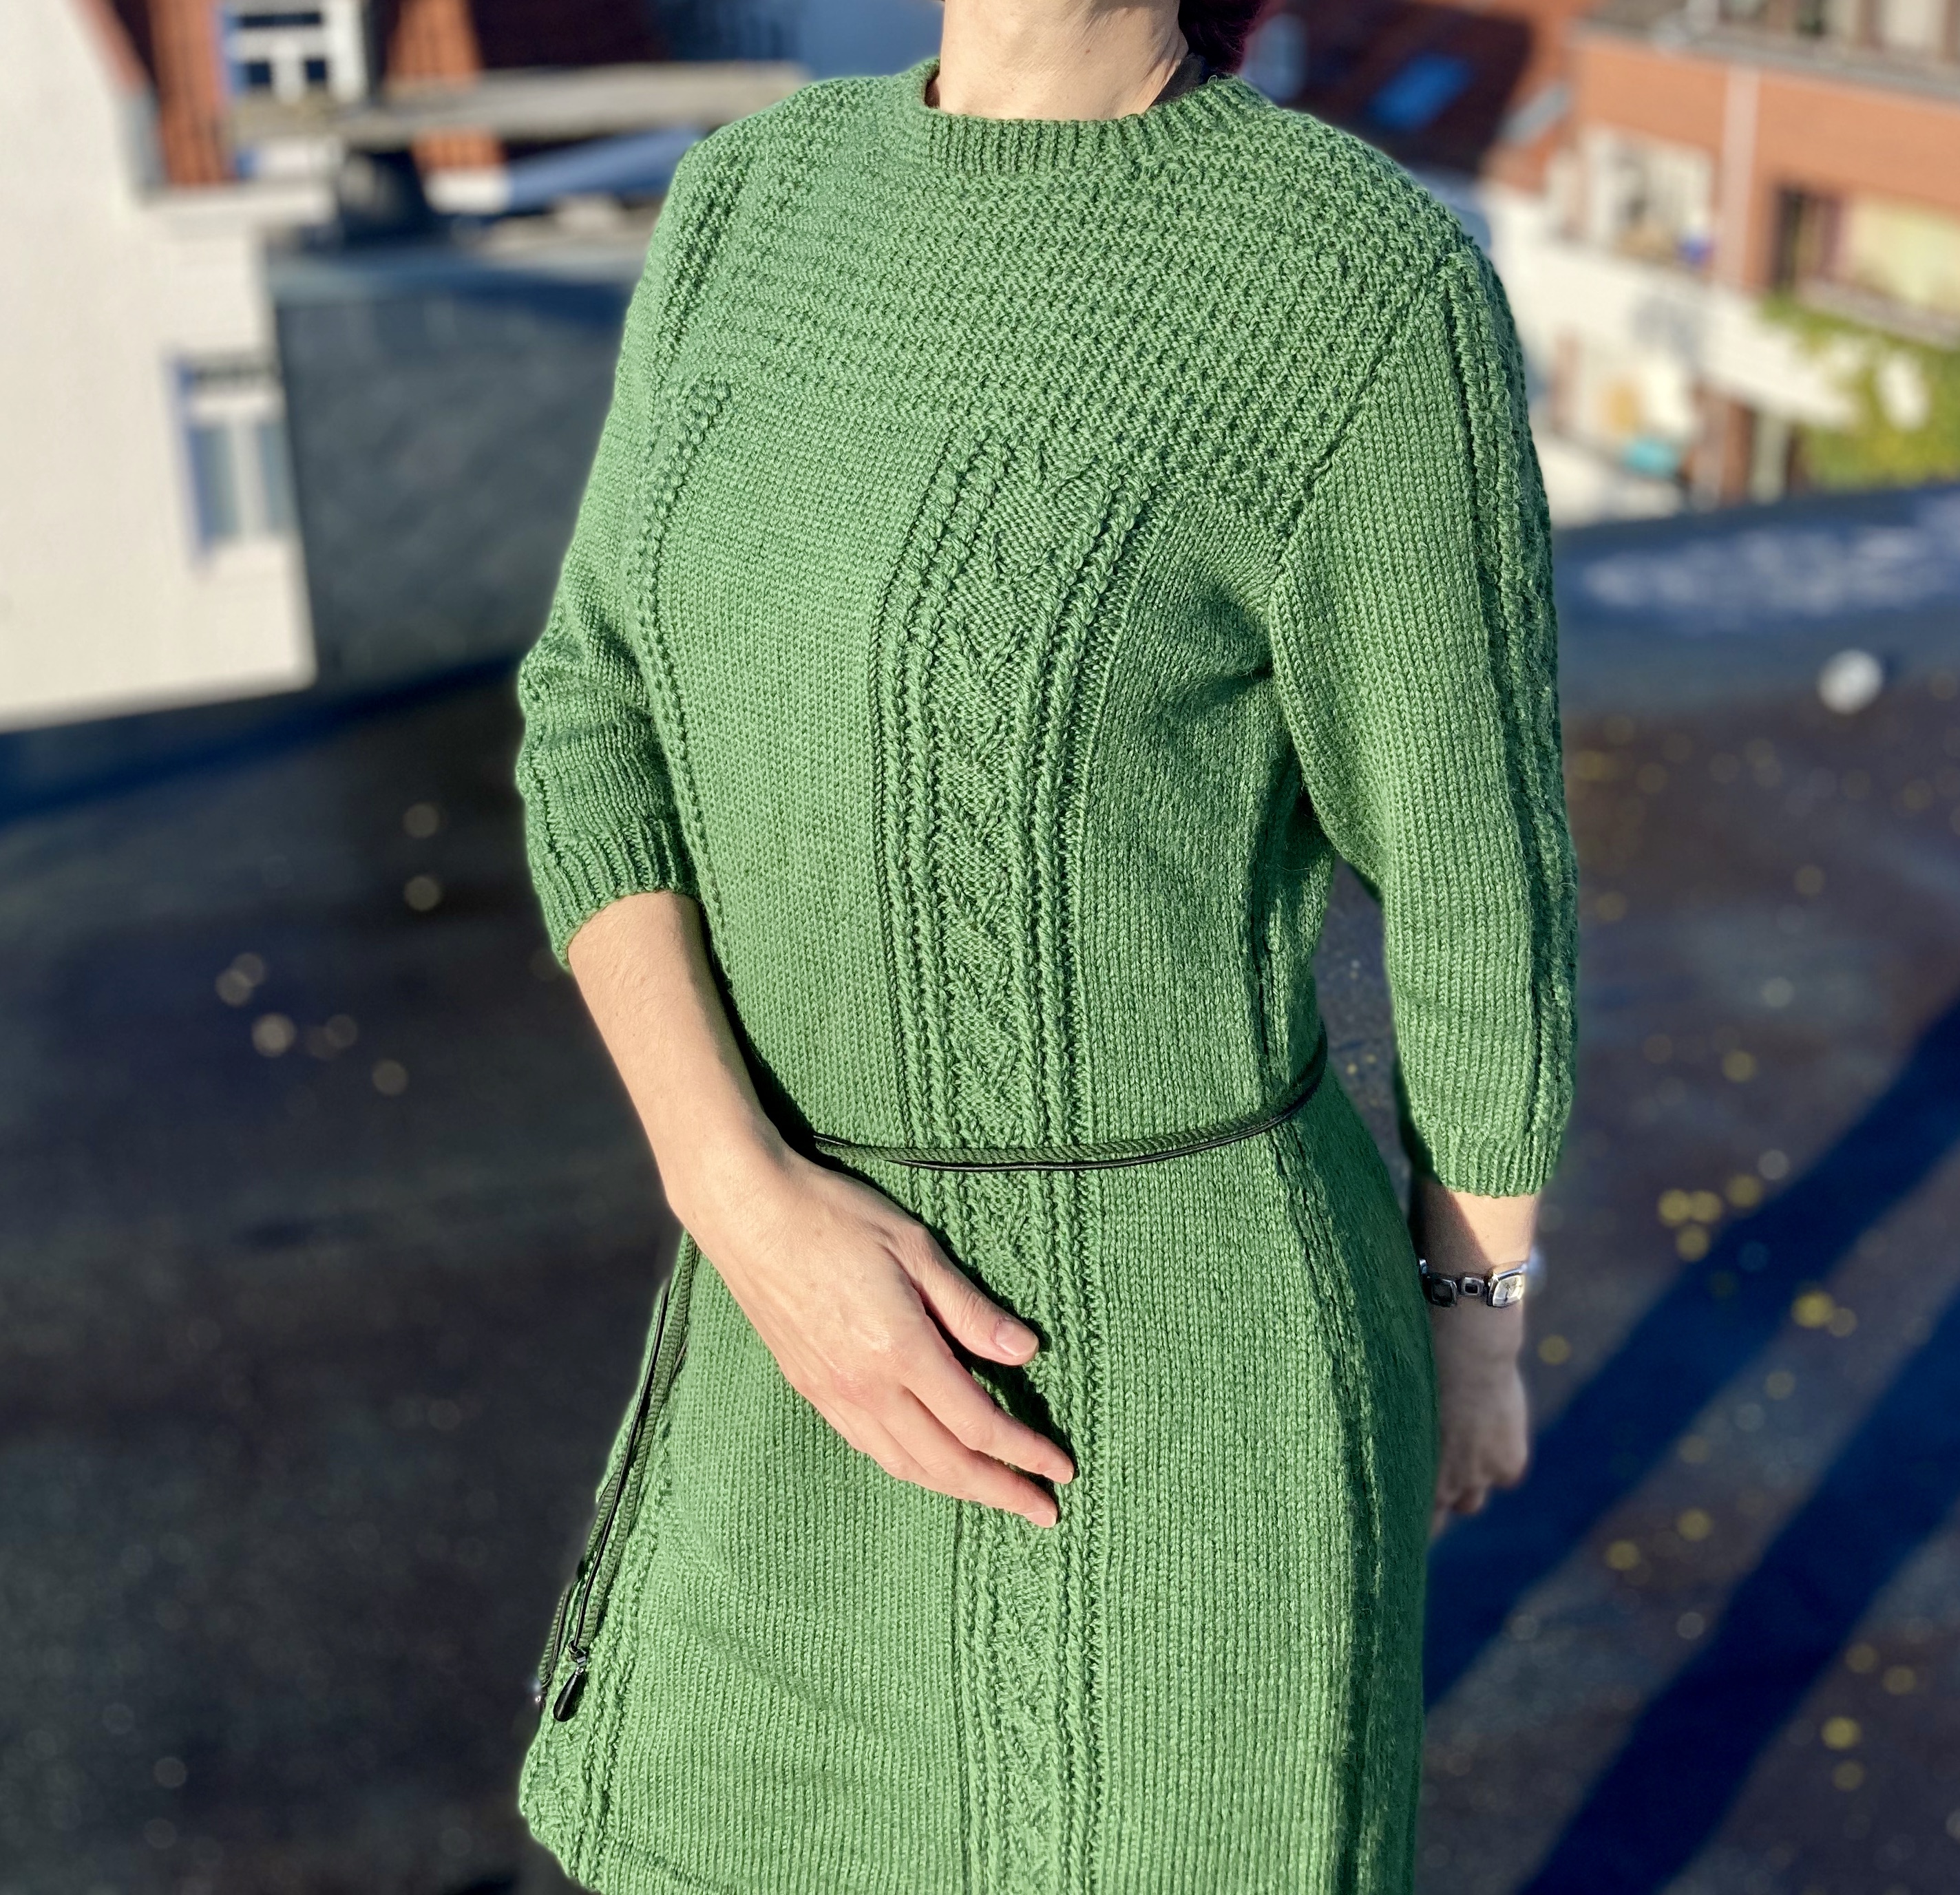
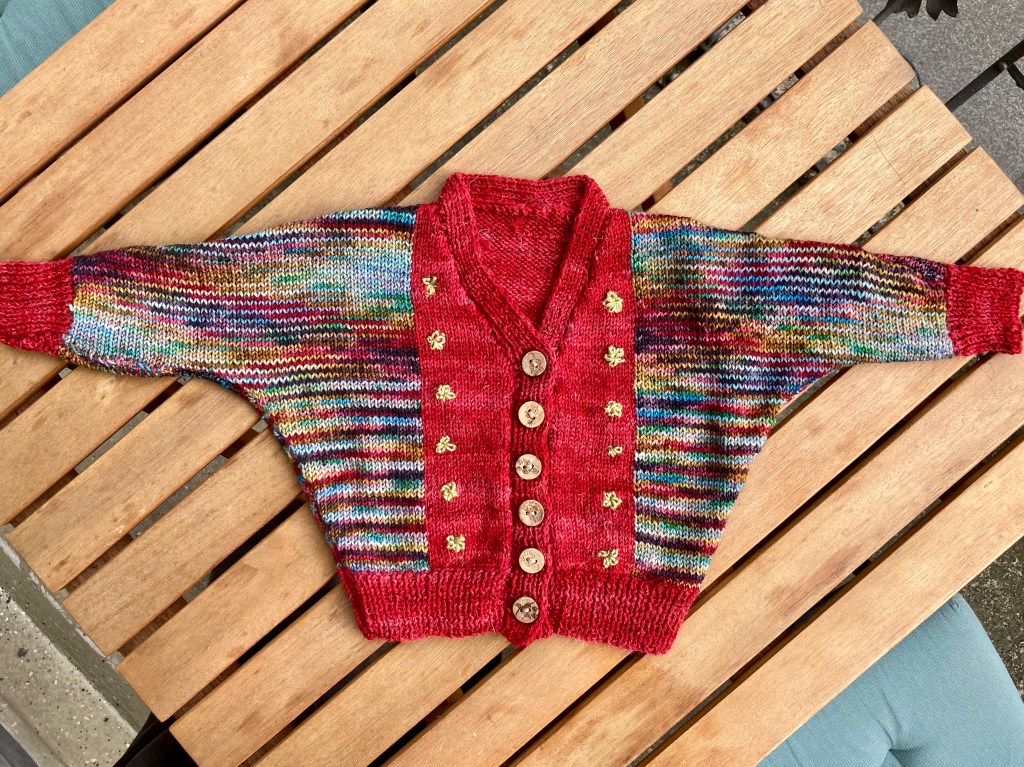
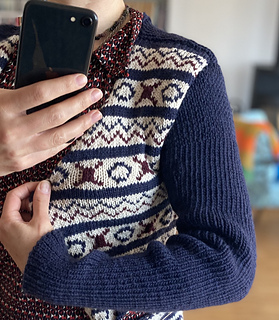
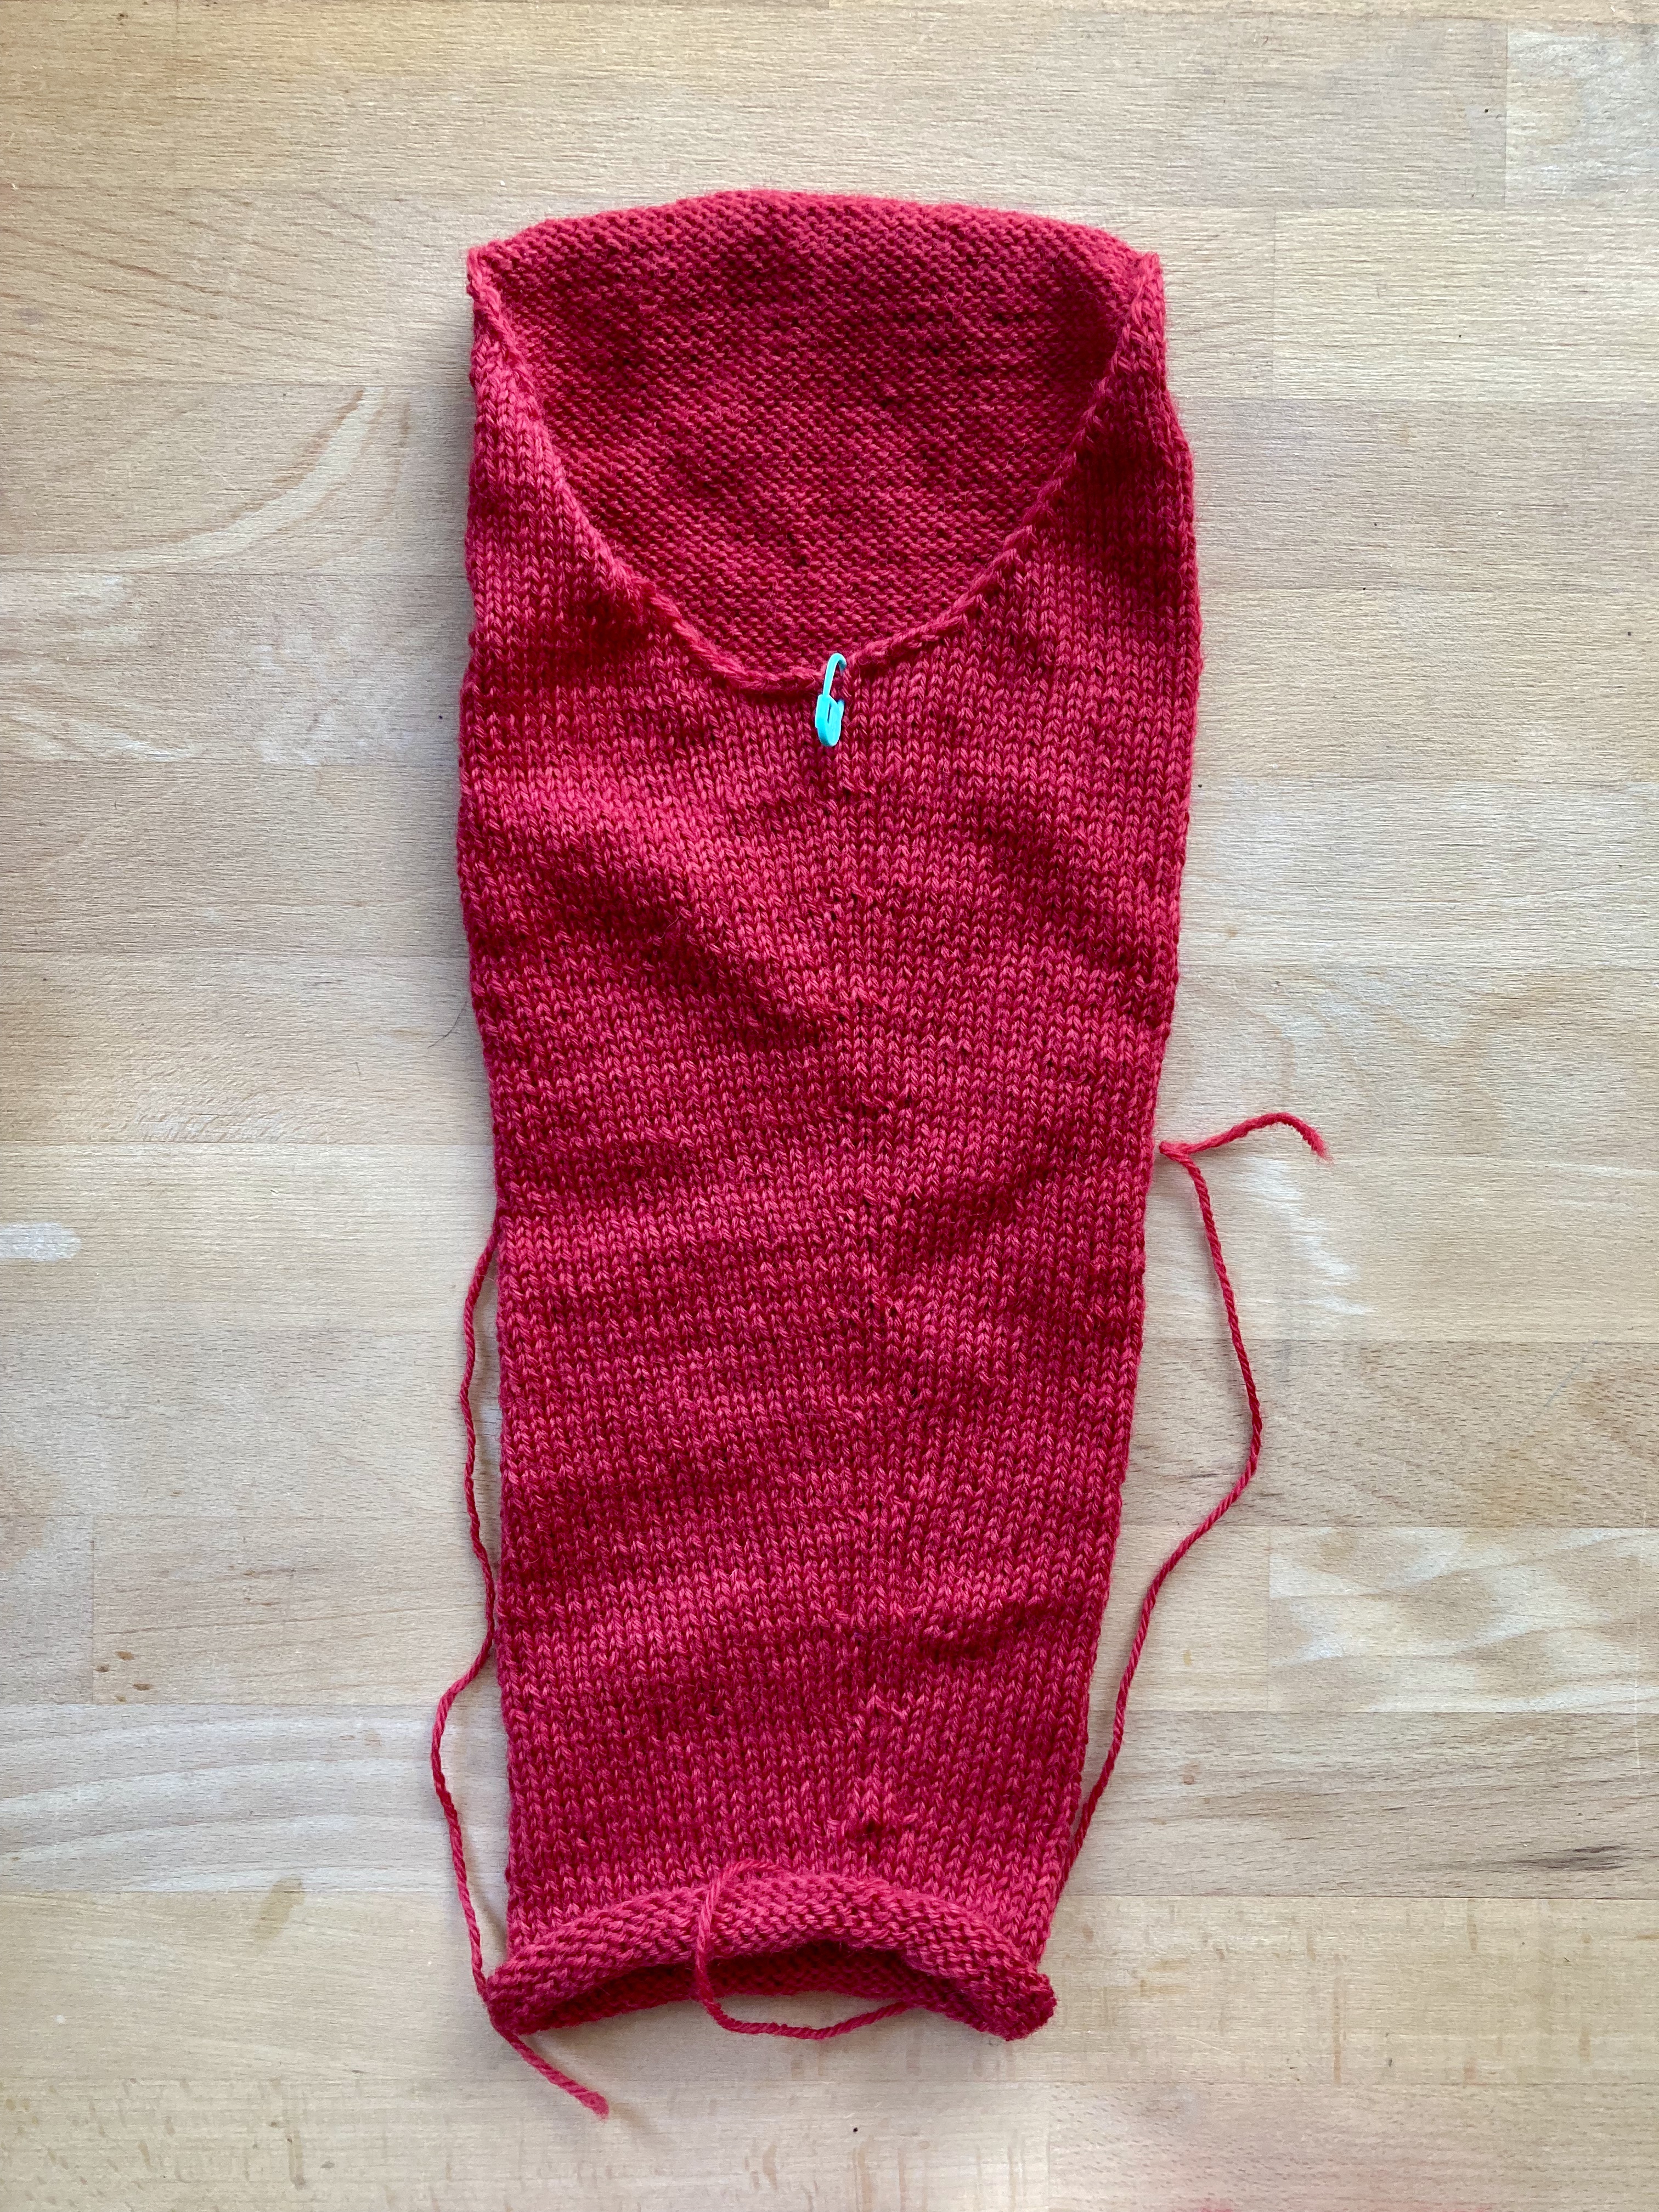
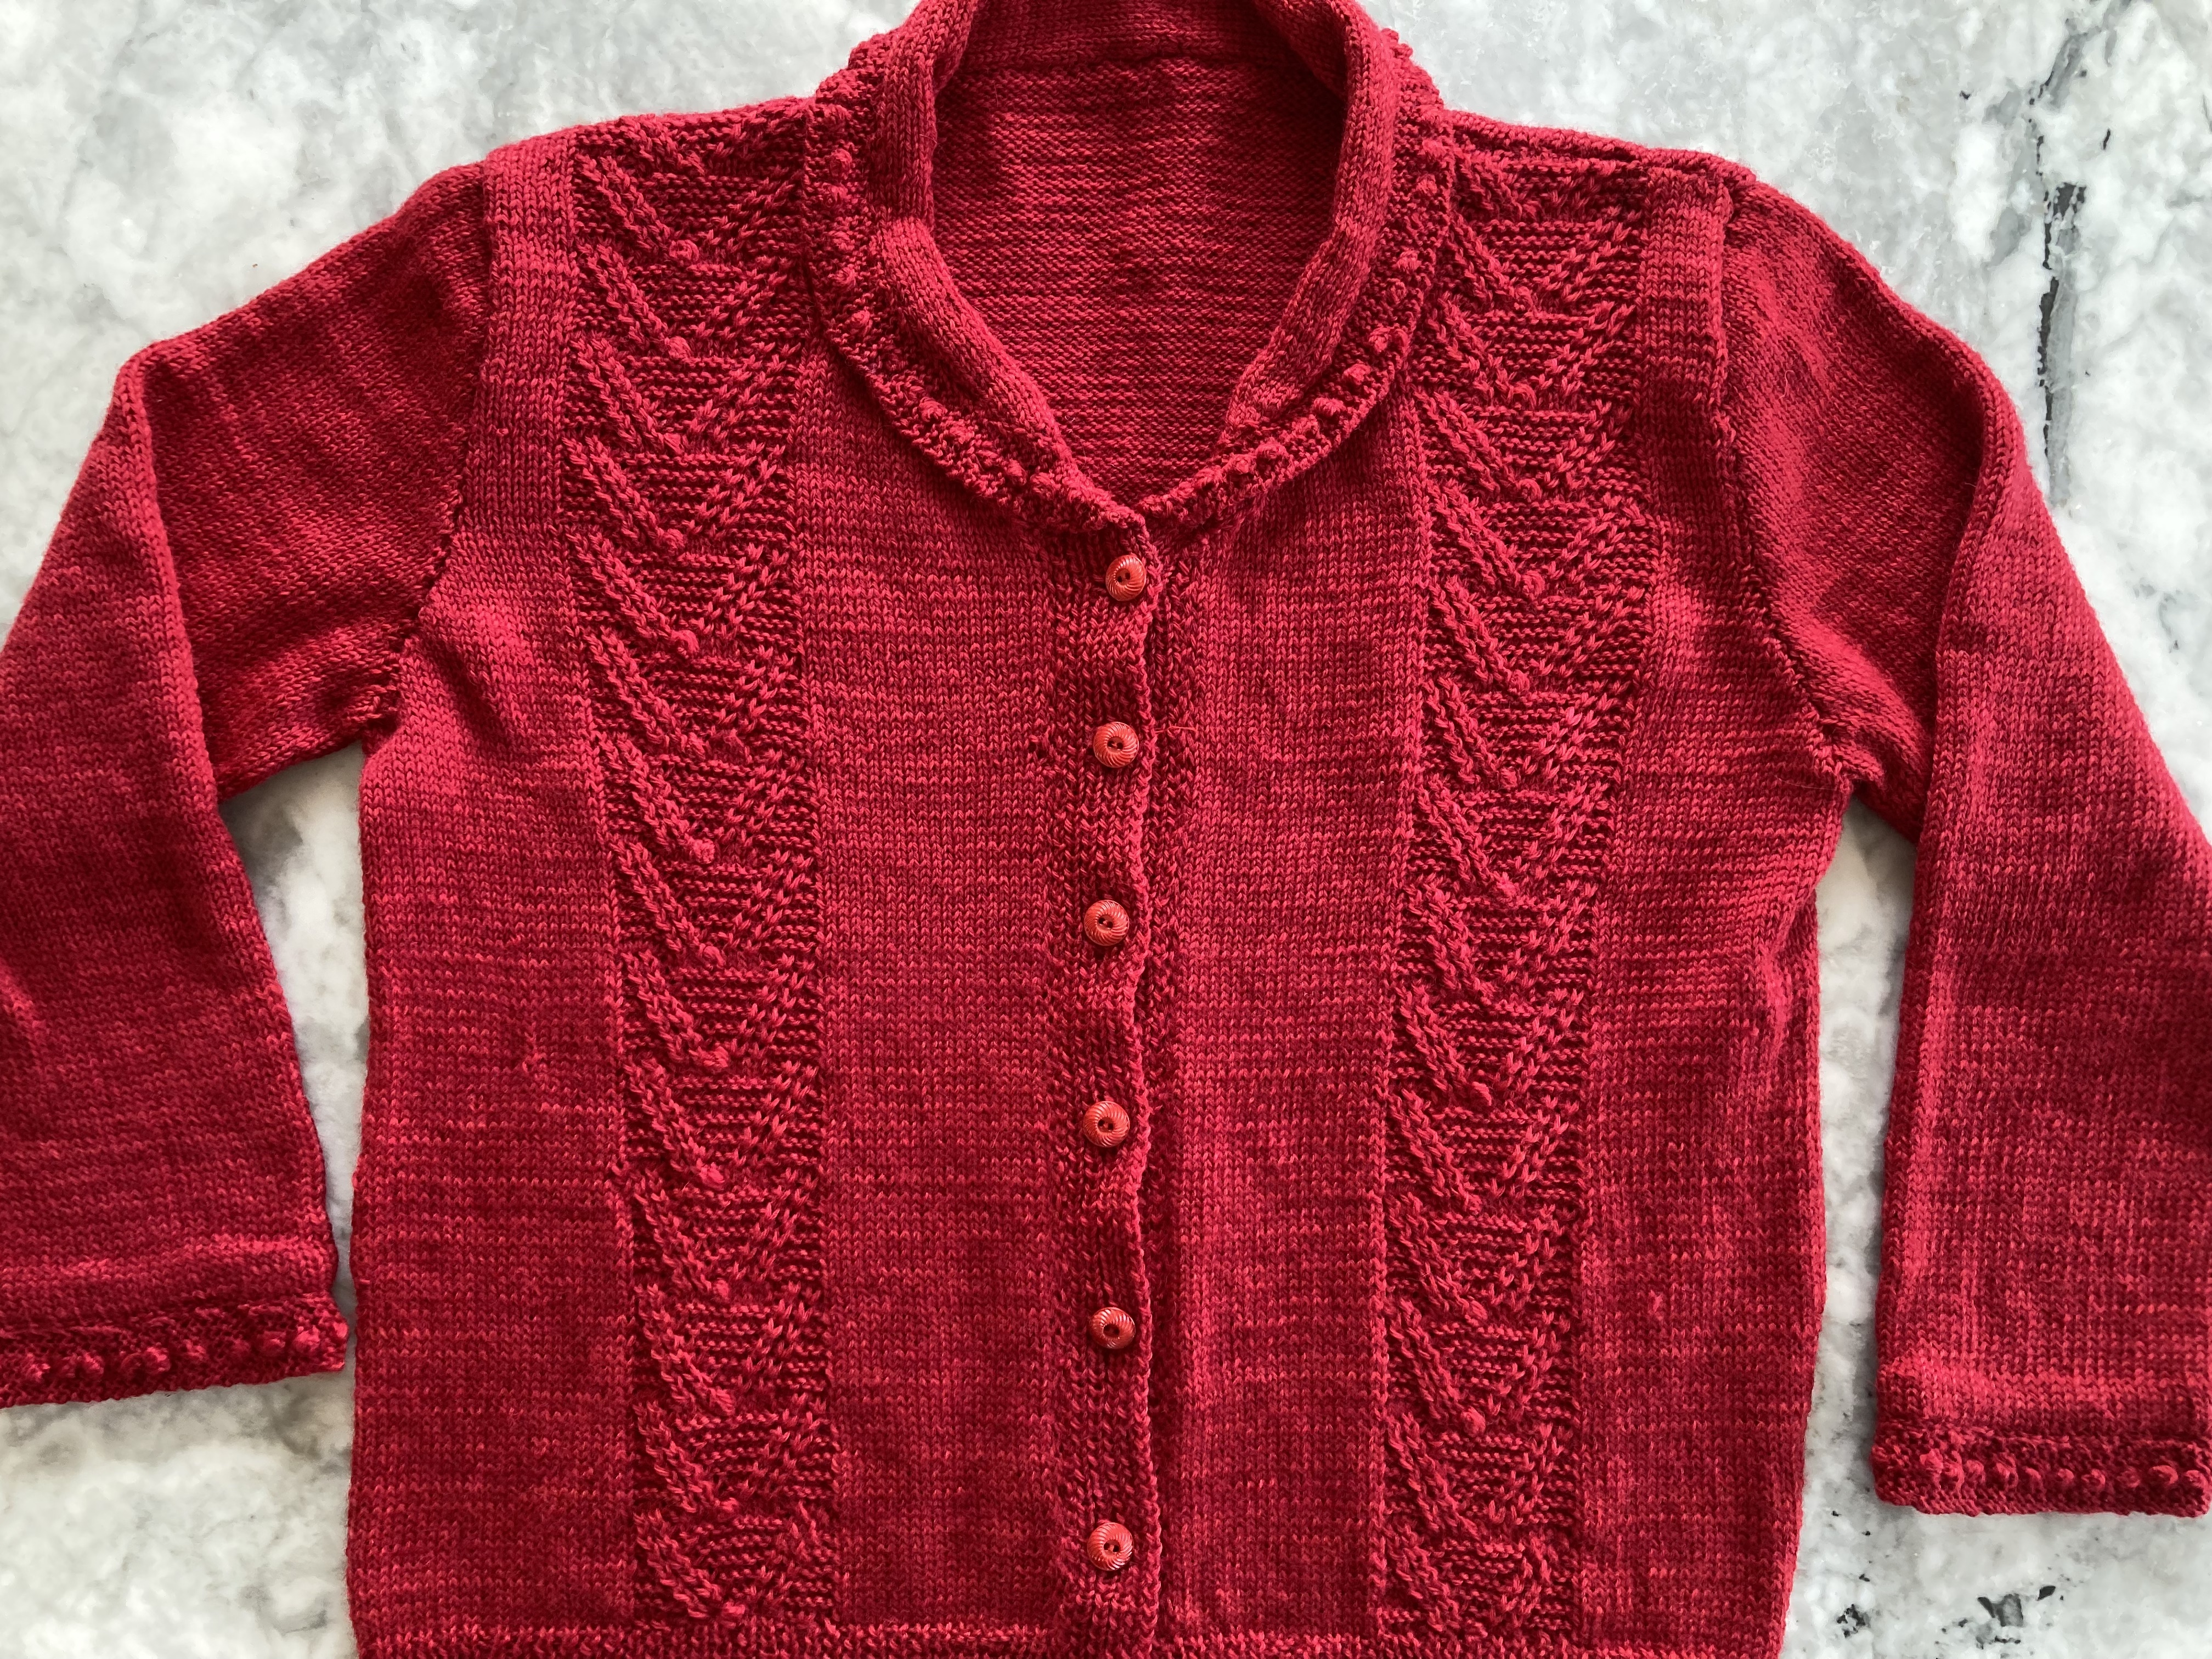
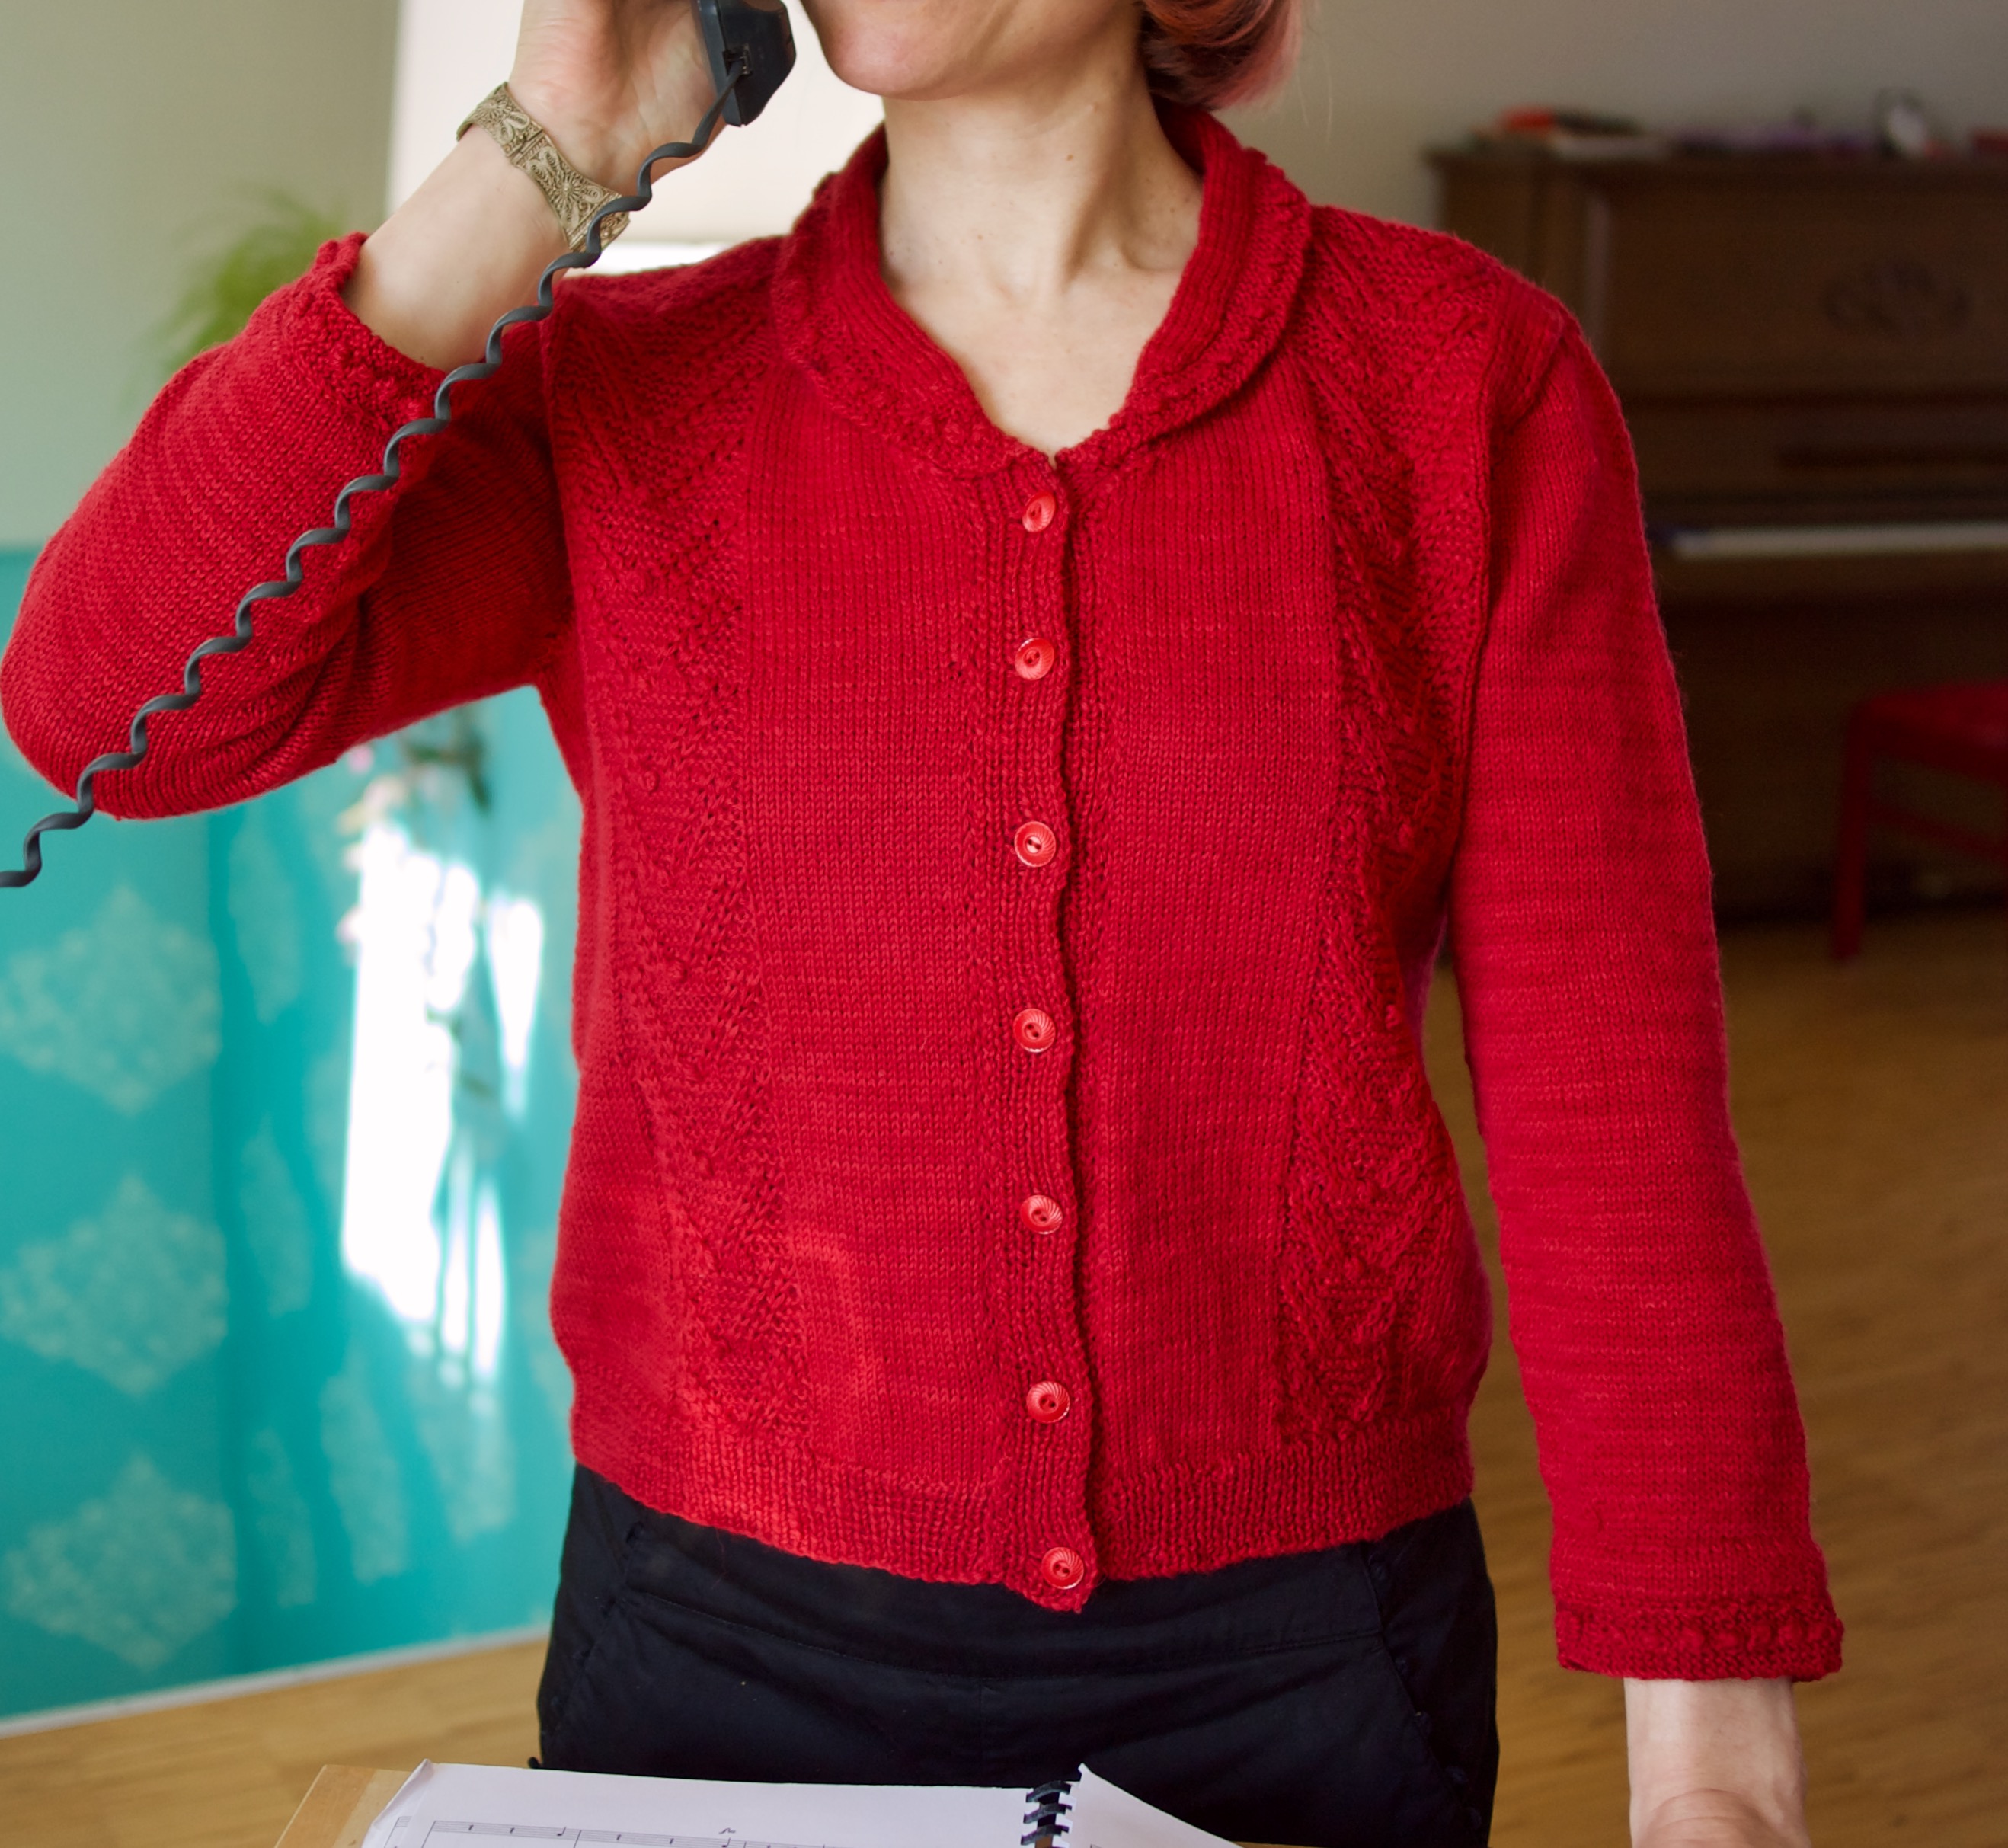
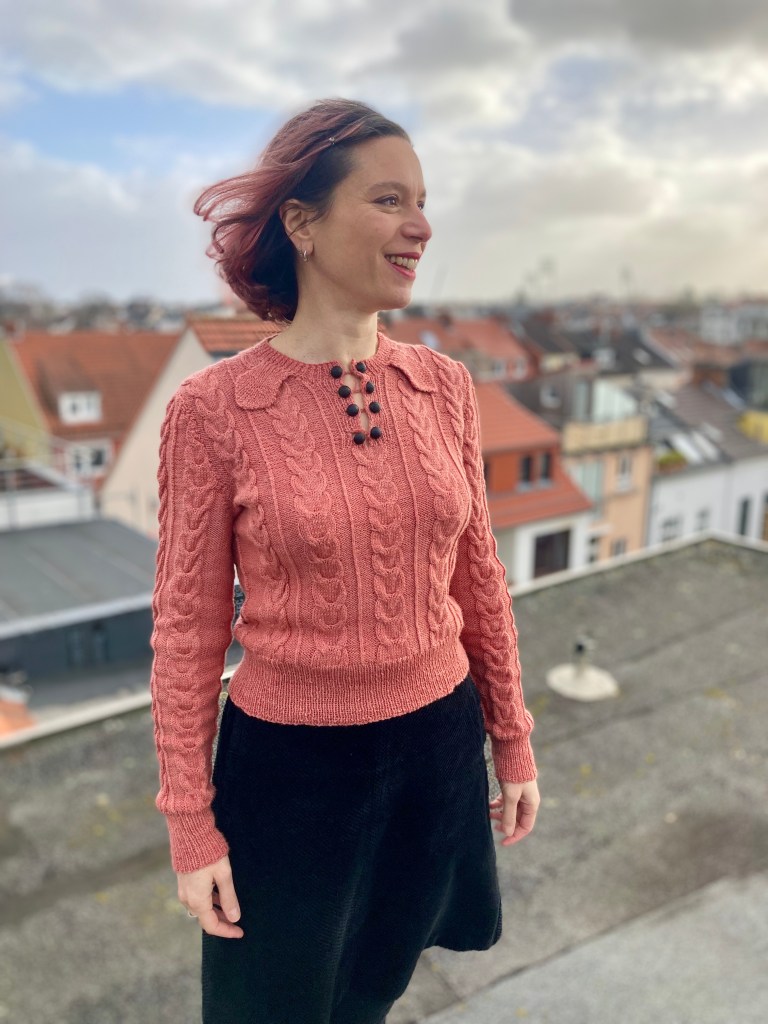
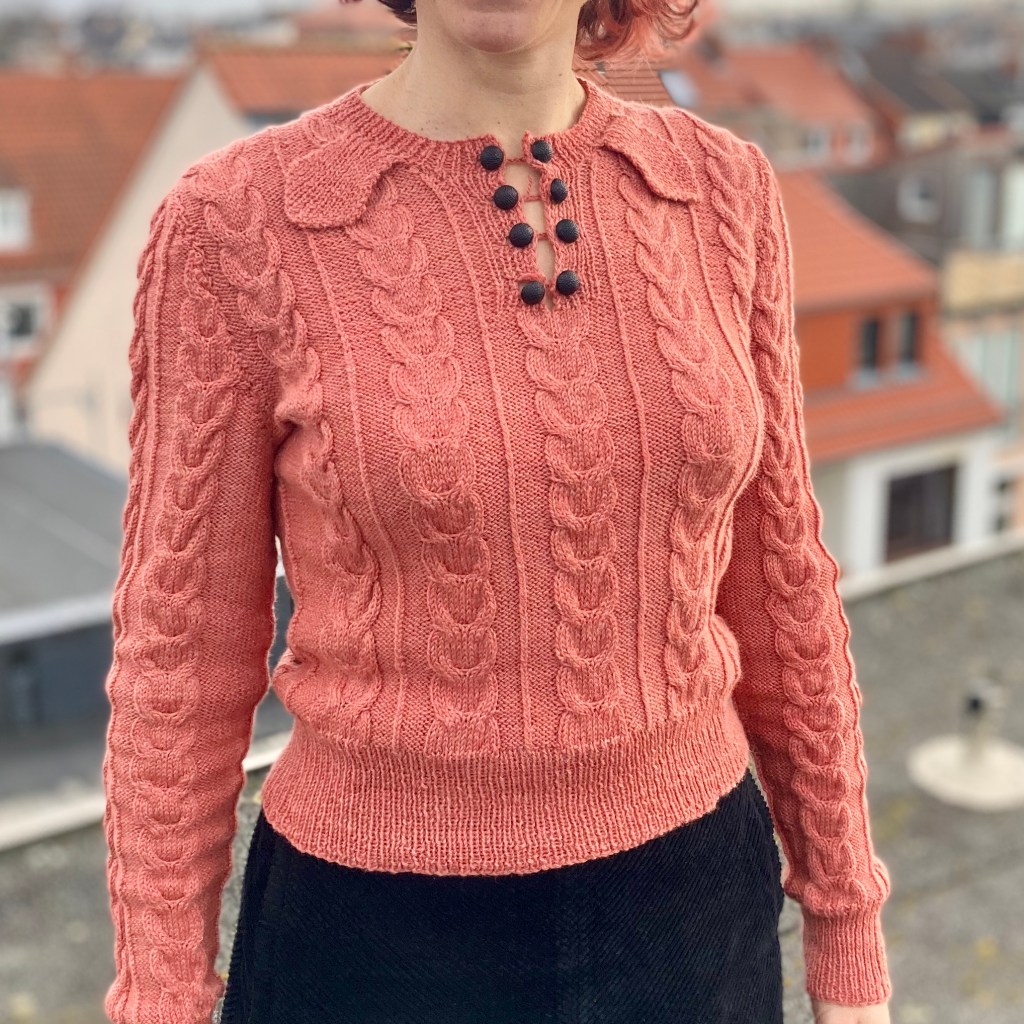
This month’s project was, as its name suggests, a classic sweater with a front panel detail. And while it may not be what you think of as a “Christmas sweater” (i.e. not tacky, no light-up reindeer baubles…), it was definitely my Christmas sweater this year, since I not only finished it on time, but on December 24th! (And there was much rejoicing.)
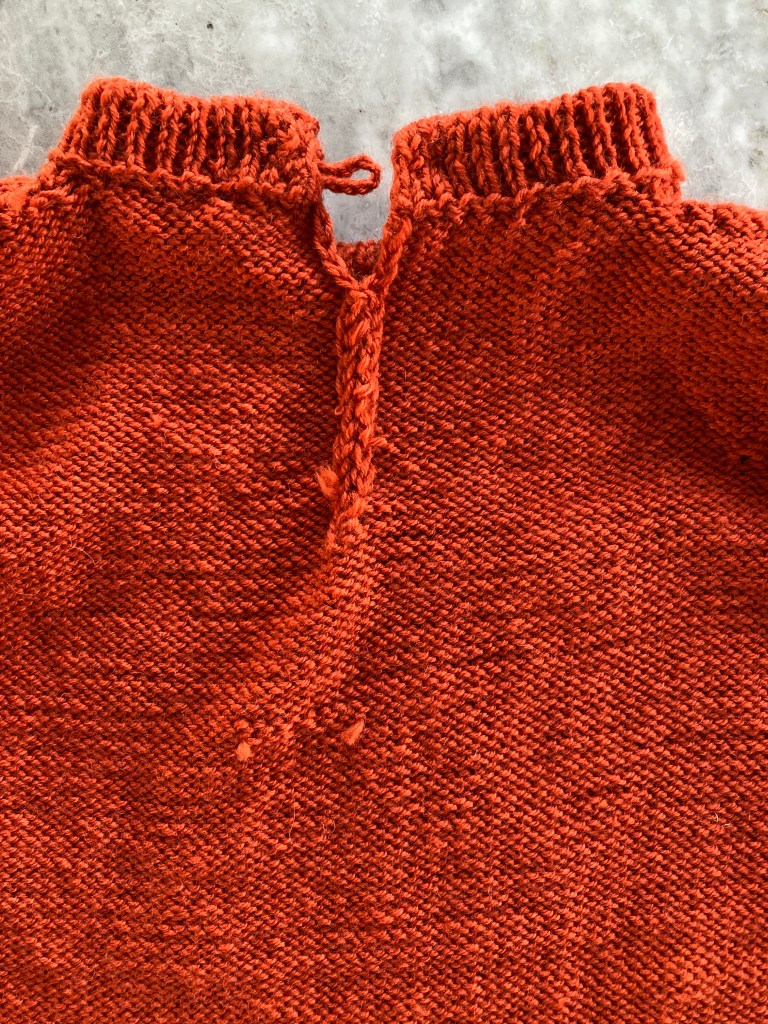
The sweater features many elements of classic 1960s casual design: a longer body (23 inches), no waist shaping, straight sleeves with an equal amount of ease (i.e. not much) from wrist to sleeve cap, set-in sleeves and a high crew neck necessitating a back neck opening. The front panel, like the one on the dress I knitted for the October blog project, appears at first glance to be some kind of cable or mock-cable, but is cleverly made out of a combination of normal knit and purl stitches as well as knit stitches made through the back loop.
The pattern uses plain Patons Double Knitting DK wool in “Flamingo”, which I would expect to be orangey-pink but judging from the colour photo on the back cover, is a cheerful bright orange. I love orange, so for once I made a project in the colour specified. My yarn was G-B Jil, an extremely normal, easy, inexpensive superwash DK wool.
The sweater knit up quickly and the only real delay came while waiting for the two extra balls of wool I had ordered to arrive. I had bought the wool at a local sewing/knitting shop that doesn’t order very often, and at the time there were only 400 grams of the orange wool there. I expected to use 450-500 grams, so ordered the two extra balls. It ended up using exactly 450 grams of wool and the two extra-ordered balls were even in the same dye lot, so there was no trouble with matching.
I made the sleeves one inch longer and used a button for the back neck closure instead of a zipper. Other than that, I made everything according to pattern. My only design worry was the complete lack of shaping — I was afraid it would make me look dumpy, since I have a pretty small waist and prefer to wear tight-fitting tops. The finished garment has zero ease in the bust and obviously a lot of ease in the waist and in retrospect, they should have written the (plain, no panel) back piece narrower than the front — it’s much more logical to have the front larger than the back, or at the very least, both the same, but effectively the back is wider than the front in this case, because the panel cinches the front piece in a bit. That said, it works out fine as written. The extra length and the tight ribbing at the hem make it cling to the hips, which keeps the waist part from ballooning.
It is easy to care for (I blocked it by washing in the machine!) and the perfect amount of warm.
As always, we had fun re-creating the magazine photos. This is the same model from the October dress, and she seems to like swingy, corkscrew poses.
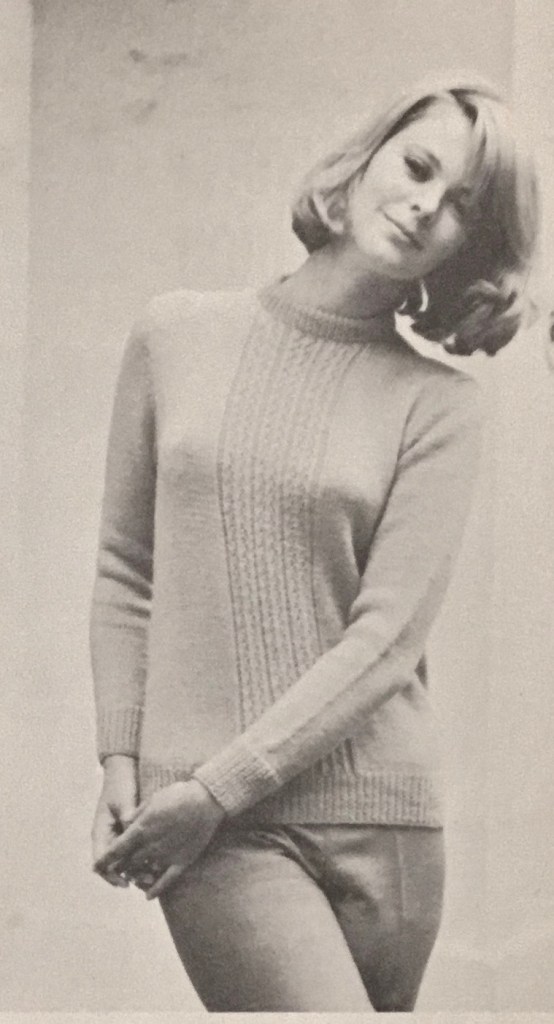
Original photo from the magazine
I am very happy with this sweater and I am sure it will get a lot of use!
Merry Christmas to everybody who celebrated it, and a happy New Year to all, when we’ll be starting the year 1965 at the Stitchcraft Sixties.
My November project was this gem from Stitchcraft’s November 1964 “Readers Pages”. Over the years, these back pages featured everything from recipes and household tips to mini-reprints of popular patterns, little “novelties” or “gift ideas” to make, advertisements for other Patons/Stitchcraft booklets or subscriptions, or quick “how-to” lessons for specific techniques or stitch patterns. There’s always a comic for children, often featuring some sort of needlecraft and/or friendly animal character that you can knit or sew or embroider in a future issue. In addition to the current comic (“ANNE and her embroidery”– in this segment, Anne learns how to make oven mitts embroidered with a fish in herringbone and cross-stitch) the November 1964 Readers Pages offered “Your Christmas List gifts to note for a needlewoman” — two Patons pattern leaflets, a subscription to Stitchcraft and/or a binding case to hold a one-year run of twelve Stitchcraft magazines, and a pattern for a knitted coat-hanger cover.
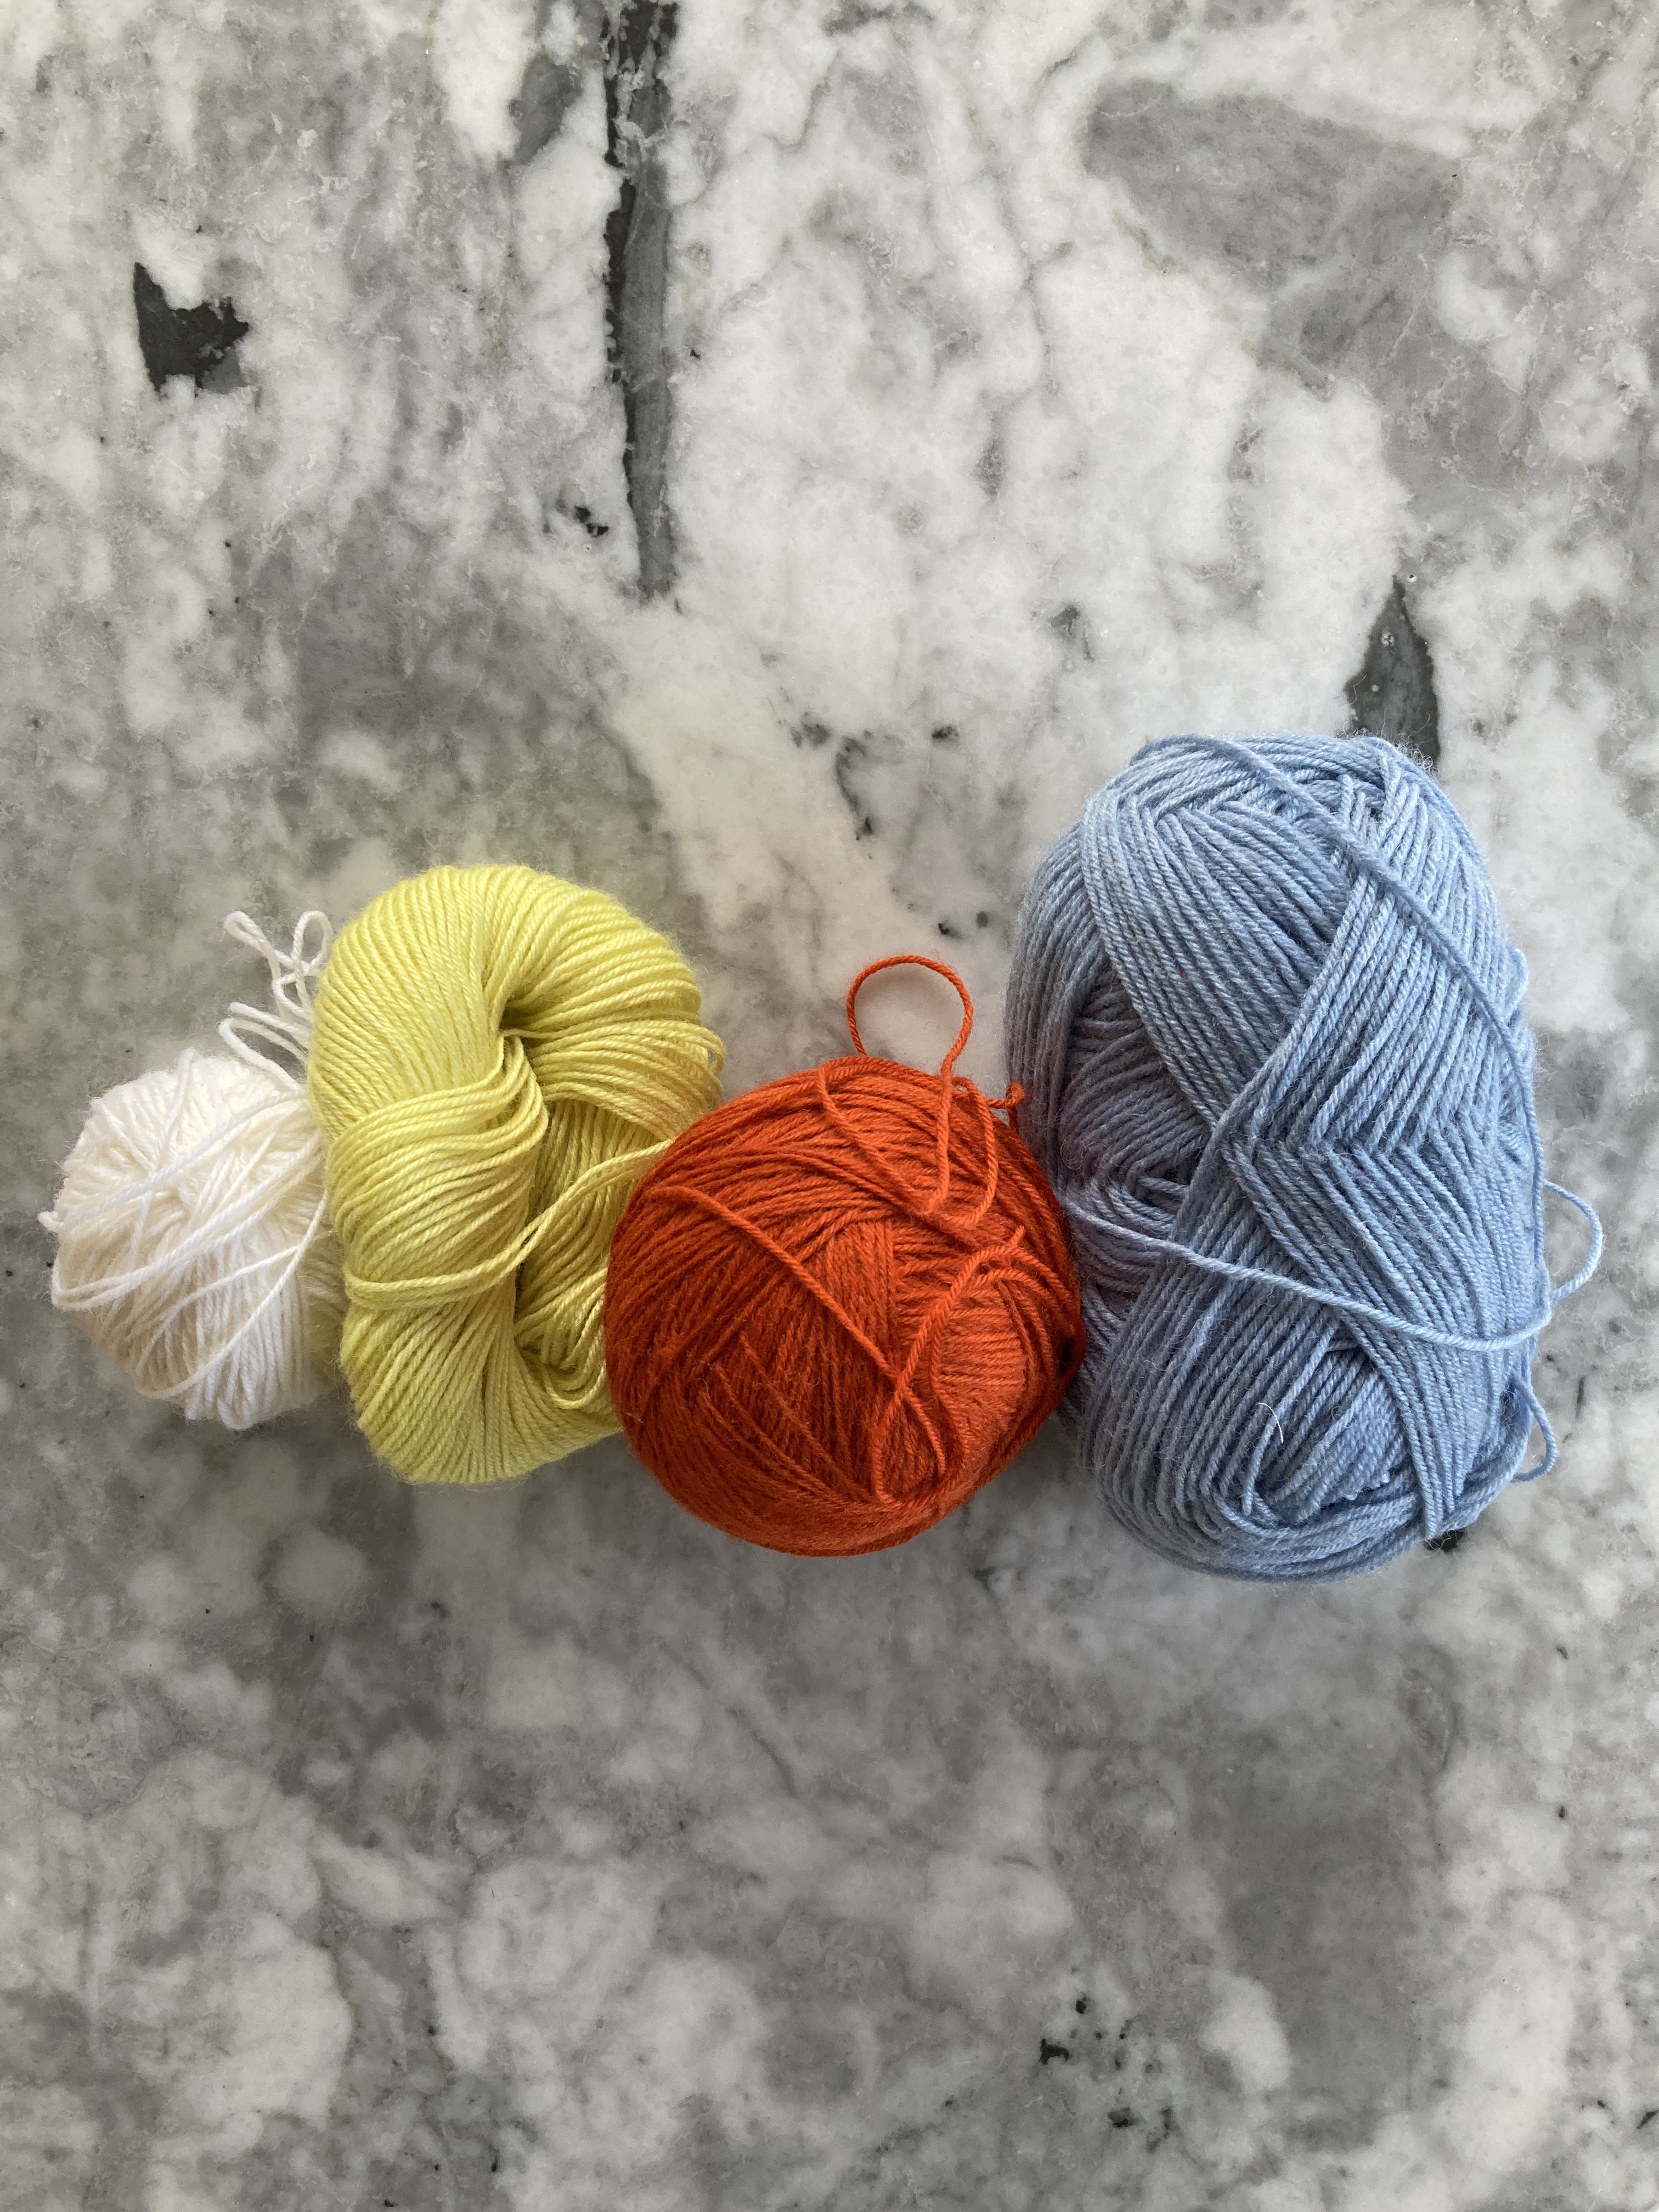
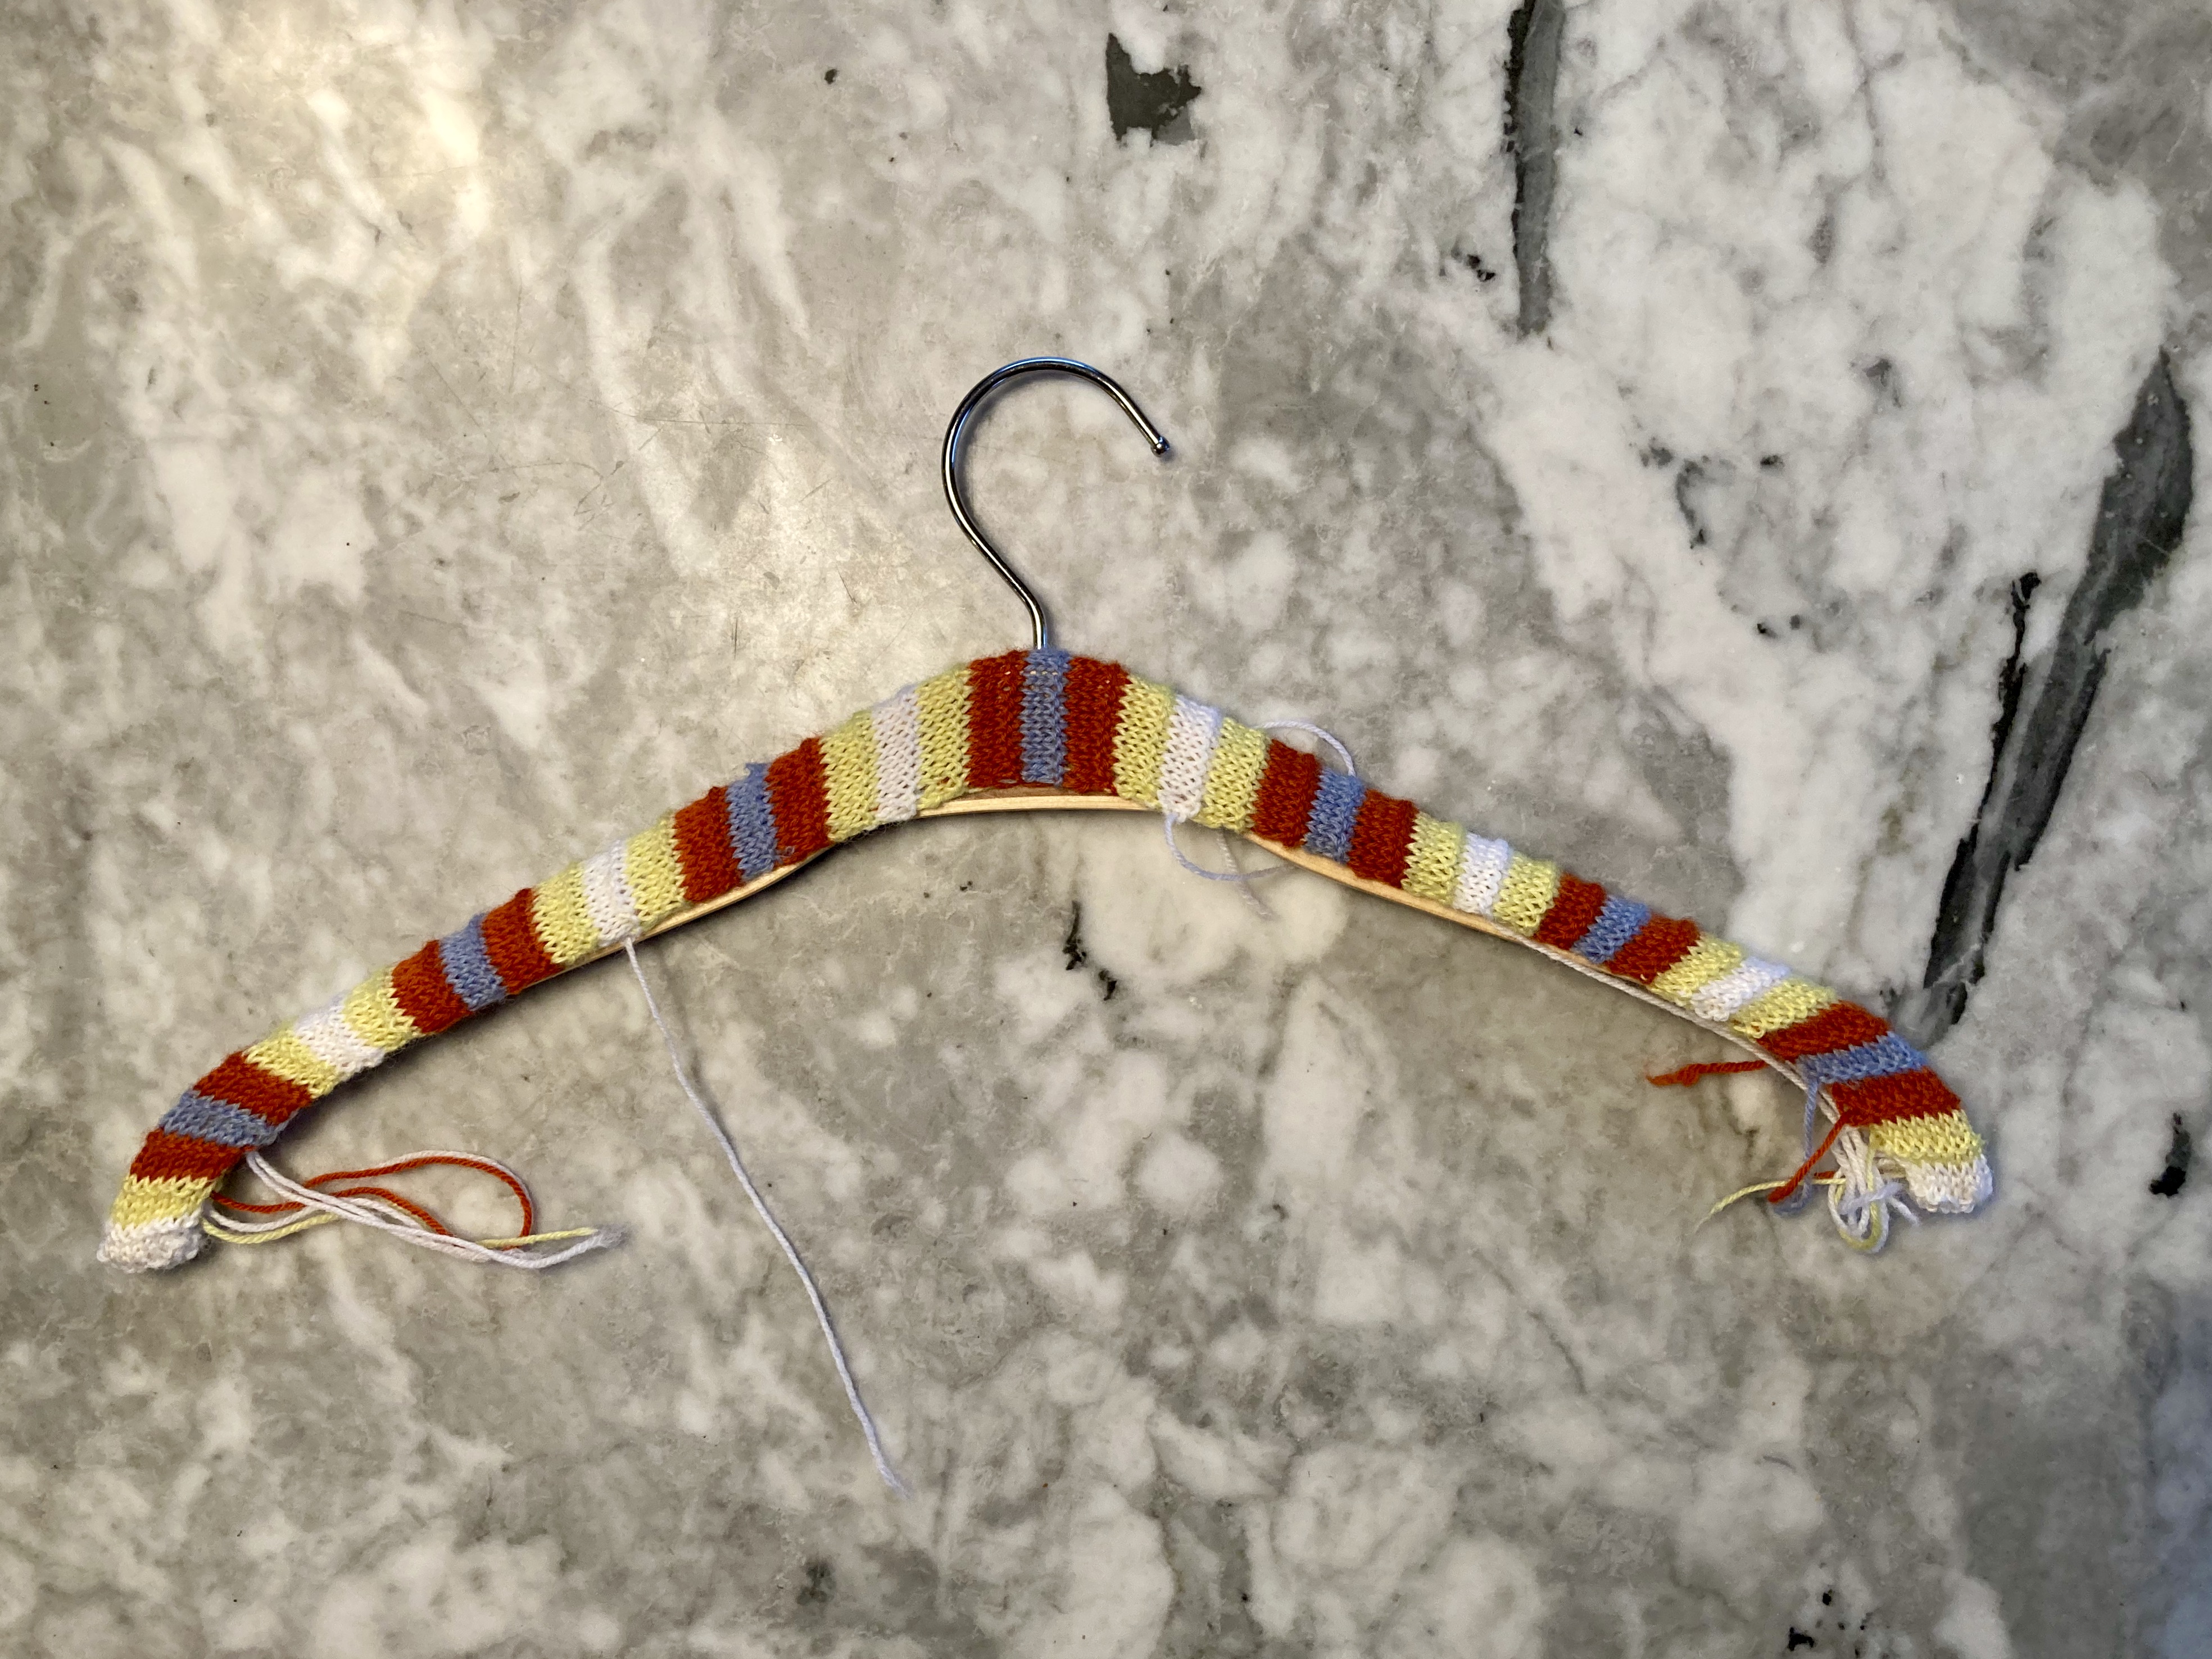
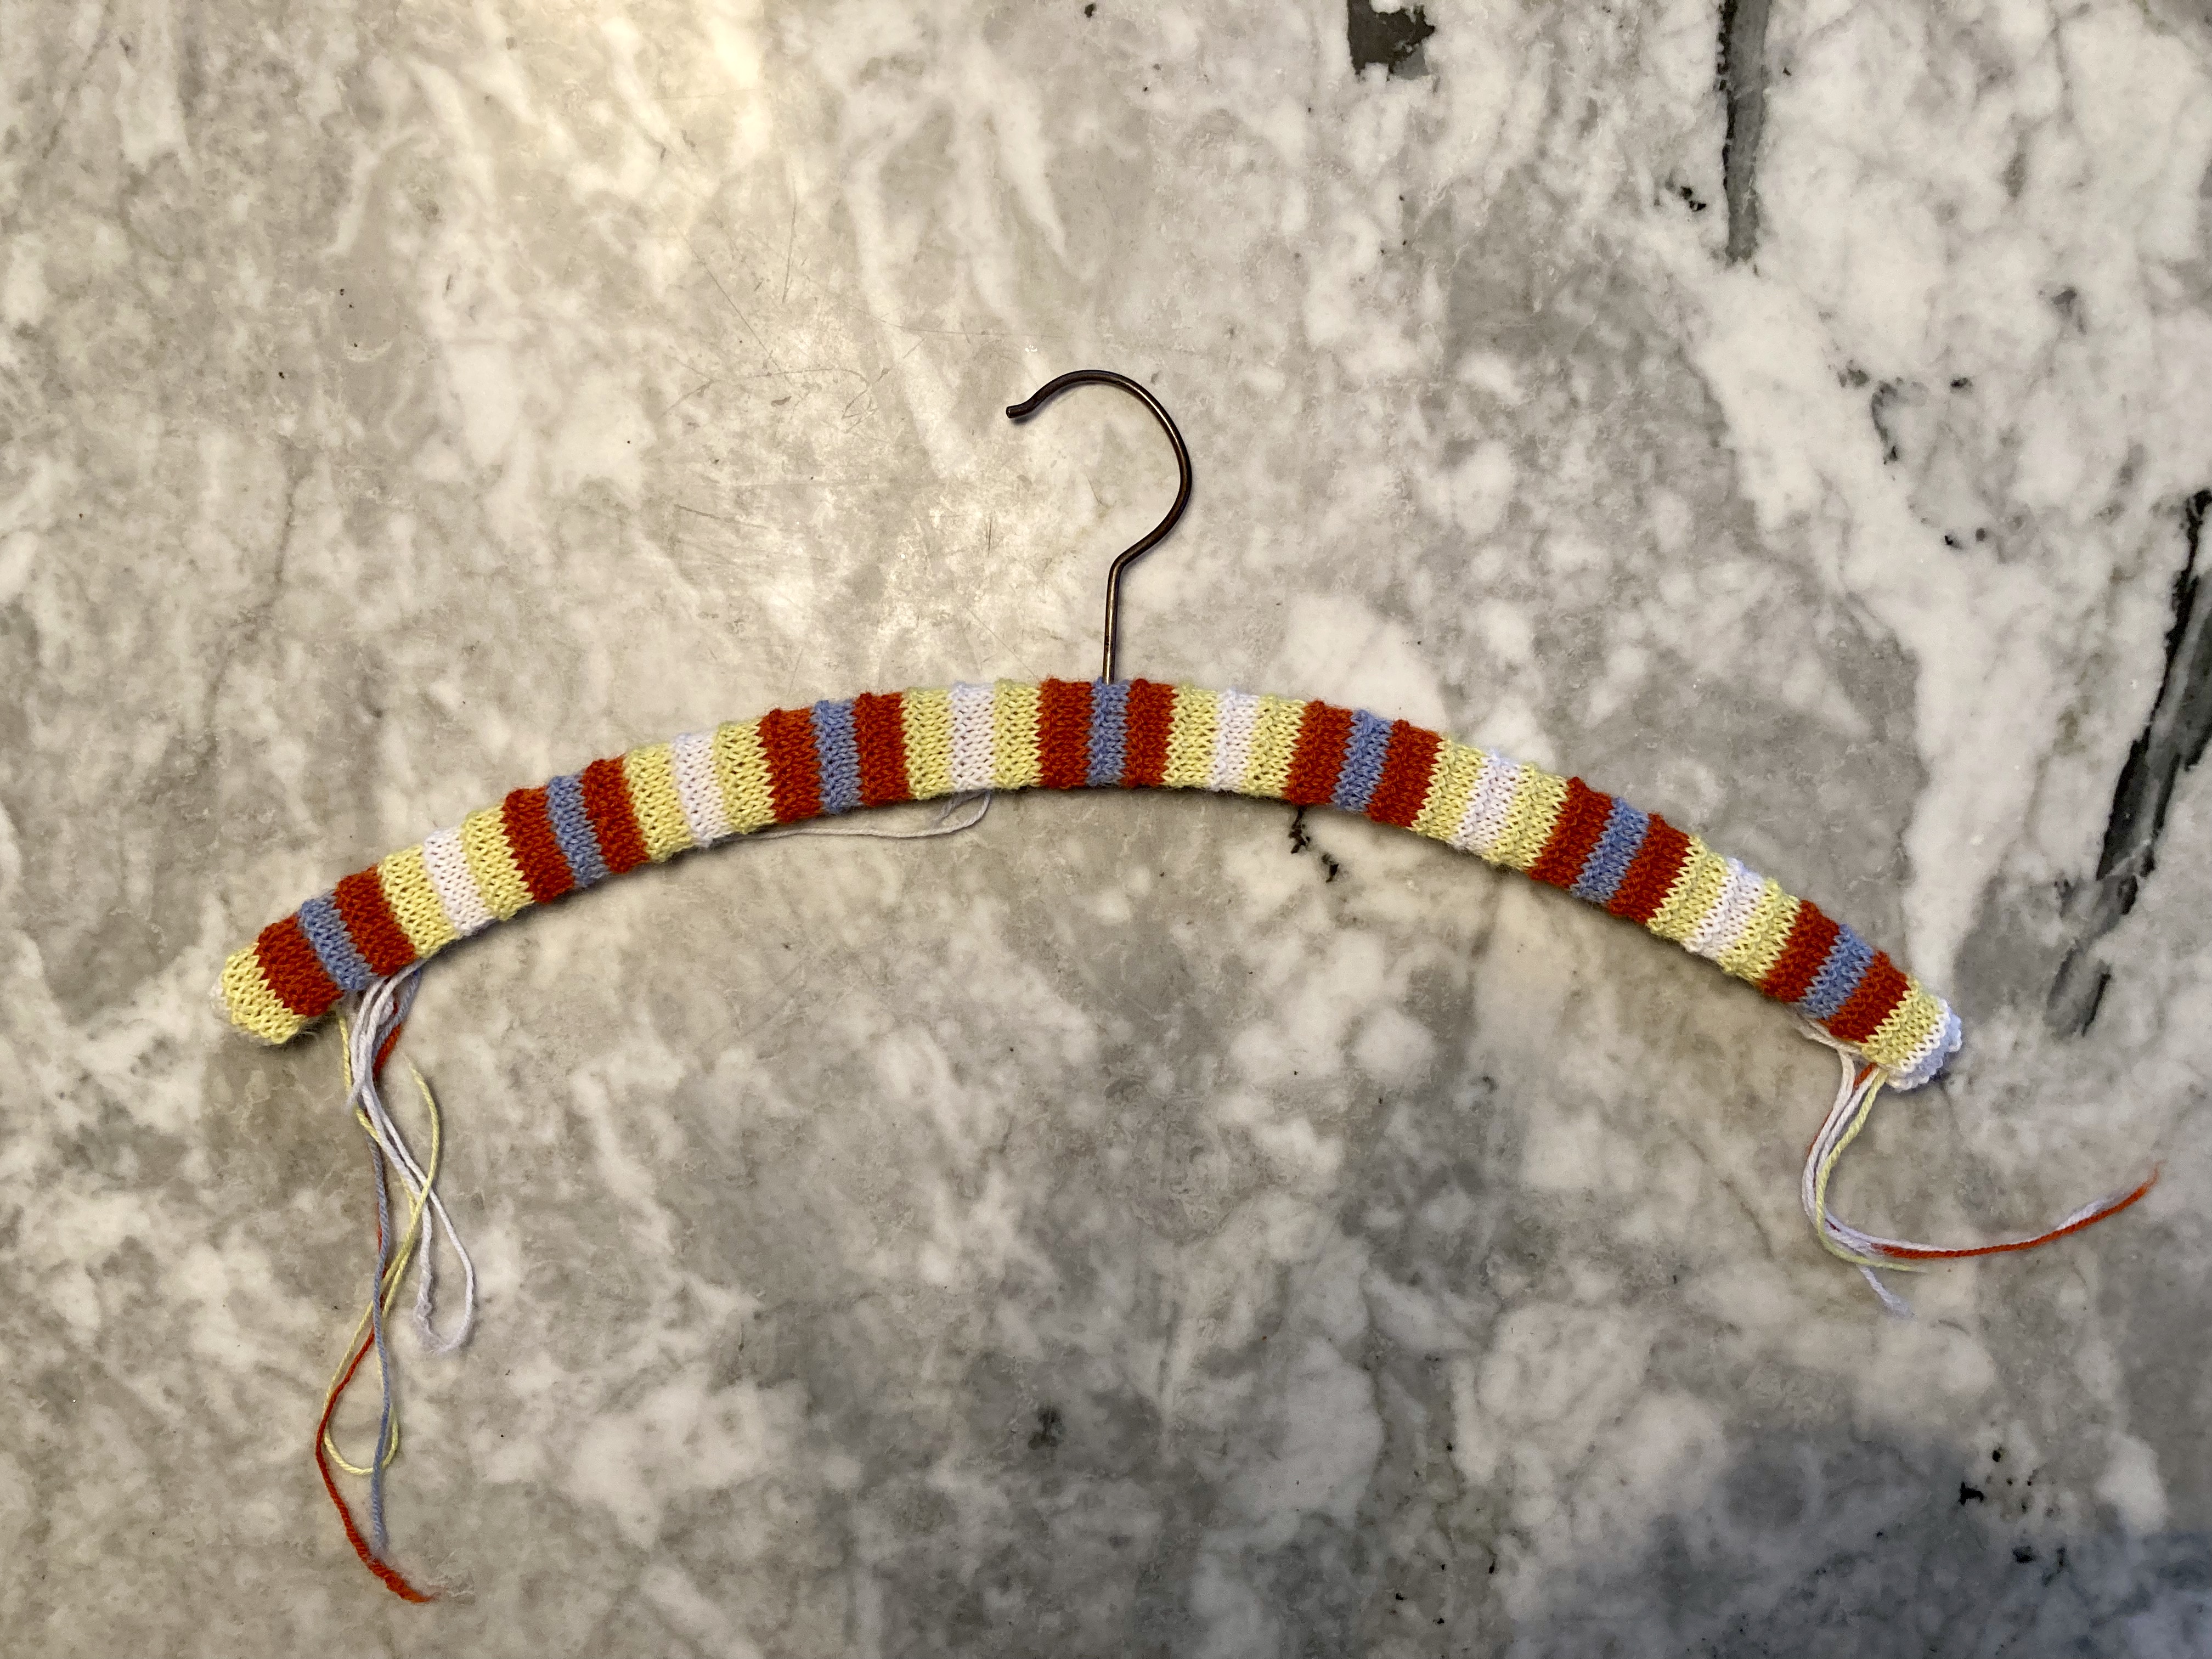
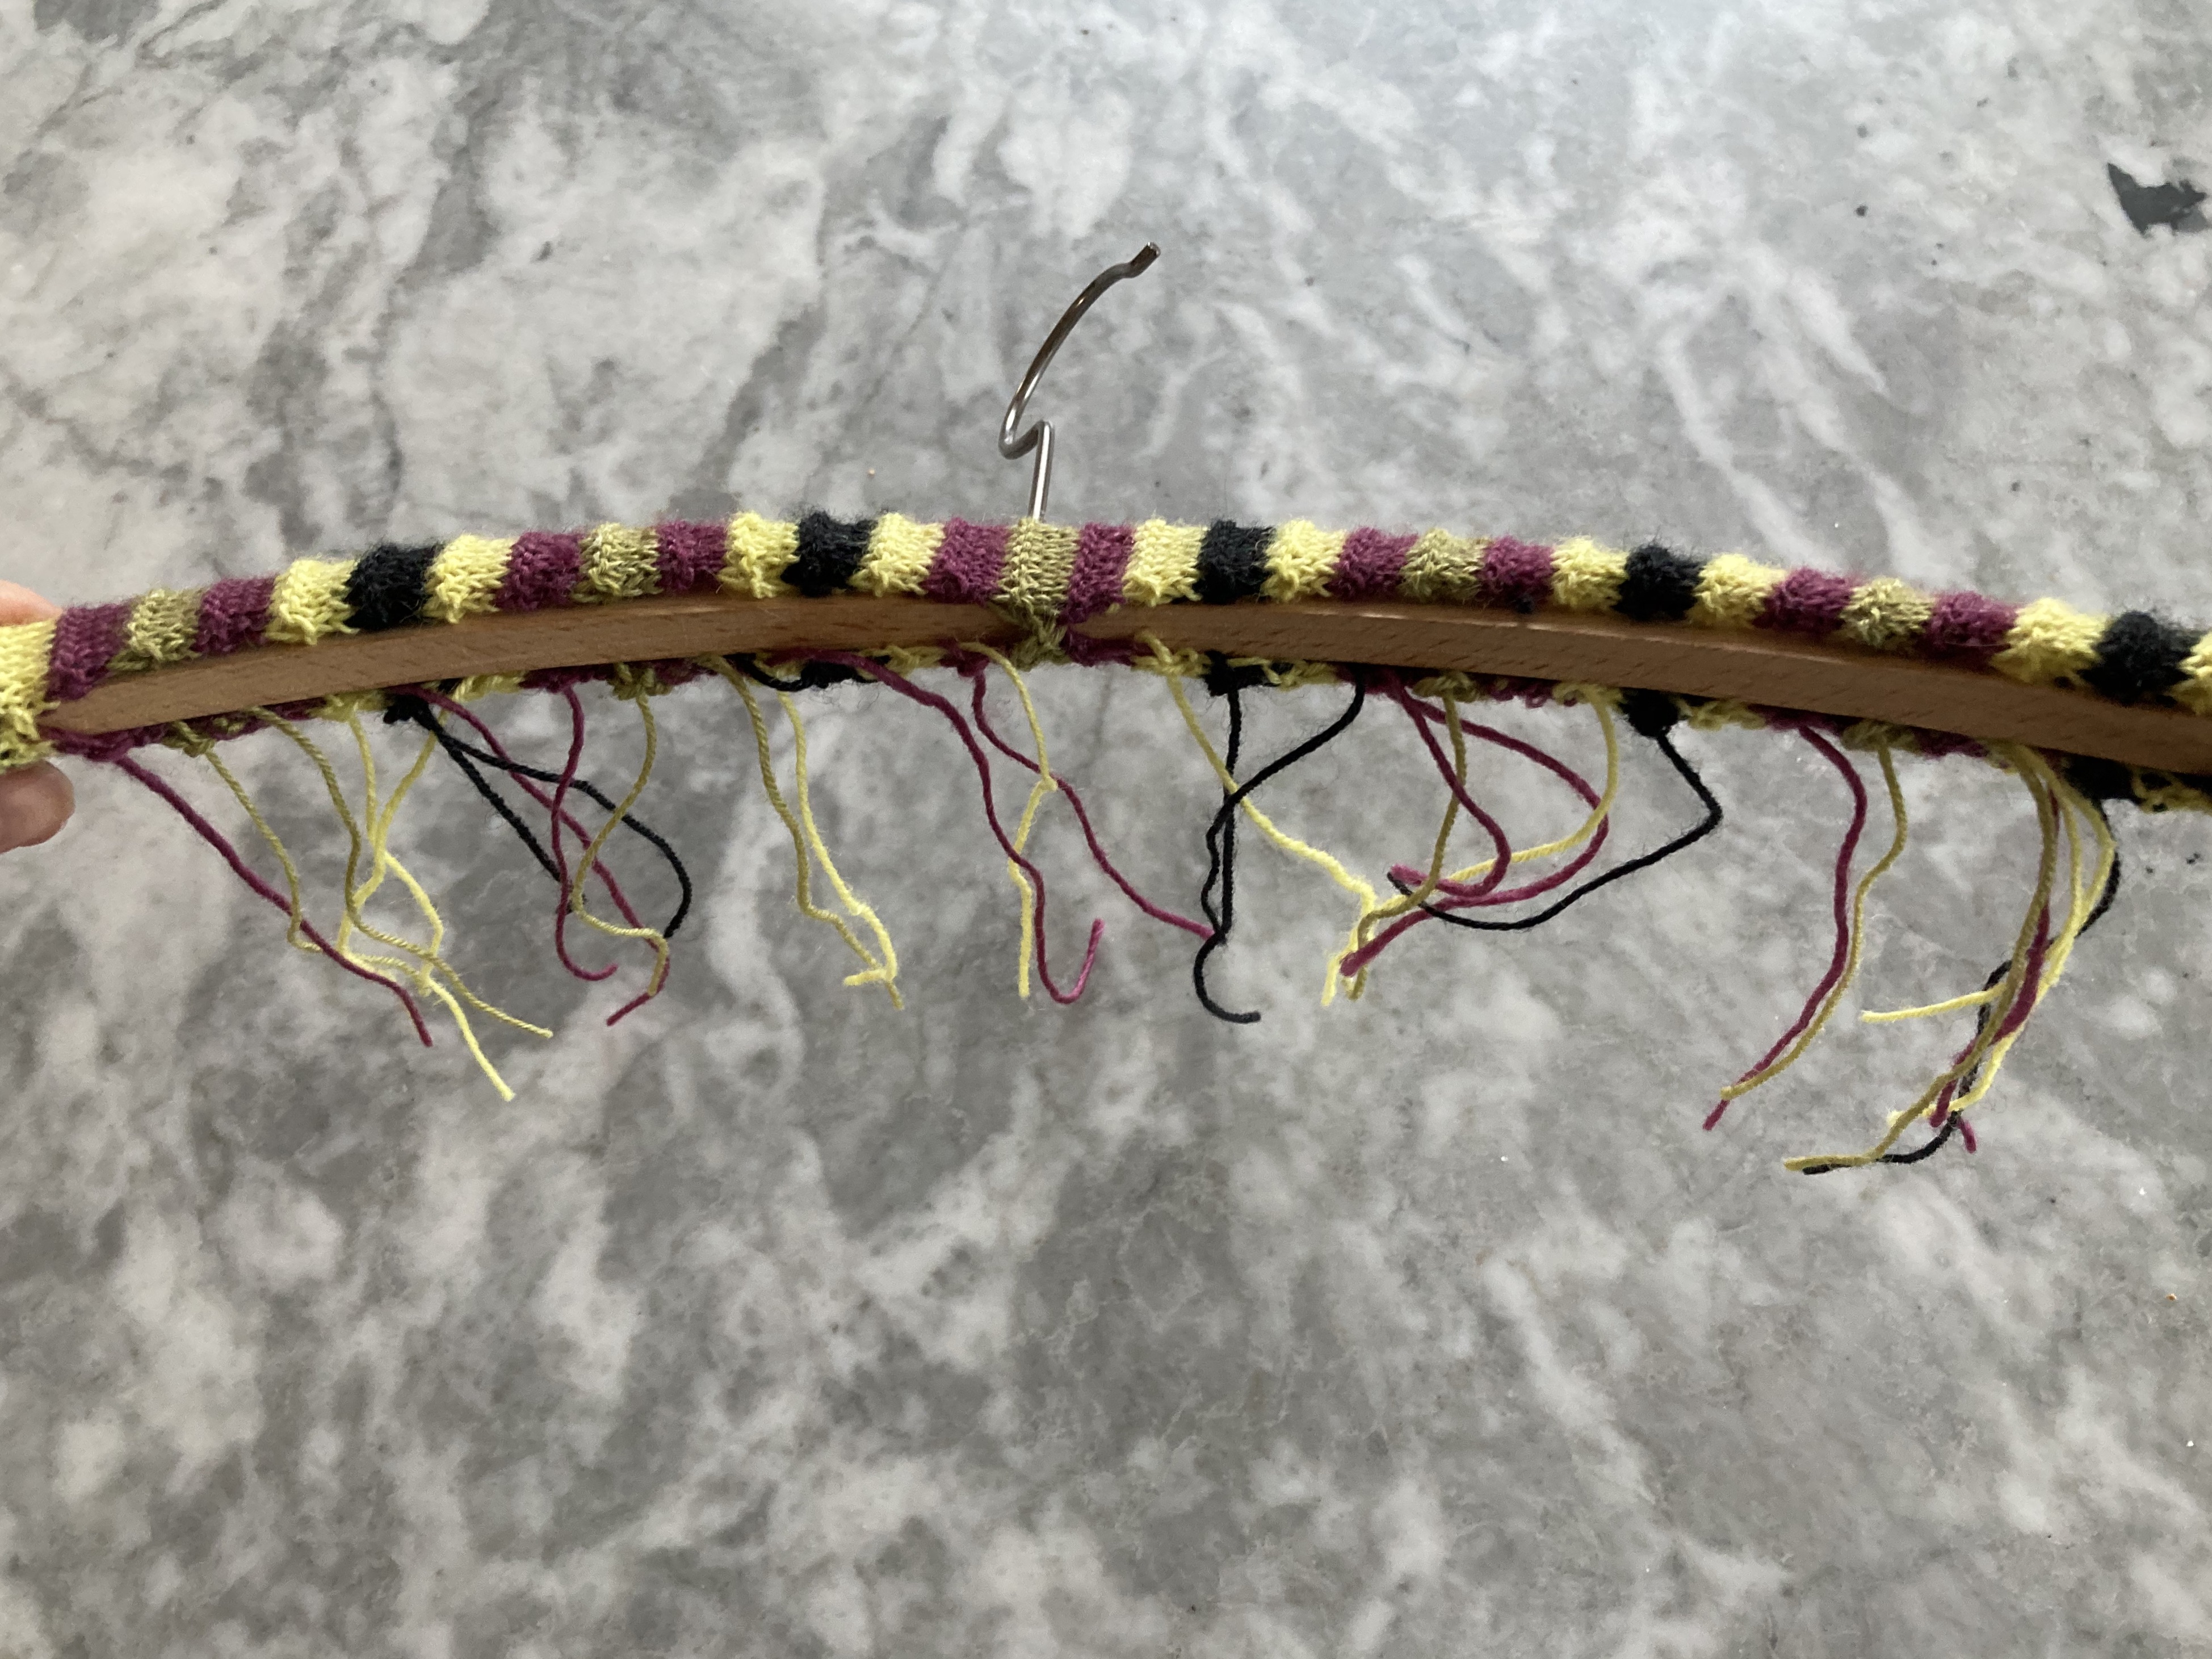
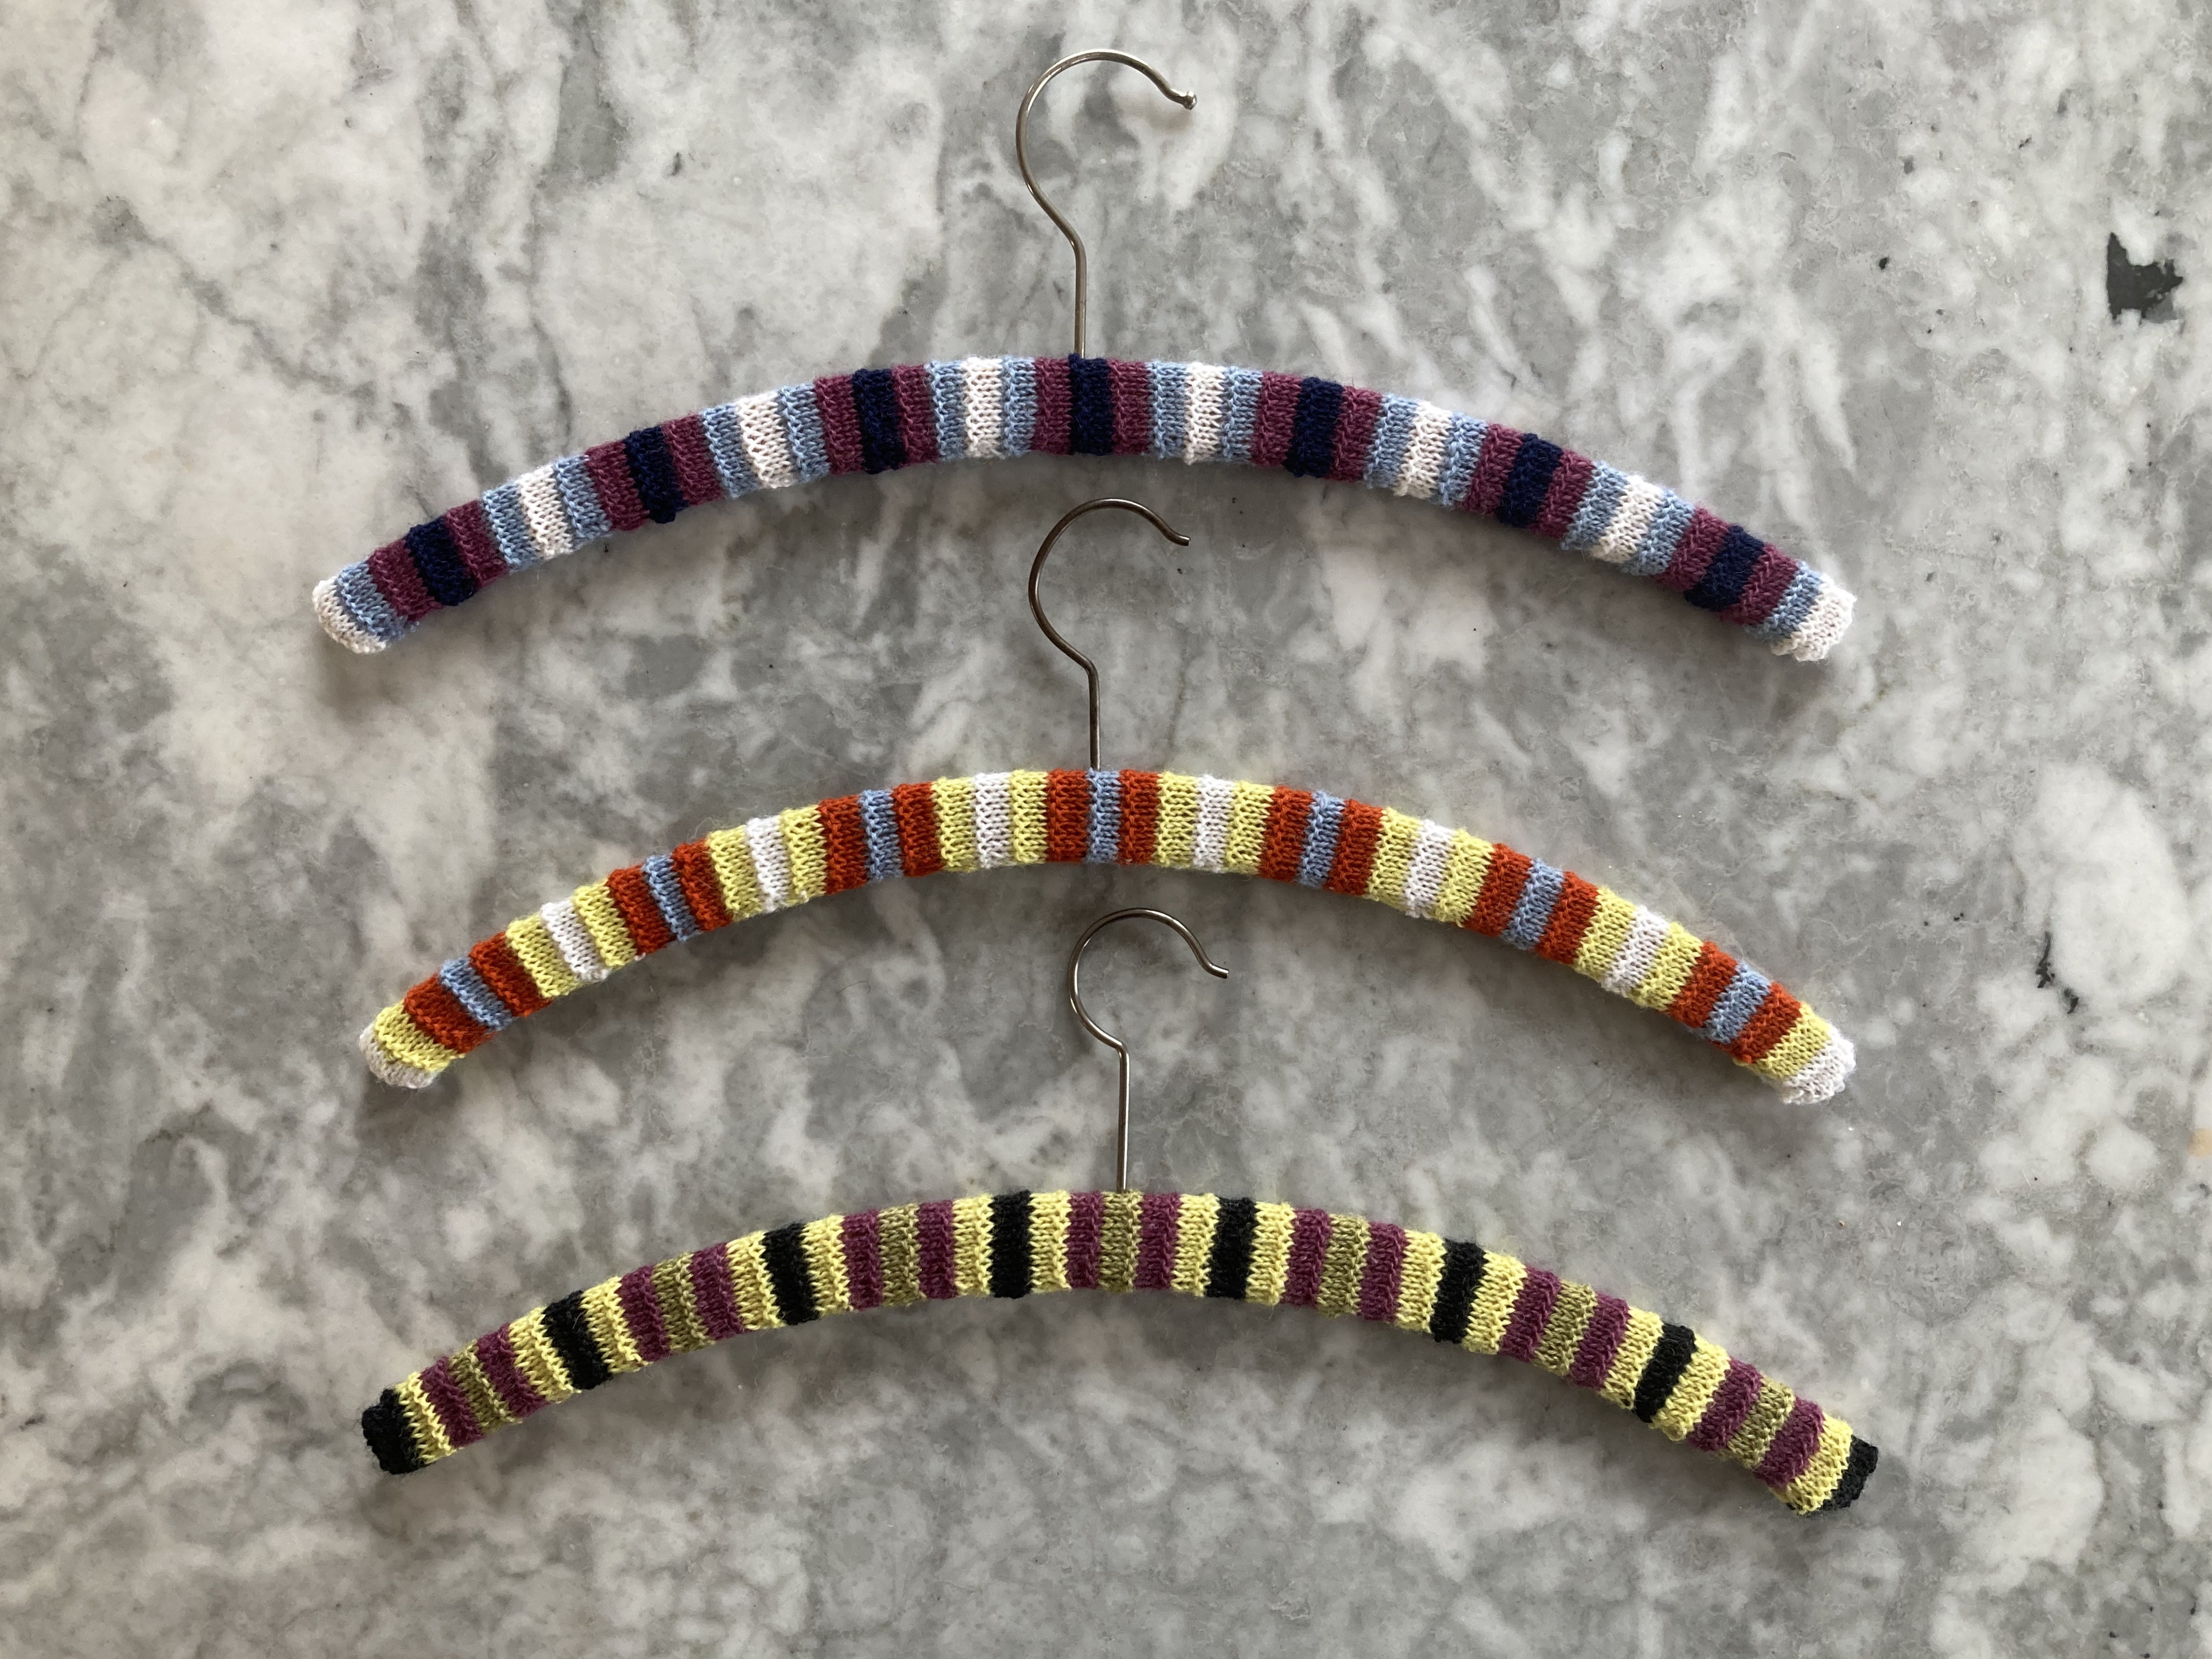
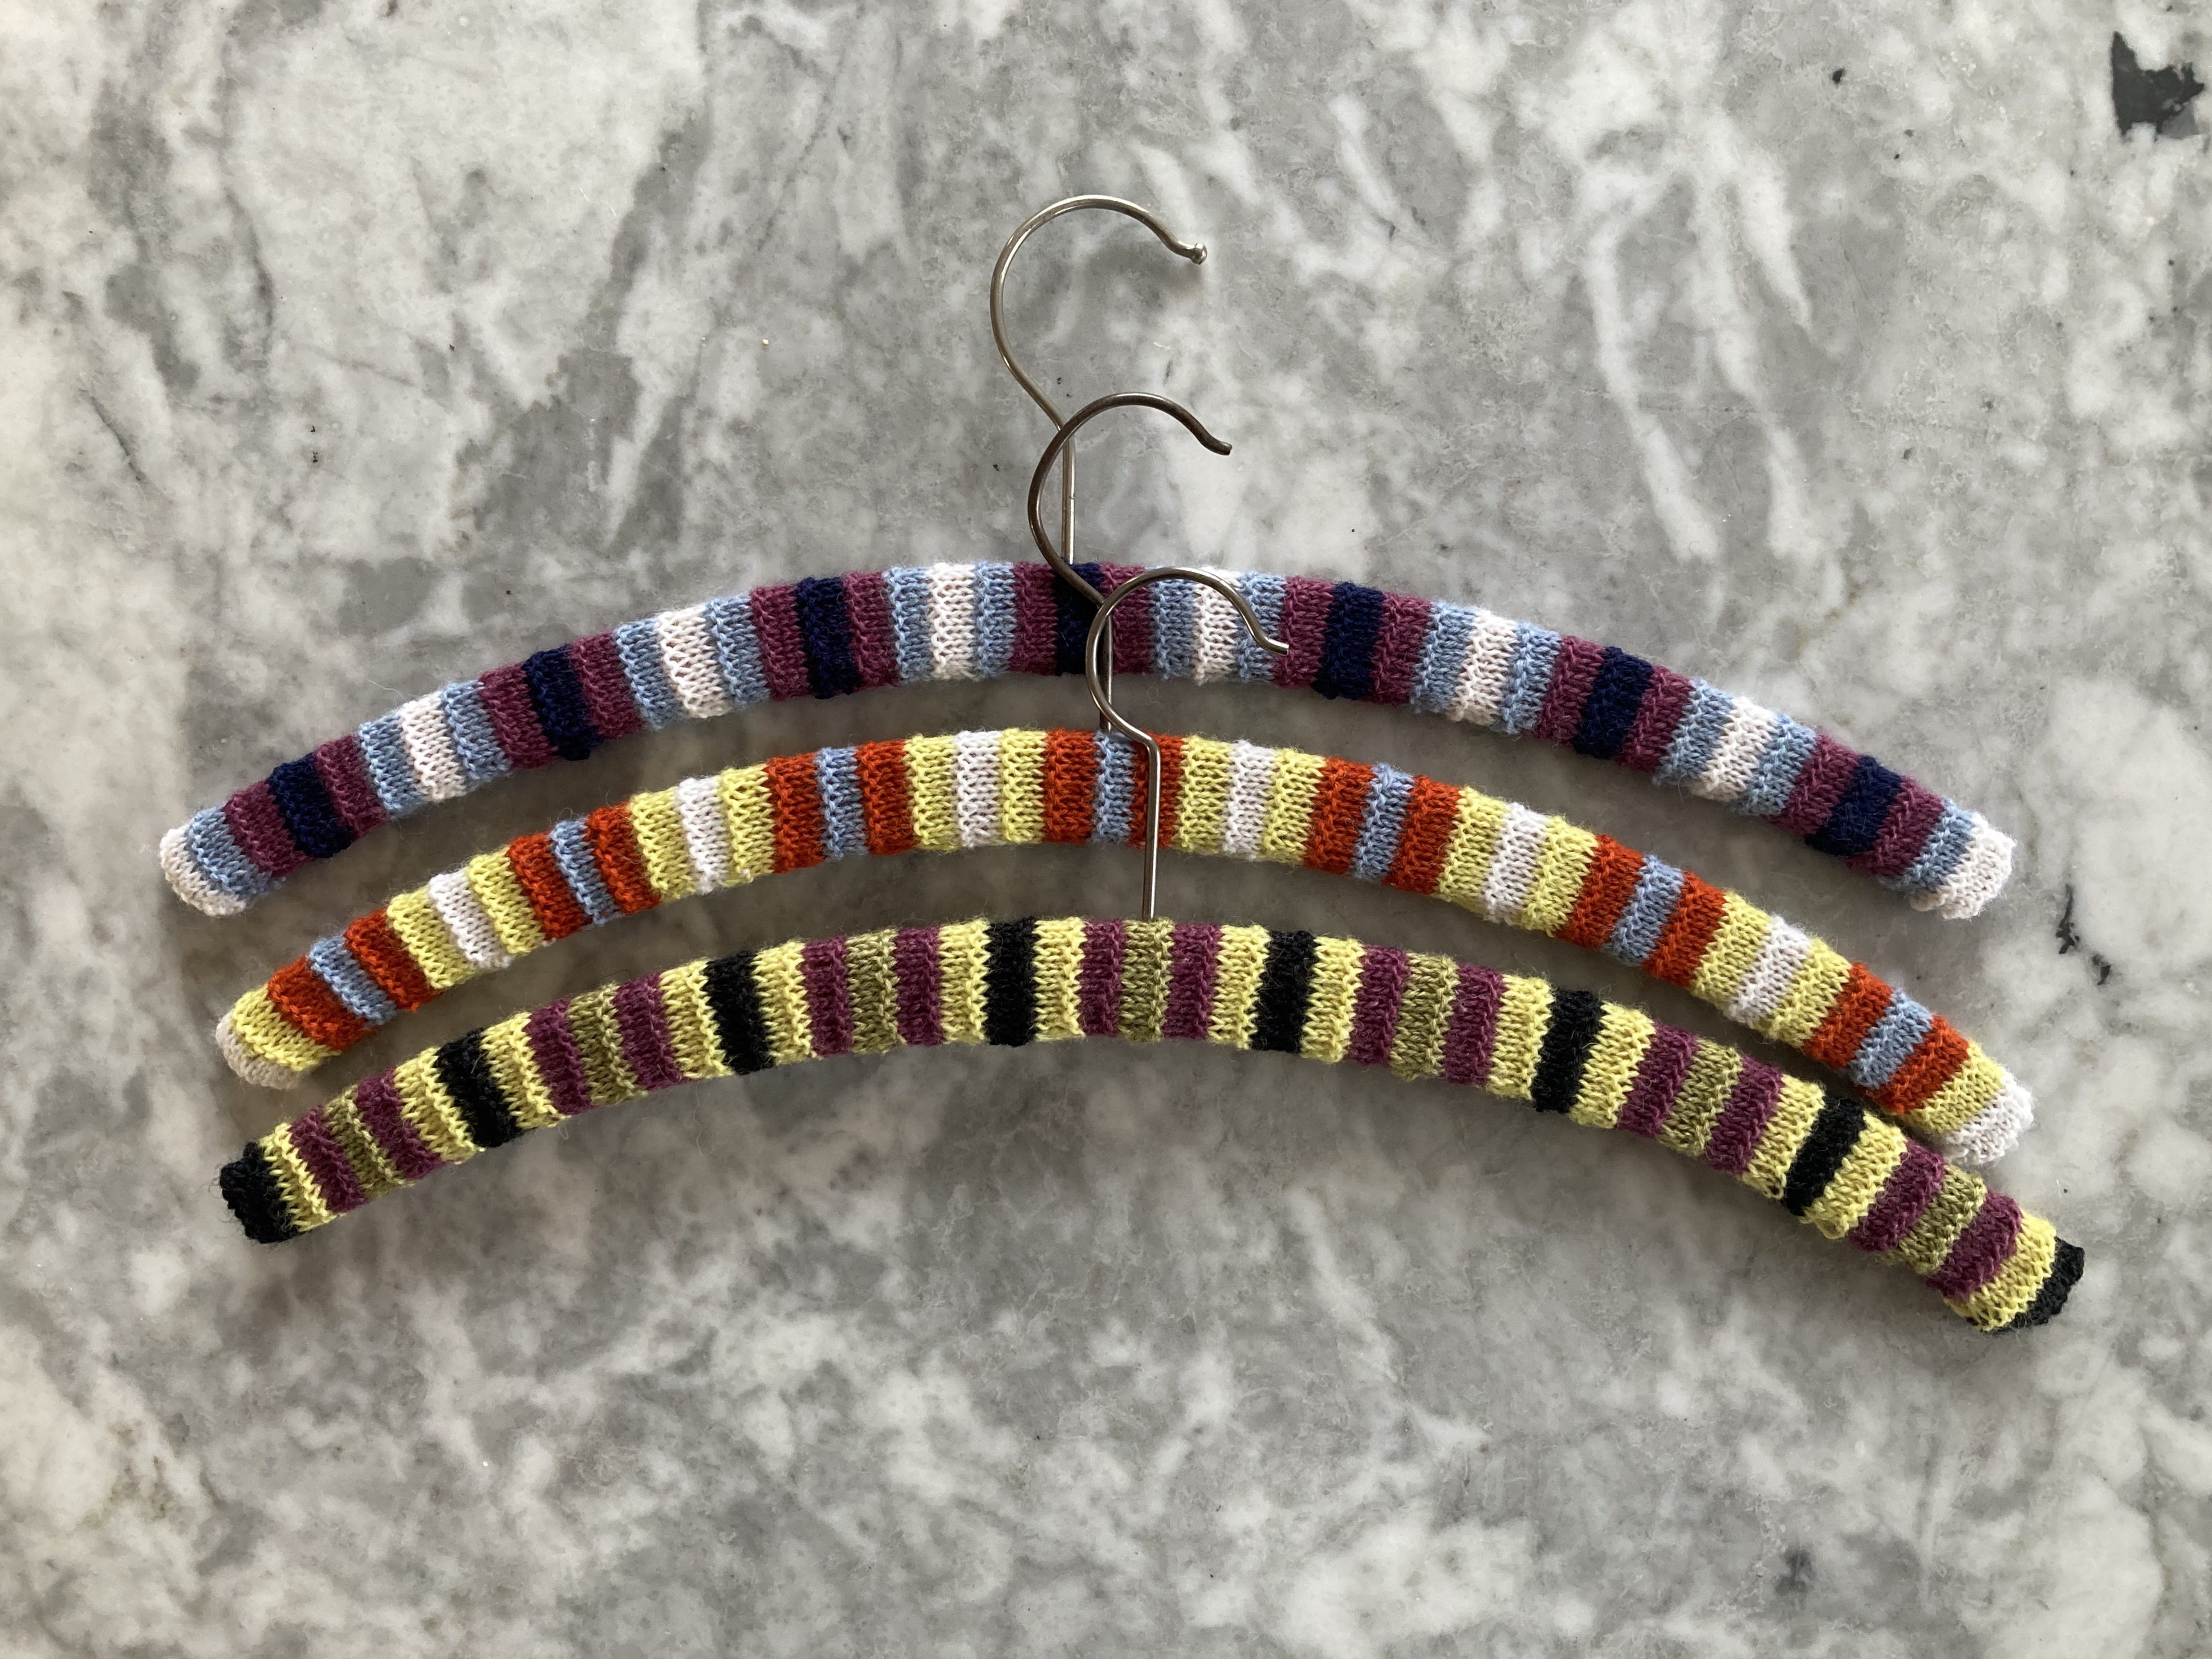
The knitted (or crocheted) coat-hanger cover was a staple in every grandmother’s and great-aunt’s house I knew growing up, so I have a pleasant nostalgic association with them. It is indeed a useful way to use of scraps of yarn, and I guess the padding helps garments not crease at the shoulders. Also, they’re cute and I think these days, they would be a very fun little holiday gift for people who like crafty items. I certainly had enough scraps of 4-ply / fingering-weight wool, so this was the perfect November project.
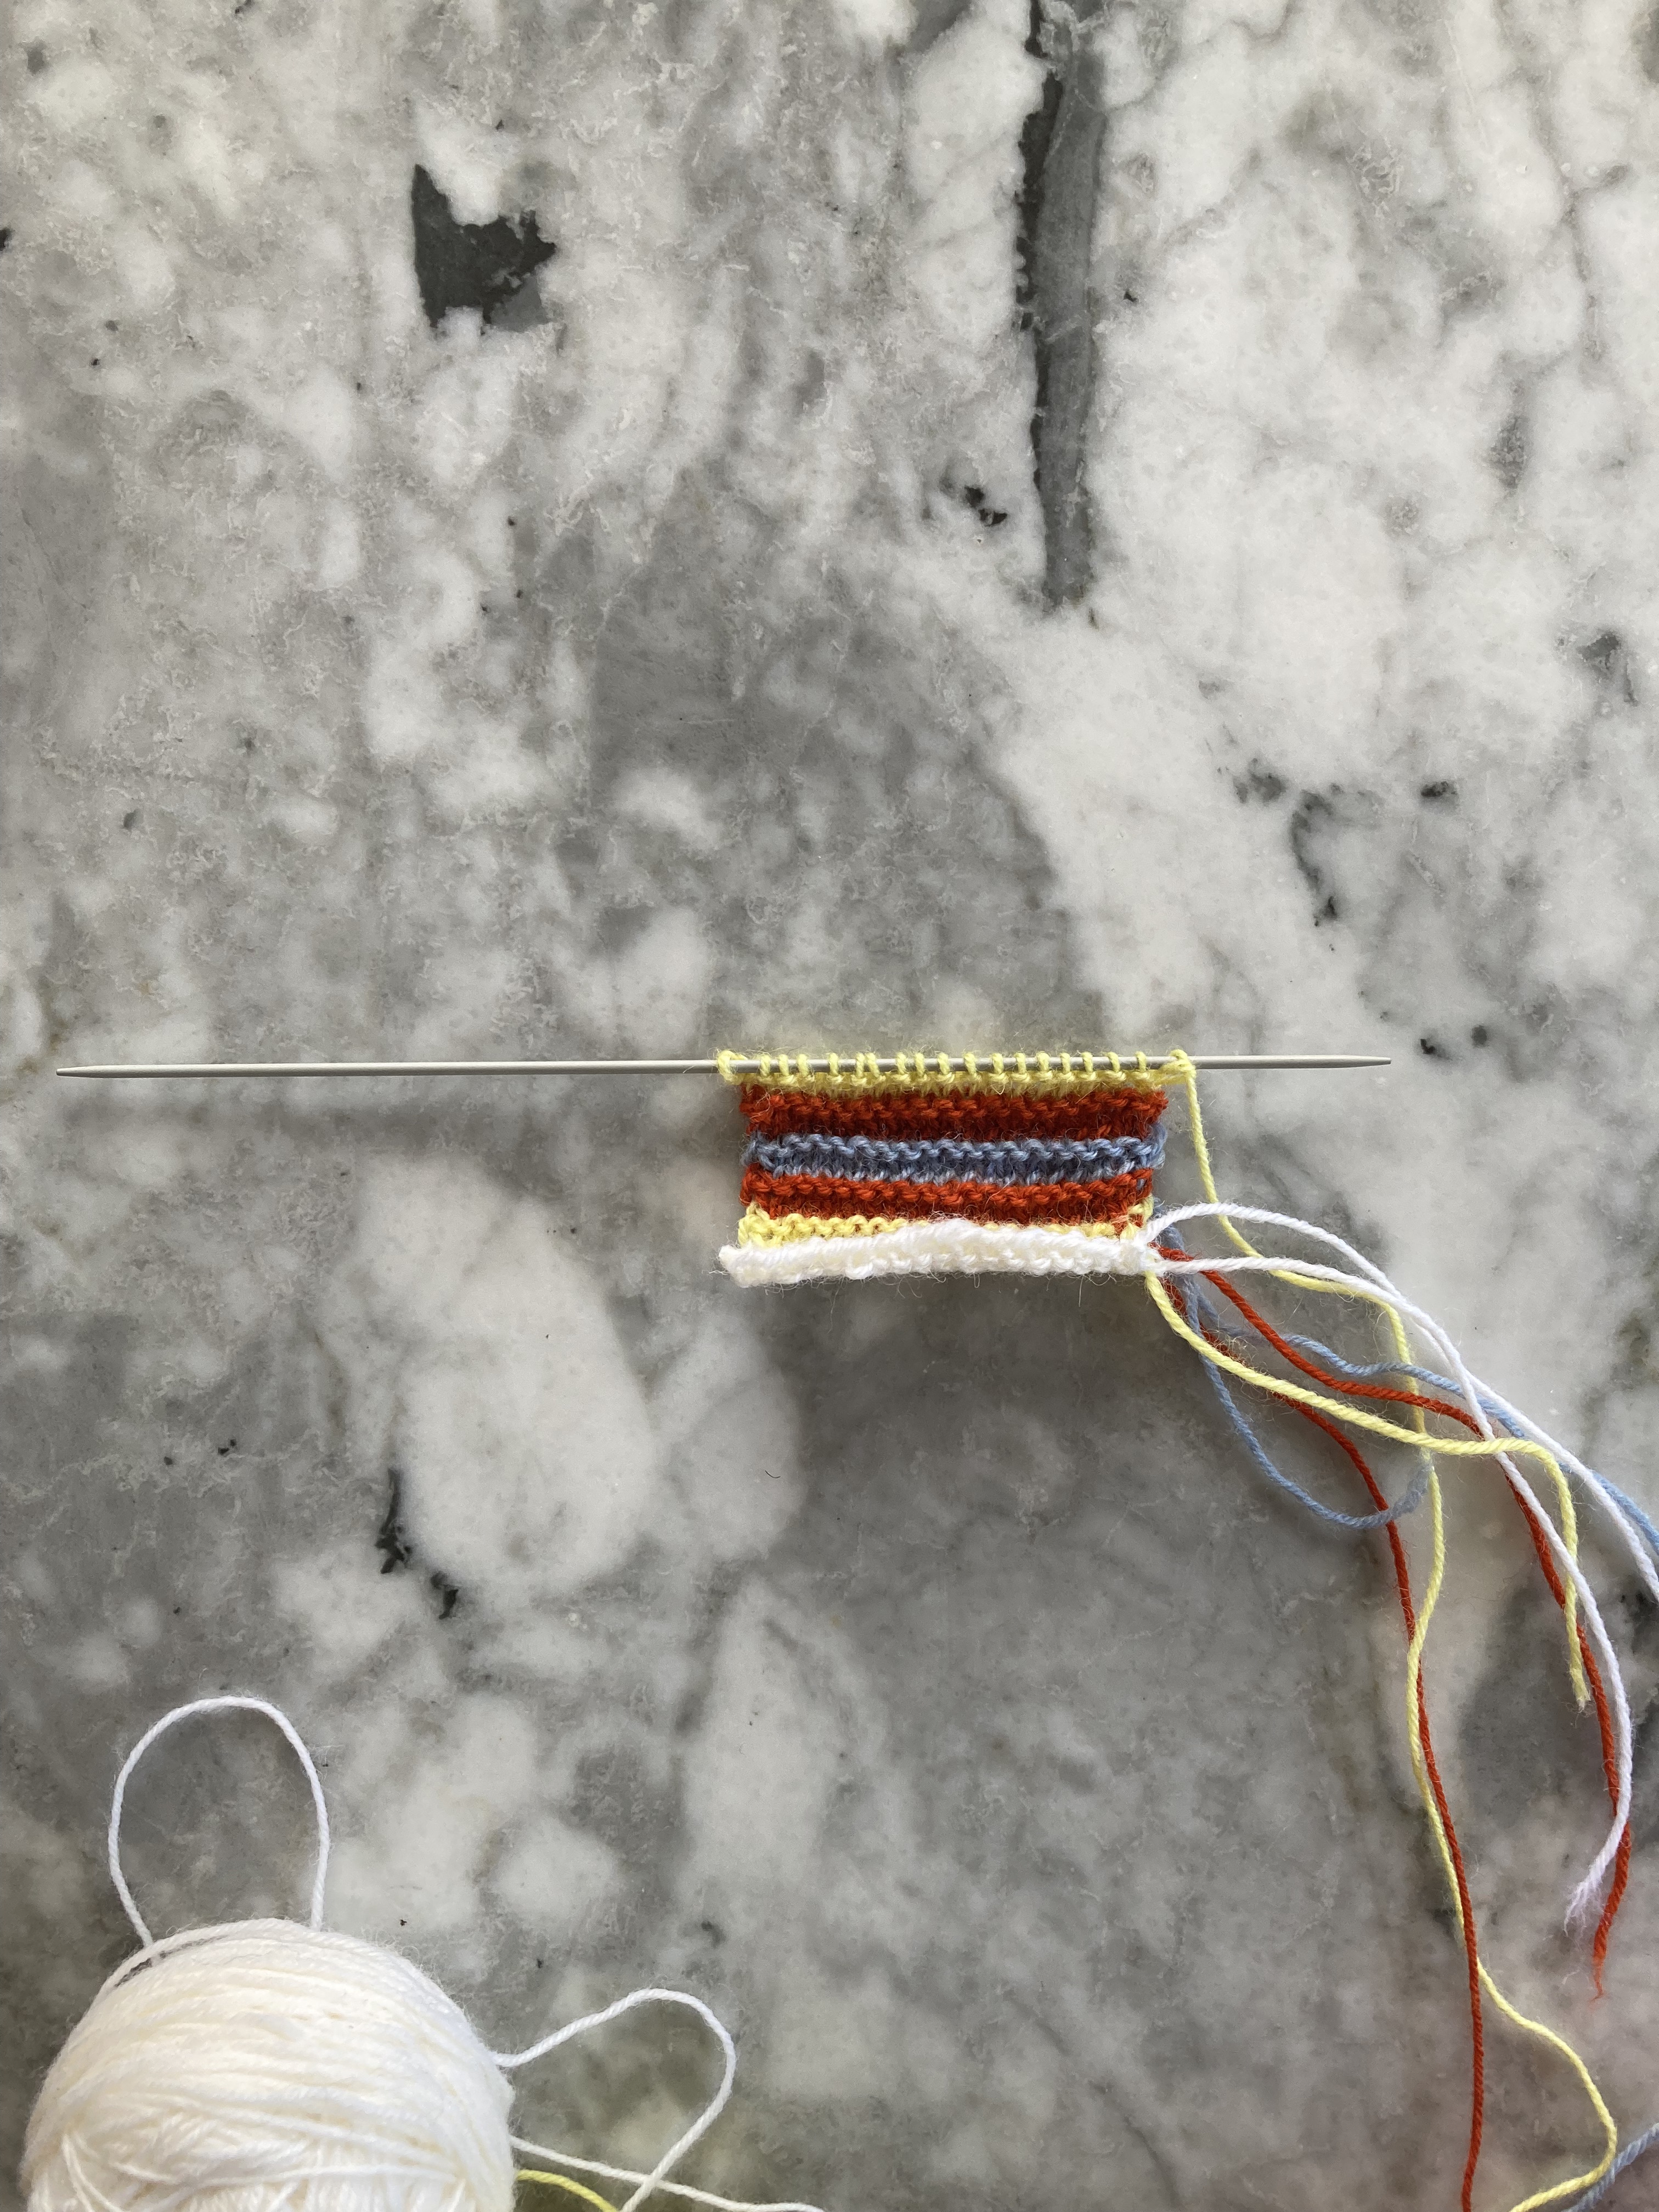
The pattern uses “oddments” of 4-ply wool in white, yellow, pink and blue (or whatever colours you have, of course) and is knitted at a tension of 7.5 stitches to the inch on No. 11 (2.75 mm) needles. It is simply a strip 19 stitches wide, started at the small end and worked in a symmetrical stripe pattern for a total of 42 4-row stripes. The pattern is k1 row, p 1 row, k 2 rows, so there’s a little purl ridge at one edge of each stripe. You sew the short ends in half, poke the hook part of the hanger through the middle of the center stripe, pull the short ends of the knitting over the ends of the hanger, sew up the stripes on the underside and voilà. Then you can make a little crochet chain to wrap the hook part of the hanger and stitch it in place.
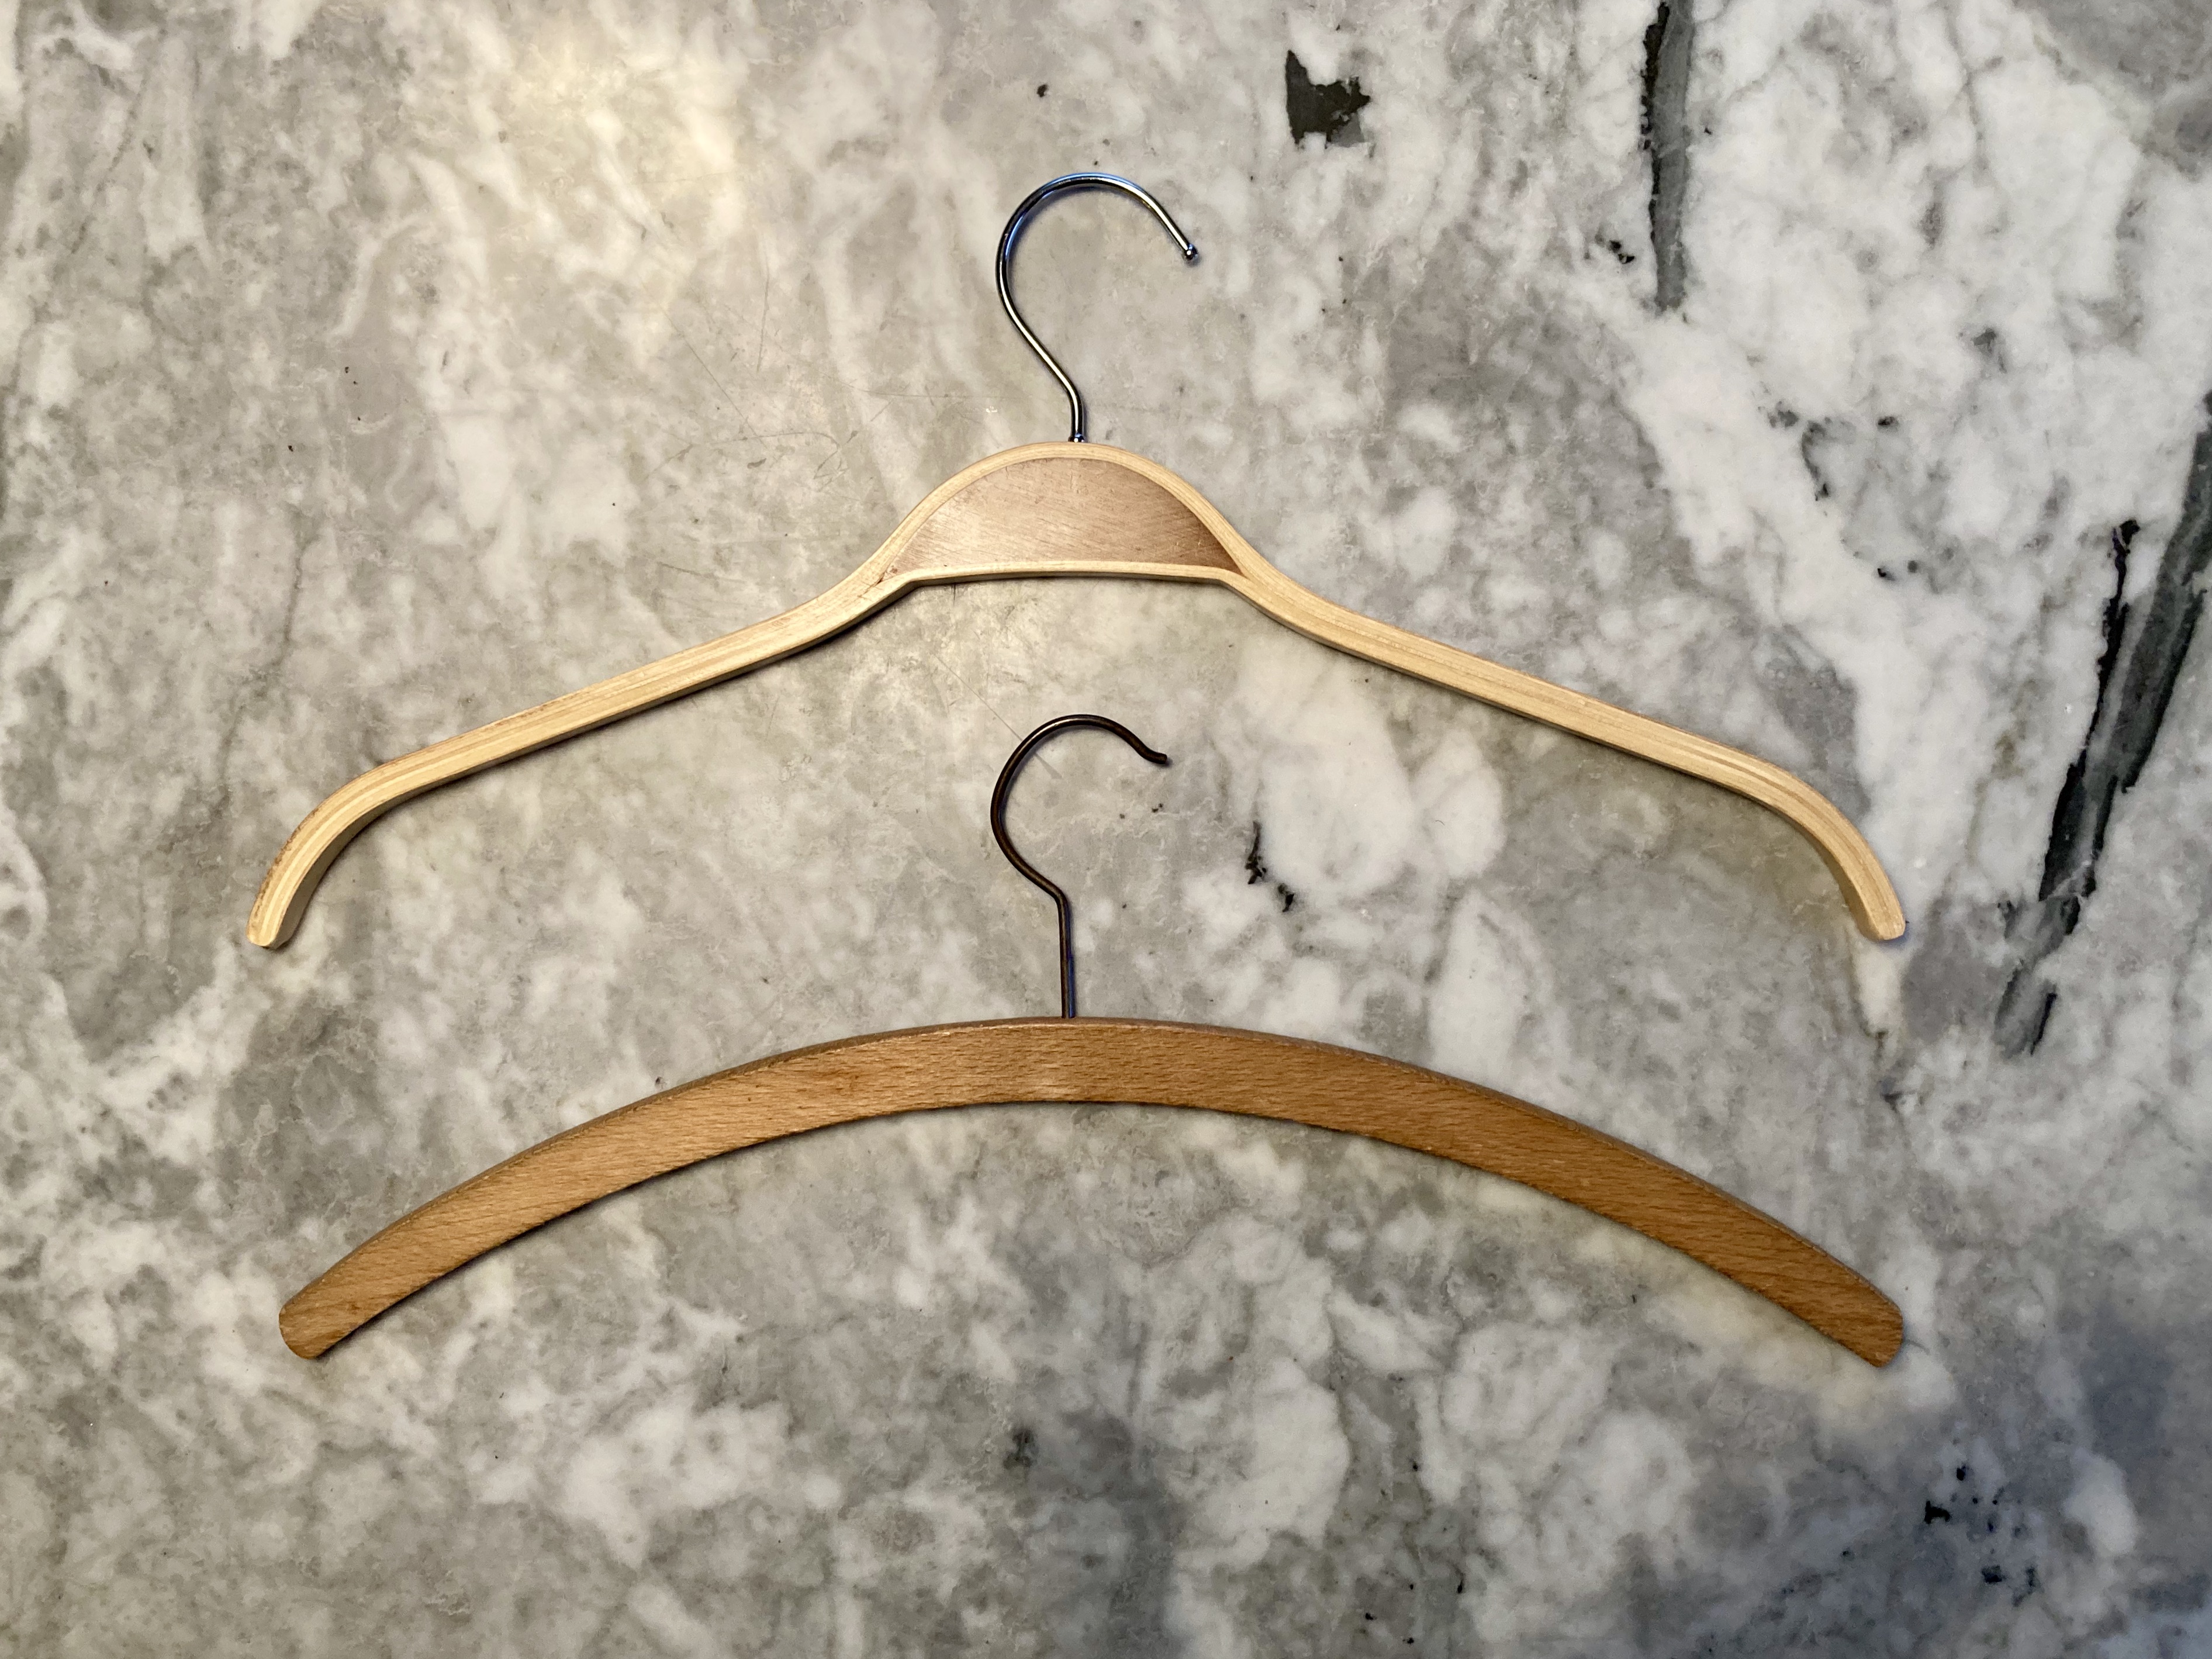
Of course, it only works on a certain size and shape of hanger… one that was apparently easier to find a few decades ago than now! All the new hangers I’ve seen or bought have a triangle shape with a bar underneath to hang things over. Admittedly, the triangle version is much more useful, because you can hang more than one thing on it (suits…) and fold things over the bar (trousers, long dresses if your closet space is short…). I only found two hangers in my closet that were the right shape for these covers! As well as a modern version that is similar, but too big at the top — as written, the knitted cover won’t stretch over the block-y part under the hook.
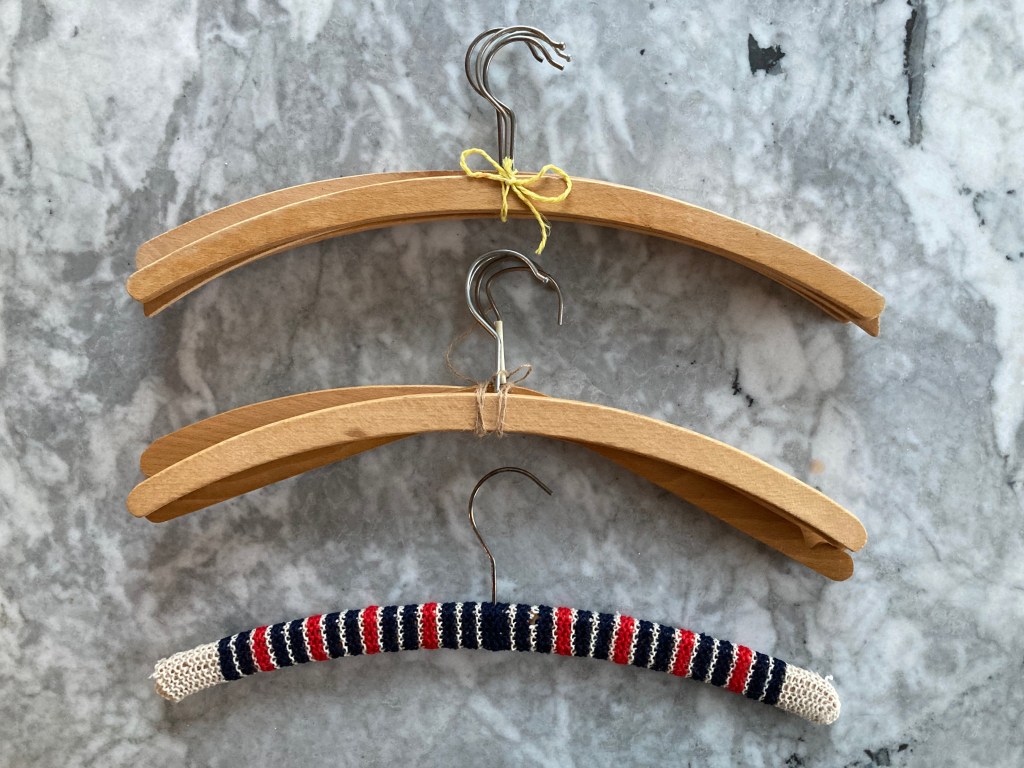
A quick look at ebay yielded a seller with a package of 8 vintage hangers for a few euros — including one that was already covered with a knitted cosy! Perfect. The covered hanger is knitted in a similar stripe pattern using three colours and garter stitch.
I made mine using the Stitchcraft pattern and more or less random colours from the “assorted 4-ply” bag. I used 2 mm needles and left the hook bare. The cover fit perfectly on the hangers (both mine and the ones from ebay, which were all the same size and type). The tedious part was stitching up the underside. When I made the first cover (blue, white, yellow and orange), I carried up the threads on the sides, thinking to save weaving in ends, but realised afterwards that the loose ends are useful for stitching up the cover on the underside of the hanger. So for the other two, I only carried up the threads within a two-colour, three-stripe block. Still… lots of ends.
I have other stuff to do and so many wips, so I’ve going to stop at three hangers for now, but maybe I can crank out a few more in December for presents. Loved this project and will surely come back to it to decorate more hangers, of which I now have plenty.
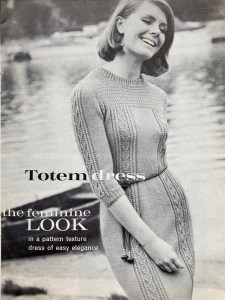
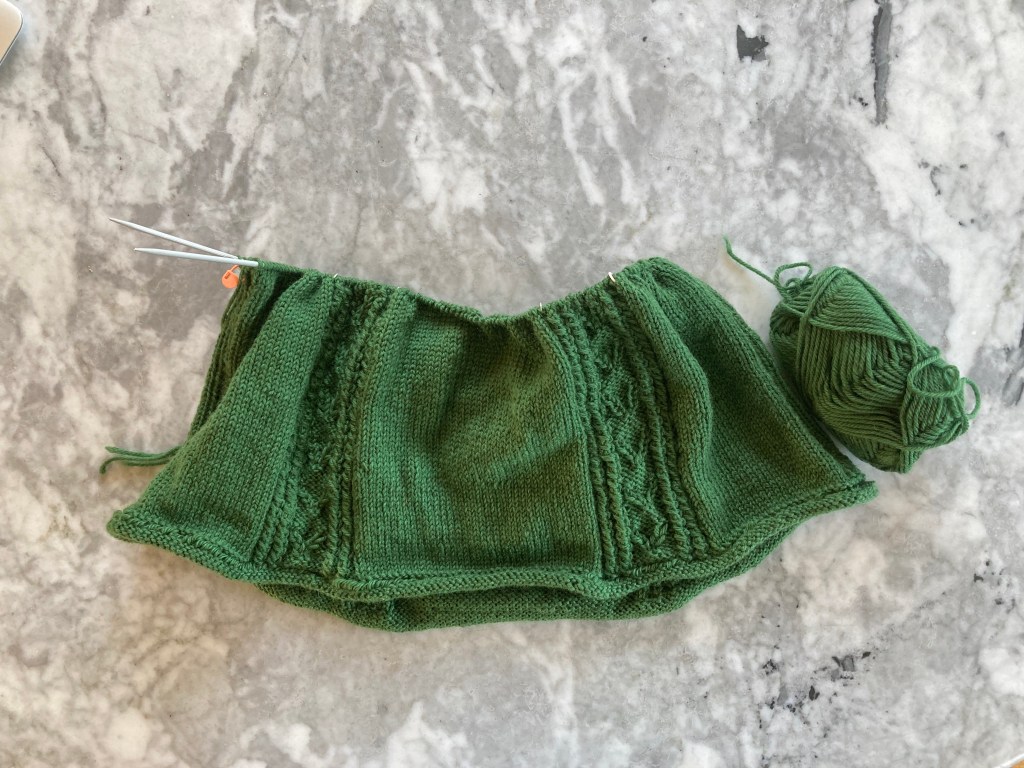
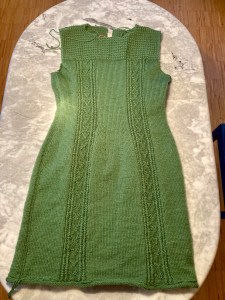
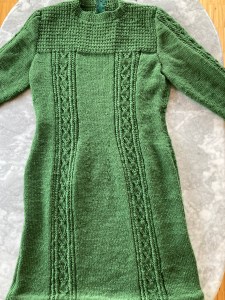
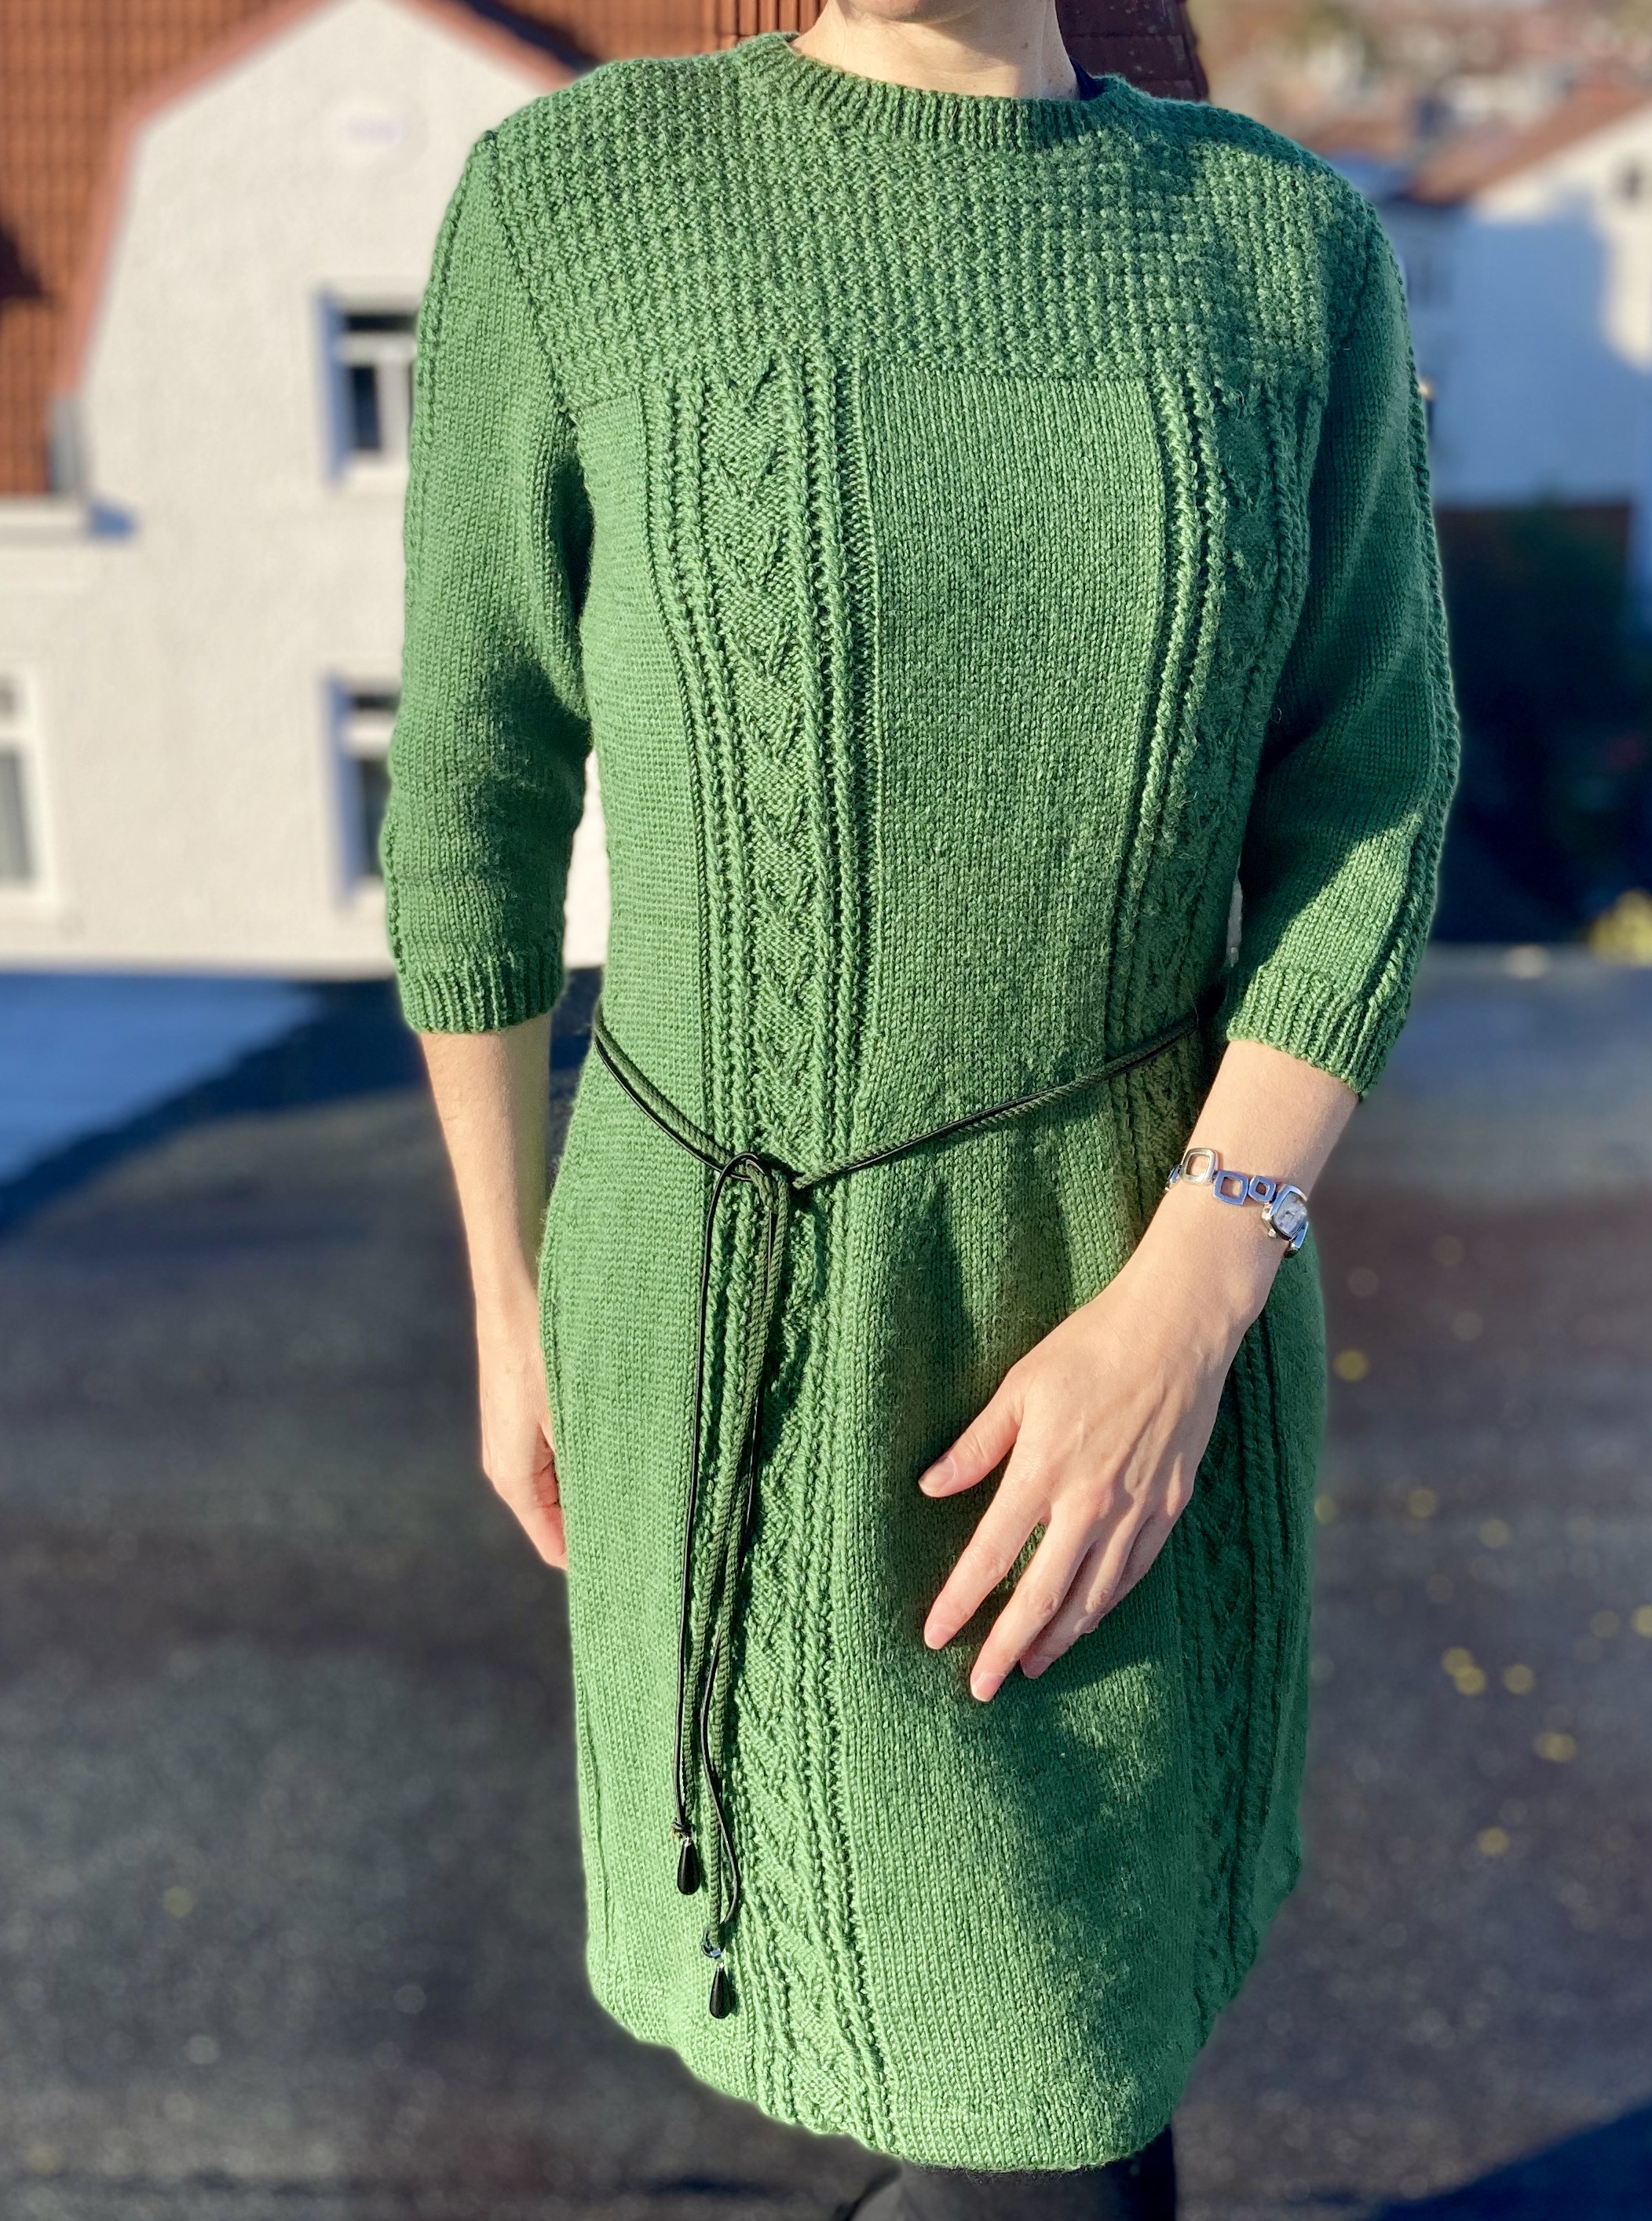
My October project was this fantastic “slim-line dress to flatter your figure”, designed in “a classic style with Aran panels and fancy rib yoke to give the fashionable textured look.” It’s written for Patons “Totem” Double Knitting, a very smooth, tightly plied crepe-twist wool suitable for the mock-cable pattern panels running up and down the dress body and sleeves.
Not having any Patons Totem on hand (of course, it has been discontinued for some time), I chose Drops Karisma, an easy-knit, easy-care DK wool. It’s also superwash — I don’t generally like superwash as it tends to stretch and sag after washing, but the advantage of not having to hand-wash a knee-length, DK-weight knitted dress won out. I chose to make it in brilliant grass green instead of “Spanish Rose” (medium pink, I assume), which is still quite appropriate for this month’s issue — it’s very close to the bright green of the men’s cardigan in the colour centrefold photo.
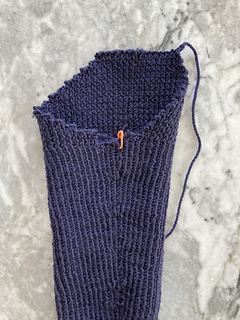
I made it in the second size with a few alterations: four inches shorter, to start. The finished length in the pattern is 40 inches, or just past knee-length, but this is a heavy garment and I am sure it will sag with wearing and washing. Also, I prefer skirts to be a bit shorter, so I aimed for 36 inches total length. To speed up the knitting, I made the dress in the round, with 3 stitches of ribbing at each side to make a stabilising “seam.” There’s a hem at the bottom edge, to which I added a purl-on-the-RS folding row. I wasn’t sure about the elbow-length sleeves and thought about making them long, but decided to stick with the pattern. (Ideally, I would have knitted them from the top down and just made them as long as I wanted, but the twisted-stitch pattern doesn’t really work upside down.)
Other than that, I stuck to the pattern. The pattern panels (2 on each of back and front, one on each sleeve) have traveling stitches in the middle, flanked by twisted stitches (k into the back of the second stitch, then the front of the 1st stitch on needle, then take both stitches off the needle together.) You are supposed to make the traveling stitches by twisting them as well:
Tw.2R = knit into front of 2nd st. on left needle, then purl into front of 1st st. and slip both stitches off needle together.
Tw.2.L = purl into back of 2nd st. on left needle, then knit into front of 1st st. and slip both stitches off needle together.
I could not make that work! I tried and tried. The stitch on the right side was usually twisted the wrong way, and the stitch on the left sat correctly, but was stretched out. I thought it might help to hold the wool in my right hand, “English” style (I generally knit “Continental” style with wool in the left hand and “pick up” the thread), but that was awkward and didn’t help. I tried ye olde “cable without a needle” trick where you basically drop the yarn and just hold it in your fingers, which worked but was no fun. Finally, I just used a cable needle, which was faster and neater. If anyone can tell my what was going wrong with the directions from the pattern, I’d be happy to hear it, though.
The knitting went quite quickly and by October 29 (date of this first post), I had finished the back and front, and one sleeve up to the sleeve-cap shaping. The total length before blocking was 34 inches, which, if my swatch is any indication, will stretch out to the desired 36 inches (and if not, that’s fine too.) The “fancy rib yoke”, by the way, is a simple rib/welt pattern: p1 row, k1 row, then k1, p1 for two rows. It makes a very pleasing, stretchy waffle effect.
I painstakingly calculated out the total amount of wool I would need, based on the yardage of the original Totem wool (from Ravelry, I didn’t have any of the real thing) and the meterage of the Drops Karisma, converting yards to metres and ounces to grams. Were my calculations successful?? We will see! Supposedly I will need about 730 grams, and I only bought 800, because I like to live dangerously. EDIT: The finished dress used exactly 737 grams of wool. Am I good at math or what?
I finished the dress mid-November, but had to travel for work right afterwards, so didn’t get around to blocking and photographing it until a week or two later. Finished measurements after blocking were about 37 inches bust, 32 inches waist, 40 inches hip and 34 inches long — perfect. The hem falls just above the knee and if it stretches a bit, that’s fine too. The wool is superwash, so I could always dry it in the dryer to make it snap back into shape.
I made a little belt out of green cord and pleather cord with baubles on the ends, to match the belt in the photos. We didn’t quite get the same poses as in the magazine, but we had fun.
The dress is warm and soft and fits perfectly. It is fun to wear and it is bright green. What more could I want? It’s glorious.
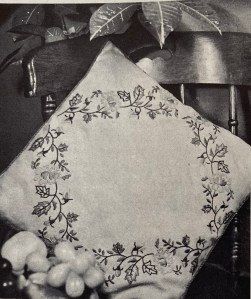
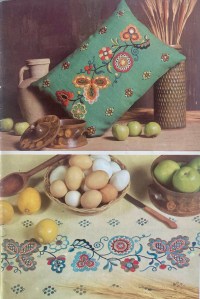
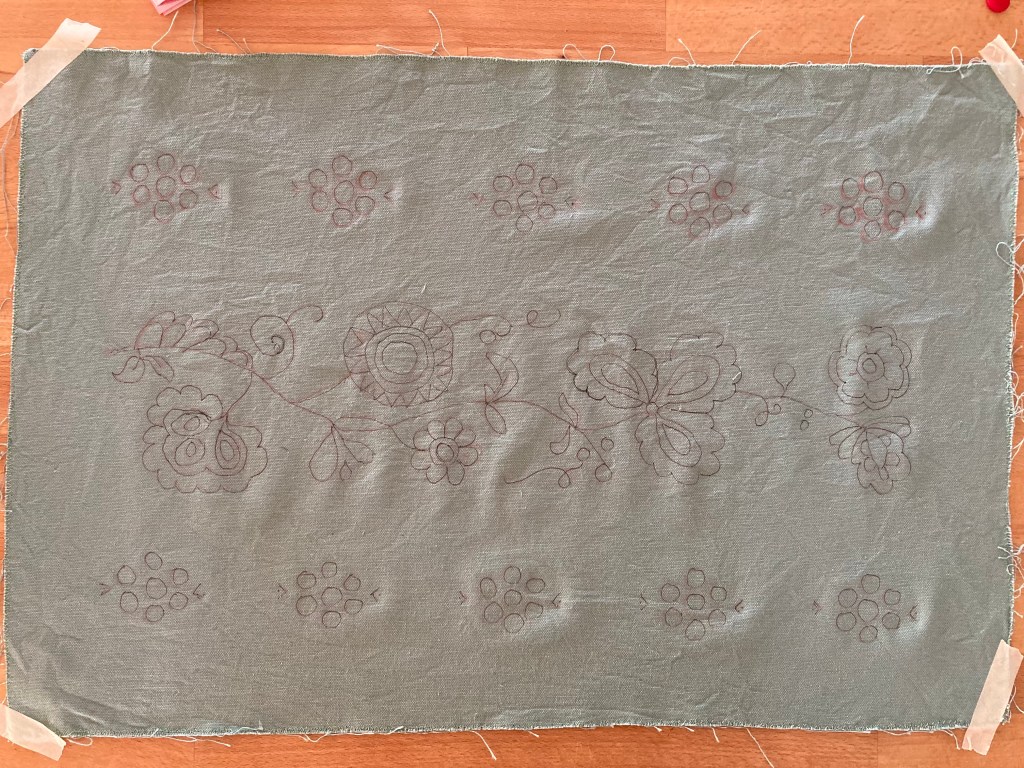
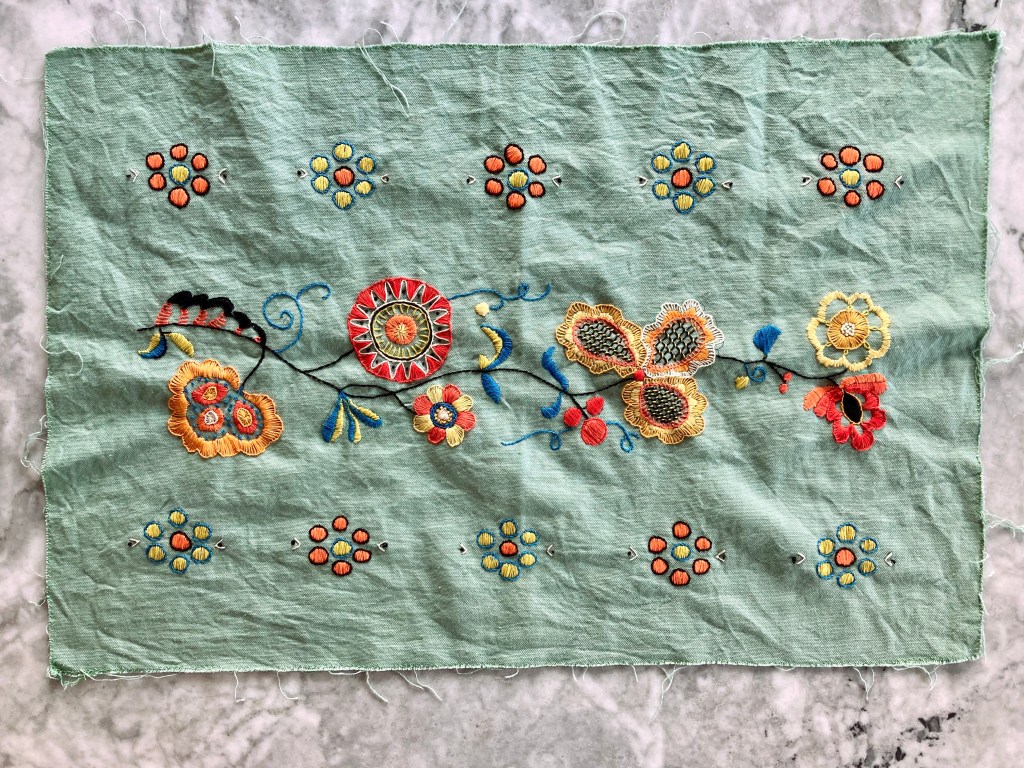
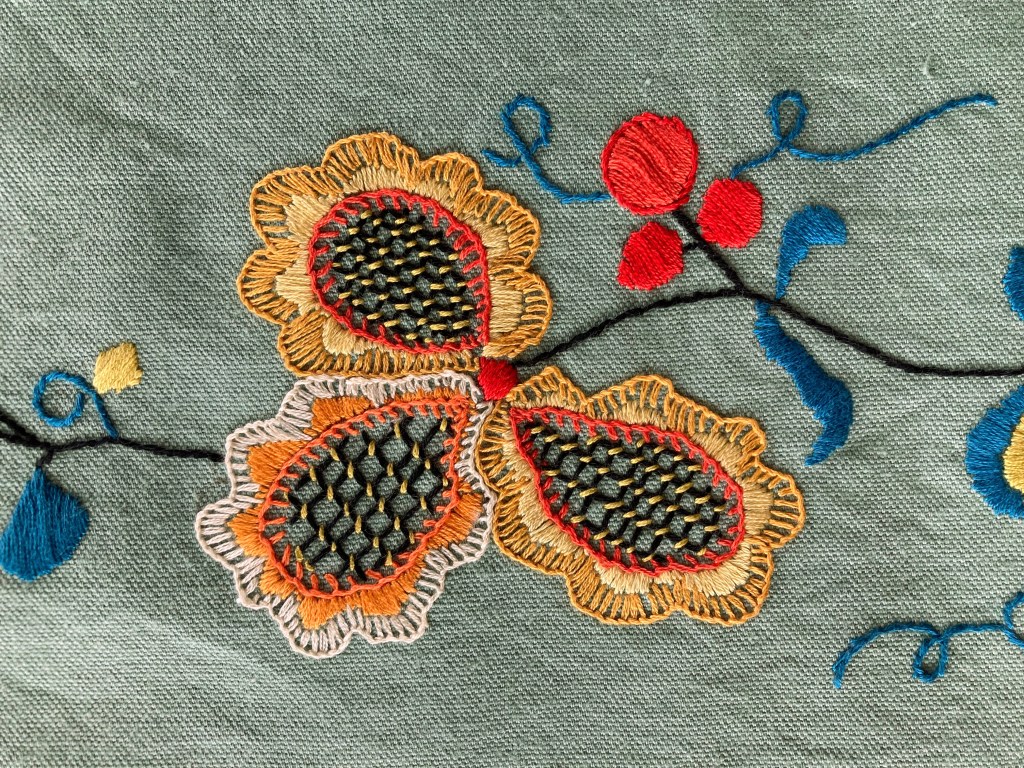
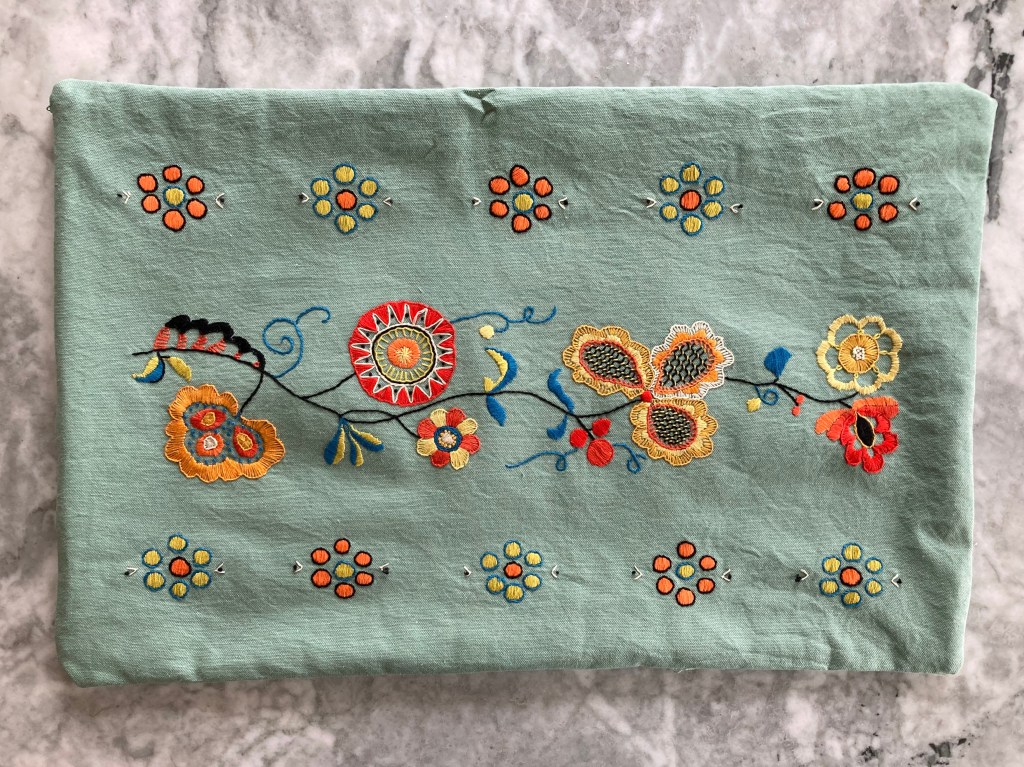
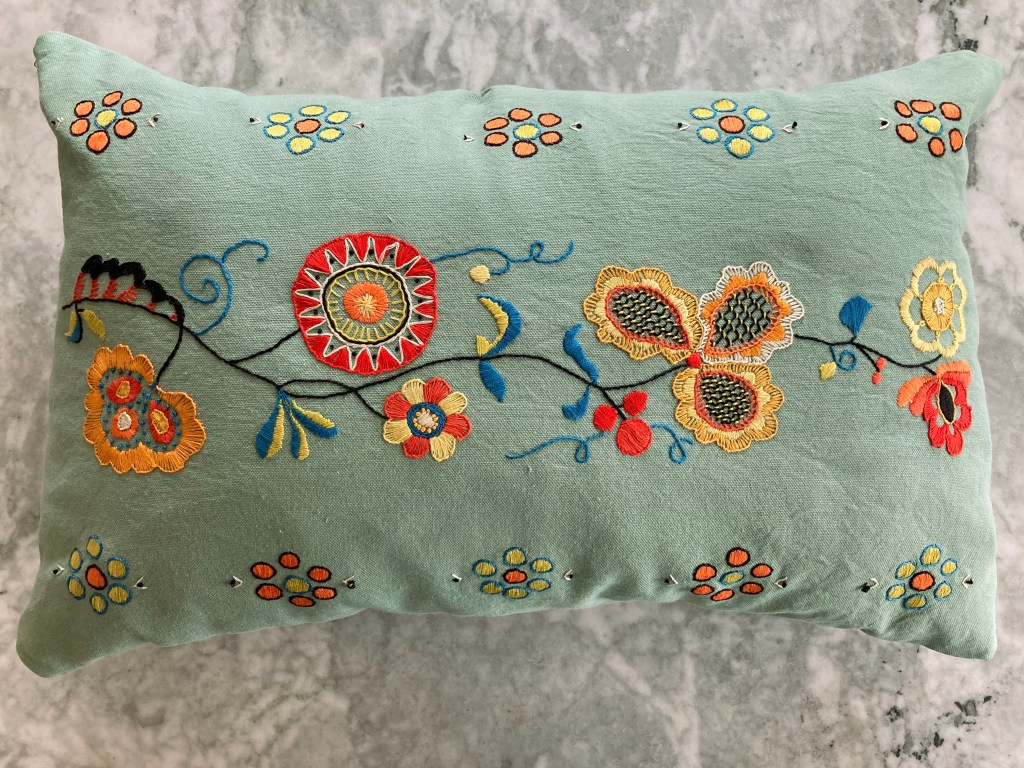
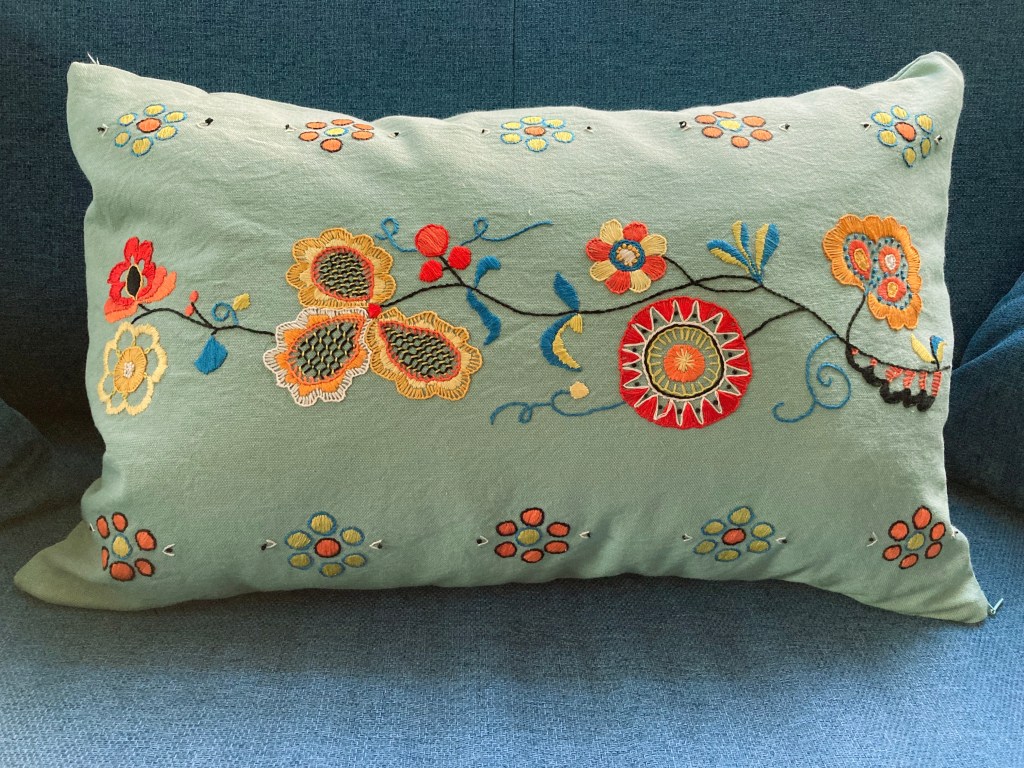
This month’s project — finished just on time! — was another embroidered cushion, larger and more ambitious than the previous ones I have made.
The cushion cover measures roughly 15×21 inches or almost 40×80 centimetres and features a highly stylised flower design in bold colours in the style of traditional Hungarian or Romanian designs. It is… interesting to note that Stitchcraft used very different appellations for traditional embroidery designs depending on the country or region they came from or which style they emulated. Typical Nordic designs were called “Scandinavian” or used the specific country name. Designs based on Indian, Persian, Chinese or Japanese works or styles usually used those country names. But anything related to a Southern or Eastern European tradition — Hungary, Romania, Czechoslovakia (one country at that time), Yugoslavia (country name at the time), Greece, etc. was a “peasant” design, with or without a specific country name. I’m sure it wasn’t meant in an insulting way (also pretty sure that most of Stitchcraft’s readers were descended from “peasants” if you go back far enough), but the word doesn’t quite sit right when you think about it in context; there is an unconscious bias at play, unfortunately typical for the time but worth noticing and pointing out when discussing vintage magazines now.
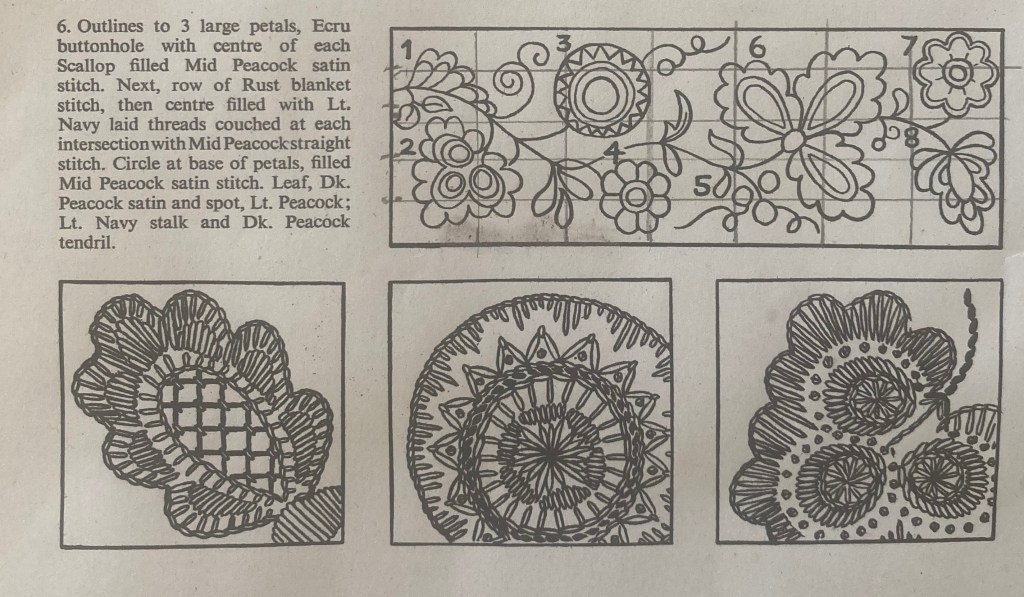
The design, in any case, is beautiful, and is given in two versions, for a cushion or a tablecloth border. As always, the biggest challenge is re-creating the transfer, which Stitchcraft readers at the time had to order separately. There is a colour photo, and helpfully, also a schematic diagram that is presumably exactly the same as the transfer, just smaller.
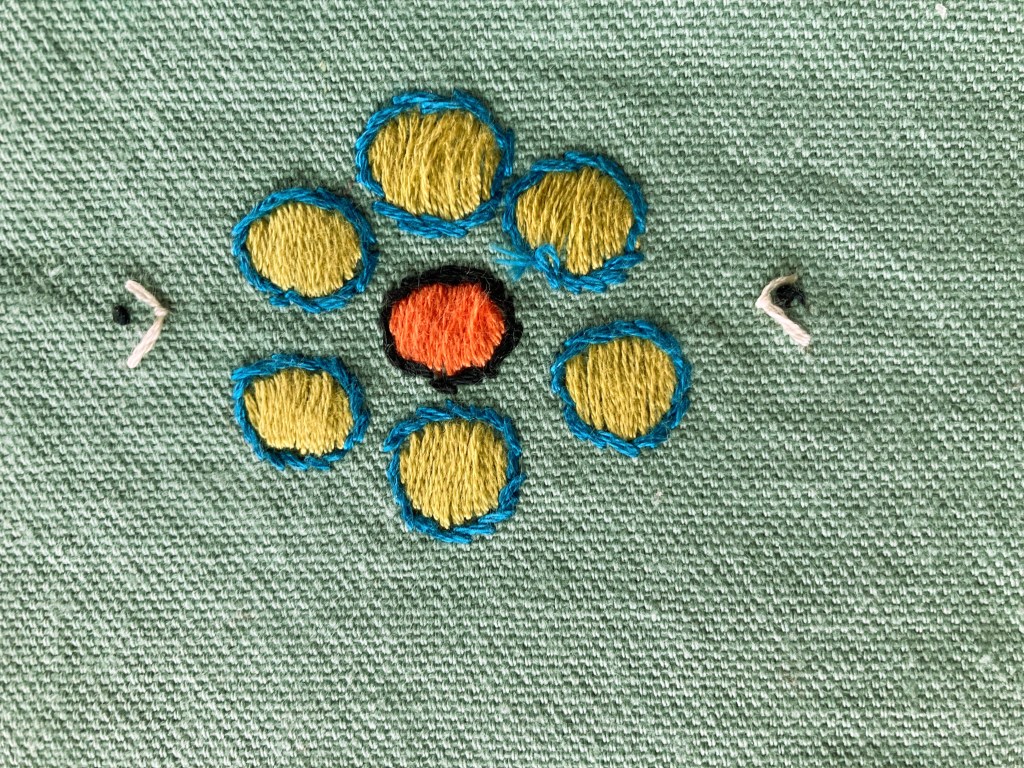
If the cushion were smaller, I might have been able to scan the diagram into the computer, adjust it to the correct size and print it out, then copy it onto the fabric with carbon transfer paper. Or even use the special embroidery printer paper that you can stick onto the fabric and wash off when the embroidery is done. But the design is much bigger than any paper my printer can print. I suppose I could have taken it to the print-and-copy shop, but I chose to enlarge the design the old-fashioned way, by drawing a grid over the diagram and the paper and copying it by hand. It’s a good exercise, and one I can certainly use more practice in. I transferred it with carbon paper and went over it with water-soluble pen. For the border flower circles, I marked the positions and just traced around a button.
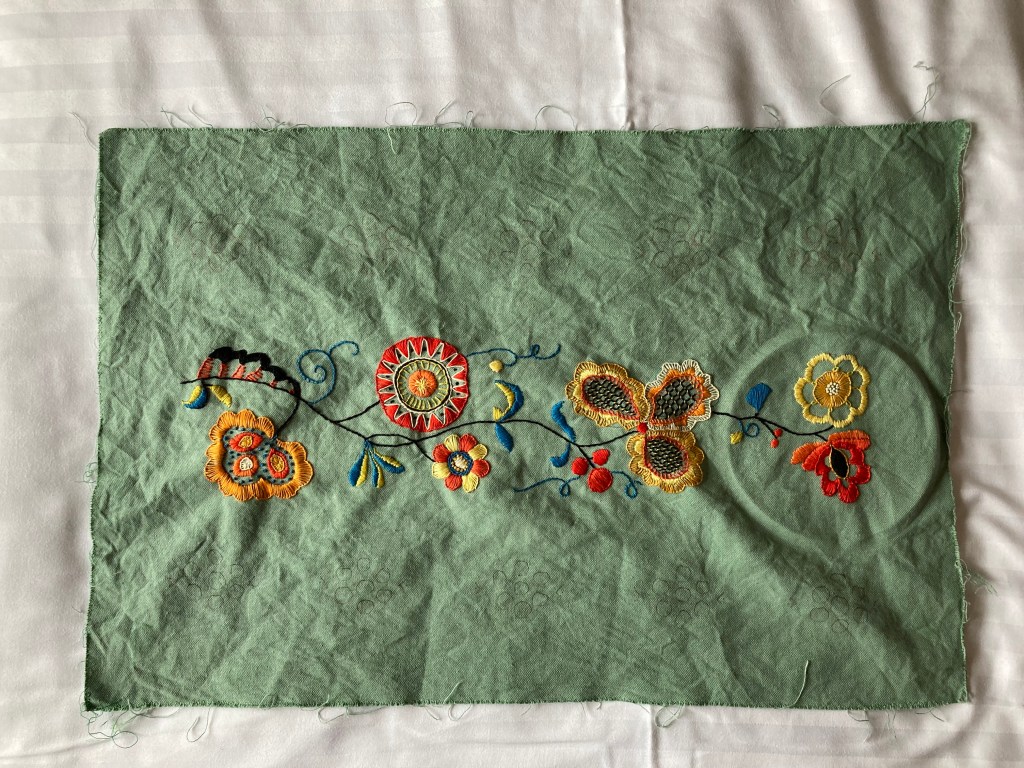
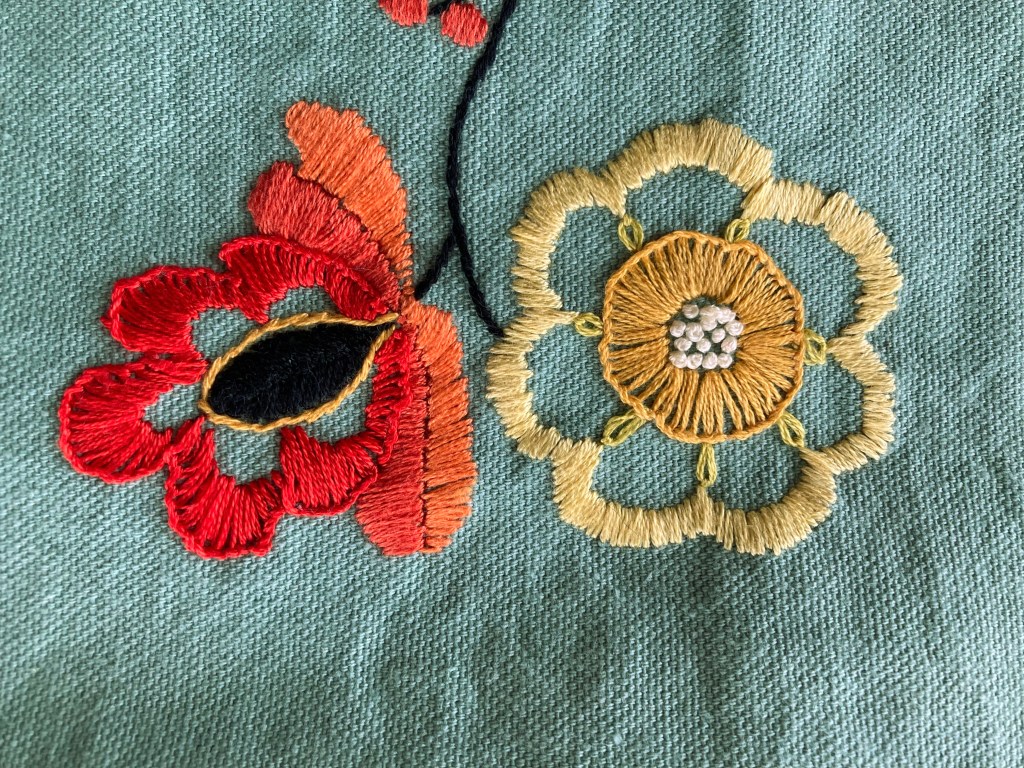
My fabric was a fairly heavy furnishing linen in exactly the same colour as the original. The pattern is written for wool embroidery thread, which I would have had to order from the one little shop in Paris that sells it. It’s a wonderful shop, but I wanted to get the project started, so I just went with regular cotton crewel thread. The colours are Black, Peacock, Red, Rust, Dk Orange, Lt Orange, Gold, Yellow, Lime, and Cream. I used the photo and my own taste as a guide to all the shades of orange and yellow. My “Lime”, like the “Lime” in the photo, was more like a slightly greenish lemon, but it looked good (and probably accurately reflected the colour of any real limes available in England in 1964…) On working the embroidery, I noticed that the directions say “White” instead of “Cream”, but I was glad I had used the off-white — I think real white would have been too strong a contrast.
The stitches are all quite basic: stem, satin, buttonhole and blanket with some French knots and one use of Romanian stitch in the middle of the red and black flower. It was good practice for buttonhole stitch and French knots, which were my nemeses before, but have improved significantly due to this project.
I realised while working it that the individual motifs weren’t quite big enough — in the original, they are much closer together, almost touching. There was no way I was going to re-do the entire transfer and start over, so I accepted it.
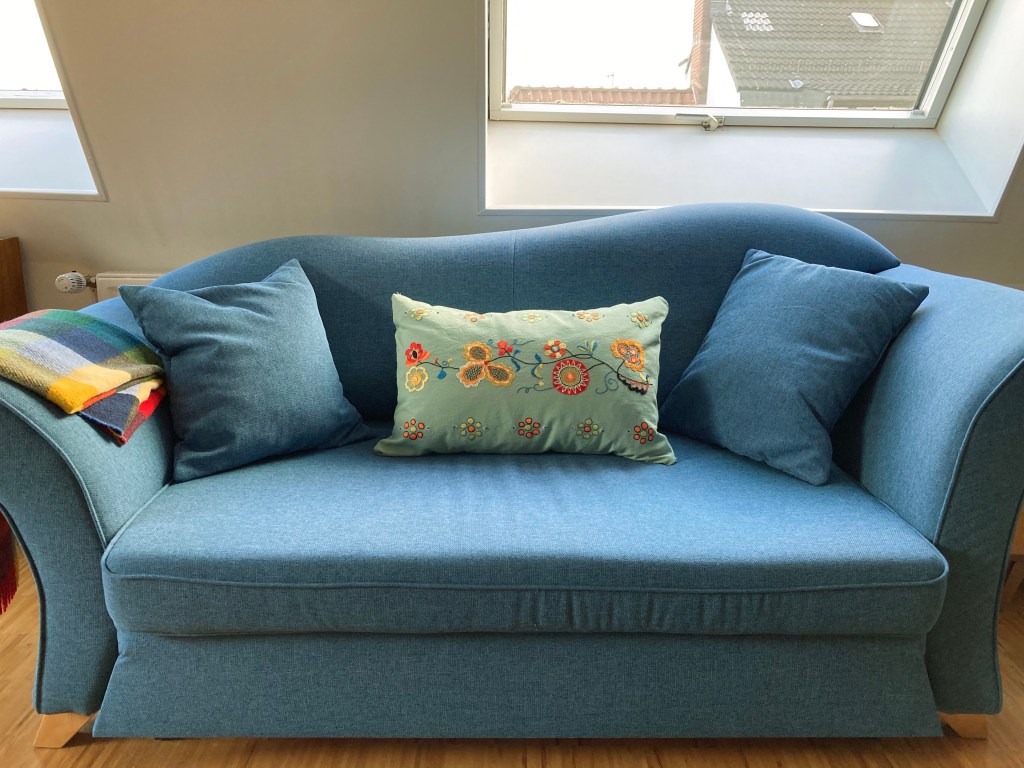
The work went surprisingly quickly, considering how large the cushion is. I made it up into a cover with the same fabric as a backing and a zipper close. A standard 40×80 cm bed pillow fits in it well. Though my embroidery skills are still a work in progress, I am very happy with the final result.
When I started this project, I had no plans for it after finishing — I have more cushions than couch/chair space, so I assumed I would give it away as a present or sell it. Happily, a colleague noticed me working on it during a break and loved it, saying it was the perfect colour for her sofa and the walls in the living room, and she offered to buy it! So it will have a good home and I earned a bit of money for the craft budget. Perfect.
This month’s blog project was a bit different than planned. The August 1964 issue didn’t have any projects that particularly called to me. There was a nice baby set of “vest and pilch”, but I didn’t know anyone who was having a baby soon… or did I? In fact, I did know that a friend of mine was expecting twins, but we hadn’t seen each other for a while and unfortunately that fact slipped my mind until the babies were almost due! At which point I could have made two vest-and-pilch sets, but I wanted to get the project done quickly and also destash some yarn that was more suitable for a top/middle layer than to be worn right next to delicate baby skin.
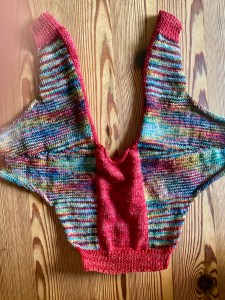
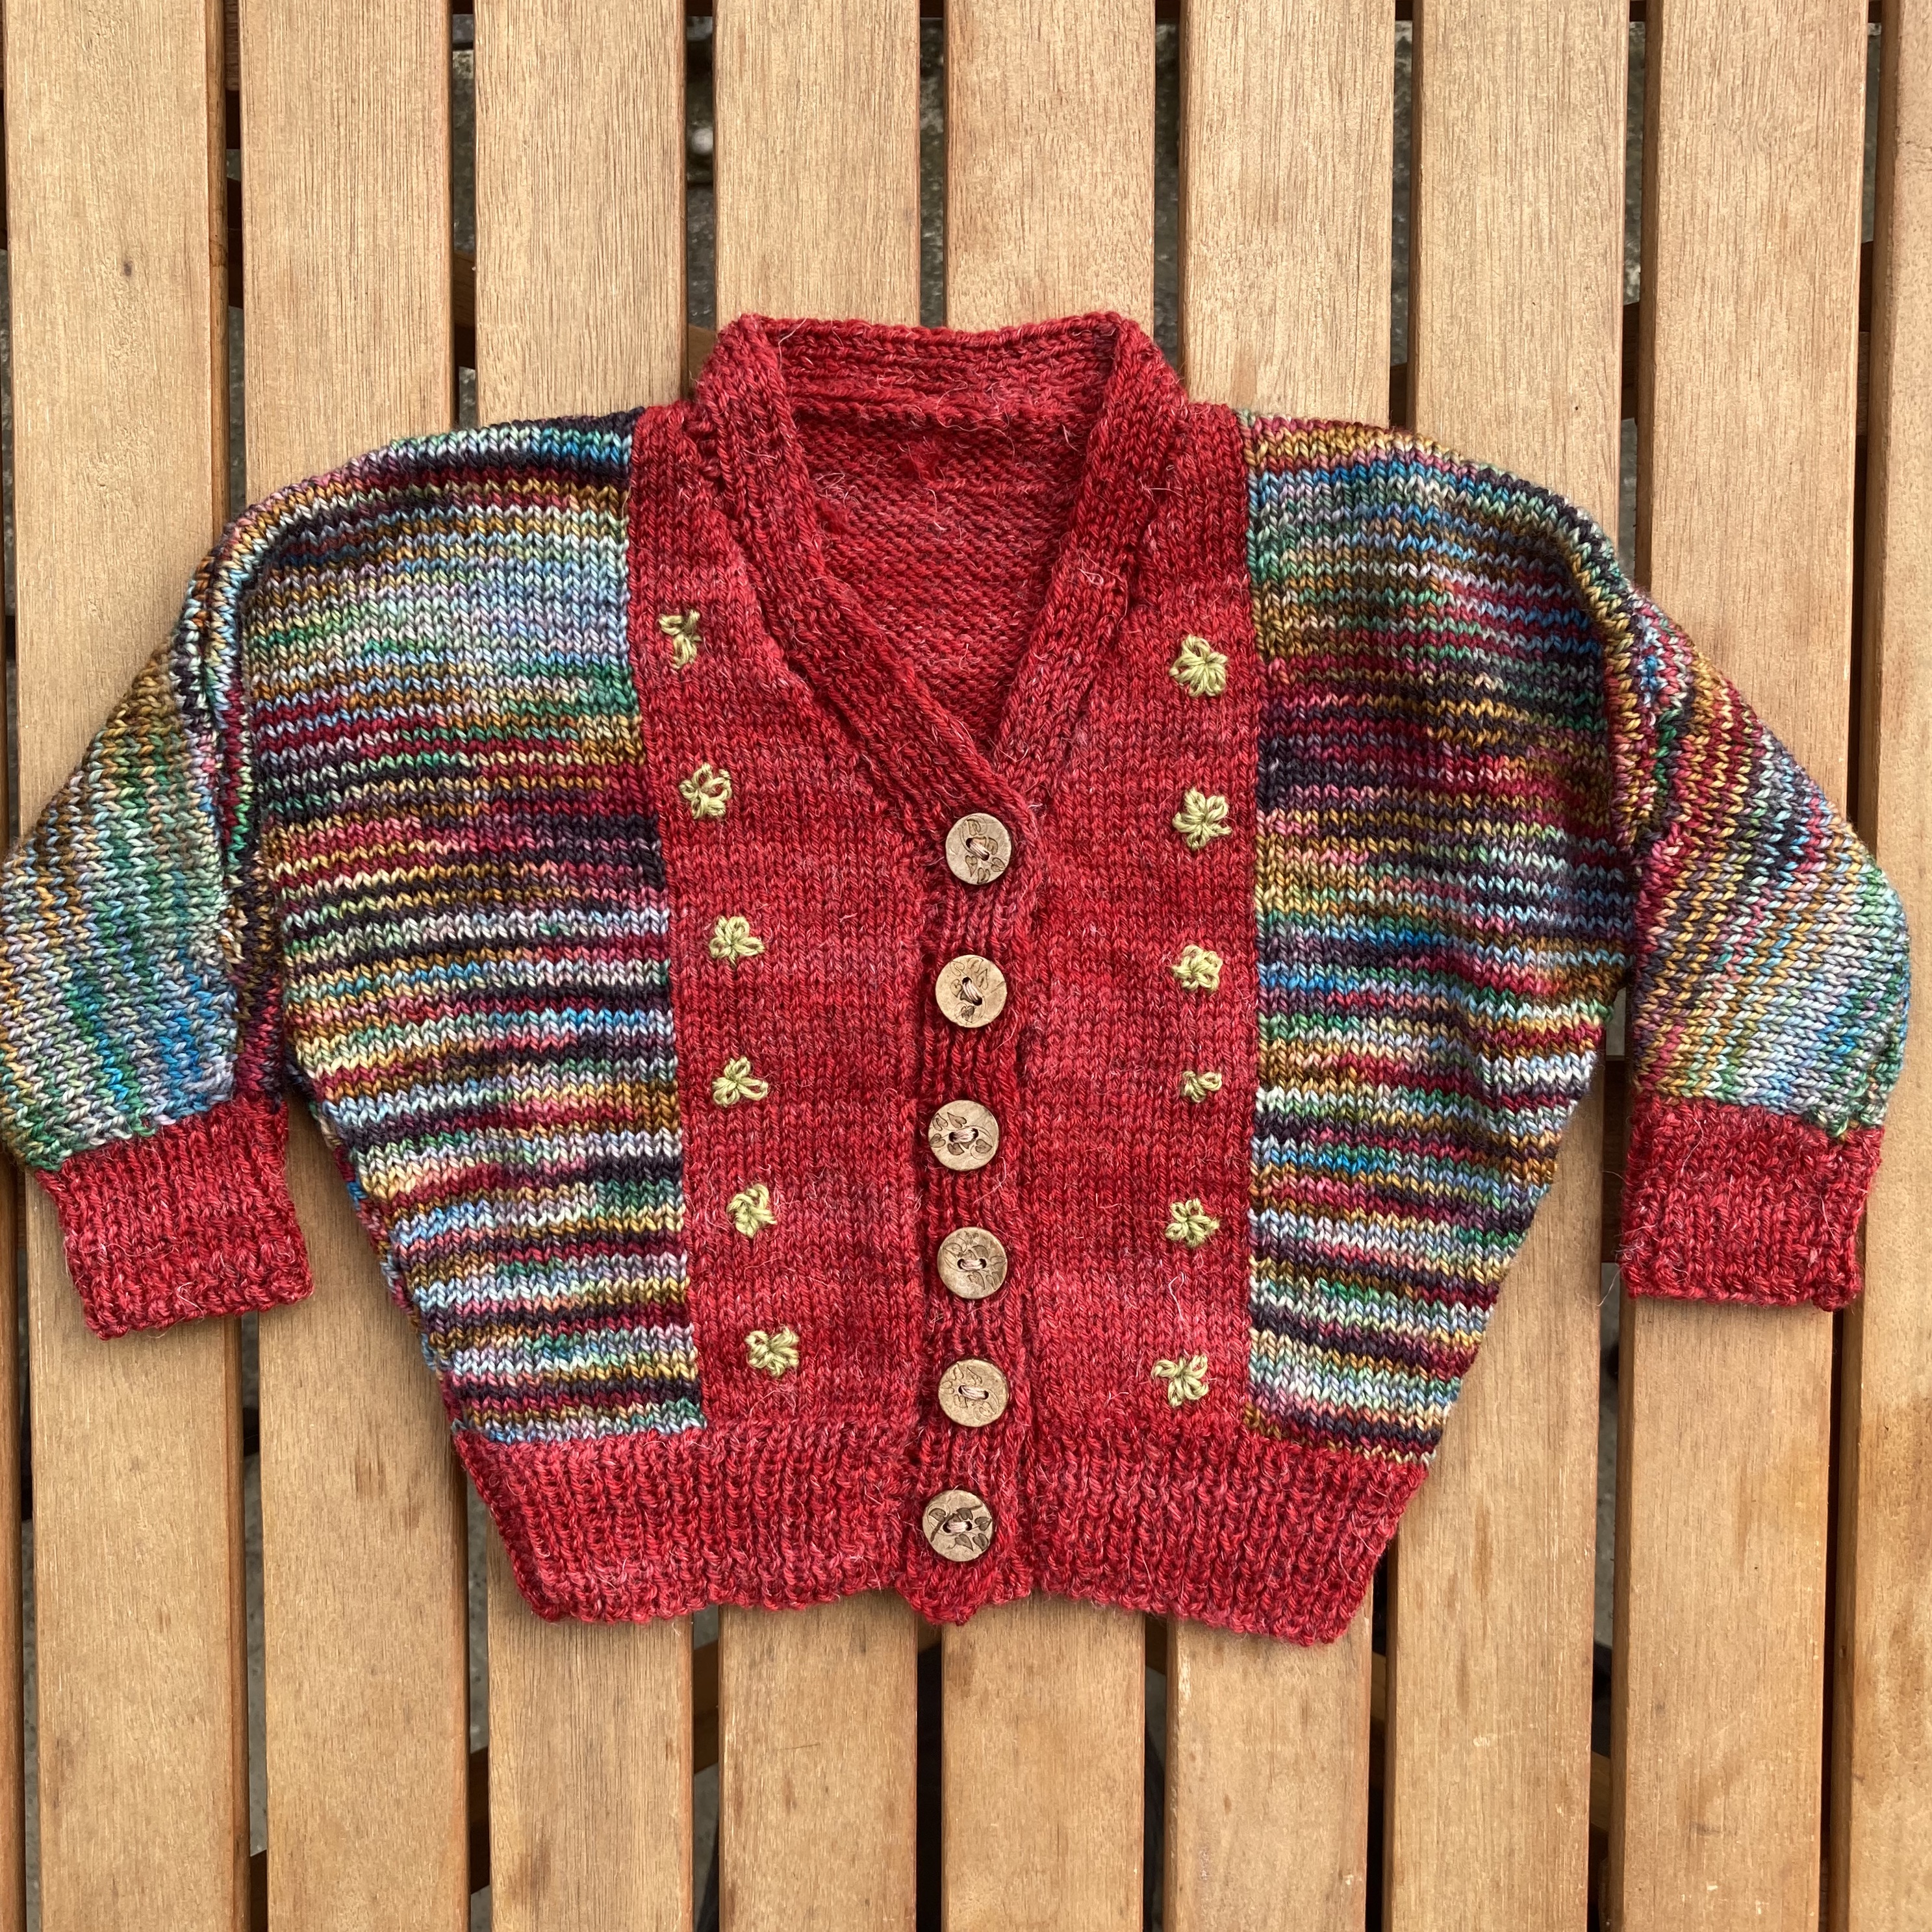
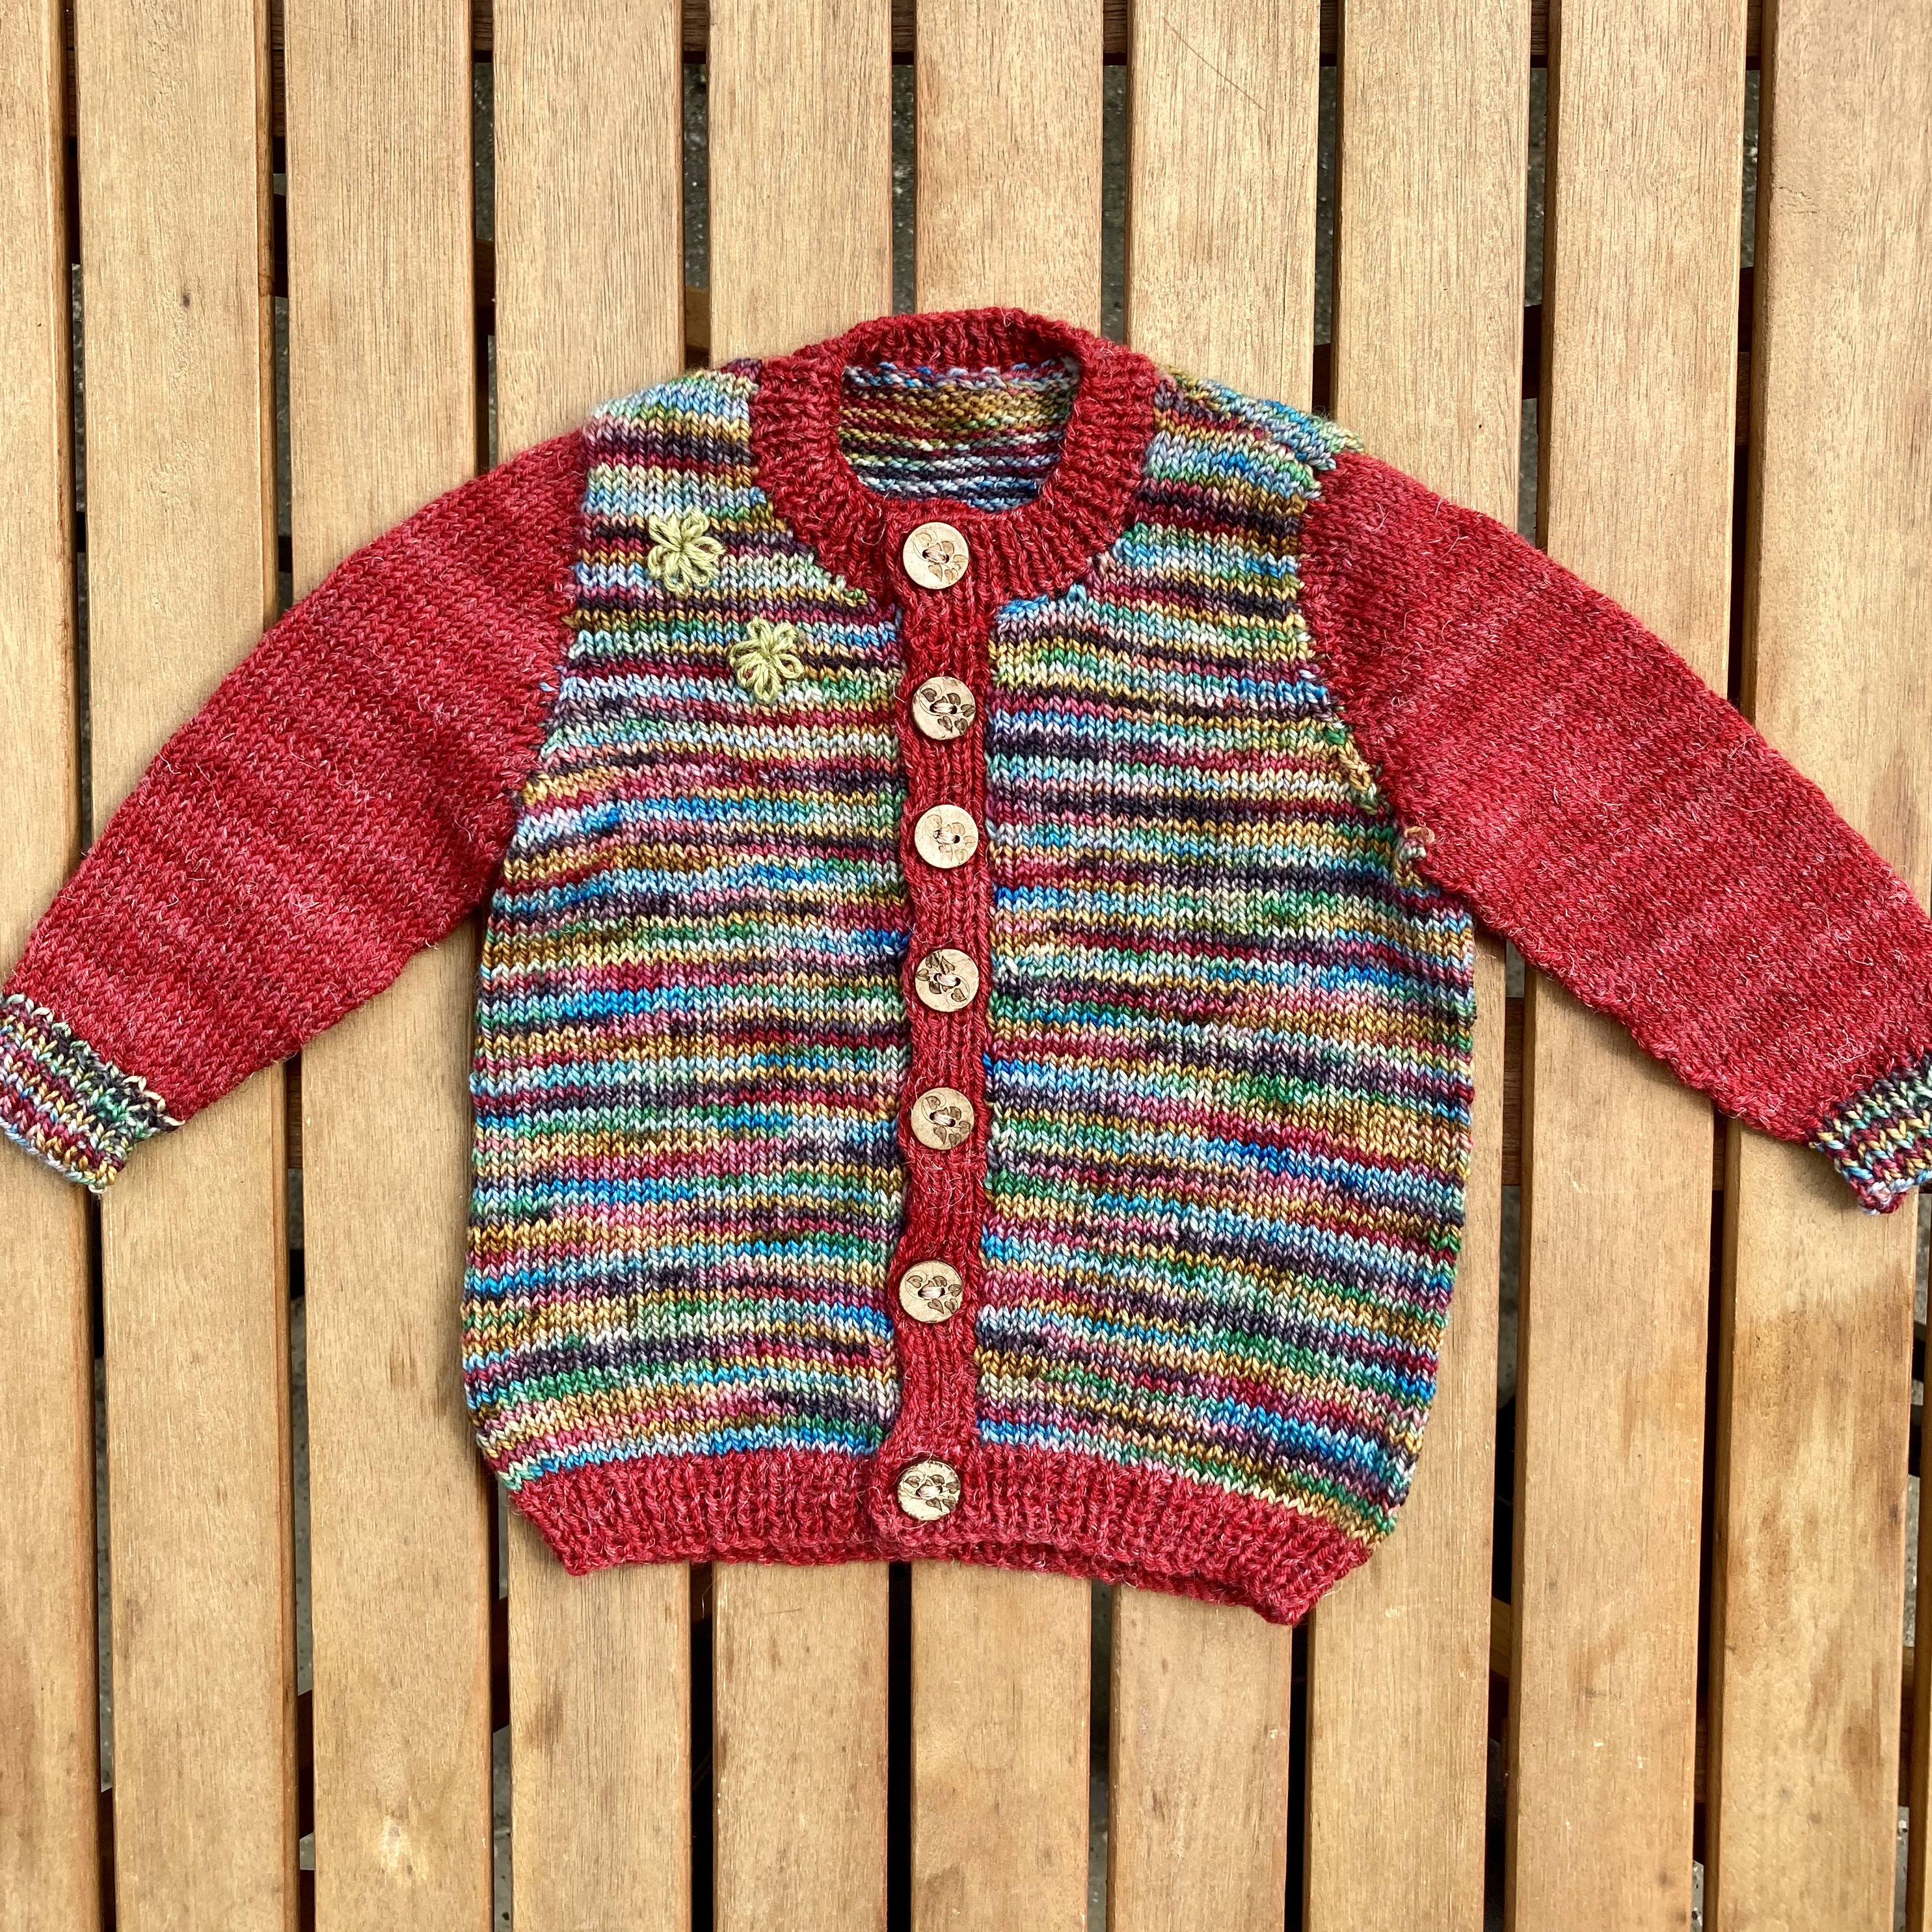
I decided to make two similar, but non-identical cardigans and opted to make one without a pattern and one from this pattern for a dolman-sleeve cardigan from Stitchcraft‘s October 1956 issue. The use of two block colours made it a good choice for the two yarns I wanted to use, and the embroidery was a cute touch.
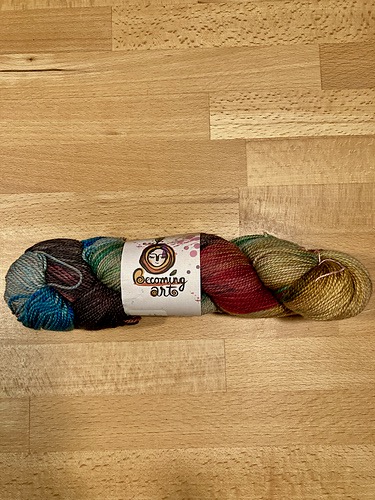
The pattern calls for Patons Beehive 3-ply Baby Wool at a tension of 8 stitches to the inch for a cardigan that is 19 inches around the underarms. My wools were Becoming Art Cielo fingering in the colour combination “Carousel” (multi) and Schöppel Admiral Hanf in red — admittedly not a very vintage colour combination or standard baby-pastel, but I like knitting bright colours for babies, and the mother’s favourite colour to wear is red, so I loved it.
Both wools were gifts — the Admiral Hanf from my knitting group’s holiday “secret Santa” and the Cielo Carousel a prize from the last KAL at the All Things Vintage forum on Ravelry. “Hanf” is German for hemp, which makes up 10% of the red yarn and gives it strength and durability. It’s not scratchy, but also not super-soft. The Cielo fingering is delightfully springy and squishy. I got 6.5 stitches to the inch with each of them on 3 mm needles, but saw no need to change the pattern, as a larger cardigan would be more practical for autumn/winter wear, when the babies will be bigger and wear more clothing underneath.
The cardigan is knit from the bottom up in three pieces — back and two fronts, with the sleeves cast on horizontally. The colour-block effect is made by using separate balls of wool and twisting them together at the colour change, intarsia-style. I made both the fronts together with separate balls of yarn on one needle to insure symmetry. The cuff ribbing is picked up and knit in rib after the main pieces are done and the front button bands are knitted separately and vertically in rib and sewn on. (I’m not a fan of this type of button band and would just as soon have knitted the bands together with the fronts, even if technically they’re supposed to be made on a smaller needle.)
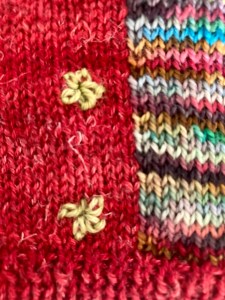
The little flowers on the fronts are embroidered on in loop stitch after everything else is finished. It was surprisingly difficult to get all the “petals” to be the same size and distributed evenly around the centre. Perhaps I should have made them larger. I’m always happy to practice embroidery on knitting, since I think it looks really cool, but it continues to be a challenge. The wool is a bit of leftover Onion Nettle Sock yarn.
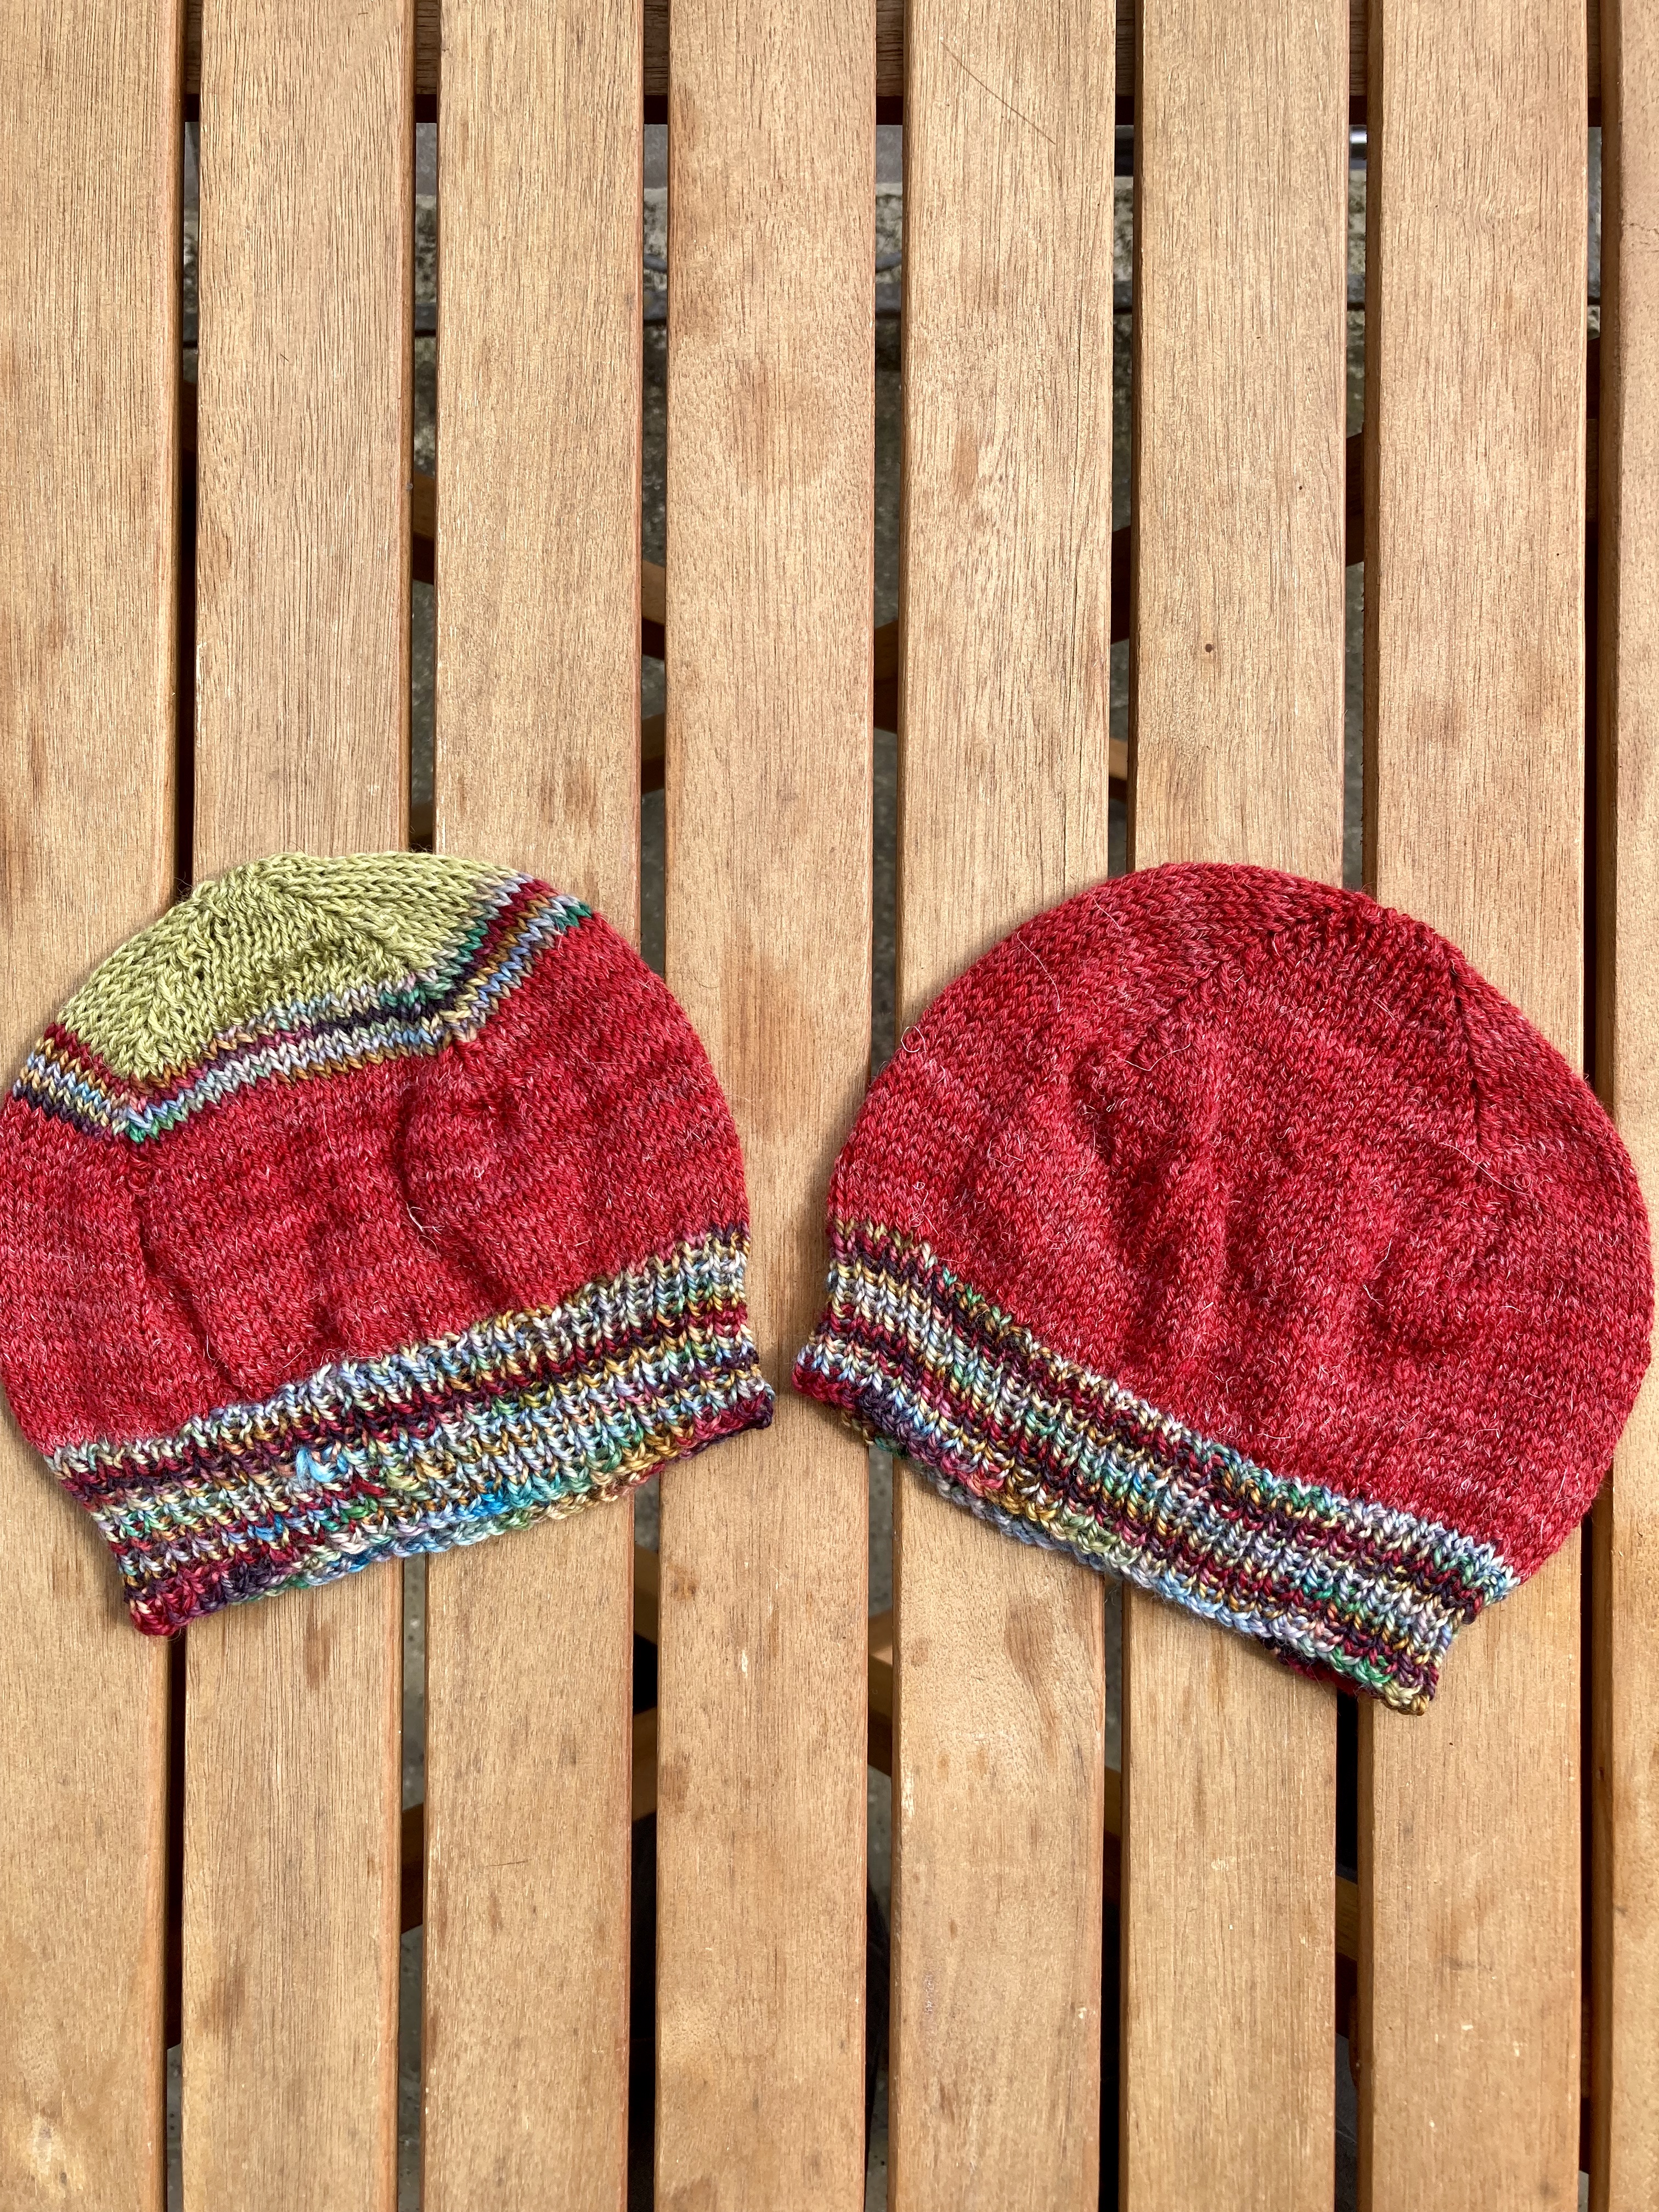
One 100 gram skein of the multi-colour wool and one 50 g ball of the red were enough to make this cardigan, another “fraternal” cardigan (plain crew-neck with set-in sleeves) made without pattern using the multi-colour yarn for the body and the red for the sleeves and ribbing, and almost two hats with multi-colour ribbing and a red body. The crown of one hat was finished in the green Onion sock, which I also used to embroider two larger flowers near one shoulder of the no-pattern cardigan.
I loved the dolman pattern and will surely use it again for another baby. I love the similar, but not identical cardigans for (fraternal) twins. I love matching hats and cardigans. I love the bright colours! And I think these sets will be very useful for the twins and make the parents happy.
Since the June 1964 issue of Stitchcraft didn’t have any projects that I really wanted to make, I thought I would share another non-Stitchcraft, non-1960s “blast from the past” project that I recently completed.
A little back story: for the last couple of years, one of the wonderful mods from the “All Things Vintage” group on Ravelry has been transcribing serial stories from 1920s newspapers and posting them, one chapter a day. She supplements them with posts of photos or postcards from the era, as well as clippings from the same newspapers with advertisements, fashion advice, and all kinds of details that give context to the stories. The stories themselves are often quite hare-brained in terms of plot (the authors had to keep readers interested through 100+ chapters, so cliffhangers and ridiculous plot twists abound) but thoroughly entertaining, and give a lot of insight into social mores and lifestyles of the time.
As you might expect, we (the group’s members) enjoy these stories immensely and add to the entertainment by guessing the outcome or the next plot twist, making insightful or humorous comments on the characters and action, or adding our own spin-off ideas to the story (one member even re-wrote a chapter in the style of a post from the popular moral-advice-seeking “AITA” subreddit.) Out of all this fun, the idea was born to have a Knit-Along / Crochet-Along relating to the current story, where participants could make an item of clothing that one of the characters might have worn, and explain how the item would fit that character’s personality.
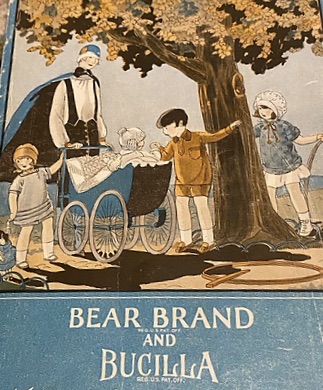
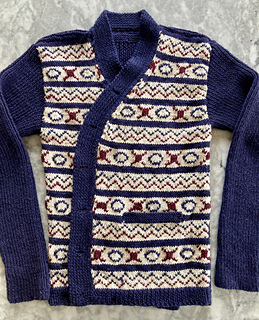
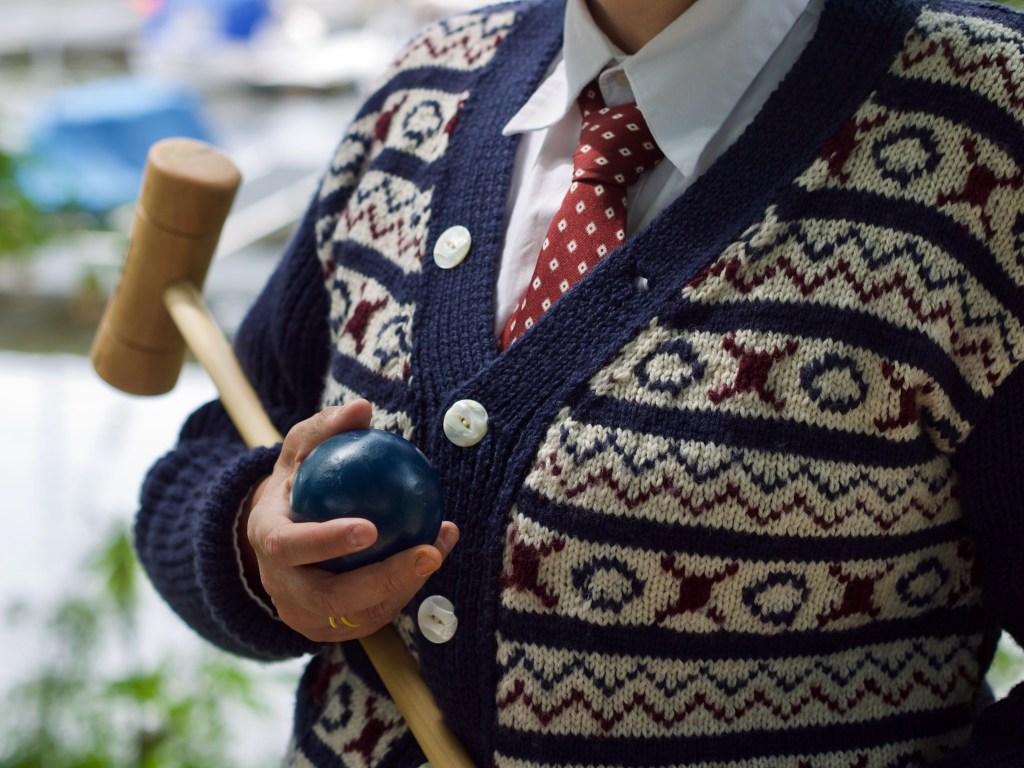
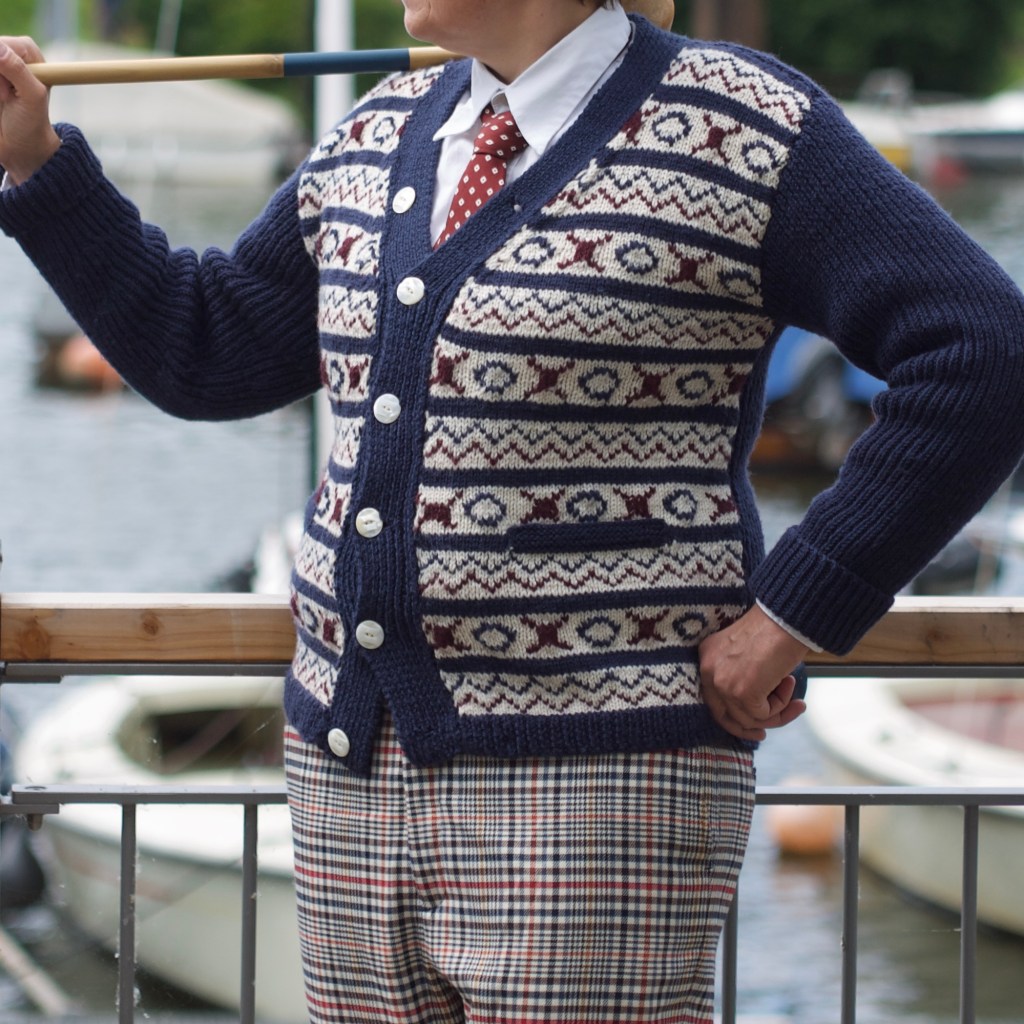
For my part, I love the stories but don’t usually knit items from the 1920s — unshaped, flowing upper-body garments make me look like I am wearing a sack. I do like the Fair Isle patterns which were enjoying a renaissance at the time, so looked for some of those, thinking I might make a slipover/vest/waistcoat for myself. Then a fellow All Things Vintage member helped me find the pattern shown above, which I knew would perfectly suit a friend of mine who is a huge 1920s fashion aficionado. Isn’t it dashing?
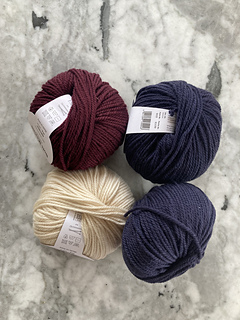
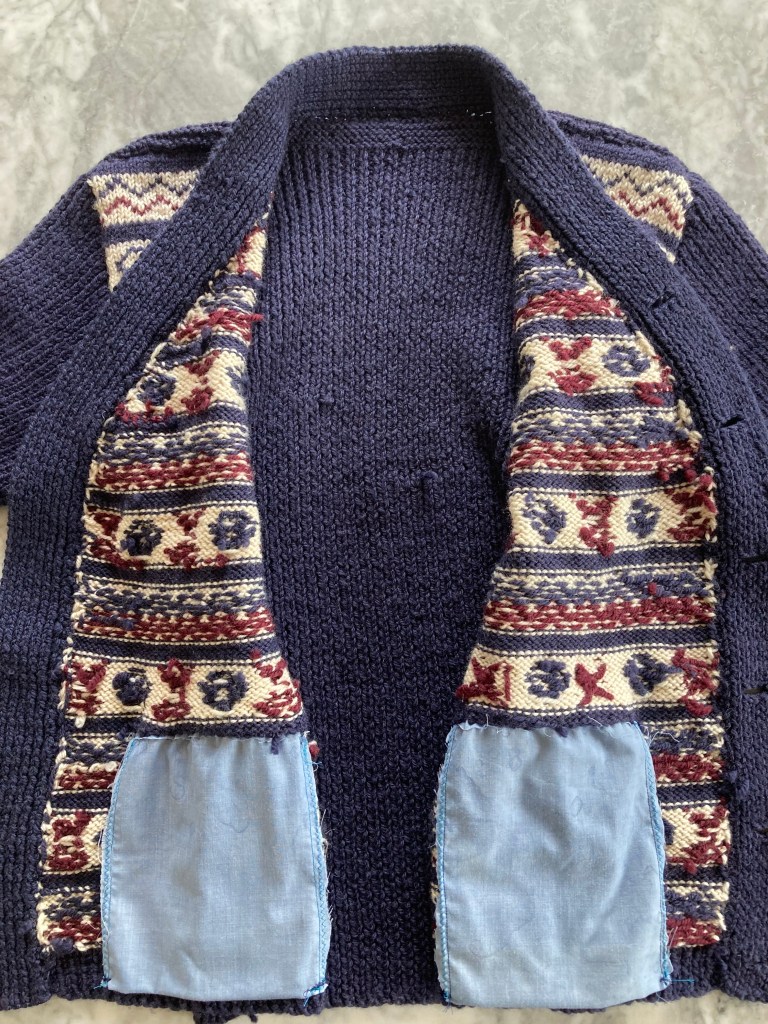
The pattern, from 1923, is written for Bear Brand Bucilla wool in stripes of fawn and brown, with additional contrast motifs in “Henna”. My friend did not want a beige and brown cardigan but did want a period-appropriate colour scheme, so we settled on navy blue and white with burgundy-red contrast, a popular “sport” combination of the time. My yarn was “Soft Merino” by Wolle Rödel, a very normal, easy-to-knit-and-care-for DK 100% wool.
The pattern was full of surprises, starting with the back, which is knit entirely in single-colour 1×1 ribbing. It is consequently very narrow, much more so than the wearer’s back, but stretches with movement. I was convinced it would make the cardigan too tight, or make the bands gap too much in the front, but the ribbing has enough “give” that it works out perfectly with the flat-knit Fair Isle fronts. The overall effect is sleek and slim-fitting, but allows for plenty of easy movement — I can see why it was intended to be worn for playing golf or other sports with lots of upper-body movement.
Speaking of those Fair Isle fronts, though… a closer read-through of the pattern revealed that they are not supposed to be knit in stranded Fair Isle technique. You are supposed to knit them in plain stripes and them embroider the motifs on later using Swiss darning aka duplicate stitch! I was truly flabbergasted to see that, as I had assumed the 1920s interest in stranded knitting designs extended to stranded knitting technique. Not so — in fact, as I learned, many other “Fair Isle” designs of the time were also produced via duplicate stitch embroidery.
I like embroidery on knitwear in moderation, but all the motifs on both fronts of the entire jacket was too much for my liking. I experimented with different techniques on the first couple of stripes — should I strand all three strands across the whole row (bulky and the dark colours show through the white background)? Not strand at all, but make each motif in intarsia using separate short lengths of wool (so many ends to weave in)? Strand the colour for one set of motifs across the row and embroider the other (worst of both worlds?) Interestingly, making all the motifs in intarsia technique and weaving in the ends turned out to be the least amount of effort, so that was my choice.
The sleeve cap construction was fascinating. Because the back is done entirely in ribbing and the front in flat colourwork, the front and back pieces have a naturally different shape above the armhole even though the bind-offs and decreases are symmetrical. The sleeve cap accounts for this by casting off three stitches every other row on the front-facing sleeve side and one on the back sleeve side. That made a very lopsided sleeve cap which fit perfectly into the lopsided armhole. Wow. I would never have thought of designing a sleeve cap like that, but it makes perfect sense and produces a very neat, squared-off shoulder.
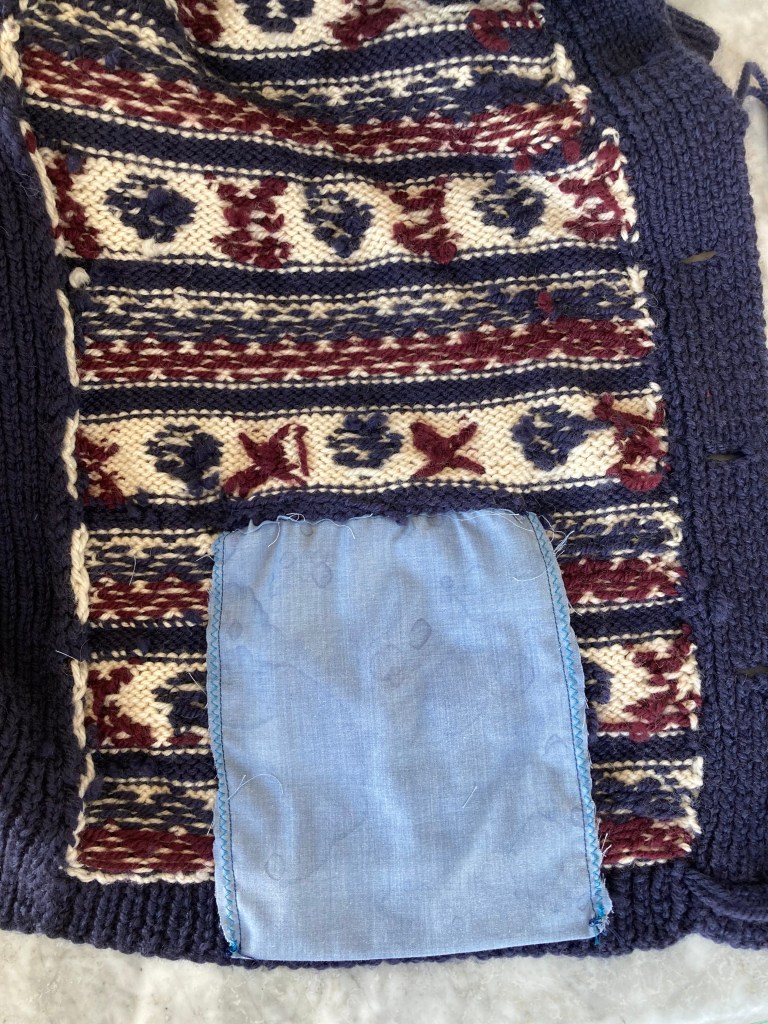
For a final surprise, the pockets are not knitted, as I am familiar with from 1950s and 1960s pocketed garments, but made of “some strong fabric” and sewn in. Thinking along with the sportswear theme, that makes sense if you are going to put a heavy golf ball in your pocket — a knitted pocket would sag under the weight, but the woven fabric (I used a bit of cotton-poly ex-pillowcase from the upcycling drawer) keeps its shape nicely. The pockets were made extra large by request and it was surprisingly difficult to sew them in place, but they turned out fine.
And that was that! The story, by the way, was “The Involuntary Vamp” by Mildred K. Barbour, published in 1921 in the Washington Herald, and concerns itself with the adventures of young Diana Langley, who was “cursed” by her aunt Marjorie with the “gift” of “lure” — all the men are after her, but the only one she really wants (Stephen Dale, an older friend of the family) cannot marry her, as insanity runs in his family. So she marries another man out of spite, jumps off her honeymoon train in the southwestern U.S. desert with a different man, gets semi-kidnapped by yet another man, gets away and finds sanctuary with yet another man (and his sister) who we later find out is responsible for the whole hereditary insanity situation… or non-situation, as it turns out (did I mention that the plots of these stories are often ridiculous, but thoroughly entertaining?) and then has more adventures before being united with Stephen Dale, who is actually quite mentally healthy and was in love with her the whole time. Diana’s first-husband-out-of-spite has meanwhile conveniently died, leaving the happy couple free to marry!
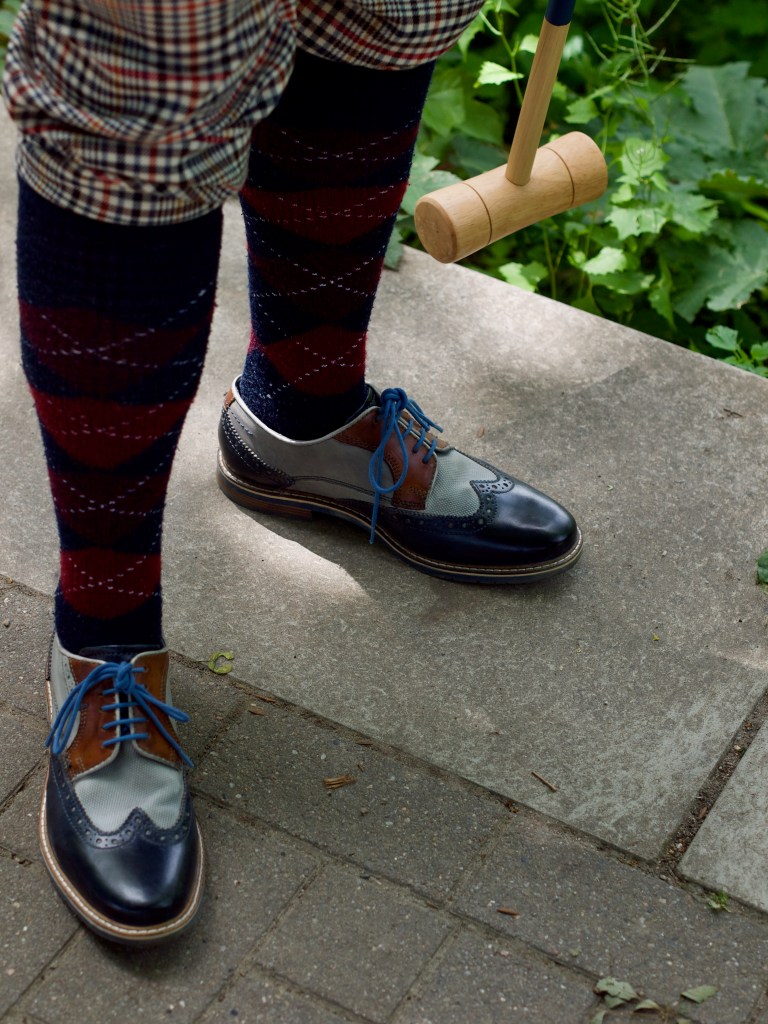
The Stephen Dale in the story is quite rich (of course), has a yacht and participates in all the usual 1920s upper-class sports, so here is my “Stephen Dale” wearing his all-purpose sport cardigan to play a round of croquet on a lovely leisurely Sunday afternoon:
There are such nice details in the cardigan, from the turned-up ribbed sleeves to the neat pocket flaps. The buttons are real mother-of-pearl, vintage buttons from the 1920s.
And with that, they boated off into the tropical sunset! May all your adventures have such a happy ending.
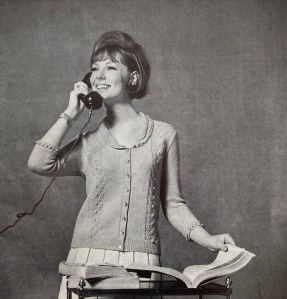
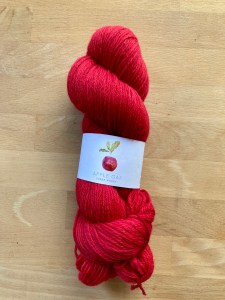
My May project was this elegant little cardigan “for warm, sunny days” with a cute, easy bobble design on the front panels and decorating the collar and sleeve borders.
It’s actually meant as a blouse, knitted in 4-ply “Nylox” wool-synthetic blend at 7 stitches to the inch, but my version is a slight bit heavier and warmer, made with “Softwool” from the wonderful Apple Oak Fibre Works, whose production site / shop I was lucky enough to be able to visit in Ireland a few months ago. It is an amazing, all-natural plant-based dyeing company with a completely circular, no-waste production system. They even grow their own dye plants. The “Softwool” that I bought is dyed with cochineal for a bright cherry red colour and otherwise untreated (not superwash).
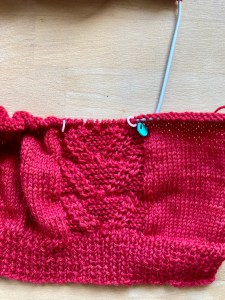
My swatch gave me 6.5 stitches to the inch, so I calculated it out with the pattern to make the second size (intended for 34-35 bust at 7 sts/inch, I am a bit bigger than that.) I started with the sleeves, to check that the modified gauge actually worked, and it did, but the body (which I made in one piece up to the armholes to save time and increase symmetry) was more complicated. I measured after a few inches and seem to be getting 7 stitches per inch, but at the same time, it was way too wide when I measured it. I trusted the gauge and kept going, and it turned out fine. Strange!
The bobble pattern is cute — two rows of twisted stitches “grow” out from a bobble made on the first row of the 12-row pattern. I don’t make bobble patterns much, but if I do, the only technique I knew until now was to knit 5 (or more) stitches in the back and front of one stitch, then cast those stitches off. This pattern says to
K into next st, turn and cast on 4, then k. into back of each of these 5 sts., cast off 4.
I couldn’t make that work and look nice! The bobble was floppy and the turning and casting on was awkward. After the first two, I used my method, which used the same number of stitches and looks fine.
The 3/4 length sleeves are finished off with a strip of bobble pattern. The collar was quite tricky. I like a collar which is picked up around the neckline and knitted on. This one is sewn as a separate piece (in very curly stockinette stitch), then you make another separate collar border piece with the bobble strip pattern from the sleeve edgings, then sew border and main piece together and sew that on. It was not easy to make it come out right and have it sit properly flat, but blocking helped a lot and in the end, it was fine.
I have an event on June 18th for which we are supposed to wear red, and I hardly have any red clothing, so I worked hard to get this cardigan finished in time and got it done a week early!
As always, we had fun re-creating the booklet photo. My telephone has a more modern shape, but it is old enough to still have a cord. What doesn’t exist at all any more are telephone books, so I substituted some thicker music scores.
I’m really happy with the way this turned out and will look forward to wearing it a lot. The only thing I might do is add some facing ribbon to the buttonhole bands to keep them from stretching.
Smart 4-ply dress — chill-proof but not too hot — is a good extra to pack in a little girl’s holiday bag. Very pretty in bright sunny yellow with a crisp edging of white.
So is Stitchcraft’s description of this wonderful little dress, which was my project for April 1964 aka April 2022. It’s made in reverse stocking-stitch with vertical rows of eyelets and has many charming details: patch pockets, a buttoned packet with collar, waist ribbing, a picot hem and crocheted picot trim.
I would love to make this in an adult size to wear myself, but for now I made it in the size written (for 26-27 inch chest, 23 inches long) and worked pretty much the way it’s intended. I say “pretty much” because I made it in the round to save time. That meant knitting it inside-out. Also, a hem in reverse stocking-stitch doesn’t look great, so the hem is in normal stocking-stitch with the picot folding edge, as intended.
The pattern is written for Patons Cameo Crepe 4-ply, which must have been a very smooth, tightly plied wool (“crepe twist”) in “bright, sunny yellow”. I do like the yellow, but I was trying to de-stash and I still had plenty of the of wonderful “Puppenfee” vintage wool that I used for this baby matinee coat last June. It is tightly plied, fine wool with an “Effektfaden” of (presumably) nylon or Lurex, giving it a little sparkle and also a bit of extra stretch — perfect for a rapidly growing child. It is also not scratchy, a rare trait with vintage wool but necessary when knitting a dress for a child.
Though lovely and not difficult to knit, the dress was quite time-consuming (7.5 stitches to the inch…) and soon ended up in the “Eternal WIP” pile in favour of more interesting projects. I needed a small, easy travel project last November (2022), so took it out and worked on it during breaks and train rides, and made a lot of progress.
I switched to knitting from the right side (but still in the round) when it was time to make the ribbed waistband, then continued in the round from the wrong side for a couple of inches until it was time to divide for the front opening. At that point, I broke off the yarn and started a new beginning-of-round from the front opening (instead of at the side, where it was until then), so that I could make it in one piece back-and-forth.
Then it went back in the WIP cabinet until now (spring 2023), when it finally got faster to knit after the skirt was finished. If you look carefully, you will see a very subtle difference in the shape of the eyelets after I switched to knitting back and forth. It doesn’t bother me, but it is noticeable if you look for it. There are no sleeves as such — you cast on a few stitches on each side and add a picot double hem to make tiny cap sleeves.
The collar and pockets are made separately and sewn on, after being decorated with a crochet picot border. I happened to have a little bit of white wool from the same stash that I inherited along with the blue wool. The placket is also knitted the same way as the hem and sleeve edgings, with double buttonholes.
I found the world’s most perfect little white fabric-coloured retro-style buttons at my local yarn and sewing shop, and sewed an extra one into the hem in case one gets lost. (They’re pretty sturdy, though.)The final touch was given by threading a couple of rounds of elastic thread through the waist ribbing to tighten it up a bit. When buying the elastic, I noticed it could also have been knitted together with the primary yarn, saving time and energy and making the waist that much springier. Noted for next time!
I never had a specific child in mind to knit it for. The little recipient of the matinee coat is currently (May 2023) almost three years old and the dress might well fit her now, but the time I started knitting it, she was quite a bit smaller and would not have fitted into the dress at all. Time to check in with the parents to see how much she’s grown! Or, I have a knitting friend here with a fairly big two-year old. Maybe the dress can even be handed on when one child has outgrown it?
In any case, this was a gorgeous project and I am seriously considering adapting it into an adult-sized version for myself.
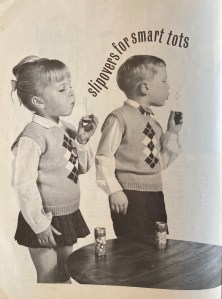
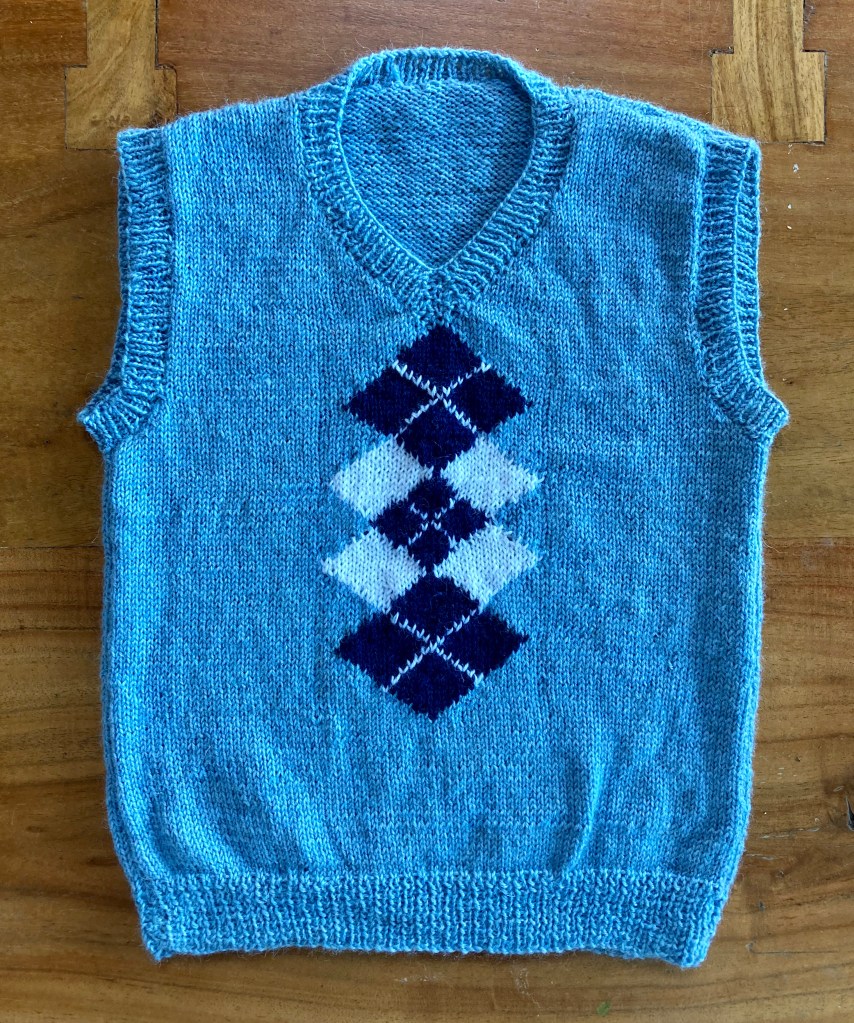
My March project was a cute slipover (vest, sweater-vest, tank top, pullover or whatever you call a knitted over-shirt garment with no sleeves and no front opening) for “tots with a fashion sense.” The tots in the photo definitely look very smart and very 1960s, with the little girl in her tiny micro-miniskirt and the boy sporting a bow tie.
The design (“from Vienna”) features a high V-neck and a simple, but effective argyle-type diamond pattern on the front. It’s written for Patons Nylox Knitting in 4-ply (fingering) weight. Nylox was a wool-nylon blend, fairly new on the market at the time and marketed for hand-knit garments that needed to stand up to lots of washing and wearing, so especially suitable for children’s clothes.
I used modern sock yarn (Meilenweit by Lana Grossa), an 80% wool / 20% polyamide mix which comes pretty close to the original Nylox yarn, and kept the original colour scheme of light blue with the diamond motif in white and navy, so this project was quite authentic to the original. The only change I made was to lengthen the body somewhat to fit the intended wearer, who is on the taller side for his age.
I don’t often work with intarsia designs, so this was a fun change and something new. It went quite quickly, as the pattern is easy and clearly written, so there’s not too much to say about it! I do think it will be well appreciated by the smart tot it was knitted for, as well as his parents.
There are some great children’s designs coming up in the next few months’ issues, so stay tuned for more well-dressed kids.
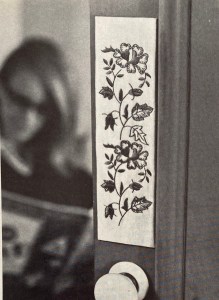
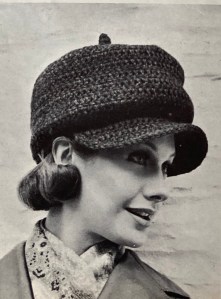
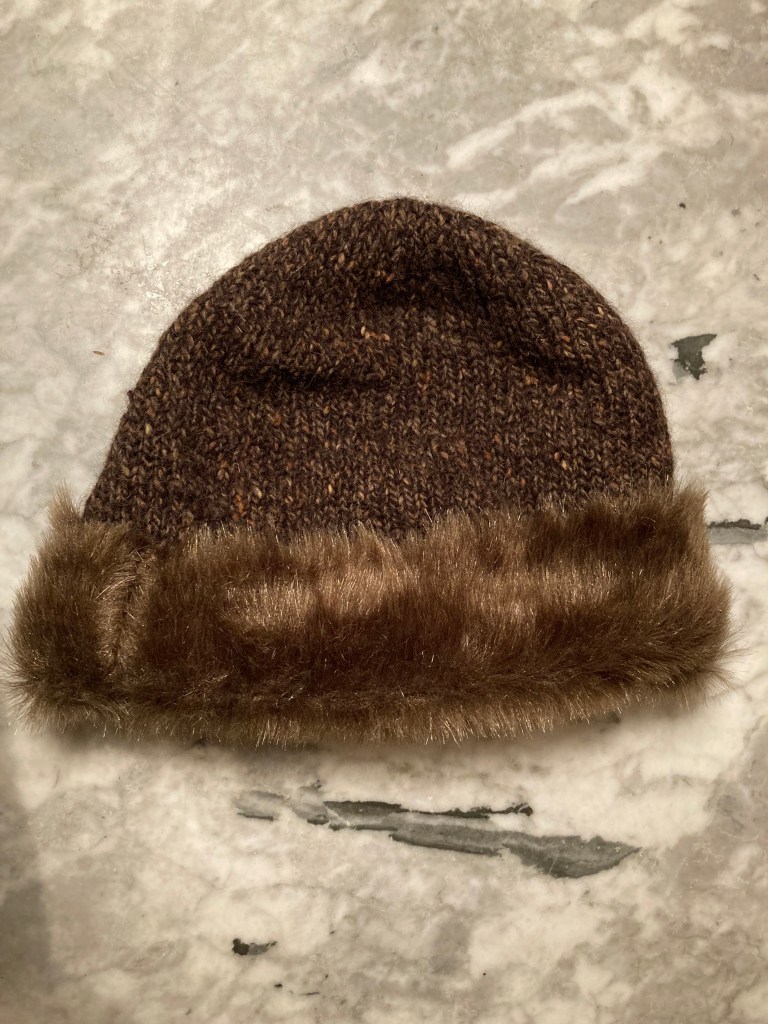
February’s project was this wonderful fur-trimmed hat. Fur or fur-brimmed hats were all the rage in the mid-1960s (my grandmother had a hat very much like this one with real fur — but too small for my head). Also, hats were big – wide-brimmed or with wide bands around the front, and often with a crown that was much higher than the wearer’s head, like the “baker boy” style crocheted cap from the same February 1964 issue, so this item is perfectly on trend.
This pattern was written to knit in Patons “Glenora”, a medium-bulky tweed yarn. (It appears to be a wool-synthetic mix, but if anyone has more detailed information, I would love to know.) The hat part is knitted and a fur strip is then sewn onto the front band. I used Lana Grossa “Fashion Tweed” (71% merino wool, 17% alpaca wool, 12% synthetic), which is lovely to work with — soft, fluffy and lightweight even at a tension of 4-4.5 stitches to the inch.
Like almost all 1960s patterns (even for hats and many gloves and mittens), this one is written to knit back-and-forth with a seam. I made it in the round. It took one evening of Netflix to knit and one evening to cut and sew the fur band and do the finishing touches. The fur in my version is fake, and was very interesting to cut: when I bought it, the saleslady wasn’t sure if she should cut into it and rip as customary when buying fabric, or cut it with scissors, since the synthetic fur is quite thick and has a slightly stretchy woven base. Ripping it took some effort, but had the advantage that the edge curled in slightly and didn’t ravel. Experiments on scraps at home showed that cutting this fake fur makes a less neat edge and lots of tiny bits of fur everywhere.
After knitting, blocking and sewing on the fake-fur band, the hat is pleated at the front edge and tucked at the crown to give the shape seen in the magazine photo. There’s a little decorative tie at the front edge too, just above the band, that is hard to see in the photos. The tie is made by knitting a strip in stocking stitch and then letting it naturally roll into a narrow tube. I suppose the modern version would be to knit some i-cord, but this worked just as well. The tuck and pleat, on the other hand, didn’t work quite as well in the wool I chose, since it is less bulky and thus has less intrinsic shape than Glenora. Still, the effect is about the same.
I made this hat for a friend’s daughter, but I would gladly make another for myself. It’s warm and fun and looks very, very 60s. I wore it for the photo with a coat inherited from my grandmother which also features a dramatic plush “fur” trim. (Sadly, the sleeves are way too short for me. They are also plain wool, and every year I search for a plush fake fur that matches the collar, so that I can make matching cuffs. I never, ever find this right colour and degree of plushness, but am considering using the same fake fur from this project, since it’s the closest I’ve ever found).
This month’s project (finished just on time!) is somewhat different from usual, as it is neither from Stitchcraft, nor from the 1960s. It’s a sleek little knitted blouse from 1937, from a pattern originally published by the Spool Cotton Company and now available on the wonderful Free Vintage Knitting website.
Unlike Stitchcraft, which I have been collecting in paper form for some time now, this was my first acquaintance with the Spool Cotton Company, and I have to admit that I hadn’t heard of it before. A Wikipedia search turned up the Clark Athletic Association, an American soccer team from New Jersey that was sponsored by the Clark Mile End Spool Cotton Company. I don’t know if this was the same Spool Cotton Company that published the pattern, but I suspect it could be. In any case, the Clark name and company are of course well known in the knitting/crochet world, having existed for centuries in various forms and mergers (Clark Thread Company –> Coats and Clark –> Coats Patons, which in a roundabout way even leads us back to Stitchcraft…).
From what I can see in the Ravelry database, Spool Cotton Company patterns were primarily for accessories and homewares crocheted in cotton (as one might expect with a brand named “cotton”). The leaflet which contained “Clarel” was entitled “New Knitted Fashions”, with coats, dresses and suits as well as knitted blouses, and was inspired by British fashion of the time (though “fun to knit because of their easy-to-follow American instructions”.) Apparently they were written to be used with Red Heart yarn.
If anyone knows more about this company or publication, or if my guesswork in the last two paragraphs was incorrect, please let me know!
“Clarel” is written for fingering-weight wool at 7 stitches to the inch, and I had some lovely (why oh why was it discontinued?) Lana Grossa Slow Wool Lino on hand, which was perfect for it. The 15% linen makes a very smooth yarn that hold cables well, but the overall texture is quite soft and stretchy.
As most patterns of this era, there is only one size given, for 34 inch bust. I calculated out a somewhat larger size using a percentage multiplier (no. of sts x 1.05) and just added the extra stitches onto the reverse stocking-stitch base that extends on the sides. I also added 2 patterns to the length and 2 patterns to the sleeve length.
I particularly love the little design details of this pattern: the mini-rib lines (just ktbl on a reverse st st background) dividing the cables, the funny tabs at the neck and the double buttons (attached together with a crochet chain.) I could make the chains a little shorter to make the placket line up straight.
All in all, I am very, very happy with this project. It fits perfectly, is lightweight, warm and soft, and makes me look like I have much more of a figure than I actually have. It even matches a tam I just knitted, as well as my fading dyed-pink hair. What more could a person want?
Next month will be a return to Stitchcraft and the 60s!
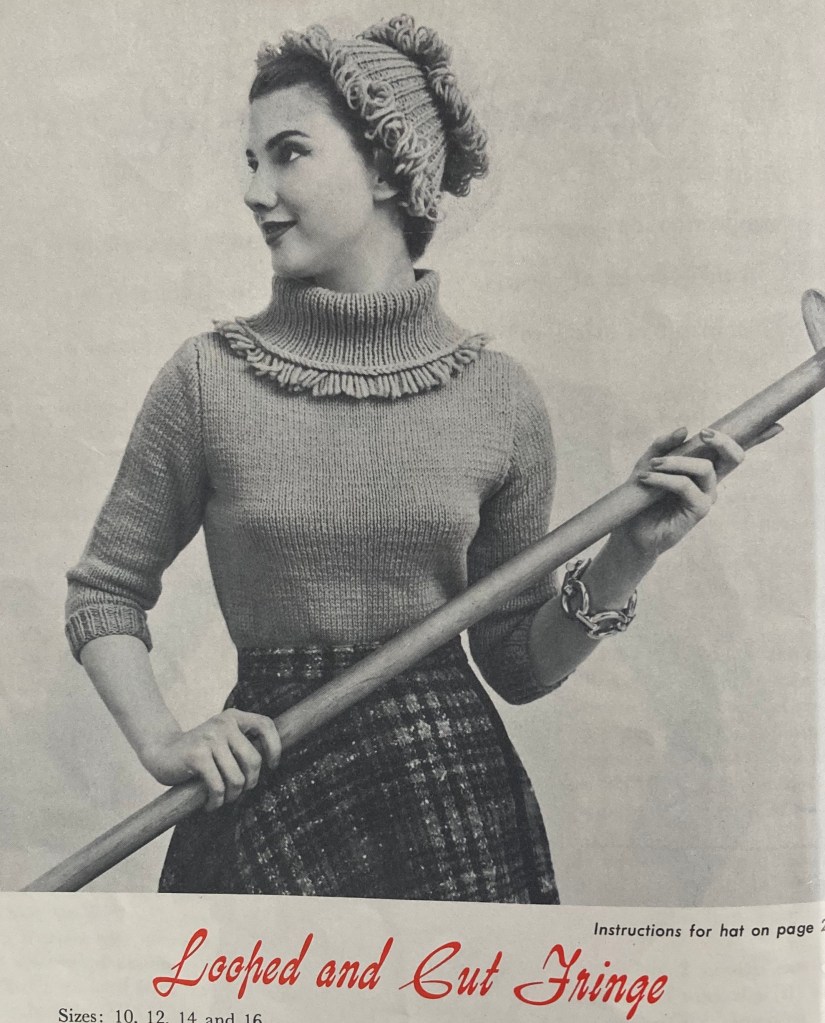
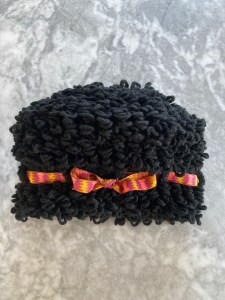
Once upon a time, there was a top hat that fell in love with a mop. Or was it a poodle? Either way, they had a child and it was… this hat. This amazing “tufted” hat made in crocheted loop stitch, “snug and gay” and shown here in a glowing shade of “Blue Lagoon” turquoise.*
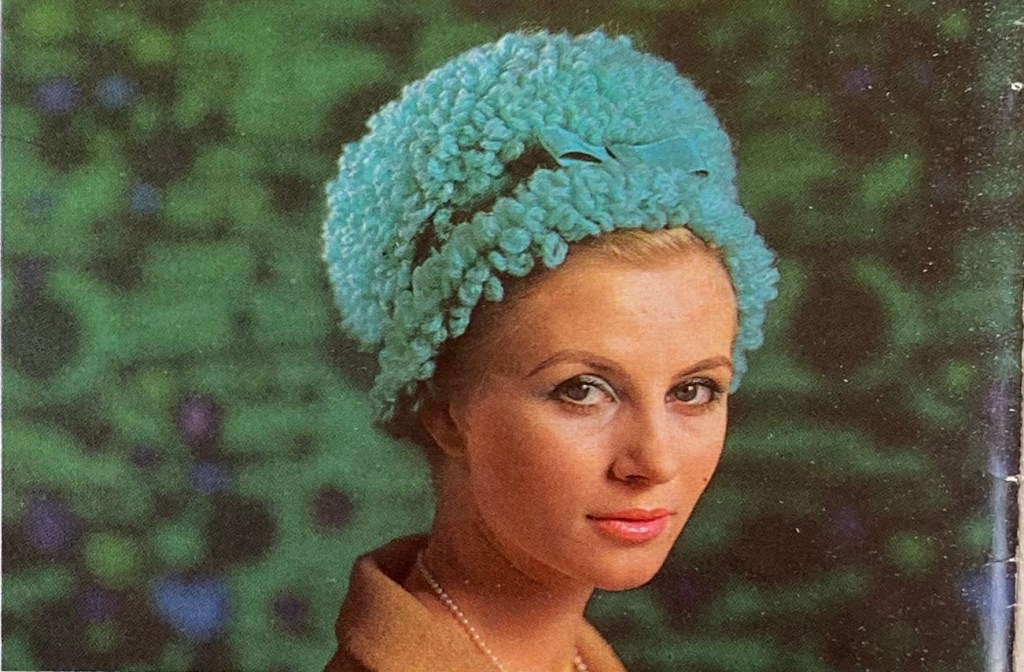
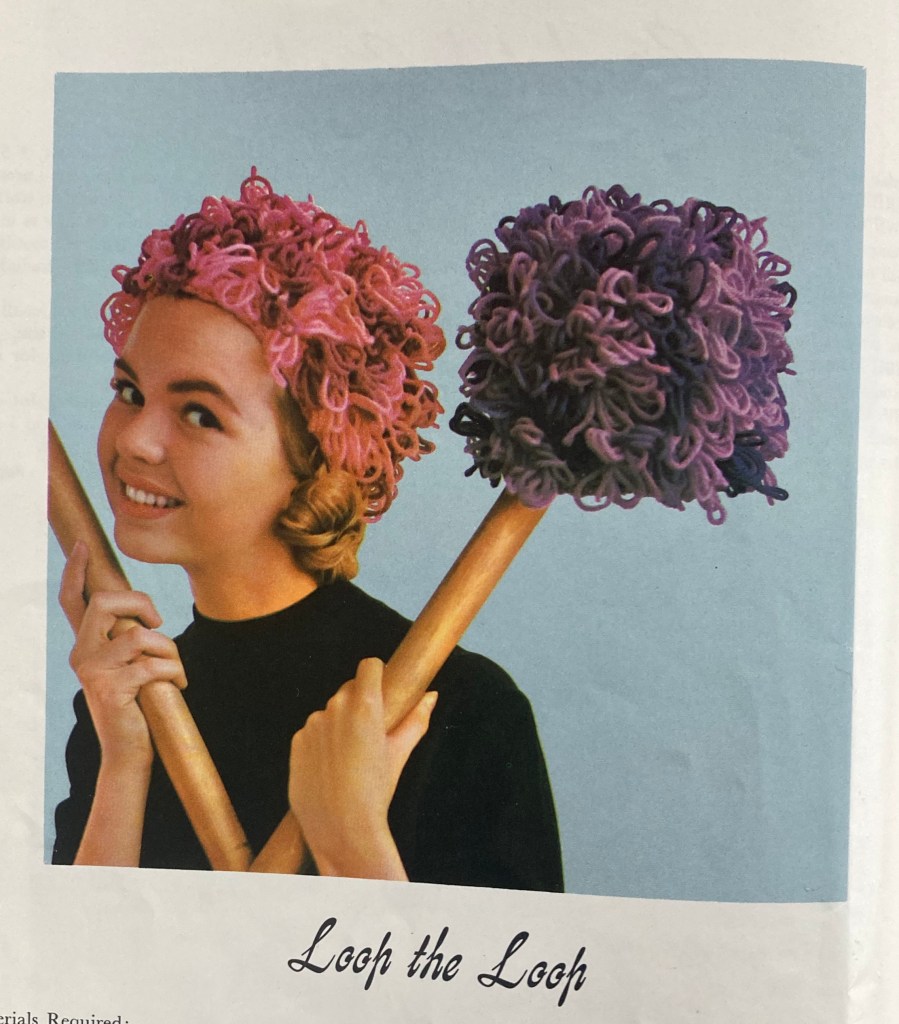
Loop-stitched accessories (knit or crocheted) enjoyed a trend in the early 1960s, and some of the designs were even more over-the-top than this one. Here are some examples from a 1959 American Thread Co. magazine book, “Fashions for the North South East West” for a “Loop the Loop” knitted hat as well as a knitted, looped-and-cut fringe hat and sweater. (The thing the model is holding the “Loop the Loop” on is supposed to be an oversized knitting-needle pole, but it just makes the hat look more mop-like.)
My first challenge with the crocheted Stitchcraft hat was finding the right wool. It’s written for “Ariel”, a wool-synthetic mix which is described as “triple knitting” but also “feather-light” and has between 15 and 19 stitches to 4 inches in stocking stitch, depending on the design. It seems to be normally plied and just slightly fuzzy. I had a hard time finding modern yarn in the right thickness (DK is usually 22 sts in 4 inches, and the bulky yarns I could find were more in the 12-16 stitch range.) Ultimately, I settled on Schachenmayer “Boston”, which is technically too bulky for this project, but which gave a great loop effect. I figured I could always make the hat a little smaller. It’s acrylic, which, I know, not great from an environmental standpoint, but very vintage-appropriate (not to mention probably waterproof).
I am not the world’s best crocheter and the loop stitch was a new technique for me, so it took a bit of getting used to. The word-for-word instructions are “insert hook into next stitch, place first finger of left hand behind hook and take wool anti-clockwise under finger and over hook then under finger again, (put wool clockwise over hook and draw through two loops) twice.” And true enough, if you follow those instructions exactly, it works, but requires a certain dexterity of brain as well as fingers. (1963 was a long way from the age of video tutorials…)
The finished hat has a loop of millinery wire in the crown to keep it from collapsing (and make it fit over your bouffant) and a ribbon to give it some shape. I had a bit of ribbon in stash with a very psychedelic pattern (so actually a few years too late in terms of 60s fashion — Stitchcraft has definitely not gone psychedelic yet — but it’s what I had.)
My colour choice was basic black, which I realised halfway through was maybe not a great idea. On the plus side, the loop fabric looks uncannily like those Persian lamb coats that were quite popular in the the mid-century years, and the hat would make the perfect matching accessory. You could even go all out and crochet yourself a modern faux-Persian-lamb coat in vegetarian-friendly synthetic yarn! Any vegans out there who have guilty dreams of vintage Persian lamb, this is your answer! I don’t have a Persian lamb coat though, nor do I particularly want one, and though I see the appeal of making a faux one, I don’t want it enough to put in the time and effort to design and make one. (Billie from the Show and Tell podcast suggested making long cuffs for a cloth coat in loop stitch to match the hat — that’s a really good idea.)
On the down side, I realised that this particular design in black had a high probability of making me look like either a recently groomed poodle or a white person in an Afro wig, neither of which are looks that I am trying to cultivate.
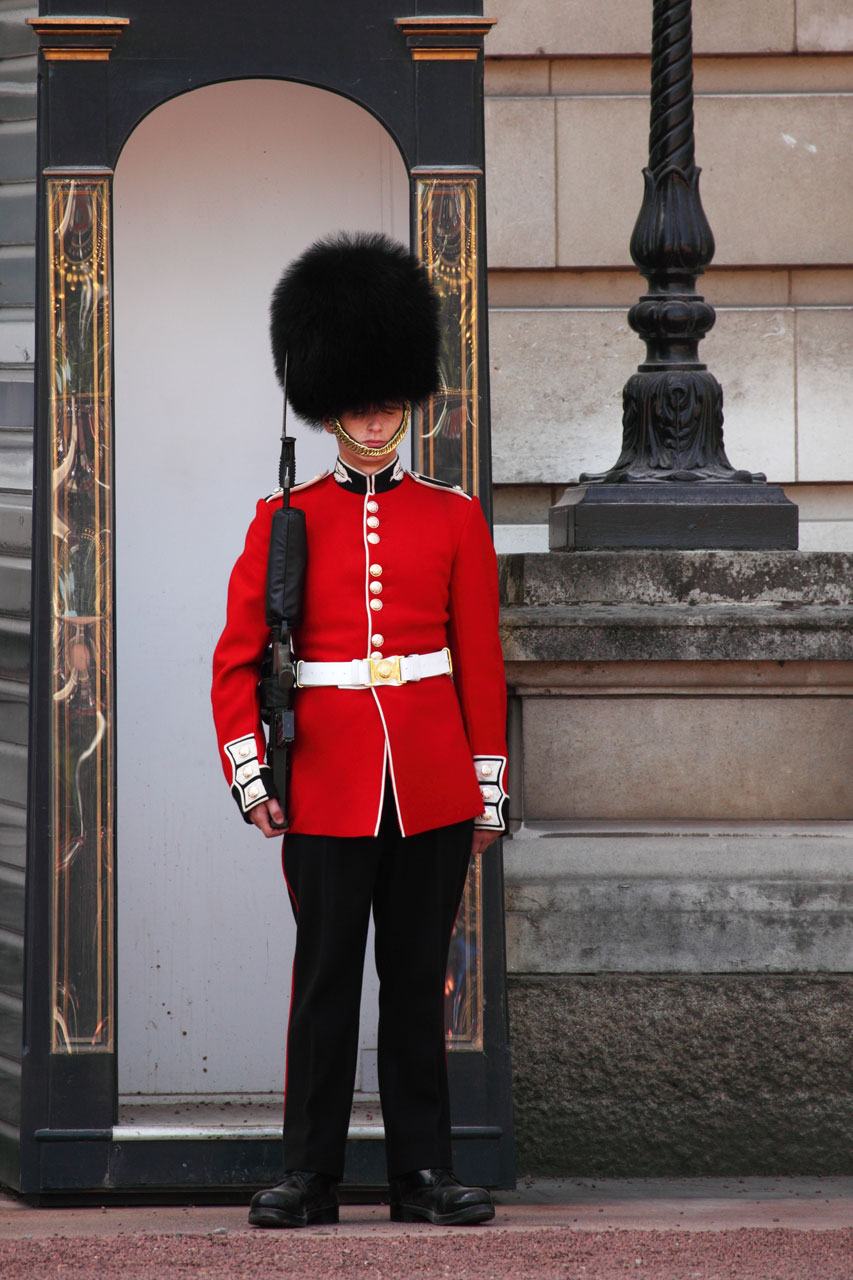
It ended up looking quite accurate, so you could say it turned out well, but I have to say, I am not convinced. The photo doesn’t do justice to the sheer ridiculous size of this thing, and the mop/poodle association is strong. If I wear it on top of my head, it looks like I am trying to join the Buckingham Palace guards.
If I push it back behind my hairline like the Stitchcraft model in the photo, it has the right basic shape and looks very 1960s, but it is still huge — the photo doesn’t do justice to the sheer size and mass of it. As always, I tried to recreate the magazine photo, and now I understand why the model looks less than overjoyed.
I don’t know what I am going to do with this hat, but I had fun making it and learned a new crochet technique, so I’m satisfied.
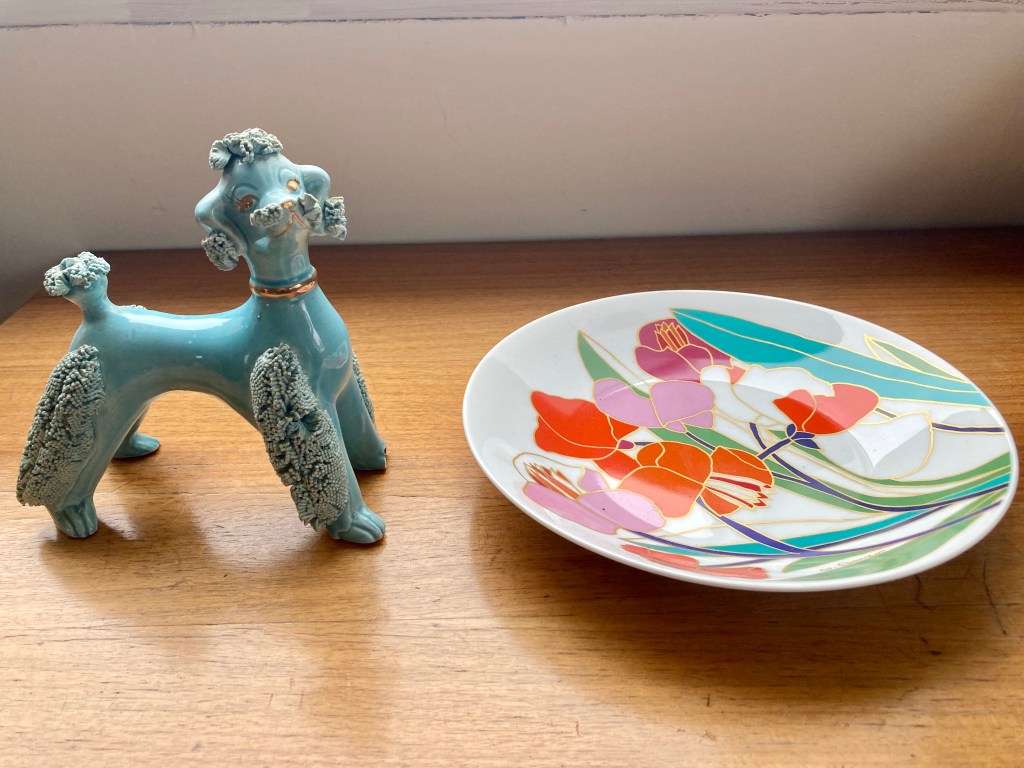
*For anyone thinking, “Turquoise poodles don’t exist”, may I present this amazing knick-knack that I inherited from my grandmother? (With historically appropriate plate.)
This month’s project was a crocheted cushion “to use up your wool left-overs.” It was promised to be “very quickly and easily made”, and it was! Nota bene, today is September 5th, I started this project on the evening of September 1st, and it is already finished, including blocking and photographing. I don’t think I have ever made any project, no matter how small, that went this fast.
It’s designed for DK wool and the original colours are black, flamingo pink, silver and white. Of course, I used leftovers of DK wool that I had in stash, and they happened to be more in the blue and green spectrum. The black is Jamieson’s Double Knitting left over from this blazer, the dark grey and turquoise are Reginella wool-alpaca mix from Chile left over from a non-vintage project, the more blue-blue is lovely Schoeller&Stahl left over from swatch knitting, the slightly darker green is Drops Lima left over from another non-vintage project and the lighter green is not technically a left-over, but hand-dyed wool from a knitting colleague. Yay, I used up some leftovers! The pattern is a standard granny-square shell stitch which just continues around to make… two giant granny squares.
I worked on both squares (front and back of cushion cover) at the same time in alternatum and was glad I did, because I ran out of some colours sooner than expected and had to adjust the colour scheme accordingly. I like how the colours turned out. The finished size in the pattern is 13 inches square, but I happened to have a cover-less cushion in the sewing drawer that was about 15 inches square, so I added another colour pattern repeat to make it fit. I considered dyeing the cushion turquoise, since I had some fabric dye and the crochet is fairly hole-y, but in the end I thought the white cushion showing through gave the dark colours in the crochet work a bit more pop. The edges of the two squares are crocheted together on the right side.
What more is there to say? I now have time to finish all those WIPs, so stay tuned for progress on the August 1963 cardigan… and the April 1963 embroidered blackwork cushion… and the I-don’t-even-remember-when-I-started-it-it’s-been-so-long epic Jacobean appliqué cushion. So many cushions, not enough sofas! Here’s one, at least.