
This month’s blog project was a bit different than planned. The August 1964 issue didn’t have any projects that particularly called to me. There was a nice baby set of “vest and pilch”, but I didn’t know anyone who was having a baby soon… or did I? In fact, I did know that a friend of mine was expecting twins, but we hadn’t seen each other for a while and unfortunately that fact slipped my mind until the babies were almost due! At which point I could have made two vest-and-pilch sets, but I wanted to get the project done quickly and also destash some yarn that was more suitable for a top/middle layer than to be worn right next to delicate baby skin.
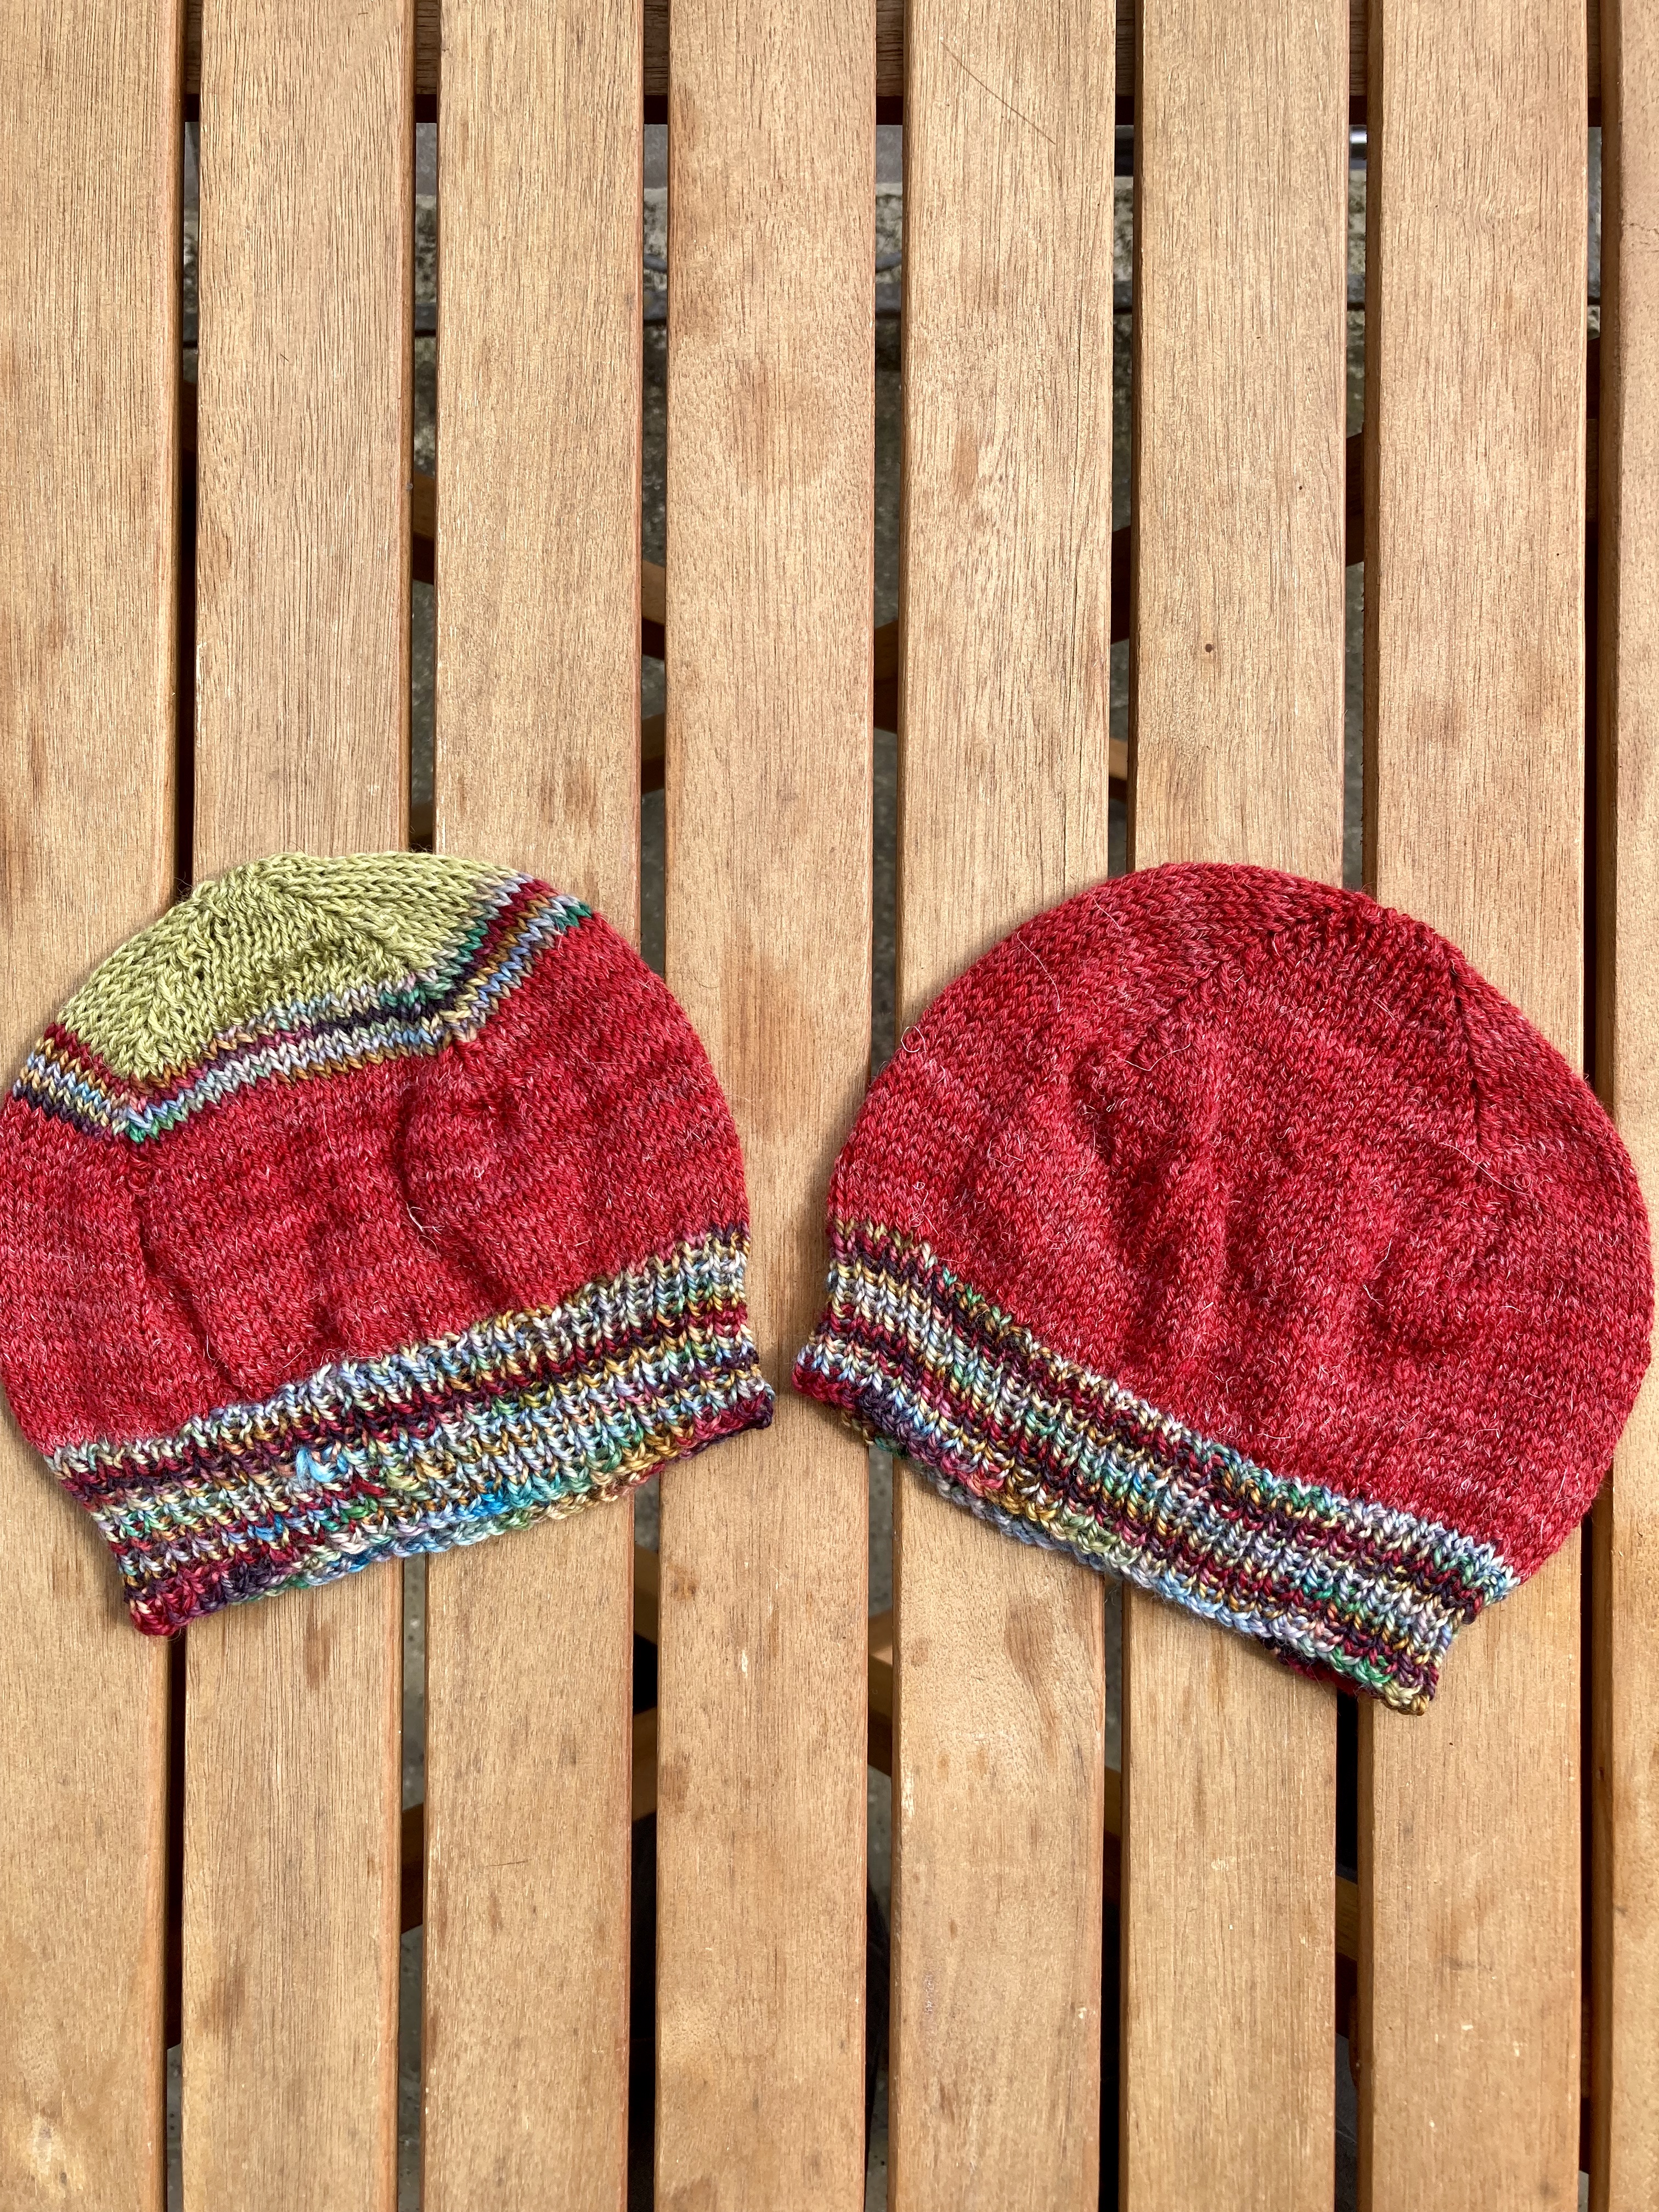
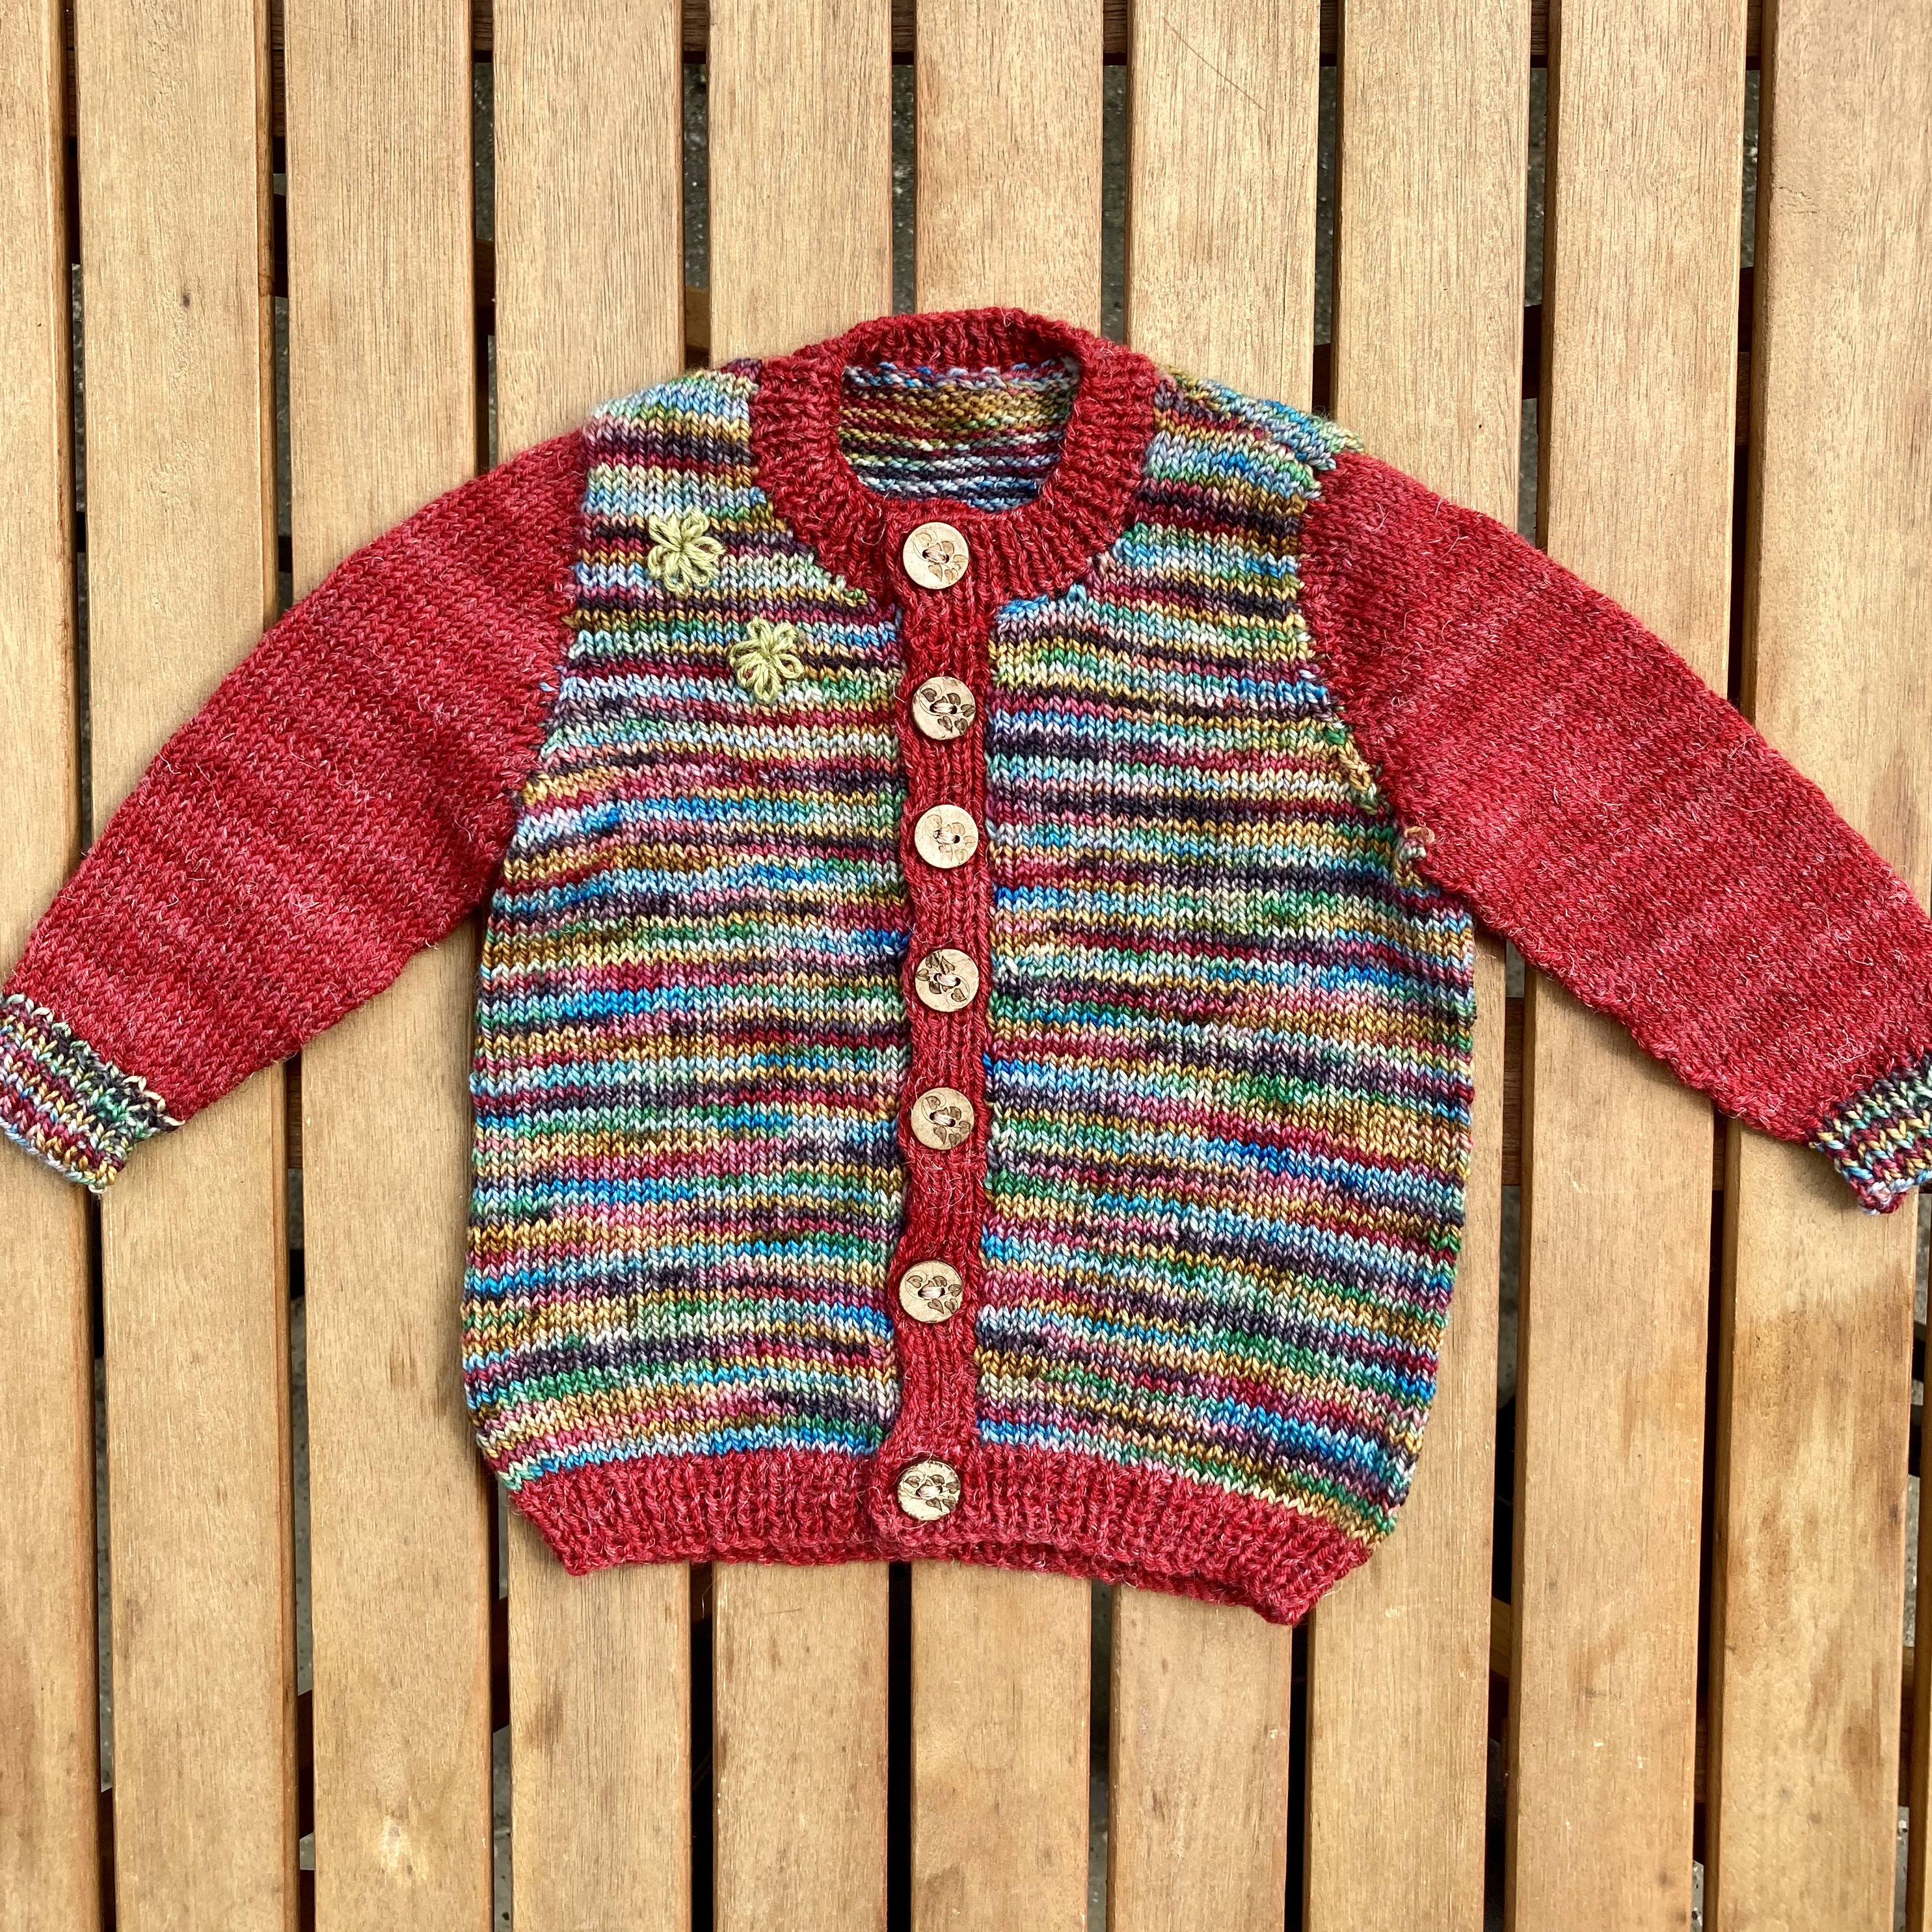
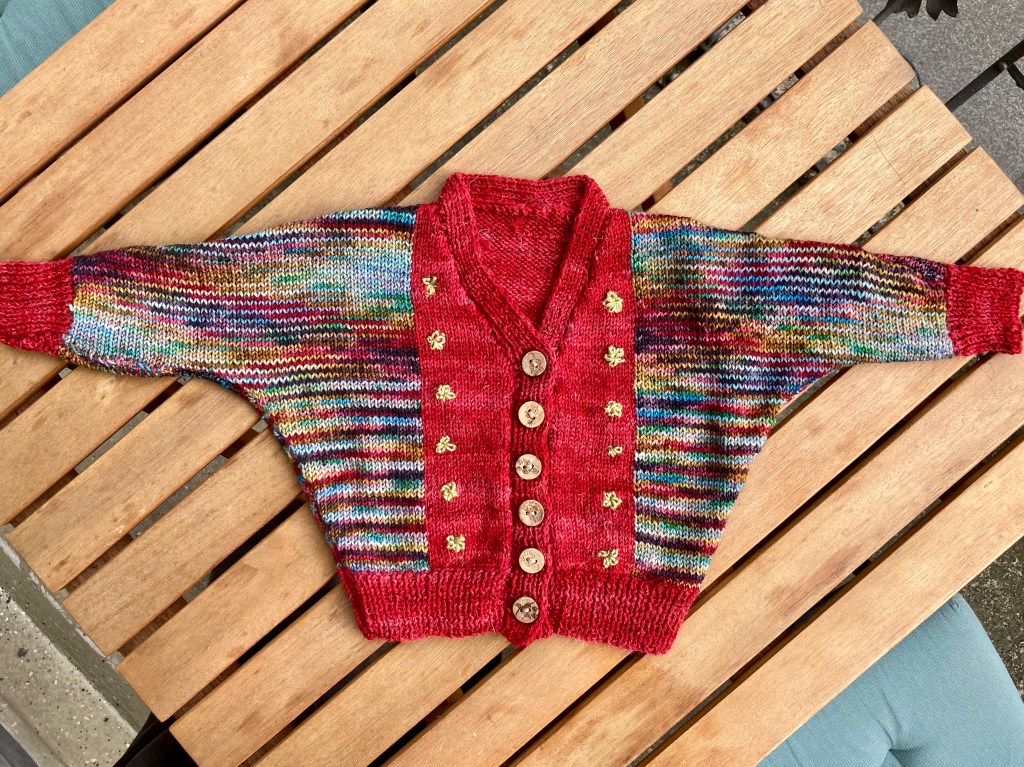
I decided to make two similar, but non-identical cardigans and opted to make one without a pattern and one from this pattern for a dolman-sleeve cardigan from Stitchcraft‘s October 1956 issue. The use of two block colours made it a good choice for the two yarns I wanted to use, and the embroidery was a cute touch.
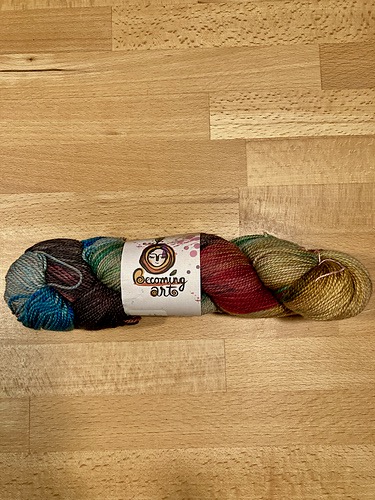
The pattern calls for Patons Beehive 3-ply Baby Wool at a tension of 8 stitches to the inch for a cardigan that is 19 inches around the underarms. My wools were Becoming Art Cielo fingering in the colour combination “Carousel” (multi) and Schöppel Admiral Hanf in red — admittedly not a very vintage colour combination or standard baby-pastel, but I like knitting bright colours for babies, and the mother’s favourite colour to wear is red, so I loved it.
Both wools were gifts — the Admiral Hanf from my knitting group’s holiday “secret Santa” and the Cielo Carousel a prize from the last KAL at the All Things Vintage forum on Ravelry. “Hanf” is German for hemp, which makes up 10% of the red yarn and gives it strength and durability. It’s not scratchy, but also not super-soft. The Cielo fingering is delightfully springy and squishy. I got 6.5 stitches to the inch with each of them on 3 mm needles, but saw no need to change the pattern, as a larger cardigan would be more practical for autumn/winter wear, when the babies will be bigger and wear more clothing underneath.
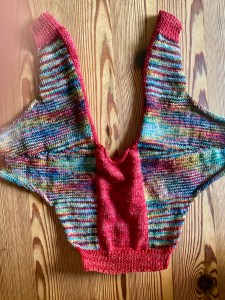
The cardigan is knit from the bottom up in three pieces — back and two fronts, with the sleeves cast on horizontally. The colour-block effect is made by using separate balls of wool and twisting them together at the colour change, intarsia-style. I made both the fronts together with separate balls of yarn on one needle to insure symmetry. The cuff ribbing is picked up and knit in rib after the main pieces are done and the front button bands are knitted separately and vertically in rib and sewn on. (I’m not a fan of this type of button band and would just as soon have knitted the bands together with the fronts, even if technically they’re supposed to be made on a smaller needle.)
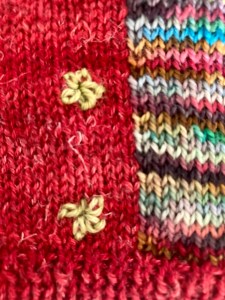
The little flowers on the fronts are embroidered on in loop stitch after everything else is finished. It was surprisingly difficult to get all the “petals” to be the same size and distributed evenly around the centre. Perhaps I should have made them larger. I’m always happy to practice embroidery on knitting, since I think it looks really cool, but it continues to be a challenge. The wool is a bit of leftover Onion Nettle Sock yarn.
One 100 gram skein of the multi-colour wool and one 50 g ball of the red were enough to make this cardigan, another “fraternal” cardigan (plain crew-neck with set-in sleeves) made without pattern using the multi-colour yarn for the body and the red for the sleeves and ribbing, and almost two hats with multi-colour ribbing and a red body. The crown of one hat was finished in the green Onion sock, which I also used to embroider two larger flowers near one shoulder of the no-pattern cardigan.
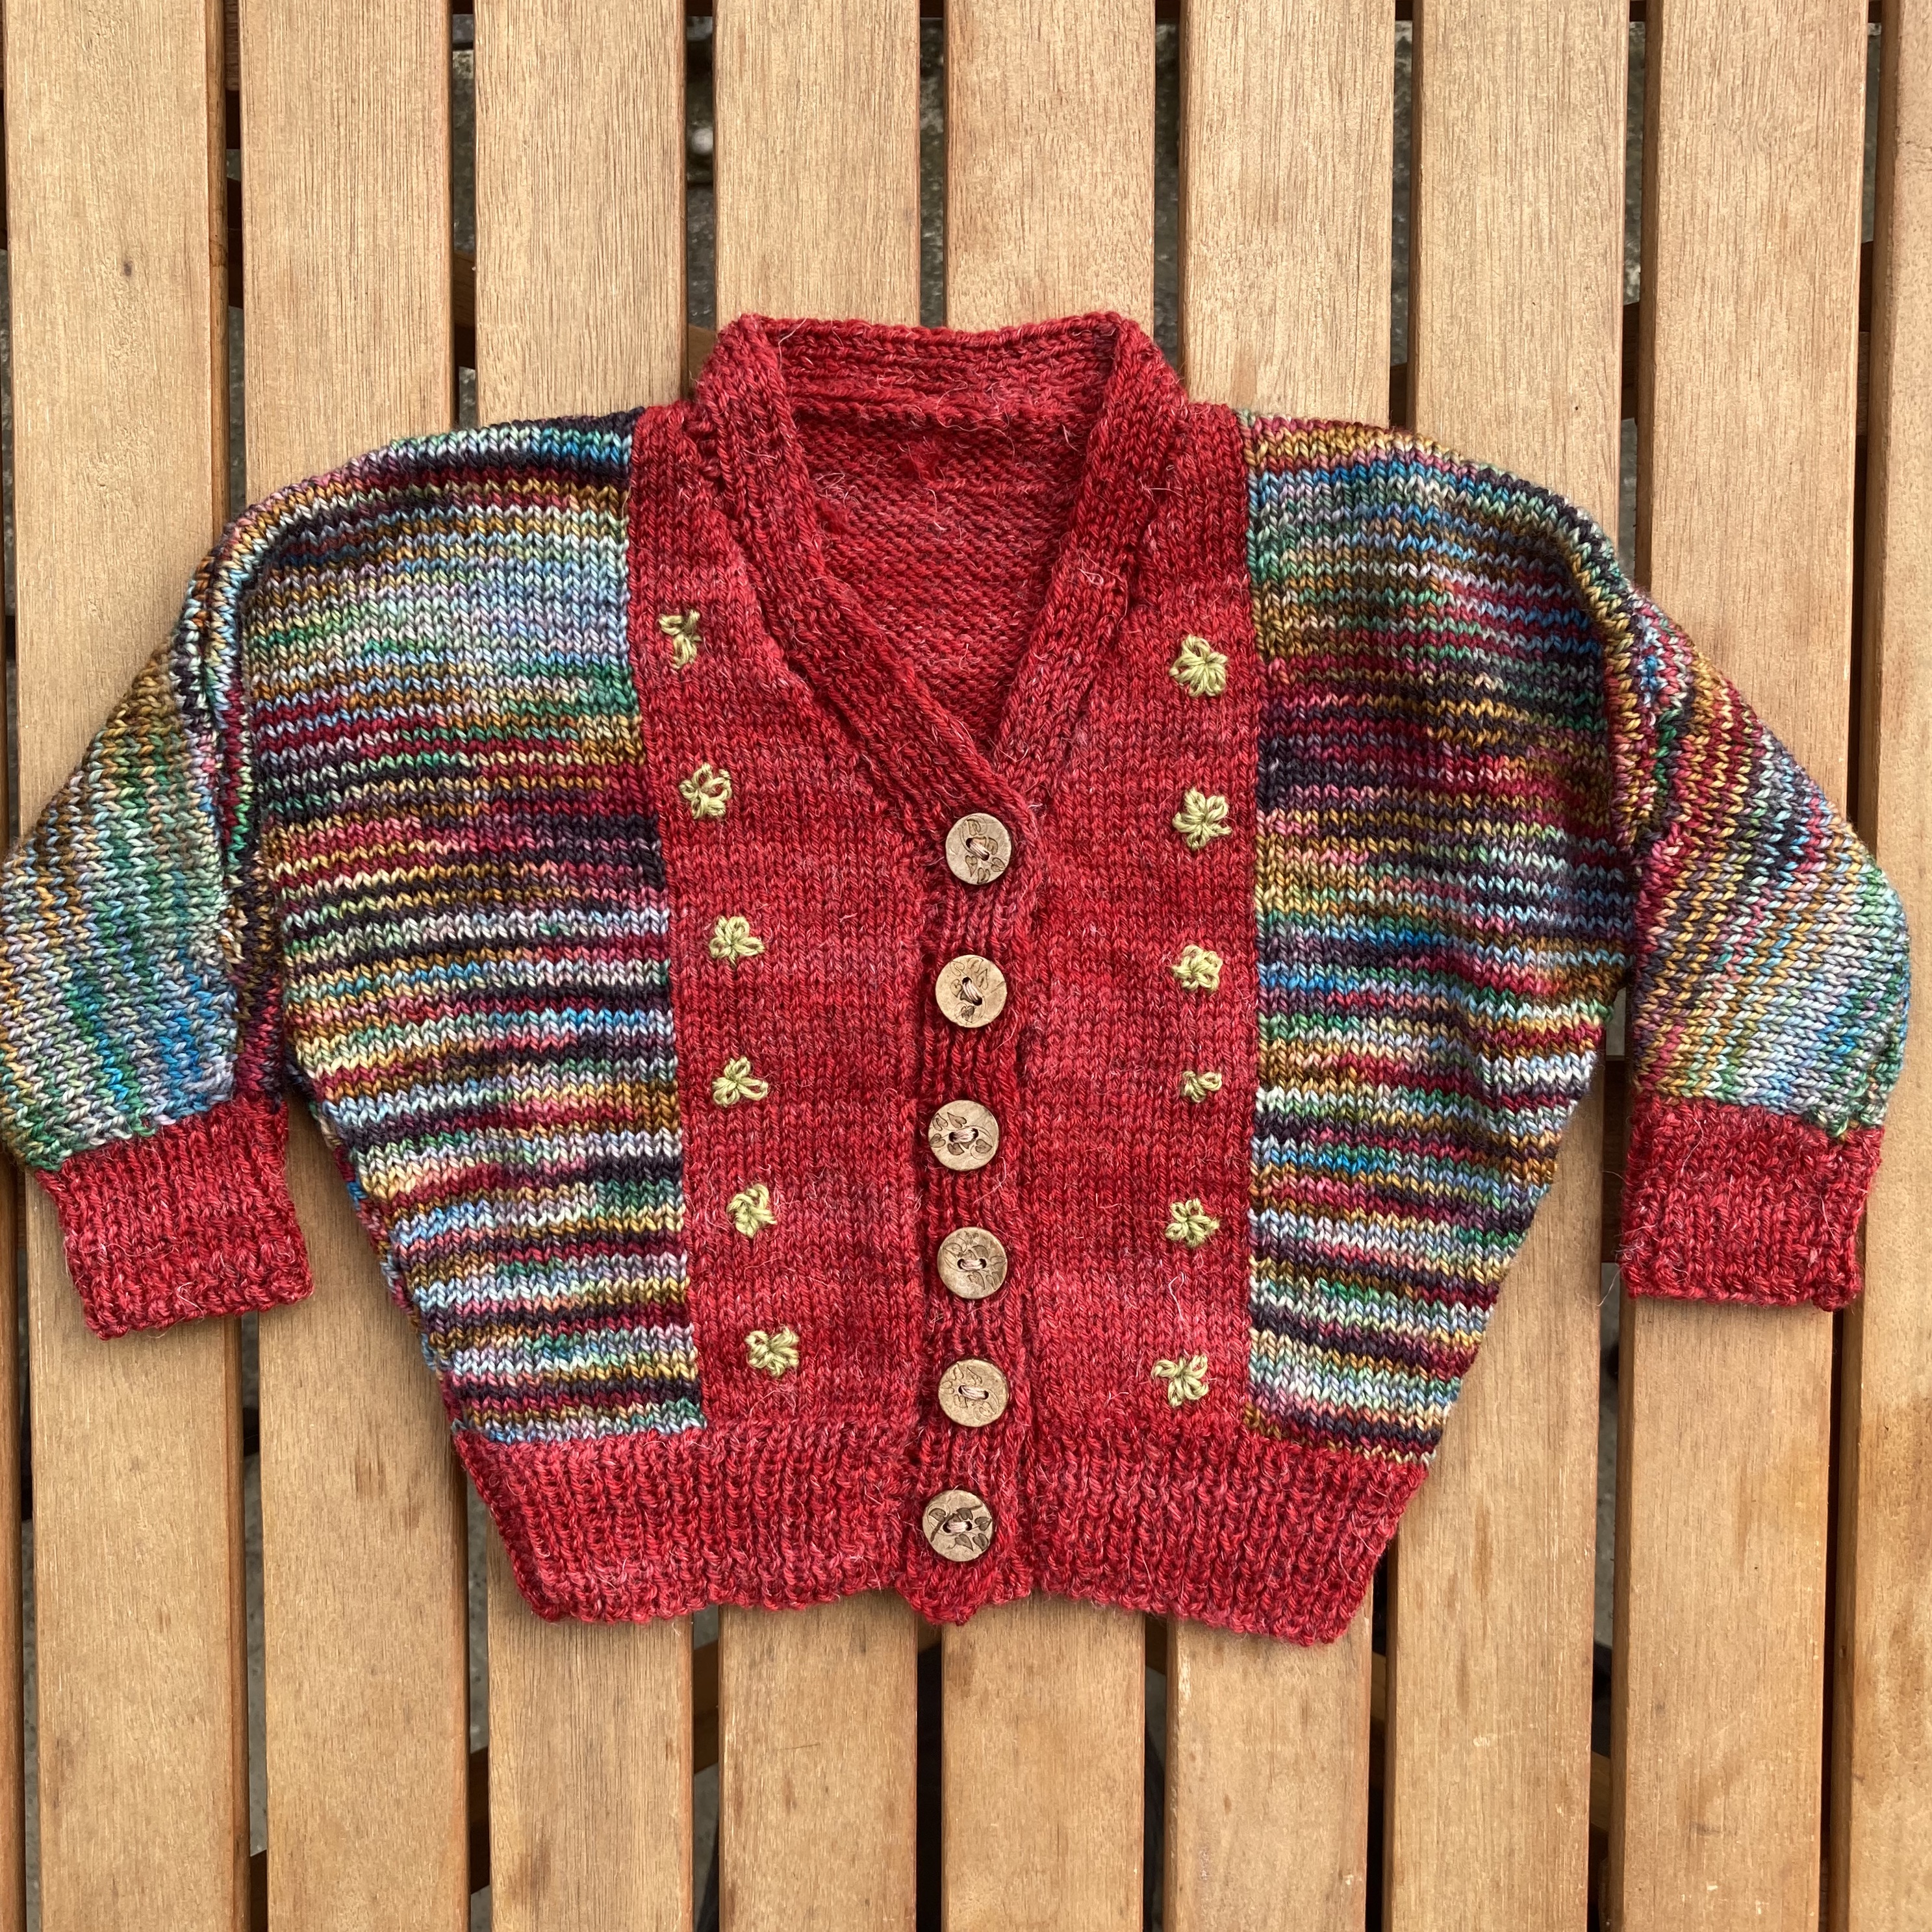
I loved the dolman pattern and will surely use it again for another baby. I love the similar, but not identical cardigans for (fraternal) twins. I love matching hats and cardigans. I love the bright colours! And I think these sets will be very useful for the twins and make the parents happy.
 My April project was the cardigan jacket, a.k.a. “matinee coat” from Stitchcraft’s April 1962 layette set “for an Easter baby.” The set included a dress, the jacket, bootees, a bonnet and a blanket to use as a pram cover, plus a sewn “pin-tidy” made out of a tiny baby doll with flannel and satin “skirts” to hold the safety pins for baby’s cloth nappies. The pin-tidy is a bit “uncanny valley” for my taste, but the knitted items are all lovely.
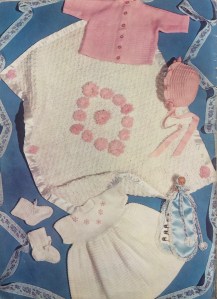 The colour is unusually dark for a baby garment, but I don’t this the friend whose baby-to-be I knit it for will mind — they wear a lot of black themselves. (Side note: I did make an all-black baby cardigan for a black-clothed metal fan father-to-be friend once, and he was thrilled, because he knew he would never find one in a store. Take note, baby clothing designers — there is a market out there!)
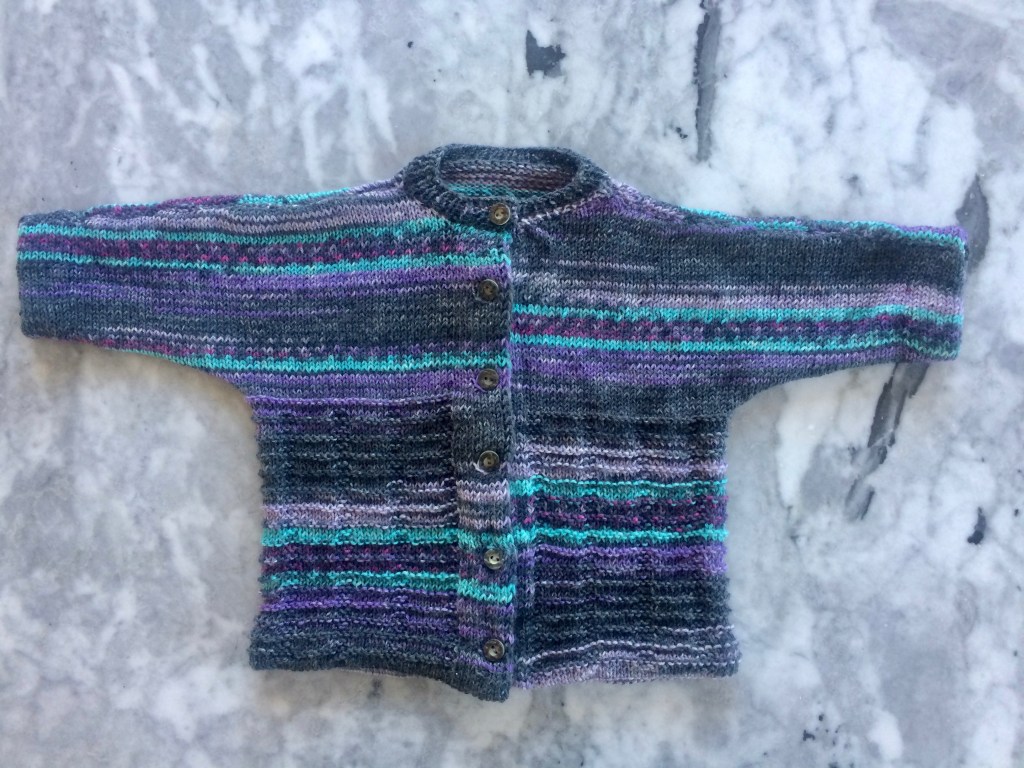
 There’s always somebody having a baby, and I do try to make something nice for all my friends’ and colleagues’ newborns. Sometimes I don’t manage to finish something until they are out of the newborn stage, which is why it’s nice to have patterns for larger babies! This dolman-sleeve cardigan, made in the smaller size, should fit a 22 inch chest, which should be fine for this particular eight- or nine-month old.
 The little leaf motifs up the front sides are quite easy and don’t require any cabling or special fuss. You just work into one stitch 5 times on one row, then work those 5 stitches in stockinette (on the reverse-stockinette background) for a few rows before closing off the leaf with decreases. The lace strips on the sides are plain yo, k2tog alternating with k2tog tbl, yo, worked on the right-side rows.
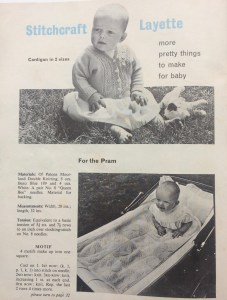 I used Jamieson’s wonderful Shetland Spindrift from a multicoloured stash that I had bought from a nice person on Ravelry. Some may say that Shetland wool is too tough for babies, but it does get softer with washing and since it won’t be worn against the skin, I think it will be fine. The colour — Buttermilk — is really beautiful, a pale yellow ever-so-slightly marled with shades of pink and winter white.
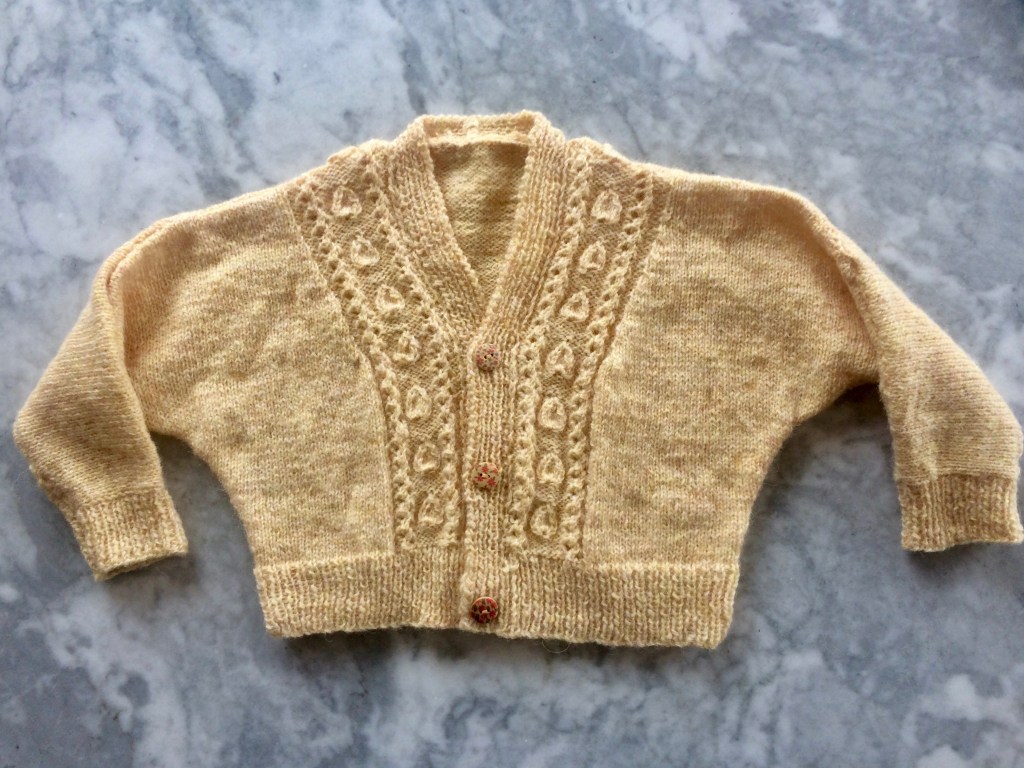
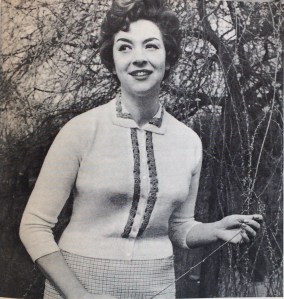 This “charming and unusual design for larger sizes” (37-38 or 39-41 inch bust) features narrow dolman sleeves, crochet insertions, and horizontal bust darts.
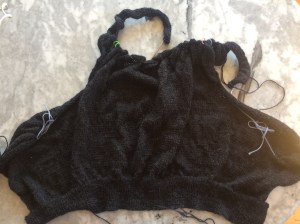 I was interested to see how it worked out with the dolman sleeves. When I think of “dolman sleeves”, I think of those 1950s, or worse, 1980s garments with a huge triangle of fabric under the arm, which must have been very uncomfortable and inconvenient to wear. But after my April 1960 blouse with the horizontal cap sleeves worked out so well, I was willing to give this one a try. And it turned out great! There is no more extra fabric under the arms than there would be with set-in sleeves, and the horizontal construction gives plenty of room in the upper chest/back area, where I am quite wide. I guess the secret lies with the number of stitches cast on for the sleeves per row — this one had 2×8 rows and then 10×16 rows, making the sleeves narrow and more horizontal, thus less triangle-like.
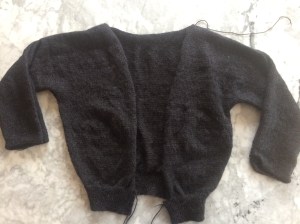 The knitting was slow-going at 7 stitches to the inch, but of course once the body was done, so were the sleeves. Seaming was a nightmare, as the yarn (Herriot Fine from
 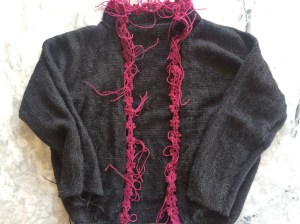 What took longer than expected was the whole crocheted edging-collar-button-band extravaganza. The crochet bands are extremely fiddly — they are crocheted onto each other as you go, it’s difficult to make them all exactly the same size, and each one needs its own, new piece of yarn. There are a total of 50 elements, so that’s 100 yarn ends to weave in right there. Then there’s the “inner” collar, the “outer” collar and the button bands, all of which are made separately and sewn on, and somehow need to end up symmetrical and fit properly on both sides. Of course, I sewed the collar on backwards the first time, forgot to switch the right and wrong sides at the collar fold, etc, etc. It all worked out in the end, though.
