 June 1961 was the issue with too many great projects in it and not enough time to make them all. My “official” project was this wonderful knitted blouse which took up the whole month, but there was also a very intricate appliquéd and embroidered cushion that will probably become a long-term learning experience project, as well as a great beach dress for a small child. Summer is waning, but I got the beach dress done.
There’s so much I love about this design: the sea horses, the buttoned straps in the back, not to mention the ridiculous poses and strange inflated? stuffed? animals that the kids in the photos are riding. Also: illustrations in the magazine, done by hand, with bubbles.
The pattern is for a 23-24 inch chest, with an 8 1/2 inch long skirt. The child I knit it for is a little thinner, but taller, so I made the width from the pattern and added 1 1/2 inches to the skirt length and made longer straps with multiple buttonholes for different length options/growing room.
 I decided to make it in cotton instead of Nylox (Patons wool-nylon mix from the 1960s) or a modern equivalent. It is always, always a problem to find non-mercerised cotton that is fine enough to give 7 stitches to the inch. Thick, mercerised dishcloth cotton is always available, mercerised crochet cotton is always available, but what passes as 4-ply or fingering weight non-mercerised cotton is just too thick. I decided on Natura “Just Cotton” which is non-mercerised, soft, pretty and supposedly free of harmful substances (Oeko-Tex certification). The label says it gets 27 stitches in 4 inches but that is illusory. The yarn is 8-ply! I don’t know why they don’t use 4 strands, thus making it a true 4-ply fine cotton for soft, light garments. I got 6 1/2 stitches to the inch with some effort, but the resulting fabric is a bit stiffer than I would have liked.
On the first try, the first ball of turquoise ran out shortly after the bottom sea-horse band and I was worried that I wouldn’t have enough, so I started over and made the skirt less full. Of course, the skirt lost a lot of its swing and I ended up with a ball and a half left over at the end… I used some of the rest to make a little kerchief that the kid can wear on her head for extra sun protection and cuteness. Let’s just hope it stays warm enough for her to still wear it this year.


 “August is an issue that needs special thought and planning” writes Stitchcraft‘s “editress”, Patience Horne, in the introduction to the August issue, pointing out that it is “rather an “in-between” month for needleworkers” — often too hot to want to wear or make heavy sweaters and too late in the year for fine-knits. At the same time, reminding people that “Autumn is around the corner” can be “a little depressing” to people enjoying their late-summer holiday.


 My favourite, though, is this sewing project: a head cushion that lets you recline charmingly in bed with your hair and makeup perfectly done, your satin nightie on, a book on your lap and your telephone on your ear. It’s glamorous leisure and lifestyle advertising personified, and though they say it’s an “idea for your bazaar”, I would bet the Stitchcraft readers who made this in 1961 did not make it to sell.
 Apropos lifestyle advertising, the early 1960s Stitchcrafts show a rise in full-page ads for Patons and Baldwins wools. That’s obviously not surprising considering the magazine was published for the Patons wool company, but the full-page ads that “tell a story” are a new trend: the late 1950s and 1960s issues up to now had little celebrity testimonials. This one caters to grandmothers and the message is clear: Knitting is not only a rewarding pastime on its own, but earns you the love and affection of the grandchildren for whom you knit. (But only if the kid likes it, and that’s only guaranteed if you use P&B wools, of course.) The 1950s and 1960s saw a huge shift in advertising methods towards a psychologically-based system, which is a huge topic that I won’t start with here, but suffice to say there will be more of these ads, and that they are representative of changing advertising styles.
 September’s issue had a fantastic design of blackwork fish on a cushion. Blackwork is a type of embroidery combining counted-thread patterns (the fillings) with regular crewel embroidery stitches for outlines and details. I loved the way it looked but had never tried it before, so this was another Stitchcraft Sixties debut.


 The pillow was easy to make up, as I didn’t use piping (I thought the design was bold enough that a plain edge would be nicer.) All in all, I love the look of blackwork but don’t like the effort. I guess it’s easier on a looser-weave fabric where you can really see the holes in the weave to count them. It was made as a gift for a friend who I think will really like and appreciate it, and I feel happy giving it to her, as I am quite satisfied with the final result.
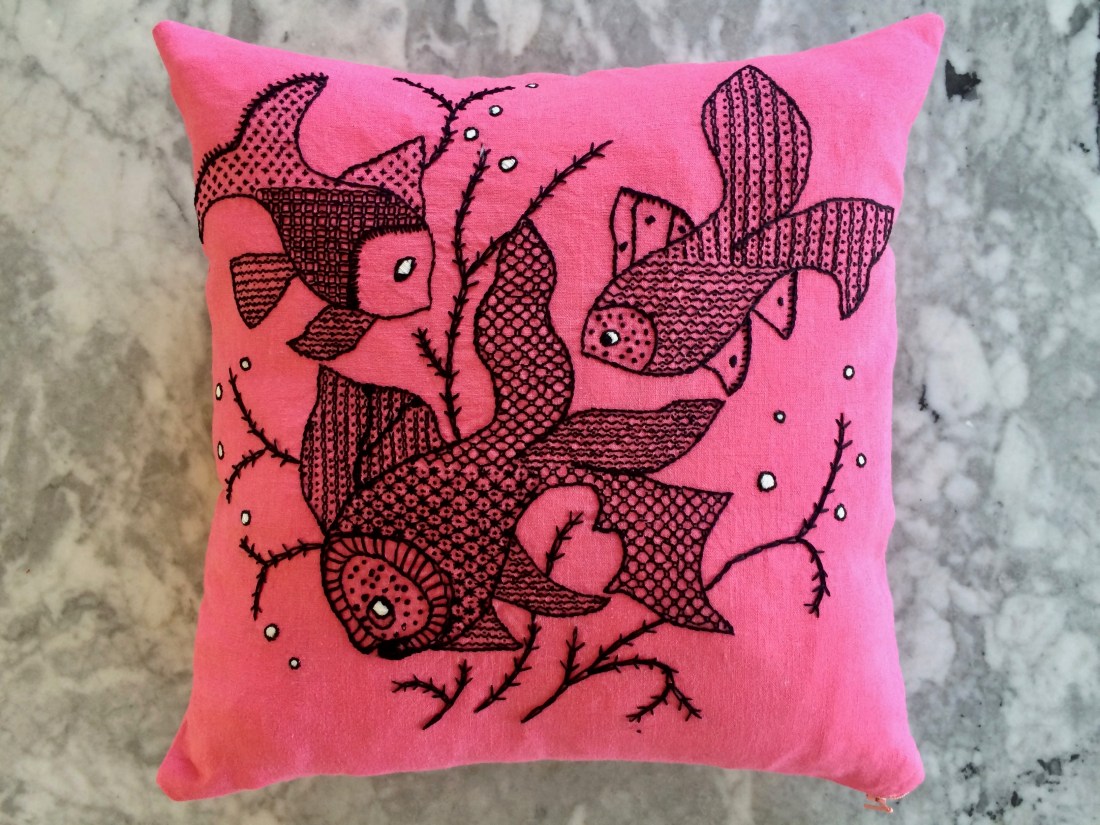
 To be honest, the June 1960 issue didn’t really have any designs that enticed me. The little summer tops were nice, but I still hadn’t finished the little summer top I started
 This was my first time working in counted cross-stitch and I thought it would be easy. You just have to count the squares and thread the embroidery cotton through the holes in an x, right? I was so, so wrong. First of all, I didn’t know what “gauge” fabric to buy, so I chose one that seemed medium-sized to me, where I could see the holes pretty clearly. I should have chosen a size bigger, since the holes were still absolutely tiny to my (perfectly good) eyes. Counting the holes was much more difficult than I expected, since they all looked the same and seemed to move around when I tried to count them.
 The embroidery itself was slow-going and not totally accurate, i.e. I do not think I always got the right number of threads (2×2 for each cross). Even when I did, the stitches were uneven and raggedy. (I did make sure that the stitches are all going in the same direction and the same top-bottom stitch pairing.) Also, it was just plain no fun to work. What a pity — the idea was so good!
 After I finished the birds, I embroidered the initials of the happy couple underneath in simple block letters (not that it was simple to get the right stitch count and center it) and framed it in an embroidery hoop with the help of
 June, the month of leisure! Or at least, leisure knits — “Fashions for Sun and Sea.” Stitchcraft’s “editress”, Patience Horne, reminds us that it’s important to have something to knit or sew while on holiday, as “it helps us to relax”, and points out that “A lot of knitting and embroidery is done in the deck-chair by busy housewives who never get time at home, and find it difficult to ease off suddenly.”
 1950s and 1960s… meaning the housewife/mother of the family had to shop, cook and keep the tent or living space tidy just as she did at home, but in worse conditions (rain, mud, no proper grocery stores, camp stove, having to fetch water for cooking and washing up). Doesn’t sound much like leisure time to me! Of course, if you were rich enough to stay in a nice hotel and eat out for meals you might well have some time for handcrafts, but that wasn’t a possibility for all families, and Stitchcraft‘s target audience was more working-to-middle-class.


 This is definitely a “cosy of unusual charm”! (Despite the ripped corner on the back cover photo.) It features appliqué and embroidery with different designs on each side and instructions to make it up into either a regular cosy to put over the teapot, or a “nest” to put the teapot into.


 bit of herringbone and the tiny straight stitches in the strawberries. Still, it was more ambitious than any embroidery I have tried up until now. It doesn’t look quite like the picture and I did take a little bit of licence, but on the whole I was pretty satisfied… except for the legs. Oh dear, oh my, oh no, the legs. I did them three times and they still look weird. Either the angle is wrong, or the thickness, or I don’t know what, but I figured doing it again would only chew up the fabric more, so it is what it is.


 “Cheerful goslings make gay kitchen ideas” — who could resist? There are patterns for a serving glove and a felt tea cosy, neither of which I particularly needed, but the tea-cosy pattern is just about the right size for an iPad case. So this became the modern version.


