EDIT December 31st, 2021: FINISHED!
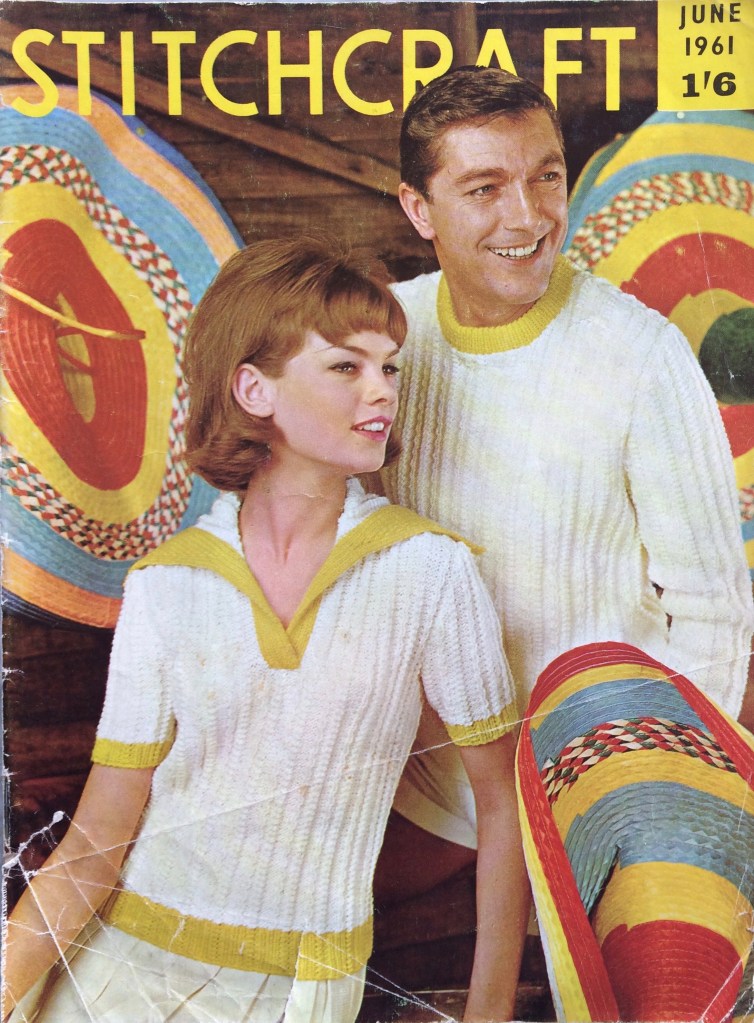
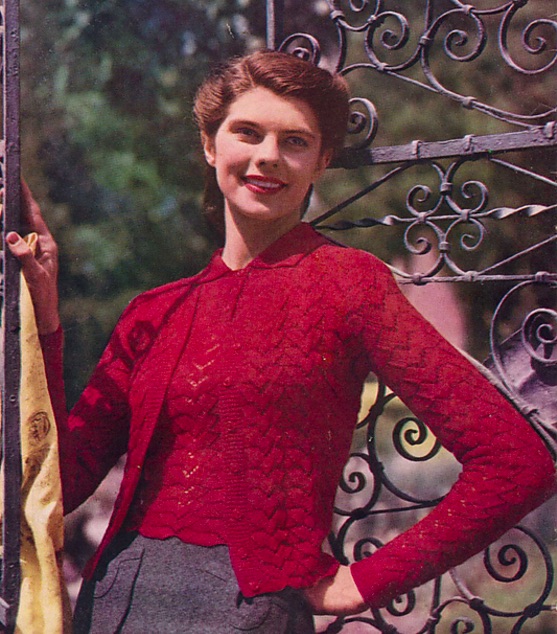
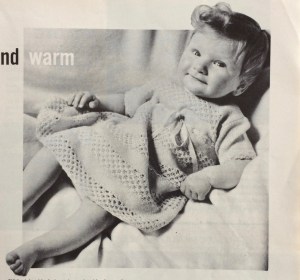
July 1962’s issue didn’t have anything in it that particularly interested me, so I took the time to go back to the June 1961 issue, which had so many nice projects in it that it was hard for me to decide which to make. (I ended up making this lacy top and later, this child’s tunic-dress.)
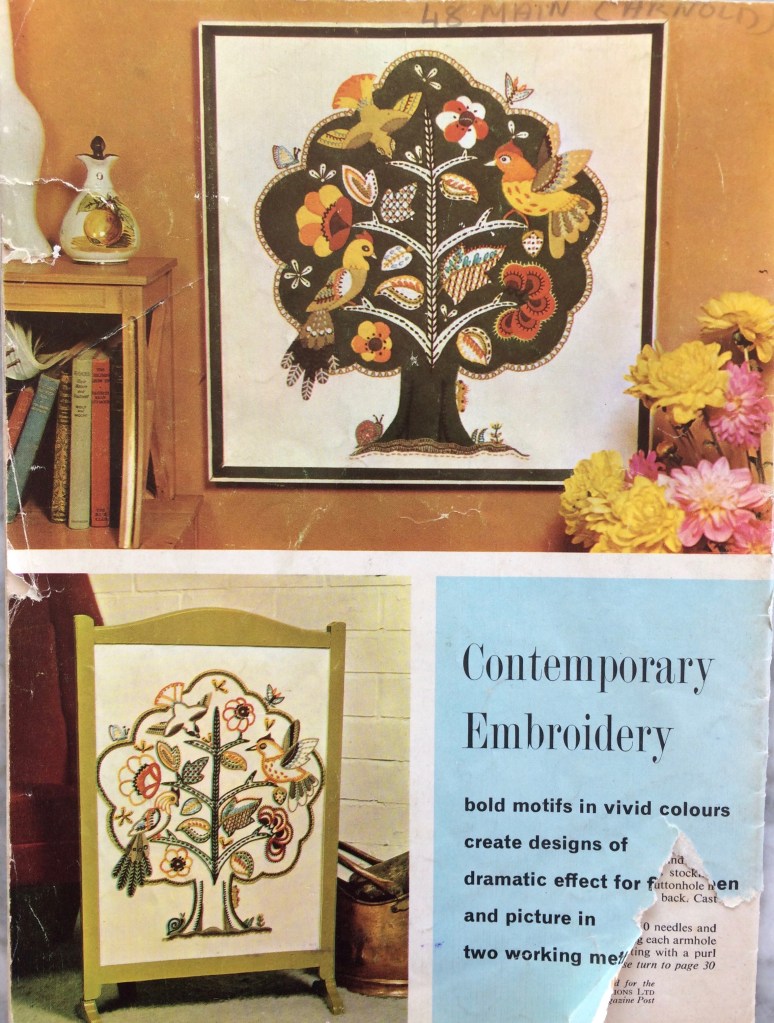
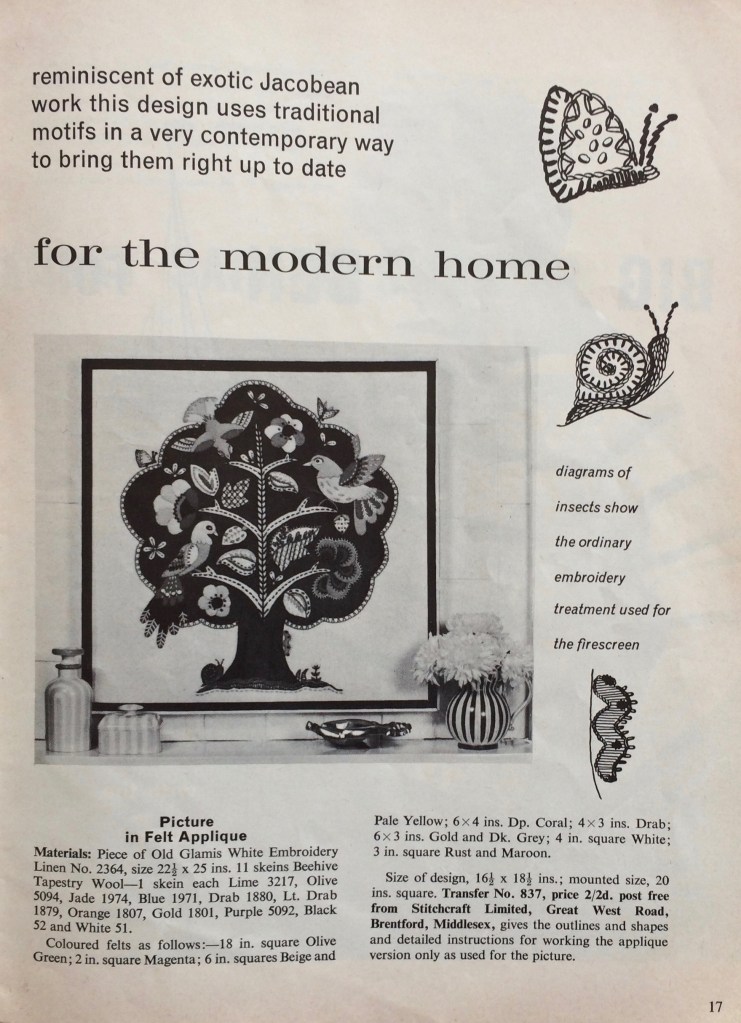
I loved the extremely complicated, heavily embroidered, faux-neo-Jacobean felt appliqué “birds in a tree” extravaganza featured in colour on the back cover, but it was too daunting. For one thing, of course I didn’t have the transfer or pattern for the appliqué pieces, since I would have had to have sent away for them via postal order in 1962. For another, there weren’t even any instructions in the magazine — the design was offered as either an embroidery or an appliqué project (see photo), and the instructions in the magazine only covered the embroidered version in any detail. The appliqué version just gave a list of materials, size of finished design, and the address where one could order the pattern and instructions. And when it comes right down to it, my appliqué and especially, embroidery skills are really not very well developed.
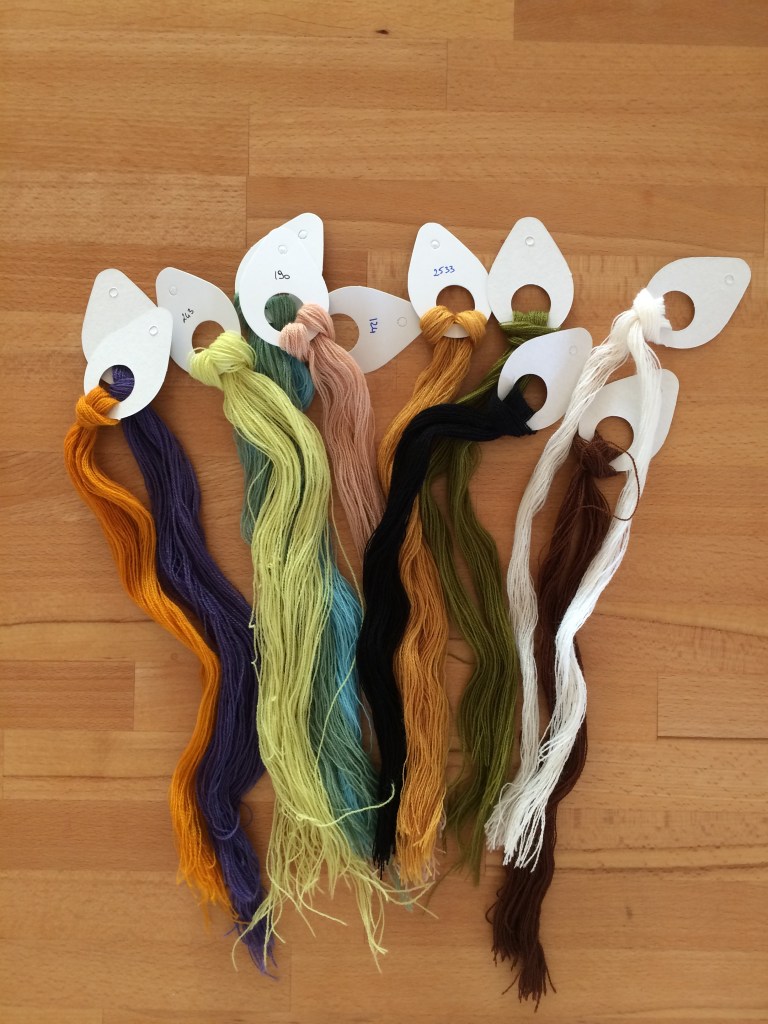
Oh yes, and while felt is easy enough to buy, the materials included tapestry wool for the embroidery, which is impossible to find in stores anywhere near me and even difficult to order online in the right weight (very fine)! Luckily, last year I happened to be in the one city I know that houses the one shop I know that actually specialises in tapestry and sells the right kind of wool, so I was able to get that, at least.
I decided to make it as a cushion, not a wall hanging. The background tree was easy enough. Technically, the white branches and leaves should have been made by cutting holes in the green tree felt and letting the (white/beige) background fabric show through, but since I chose a blue background fabric, I appliquéd them as well. It was predictably difficult to make and cut out my own patterns for the little bits of felt for the birds and leaves, and after making the first two birds, I realised it was easier to just cut the pieces freehand. Since there were no instructions to follow, I went from the photo and the instructions for the embroidered version, which obviously didn’t give much useful information.
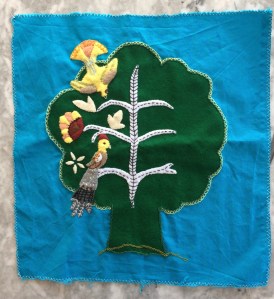
Such a detailed project took forever, of course. It needed many tools and materials, so I could only work on it at home at a table, and not during the winter months, as I needed natural light for the fine work.
I made two of the birds on the left first, wasn’t really happy with them, and realised why after making the first flower on the left. I liked the way the flower turned out — it’s much simpler! The birds seemed overdone in comparison. I thought about changing the design and realised at some point that, of course, the who idea of this neo-Jacobean, embroidered and appliquéd extravaganza is that it is supposed to be over the top.
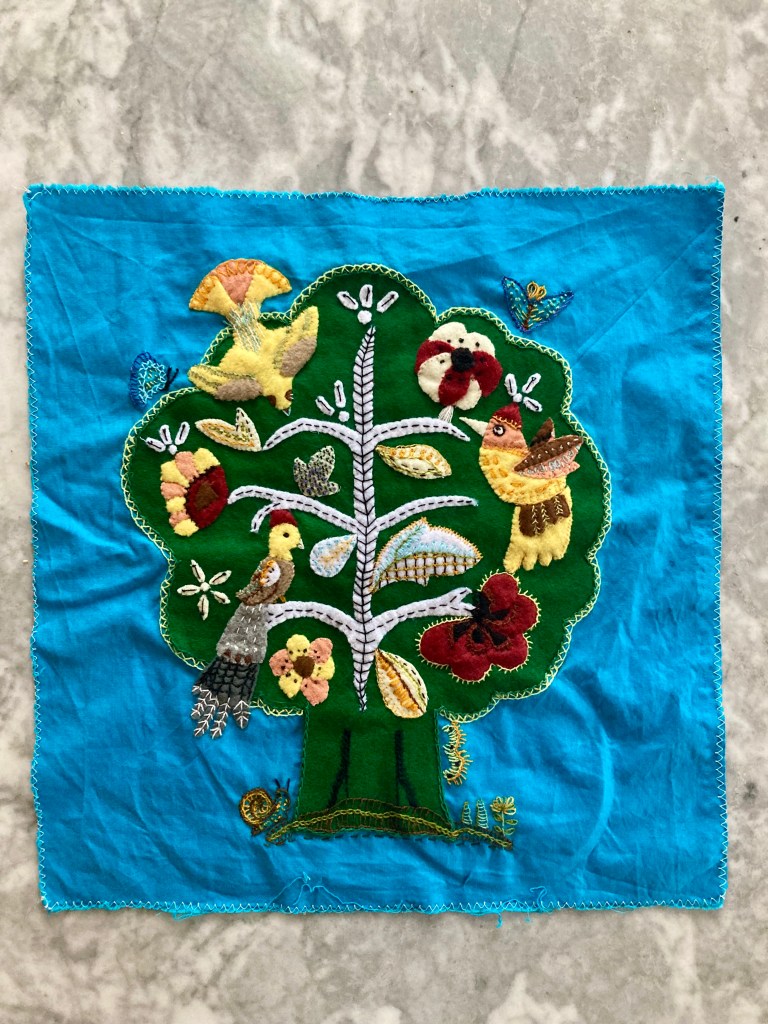
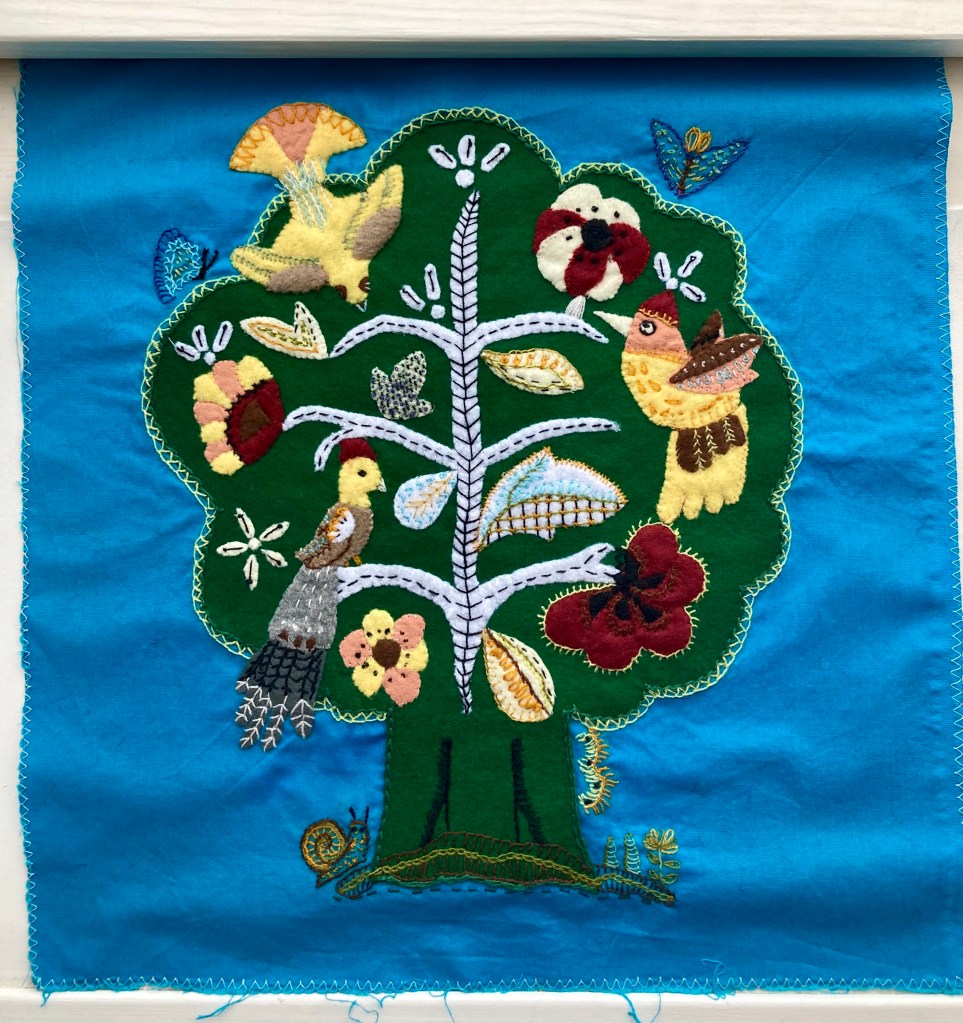
And so, slowly and painstakingly, it got done, one piece at a time. (It also spent a lot of time in the cupboard in between bursts of activity.) The embroidery directions in the magazine were often quite different from the appliqué version, so I did a lot of guesswork and adaptation based on the (rather small) colour photo on the back cover, from which the colours had changed and faded in the 50 years since its printing.
I was determined to get it done before the end of 2021, and I did (on December 31st.) It was a huge milestone for me in my appliqué / embroidery learning process, and I am really, really happy with the way it turned out.


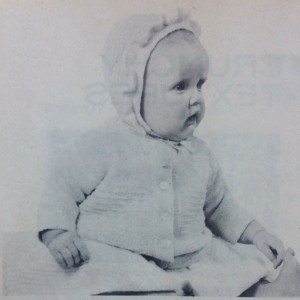 My April project was the cardigan jacket, a.k.a. “matinee coat” from Stitchcraft’s April 1962 layette set “for an Easter baby.” The set included a dress, the jacket, bootees, a bonnet and a blanket to use as a pram cover, plus a sewn “pin-tidy” made out of a tiny baby doll with flannel and satin “skirts” to hold the safety pins for baby’s cloth nappies. The pin-tidy is a bit “uncanny valley” for my taste, but the knitted items are all lovely.
 The colour is unusually dark for a baby garment, but I don’t this the friend whose baby-to-be I knit it for will mind — they wear a lot of black themselves. (Side note: I did make an all-black baby cardigan for a black-clothed metal fan father-to-be friend once, and he was thrilled, because he knew he would never find one in a store. Take note, baby clothing designers — there is a market out there!)
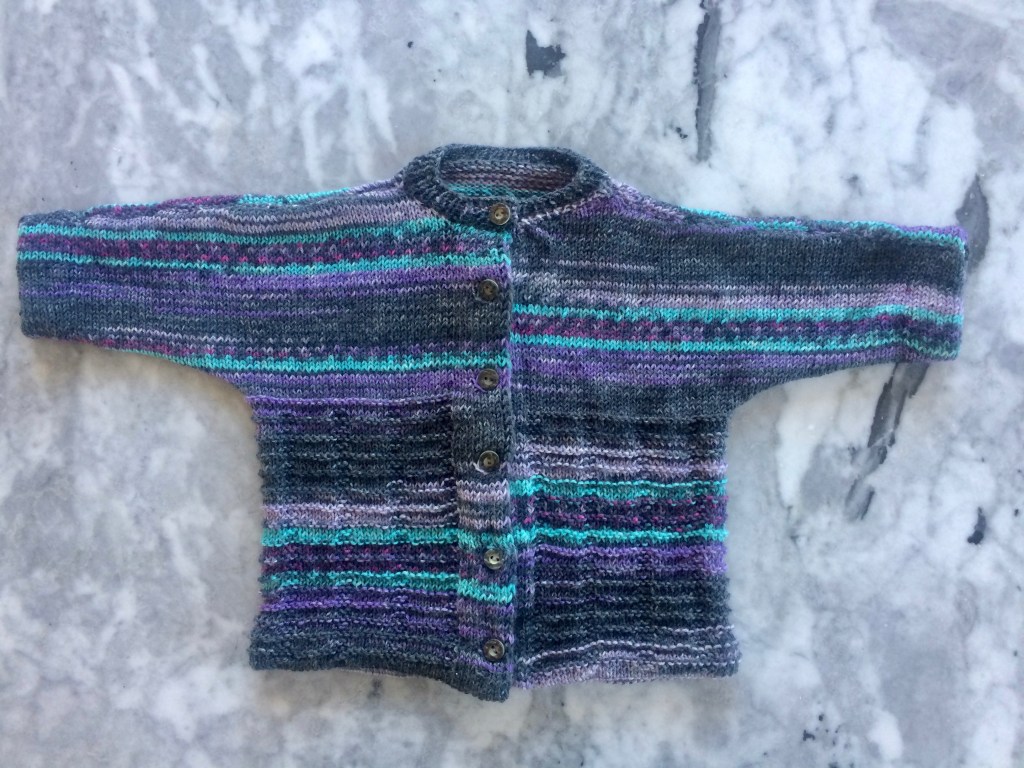
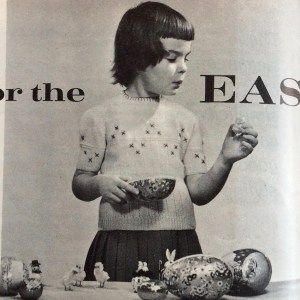 Greetings from the Covid-19 lockdown! March 1962’s project sports the headline “Ready for the Easter Parade” in the magazine, but there are definitely not going to be any Easter parades in March 2020. I hope all of you, dear readers, are staying healthy and staying home.

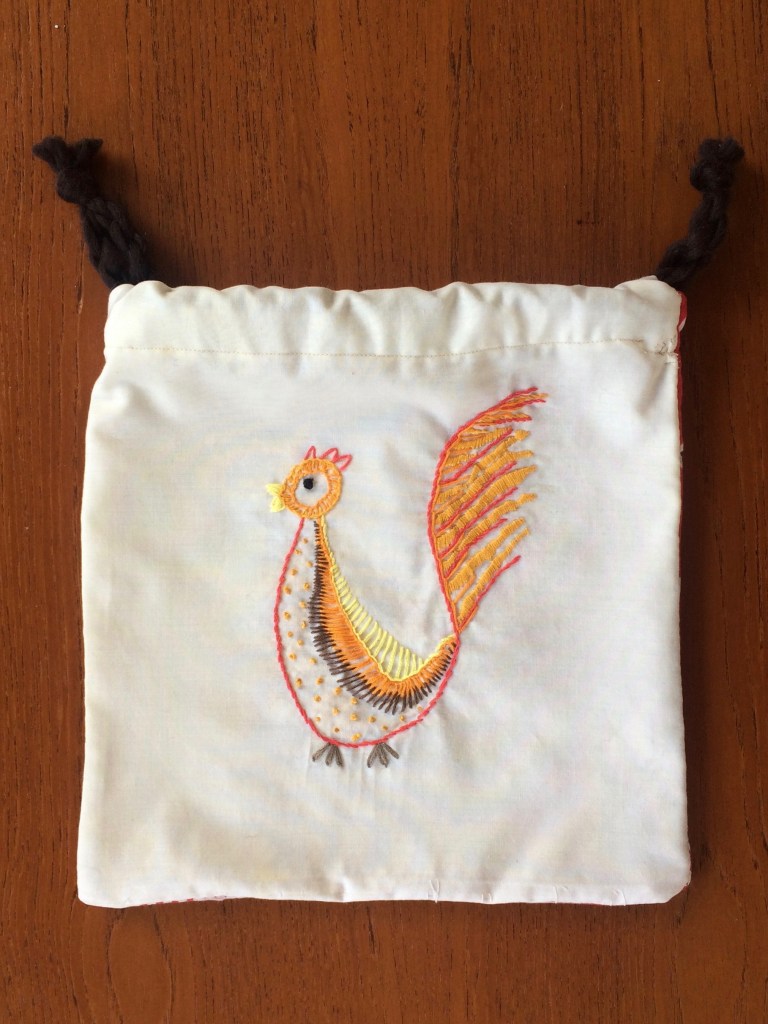
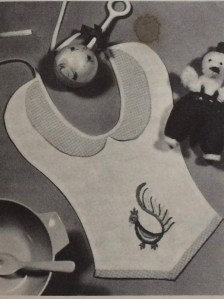 No, it’s not the menu choice for tonight’s dinner, don’t worry. My February 1962 was a little embroidered… animal , originally designed for a toddler’s “feeder” and which I adapted into a bag for vegetables/small projects/”stuff”. I say “animal” in this vague way because it is referred to as a “Squirrel” in the instructions, followed by more specific instructions on how to embroider the supposed squirrel’s beak and feathers. I can maybe, maybe forgive enough poetic license to call a squirrel’s mouth a “beak”, and the creature’s fluffy tail could be mistaken for a squirrel’s, but feathers… no. It also looks suspiciously like a chicken in the photo! So, not a squirrel, but a chicken and a proofreading error.


 I hang out a lot in the “All Things Vintage” forum on
 Adding to the frustration: as always, no matter how small the needles or how thin the wool, I could not knit tightly enough to get the minuscule gauge, which itself was only given as a “life-size” photograph in the pattern. Of course, I am also larger than the 34-35 inch bust given in the pattern, but how much larger the garment, calibrated for how much larger the gauge? Right, lots of calculations, estimations, measurements upon measurements, and just plain guesswork. Plus the thing pulled together either more or less, horizontally or vertically, as it got larger — my gauge swatch (a pocket lining) was utterly useless. I had to start three times.
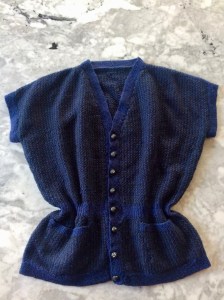

 UPDATE AND EDIT February 25, 2020: Project finished!
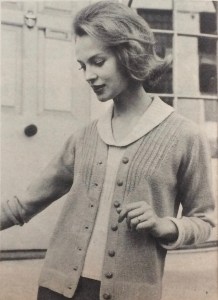 There were only two problems. Problem number one: Concept Silky Lace is only available in colours I don’t wear (shades of white and pastel) as well as orange (great, but I used it for the other project), a sort of light jeans blue (OK, but not exciting) and purple. Purple is not my best colour, but given the limited choice and the fact that I really wanted to use this specific yarn, I went with it. That led to problem number two: there were only two balls of it in the store and they had to order more. Unsure whether the two additional balls I ordered would be from the same dye lot or if it would make a difference if they weren’t, I started by making the sleeves with the yarn I had, and waited.
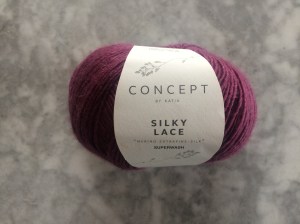 It took more than two weeks for the yarn to arrive, so I was woefully behind. Also, the yarn that arrived was from a different dye lot, so I wasn’t sure how to camouflage the colour changes or if I even had to. After making the ribbing for the body in the “old” yarn and the body (stockinette stitch, and I decided to do it in rounds to go faster) with the new yarn and not noticing any difference, I just used up the old yarn and moved onto the new in the fancy-yoke part. It worked fine and didn’t make a stripe — thank you Katia for your excellent colour-match dye work.
 Once the project got started, it was finished very quickly. I was worried about the size, as it seemed to stretch quite a lot width-wise and I though it would be too wide and baggy. Once it was bound off and sewn, it was fine. I made it an inch longer in the body than it said to make it in the pattern, but I could have made it even longer — people were really short fifty years ago!?! Blocking helped stretch out the length.


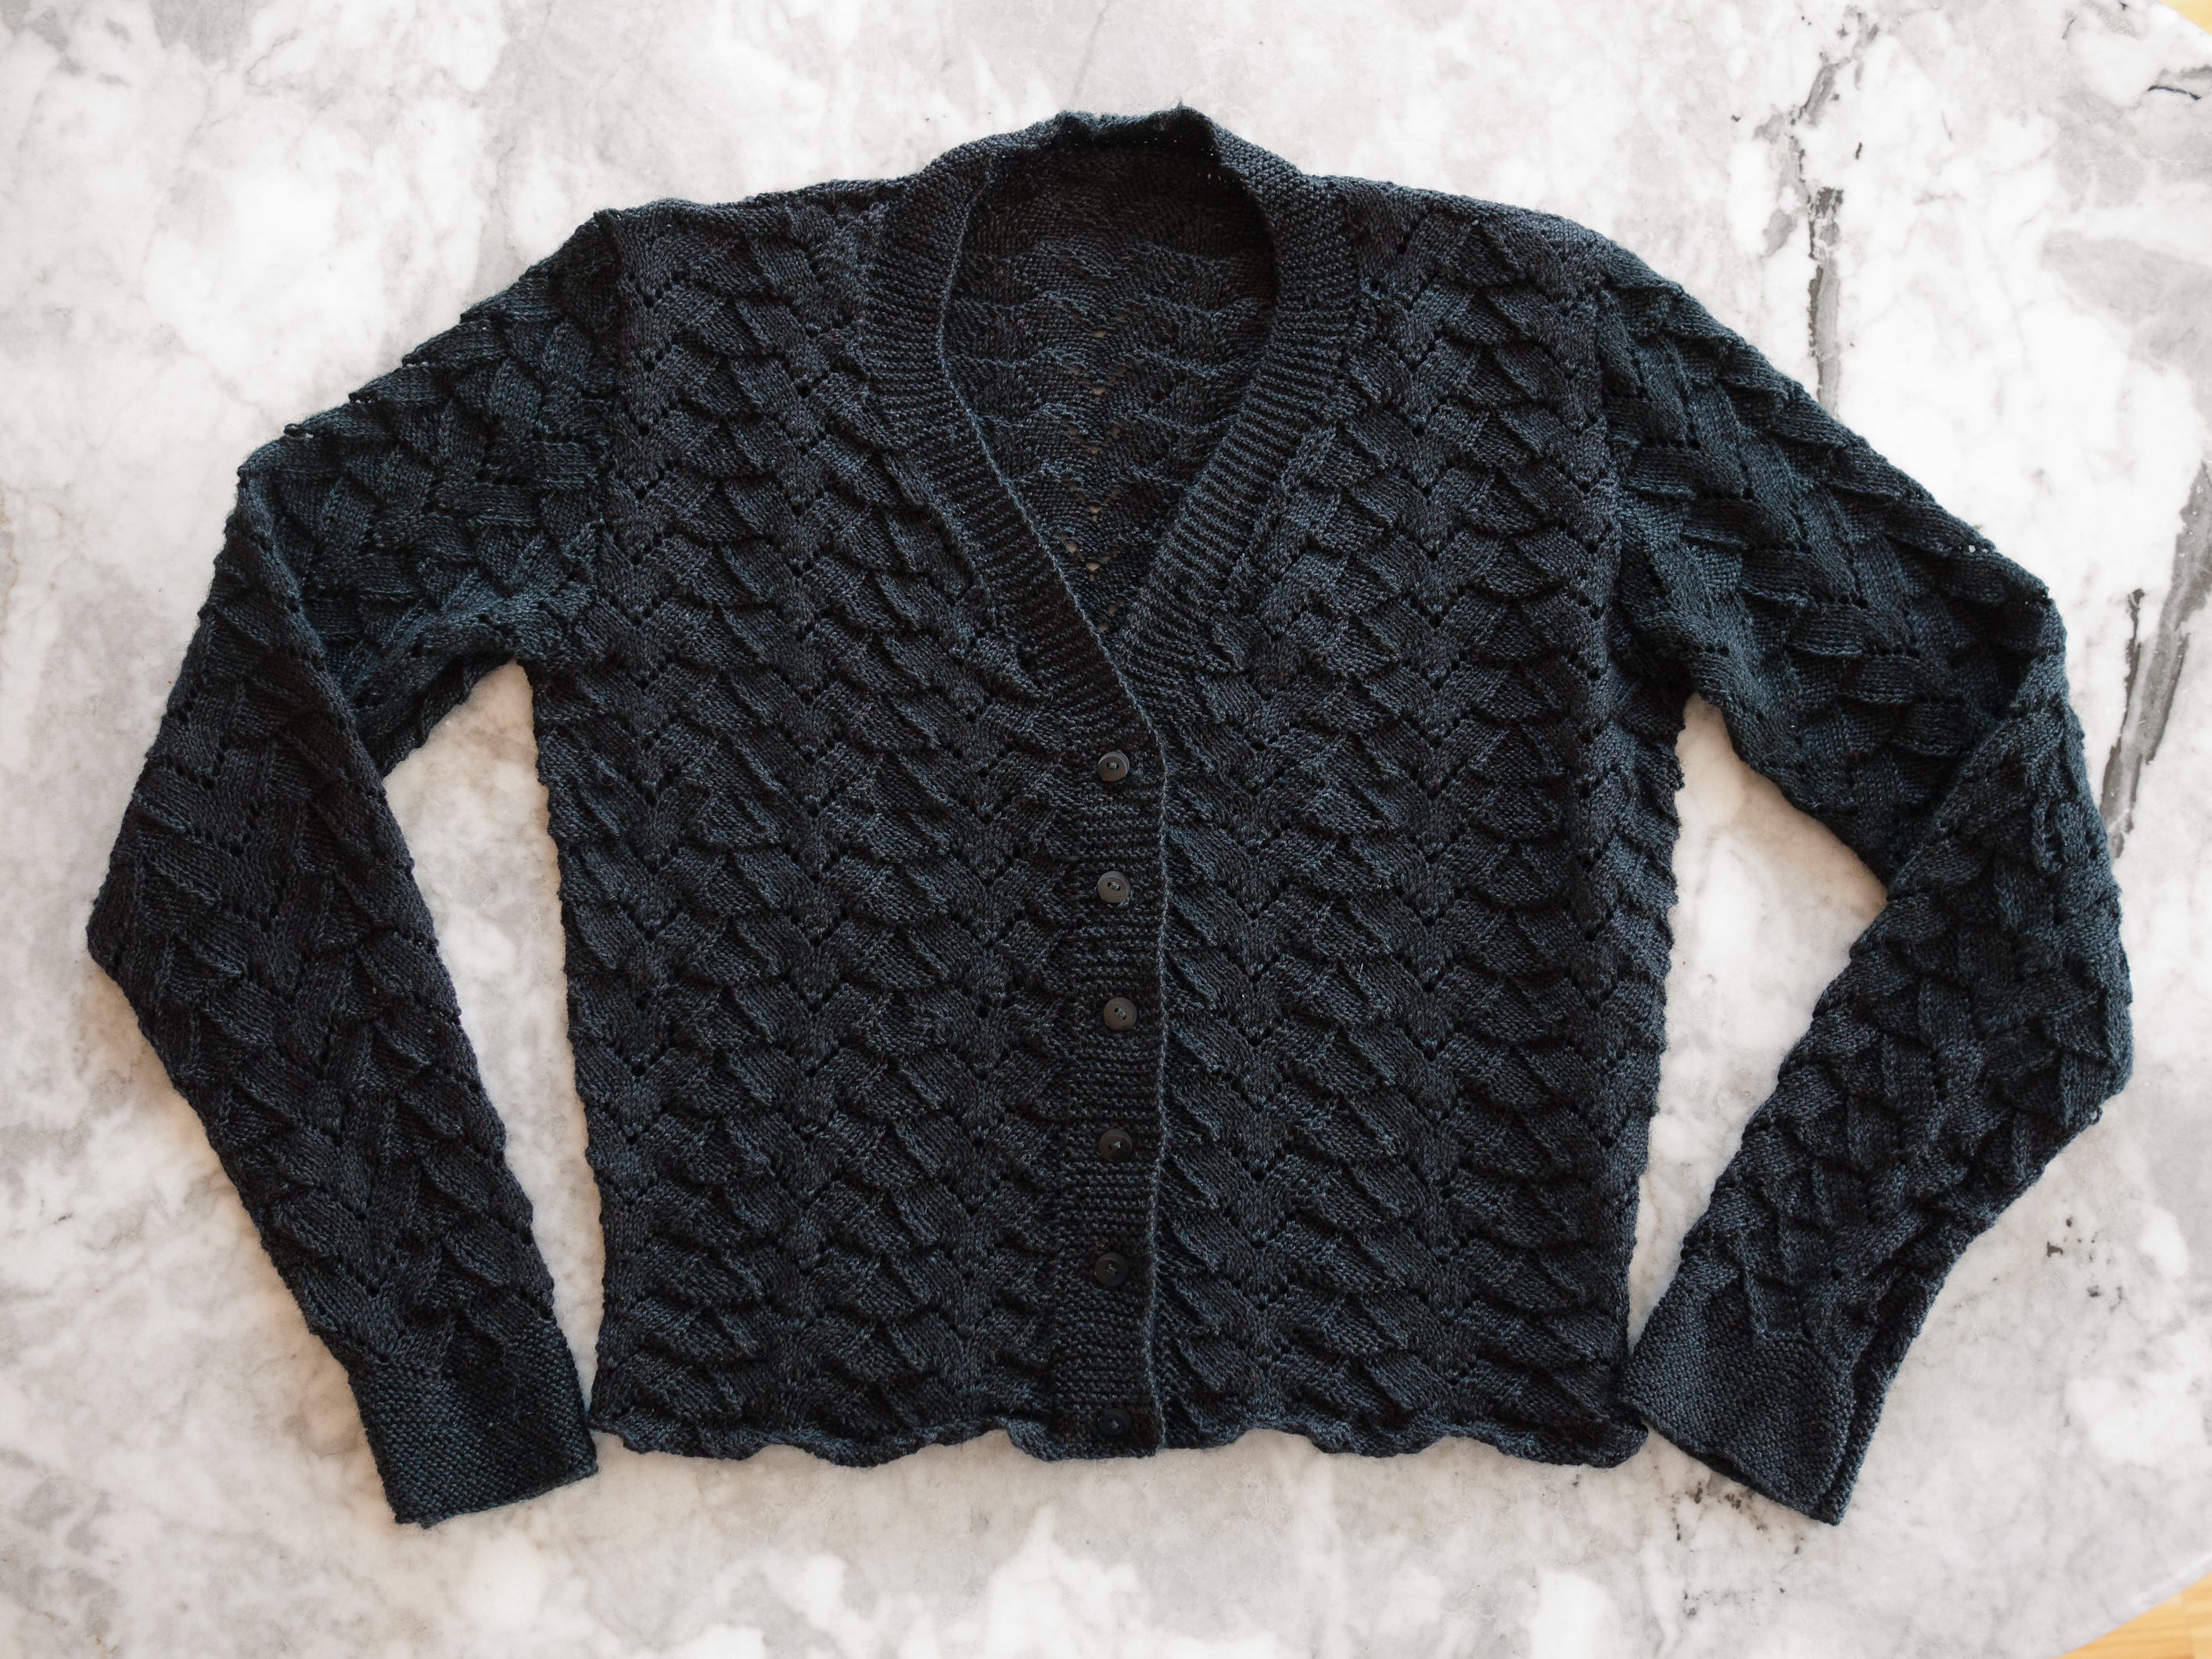
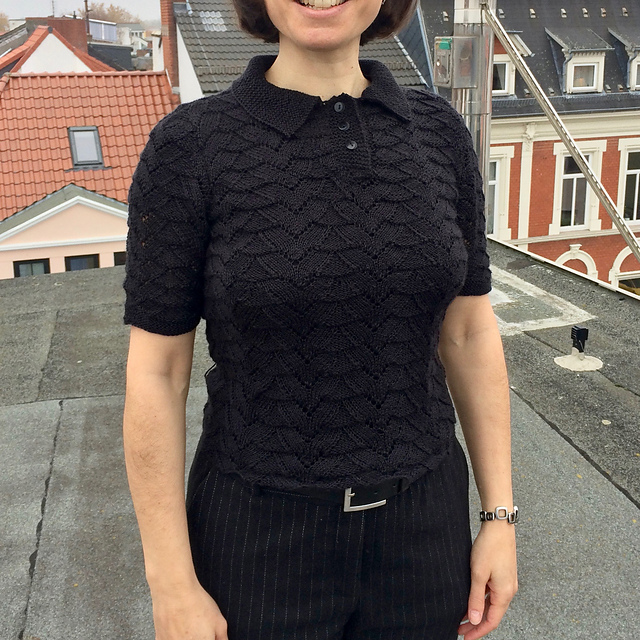
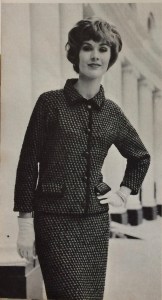 Post updated on December 28, 2019: Finished!
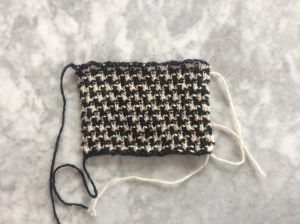 The pattern calls for Patons Rimple DK (nubbly wool with synthetic) in black and Patons Totem DK (smooth “crepe” wool) in “Oakapple”. I admit I had never heard of an an oak apple before and looking at the black-and-white photo, it’s it’s hard to tell what exact colour was used — but it’s obviously some kind of whitish-beige. Which, as it turns out, is pretty much the colour of at least some kind of real
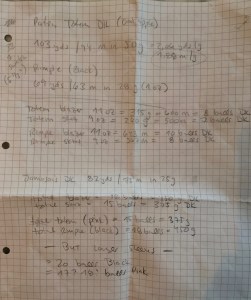
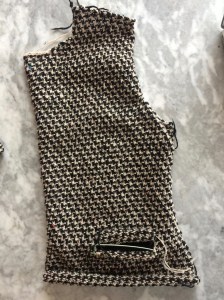 The knitting itself was a dream, though — so nice to work in DK after the fingering-weight projects of recent months past. It knitted up fast and easily and the fabric feels good in the hands. The pattern is quite clear and simple. Even the set-in pockets with flaps and the buttonholes (such a nightmare, always) were successful and the buttonholes evenly spaced. (I used the method that Stitchcraft always suggests: make the side without buttonholes first, then mark the button positions with pins and make the buttonholes to correspond. With a repeating pattern like this one, you can count the rows between buttonholes quite accurately.)
 After putting it together and blocking, the back piece had stretched width-wise, the sleeves had stretched length-wise and the sleeve cap didn’t fit well. Also, the shoulders were too wide. What to do? I didn’t want to cut the knitted fabric, nor do everything over. My solution: I re-sewed the sleeve caps in where the shoulder and sleeve line should have fallen, then tucked the resulting extra fabric in towards the neck on the front piece to make a sort of built-in shoulder pad. I normally hate shoulder pads and rip them out of everything I buy, but in this case it turned the droopy, sloppy-looking shoulder into a crisp, tailored-looking one. I’m so sorry I forgot to take a “before” picture — the change was pretty dramatic.
 To fix the back width, I added two vertical darts. That wasn’t as elegant as it could have been if I had knitted them in, but it was fine. The sleeve-cap changes pulled the sleeves in a little shorter, so I just finished the cuffs with the same binding that I used for the rest. The buttons are modern, but aren’t they perfect? I even remembered to buy a few extra.
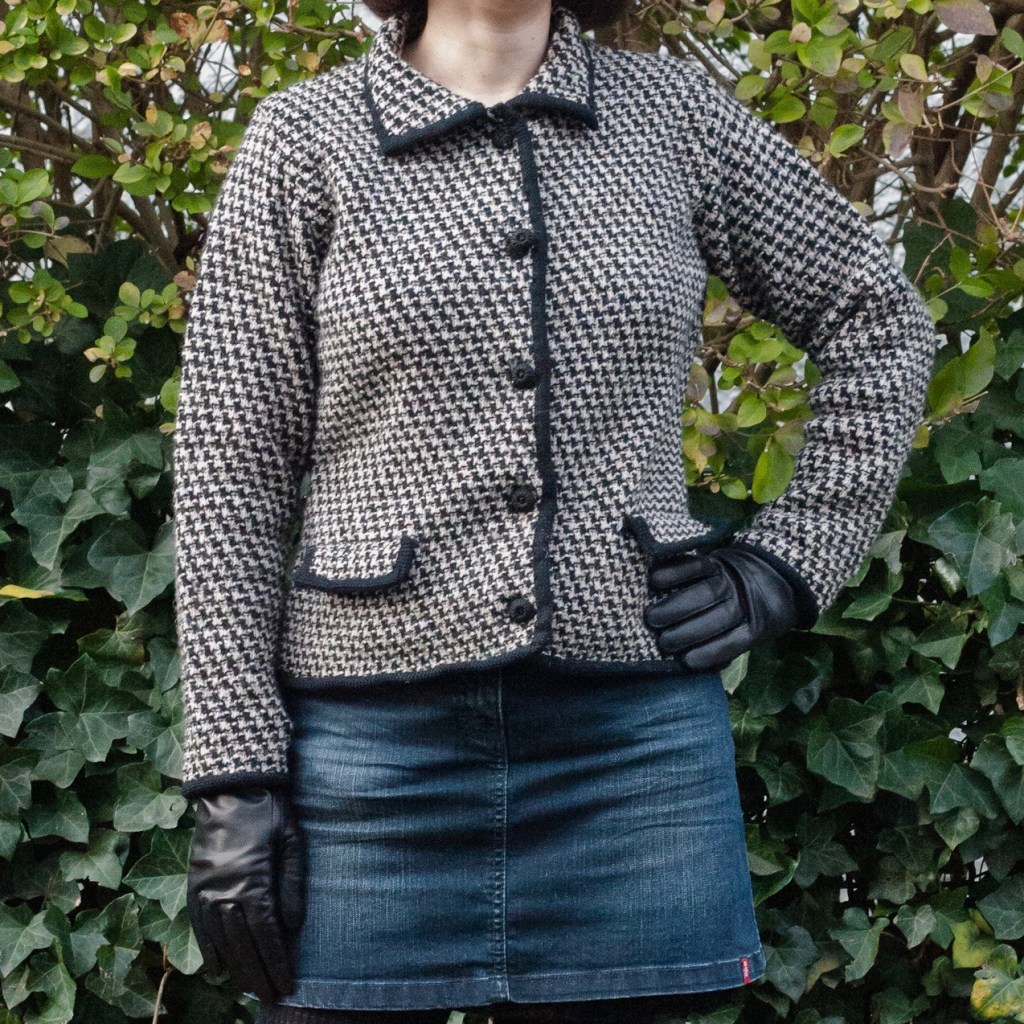
 There’s always somebody having a baby, and I do try to make something nice for all my friends’ and colleagues’ newborns. Sometimes I don’t manage to finish something until they are out of the newborn stage, which is why it’s nice to have patterns for larger babies! This dolman-sleeve cardigan, made in the smaller size, should fit a 22 inch chest, which should be fine for this particular eight- or nine-month old.
 The little leaf motifs up the front sides are quite easy and don’t require any cabling or special fuss. You just work into one stitch 5 times on one row, then work those 5 stitches in stockinette (on the reverse-stockinette background) for a few rows before closing off the leaf with decreases. The lace strips on the sides are plain yo, k2tog alternating with k2tog tbl, yo, worked on the right-side rows.
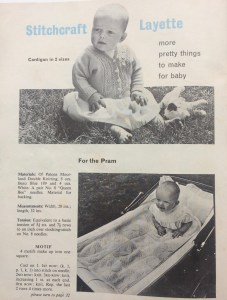 I used Jamieson’s wonderful Shetland Spindrift from a multicoloured stash that I had bought from a nice person on Ravelry. Some may say that Shetland wool is too tough for babies, but it does get softer with washing and since it won’t be worn against the skin, I think it will be fine. The colour — Buttermilk — is really beautiful, a pale yellow ever-so-slightly marled with shades of pink and winter white.
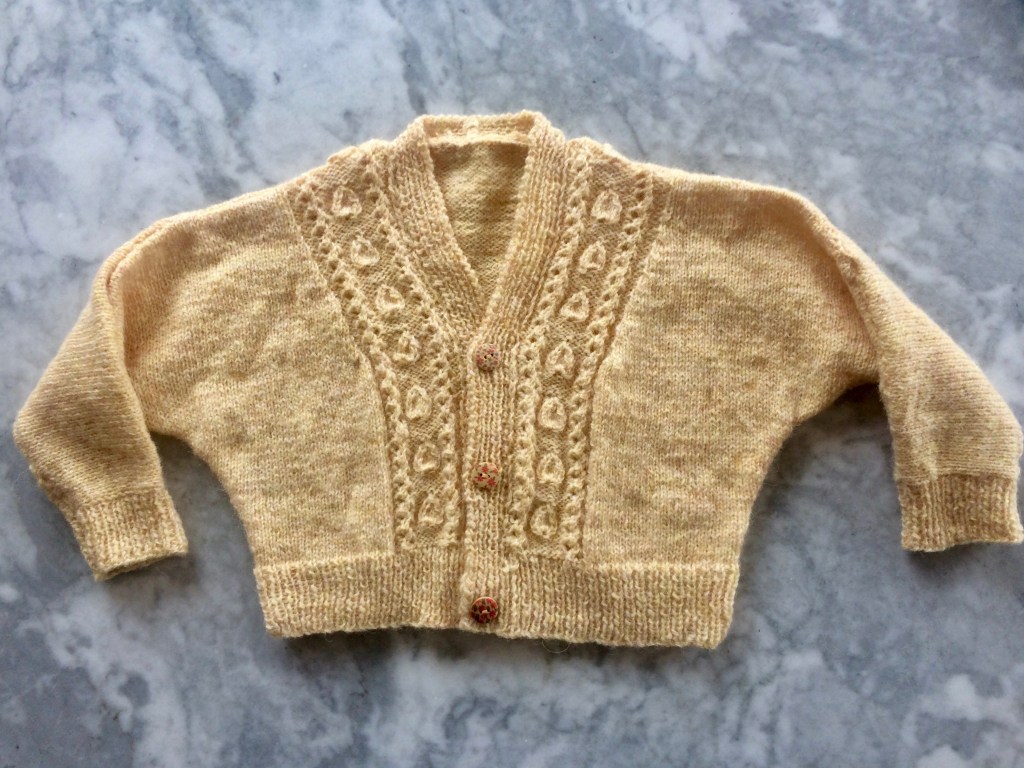
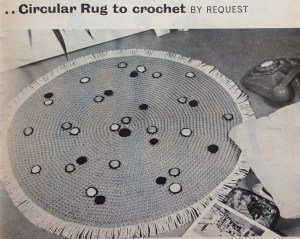 September’s project (finished only one day late) was this extremely 1960s crocheted green rug with black, white and orange embroidered spots (they “add a modern touch”) and fringe. Loved it!
 Felting wool, like rug wool, is bulky, mostly unprocessed, coarse and strong, so that was my first thought… but would it felt with use or washing? I decided to take the chance, since it’s easy to find, inexpensive and there happened to be some in the perfect colour at my local yarn shop. It’s the exact same shade of green as
  The crochet part was easy — just rounds of double crochet with regular increases — and went very quickly. You can see that the wool I ordered was from a different dye lot than the first skeins from the store, but I don’t mind. The embroidery was a bit tedious and the fringe posed a new problem: this type of old-fashioned cotton sew-on fringe is very much not in fashion and hard to find in stores these days. I hate buying things on the Internet, so I asked my friendly wool-shop owner from the store where I bought the wool what she thought, or if it could be ordered through the store. She suggested hand-knotting the fringe with cotton yarn in a similar colour to the rug. (the fringe in the original seems to be white or a lighter colour). I was eager to get the thing done and not wait for more elements to arrive, so I did it. I like the result! It’s stringier than the original, of course, but it makes the rug look like a sort of friendly amoeba. I like that.
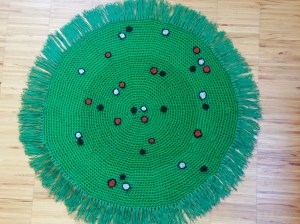 Wash-blocking it gently in cold water worked well and did not felt the wool. Also, it is going to live under my coffee table where it won’t get much foot traffic, so I’m not worried.
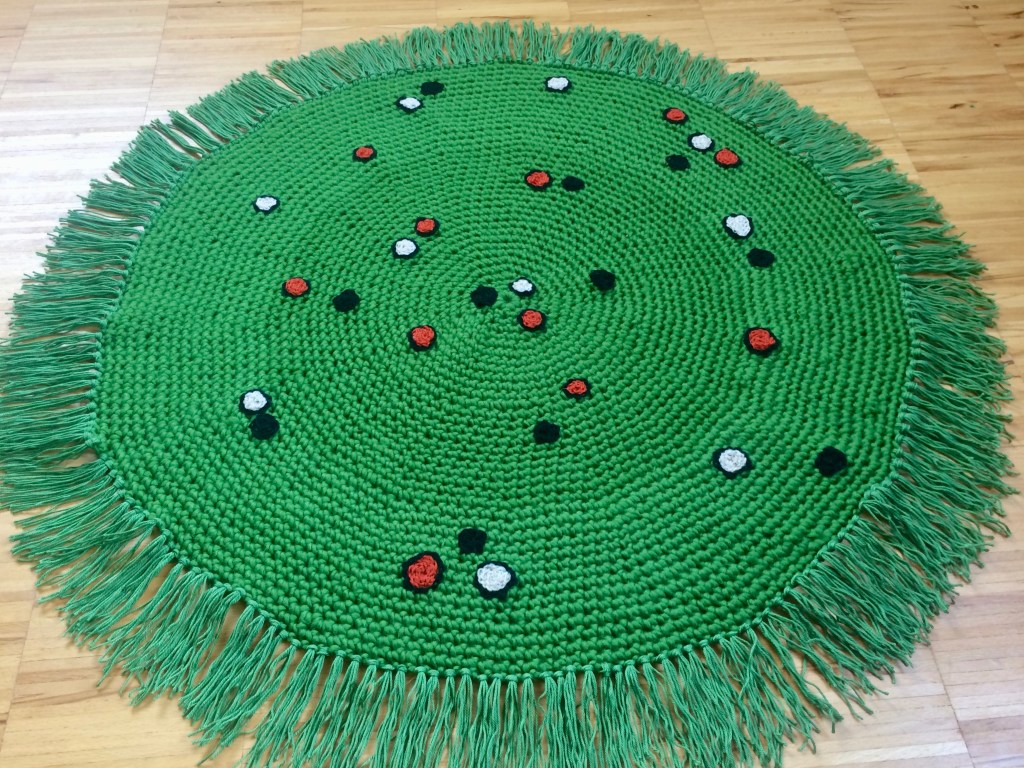
 Stitchcraft‘s August 1961 “Late Summer” issue had multiple cute, easy embroidery and tapestry projects. Mine was this little set of rose sprays. To show the versatility of the designs, the magazine usually had directions for and photos of the designs made on different items: a cushion and/or tray cloth, for example. Overall, there was a huge range of homewares that could potentially be embroidered: an apron, a place mat, a chair-back, a wall hanging, a “nightie case”, a project bag, a finger plate, a fire screen, even a room divider or a waste-paper basket cover. This issue added a new idea to the mix: the rose-spray design on a lampshade, complete with a pattern to cut out, sew and fringe the lampshade cover itself.
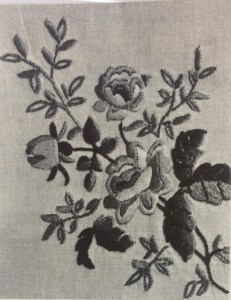
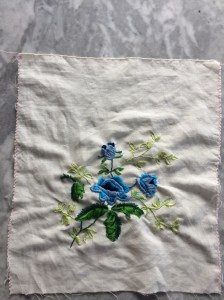 Of course, they don’t have to be embroidered, but why not? Cotton embroidery floss is machine-washable even at high temperatures and I have plenty of scraps and bits of plain linen or cotton materials that can be put to good purpose. The bag I made for this August project was made from a piece of linen from shoes, yes, shoes that a friend bought (the shoes came wrapped in this piece of fabric in the shoe box instead of in paper.) I had enough embroidery floss on hand, so this was an almost 100% up-cycled / didn’t have to buy anything new project. (I say almost because I bought the cord for the drawstrings — then realised I could have made monks’ cord or i-cord from leftover cotton yarn. Next time…)
 The design is of
 June 1961 was the issue with too many great projects in it and not enough time to make them all. My “official” project was
 I decided to make it in cotton instead of Nylox (Patons wool-nylon mix from the 1960s) or a modern equivalent. It is always, always a problem to find non-mercerised cotton that is fine enough to give 7 stitches to the inch. Thick, mercerised dishcloth cotton is always available, mercerised crochet cotton is always available, but what passes as 4-ply or fingering weight non-mercerised cotton is just too thick. I decided on Natura “Just Cotton” which is non-mercerised, soft, pretty and supposedly free of harmful substances (Oeko-Tex certification). The label says it gets 27 stitches in 4 inches but that is illusory. The yarn is 8-ply! I don’t know why they don’t use 4 strands, thus making it a true 4-ply fine cotton for soft, light garments. I got 6 1/2 stitches to the inch with some effort, but the resulting fabric is a bit stiffer than I would have liked.


 In 1961, Stitchcraft had a nice running feature they called “Stitchcraft Layette”: a set of matching baby clothes and accessories with a pattern in each issue for a few months running. The first was a light, warm dress in
 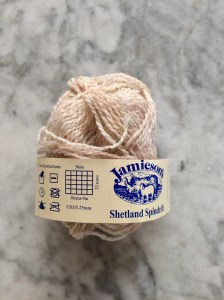 I made the project in
  I was happy with the result and it reminded me of another pattern I had seen somewhere… in another Stitchcraft... oh right, it was this “Sunday Best” from April 1960! Bramble and stockinette stitch: always a good choice for baby stuff.
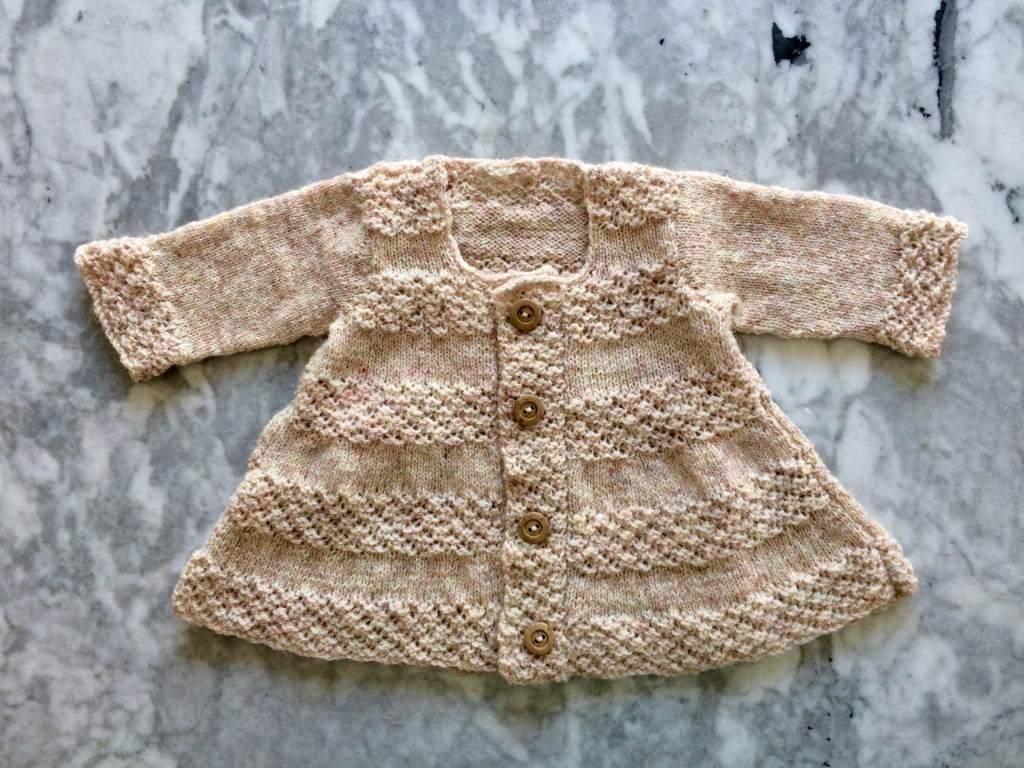
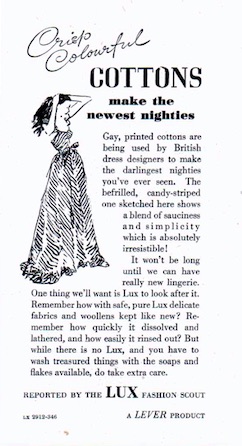
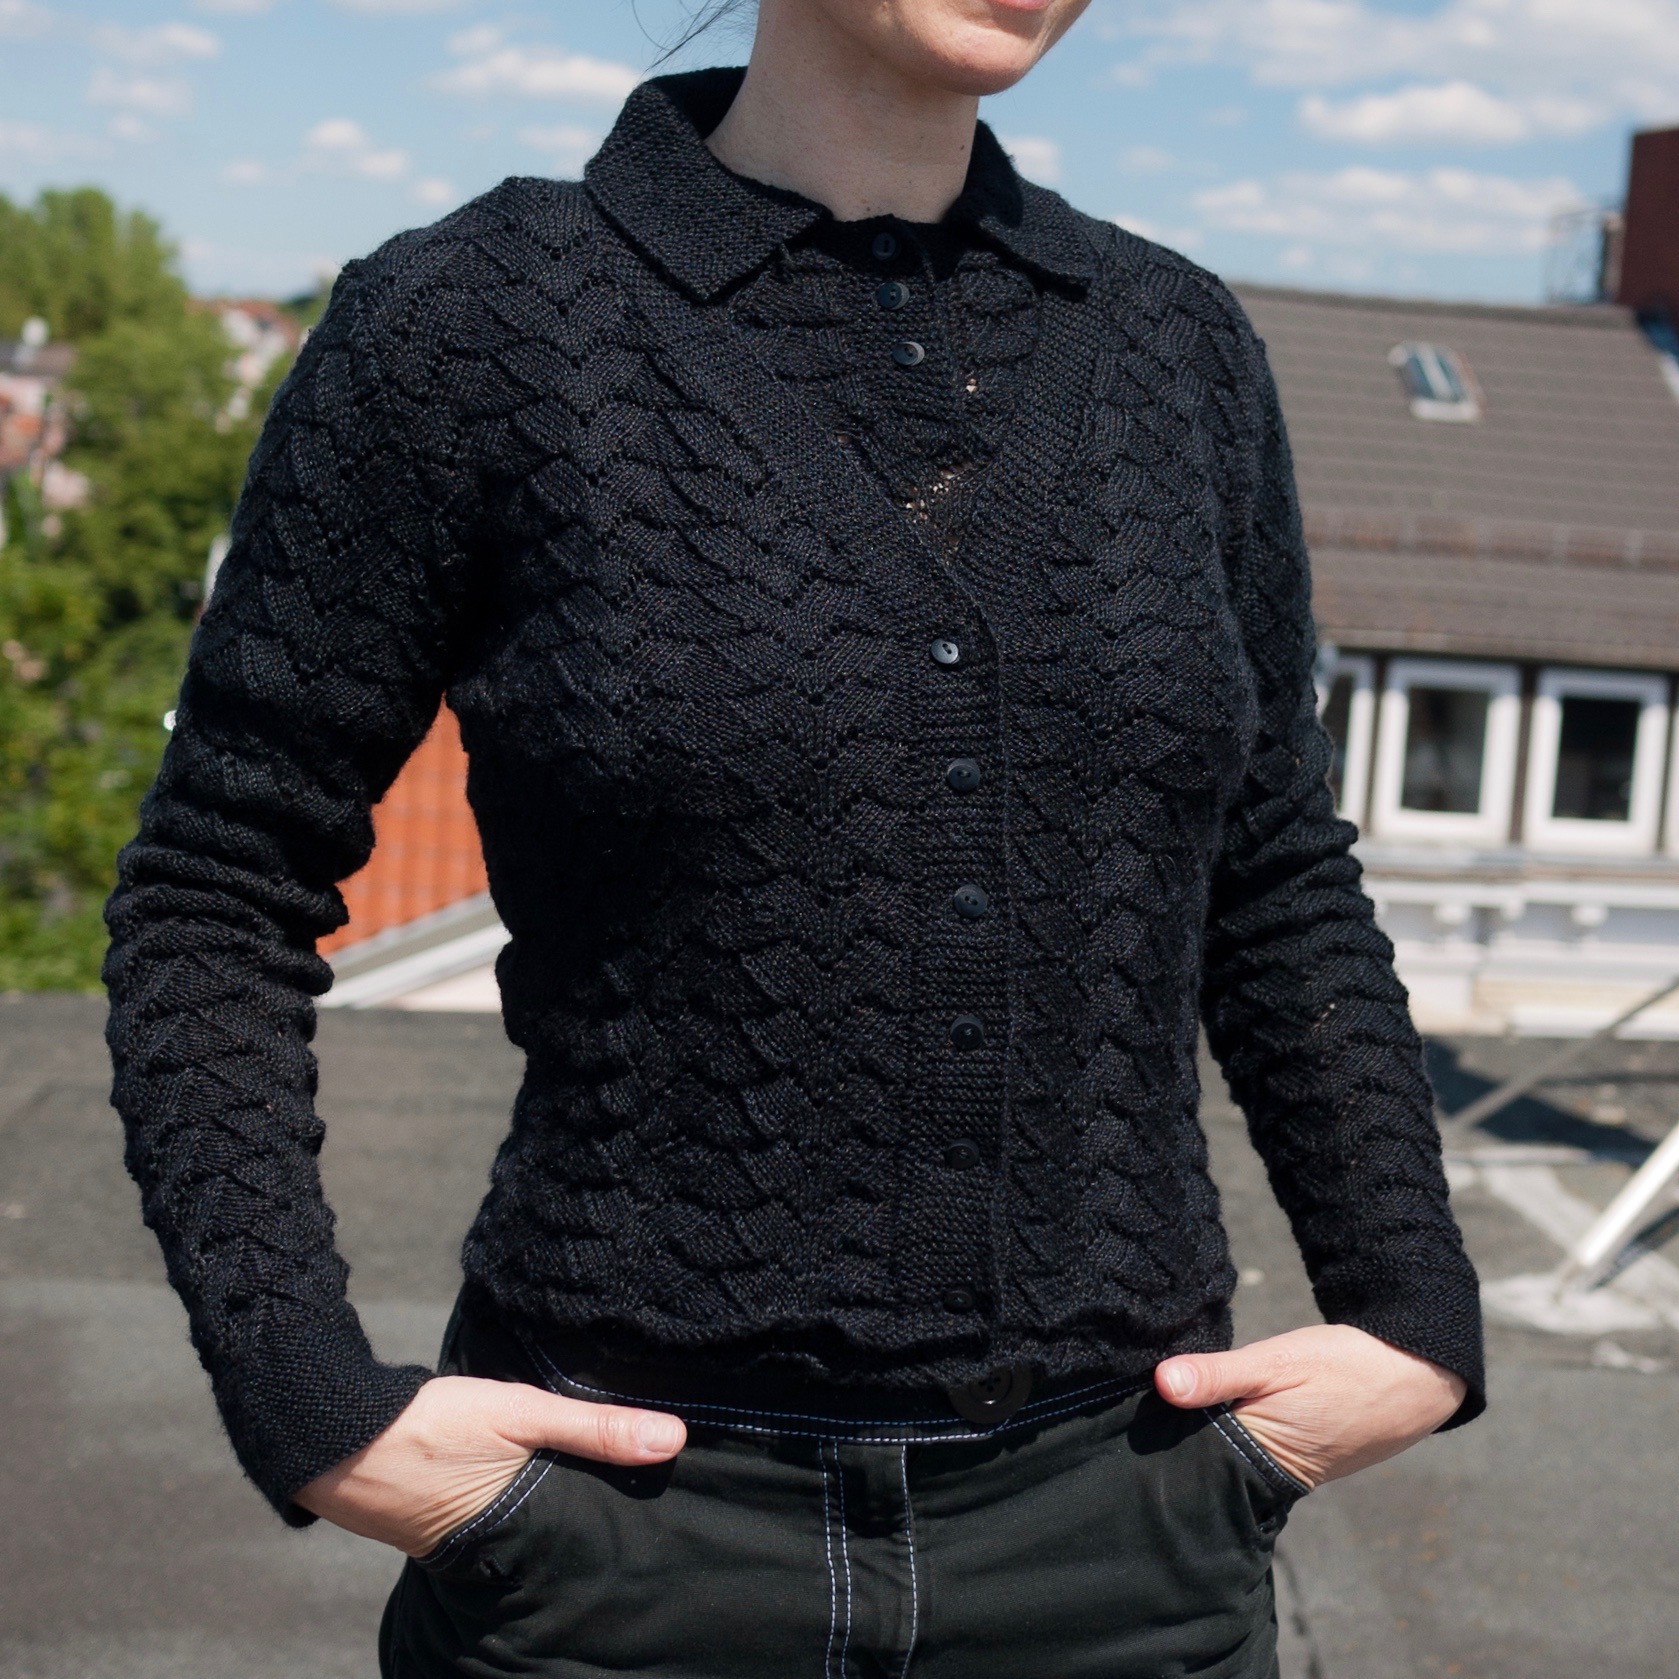
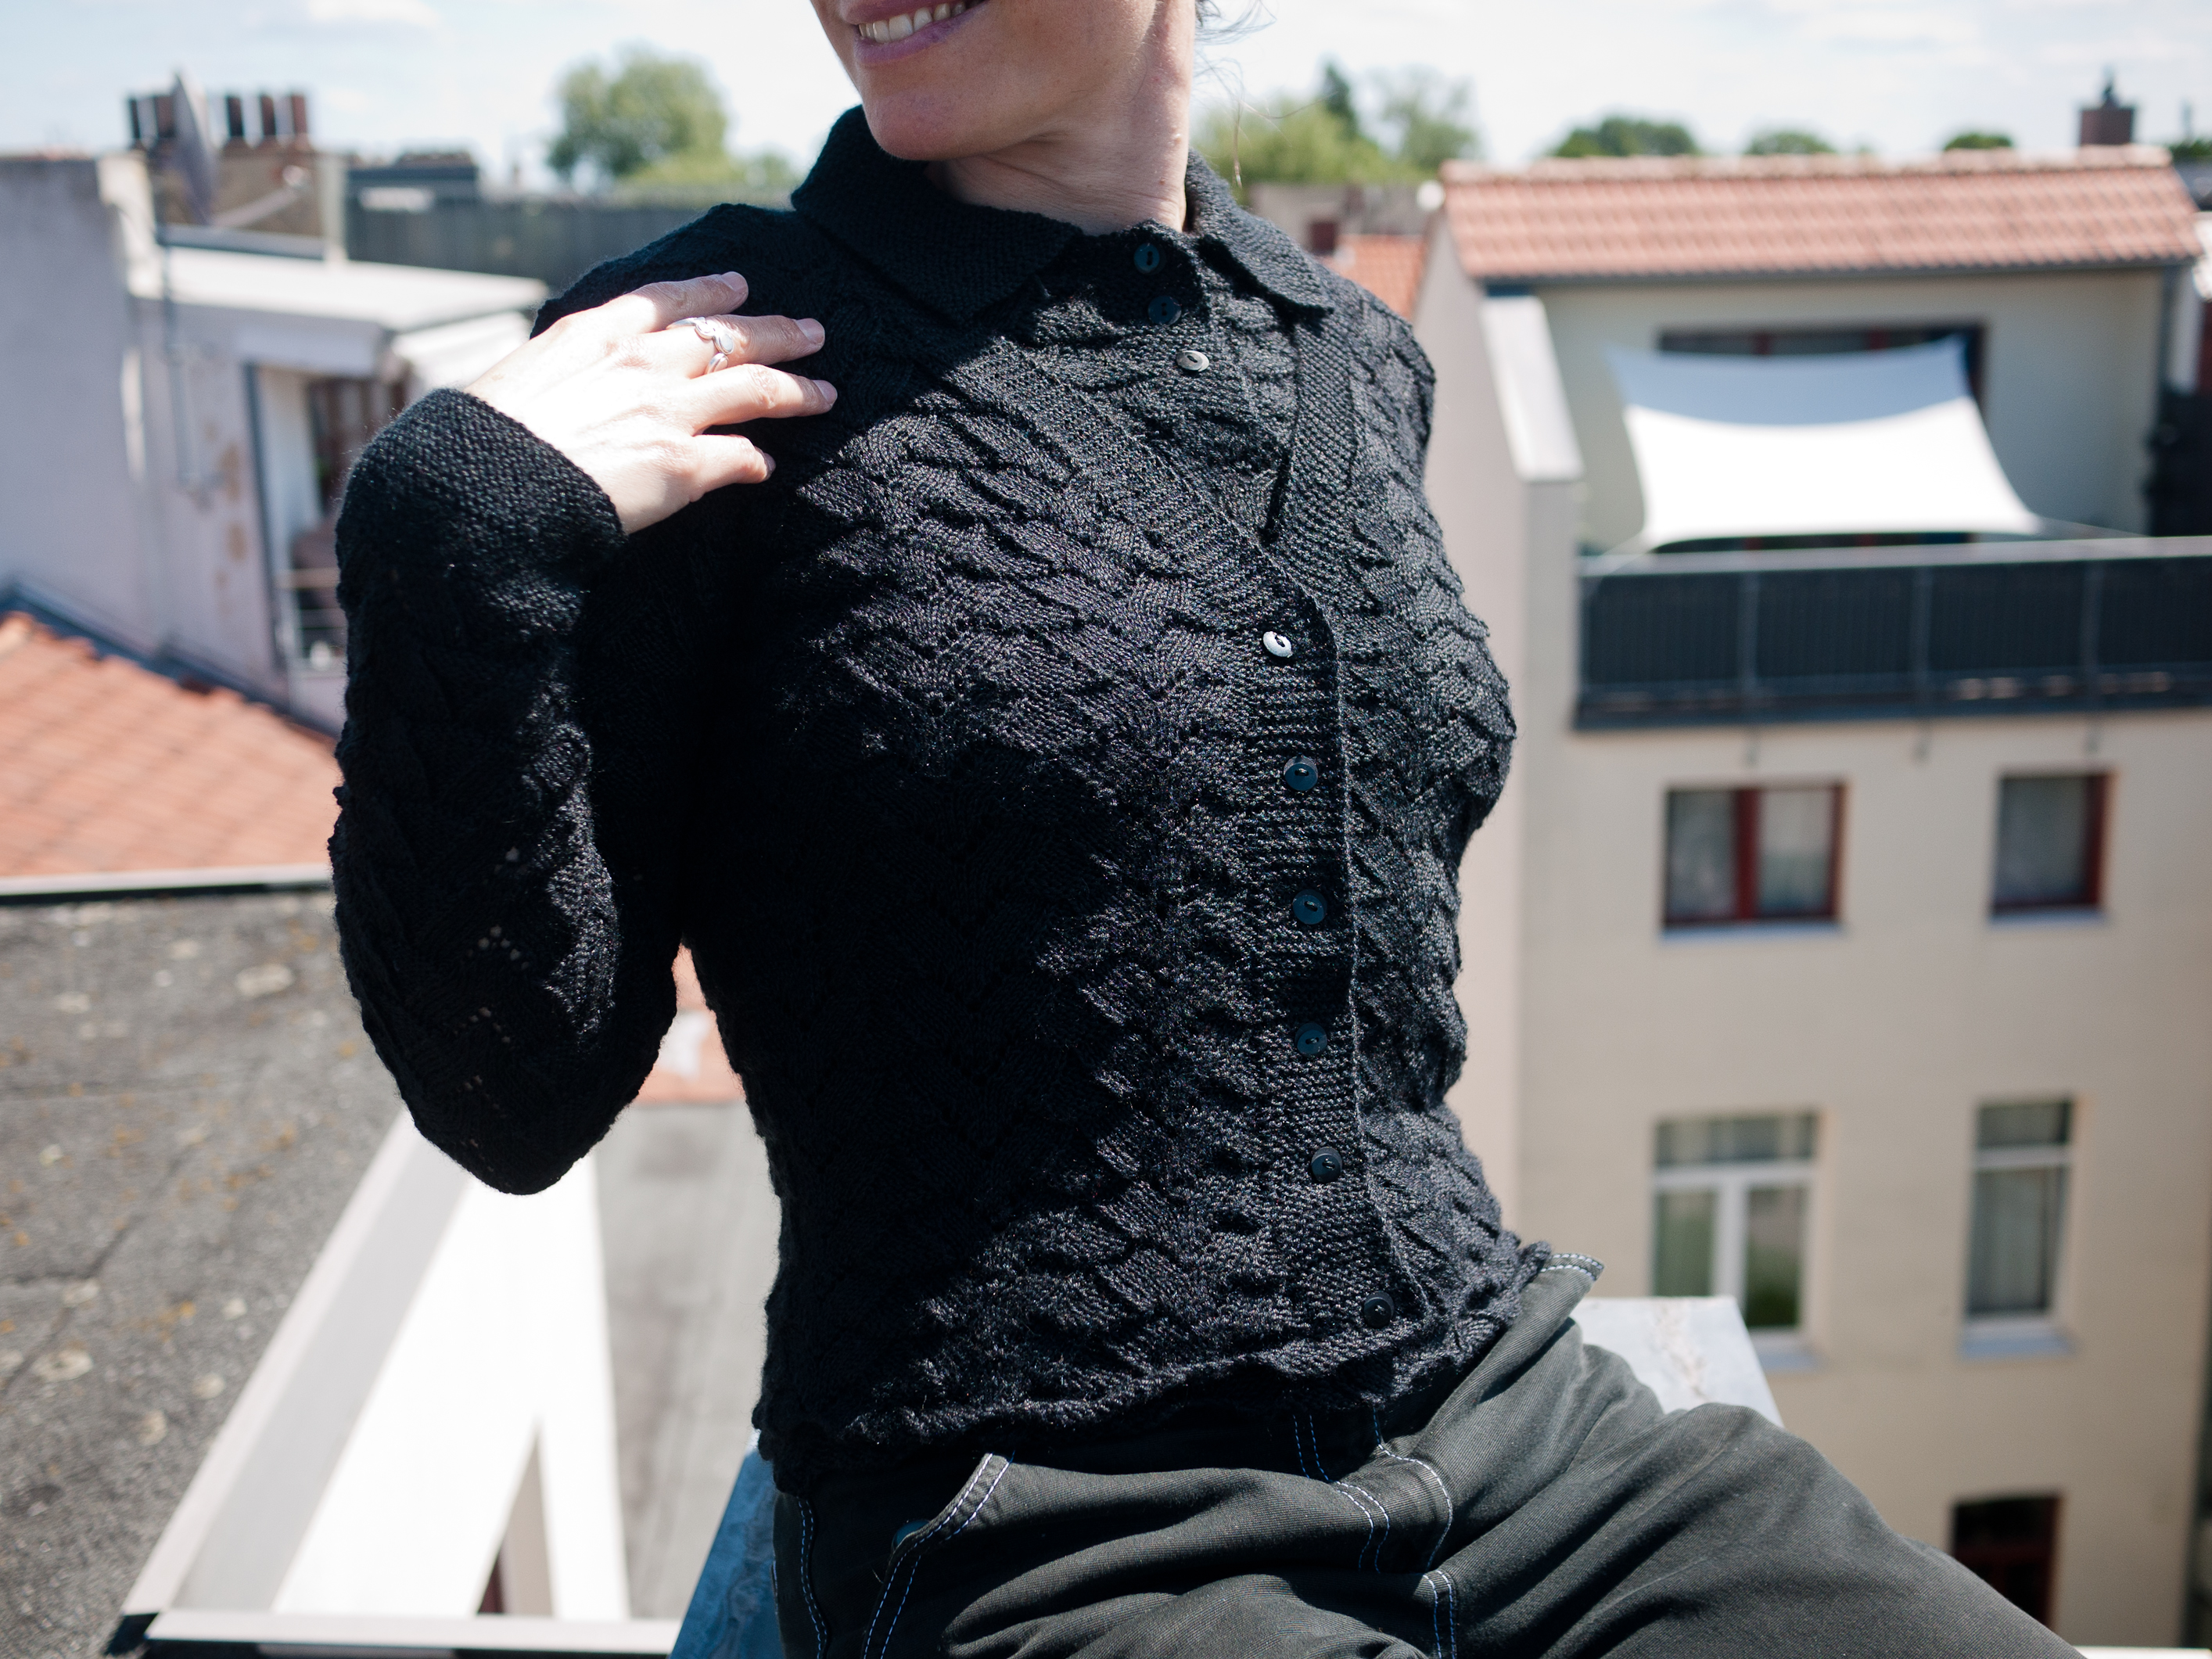
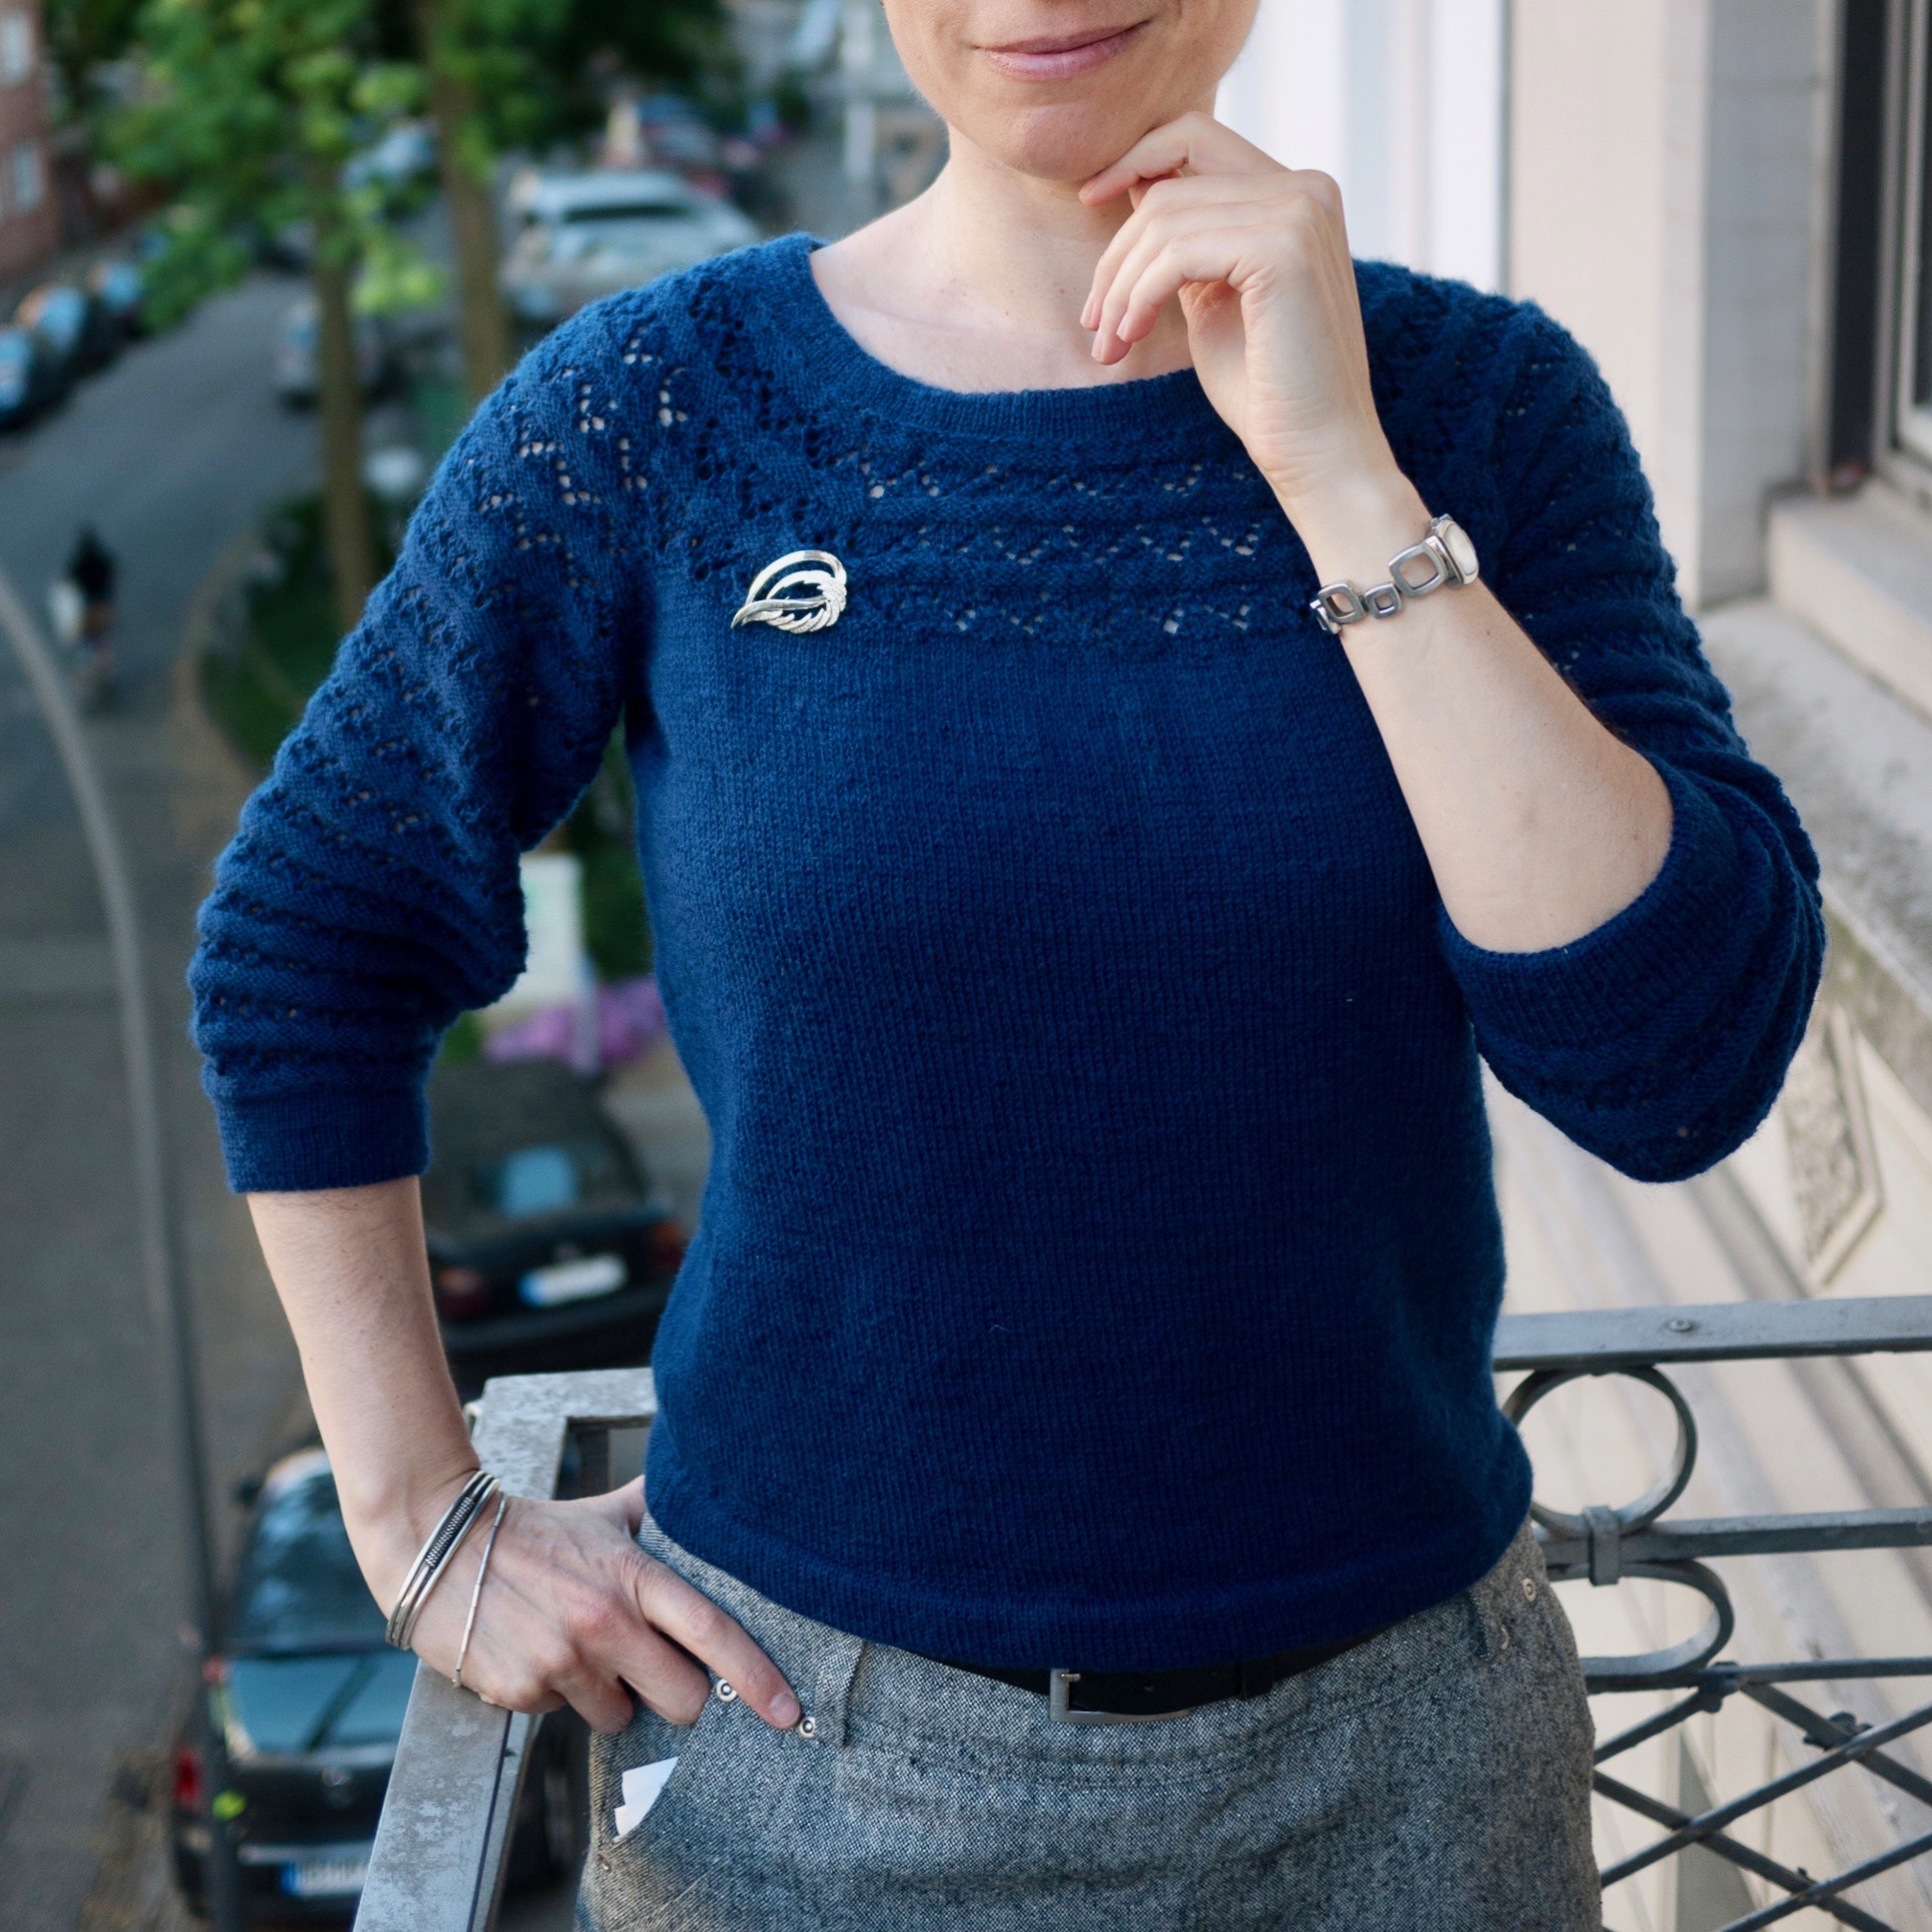
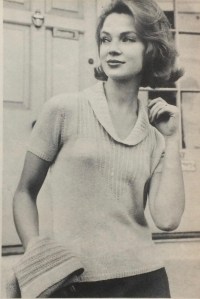
 June’s project was this lovely sleeveless top in a leafy lace pattern, touted as a “very wearable and useful jumper to make for your holiday.” It looked pretty and elegant and suitable for my summer climate, which is generally not too hot — a lightweight wool garment in lace with no sleeves should be perfect most days.
 orange non-vintage clothing.
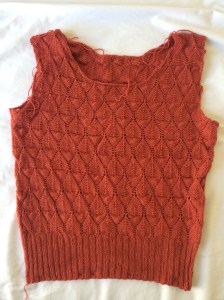 Then I ran into trouble with the weather, which was suddenly 34-36 degrees Centigrade with no chance of a cooler room either at work, home or on the move. My hands were too sweaty to hold wool and I had to take a break for a few days until we returned to our regularly scheduled 18-20 degrees. Then I finished the body and moved on the the neck and armhole edgings, which took forever! It’s actually an interesting design, which I haven’t seen before: You knit a strip of stockinette stitch with 3-stitch garter stitch border on one side, then fold the strip in half lengthwise like a sort of hem under the garter-stitch bit and sew it onto the neck or sleeve edge with the garter stitch facing out. It’s a like a separate hem sewn on, and the front neck strip has some cleverly thought-out short rows to make it fit the curve of the neck. But oh does it take a long time to make the strips.

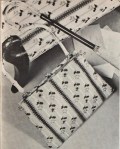 My project from the May 1961 issue of Stitchcraft was a charming tapestry handbag with a Victorian-inspired flower ribbon design. The magazine gives directions for either the handbag or a piano-stool top. As much as I would love to have a handbag that matched my piano stool, I’m just making the bag for now.
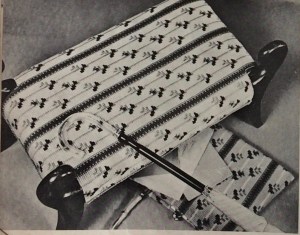 counted cross-stitch done on tapestry net canvas with tapestry wool. The hardest part was getting all the components together! The original pattern calls for Beehive Tapestry Canvas No. 27 and Beehive Tapestry Wool, which as far as I can see do not exist anymore — and if they did, they could very well be quite different from the same canvas and wools manufactured in 1961. Unlike cross-stitch fabric, there’s no indication of holes per inch, so I had to sort of guess from the photo of the bag (3 purple stripes across and 3 or 4 flowers vertically in the stripes) and the number of stitches in one repeat of the chart and factor in the size that I wanted the bag to be (a little smaller than the 9 inches deep and 11 inches wide given in the pattern) and the size of the modern handles.
 I found some net that seemed about right, but tapestry wool is not to be found in a craft, knitting, wool, fabric, or notions store anywhere near me. So I had to order it online… from a mail-order Internet store whose address is in my own city, but does not have an actual brick-and-mortar store. So I couldn’t see the wool before buying and they had to ship it to me, when I could and would have gladly just gone over and picked it up. And seen it beforehand… because it is really thick! About as thick as double knitting wool. It would have been so much easier to match the size of the wool to the size of the net if I could have found both of them in the same place. It’s usable with the net I bought, but I think the bag will be rather stiff.
 and buy all of this stuff together. It works for knitting, sewing and embroidery, but I guess tapestry is such an unfashionable hobby that it’s not worth using store space for the materials. I should probably be glad that they’re still manufactured at all.