April 1963: Blackwork Butterflies

Embroidered cushion, magazine photo from Stitchcraft, April 1963

UPDATE December 18, 2021 – Finished!

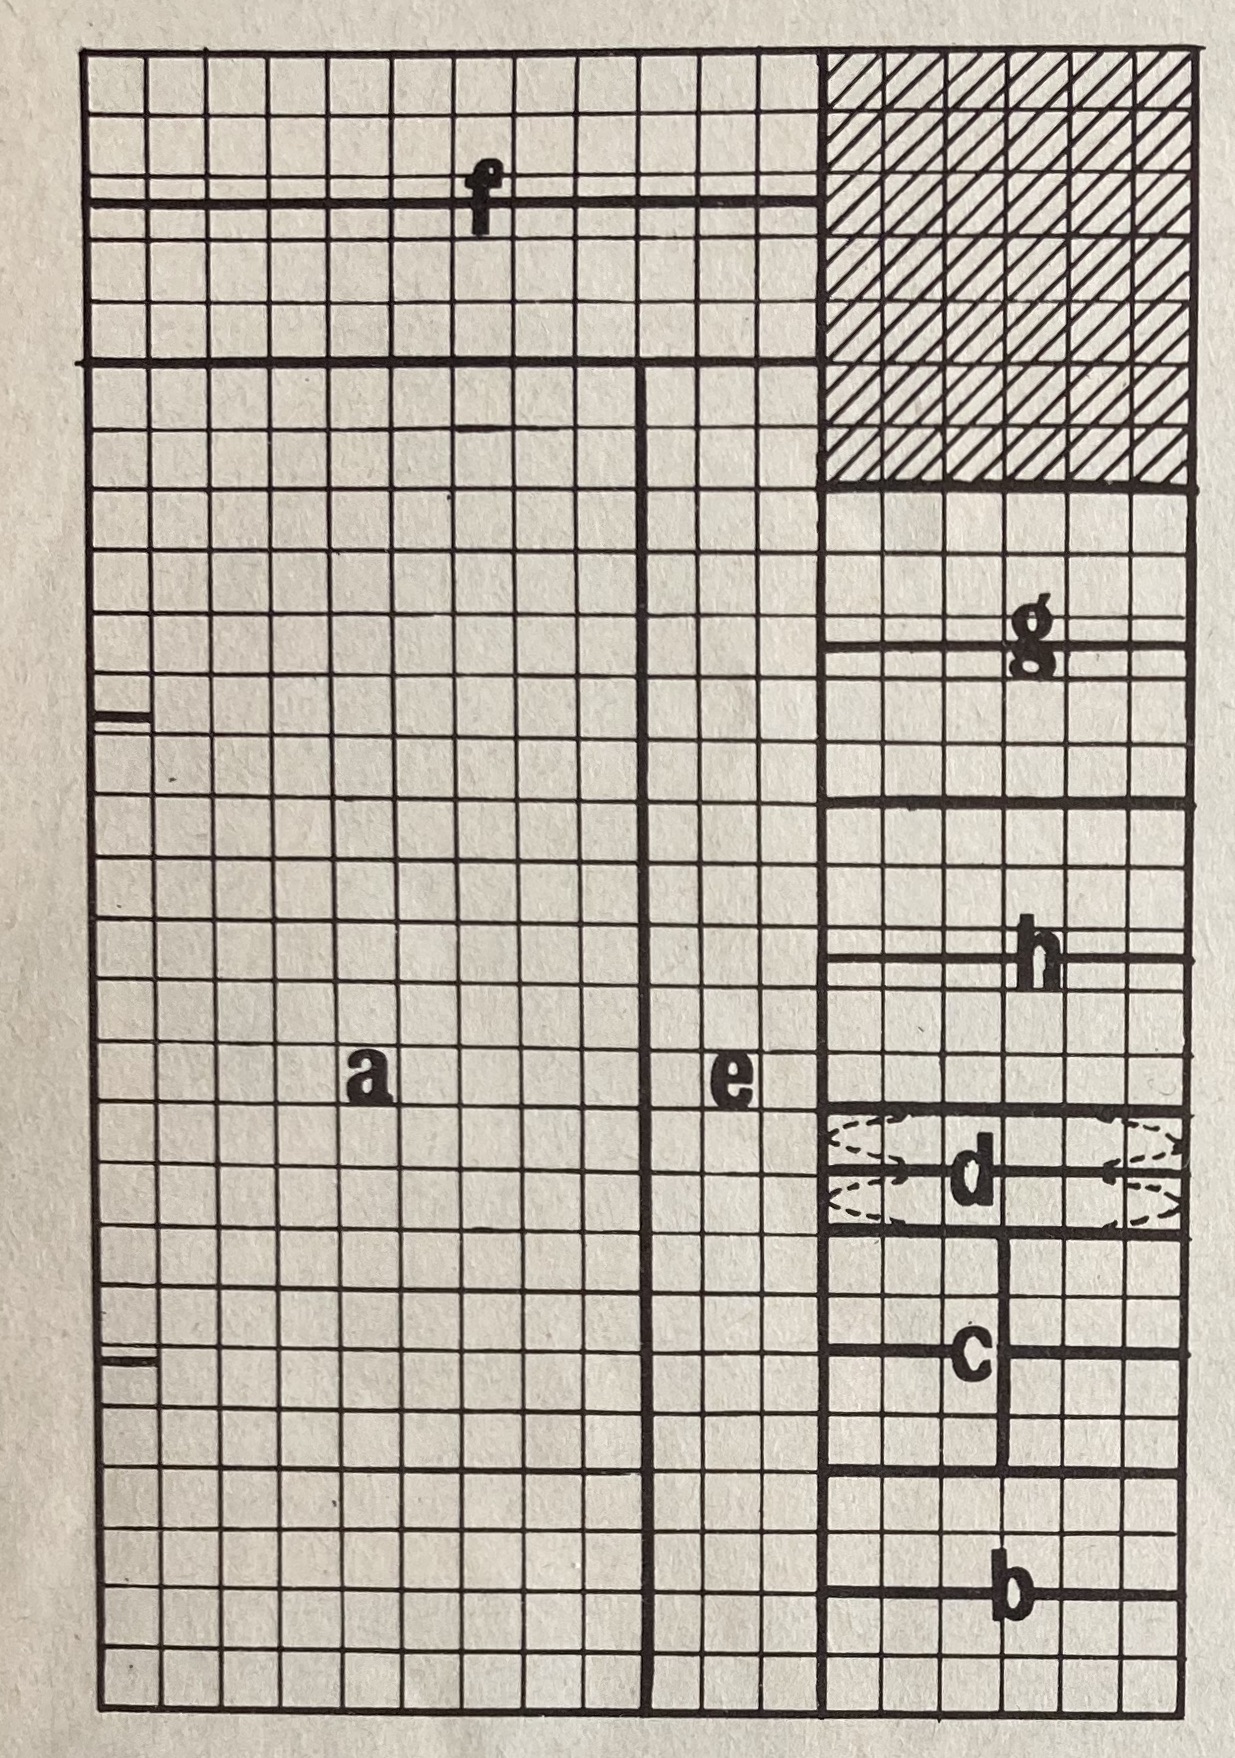
“For the embroideress who likes to tackle something different” came this amazing design from Stitchcraft‘s April 1963 issue. I am daunted by blackwork embroidery, having tried it only once until now with this cushion from the September 1960 issue. It’s fundamentally a form of counted embroidery, like cross-stitch, except that the stitch patterns aren’t crosses. The fillings are worked first using different geometrical counted patterns and the outlines and details are then added in (non-counted) crewel stitches like stem stitch, satin stitch, buttonhole, etc.

My biggest problem with all forms of counted embroidery is finding the proper ground fabric. The standard “Aida” fabric often used for cross-stitch is way too large, but furnishing linen, like the kind I mistakenly used for the fish cushion, is too tightly woven, making it impossible to count the holes properly and get the filling stitches to line up properly and look right. With the fish cushion I ended up just freehanding it, which is fine if you don’t look too closely but is obviously not the right procedure. I resolved to find the perfect-size linen this time!

… during a never-ending pandemic, where even if there were a shop nearby that sold all different sorts of embroidery fabrics, it would not be possible to go in and look at them to see how tightly woven they really are, as retail stores were closed in my area at the time. Of course, online shops give you information about the thread count and weight! Well… some give information about the weight, and some the number of threads per centimetre, and some just show a photo, which is utterly useless because who knows from how close it was taken?

The pattern is written for Glenshee Embroidery Fabric quality 212, a type of fabric that apparently does exist again after being unavailable for decades, but which seems to be available from exactly one distributor in two colours (beige and grey). At least I was able to find out what kind of thread count it had: 29 threads per inch, which converts to 11.6 threads per centimetre. I would be happy with anything between 11 and 12 and I wanted the fabric to be blue.

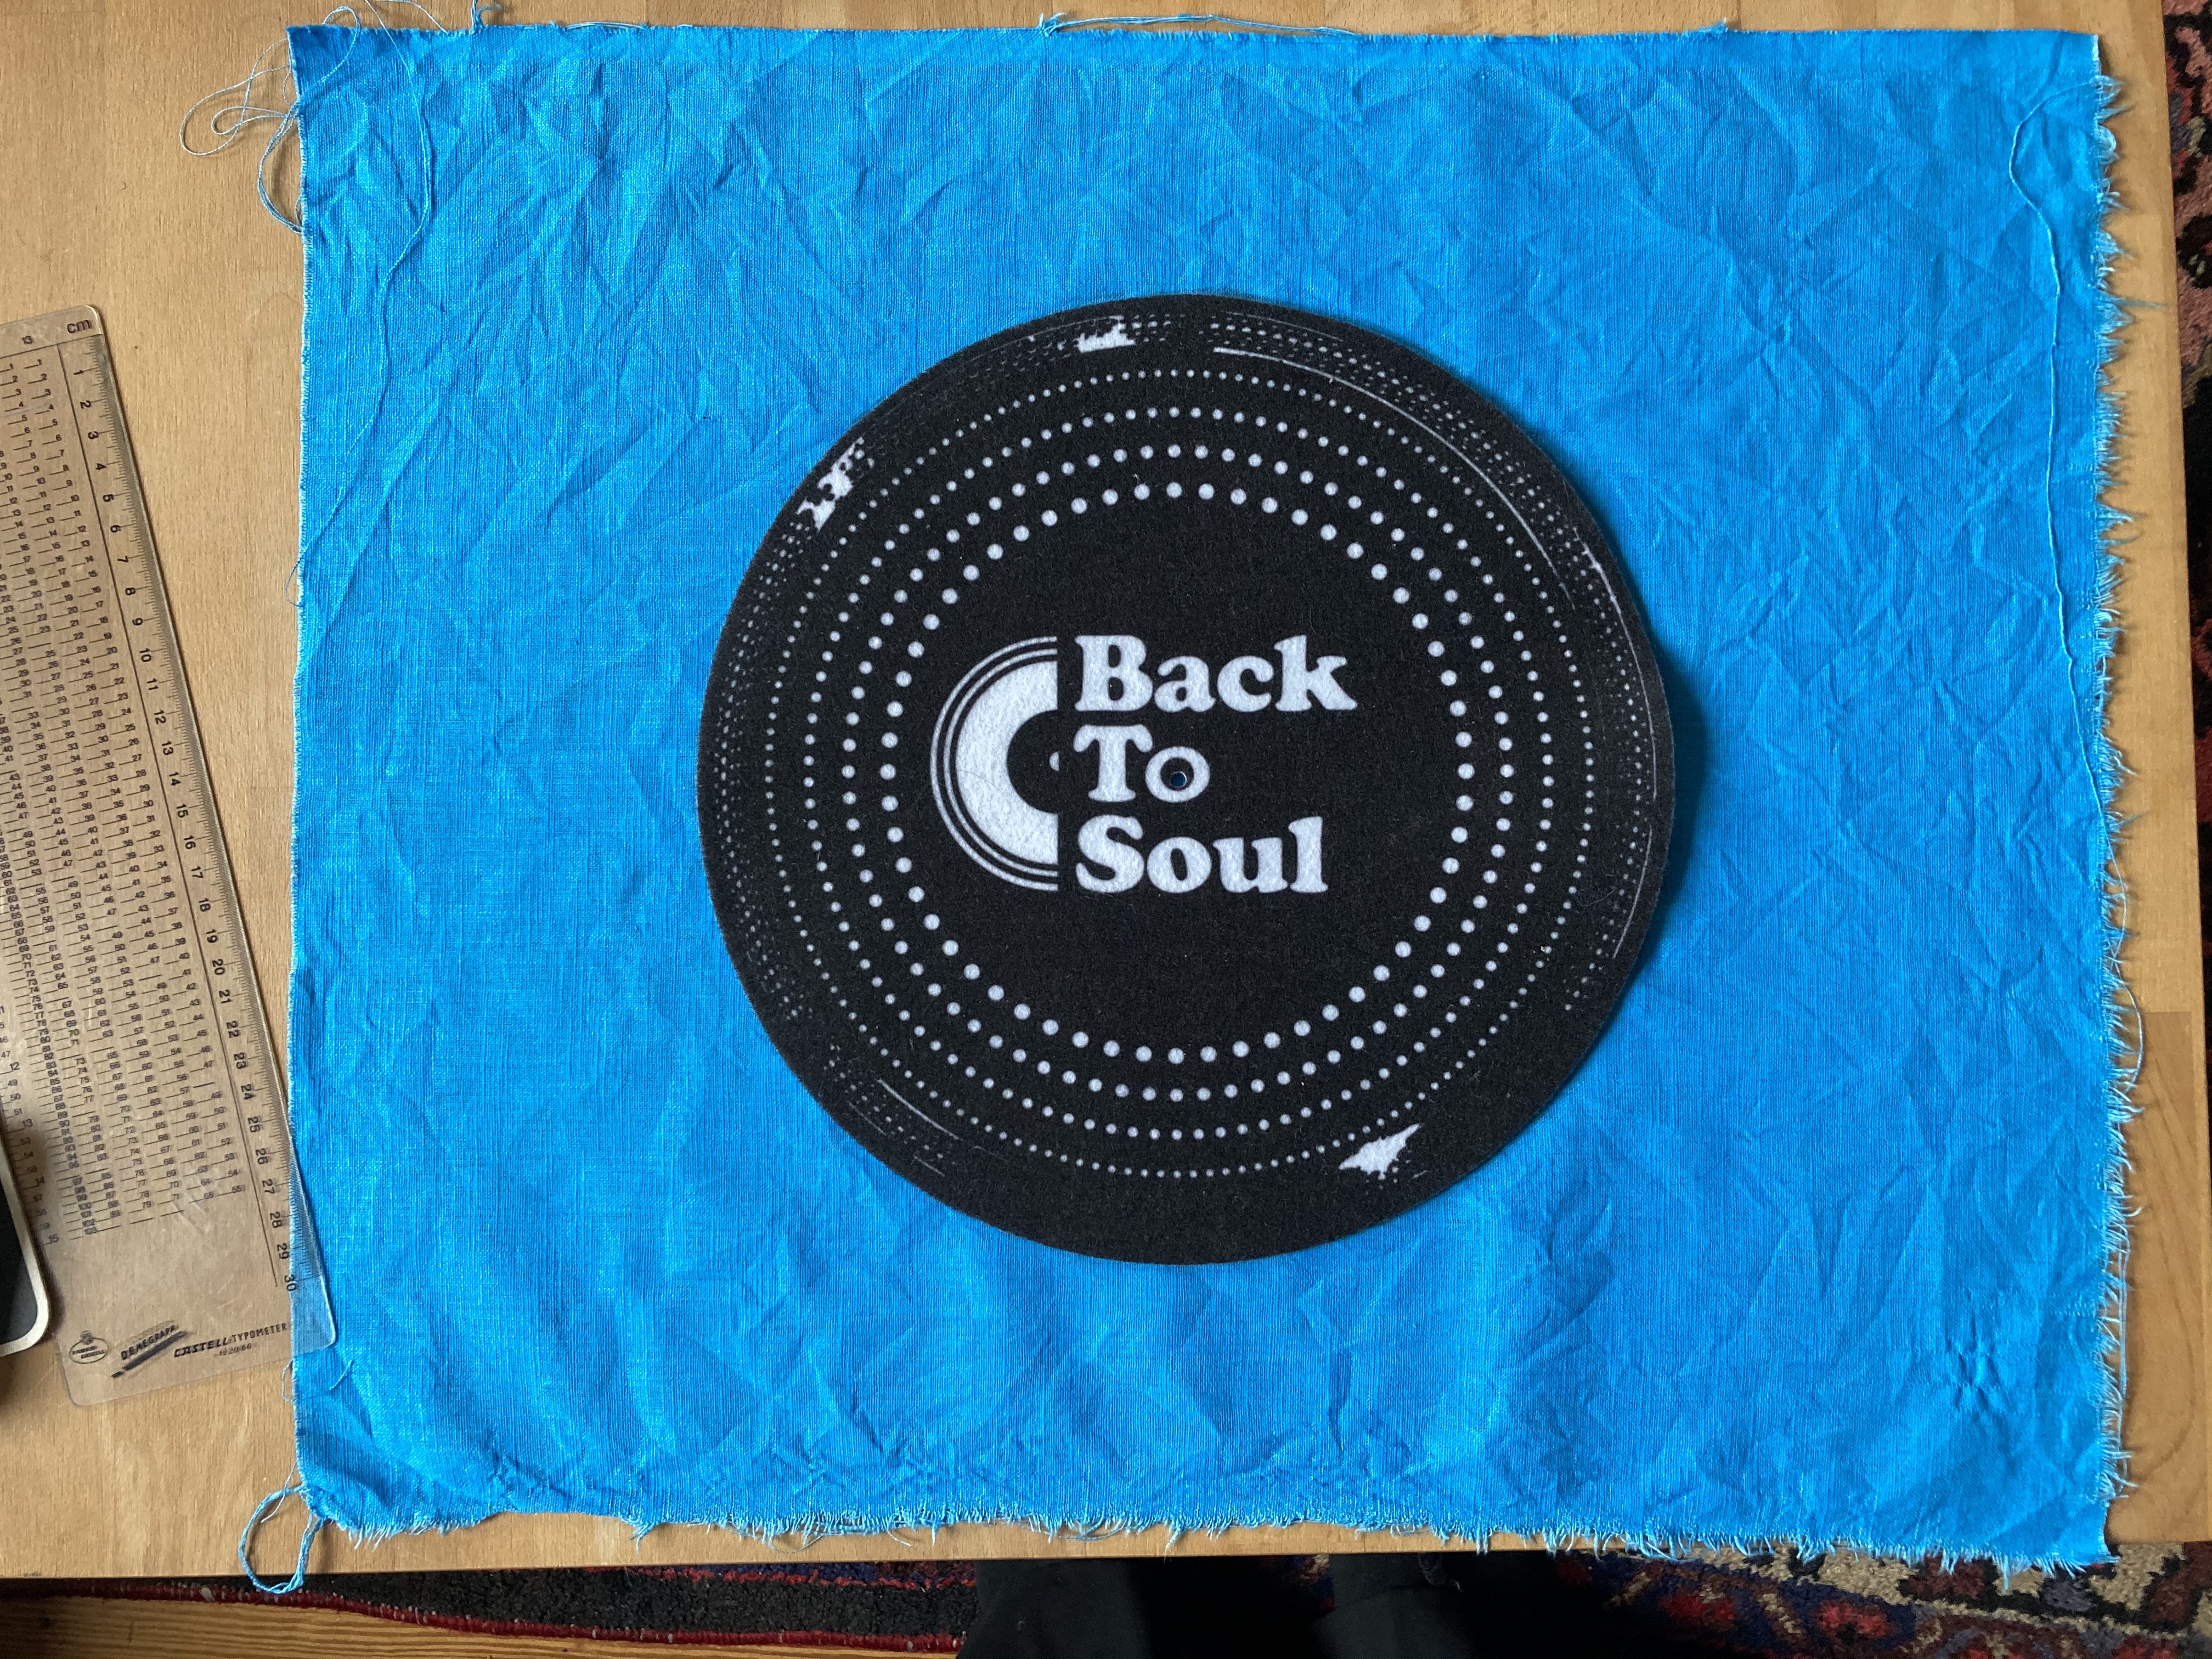
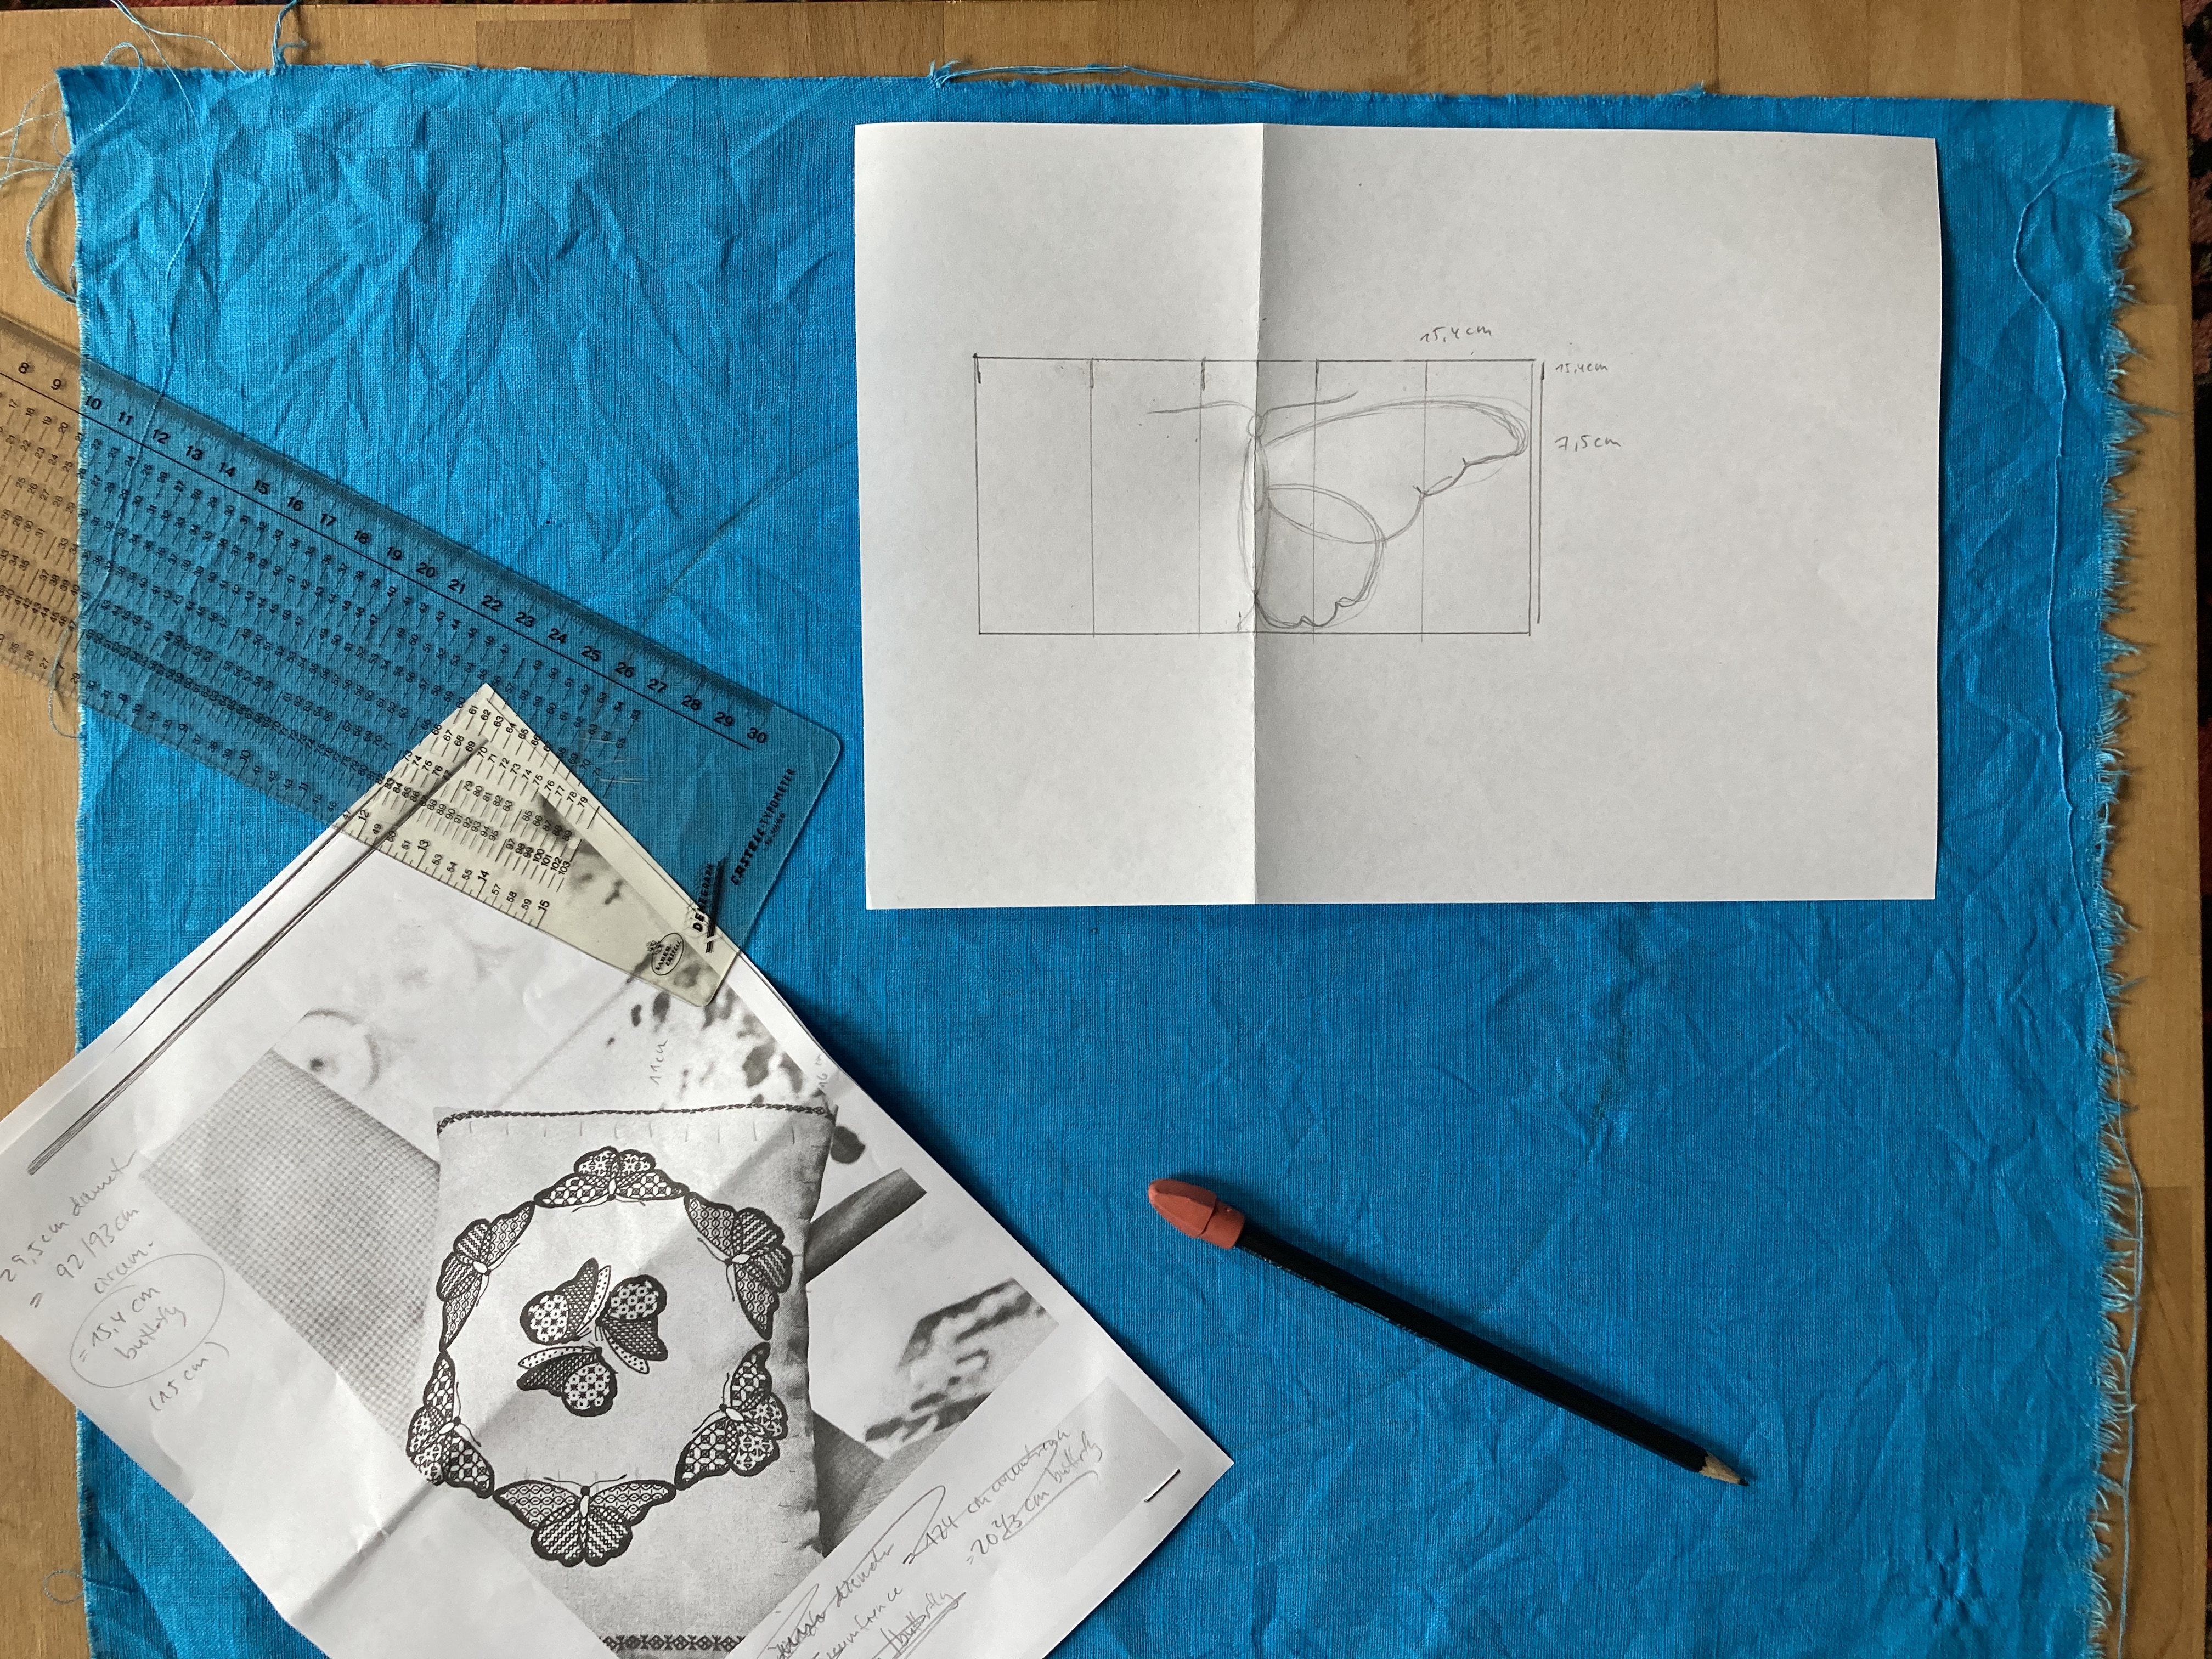
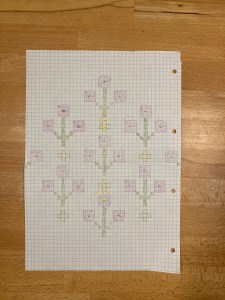
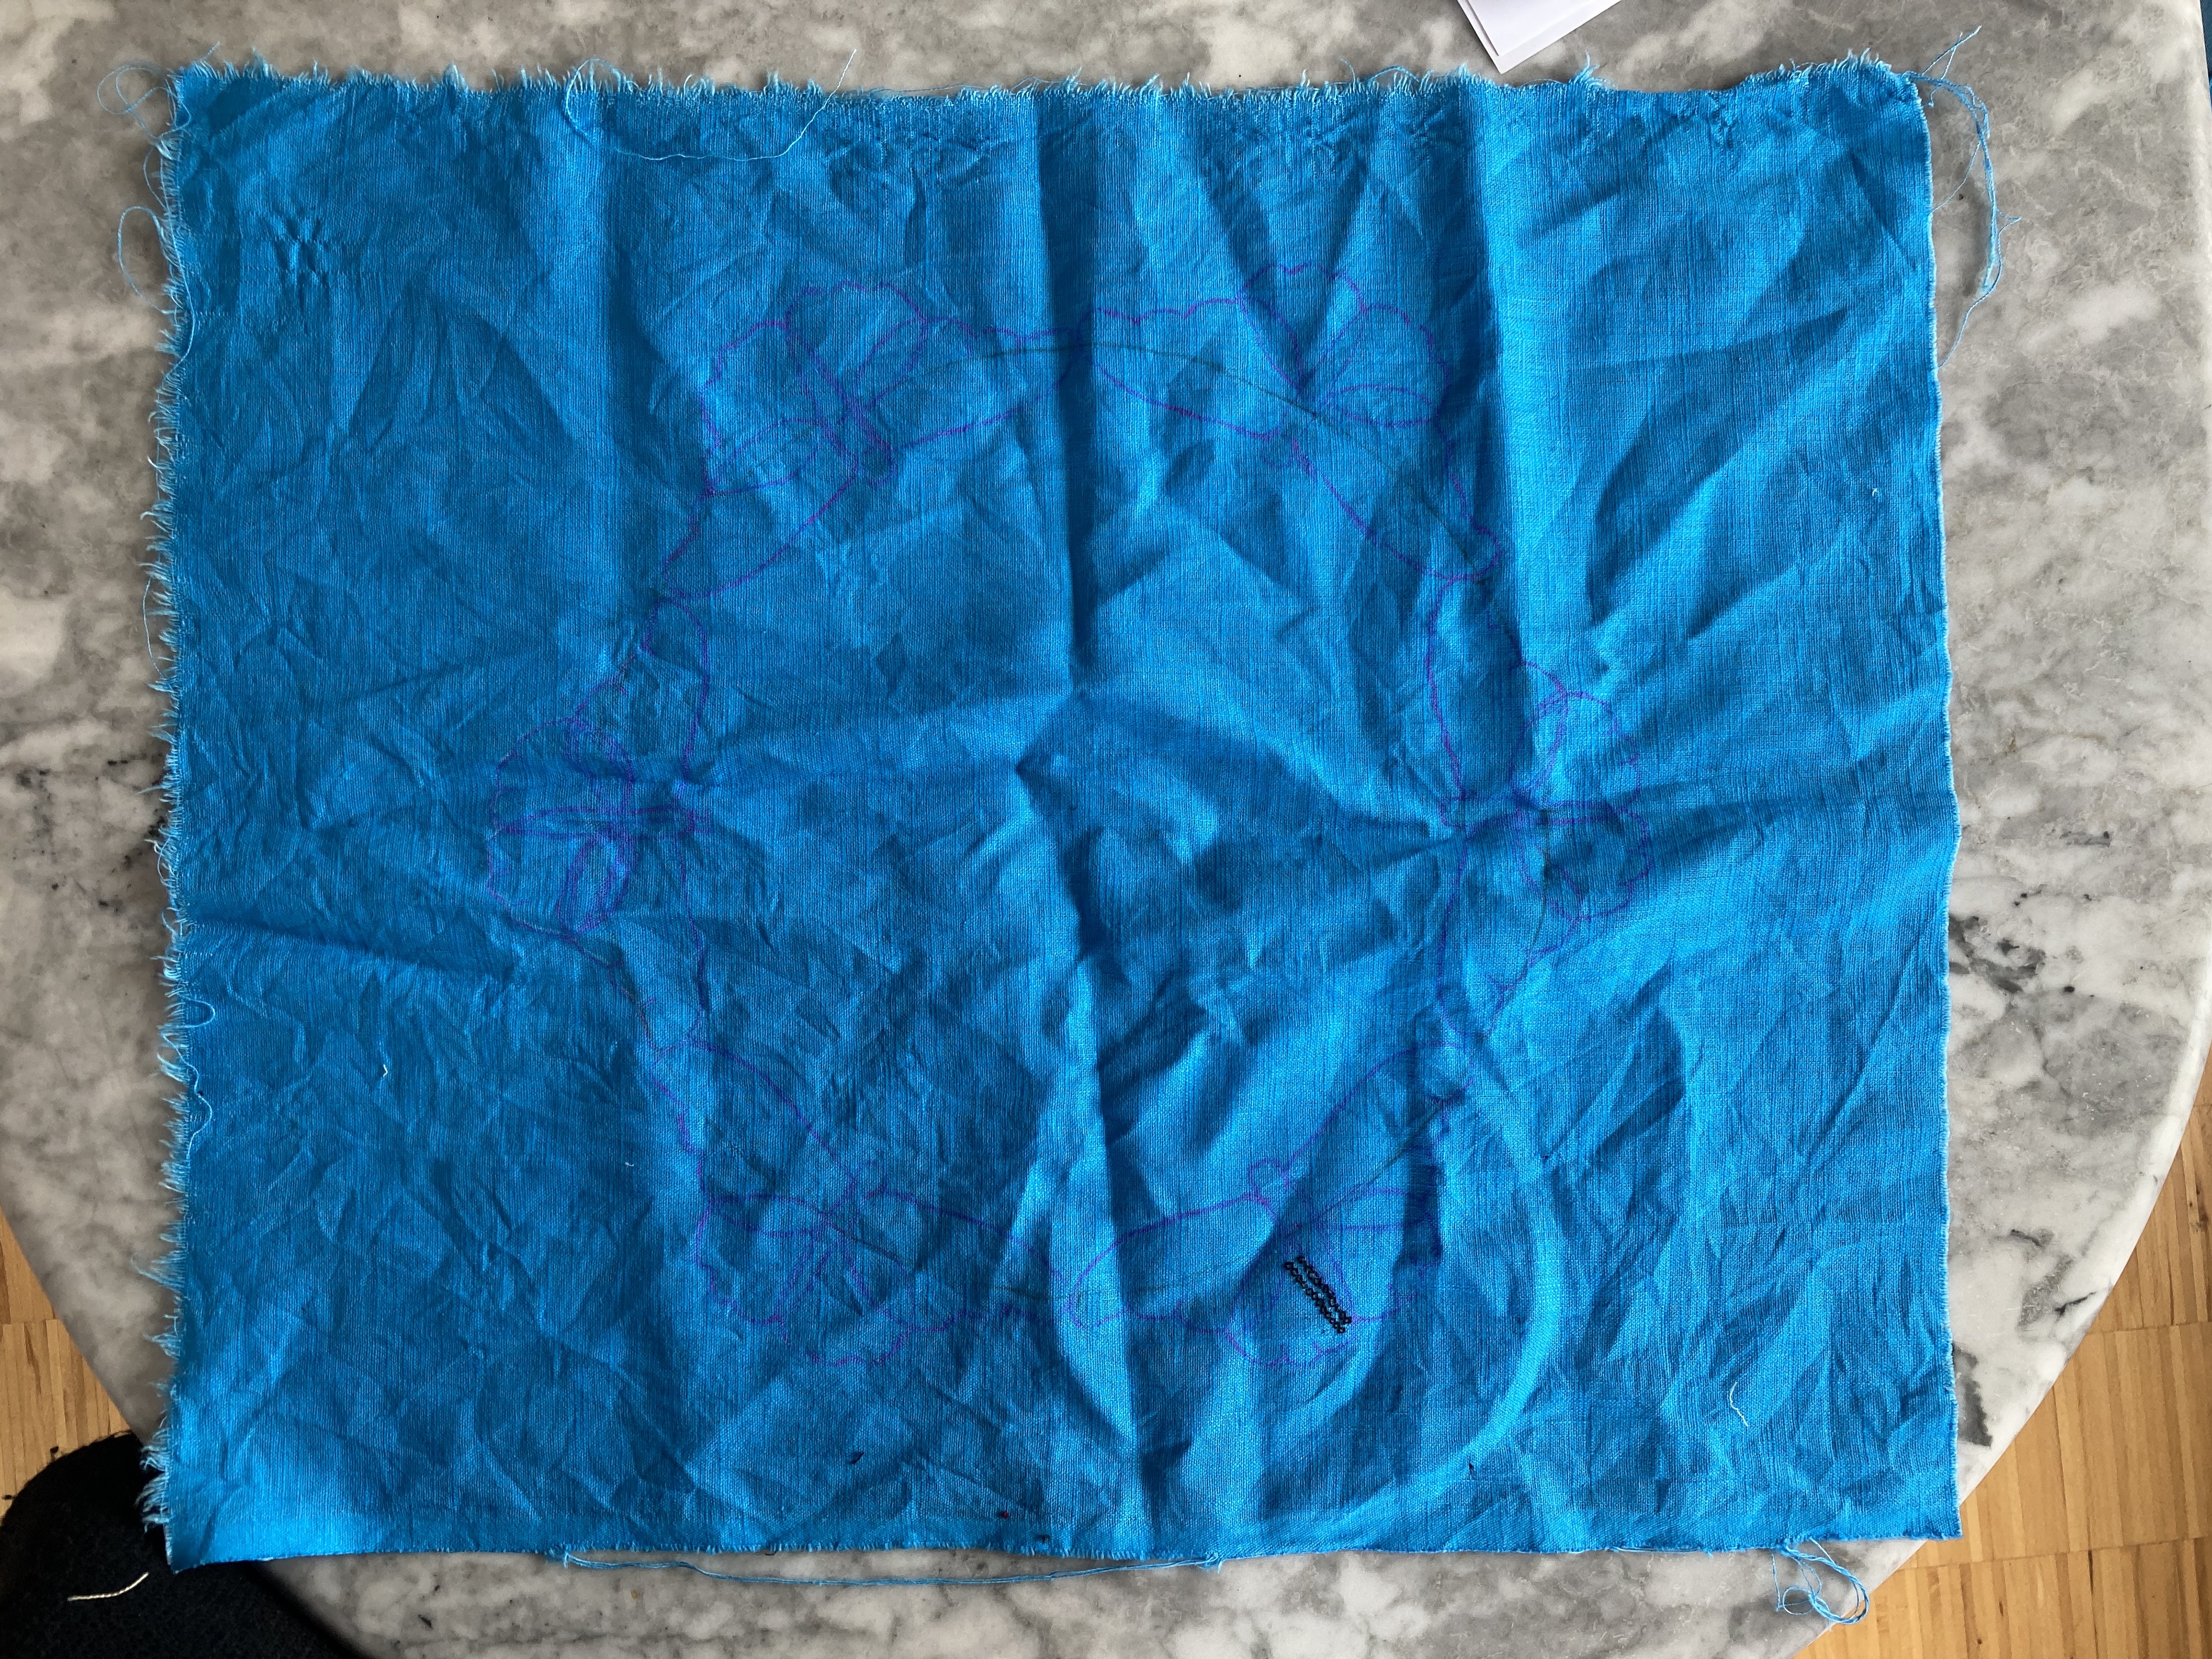
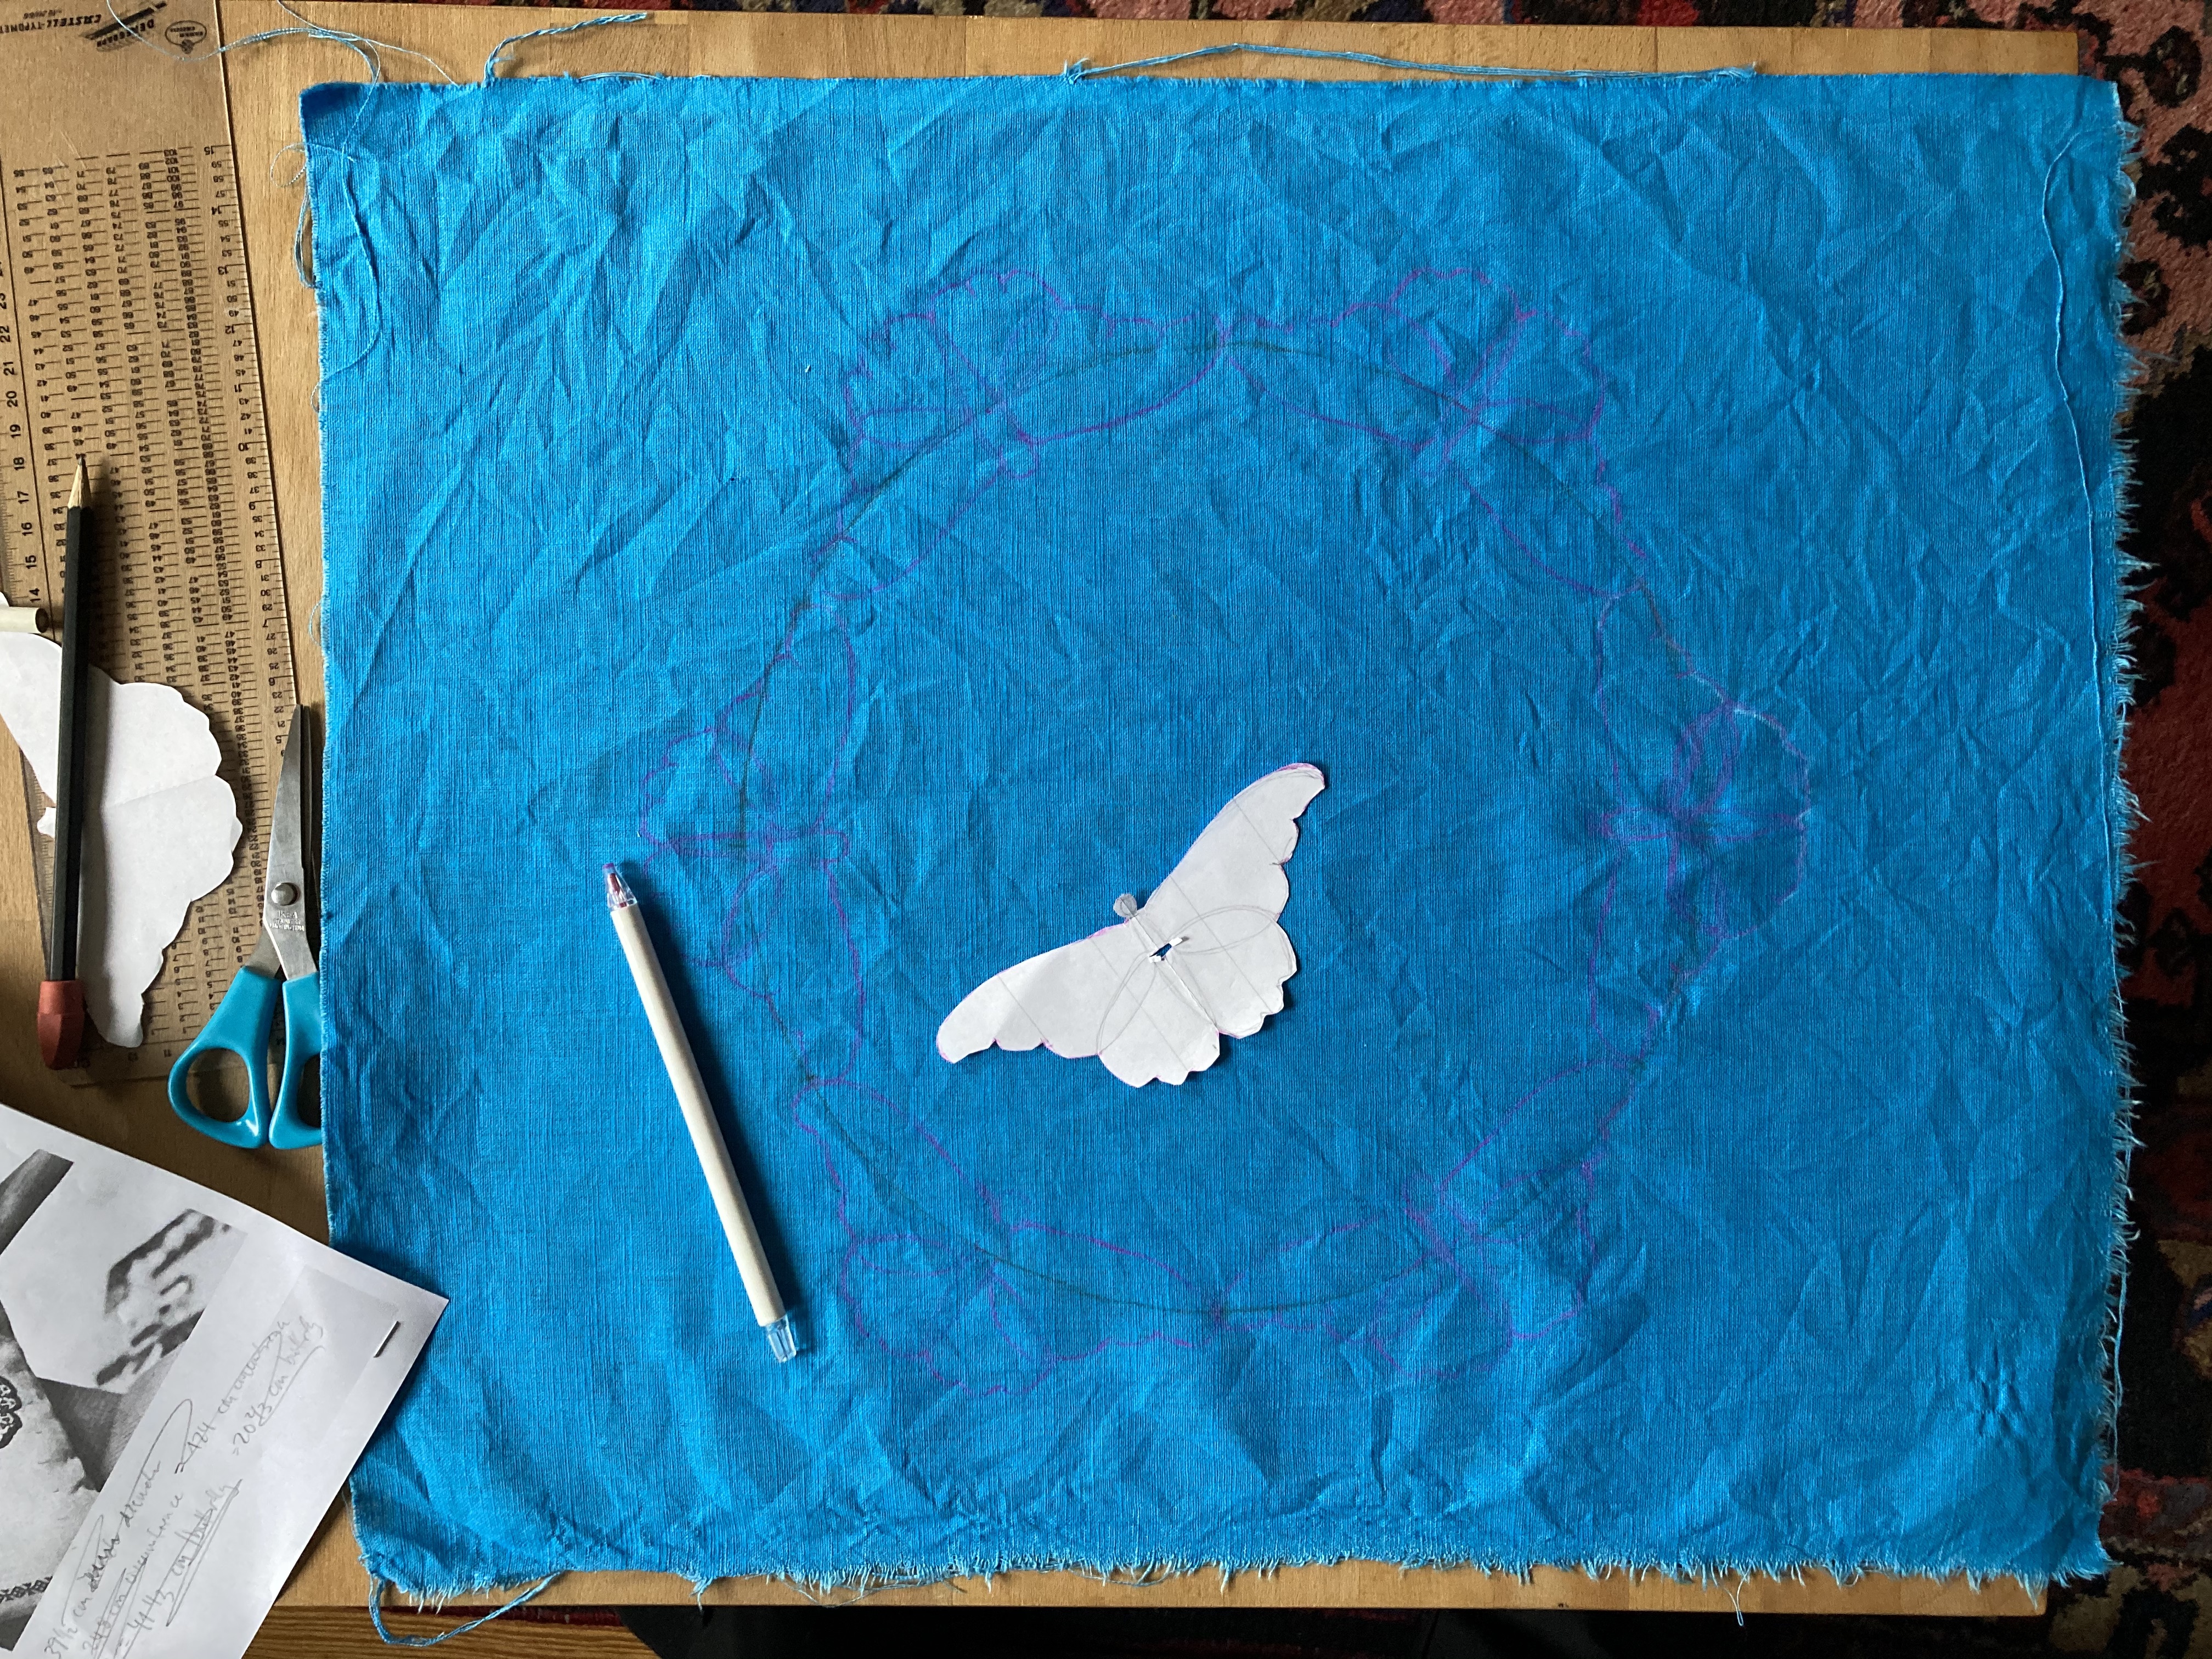
The first linen I bought was called something like “100% Linen Medium Blue” and I should have noticed right away that that meant it was regular furnishing linen, not specifically embroidery fabric — embroidery linens have special names according to their type and thread count. I loved the colour, though, and was determined to try. Of course I didn’t have a transfer, so I painstakingly calculated out the size of the circle for the main butterflies and from there, the size of each butterfly. I made a paper stencil for the butterflies and drew around a felt record-player cover (coincidentally the perfect size!) with a pencil to get the circle right. On starting the first butterfly, it was clear that the fabric was too tightly woven. It was pretty much the same type as the fish cushion. I was determined to make this project the right way, so after all the work I had put in marking the fabric and starting the pattern, back to the Internet I went and bought a few different kinds of embroidery fabric with a thread count between 11 and 12 threads per centimetre.

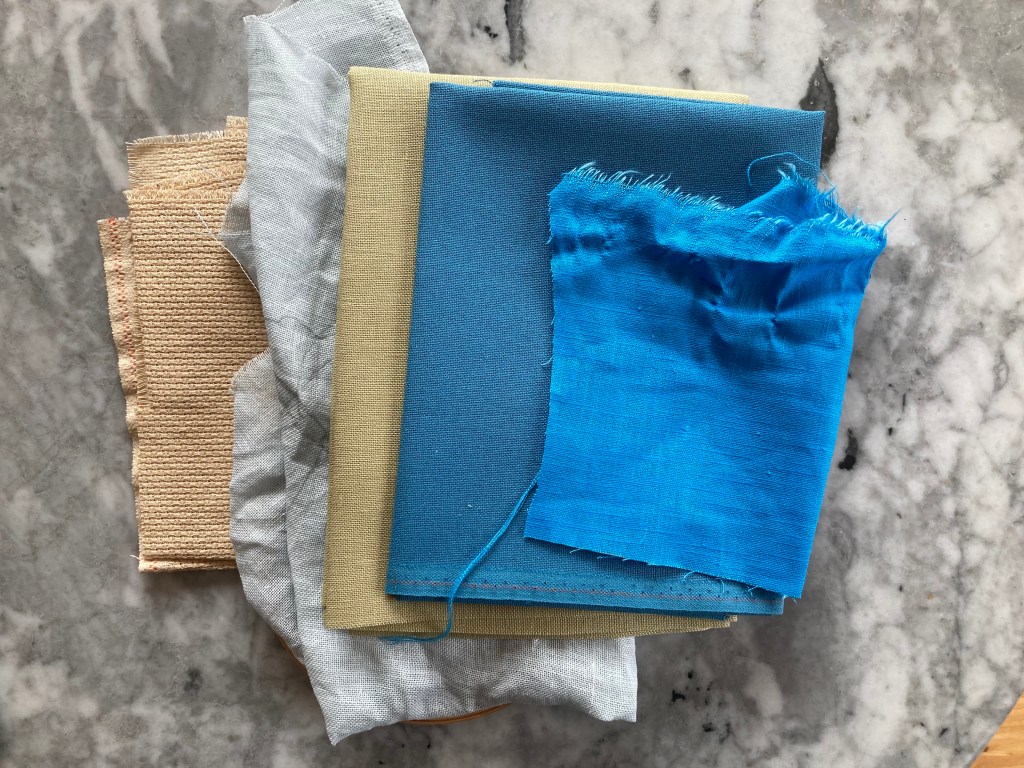
It is amazing how different fabrics can be that have the same or similar thread count!

Here is a photo below. For comparison, the fabric on the far left is the normal “Aida” used for cross-stitch at 6.4 threads to the inch. The light grey-blue is “Permin”, which has 11 threads/cm and is very open, almost like netting. The beige-ish fabric next to it is “Belfast” with 12.6 threads/cm and perfect for this project, but wasn’t available in blue. Next to it is “Murano”, which also has 12.6 threads/cm and is a cotton/viscose mix, not 100% linen like the others and the blue they had was a bit too dark. On the far right is the furnishing linen I had originally bought, and the only one in the colour I wanted.

I wasn’t 100% happy with any of the the four options I had now bought, but I had spent a lot of time and money already and just wanted to get the project started in a way that I would be able to finish it. So I decided to use the Permin, which was not the perfect colour (a bit light, but I could try to dye it?) and very net-like (but at least it was easy to do the counted work).

The slight difference in thread count and the net-like aspect of the fabric made me decide to work with 3 strands of thread instead of 2 as in the pattern. Other than that, I followed the pattern as best I could. My buttonhole stitch outline is more like blanket stitch and not as thick as in the pattern, but that’s OK. After almost finishing the second butterfly, I decided to go against the instructions and work the outlines of the butterflies first, then fill them in with the counted work. The other way around probably works well if you used an iron-on transfer with easy-to-follow lines, but my pencil tracings are less accurate.

The pink is embroidery transfer pen and will wash out.

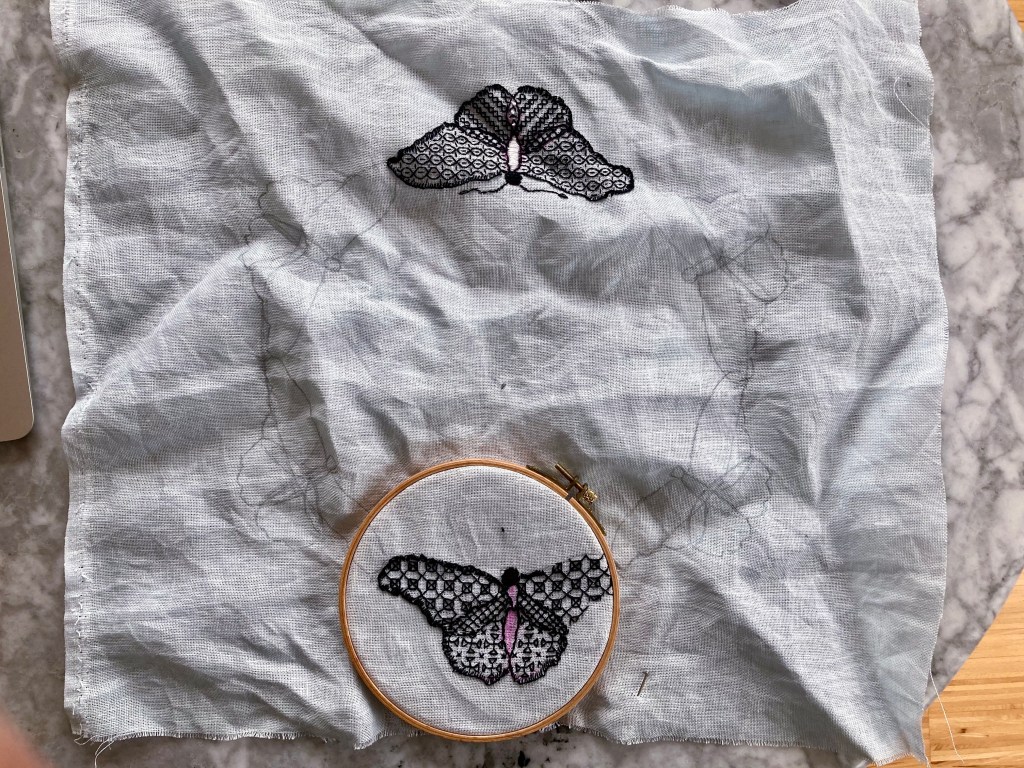
It was slow going, but there is something meditative about embroidering precise geometrical shapes.

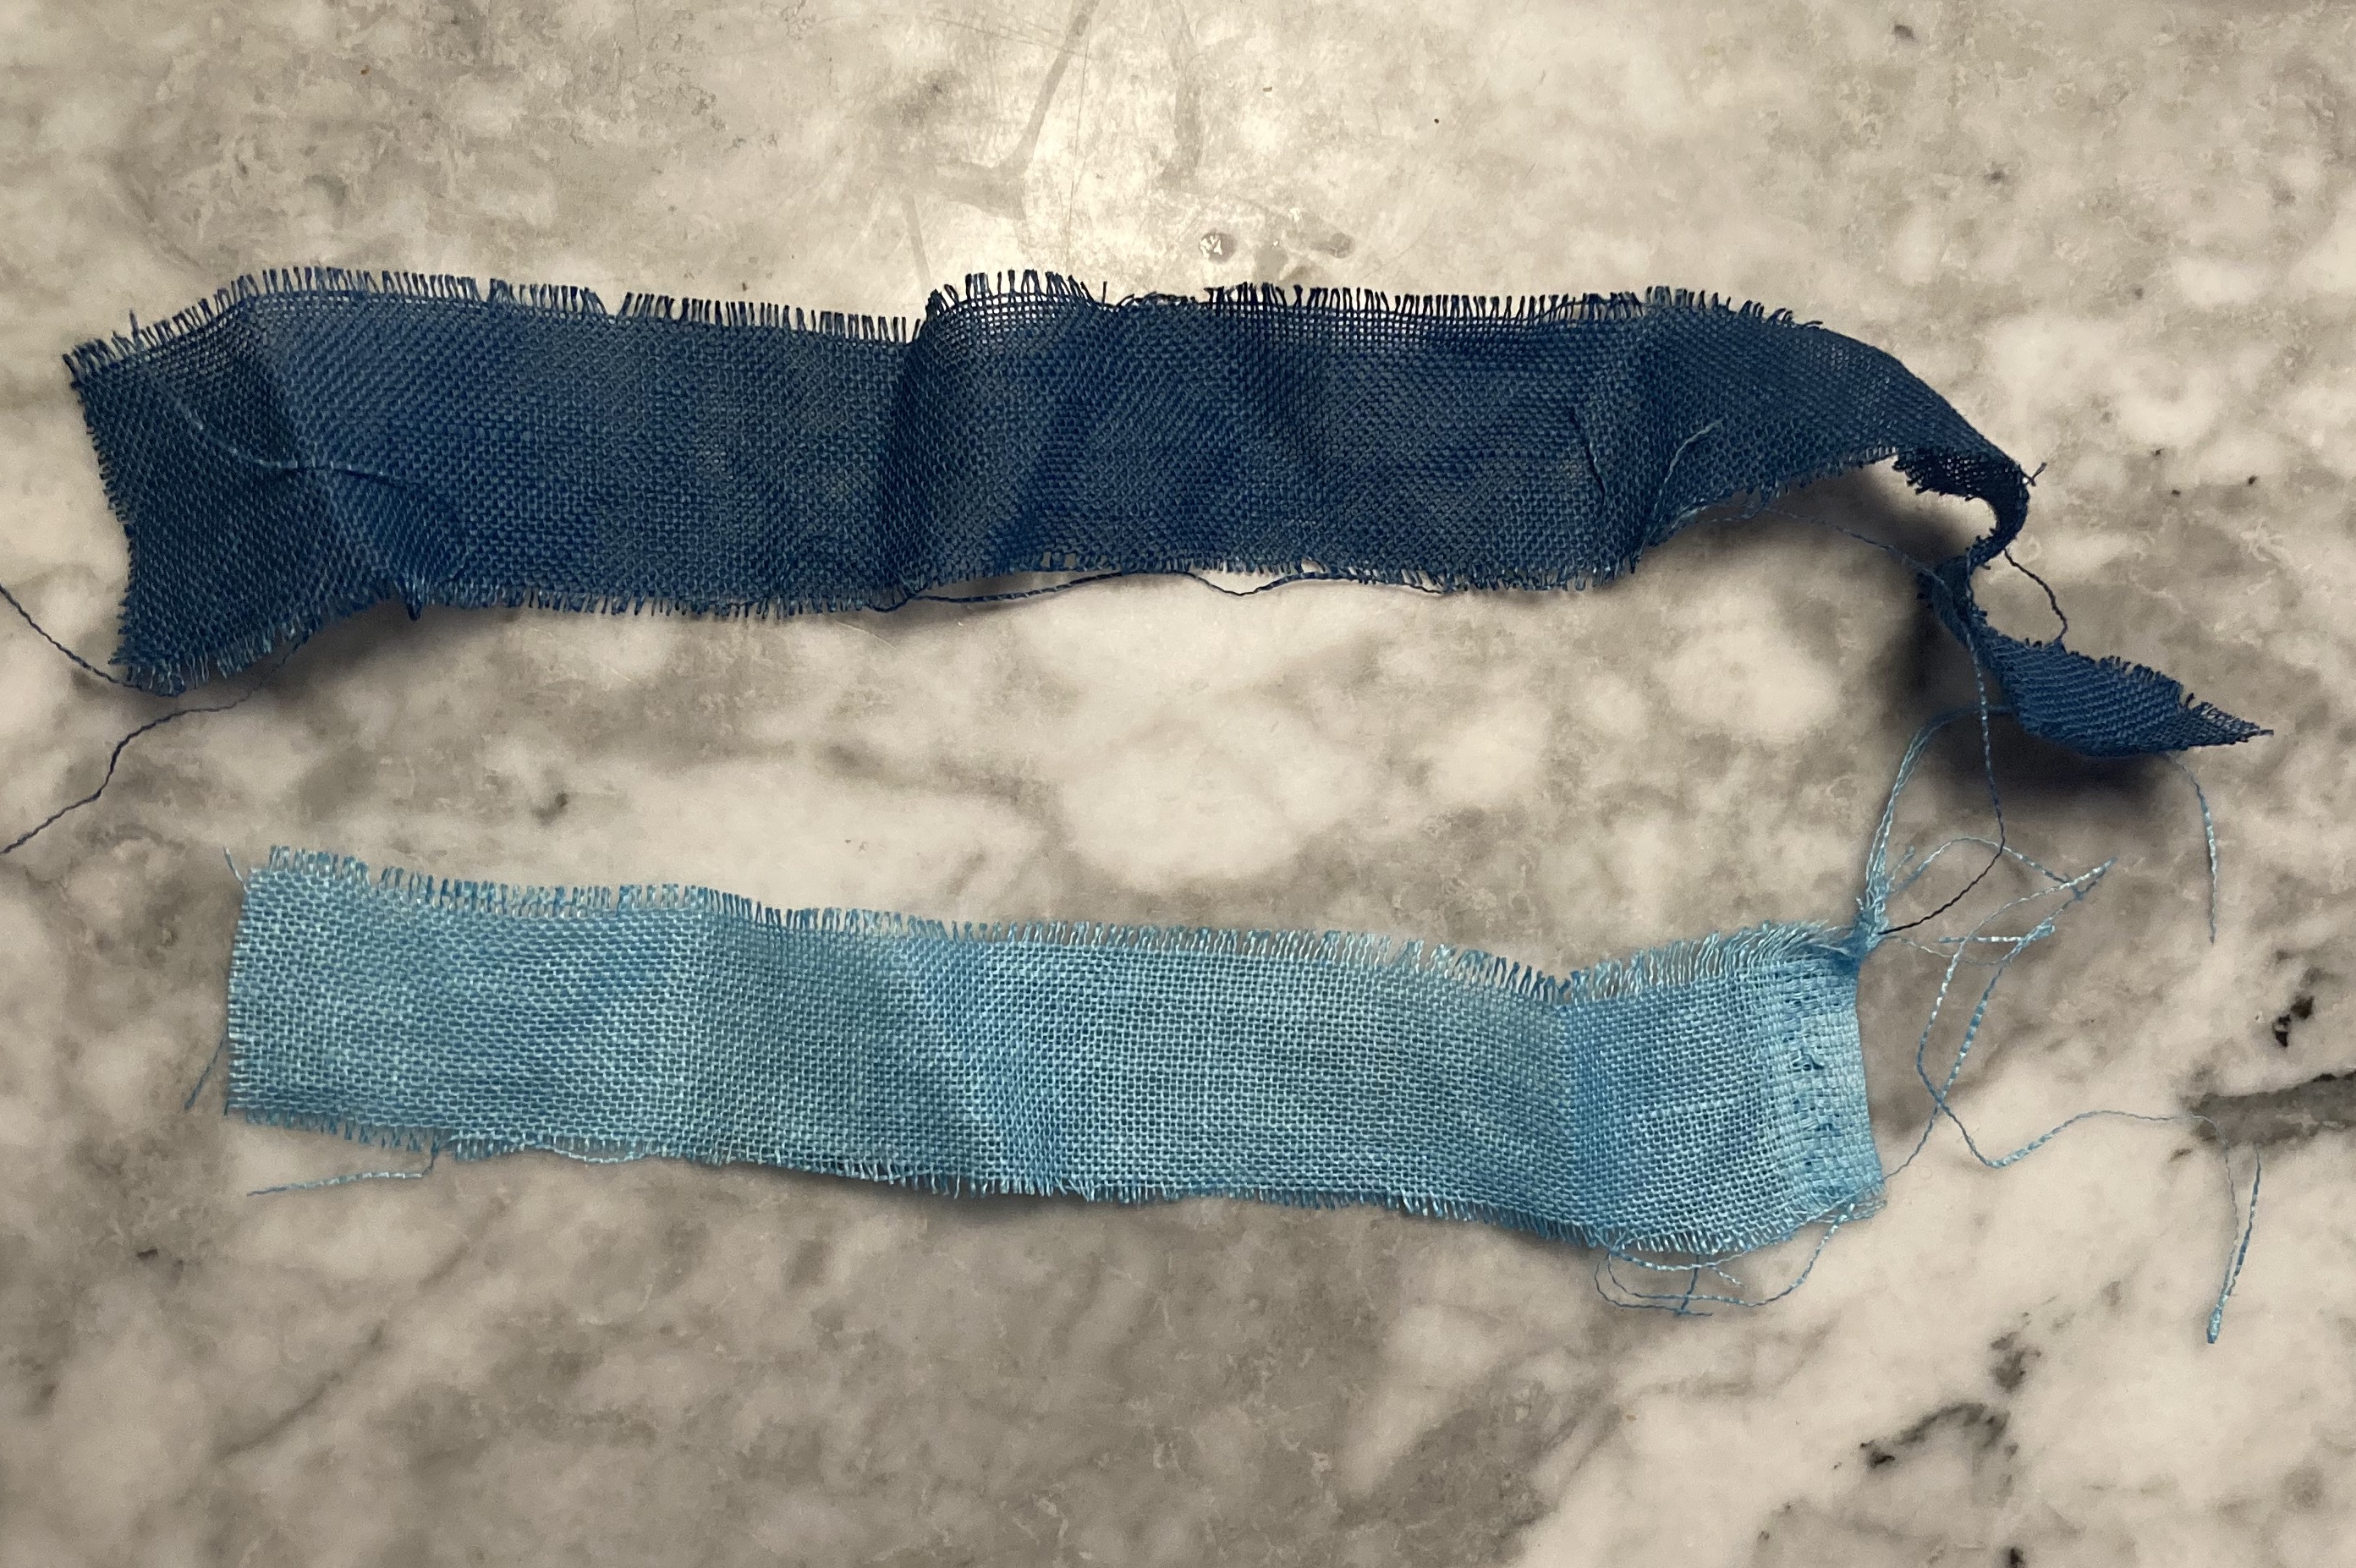
After embroidering two or three of the butterflies, I got my hands on some fabric dye and experimented with scraps of the cut fabric. “Deep Sea Green” (top) is actually blue, which was desired, but too dark and not vibrant enough. “South Sea Turquoise” (bottom) was the ideal colour, but I started liking the pale fabric more the more butterflies were embroidered. I decided to stick with the fabric as it was until the embroidery was complete, leaving off the white satin stitch body bits until after I dyed the fabric (or not).

Two strips of dyed fabric in different shades of blue

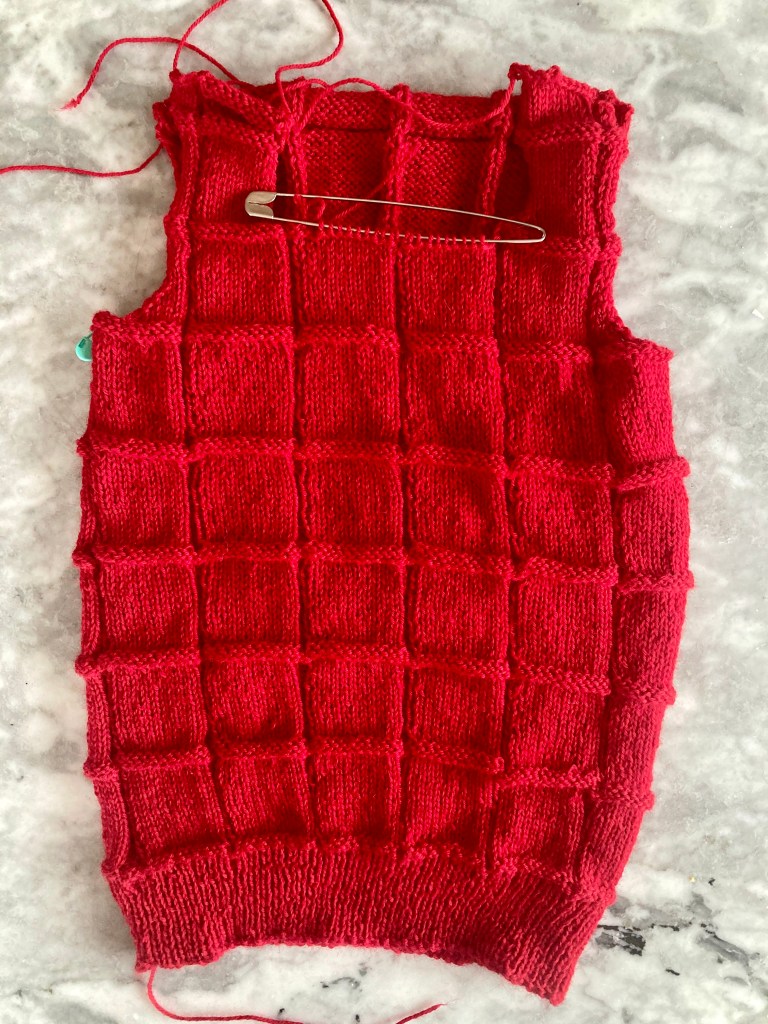
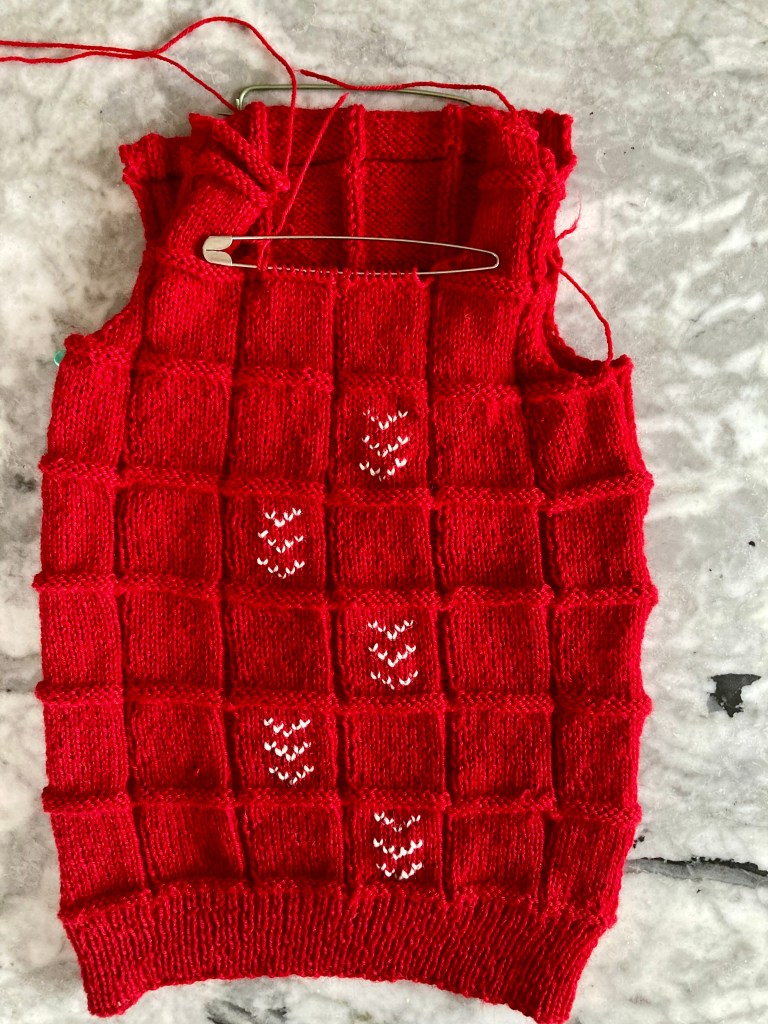
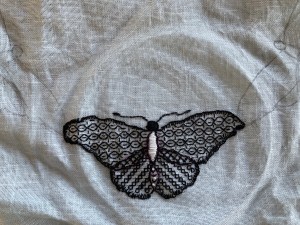
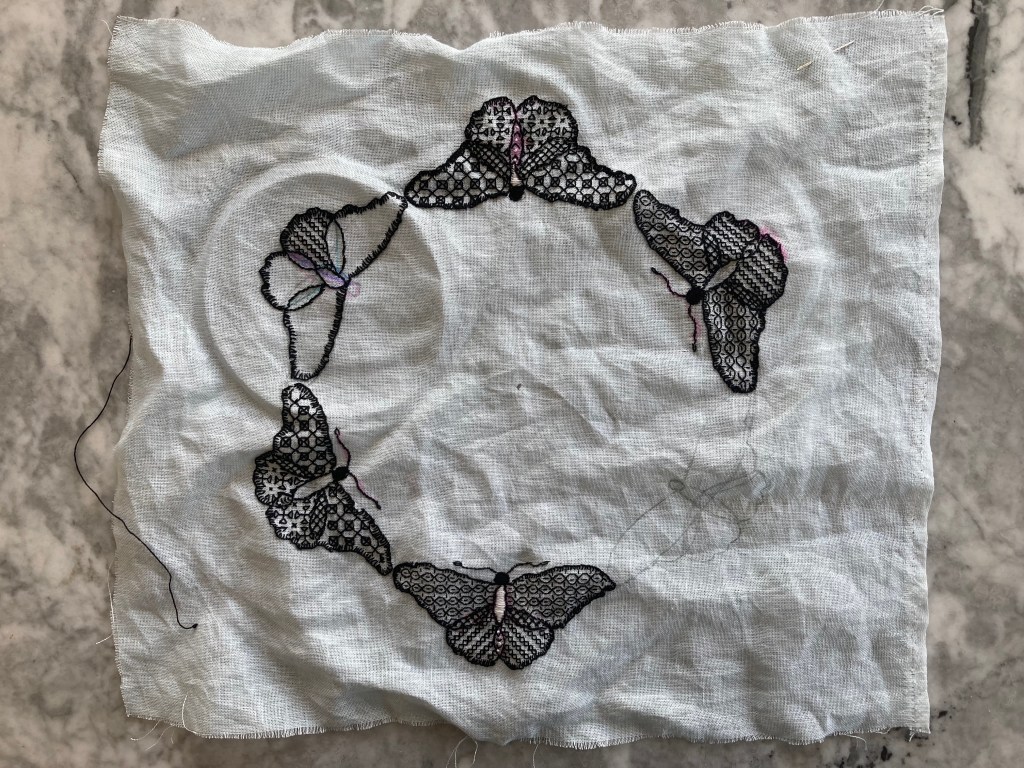
May 2021 passed very quickly and I hardly made progress on my May project, let alone this one. Here is a photo of my progress at the end of May:

Unfinished embroidery project, blackwork butterflies on pale blue fabric

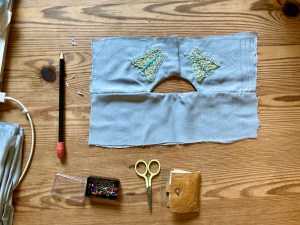
After leaving it for a while to work on other projects, I picked it up again and tried to work a little bit each day. Things got complicated in the autumn, as the days got shorter and darker – I realised I could only work in bright, natural daylight, otherwise I couldn’t see the threads well enough to count them, even with a good lamp. But I kept going and eventually, there it was!

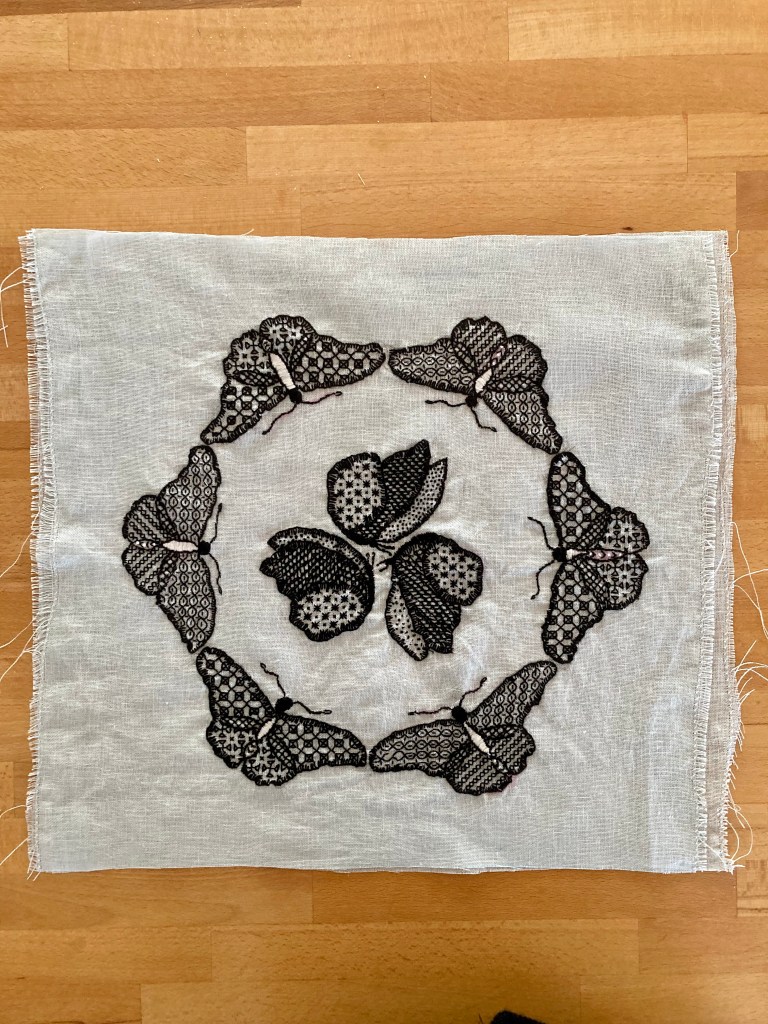
Making it up into a cushion was easy. I made the cushion itself from an old white pillowcase that had been retired to the upcycling drawer, made the back from more of the net and added a zipper. I had left off the extra embroidered borders, since the design turned out more square than rectangular.

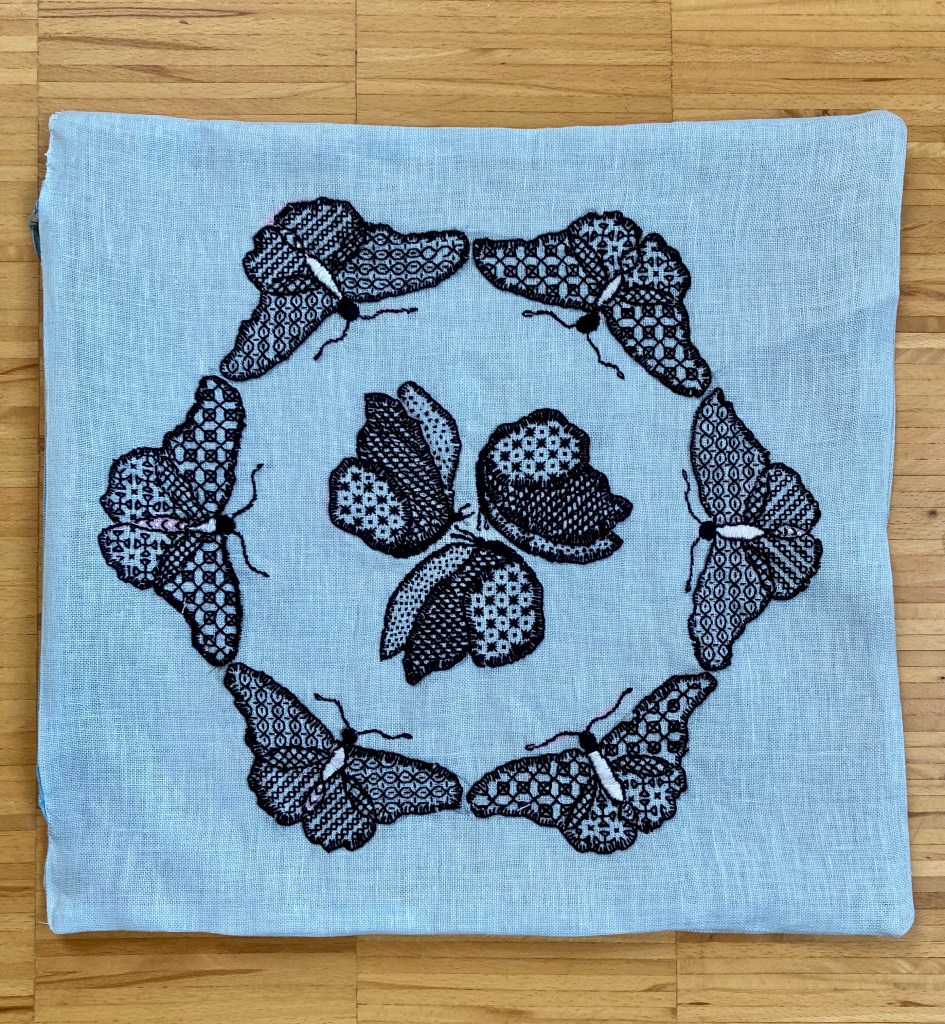
(The actual colour is somewhat less blue than the photo above, but more blue than the one below. I can’t get the colour correction to work properly on this device. )

The only problem was the transfer marker, which didn’t wash or iron out well. A tip in one of my old Stitchcrafts suggested using “solvent” if nothing else worked, Having no idea exactly what kind of solvent they meant, I tried alcohol, which didn’t work, and kitchen de-greaser, which worked somewhat. Any little bit left in will hopefully wash out in time.

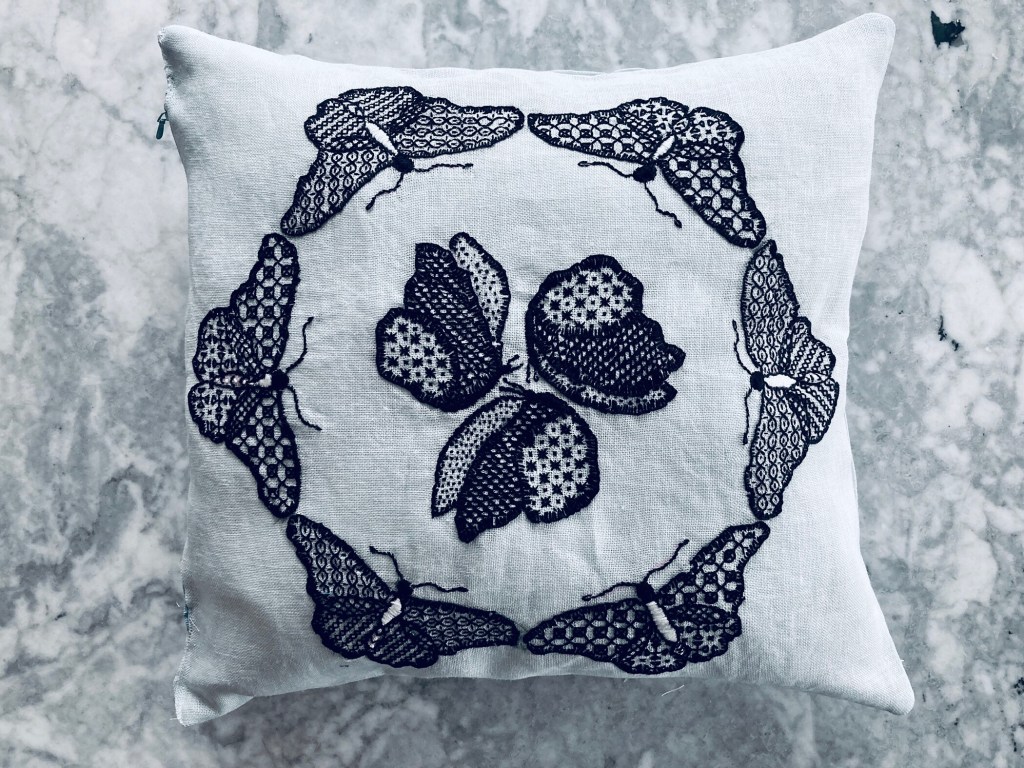
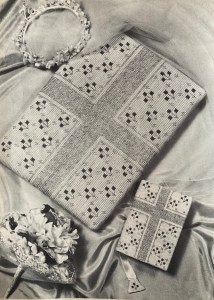
Wow, it’s finished! I am really impressed with myself for getting this done, but I think it will be my last blackwork project for the time being.

April 1963: Overview

Cover photo, Stitchcraft magazine, April 1963

First Fashions for Holidays! It’s almost always some sort of holiday season in these vintage knitting magazines — in this case, Easter and preparations for the summer. As the British climate makes it possible to wear thick, warm wool sweaters pretty much any month of the year, “holiday / not holiday” is less a matter of warmth or season and more about casual, easy-care garments to wear while “strolling” and sight-seeing, or projects that are small and simple enough that you can work on them while lounging in your deck chair. Or, as the facing page title puts it, “Sweaters off-duty.”

Thick, collared pullovers and cardigan jackets that can be worn as outerwear make up the bulk (-y) of the garments in the first category, many of them made in Patons Big Ben wool at 3 1/2 stitches to the inch. The tweedy, dark green jacket on the inner front cover is a good example of this and features an intriguing wavy slip-stitch pattern. The “Italian” tunic on the inner back cover has a knitted-in border pattern made of beads. DK-weight wool is used for the women’s round-yoke sweater on the front cover. Hip-length is the fashion for everyone, wide collars continue to be in style and decorative borders near the hem are the new spring trend.

There are fashions in finer-weight wool as well, “for elegant summer wear”. The red men’s pullover on the inside cover and the women’s Nylox pullover both have interesting stitch patterns, though I feel like the placement of the inserts on the women’s pullover could go horribly wrong a little too easily. If your man finds cables too exciting, you can knit him a plain V-neck pullover in bouclet wool and match it to your own fluffy mohair-mix jacket, made in Patons’ best-ever-named wool, “Fuzzy-Wuzzy.” Colours are strong and bright, including some very springlike salmon and turquoise.

Fashions for the younger members of the family cover all age groups: a dolman cross-front cardigan for the baby, a play-set for the toddler, a “miniature Paris blazer” for small and medium-sized children (she’s painting a picture on a easel, so you know it’s Parisian!) and a quick-to-make “chunky” pullover for “sub-teens” which is easy enough for a bigger girl to make for herself. (I don’t think the young model in the photo actually knows how to knit, though.)

With all that pre-holiday prep knitting, the homewares in this issue are generally unspectacular. There are chair sets in counted cross-stitch, a crocheted cushion and rug for the older daughter to make for her room, and a tapestry tea-cosy. The two more interesting projects are these corded crochet mats and a wonderful cushion with a design of butterflies, made in blackwork embroidery. Unfortunately I’m not good enough at crocheting to really understand how the “corded” look on the mats is achieved, besides the fact that there are a lot of picots and crocheting many stitches into a ring. Oh, and there are embroidered table mats, too, featuring line drawings of famous parks. I like the white-on-black effect — something different.

That’s it for this issue! The ads are pretty normal and in the comic, Miss Muffet continues her adventures, getting magically shrunk down to the size of an insect in order to go flying with a nice beetle-lady. I’m afraid the dragonfly might have dropped her into the lake, though! Oh no! How will it end?

My project for this month will be the embroidered butterfly cushion. Happy Spring!

March 1963: Sunday Best Dress

baby dress and coat, image from Stitchcraft magazine, March 1963

My March project featured sewing, for a change. I can sew, both by hand and with the machine, and I have sewn quite a few things in my time (even worked in the costume department of various community theatres as a teenager/young adult), but I do not enjoy sewing, nor am I particularly good at it, to be honest. (My costume shop work involved mostly either “pulling” outfits from storage, or doing fittings and alterations, or sewing things that someone else, i.e. the head designer had cut out. For that reason, I never learned to cut things to fit properly and am surprisingly bad at working from bought patterns.) Years of knitting have also made me very inexact about perfect measurements and straight lines, which is obviously sub-optimal for sewing. But I gave it another try to make this embroidered “Sunday best dress” for a baby from the March 1963 issue.

For once, you didn’t have to send away for the sewing pattern; since all the pieces were basically rectangles, they just printed a little scaled-down plan for cutting the material on a graph, with each square being equivalent to 2 inches. It was designed for silk or crepe fabric. I had bought a large remnant of beautiful light-grey viscose (rayon) some time ago, of which I used a small amount for the lining of February 1963’s needlepoint bag and had plenty left over. Rayon fabric has been around for more than a hundred years and was (and still is) used as “artificial silk” throughout the 20th century, so my fabric was quite period-accurate even though modern. I didn’t have silk floss to do the embroidery and just took the opportunity to use up some small scraps of normal cotton floss in pastel colours.

The dress was supposed have three embroidered butterflies on the front and close in the back with a couple of buttons. I didn’t have all that much embroidery thread and I did have quite a lot of lovely vintage buttons in a perfect pearly-green colour (thank you, kind seller on Ebay!), so I changed it around to fasten in the front, using the two-butterfly design from the coat (which I didn’t make).

The butterfly design was easy enough to copy without a transfer and features laid stitches on the wings — something new for me. My embroidery skills are still far from professional, but improving. The sewing work was interesting because I am not always in the same place as my sewing machine due to pandemic chaos — but also didn’t want to wait until I was — so I sewed everything except the buttonholes and waist strengthening zigzag at the end by hand. Including the gathers, buttonhole band, frilled sleevelets etc. Now I know why Marilla from the Anne of Green Gables books had to stop sewing in her later years to preserve her eyesight! Everything was tiny and took forever and my fingers, which are actually quite long and thin and nimble, felt like elephant feet.

Photo of sewing work-in-progress with various sewing tools

I did the buttonholes on the machine when I could, because I was definitely not going to try to sew buttonhole stitch by hand on thirteen tiny buttonholes. My machine-sewed buttonholes look messy enough that they could pass for hand work, ha ha. I am surprised that it turned out even vaguely even (yes I know, the hem in the front is a mess.) But in spite of its obvious imperfections, I’m quite happy with the result and proud of myself for making it work. I know a one-year-old baby who would fit in it perfectly and the parents will be very happy to have it as an Easter dress for her, so in my mind, it’s a success.

Finished sewing project: embroidered dress for a baby

Meanwhile, the “naughty pile” of unfinished projects is slowly diminishing and I’m looking forward to getting back to knitting.

March 1963: Overview

Cover photo, Stitchcraft magazine, March 1963

Start your engines and give that propeller a whirl! The theme of this month’s issue is “Fashion On The Go” and the photo team really outdid themselves in showcasing adventurous and enjoyable modes of transportation. “With the wonderful opportunities for travel”, writes “editress” Patience Horne, “you need clothes that are easy to wear and will carry you through the day without a lot of care and pressing.”

Travel opportunities definitely took off (pun intended) in the early 1960s. Passenger air travel, though still a luxury, became increasingly possible and affordable with the advent of jet aircraft. Ocean liners, challenged by the rise of air travel, revamped into cruise ships. The Eurail train pass was introduced in 1959. Huge improvements in automobile technology and design made the freedom of the open road more tempting and accessible than ever. Yearly sales of Vespa scooters doubled from 1956 to 1960. Of course there was very little, if any, concern for environmental factors, and the oil crises of the 1970s were far in the future. There was no better time to travel.

On the race-car track, our cover model is wearing her “Paris Flash Slimline Blazer” — a simple but elegant jacket in moss stitch — and her colleague is sporting a “Double Quick shirt waister” that promises to be “the perfect travelling dress”. In a lovely juxtaposition of modernity and history, the model in the photo next to her is posed in front of what looks like an old-fashioned, horse-drawn stage coach! Her twin-set is made in finer 4-ply wool and though you can’t see it in the photo, the jumper is made in normal stocking stitch and the cardigan in reversed stocking stitch. In a separate photo, you see her posed in front of a horse box — no doubt one of the horses who pull the coach. Train travel is covered with a beautiful photo of this tweedy green travelling coat. It looks very cosy, but as it is made from 60 ounces (!! 3 3/4 pounds or 1700 grams !!) of extra-bulky, extra-heavy Big Ben wool and unlined, I can only imagine how it will stretch and sag with time and wearing.

The centerfold photo showcases more glamorous nautical and aerial travel opportunities. (I am sorry to say that the photo is blurry in the magazine, not just in my photo.) The “boat-deck sweaters” are both in double knitting weight with plain stocking-stitch and collared-shirt form for him, fun nubbly Rimple wool and a welted front insertion with cute tied collar for her. Collars, in general, remain well in fashion, though they are not quite as large as in the last few seasons. The airplane enthusiasts in the right-hand photos sport a casual, oversized cabled cardigan in bulky Big Ben wool and a striped dolman-sleeve pullover in double knitting weight. The dolman pullover sits weirdly around the neck and looks like it would be awkward to wear.

For those who prefer more leisurely ways to travel, i.e. walking around town, here’s a “stroller sweater” in fluffy Ariel and a sort of diagonal basketweave stitch pattern. Even the children get a travel-themed photo, if only in the studio! While the little sister is very keen to drive her wooden locomotive, big brother is apparently tired of playing conductor (but still blocking the tracks…) They’ve both got wonderful things to wear. The two-tone pleated skirt is knitted sideways and the pleats sewn in with the making-up, and his light-weight pullover has another fun diagonal knit-and-purl pattern.

With all these wonderful things to knit, you would think the homewares would be less interesting, but there are still plenty of projects that are mostly small enough to pack with you on your travels. There are all sorts of cushions to embroider: darned and tufted in very 1960s colours (brown, biscuit, fawn, two shades of orange and two shades of rust), neon-on-black “peasant embroidery” in regular crewel work, and with a matching chair-back in Assisi embroidery — traditional Italian designs where the backgrounds and ornaments are filled in with cross-stitch, but the main motifs are left unworked. The Victorian-inspired tapestry chair seat and stitched bathroom rug are probably too unwieldy to pack, but the fine embroidered initials and baby outfit are easy and portable. Readers could order the pattern for the baby set along with the embroidery transfer.

The back pages feature the worst of the Patons & Baldwins “please your man” advertisements, in which a woman can’t even knit herself something for once or look nice in it without all of it being To Please Him. (And then she has to pretend to be interested in whatever boring mansplaining he’s doing with the book he’s showing her.) I can’t help thinking of that scene in Vertigo where James Stewart’s character is trying to get Kim Novak’s character to dye her hair… and she doesn’t want to… and he gets more and more frustrated before blurting out, “It can’t matter to you!” Alfred Hitchcock would have approved of this ad.

The “Children’s Features” continue the alternative telling of the Miss Muffet rhyme story, in which Miss Muffet, leaving the home of the kindly spider-lady, gets captured up by a grumpy beetle, saved by the first spider, and then in turn saves a captured beetle who promises her a present. What could it be? We will find out in next month’s issue!

None of the larger projects are begging me to make them and I’m still working through the WIP pile, so I’m going to use some of that fine embroidery on the vintage handkerchiefs I inherited from my grandmother.

February 1963: Needlepoint Bag

Magazine photo of a needlepoint church kneeler and prayer book (1963)

I was a bit uninspired by the February 1963 issue, which had several nice garments that were either too bulky for my taste or would just take too long to finish. I’m also trying to work from stash as much as possible. With that in mind, I adapted this “Prayer book cover and kneeler for a bride” tapestry design for a small, simple needlepoint bag.

My first, and until now, only tapestry/needlepoint project (what is the difference, anyway? Stitchcraft always uses the word “tapestry”and often qualifies it with gros point or petit point, but I see “needlepoint” used just as often in other sources) was this unfinished failure from the May 1961 issue. I still had the wool and enough canvas to make a smaller bag using the flower part of the design from the prayer-book cover.

Since the original chart was not printed in the magazine but had to be ordered via post, I had to recreate it myself on graph paper, which wasn’t too difficult. The basic stitch is a half cross stitch, which works much better with this combination of wool thickness and canvas density than the earlier project, which was all in cross-stitch. The flower heads are made with eye stitch — 8 stitches all going into the same center hole. The stems of the flowers and the little hash marks between them in the original are supposed to be embroidered over the tapestry using gold Lurex thread, but I changed that to add some little pink and yellow blossom-like accents and just worked the stems in green wool.

Needlepoint chart drawn on graph paper with coloured pencils

So far, so good. I ordered a little bag clasp, marked out the approximate area of the needlepoint and started on the first half. In the middle of the large piece of canvas. Obviously that was a bad move, because a bag has to be worked symmetrically along the bottom fold line, no? The canvas was just large enough to divide it into two parts, but obviously it would have been better to work the whole thing in one mirrored piece and not have to sew a seam on the fraying bottom edge.

Once that problem was solved, I found the actual work to be relaxing, if somewhat boring (lots and lots of grey background). Also, I just barely squeaked through with enough grey wool to finish both pieces. The hard part came when fitting the finished tapestry into the clasp frame and dealing with the lining. The tapestry was… strangely twisted? The two sides of the bag did not lie flat over each other even though both pieces were perfectly identical and perfectly mirrored. I steamed the life out of it with the steam iron and managed to get it flatter, but… why? How? Things only got worse when I added the lining. I hate sewing and I hate linings. No matter how carefully I cut out a lining to the correct size and pin it and mark it and all the other boring things you are supposed to do, it never, ever comes out to the right size, or lies flat, or looks neat and deliberate. (I did manage to get the lining into the bag with a nice neat edge at the top… then realised it made no difference, as the top edge was going to be sewn to the metal clasp.)

Needlepoint bag without lining or clasp

The clasp has holes in it to sew the bag and lining in on the top and sides, and it was clear enough how that should be done, but theory was easier than practice and there was much clenching of teeth and growling. Also, a lot of that nice neat edge needed to be painstakingly ripped out to fit it over the clasp rim, reducing the nice neatness considerably. Did I mention how much I hate sewing? In the end, the edge was quite messy on the inside and not perfectly aligned on the outside. Both the needlepoint and the lining are oddly twisted and uneven and steaming it didn’t help anymore.

My take from this project: Needlepoint is fine, but not as much fun as knitting. Some older issues of Stitchcraft give an address where you can send tapestry projects in to be professionally made up into a bag or cosy or whatever “for a reasonable price” and if that service still existed, I would definitely take advantage of it! I have to make up the project myself, it is not worth it.

February 1963: Overview

This month’s issue brings us on another lovely photographic journey, with “elegant settings for Spring Fashions” in and around historic Bath. Looking closer at the photos, it’s clear that some thought went into the combinations of outfit and setting. The “city” photos show models in elegant knitted dresses or suit-like separates, whilst the “country” photos highlight the continuing trend for casual, bulky garments that could theoretically be worn as outer garments instead of a coat in spring weather.

Our cover model starts off the “city” look with a fur-trimmed dress in “Ariel“, a bulky, yet airy triple-knit wool-acrylic blend. It’s advertised as being “light as thistledown” — the whole dress uses 14, 15 or 16 2-ounce balls of wool, which comes out to about 550 grams for the middle size stitch pattern. I’m guessing the diagonal slip-stitch herringbone pattern and ribbed, belted waistline also help control any sagging. The same yarn and same stitch pattern are used for a jumper-and-skirt set in a dramatic yellow and black colour combination. Look at that model’s hair! I always thought people with red hair should never wear yellow, but she looks amazing. Bobbles on ties feature in both the belt of the dress and the neckline of the jumper and skirts are still just below the knee.

Rounding out the elegant city category is a classic skirt set whose rectangular, unshaped form is made more elegant by the use of vertical lines on the cardigan. Bouclet wool in fingering weight keeps the effect sleek and light.

For casual country wear (a.k.a. “The Open-Air Look”), bulky Big Ben wool is still the first choice, or double knitting weight for a somewhat lighter look. Both the men’s and women’s garments are hip-length and unshaped and cardigans are mean to be worn buttoned. At the same time, interesting stitch patterns, textured wools and details like collars and pockets break up some of the shapeless-bulky effect. Even toddlers can join in on the fashion fun with a knitted bathrobe, which showcases many of the current trends (bulky “Ariel”, textured stitch pattern, contrasting collar and cuffs, and a bobble-tie belt) as well as being practical for chilly homes in February.

The homewares in this issue are mostly standard fare — cutwork or embroidered aprons, tablecloths or finger plates — but a couple of more creative ideas stand out. There’s a pile rug with a “modern” design, which I would have loved to have seen in a colour photo (note guitar and records — I did mention that the Beatles’ first album came out in 1963, right?) and a crocheted and cross-stitched bathmat that makes it very clear in which room it belongs (though I can’t help laughing when I think that this issue was also photographed in Bath — they could have had some absurd fun with the bath mat in front of the cathedral or one of the historic buildings…)

For tapestry fans, there’s a prayer book cover and kneeler “for an Easter bride” with a flowery cross pattern, using gold Lurex thread together with wool (kneeler) or silk (book cover) for extra luxury. There’s also a footstool made up of old tins! They used old stockings to pad and wrap the clean, empty tins, then stitched fabric around the bottom and sides and covered the top with the tapestry. The result is a bit oddly shaped, but I suppose it would be quite useful — strong and able to support a bit of weight, but still quite light — and I admire the creativity and the upcycling spirit.

There are no particularly interesting advertisements in this issue, but in the ongoing children’s retelling-of-fairy-tales comic series, Miss Muffet gets invited to the spider’s home, where Mrs. Spider shows her the lace curtains and tablecloths she has spun out of spider-silk and teaches her to spin a shawl. How sweet! Next month: “The Beetle-lady.” (Also: Note the ruler printed on the side of the page, to make it easy to check your knitting tension. It’s in every issue.)

I’m a bit at a loss as to what project to make from this issue. I love the “Ariel” cover dress and yellow sweater, but I have serious stash overflow and so, so many unfinished projects, so I would prefer to make something small and easy. I am not religious and would probably not have much use for a prayer-book cover or kneeling pad even if I were, but the flower tapestry design without the cross would be pretty and versatile, and I still have tapestry wool and backing fabric from an earlier failed project. The question is, what should I make out of it? A clutch purse? Coin purse? Cell phone cosy?? I already have so many little zippered bags for knitting tools and sewing notions and general “stuff”. I’ll give it some thought and let you know. If it’s easy enough, I will hopefully be able to finish up and edit some of the WIPs lying dormant in the blog. Stay tuned!

January 1963: Junior Fashion

This month’s issue had a wonderful winter pullover for a larger child, featuring white “Swiss darning” (a.k.a. duplicate stitch embroidery) on a brilliant red background. I had also promised a friend to knit something for her toddler, whose favourite colour is red. Perfect!

Well, not quite perfect, since the toddler in question has a 22 inch chest and the pattern is written for children with 28, 30 or 32 inch chests. But it’s also written for DK weight wool and it was easy enough to find a lighter-weight wool to convert the pattern down into a smaller size. DROPS Garnstudio “Nord” (45% alpaca, 30% polyamide, 25% wool) gives 26-27 stitches in 4 inches and is soft and easy to care for. It’s also inexpensive and the red colour is beautiful. The white is just subtly off-white, which I like better than pure white for pairing with a really strong colour like the red.

The pattern uses stocking stitch and reverse stocking stitch to make square-ish pattern “blocks”, which are embroidered with white wool in duplicate stitch after everything is finished. Duplicate stitch or “Swiss darning” as it was often called in vintage magazines, is made by threading a length of contrasting colour yarn around stitches that have already been made. I had seen it on garments and in many vintage patterns (all kinds of embroidery on knitting was quite popular in the 1950s and early 1960s), but I had never tried it myself until now. It is pretty easy in principle, but tricky to get the stitches to look even — in this smooth yarn, any pulling of the thread made the embroidered stitches disappear. But it worked and it really peps up an otherwise simple pattern!

I made the body in the round to save time, but correctly guessed that it would be easier to embroider the sleeves if I made them flat.

This was fun and easy to make and I actually finished it on time for once! I have plenty of yarn left, so I think I’ll go ahead and make the hat before I give both to my friend. EDIT: I made the hat! Here is an updated photo.

January 1963: Overview

Happy New Year, everyone! It’s 2021 in the real world and 1963 in the Stitchcraft Sixties blog world. The real-life 1963 was a turbulent year: the Cold War escalated, as did the war in Vietnam; the civil rights movement in the US both gained ground and suffered violent setbacks; John F. Kennedy was assassinated; the Second Vatican council entered a new phase. In England, scandals abounded in the wake of the Profumo affair and the divorce of the Duke and Duchess of Argyll. On a happier note, the Beatles recorded their first album, Please Please Me, kicking off Beatlemania around the world, and women in Iran gained the right to vote. Also, the smiley-face symbol was invented. 🙂

Of course, none of this — not even the Beatles or the smiley face — had any direct influence on Stitchcraft (certainly not in the January issue, before any of it happened…). What we think of as “1960s fashion” — the miniskirt, the “space age” look, the shift dress, the Mod look, the hippie-bohemian styles of the later years of the decade — was just gearing up around 1963, and Stitchcraft was a fashion-conservative magazine. That said, holdover fashions from the 1950s like fitted, waist-length cardigans and wide, swingy skirts have disappeared completely by now; the female models often wear trousers or “slacks” and casual, bulky-knit sweaters are ubiquitous.

So what does January 1963 have in store for us? The theme of the January 1963 issue is “Paris Casuals” and resolves to start with “a bumper all-round family number.” For adults, that means warm, comfortable jumpers and cardigans in a range of wool weights with V-necks or interesting collars and textured stitch patterns. The cover garment epitomises all the trends: made in bulky Big Ben wool in a two-colour slip stitch pattern, it sports “this season’s Paris collar choice and longer line.” The textured raglan cardigan is a similar look, as is the man’s casual cardigan on the back cover. The bouclet cardigan gives a nod to earlier fashions with its choice of fine wool and classic shape, but here too it is longer and looser-fitting than previous classic bouclet garments. A simple collared jumper in double knitting with attractive fine details rounds out the adult garment selection.

There are great winter fashions for children, first and foremost the girl’s skating set of skirt and collared pullover. Unfortunately, I suspect something went wrong with the sample knit, as both pictures show the model turned 3/4 away from the camera and it’s not clear how it is supposed to look from the front. (Also, could someone please give her some warm tights to wear before she goes out onto the ice.) Toddlers get a cute “buster suit” with a design of cherries on the jumper, and older children get a wonderful hoodie (to use the modern term) and jumper-cap set to wear while playing in the snow. (Or in the photo studio — check out the snowman and snowball made of wool and/or cushion stuffing fluff!). Crisp, wintery colours of blue and red with white are trending. Notice also that the girl model is wearing trousers, the hooded sweater is unisex, and the model wearing the red outfit in the black and white photo is allowed to be active and tomboyish for once. I wouldn’t even have known she was a girl if the sweater weren’t (for whatever reason) considered specifically a girls’ garment. Slowly, very slowly, roles are changing.

Babies get a pram cover instead of a garment this time — padded and quilted to be extra warm — and there’s a cute bedjacket and fantastic “tower” hat that is perfectly in fashion. (Side note: The caption, “PARIS HAT”, makes me think of that line “If a Harris pat means a Paris hat, Bébé… ooh la la!” in “Always True To You In My Fashion” from the musical Kiss Me, Kate. In true Cole Porter style, it’s an upbeat love song… in which the singer explains to her boyfriend that her dalliances with other men for gifts and money — basically sex work, though of course not explicitly described in those terms — shouldn’t count as infidelity, since she’s only doing it for the financial benefits and is true to him in her heart. Ah, romance! Anyway, the hat is great.)

With all the great knitted items, home fashions are pretty standard this month. There are rugs and cushions, a lovely embroidered tablecloth and tea-cosy set, a tapestry picture, a cutwork table set, a very impressive crocheted doily and a hassock or kneeling cushion for church-goers.

The “readers’ pages” have a review of what was probably a very interesting book on dressmaking for dolls, and –bucking the “single girl” trend of the early 1960s — we’ve got another “stand by your man and knit him something” ad for P&B wools (though this one is really quite sweet and romantic, unlike the “you only exist to be pretty for him” ad seen in other issues). There’s also a new cartoon serial for children: a re-telling of the “Little Miss Muffet” nursery rhyme, where Miss Muffet is not at all afraid of the spider. I’m sure, when she grows up, she will be not at all afraid to suggest to her man that he knit something for her for once.

My project from this issue will probably be a scaled-down version of one of the children’s sweaters for a smaller child. Stay tuned!

Out of Order: Felt Stars, December 1963

2020 has been a bad year for many things, but a good year for little home-made presents made from stash. I used a lot of cotton fabric for pandemic masks (with an added inner layer of fabric cut from an upcycled duvet cover made of special hypoallergenic tight-weave, dust-mite-proof fabric) and a big piece of green felt went to this iPad cosy, but I still had plenty of large scraps of all kinds of materials and the usual box full of odd buttons and leftover embroidery floss. Meanwhile, the holiday season was upon us, all the stores were closed and I wanted to be frugal with money but still be able to leave some mini-presents in friends’ mailboxes with a card and some cookies. These little felt stars from the December 1963 issue of Stitchcraft were the perfect choice.

There was a life-size transfer in the magazine to trace (or photocopy and cut out — I’m lucky to have a printer at home that is also a scanner and single-page copier) with samples of the three star designs to copy onto the points of the star. I traced it onto the felt with chalk, cut out two stars, picked my favourite design, and embroidered away. (Technically I should have first traced the design onto the fabric, then embroidered it and then cut out the stars, but it worked anyway.)

I had neither sequins nor pearls, so I just did everything in embroidery and added a button for the center on one side. I overstitched the edges to make a little cushion, added a loop for hanging on a tree and stuffed it with polyester fluff. Wonderful! The first star went to a fellow knitter from my now-online knitting meetup — we did a Zoom version of our usual “secret Santa” wool gifting party — and by then I was so involved in getting people’s knitted gifts finished that I ended up not making any more this year. Now that I know how it works, and that it works, I can make more next time.

Merry Christmas, if that’s your holiday, and happy New Year to all of you.