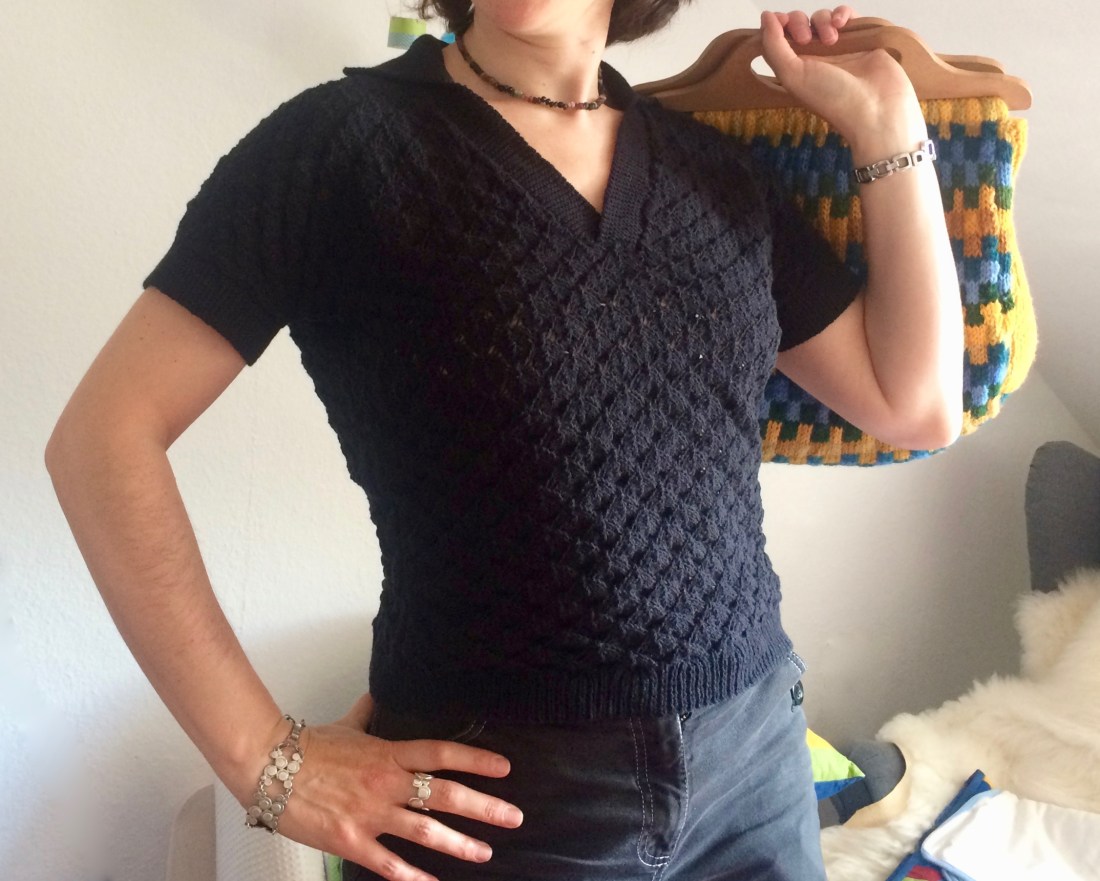
 I loved this twinset at first sight. I loved the short raglan sleeves on the pullover, the cable-and-mesh panel on the front and the very original mock-turtleneck-meets-peter-pan collar. It’s one of the reasons I started this whole long-term Stitchcraft blog project, so I’m thrilled to have it come to life.
The yarn I used was ideal in terms of wearability: Lang Merino Bébé which is extremely soft and smooth and can be worn next to the skin with no problems at all. It is a little thicker than Patons Beehive Fingering, for which the pattern is written, so I had to work with a modified gauge (6 1/2 stitches per inch instead of 7) and ended up making a combination of the small (34-35 inch bust) and medium (36-37 inch bust) sizes to get a slightly larger size in the end. I guess in terms of actual measurements, I ended up with the second size, which fits fine.
Of course, the pattern is written to make in pieces and sew together, but I love making raglan-sleeve garments in one piece and working them together without seaming. It was a fun challenge to integrate the different decrease speeds of this compound raglan (the sleeves decrease every 4 rounds for quite a long time whilst the front and back decrease every other round), as the instructions are on different pages.
 The cables have an interesting twist — literally. You put four stitches on the cable needle, knit the other four and then give the cable needle an extra 360 degree clockwise twist before knitting the stitches off of it. This gives them a cool extra definition. I forgot to do it once and it was almost unnoticeable — almost — but I didn’t want to rip back that far, so when everything was done I looped a little tiny thread around one of the cable stitches and just pulled it over more to the side and tacked it down by tying the thread ends in a knot on the wrong side. Look at the close-up picture above — can you tell which cable it was? I can’t on the finished garment. Good to know.


The collar is knitted separately in two pieces that are then knitted onto the picked-up stitches around the neckline, sort of like a three-needle bind off only without the binding off. Then you continue for an inch of mock turtleneck. The back of the pullover is open and you are supposed to put in a zipper, but I went for the keyhole effect and just added a button with a little crochet chain loop for a buttonhole. The final result is comfortable and pretty.
 The cardigan is somewhat more plain, as it doesn’t have the cables, but it makes such a lovely set with the pullover — not to mention it’s an excellent “everyday” cardigan to go with lots of other outfits. The sleeves came out a bit long — I was obviously over-compensating for my long arms and the fact that I always have to lengthen the arms a bit — but it looks just as good with the cuffs turned back, and I can turn them down for extra warmth under a coat and gloves. I hadn’t expected the raglan sleeves to have so much armhole depth. I thought about adding facing ribbon to the button bands, but it turned out to not be necessary, as the cardigan fits fine whether buttoned or unbuttoned. In short, I am thrilled with my new twin-set and it will surely get a lot of use this winter.


 This “charming and unusual design for larger sizes” (37-38 or 39-41 inch bust) features narrow dolman sleeves, crochet insertions, and horizontal bust darts.
 I was interested to see how it worked out with the dolman sleeves. When I think of “dolman sleeves”, I think of those 1950s, or worse, 1980s garments with a huge triangle of fabric under the arm, which must have been very uncomfortable and inconvenient to wear. But after my April 1960 blouse with the horizontal cap sleeves worked out so well, I was willing to give this one a try. And it turned out great! There is no more extra fabric under the arms than there would be with set-in sleeves, and the horizontal construction gives plenty of room in the upper chest/back area, where I am quite wide. I guess the secret lies with the number of stitches cast on for the sleeves per row — this one had 2×8 rows and then 10×16 rows, making the sleeves narrow and more horizontal, thus less triangle-like.
 The knitting was slow-going at 7 stitches to the inch, but of course once the body was done, so were the sleeves. Seaming was a nightmare, as the yarn (Herriot Fine from
  What took longer than expected was the whole crocheted edging-collar-button-band extravaganza. The crochet bands are extremely fiddly — they are crocheted onto each other as you go, it’s difficult to make them all exactly the same size, and each one needs its own, new piece of yarn. There are a total of 50 elements, so that’s 100 yarn ends to weave in right there. Then there’s the “inner” collar, the “outer” collar and the button bands, all of which are made separately and sewn on, and somehow need to end up symmetrical and fit properly on both sides. Of course, I sewed the collar on backwards the first time, forgot to switch the right and wrong sides at the collar fold, etc, etc. It all worked out in the end, though.
 “Free and easy” is this month’s motto. Summer is here and nobody really feels like handling warm wool, so the emphasis is on “travel knits” (lightweight), “casual knits” (not too complicated) and “stroller styles” (loose and oversized). There is more embroidery and needlework than knitwear, and some easy sewing projects. Shall we relax and take a look?
 I have to take a moment here to quote one of my favourite Roald Dahl stories, “The Boy Who Talked With Animals.” It’s about a little boy who saves a giant tortoise from the soup kettle, and Dahl’s description of the tourists waiting on the beach for the caught tortoise to be hauled in has, for some reason, stayed with me through the years:


 You can also embroider a tablecloth, make tea-towels in huckaback, or attempt this fabulous tea cosy and/or evening bag in faux eighteenth-century tapestry. I so, so want to make this evening bag! I would love it and use it all the time. But I am too overwhelmed by the idea of trying to make a chart based solely on the photos — the design is fairly intricate — and having never before attempted tapestry work, I fear it would just be too much for a rank beginner. I will definitely file it away for future days when I know how to approach it better.


 To be honest, the June 1960 issue didn’t really have any designs that enticed me. The little summer tops were nice, but I still hadn’t finished the little summer top I started
 This was my first time working in counted cross-stitch and I thought it would be easy. You just have to count the squares and thread the embroidery cotton through the holes in an x, right? I was so, so wrong. First of all, I didn’t know what “gauge” fabric to buy, so I chose one that seemed medium-sized to me, where I could see the holes pretty clearly. I should have chosen a size bigger, since the holes were still absolutely tiny to my (perfectly good) eyes. Counting the holes was much more difficult than I expected, since they all looked the same and seemed to move around when I tried to count them.
 The embroidery itself was slow-going and not totally accurate, i.e. I do not think I always got the right number of threads (2×2 for each cross). Even when I did, the stitches were uneven and raggedy. (I did make sure that the stitches are all going in the same direction and the same top-bottom stitch pairing.) Also, it was just plain no fun to work. What a pity — the idea was so good!
 After I finished the birds, I embroidered the initials of the happy couple underneath in simple block letters (not that it was simple to get the right stitch count and center it) and framed it in an embroidery hoop with the help of
 June, the month of leisure! Or at least, leisure knits — “Fashions for Sun and Sea.” Stitchcraft’s “editress”, Patience Horne, reminds us that it’s important to have something to knit or sew while on holiday, as “it helps us to relax”, and points out that “A lot of knitting and embroidery is done in the deck-chair by busy housewives who never get time at home, and find it difficult to ease off suddenly.”
 1950s and 1960s… meaning the housewife/mother of the family had to shop, cook and keep the tent or living space tidy just as she did at home, but in worse conditions (rain, mud, no proper grocery stores, camp stove, having to fetch water for cooking and washing up). Doesn’t sound much like leisure time to me! Of course, if you were rich enough to stay in a nice hotel and eat out for meals you might well have some time for handcrafts, but that wasn’t a possibility for all families, and Stitchcraft‘s target audience was more working-to-middle-class.


 This is definitely a “cosy of unusual charm”! (Despite the ripped corner on the back cover photo.) It features appliqué and embroidery with different designs on each side and instructions to make it up into either a regular cosy to put over the teapot, or a “nest” to put the teapot into.


 bit of herringbone and the tiny straight stitches in the strawberries. Still, it was more ambitious than any embroidery I have tried up until now. It doesn’t look quite like the picture and I did take a little bit of licence, but on the whole I was pretty satisfied… except for the legs. Oh dear, oh my, oh no, the legs. I did them three times and they still look weird. Either the angle is wrong, or the thickness, or I don’t know what, but I figured doing it again would only chew up the fabric more, so it is what it is.


 My first project for May was a “matinee coat” for a 6-month old baby. The baby I knit it for hadn’t been born yet, but I always like to make a six-month size for a newborn. Of course it will be too big at first, but eventually the coat will fit.
 I actually did just that, because the written pattern was very difficult to follow on the first few rows after the underarm divide. The raglan increases at the top are done with eyelets and make-1 increases on a each side of a bit of moss stitch, and after the underarm divide, the same type of increase is done on the fronts and back to make a flared skirt. That all makes perfect sense, but the way the pattern was written made it difficult to find the placement of the increases if making the fronts and back all in one. So I just went ahead and followed the pattern exactly. Except for the sleeves, which are supposed to be long, but I ran out of yarn.
 If you are looking at the first picture and wondering what went wrong, let me assure you that it was NOT a tangled mess! As long as the sleeve stitches were on holders, there was no way to make the thing sit down flat for a photo. Kind of the same problem with the baby, if you think about it… Here’s a picture during blocking (at left) and here’s a picture of the finished garment. I am very happy with it!
 Is it already May? Nothing makes time fly like writing monthly blog posts! May 1960 is a “Roundabout of Holiday Knitting” (complete with a little circus-fair logo that fills up any little dead space in the page formatting, how cute) where in “today’s story”, “no one thinks of going away without 2 or 3 brand-new woollies packed away in their luggage.” So let’s get started…
 I am quite sure no small child wants to swim in hand-knitted wool trunks with a belt these days, but I imagine the sun-suit on the opposite page would be fun and practical for beach wear if made in cotton. The baby and older girls of the family get pretty cardigans or a tunic “to wear with her jeans.” I’m glad to see activewear for girls, since generally one is assumed to make pretty, decorative stuff for girls and strong, “manly” stuff for boys — sexism that is not surprising in 1960, but which always depresses me to see in today’s knitwear patterns for children.


 My second project for April (obviously not finished before the end of the month, seeing that I started it two days before) was this cute lace blouse with a “Popular neckline.” I do love the neckline, and the leaf pattern.
 The biggest problem was making the side-seam increases. The lace pattern has a repeat of 12 stitches, but a sort of varying number of edge stitches. I honestly had no idea where to fit in the extra stitches, or how to keep them in pattern when the increases and decreases within the pattern are broadly spaced. Time to hit the


 “Cheerful goslings make gay kitchen ideas” — who could resist? There are patterns for a serving glove and a felt tea cosy, neither of which I particularly needed, but the tea-cosy pattern is just about the right size for an iPad case. So this became the modern version.


 “Already there is talk of holidays” says the introduction to the April 1960 issue, “and whether it’s to be the sea, country, sight-seeing or sailing, you can’t go without your holiday hand-knits.” At the same time, spring and April mean Easter, with lots of opportunities for hand-made accessories and knickknacks.


 My second project for March — though it wasn’t finished by the end of the month — was a young boy’s pullover with a cute stripe-and-dot pattern.


 First project for March: this charming jacket from the jacket-and-skirt set titled “Spring Magic in Judy’s trim Outfit”. What a great title! And what a great photo in the booklet. I’m glad today’s girls don’t generally get their hair tortured into curls like litte Judy’s in the picture, but she certainly looks happy enough holding hands with her gigantic teddy bear.


 I will be making two children’s designs: the fabulous checkered coat for a toddler, and “John’s new pullover” for a soon-to-be six-year-old.
 February’s project was pretty simple: a crocheted cap and “mitts” with a cute bobble pattern. I couldn’t decide on the colour (lavender or purple) and didn’t have quite enough of either to make both cap and mitts, so I ended up making the cap twice and using up leftovers of both colours plus a little extra of a different purple yarn to finish the mittens.


